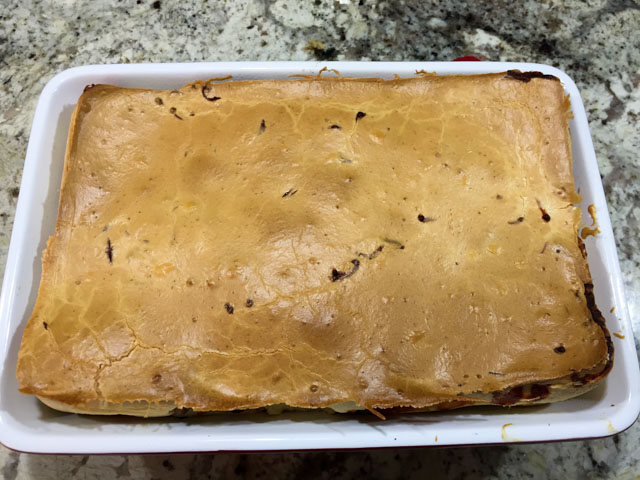
TORTA DE LIQUIDIFICADOR

Come again? 

🙂


The best translation for this Brazilian recipe would be “Blender Pie.” First, let’s learn how to say it like a native. Repeat after me, three times:
.

Easy, right? I knew you could do it.

baked2
I have a sister in Brazil who is 16 years older than me. By the time I got into my teens she was already married, throwing parties, and pretty involved into cooking. One of the things she used to make was this blender pie, but her favorite filling was tuna with green peas, black olives and tomatoes. Being the mega picky girl I was, I never touched that kind, preferring instead more friendly (and austere) versions with ham and cheese, at most a touch of oregano. The basic process is always the same, a thick batter is made in the blender, half of it gets poured into a baking dish, the filling of choice scattered on top, and the rest of the batter spread all over. It is comfort food by default, or as we say in Portuguese, por definição. I won’t sugar coat the pill, it is a bit heavy. Accept it and move on. As an appetizer a couple of small squares will be enough for each guest. If you’d like to serve it as dinner with a salad on the side this full recipe feeds six hungry people.

Blender Pie

TORTA DE LIQUIDIFICADOR
(BLENDER PIE)
(from the Bewitching Kitchen)

for the “dough”
1 cup oil (I used canola)
2 cups milk (full-fat)
3 eggs
2 cups all-purpose flour
1/4 cup shredded Parmigiano cheese
1 teaspoon baking powder
1/2 teaspoon salt

for the filling
caramelized onions
sautéed mushrooms
shredded mozzarella cheese
diced tomatoes
(or any other filling you like to use)

Heat the oven to 375 F. Lightly grease or spray with oil a baking dish (9 x 13 or slightly smaller is fine).

Make the dough: add to a powerful blender all the ingredients, and blend for 5 minutes until completely smooth. Stop the blender and clean its sides a couple of times during the process.

Pour half of the batter in the prepared dish, add all ingredients for the filling on top, pour the rest of the batter, spreading gently with an offset spatula to enclose all the filling.

Bake for 45 minutes or until all puffed up and golden on top. Let it cool until just warm before cutting in slices. It can be prepared a couple of days in advance, to re-heat use a low oven, microwave is not recommended.

ENJOY!

to print the recipe, click here

compositeblender

The beauty of this recipe is its versatility. You can pretty much use any filling you imagine: shredded barbecued chicken, ground beef with taco seasonings, roasted veggies, maybe some grilled shrimp, all doable. One popular version in Brazil uses corn and peas, green and yellow like the colors of the country. I do think cheese is pretty much mandatory in any kind of blender pie. If using shrimp or roasted veggies I suppose a bit of crumbled feta would be a nice option. No need to measure anything, just cover the extension of the baking dish with a hearty amount of filling.

I made this particular version for a reception we hosted. Keep in mind that in the span of two weeks we hosted three receptions for faculty and one pizza-party for our whole lab. After the pizza party we had some toppings leftover, so this Brazilian concoction of my past was a perfect choice to use it all up. But to make it more special, I prepared a batch of  caramelized onions, following this recipe from my friend Elaine. She used a clever method that allows caramelization to be an almost hands-free process, by making them in a low oven. I added a smidgen of balsamic vinegar to the onions, together with salt, pepper and olive oil.

Here they are, in a before and after shot…
caramelizedonions1caramelizedonions
I intended to add black olives to the filling too, but found the bowl with pitted Kalamata staring at me right after shutting down the oven door. Not the first time I pull this type of trick on myself, I believe it won’t be the last. Black olives would have been wonderful… (sigh)

The little pie squares are irresistibly gooey due to all the cheese…

closeup1

So there you have it, a Brazilian concoction from my teenage years finally featured in the Bewitching Kitchen. I hope I made my sister proud!  

ONE YEAR AGO: Lamb Meatballs with Toasted Orzo

TWO YEARS AGO: Dulce de Leche Cheesecake Bars

THREE YEARS AGO: Penne with Trapanese Pesto

FOUR YEARS AGO: Superman

FIVE YEARS AGO: Spring Pasta

SIX YEARS AGO: Ice Cream Melts for Mango

SWEET POTATO CRUST QUICHE

This recipe captured my imagination the moment I saw it in Cooking Light and I could not wait to make it, because c’mon, we are talking quiche… I don’t know a single person who doesn’t like it. Ok, I take it back. My first husband didn’t. Obviously, things could not have ended well in that relationship. One wonders. Back to culinary issues, quiche is such a great recipe: it has elegance, it has substance, and you can come up with all sorts of variations for the filling. The only thing that gives me pause about making it is the pastry part, since it needs to be refrigerated, rolled out, etc etc. Not a huge deal breaker, but it definitely makes this delicacy less likely to show up at our table on weeknights.  This variation takes care of that problem. Instead of dealing with the dough, you grab a couple of sweet potatoes, peel them, slice them thin and call it a day. It also has the added bonus of being quite a bit lighter. What’s not to like?

Sweet Potato Crust Quiche

SWEET POTATO CRUST QUICHE
(adapted from Cooking Light magazine)

2 medium sweet potatoes
a few sprays of coconut oil
1 (5-ounce) bag baby spinach
1/2 cup full-fat milk
1/2 teaspoon kosher salt
1/4 teaspoon freshly ground black pepper
dash of freshly ground nutmeg
1/4 teaspoon crushed red pepper
4 large eggs
2 large egg whites
1.5 ounces feta cheese, crumbled

Heat the oven to 350°, then peel and slice sweet potatoes. Coat a pie dish with coconut cooking spray, then fill the bottom of the dish with a layer of sweet potato slices. Once the entire dish is filled, spray one more time with cooking spray and season lightly with salt. Bake for 20 minutes. Turn heat up to 375°.

For the filling, heat a nonstick skillet over medium heat. Add spinach; sauté 3 minutes. Remove from heat; cool. Combine milk with all the spices and eggs in a bowl, stir well with a whisk. Arrange spinach mixture in crust; pour egg mixture over spinach. Sprinkle with feta. Bake at 375° for 35 minutes. Let stand for at least 10 minutes; cut into wedges.

ENJOY!

to print the recipe, click here

quichecompotsite

Comments: I loved this recipe! To me it was close to perfection because I liked the slight sweetness offered by the potato crust in contrast with the sharp feta cheese. However, Phil would prefer the crust to be harder, and due to the nature of sweet potatoes, that is not an easy task. He thought maybe if I baked the crust longer and at a higher temperature it could work better. It’s definitely worth experimenting. One of the issues is “shrinkage.”  Baking for the time specified in the recipe already caused the sides to shrink down considerably. I guess I could add a bit more slices to the sides and see how it goes. But, even with a slightly soft crust Phil thought the quiche was flavorful and made for a delicious side dish for our dinner. I know most people would serve it with a light salad, but we are meat lovers and savored a nice T-bone steak with it, medium-rare in all its glory. My apologies to all our vegetarian friends and two of my nieces in Brazil.

slice2

So many flavors going well together here!


ONE YEAR AGO: Chicken Thighs with Artichokes and Capers

TWO YEARS AGO: Pea Pancakes with Herbed Yogurt

THREE YEARS AGO: Mushroom Stroganoff

FOUR YEARS AGO: Tomato Sourdough

FIVE YEARS AGO: Gamberetti con rucola e pomodori

SIX YEARS AGO: Flirting with Orzo

TOMATO TATIN

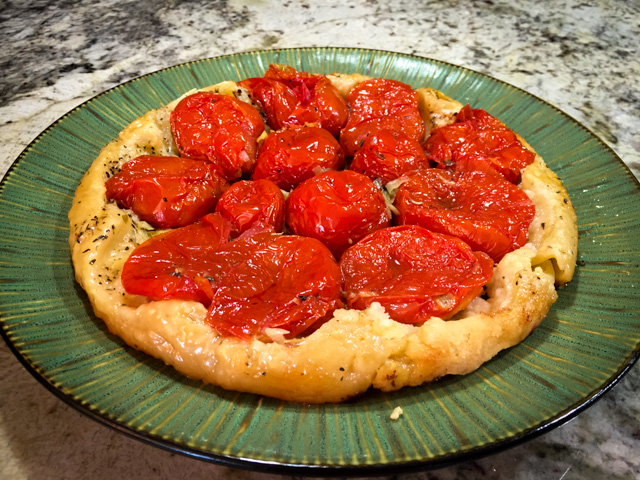
One of my favorite desserts is the classic Tarte Tatin, a delicious upside-down apple pie originated in France in the 1880’s. I made it quite a few times before my blogging days, and often tell myself that I should bake one “for the blog.” You know, I am unselfish that way. But after reading a cooking forum in which people raved about a savory version of the classic, I had to make it. Roasted tomatoes with a touch of herbs and cheese are covered with a buttery dough, baked, and inverted on a platter for a stunning presentation… If some tomatoes  stick to the pan, no need to use crass language, gently scoop them out and coach them into the original position. After all, it is supposed to be rustic, so small boo-boos are forgiven…

Tomato Tatin
TOMATO TATIN
(adapted from Whip +  Click)

for the dough:
205 grams (1+1/3 cup) flour
1/2 teaspoon sea salt
118 grams (8 tablespoons) chilled butter, cut into cubes
1 egg

for the filling:
940 grams (2 pounds) plum tomatoes
olive oil
Herbes de Provence to taste
sea salt and pepper to taste
1 large leek, washed and thinly sliced
grated Parmigiano cheese

Make the dough: Sift the flour into a bowl. Add salt and cubed butter and work into the flour with your fingers until the butter pieces are no bigger than lentil size. Add the egg and mix until just combined. If it is too dry, add cold water one teaspoon at a time. Chill for 30 minutes.

Prepare the leeks. By sautéing the slices in a little olive oil, season with salt and pepper. Cook it in a very low heat, stirring often until golden brown. Reserve.

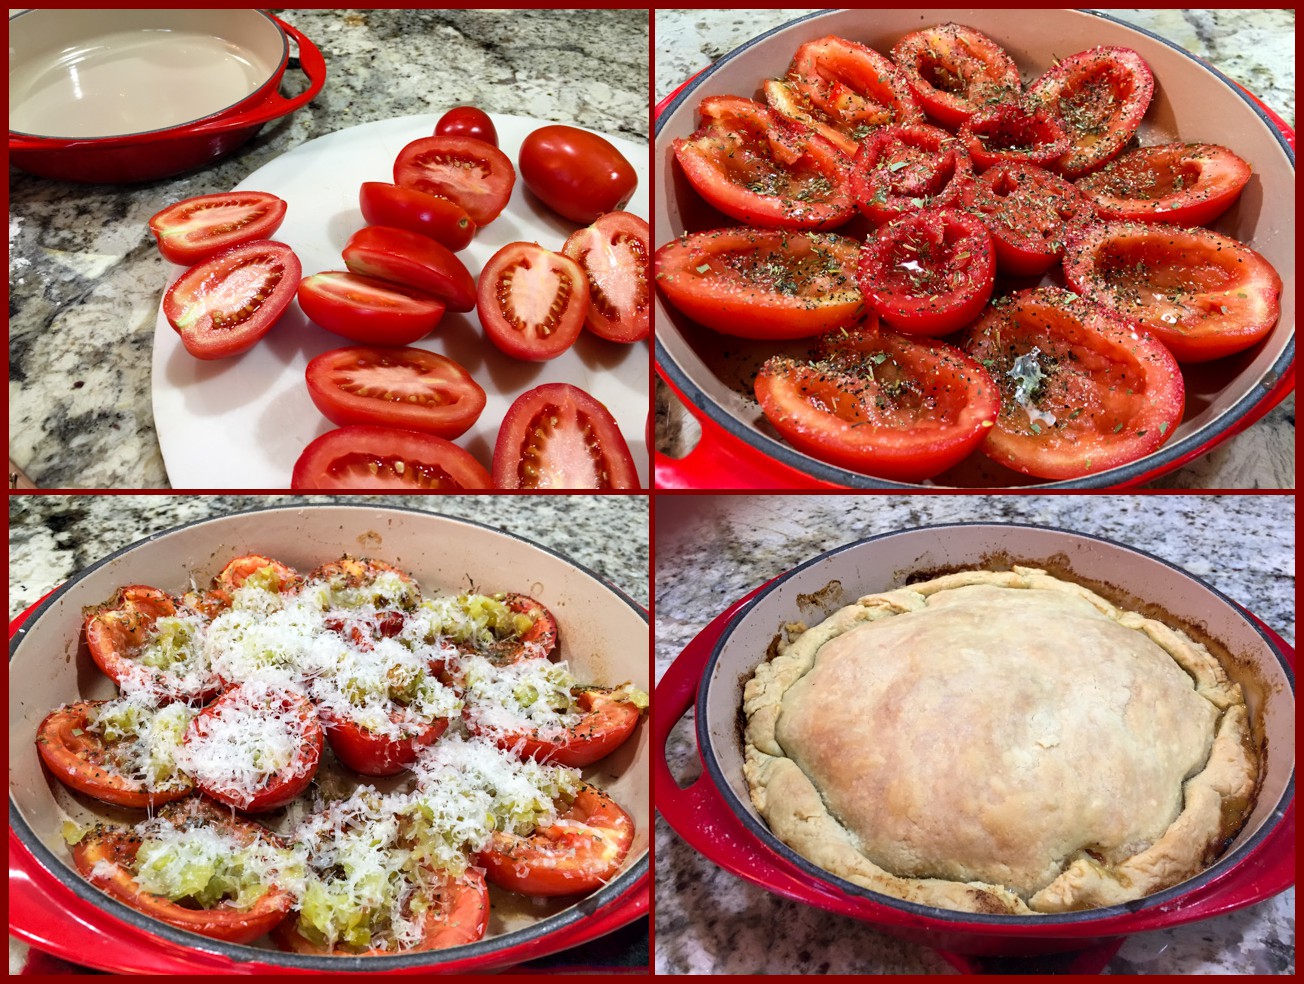
Heat the oven at 350 F. Cut tomatoes in half, core and remove the seeds. Coat the bottom of a 10 inch round dish with olive oil and place the tomatoes skin side down all around the pan. Season with salt, pepper, herbes de Provence and drizzle with olive oil. Bake for approximately 30 minutes or until soft.

Before you take out the tomatoes, roll out your dough to a 10 inch round. Spread the leeks on top of the tomatoes, then add an even layer of grated parmesan. Add the dough on top and tuck the edges in. Bake for another 30 minutes or until the dough is golden brown. To unmold, run a knife around the edges and flip onto a serving dish.

ENJOY!

to print the recipe, click here

composite
Comments: This was my first time making this recipe, and I think there is room for improvement. I added a little bit too much olive oil to the tomatoes before placing the dough on top, and the dough itself turned out a tad too oily for my taste.  I also think that for the size of my pan, one or even two more tomatoes cut up would have been better.  They shrink a little during roasting, keep that in mind when you make it and aim for full coverage of the pan. I hope you do try this recipe, by the way. It is very elegant and quite simple to prepare. Perfect to open a dinner as a first course, or to serve for brunch. It is nice at room temperature too, making it possible to prepare it in advance. My kind of recipe, all the way.  I intend to try a lighter version using phyllo dough just for fun… What do you think?

ONE YEAR AGO: Headed to Colorado!  (and there we are again this year…  😉

TWO YEARS AGO: Farofa Brasileira

THREE  YEARS AGO: Thai-Inspired Pork Tenderloin

FOUR YEARS AGO: A yummy Brazilian cake: Bolo de Fuba’

FIVE YEARS AGO:  Summer’s Tomatoes

SIX YEARS AGO: Leaving on a jet plane… 

CHOCOLATE TOFFEE BANANA BREAD

I’ve been on a banana bread kick lately, trying some recipes that appeal to me because they have some unexpected twist, some intriguing component. Like this one that pairs a regular, well-behaved banana bread formula with toffee and chocolate. Banana, toffee, and chocolate. A trilogy not to be messed with. I found the recipe during a session of Pinterest surfing, saved it to my cooking board  and now that it’s been tried and thoroughly enjoyed, I share it with you!  Am I nice or am I nice? You decide.

BananaToffeeBread

CHOCOLATE TOFFEE BANANA BREAD
(recipe from The Weary Chef)

3 ripe bananas
2 eggs
1/3 cup vegetable oil
1/2 cup brown sugar
1½ cup all-purpose flour
1½ tsp. baking soda
1 tsp. cinnamon
1/4 tsp. salt
1/2 cup chocolate chips
1/4 cup butterscotch chips

Heat the oven to 350 degrees F. Spray  a 9 x 5 inch loaf pan with cooking spray.

In a large mixing bowl, mash bananas. Stir in eggs, oil, and brown sugar until smooth.

Add flour, baking soda, cinnamon, and salt, and stir just until dry ingredients are incorporated. Stir in toffee and chocolate chips until mixed in evenly.

Pour batter into prepared pan, and bake 45-55 minutes, checking at 45 minutes. Bread is done when edges are brown and toothpick inserted in the center comes out dry.

Carefully remove loaf from pan to cool on a wire rack before cutting.

ENJOY!

to print the recipe, click here

BananaBread Served

Comments:  I think that nothing perfumes the kitchen more intensely than a banana bread baking in the oven. They say that to increase the chances of selling a home, one should bake cinnamon rolls or an apple pie right before showing it, but I suspect that banana bread would work even better. The smell is intoxicatingly delicious…

The original recipe from Andi’s site called for chocolate covered toffee bars chopped in pieces, but I went with a 50:50 mixture of butterscotch and chocolate chunks from Trader Joe’s.  The butterscotch chips were barely noticeable in the crumb of the banana bread, but their flavor… definitely there.  This was a very moist and tender banana loaf, well-received by our colleagues from the department.   I am sure it will please all the banana bread lovers out there, so give it a try, even if your house is not in the market…

😉

ONE YEAR AGO: In My Kitchen, June 2014

TWO YEARS AGO:  Strawberry Frozen Yogurt

THREE YEARS AGO: Baked Coconut and “The Brazilian Kitchen”

FOUR YEARS AGO: Honey-Glazed Chicken Legs

FIVE YEARS AGO: French-Style Rolls

THE SECRET RECIPE CLUB: HERBED GOAT CHEESE SOUFFLES


Herbed Goat Cheese Souffle
Last Monday of February, a month that used to be my favorite. Summer in Brazil, carnival (not that I was that much into it, but still, a big break from work in the height of the summer was always well-received). That all changed 23 years ago, when I first moved to France and then, a couple of years later permanently to the US.  February is now a month I do my best to survive. I count the days for it to be over to get some hope of life percolating back into my veins. ANYWAY, I am sure you are not here to read me whine and pout. Instead, you are here for the reward of a revelation: which blog was my assignment for this month’s adventure with The Secret Recipe Club: it was the The Wimpy Vegetarian!  I literally screamed with joy when I got the email notification, because as a regular reader of Susan’s blog, I felt totally at home “stalking” it.  You should visit her “About” page, but let me just say that when she decided to become a vegetarian, or as she put it “to focus more on a plant-based diet“, her husband was not exactly thrilled. He went along with it for a while, but at some point started referring to “farro” as “horse food“. No bueno, folks. But Susan fought back using all the culinary skills accumulated from her classes at Tante Marie Cooking School, and turned veggie dishes (horse food included) into concoctions her husband could not resist. She succeeded big time, and her blog is there to show us how. There were so many dishes I bookmarked as tempting possibilities, but I narrowed them down to these:  Rustic Cauliflower and Tomato Gratin, Arepas Rellenas (I even have the special flour to make them, so I must get to this recipe at some point), Skillet Baked Corn Pudding, Farinata (another recipe I’m always dreaming about), Sweet Potato Biscuit Pillows (excuse me, I need to wipe drool off the side of my mouth), Broccoli-Cheddar Quinoa Casserole Tart. Susan is a fantastic cook and often enters – and wins – cooking contests, so pretty much anything on her site feels quite special.  Pay her a visit, and become a subscriber, even if you are not a strict vegetarian.

For my assignment, I went with very elegant Herbed Goat Cheese souffles. They turned out amazing!

baked

HERBED GOAT CHEESE SOUFFLE
(from The Wimpy Vegetarian)

1/2 teaspoon dried lavender
zest from 1/2 medium lemon
3 tablespoons finely grated Parmesan cheese
pinch of salt
freshly ground black pepper
3 ounces fresh soft goat cheese
1 ounce ricotta cheese
1 tablespoon fresh thyme leaves
1 tablespoon honey
3 eggs, separated
1/4 cup low-fat milk
2 teaspoons all-purpose flour (I used 4)
butter for the ramekins

Heat the oven to 375 degrees F. Prep the ramekins by smearing them with butter and sprinkling grated Parmesan cheese on the bottoms and around the sides. Set aside.

Rub the dried lavender between your fingers to reduce as much as half of the buds to a powder. Combine this with the lemon zest, 1 tablespoon of Parmesan, salt and pepper in a small bowl. Set aside.

In a medium bowl, combine the goat cheese, ricotta, 2 tablespoons of Parmesan cheese, thyme, honey, egg yolks, milk and flour together. Stir well to completely combine. Add to the reserved lavender mixture.

In a small bowl, whip the egg whites just to a firm peak. Be careful not to get them too firm, or they’ll be difficult to fold into the cheese-yolk mixture. Fold the beaten egg whites into the cheese-yolk mixture in thirds using a large spatula. It’s fine to have lumps of egg whites in the mixture – it will not be smooth. Place the ramekins in a baking dish and fill the dish with hot water one-half the way up the sides of the ramekins. Carefully spoon the cheese-egg mixture into the ramekins, filling them 2/3 full.

Bake for 20 minutes, or until browned on top and springy – firm to the touch. Remove and allow to cool in the ramekins for 15 minutes. The souffles will collapse and start to pull away from the sides of the ramekins. Run a knife around their edges and turn the ramekin upside down. The souffle should slide right out.

ENJOY!

to print the recipe, click here

composite1

Comments: What I loved the most about the recipe was the inclusion of lavender. It gave the souffle a sort of unusual component, Phil could not guess what it was, but once I told him it was lavender he could detect it. You need to add just a small amount, it is quite potent, don’t go crazy with it.  I was also surprised by the method of preparing the base, as I always make a bechamel type sauce. For this recipe, you mix it all and do not pre-cook, it goes straight into the oven, in a water-bath environment. Because I was afraid the mixture was a bit too liquid, I added double the amount of flour.  Not sure it was necessary, but they ended up with a very nice texture, and un-molded easily.

served2

This is the type of recipe that would be perfect for entertaining, or for that special dinner for two, candlelight and all… a first date, a first year anniversary, you catch my drift.  Any meal will be special when these are part of the menu!

Susan, it was a great pleasure to indulge a little more deeply into your blog, I hope you also had a blast with your assignment this month…

For my readers, the usual reminder to poke the blue frog at the end of my post. She will take you to plenty of great recipes made by my fellow virtual friends at The Secret Recipe Club.

ONE YEAR AGO: Barley Risotto with Peas

TWO YEARS AGO: Jammin’ Blueberry Sour Milk Pancakes

THREE YEARS AGO: Scallops with Black Pasta in Orange Cream Sauce

FOUR YEARS AGO: Stir-fried Chicken with Creamed Corn

FIVE YEARS AGO: Potato, Cheddar, and Chive Torpedo (one of the best breads I ever made!)