BRIOCHE ROLLS WITH PISTACHIO FILLING

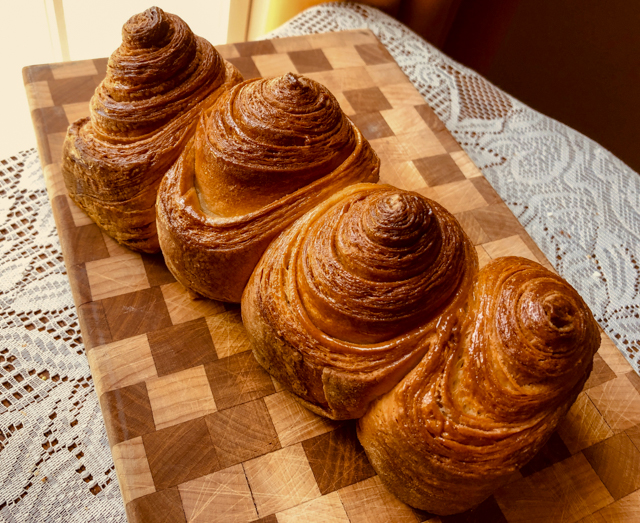
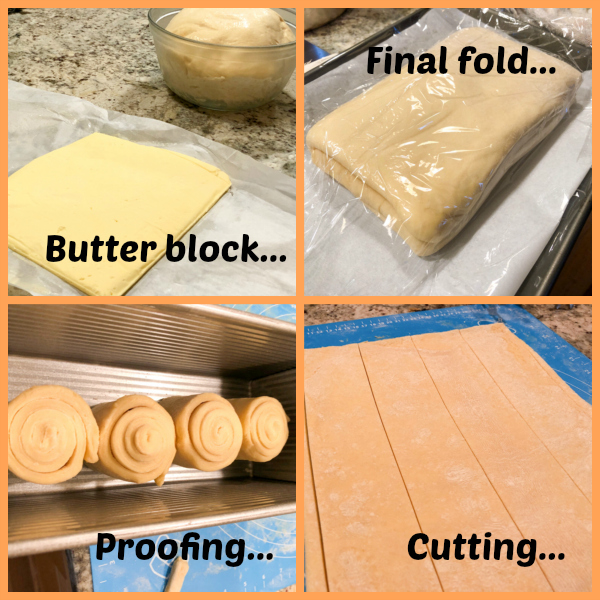
I went back to a favorite recipe to make brioche dough, found in Helen Fletcher’s blog Pastries Like a Pro (click here to retrieve it). After the overnight proofing in the fridge, I took 60g amounts and shaped as little rolls, enclosing a tasty pistachio filling.


BRIOCHE ROLLS WITH PISTACHIO FILLING
(from Helen Fletcher and The Bewitching Kitchen)

for the dough, click here

for the filling:
3/4 cup granulated sugar
1/4 cup unsalted butter, at room temperature
1/8 teaspoon salt
1 large egg white
1/4 teaspoon vanilla extract
1 + 1/4 cup pistachio flour

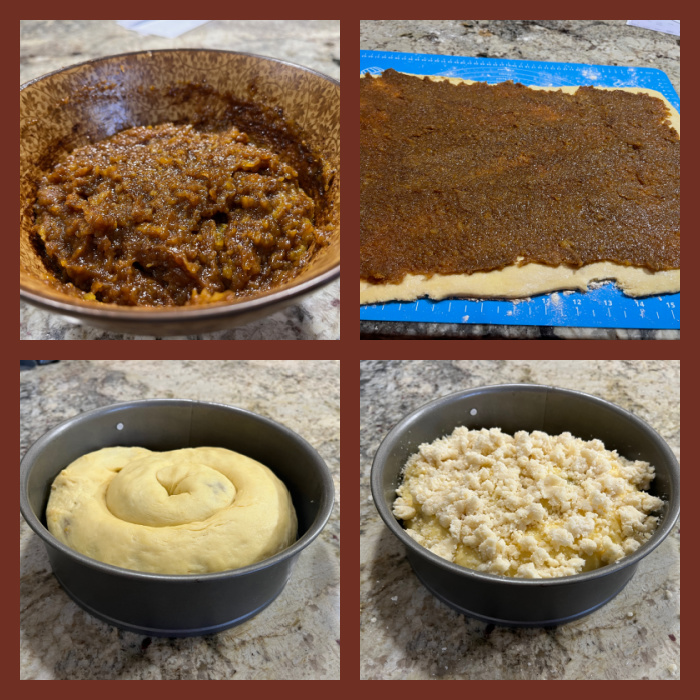
In a medium bowl, mix together the granulated sugar and butter with a wooden spoon or rubber spatula until combined. Mix in the salt and egg white (reserve the egg yolk for the egg wash), and then add the vanilla extract. Stir in the pistachio flour. Place in a large piping bag and reserve.

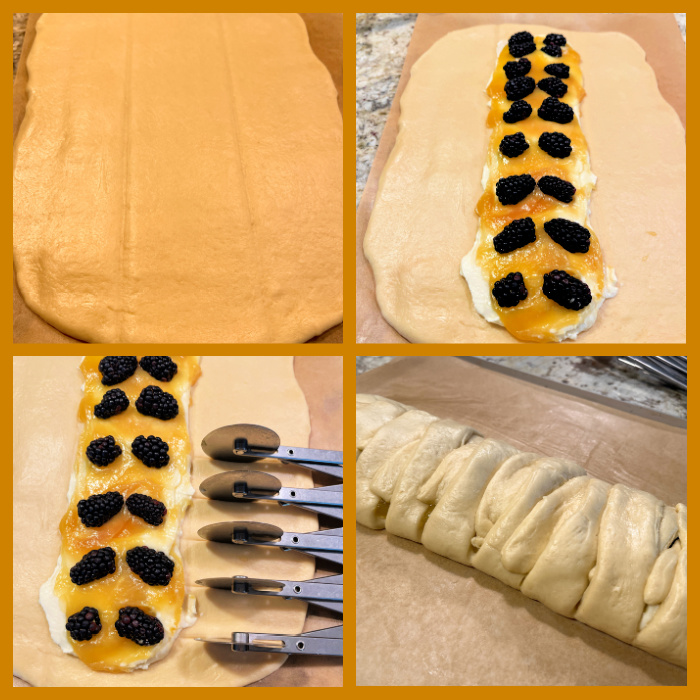
To shape the rolls: grab 60g portions of the dough, still cold from the fridge and roll as a rectangle so that the shorter dimension will fit in your baking pan of choice. Cut small strands on 3/4 of the length as shown in the pictures below. Add the filling to the top and roll it to close. Place in your baking pan and let it rise covered loosely for 1 hour to 90 minutes. Brush the surface with the egg yolk reserved, and bake at 375F for 20 to 25 minutes, until golden brown.

ENJOY!

to print the recipe, click here

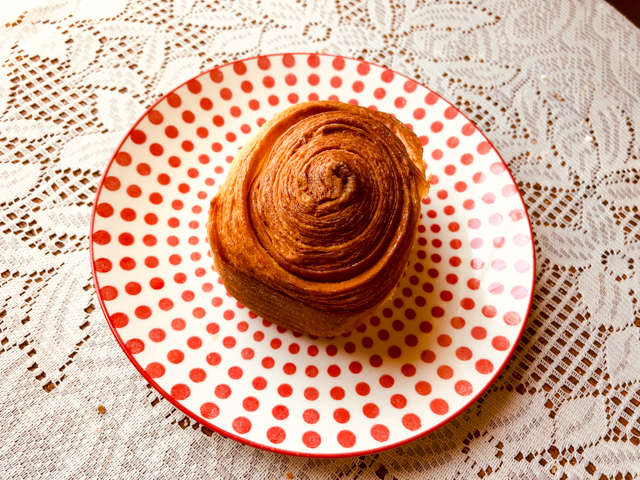
Comments: I saw this cool shaping technique over at Instagram in the page of Chef Antonis, from Greece (click here to visit his page. Worked like a charm with this brioche dough, I intend to try other shaping methods in the future.

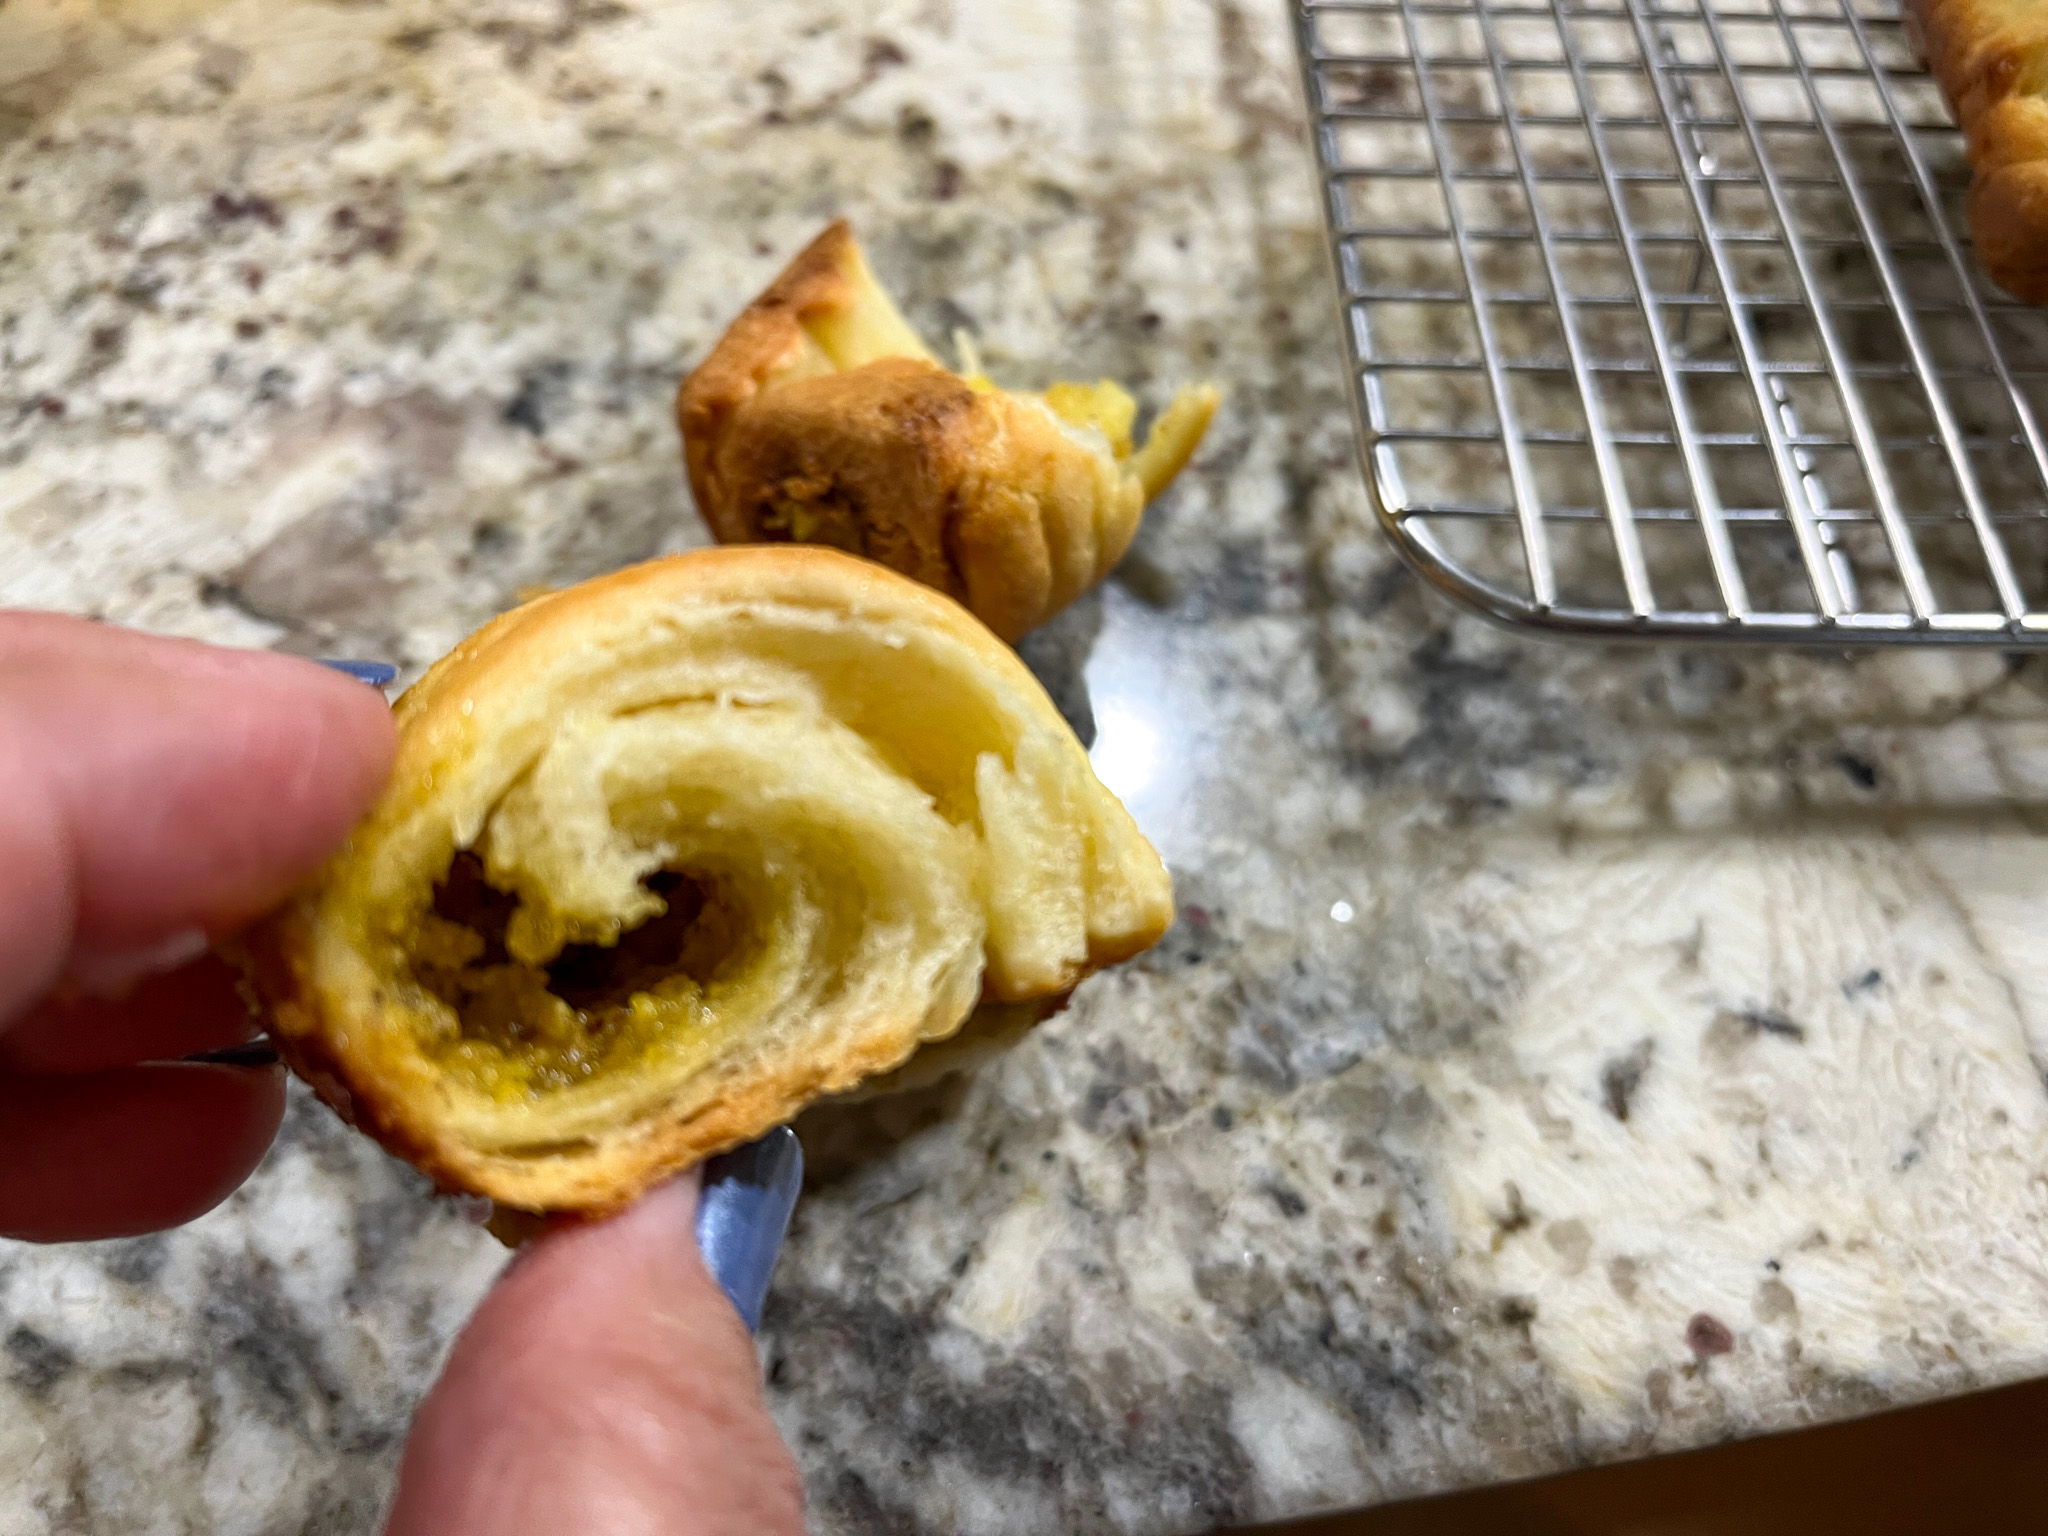
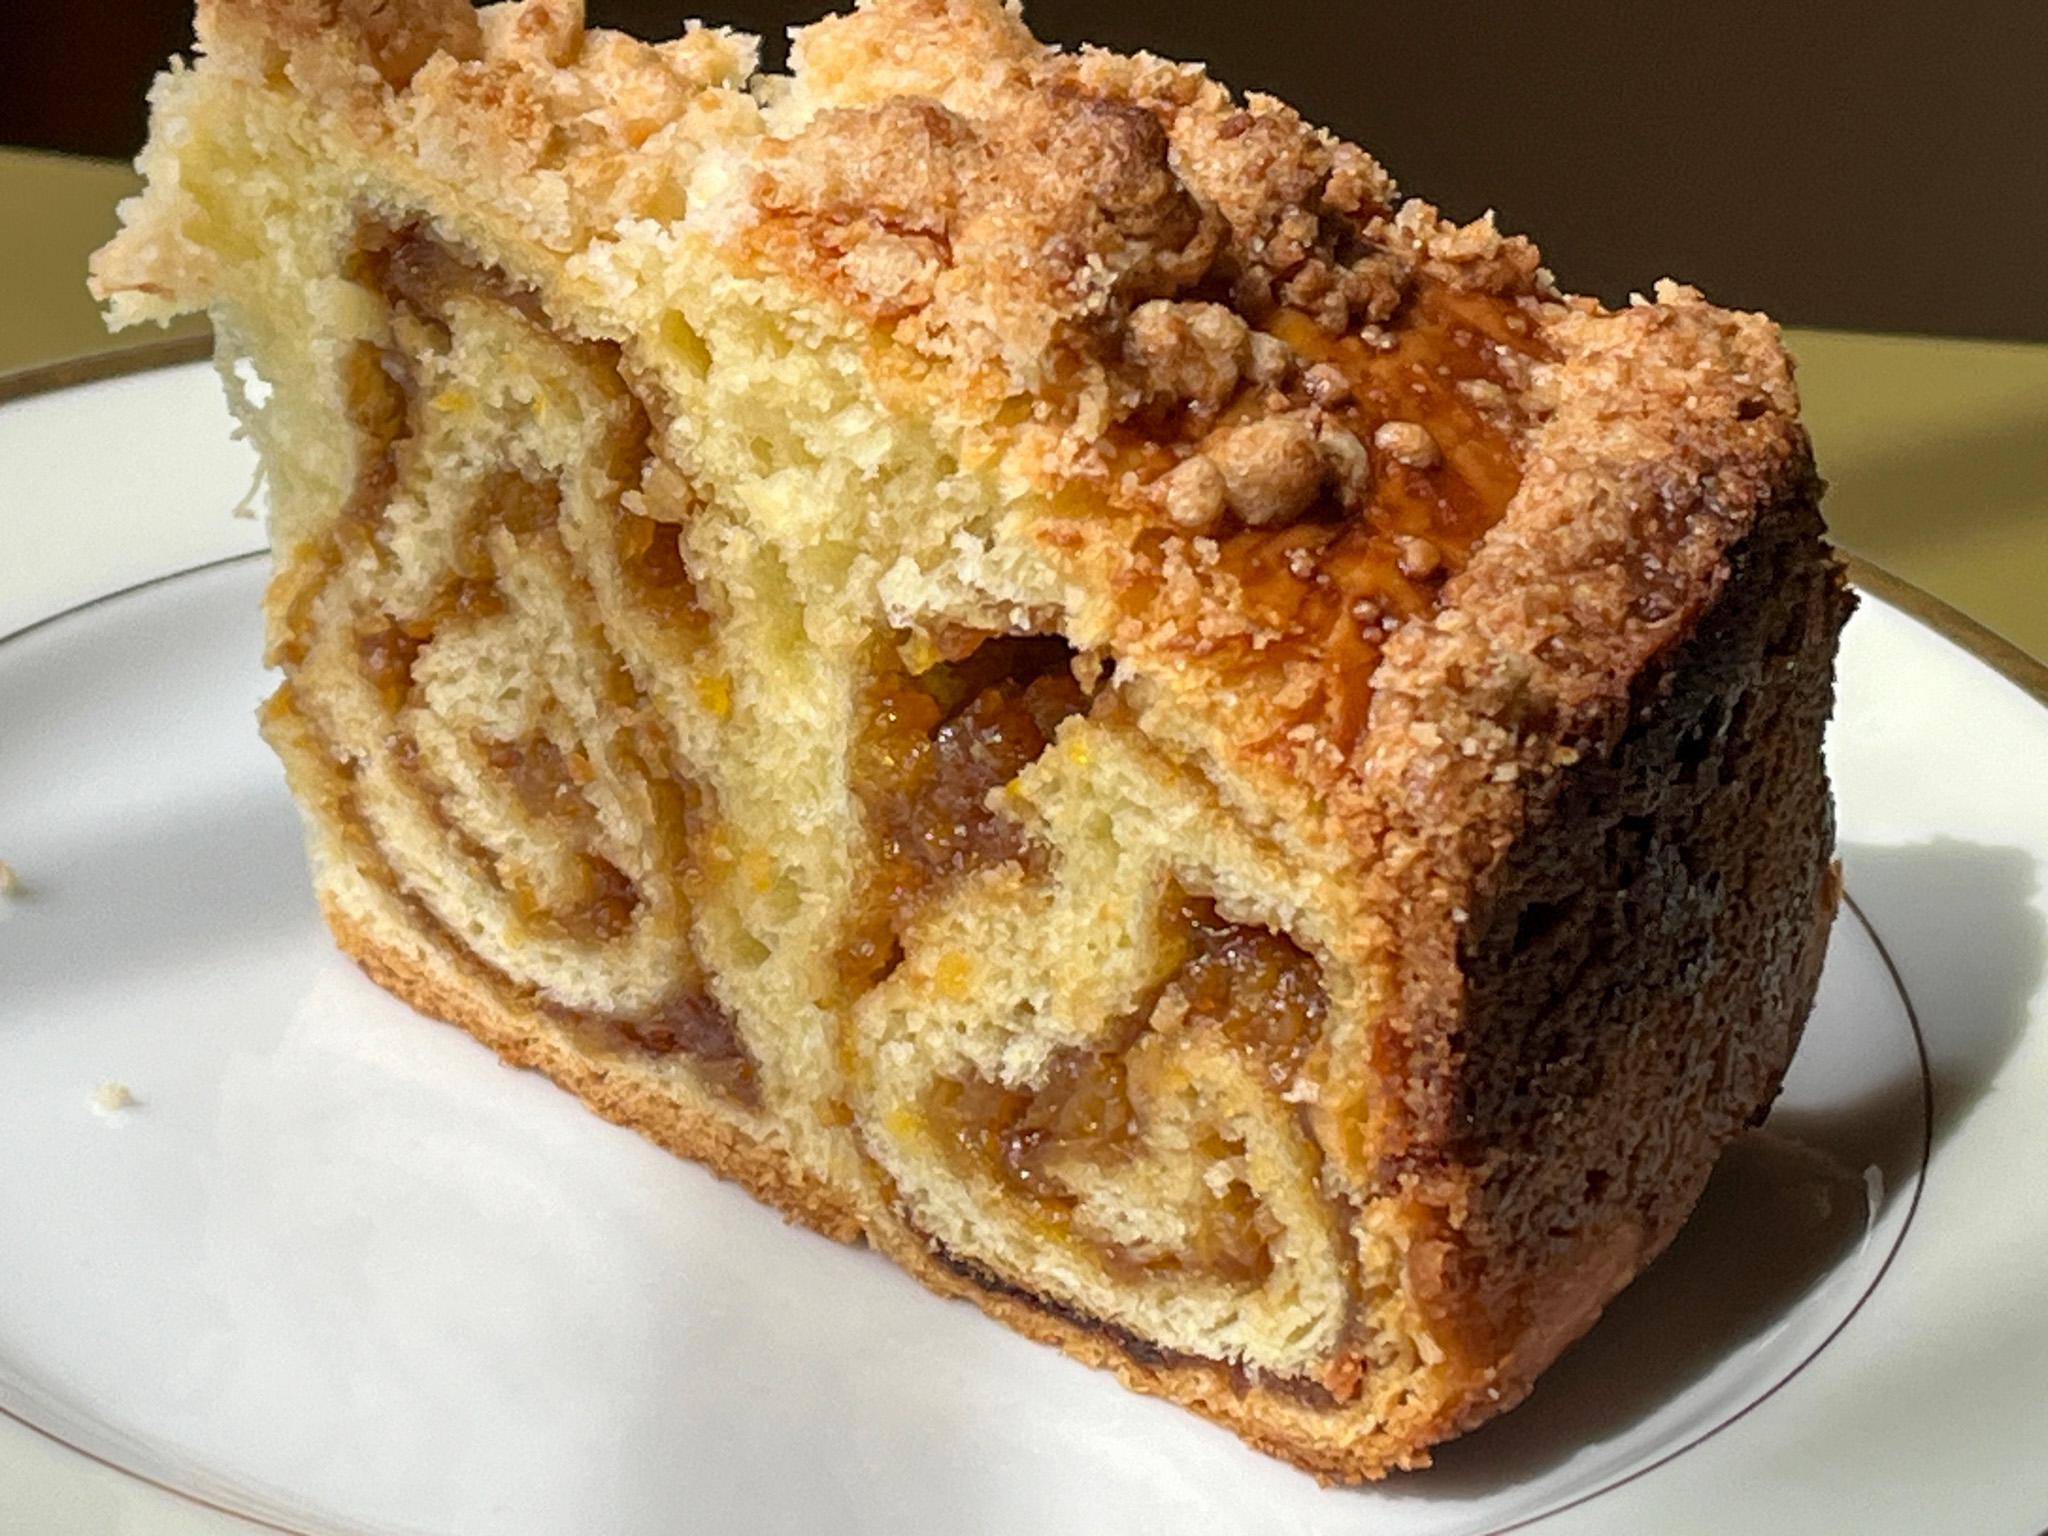
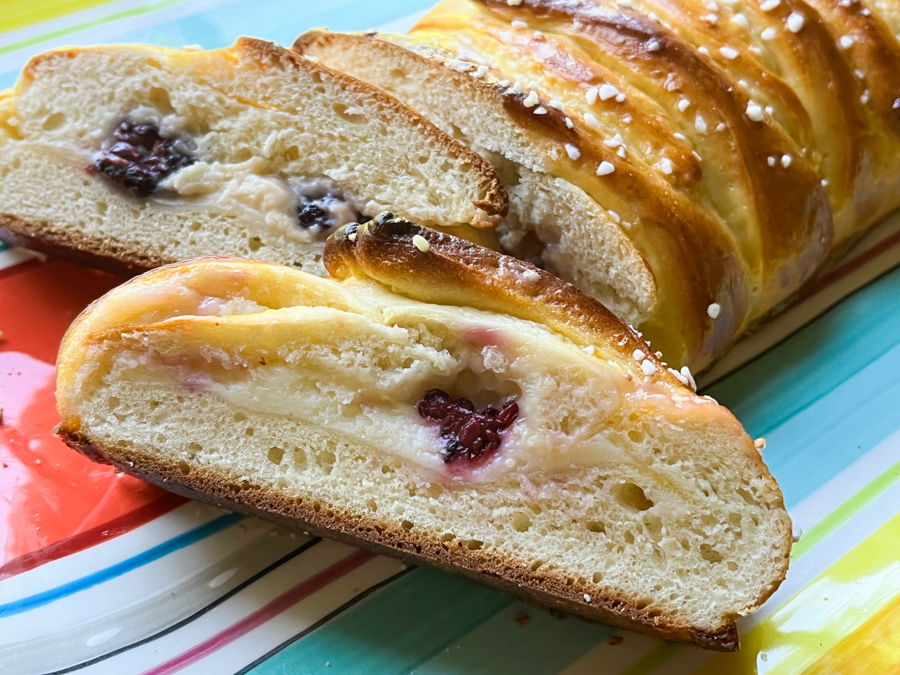
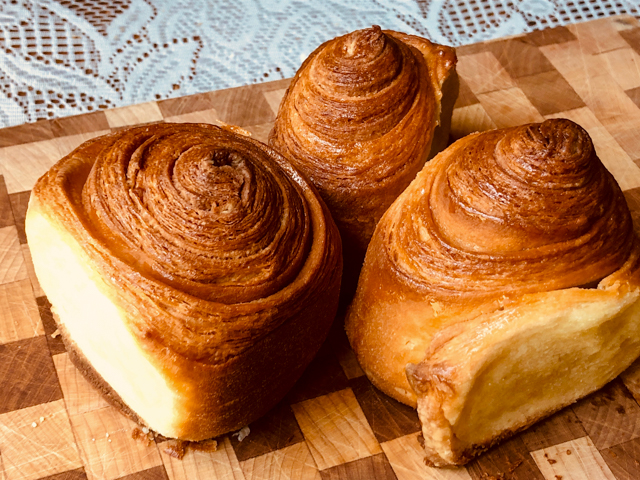
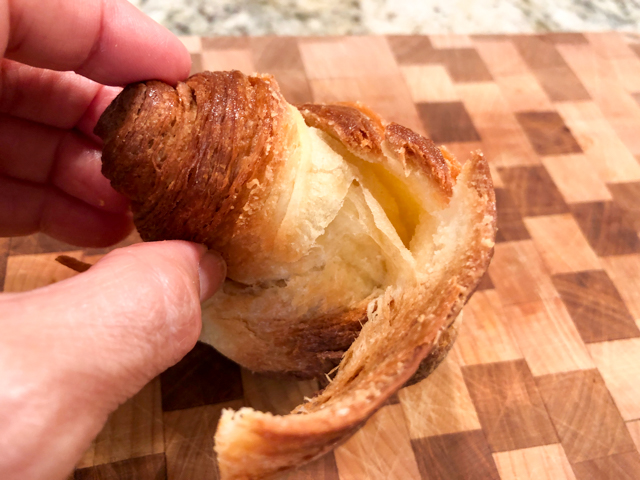
The picture above is slightly out of focus, but when I noticed it was too late and I did not want to cut another one, as they were to be donated later that day. The dough has the right amount of sweetness, and the pistachio cream complemented it well. I highly recommend you play with this recipe and come up with new combinations of flavors and shaping.

Once again, a huge thank you to Helen for her great method to make brioche dough!

ONE YEAR AGO: Shrimp with Pickled Jalapeños and Broccoli

TWO YEARS AGO: Sticky Spicy Pork Over Golden Rice

THREE YEARS AGO: Mini-Pullman Sourdough Bread

FOUR YEARS AGO: Gibassier

FIVE YEARS AGO: Sundried Tomato Twist Bread

SIX YEARS AGO: And now for something completely different….

SEVEN YEARS AGO: Parsnip, Coconut, and Lemongrass Soup

EIGHT YEARS AGO: In My Kitchen, October 2016

NINE YEARS AGO: Paleo Moussaka

TEN YEARS AGO: In My Kitchen, October 2014

ELEVEN YEARS AGO: In My Kitchen, October 2013

TWELVE YEARS AGO: Crimson and Cream Turkey Chili

THIRTEEN YEARS AGO: Taking a break from the nano-kitchen

FOURTEEN YEARS AGO: Chocolate Chip Cookies

APRICOT CRUMB COFFEE CAKE

Is it a cake? Is it a sweet bread? Is it heaven on a plate? Yes to all! Another amazing recipe from Helen Fletcher, this is a bit involved but absolutely worth it… Slicing through it to reveal the coiled pattern inside is just too cool!

APRICOT CRUMBLE COFFEE CAKE
(from Helen Fletcher’s Pastries Like a Pro)

¾ cup unsalted butter (170 grams)
1 teaspoon active dry yeast
3 tablespoons warm water
Pinch granulated sugar
2 ¼ cup bread flour (315 grams)
1 ½ tablespoons granulated sugar
½ teaspoon salt
3 large eggs, room temperature
¼ cup half and half (or heavy cream)

Filling
¾ pound dried apricots
1 cup water
5 tablespoons butter (75 grams)
½ cup powdered sugar (65 grams)
1 ½ teapoons vanilla
2 teaspoons cocoa

Almond Paste Crumb Topping
1 cup cake flour (125 grams)
½ cup almond paste (125 grams)
⅔ cup granulated sugar (130 grams)
½ cup unsalted butter (114 grams)

Assembly
1 large egg, well beaten

Make the brioche dough: Cut the butter into small pieces by cutting the stick in half lengthwise, the cutting it into half inch pieces. Place it back in the refrigerator to keep cold. Make a sponge by dissolving the yeast and pinch of granulated sugar in the 3 tablespoons warm water. Add 3 tablespoons flour from the measured amount of 2 ¼ cups flour. Stir together to completely mix the ingredients. Cover with film and set aside to double or more while preparing the rest of the ingredients.

In the processor bowl fitted with the steel blade, place the remaining flour, salt and sugar. Process 5 seconds to mix. Place the cold butter in a circle over the flour. Process the butter until it is indistinguishable, about 20 seconds. Scrape down and process about 5 seconds more.
Place the eggs in a circle over the dry ingredients, pour the half and half or cream over the eggs, and add the sponge, also in a circle. Process approximately 20 to 25 seconds until the ball which initially forms breaks down into a creamy, evenly dispersed batter in the processor bowl. Do not stop processing until the batter is formed, as the motor may stall when you try to restart it. If the ball doesn’t break down, that’s fine as long as everything is mixed well.

Remove from the processor bowl and place in an ungreased bowl. Cover securely with plastic wrap and allow to rise until double in bulk about 2 to 2 ½ hours. Stir down and refrigerate overnight. Punch down and use as directed. It can stay in the refrigerator for up to 3 days before using.

for the filling:
Place the apricots and water in a small saucepan and bring to a boil. Reduce to a simmer and, stir frequently until most of the water is gone. Place the apricots and remaining ingredients, except the cocoa, in a processor bowl and process until smooth. Set aside to cool. Stir the cocoa in. This may be made a week ahead and stored in the refrigerator. Remove to room temperature before using.

for the crumb topping:
Place the flour and almond paste (either home made or bought) in the bowl of a processor. Process until the almond paste is indistinguishable. Add the sugar and butter and process until it begins to form crumbs. Switch to pulses and pulse only until large crumbs form. Remove them to a bowl and refrigerate until needed.

To assemble the coffee cake:
Spray a 9×3″ cheesecake or springform pan with a non-stick baking spray. Set aside.
Remove the brioche from the refrigerator, punch down, pat into a rectangle on a lightly floured surface and roll into a 20×11 inch rectangle so the long horizontally in front of you to make rolling up easier.
Spread the filling evenly over the brioche within ½” of the edges. Roll up tightly from the 20″side and pinch the seam securely together. Roll and gently stretch it until it is 30″ long. If it is very soft at this time, coil it up on a parchment line baking sheet and chill to firm up. Do not let it freeze.

Starting in the middle of the pan, coil the roll around towards the outer edge of the pan. Press it down to flatten and fill the pan. Cover with a towel and let rise until doubled in bulk. Because everything is cold, this could take 4 to 4 ½ hours to rise.

Heat the oven to 375F. When the coffee cake is full risen, brush it with the beaten egg and distribute the almond paste crumbs evenly over the brioche. Bake for 45 to 55 minutes until the top is browned. A tester is difficult here because the filling stays moist and clings to the tester. If the top begins to brown too quickly, tent it with foil. Cool until barely warm and release the cake. Dust with powdered sugar to serve.

ENJOY!

to print the recipe, click here

Comments: Helen’s method to make a brioche in the food processor is something I’ve been meaning to try for the longest time, and it works so well, I will keep it as my method of choice from now on. It considerably speeds up the preparation of the dough, and you cannot beat the texture. A pleasure to work with. I could have done a better job keeping the coil leveled on all sides of the pan, if you look at the bottom left photo of the composite above, you’ll see that my coil got a bit lopsided. Other than that, no issues. I highly recommend you visit Helen’s site (click here) because she goes over every little step with pictures and you get a better idea of what to expect as you make this recipe.

The crumb topping is irresistible, so I advise you to stop nibbling on it and use it exclusively to top the cake. I made my own almond paste, following Helen’s detailed recipe, and it turned out perfect! I used her simple syrup method. You can read her post about it clicking here. My little concoction looked exactly like hers – or the ones you can buy at the store – but my picture was badly out of focus, so you will have to take my word for it. I loved making this crumb cake, now I dream of variations, maybe some black sesame paste in the filling could be fantastic also!

ONE YEAR AGO: Hawaij, Three Ways

TWO YEARS AGO: A Most Painful Goodbye

THREE YEARS AGO: Masala Clay Pot Chicken Thighs

FOUR YEARS AGO: Happy Swirls Tonka Macarons

FIVE YEARS AGO: Chocolate Tartlets with Honey-Caramel Filling

SIX YEAR AGO: Zucchini Soup with Tahini

SEVEN YEARS AGO: Black Sesame Macarons

EIGHT YEARS AGO: Fine Tuning Thomas Keller

NINE YEARS AGO: Cauliflower Tortillas

TEN YEARS AGO: Majestic Sedona, Take Two

ELEVEN YEARS AGO: Secret Ingredient Turkey Meatballs

TWELVE YEARS AGO: Swedish Meatballs and Egg Noodles

THIRTEEN YEARS AGO: Italian Easter Pie

FOURTEEN YEARS AGO: Black Olive Bialy

KAREN’S BRAIDED LEMON BREAD WITH BLACKBERRIES

She posted. I read the post while away on a trip. Could not wait to get home to bake it. As far as enriched bread goes, you cannot get much better than this. Think brioche loaded with a tangy lemon cream and luscious blackberries. As I said, cannot get much better. THANK YOU, KAREN!

BRAIDED LEMON BREAD WITH BLACKBERRIES
(from Karen’s Kitchen Stories)


For the Sponge:
3 ounces warm water (95 to 105 degrees F)
1 teaspoon sugar
1 1/2 teaspoons instant yeast
30 grams unbleached all purpose flour

For the Final Dough:
All of the sponge
85 grams vanilla yogurt, room temperature (I used plain and added 1/2 tsp vanilla)
56 grams softened unsalted butter
1 large egg, beaten
50 grams sugar
1 teaspoon salt
1 teaspoon vanilla
300 grams unbleached all purpose flour
one beaten egg for the egg wash
pearl sugar for topping (optional, but nice)

For the Filling:
85 grams cream cheese, at room temperature
25 gram sugar
29 grams sour cream (I used creme fraiche)
1 tsp lemon juice
15 grams all-purpose flour
100 grams lemon curd
Handful of blackberries


Combine the sponge ingredients in a small bowl, stir, and cover with plastic wrap. Let it sit for 15 minutes.
In your stand mixer bowl, combine the sponge, yogurt, butter, egg, sugar, salt, vanilla, and flour. Mix with the dough hook for about 8 minutes. Place the dough in an oiled dough rising bucket or bowl, cover, and allow to rise for one to two hours, until doubled (mine took 2 hours and 30 minutes).

Mix the cream cheese, sugar, sour cream, lemon juice, and flour until smooth. Cover and set aside.
Line a cookie sheet with parchment paper. Place the risen dough not the parchment, and press or roll it into a 10 inch by 15 inch rectangle. Mark the dough lengthwise into thirds by pressing a ruler into the dough. Spread the cream cheese mixture onto the middle third, leaving about an inch uncovered at the top and the bottom. Spread the lemon curd on top of the cream cheese mixture. Top with the blackberries.

Cut the outer sides into strips. Cut off the strips from the four “corners” of the dough, leaving a flap at the top and bottom. Fold up the bottom flap and fold the strips over the filling alternating in a braid pattern. Fold the flap over the top before finishing the braid. Cover loosely with oiled plastic wrap.
Preheat the oven to 360 degrees F.


Let the dough rise for about 45 minutes. When the dough is ready, brush it with the egg wash and sprinkle it with the sugar. Bake for 25 to 30 minutes until a deep golden brown. Cool on a cooling rack for at least 20 minutes. Slice and serve.

ENJOY!

to print the recipe, click here

Comments: Make sure to stop by Karen’s post because her pictures and explanations are very detailed and will help you with the shaping. The dough is a pleasure to work with, as enriched doughs always seem to be. You can make the filling while the dough rises, and use store-bought lemon curd to make your life easier. Next time I will add more blackberries, I was afraid they would contribute too much moisture and leak too much, but that was not the case.

This basic method can be used for savory breads, or use different sweet fillings. Karen has a lot of suggestions in her article, so pay her a visit.

ONE YEAR AGO: Bulgur-Pork Tomatillo Platter

TWO YEARS AGO: Baking through the blogosphere

THREE YEARS AGO: Chickpea Burgers, Vegan and Delicious

FOUR YEARS AGO: Macarons with Ganache Noisette

FIVE YEARS AGO: Quiche with Asparagus and Fennel

SIX YEARS AGO: Fakebouleh

SEVEN YEARS AGO: Yellow Squash Soup

EIGHT YEARS AGO: Grilled Chicken with Tamarind and Coconut Glaze

NINE YEARS AGO: Chicken-Apricot Skewers

TEN YEARS AGO:  Asparagus Quiche

ELEVEN YEARS AGO: Two-stage Pea and Prosciutto Risotto

TWELVE YEARS AGO: Mellow Bakers: Corn Bread

HOME BAKERS COLLECTIVE: JUNE PROJECT

We just passed Summer solstice. It always makes me sad, knowing that days will be getting shorter and my beloved sun will stay around less and less time each day. Covid-19 is showing its ugly face again, adding more uncertainty to a year that has been full of it from the beginning. But for every yin there is always a yang, and the month of June also brought another group challenge by the tent bakers. This time Alex Tent Baker Extraordinaire came up with the theme, and he was quite straightforward with it. Laminate something. That was his  brief. A brief brief. I loved it! I had quite a few options dancing in my mind, but quickly settled on a Brioche Feuilletée, because it is all about the lamination, no distractions from it. So, without further ado, my assignment is here for you.

BRIOCHE FEUILLETÉE
(recipe from Matt Adlard’s Bake it Better)

for the dough:
415g all-purpose flour
8g salt
50g sugar
85g eggs
153g whole milk
42g soft, unsalted butter
9g instant yeast

for the butter block:
250g unsalted butter

OVERVIEW OF THE RECIPE 
(simplified version, original recipe is copyrighted)

The dough is prepared using all the ingredients and allowed to proof for one hour. It is next transferred to the fridge overnight. At that time, the butter block is made with dimensions of approximately 7 x 8 inches and also placed in the fridge.

Next day the butter block is enclosed in the dough and three folds are performed. First a double fold, the other two single folds. The dough is rolled out and cut into four strips, about 2.5 inches in width. Each strip is rolled and placed inside a loaf pan for a final proofing of 2 to 2 and a half hours.

Bake in a 325F oven for 45 minutes to 1 hour, until deep golden. Remove from the pan and allow it to cool completely.

ENJOY!

to print the recipe overview, click here

Comments: If you want to know all the details and tips that make this recipe easier to follow, you will have to join Matt Adlard’s site. It would not be fair to publish his detailed instructions here, plus his video is a great help. I’ve been a member of his online group for a few months and highly recommend it for those interested in all areas of patisserie. I will write a full blog post about it in the near future. Not only you learn a lot, but you get to interact with a lot of cool, baking-fanatic folks. See what they bake, follow their progress, share failures and victories.


Matt bakes it in a slightly different way. He adds a baking sheet and a heavy weight to the top of the pan, so that as the dough rises during baking, it gets squished on top, ending in a cool rectangular shape, laminated on all sides, but flat. I did not have a pan with the appropriate dimensions to achieve that effect, so I went with the regular baking in which it all freely explodes upwards.


No matter how you bake it, the result will be the same: layers of buttery goodness that you roll out and enjoy. Nothing else is needed, as the bread is quite rich and indulgent as it is, but if you want to spread it with jam, more butter, clotted cream, you will not hurt my feelings. And I bet Matt will not mind a bit either.

Alex, thanks for a great challenge this month… It is hard to believe that one year ago   we were all frantically practicing for the show in our own homes, wondering  who were the other bakers, how would we get along…  Good times.

For my readers, make sure to stop by the Home Bakers Collective, to see what my friends laminated this month… If the link is not yet published, try again a little later in the day.

ONE YEAR AGO: In My Kitchen, June 2019

TWO YEARS AGO: In My Kitchen – July 2018

THREE YEARS AGO: In My Kitchen, July 2017

FOUR YEARS AGO: Secret Recipe Club: Falafel and a Bonus Recipe

FIVE YEARS AGO: Chocolate Toffee Banana Bread

SIX YEARS AGO: In My Kitchen, June 2014

SEVEN YEARS AGO:  Strawberry Frozen Yogurt

EIGHT YEARS AGO: Baked Coconut and “The Brazilian Kitchen”

NINE YEARS AGO: Honey-Glazed Chicken Legs

TEN YEARS AGO: French-Style Rolls

ELEVEN YEARS AGO: Chicken Breasts, Coffee, and Serendipity

OLIVE OIL BRIOCHE

Karen from Karen’s Kitchen Stories is a source of endless inspiration for me. Particularly on anything related to bread, she finds the most unusual, exotic, unique recipes, and then bakes them like it’s no big deal at all.  Just to give you a recent example, look at this incredible concoction for which she used 12-ounce empty soda cans wrapped with foil as a baking “pan.”  Amazing, isn’t it? Today I share with you my adventure with her Olive Oil Brioche. I made only half the recipe and still had a ton of dough to play with. Enough for a large loaf and 6 buns. For reasons that will be discussed in the comments, if you make it, be ready to have one loaf and 8 buns. The amount for the loaf pan was a tad too much.

OLIVE OIL BRIOCHE
(slightly modified from Karen’s Kitchen Stories)

for the poolish:
100 grams all purpose flour
100 grams water
1.5 grams instant yeast

Mix the ingredients, cover with plastic wrap, and place in the refrigerator over night.

for the levain (Sourdough)
1 tablespoon starter
110 grams all purpose flour
110 grams water

Mix the ingredients, cover with plastic wrap, and let sit overnight at room temperature until bubbly.

for the final dough: 
200 grams poolish
150 grams levain
500 grams bread flour
12 grams salt
7.5 grams instant yeast
250 grams eggs
120 grams milk
80 grams honey
Zest of one Meyer lemon (optional)
25 grams water
220 grams extra virgin olive oil
For the egg wash: 1 egg plus one tablespoon milk

In a stand mixer, combine the flour, salt, yeast, eggs, milk, levain, poolish, honey, lemon zest, and water and mix on low for about 5 minutes. Cover and let rest for about 20 minutes.

Mix the dough with the spiral hook on medium to high speed for 8 minutes.
With the mixer running on medium,  add the oil slowly, pausing so that the oil is absorbed. I did it in three additions. Incorporation of the oil will take time, so exercise patience.  Add a sprinkle of bread flour to speed incorporation if you so desire, but do it only in the second and third addition. The dough should end up very smooth and not tear when  you stretch it.

Allow the dough to bulk ferment (in a large bowl covered in plastic wrap) for 2 hours at 70 degrees F. Do three stretch and folds during the first 90 minutes, one every thirty minutes.  When the dough is ready, remove three pieces of about 250g each and braid them. Place in a slightly oiled 9 x 5 loaf pan for final proofing. Divide the rest of the dough in 8 portions, shape as buns, and proof.

Heat the oven to 425 degrees F.  After the bread has been proofing for 1 and a half to 2 hours (until doubled), brush with egg wash and bake until golden brown, 30 to 40 minutes, until internal temperature is 200 F. You can sprinkle sesame seeds on the buns if you so desire.

Un-mold the large loaf and cool on a wire rack together with the buns.

ENJOY!

to print the recipe, click here

Comments: I will not lie to you, this is a project. The bread requires a sourdough starter, a poolish (fermented flour using small amount of commercial yeast and prepared the day before), and commercial yeast in the final dough. But it is a total pleasure to work with, rises like a rocket and the texture and taste? You will not miss the butter, that’s for sure. As Karen said, it keeps a lot better than the traditional version. And freezes beautifully too.

When you start adding the olive oil, you will be sure the whole thing is ruined, and might have a few rude thoughts directed at me. It seems impossible for the dough to come together. Have bread faith. And here is a little tip that might help: as you add the olive oil and the mixer is going and going, with a puddle of oil all around and looking hopeless, add just a sprinkle of bread flour on top. It will help things get in shape faster. But just a sprinkle, I say 1 tablespoon or so. If you add the olive oil in three additions, do that in the final two, when the dough will have more trouble incorporating it.

For a 9 x 5 loaf pan, I advise you to make three strands with about 250g of dough in each. Then divide the rest in 8 buns. When you do that, you will be able to let the shaped loaf proof for closer to 2 hours and it will not rip a bit like mine did. I had no choice but to bake after 1 hour and 10 minutes, the dough wanted to leave the pan and explore the kitchen. No bueno. That’s because I used 300g per strand, a bit too much. Don’t be put off by the complexity of this recipe, once you have the starter and the poolish prepared the day before, it is just a matter of weighing all other ingredients and having some fun.

Karen, thank you for the inspiration, I know I tell you this all the time but it’s so true… Your blog is a pleasure to follow!

ONE YEAR AGO: Coconut and Lime Macarons

TWO YEAR AGO: Flank Steak Carnitas

THREE YEARS AGO: Sesame and Poppy Seed Sourdough

FOUR YEARS AGO: Pecan-Crusted Chicken from Southern at Heart

FIVE YEARS AGO: Lamb Shanks en Papillote with Cauliflower-Celeriac Purée

SIX YEARS AGO: Chestnut Brownies and a Blog Award!

SEVEN YEARS AGO: Quinoa with Cider-Glazed Carrots

EIGHT YEARS AGO: Celebrate Wednesday: Heirloom Tomatoes Steal the Show

NINE YEARS AGO: Pain de Provence

TEN YEARS AGO: Golspie Loaf, from the Scottish Highlands