
I would like to invite you to visit my baby blog, as I absolutely loved making this platter of cookies to welcome the Chinese New Year.
Follow this link for all the details…

I would like to invite you to visit my baby blog, as I absolutely loved making this platter of cookies to welcome the Chinese New Year.
Follow this link for all the details…
Let’s get the V word in the open right away: vegan. This is vegan. And also very tasty. If you are not too fond of mayonnaise, this cole slaw will have your name written all over. Low in saturated fat, high in flavor. I did not add red cabbage because I wanted to keep a milder texture but consider including some if you prefer more crunch.

VEGAN COLESLAW WITH ALMOND DRESSING
(adapted from The Complete Vegan Cookbook)
for the dressing:
½ cup blanched, slivered almonds
1/2 cup water
½ teaspoon salt
2 tablespoons apple cider vinegar
1 tablespoon Dijon mustard
1 tablespoon agave nectar
2 tablespoons grapeseed oil
juice of 1 lemon
water as needed to adjust consistency
for the coleslaw:
1 small head of cabbage, cored and very thinly sliced
3 large carrots, shredded in the food processor
1 yellow bell pepper, seeded, cut into matchsticks
1/3 cup fresh parsley, minced
1/2 tsp dried dill
salt and pepper to taste
fresh lemon juice, to serve
Combine the almonds with ½ cup water and a pinch of salt in a small saucepan. Bring to a boil over high heat, cover, remove from the heat, and let the almonds soak for 20 minutes. In a blender, combine the almonds with their soaking water, vinegar, lemon juice, mustard, agave, salt,, and oil. Blend until creamy, adding water if needed to bring the consistency to that of mayonnaise or a little thinner. Reserve.
Add the cabbage, carrot and yellow pepper pepper to a large bowl and toss with the dressing. Fold in the parsley and dill, season with salt and pepper, and serve with a fresh squeeze of lemon juice all over.
ENJOY!
to print the recipe, click here
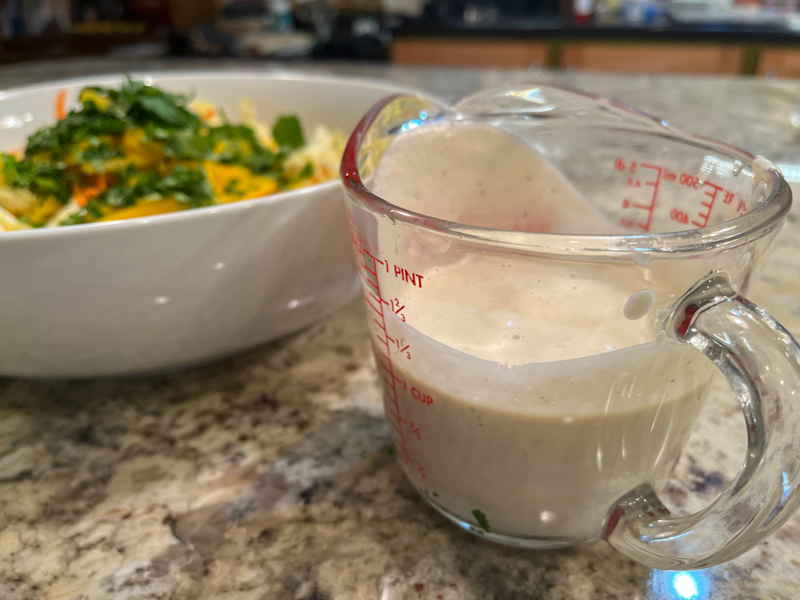
Comments: I was very intrigued by this dressing, which goes in the direction of the cashew cream, but using almonds instead. I advise you to make the dressing a little thinner than mayo, because it tends to get drier as it sits. Leftovers lasted for two days without getting soggy – maybe everything turned slightly softer but not by much. The flavor actually intensified a bit.
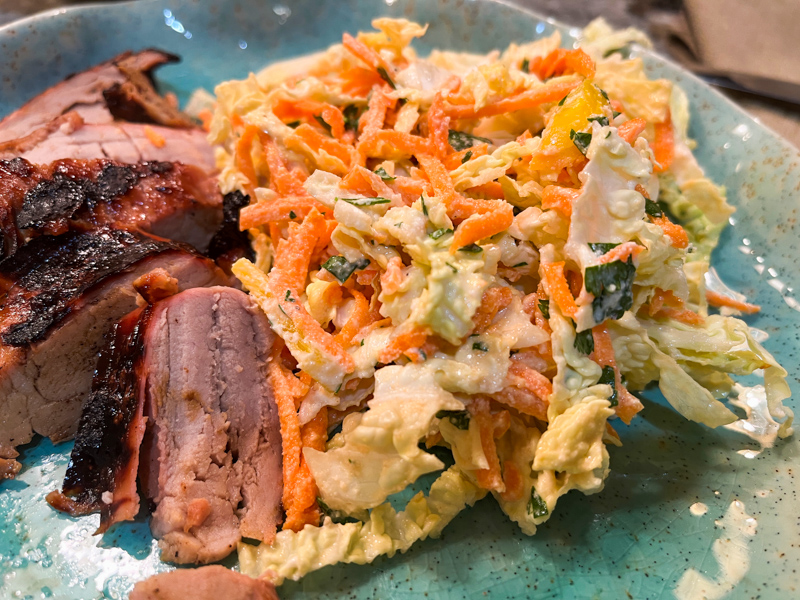
The vegan aspect of our meal was destroyed by associating the coleslaw with grilled pork tenderloin. Of course, if you are vegetarian, pick other dishes to enjoy with this delicious slaw. We don’t eat mayo, some versions we like use yogurt instead, but for my personal taste, this is the best alternative dressing for coleslaw we’ve had so far.
ONE YEAR AGO: Busy Bee Sugar Cookies
TWO YEARS AGO: Mincemeat Pies, when the third time is a charm
THREE YEARS AGO: Shibari Bread]
FOUR YEARS AGO: Incredibly Simple Times Four – January 2018
FIVE YEARS AGO: Two Salads and a Blog Award!
SIX YEARS AGO: When Three is Better than Two
SEVEN YEARS AGO: Somebody Stop Me!
EIGHT YEARS AGO: Zucchini Pasta with Cilantro-Cashew Pesto
NINE YEARS AGO: Bran Muffins, Take Two
TEN YEARS AGO: Brown Butter Chocolate Chip Cookies
ELEVEN YEARS AGO: Mogo Mojo
TWELVE YEARS AGO: Slow-Roasted Chicken Thighs: an Ice-Breaker
Yes, I do have a cookie blog, but when I try a new recipe, it will be here in my Bewitching Kitchen site. These cookies are a marriage of Oreos with Linzer, perfect for Valentine’s Day. They have a wonderful peppermint flavor, both in the cookie and the filling. Simply omit if you are not fond of it. I actually modified the filling a bit, because using the hard candy takes it too much into toothpaste-territory for my taste. Check the original recipe, you might prefer to follow that path. Remember, your kitchen, your cookies!

CHOCOLATE-PEPPERMINT COOKIES
(slightly modified from purewow.com)
for the filling:
1 bag of Moroccan mint tea
½ cup (115g) heavy cream
200g finely chopped white chocolate
Pinch of fine sea salt
pink gel food coloring
for the cookies:
10 tablespoons (142g) unsalted butter, at room temperature
135g granulated sugar
53g brown sugar
1 large egg, at room temperature
1 large egg yolk, at room temperature
1 teaspoon vanilla extract
¼ teaspoon peppermint extract
240g all-purpose flour
45g black cocoa powder
¼ teaspoon baking powder
½ teaspoon fine sea salt
pink sanding sugar to decorate
Place the tea bag and heavy cream in a small saucepan. Heat until simmering, close the pan and let it infuse for 5 minutes. Remove the tea bag, squeezing it hard. Re-heat the cream and when it is almost boiling, add to a bowl with the white chocolate, together with a pinch of salt. Let sit for a minute, then stir gently until fully dissolved. Add a tiny drop of pink gel food coloring (optional). Transfer to the fridge for several hours. When ready to use, whip it with a handheld blender but do not over-whip or the ganache might seize up.
Make the cookie dough: In the bowl of an electric mixer fitted with the paddle attachment, cream the butter, granulated sugar and brown sugar until light and fluffy, about 5 minutes. Add the egg and egg yolk; mix well to combine. Thoroughly scrape down the side of the bowl, then add the vanilla and peppermint extracts and mix to combine.
In a small bowl, whisk together the flour, cocoa powder, baking powder and salt; add to the mixer and mix until just incorporated. Scrape down the side of the bowl, then mix again briefly on low speed to make sure everything is combined. Divide the dough in half and form each half into a 1-inch-thick disk. Wrap each disk tightly in plastic wrap and refrigerate for at least 1 hour (and up to overnight).
Heat the oven to 325 F.
On a lightly floured surface, roll out one portion of dough to ⅛ inch thick. Use a 2-inch round cookie cutter to cut the dough and then transfer each round to one of the prepared baking sheets. Repeat with the second disk of dough. Use a mini cookie cutter to cut a shape from the center of each cookie on the second tray; remove the cutouts. Bake until the cookies are set at the edges, 8 to 10 minutes, rotating the trays between racks halfway through baking. Cool completely.
Assemble the cookies: Flip the cookies without cutouts over, then pipe the filling into the center of each cookie, leaving a ¼-inch border. Place one of the cookies with a cutout on top and press down slightly until the filling reaches the edge of the cookies. Sprinkle sanding sugar on the opening. Let set for 30 minutes before serving. They keep well at room temperature for several days.
ENJOY!
to print the recipe, click here

Comments: I used a small heart-shape cutter for the opening. You can use a simple round or another shape of your choice. I recommend using black cocoa if you really want to take those into the Oreo world. And the peppermint flavor was a nice twist. I visualize those with a Christmas aura, making the center as a round, or a star-shape and using red, white, and green non-pareils to decorate the center.
The cookie itself is very flavorful and I baked some in small little rounds, then decorated the top with dots of Royal icing I had leftover from another cookie adventure. That is of course totally optional, but oh so very cute, right?

If you like Oreos, I hope you give this version a try.

ONE YEAR AGO: Slow-Roasted Sweet Potatoes in Tomato Cardamon Sauce
TWO YEARS AGO: Sweet Potatoes in Tahini Sauce
THREE YEARS AGO: 30-Hour Leg of Lamb with Mashed Sweet Potatoes
FOUR YEARS AGO: Maple-Grilled Pork Tenderloin over Lemony Zucchini
FIVE YEARS AGO: Danish Rye Bread
SIX YEARS AGO: The Best Sourdough Recipe
SEVEN YEARS AGO: Mini-Quiches with Duxelles and Baby Broccoli
EIGHT YEARS AGO: Quinoa and Sweet Potato Cakes
NINE YEARS AGO: Pumpkin Bolo de Fuba’ Cremoso
TEN YEARS AGO: Citrus-crusted Tilapia Filets
ELEVEN YEARS AGO: Bran Muffins, not just for Hippies
TWELVE YEARS AGO: Flourless Chocolate Cake
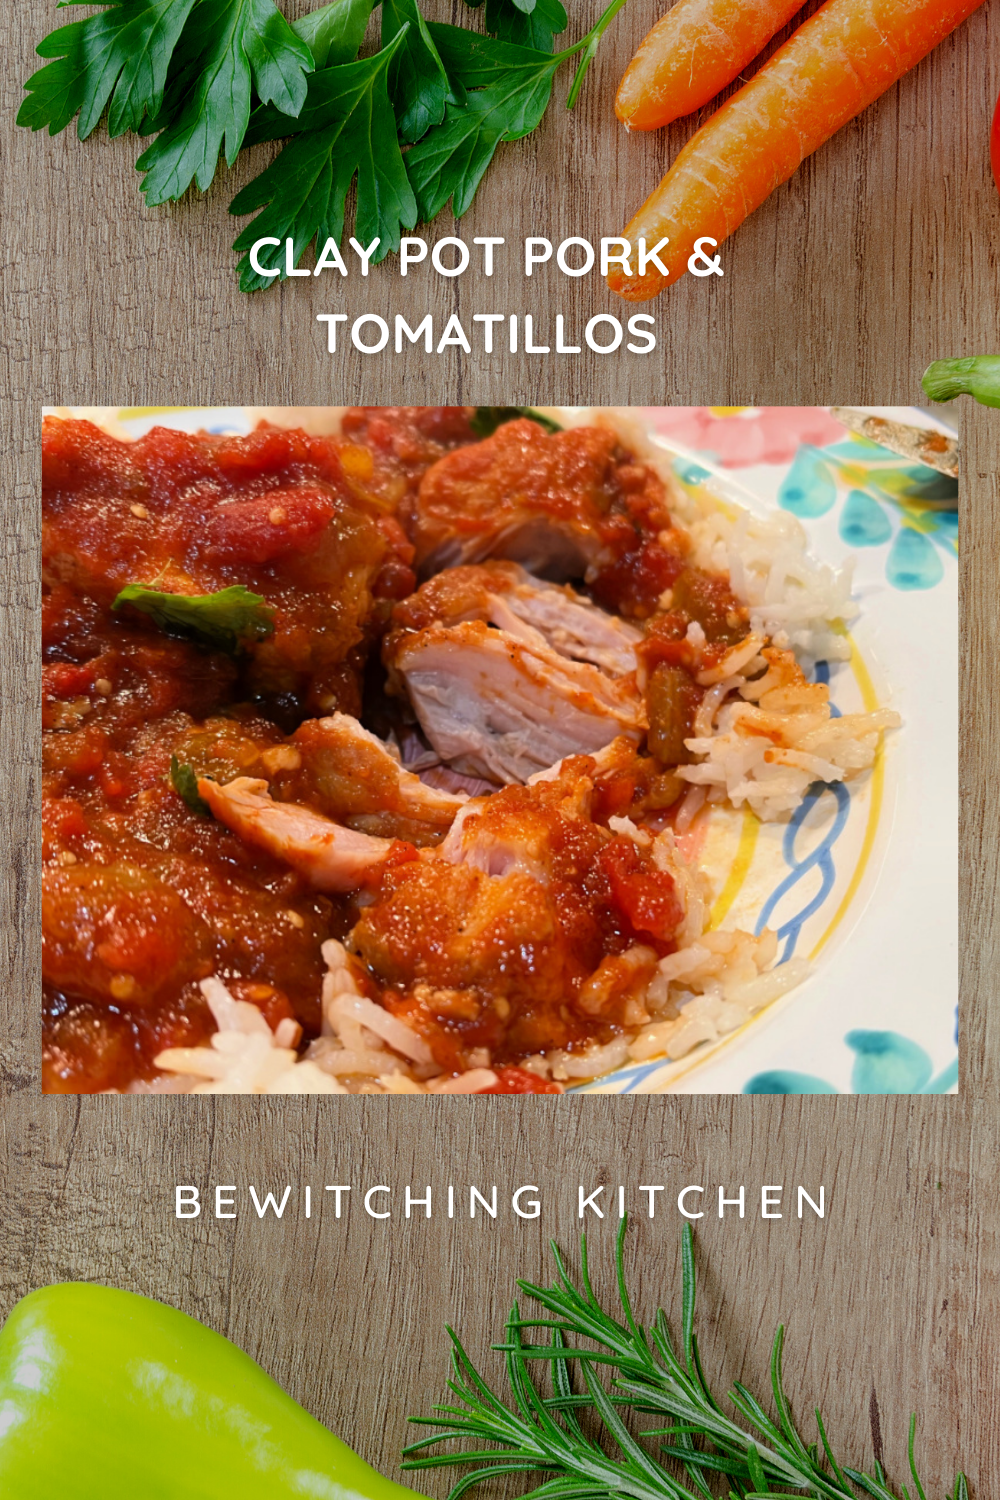
No worries if you don’t own a clay pot, just use any other suitable pot and go for it. I used several sources to inspire me for this recipe, and we were blown away by the outcome, The thing I love the most is being able to use a cut of pork that can be a bit tricky: boneless country style ribs. This type of recipe usually calls for pork shoulder, cut in pieces. I hate dealing with it, I end up wasting a lot of meat because… I literally butcher it. In the bad sense of the word. Boneless ribs come in a neat package, I cut each in two or three pieces and that’s all. The clay pot prevents it from getting dry and stringy. Win-win situation. Try it and you won’t be disappointed.

CLAY POT PORK AND TOMATILLO BRAISE
(from the Bewitching Kitchen)
3 tablespoons grapeseed oil
3-4 lb. boneless country pork ribs, cut in pieces
Kosher salt and freshly ground black pepper
2 shallots, coarsely chopped
2 cloves garlic (optional, I omit)
1 can crushed tomatoes, fired roasted if possible (28 oz)
10 tomatillos, peeled, washed and quartered
1 Serrano pepper, chopped (seeded if you prefer less heat)
1 tsp chipotle pepper (ground)
1 tsp chili powder
1 tsp ground cumin
2 bay leaves
2 tablespoons apple cider vinegar
1 tsp salt
water as needed
fresh cilantro to serve
Soak the clay pot in cold water.
Heat 2 Tbs. of the oil in a pan until very hot. Pat the pork dry, season with salt and pepper to taste. Cook the pork until browned on both sides. Transfer to a bowl as you continue browning all pieces. Add a little more oil to the pan, sauté the shallots and garlic (if u sing). Add the ground spices and let them sauté for 30 seconds or so, stirring constantly.
Add the tomatillos and Serrano pepper, sautee for a couple of minutes, then add the can of tomatoes, bay leaves, apple cider vinegar, and salt. Stir everything and add the pork. If needed, add water to almost cover the meat.
Transfer everything to the soaked clay pot, place in a cold oven and turn it to 375F. Cook for 2 hours and 15 minutes if your oven heats slowly (like mine does) or 2 hours in a fast-heating oven.
Serve with fresh cilantro.
ENJOY!
to print the recipe, click here
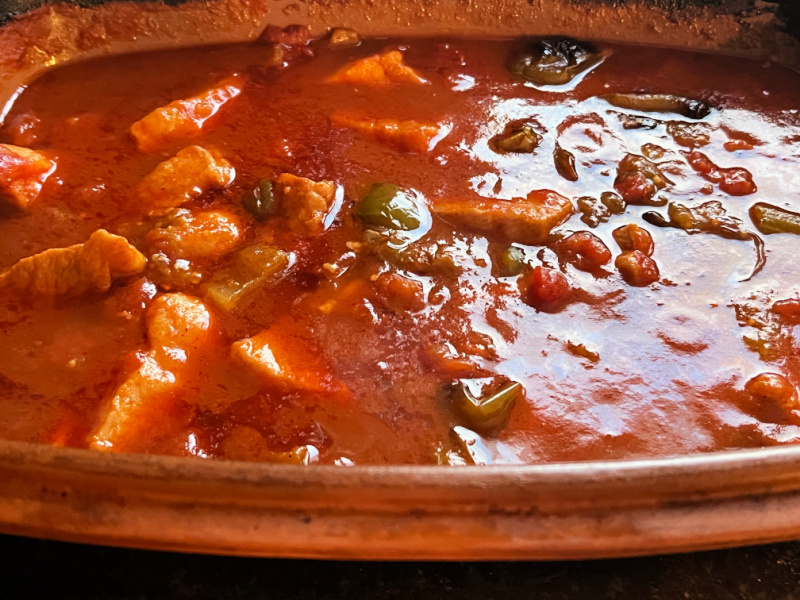
Comments: The picture above shows how much liquid I add to start the braise. I probably needed to add slightly less than 1 cup of water. The meat turns very tender and with perfect texture for our taste. Such an easy cut of meat to work with!

Although not very traditional, hubby loves to have this pork in a Brazilian-ized way: with black beans…
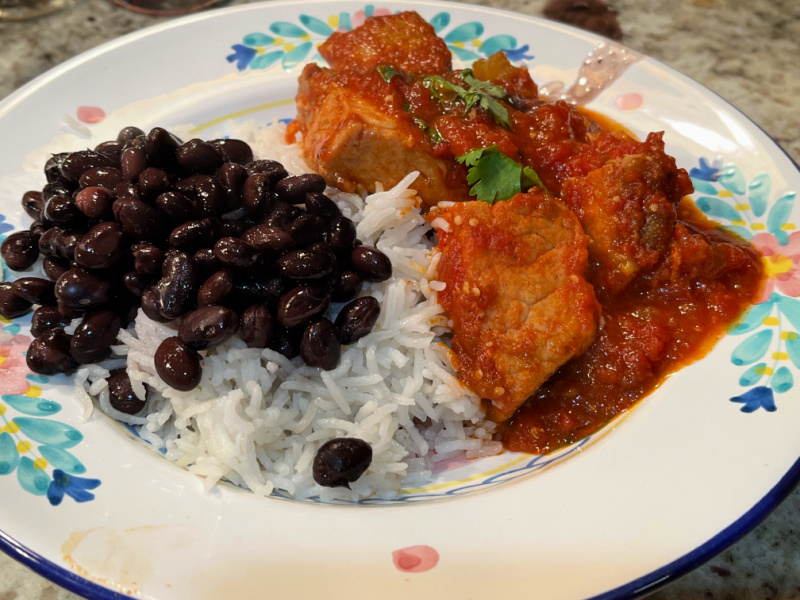
You can of course use the toppings traditionally paired with chili: guacamole, crumbled Mexican cheese, a little sour cream. Whatever path you choose, I am sure this will be a favorite.
ONE YEAR AGO: Vegan Chocolate-Dipped Cinnamon Cookies
TWO YEARS AGO: Lemony Barley with Shrimp and Spinach
THREE YEARS AGO:Black Rice with Roasted Cauliflower
FOUR YEARS AGO:La Couronne Bordelaise
FIVE YEARS AGO: A Special Birthday Dinner
SIX YEARS AGO: Duck Confit for a Special Occasion
SEVEN YEARS AGO: Tuscan Grilled Chicken and Sausage Skewers
EIGHT YEARS AGO: Celebrate Wednesday with Pork Tenderloin & Apples
NINE YEARS AGO: Salmon Wellington
TEN YEARS AGO: The Green Chip Alternative
ELEVEN YEARS AGO: Weekend Pita Project
TWELVE YEARS AGO: Let it snow, let it snow, eggs in snow
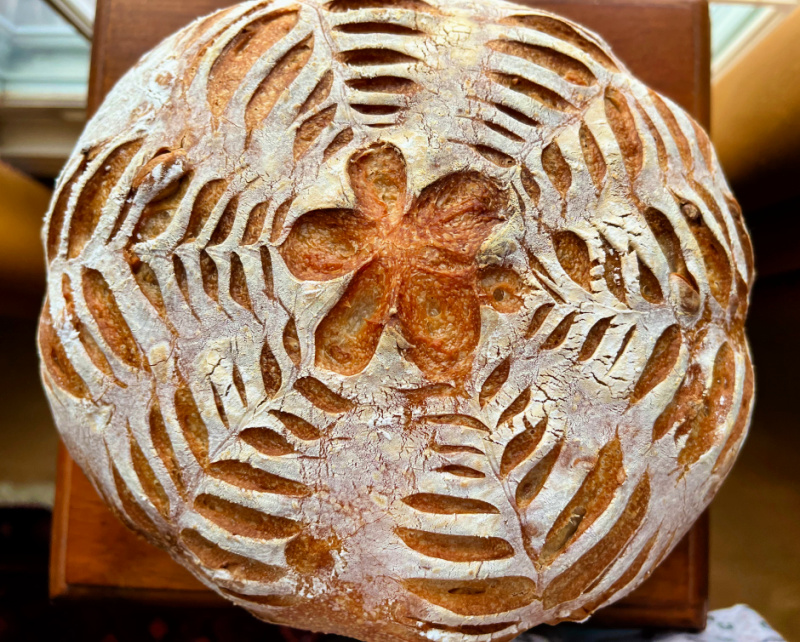
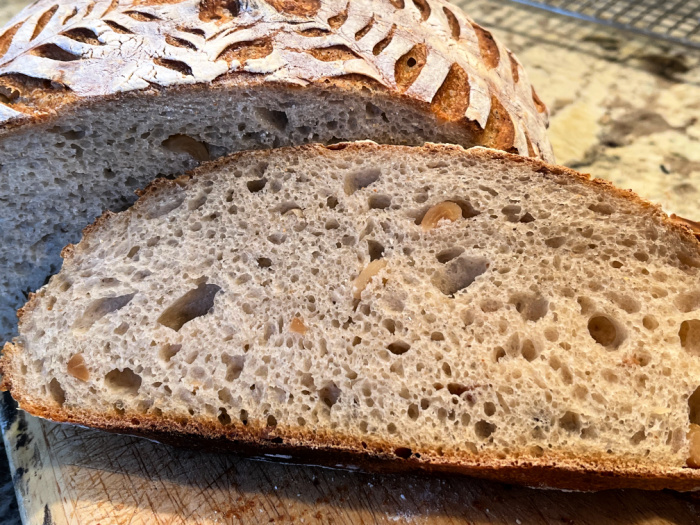
Of all the nuts out there, the peanut is the ugly duckling. Simple, humble, affordable, available everywhere. It does not have that majestic feel of a macadamia, or the sexy aura of a hazelnut. Most sourdough breads include walnuts or pecans, leaving them once again neglected. Not in my kitchen, though. This bread gets a double load of peanuts. Peanut butter, and roasted peanuts joined together with flour, salt and a wild bunch of yeast and bacteria aka sourdough starter.
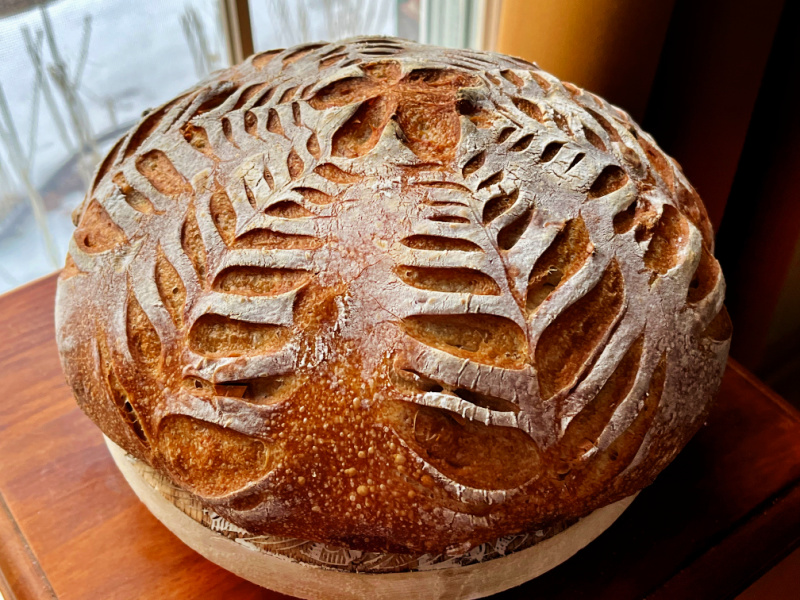
DOUBLE PEANUT SOURDOUGH LOAF
(from The Bewitching Kitchen)
370g water
70g active sourdough starter at 100% hydration
470g bread flour
20g spelt flour
10 g rye flour
30g peanut butter (smooth)
30g roasted peanuts, unsalted
10g salt
ENJOY!
to print the recipe, click here
Comments: If you follow my blog, you know that my default method for sourdough involves the Kitchen Aid initial kneading and never heating the Dutch oven before dropping the bread inside, over parchment paper. Those two details make life a lot easier in terms of clean up of bowls, hands, and lack of burning marks in forearms and fingers…

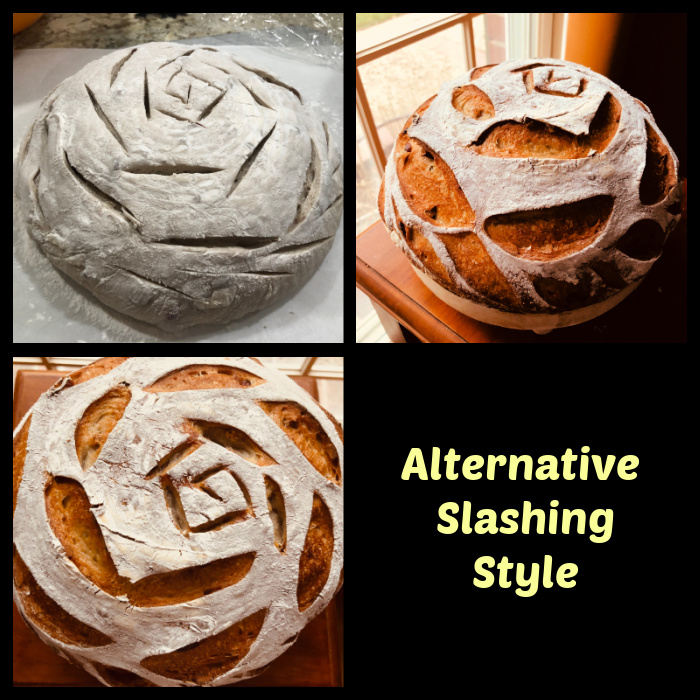
I add the peanuts after 2 minutes kneading with the KA, and run the machine for one additional couple of minutes or so. That is enough to incorporate the nuts in the dough, which will continue to happen during the subsequent foldings. You can slash the dough in patterns or just do a simple slash. Below I show you another type of pattern, a kind of geometric flower.
We loved the subtle peanut flavor of this bread, and biting into a little peanut here and there was also very nice. The peanuts will end up softer than other nuts normally used in breads.
ONE YEAR AGO: Fennel-Rubbed Shrimp in Light Coconut Sauce
TWO YEARS AGO: Puff Bread Balls, Two Salads and a Cookbook Review
THREE YEARS AGO: Pistachio-Caramel and Apple Mousse Cakes
FOUR YEARS AGO: La Couronne Bordelaise
FIVE YEARS AGO: A Special Birthday Dinner
SIX YEARS AGO: Duck Confit for a Special Occasion
SEVEN YEARS AGO: Tuscan Grilled Chicken and Sausage Skewers
EIGHT YEARS AGO: Celebrate Wednesday with Pork Tenderloin & Apples
NINE YEARS AGO: Salmon Wellington
TEN YEARS AGO: The Green Chip Alternative
ELEVEN YEARS AGO: Weekend Pita Project
TWELVE YEARS AGO: Let it snow, let it snow, eggs in snow
