ROASTED STRAWBERRY-BUTTERMILK SHERBET

Tomato, tomahto = sorbet, sherbet?  Not quite.  Tomato and tomahto are the exact same creature, whereas the other pair refers to different concoctions.  Sorbet has no dairy in it, sherbet contains up to 3% milk fat (from milk or cream).  Pass the 3% level and you’ll get to ice cream territory. Feeling enlightened yet?  😉  I found this recipe in the latest issue of Bon Appetit, and the words “roasted strawberry” and “buttermilk” made me dream.  The stars must be in a lucky alignment, because very little time elapsed between reading the recipe and getting to work.  Fresh blueberries were a perfect match for this slightly tangy dessert.

served11

ROASTED STRAWBERRY-BUTTERMILK SHERBET
(adapted from Bon Appetit, July 2013)

4 cups strawberries (about 1 pound), hulled, halved or quartered
1/2 cup sugar
1/2 vanilla bean, split lengthwise
1 cup buttermilk
1/3 cup sour cream
Pinch of kosher salt

Heat oven to 425°. Combine strawberries and sugar in a 13 x 9 inches baking pan. Scrape in seeds from vanilla bean and add pod; toss to combine. Roast berries, stirring occasionally, until juices are bubbling,  about 20 minutes. Let cool.

Discard vanilla pod. Purée berries, buttermilk, sour cream, and salt in a blender until smooth. Place in the fridge for several hours or overnight. Process mixture in an ice cream maker according to manufacturer’s instructions. Transfer sherbet to an airtight container and freeze until ready to serve.

ENJOY!

to print the recipe, click here

composite

Comments:  My modifications of the recipe involved cutting down the sugar (the original called for 1 full cup) and reducing the buttermilk amount. The reduction in sugar had to do with our personal preference. The reduction in buttermilk had to do with the size of my blender.  One cup filled it almost to the very top, a little more and we would have a buttermilk tsunami in the kitchen.  I don’t think it made much difference, but check the link to the original recipe online in case you prefer to follow it.  If you use the recipe I posted, please taste the mixture before you place it in the ice cream machine. You might prefer it a little sweeter than we do.

Add a little marshmallow topping and you’ll have a perfect dessert for the 4th of July celebrations: red white and blue, with Summer written all over it.  😉

IMG_2267

For those who live in the US, have a wonderful 4th of July!

ONE YEAR AGO: Amazing Ribs for the 4th of July!

TWO YEARS AGO: Baby Back Ribs on the 4th of July

THREE YEARS AGO: Blueberry Muffins

FOUR YEARS AGO: A Pie for your 4th of July

MEXICAN FOCACCIA

Recently I took the liberty of calling an avocado dip as “hummus”, and now I will push the envelope once more and share with you my Mexican focaccia.   If you’ve been around my blog for a while, you know I am crazy about all things bread. Focaccia is a favorite in our home, because it is so simple to put together: no kneading, no complex shaping, just a simple flat bread that you can cut in squares and bring to parties, potlucks, or save it all for yourself…  The inspiration for this twist on focaccia came when I had leftover tomatillo sauce from Marcela’s enchiladas suizas.  As to the basic focaccia recipe, you can find it here.

pieces

What you will need…

…. your basic focaccia recipe

…. good quality olive oil

…. tomatillo sauce a la Marcela Valladolid

…. yellow tomatoes, sliced thin

…. Mexican oregano

…. crumbled Cotija cheese

…. Maldon salt flakes

Once you make the dough and open it on the baking sheet, pour some olive oil on the surface, make indentations with your fingers.  Spread a nice coating of tomatillo sauce,  layer yellow tomatoes on top.  Sprinkle oregano, Cotija cheese, a little salt.   Bake as instructed in the original recipe.

Let it cool on a rack, cut in squares and ENJOY!!!!!   😉

served

I am submitting this post to Susan’s Yeastspotting

ONE YEAR AGO: Sunny Kamut Salad with Roasted Lemon Vinaigrette

TWO YEARS AGO: Pane de Casa & Crostini

THREE YEARS AGO: Down-home Dig-in Chili

FOUR YEARS AGO:  Cinnamon Rolls

SECRET RECIPE CLUB: CARROT FLAN WITH GREENS AND LEMON VINAIGRETTE

flanJune, folks. We are in June. That means half of this amazing year is pretty much over.  Carpe diem. The months always end on a nice note for me, because the last Monday brings Reveal Day of The Secret Recipe Club.  I was paired this month with Dena from Oh! You Cook!”. Dena describes herself as a librarian by day, recipe blogger by night, except on nights in which she works as a librarian…  Not only she works around books, but she is an author herself, having published last year “The Everything Kosher Slowcooker Cookbook”.  Check it out here.  Reading her blog is a lot of fun! She is quite witty, and often opens her articles with remarks that will bring a smile to your face.  For instance, the recipe I chose, carrot flan, is under a post entitled “Go Forth on the Fourth…”  I quote straight from her blog:

Go Forth on the Fourth…  and barbecue, of course! 

Steaks… check!

Skewered chicken… check!  

Carrot flan… huh?   🙂

So there you go. Whether you are making this dish as a side for a barbecue or as a light meal, it will turn your day into something unique. Elegant, light, sophisticated, and the best part: it’s actually quite simple to make.

top

CARROT FLAN WITH GREENS AND LEMON VINAIGRETTE
(adapted from “Oh! You Cook!”)

Makes 6 individual servings.

for the flans:
12 ounces carrots (enough to make 2 1/2 cups of chopped pieces)
4 eggs
4 ounces (1/2 cup) heavy cream
1/2 teaspoon sea salt
1/4 teaspoon ground black pepper
pinch of grated nutmeg

for the vinaigrette:
1/4 cup olive oil
3 tablespoons fresh lemon juice
1 teaspoons Dijon mustard
1/2 teaspoon grated lemon peel
1/2 teaspoon honey

Make the flans: Heat the oven to 325 degrees F. Butter 6 ramekins (3/4-cup size). Cook the pieces of carrots in boiling salted water until tender, about 8 minutes. Drain and puree in a food processor or blender until smooth, and let cool slightly.

Whisk the pureed carrots together with the eggs, heavy cream, salt, pepper, and nutmeg. Divide the mixture among the buttered ramekins, and place the ramekins in a baking pan. Add enough hot water to the baking pan so that the water goes halfway up the sides of the ramekins. Cover the pain with foil and bake until the custards are set and a knife inserted near the middle of one comes out clean. (In my pathetic oven it took almost 1 hour, but you should start checking it at 40 minutes, normally it should take around 45 minutes). Remove the ramekins from the baking dish and let cool slightly before unmolding.

For the vinaigrette:  whisk together the lemon juice, lemon peel, mustard, and honey. Stream in the olive oil, whisking constantly, until an emulsion forms. Season well with salt and pepper,  and store in the refrigerator.

Final assembly of the dish:  Place a handful of salad greens of your choice for each serving of flan in a large bowl. Drizzle some vinaigrette over the greens, season with coarse salt and freshly ground black pepper, and toss to dress. Run a knife around the inside of the ramekins to loosen the flans, then invert them over a plate to unmold. Serve the flans with the salad  and an additional drizzle of the vinaigrette.

ENJOY!

to print the recipe, click here

composite-001
Comments: This might be a bold statement, but I’ll go ahead with it: I think this was my favorite recipe of all the “Secret Ones” I’ve made in the year and a half participating in the event.  Phil raved about it from the first bite, and said that these flans could be served on the best bistrots of Paris. How’s that for a compliment?  The leftover flans were warmed in a microwave for 40 seconds, and they unmolded perfectly then.  So, this recipe is a wonderful option for a dinner party.

tiediePolishing off the meal with non-stop compliments: Nice! Wearing a tie-die shirt with more colors than the dinner plate? Optional, but so very cool… 😉

If you want to see what my friends from Group D cooked up for this Reveal Day, click on the blue frog at the bottom of the post…. have fun!

ONE YEAR AGO: The Secret Recipe Club: Granola Bars

TWO YEARS AGO:  Awesome Broccolini

THREE YEARS AGO:  A Twist on Pesto

FOUR YEARS AGO: Ciabatta: Judging a bread by its holes


AVOCADO “HUMMUS”

IMG_2053Sometimes (quite often, I’m afraid) I have a recipe on my list of things to do ASAP and there it sits for a year or five. But every once in a while the exact opposite happens: I see a recipe, fall in love, and make it right away.  This avocado hummus showed up on my screen during the last Secret Recipe Reveal Day, which fell exactly on Memorial Day.  Maybe having the day off helped, but the truth is that I saw the recipe mid-morning, and made it at 3pm.  How about that for efficiency?

AVOCADO HUMMUS
(slightly modified from Chocolate and Chillies)

1 19 oz can of chickpeas, drained and rinsed
2 avocados, pitted and diced
1 garlic clove, minced or pressed (I omitted)
handful of cilantro, roughly chopped
4 tbsp freshly squeezed lemon juice
2 tbsp extra-virgin olive oil
1/2 tsp ground cumin
1/4 cup water
salt and freshly ground pepper to taste

In a food processor add all the ingredients and process.  Add more water if you would like it thinner.

ENJOY!

to print the recipe, click here

We love hummus!  It is one of the items we always have in the fridge, in fact. I know homemade is best, but we love it so much that we always have one or two of those little packages of Athenos plain hummus.  I often add a little bit of freshly squeezed lemon juice, a touch of smoked paprika, and we enjoy it with crackers or veggie sticks.   But this version with avocado instead of tahini is shockingly delicious…  BTW, do you know that blog, Shockingly Delicious?  Great site, check it out…

This hummus recipe makes quite a large amount, so I could save some for a later, happy day!

IMG_2054

ONE YEAR AGO: Moving is not for sissies!

TWO YEARS AGO: Awesome Broccolini

THREE YEARS AGO: Pizza! Pizza!

FOUR YEARS AGO:  From Backyard to Kitchen

THE BEWITCHING KITCHEN TURNS FOUR!

cake2
June 16th, 2013

My beloved blog turns 4  years old today! To celebrate, I assembled all the cake suggestions my readers offered two years ago, assigned numbers to each of them, and drew the winner cake. Celia’s suggestion was the lucky one, so I gathered all ingredients, took a deep breath and made her White Chocolate Bundt Cake to celebrate the occasion…

She wrote a great post about this cake, one that made the process almost pain-free to a person who hyperventilates with just a glimpse of a Bundt pan. Those crevices are evil. To make matters worse, the cake included that dreadful step of creaming sugar with butter.  But, a woman’s gotta do what a woman’s gotta do. I did not run away from it, kicking and screaming. Sometimes it is good to resist a first impulse.

WHITE CHOCOLATE BUNDT CAKE
(from Celia’s  blog, Fig Jam and Lime Cordial)

for the cake:
450g all-purpose flour
1 tsp baking powder
¼ tsp baking soda
½ tsp salt
250g unsalted butter, softened
440g white sugar
1½ tsp pure vanilla extract
5 large (59g) eggs, at room temperature
115g white chocolate, melted and still warm
250g thick Greek yoghurt
115g  white chocolate chunks or chips

for the topping (optional):
115g (4oz) white chocolate
65ml (¼ cup) heavy cream
115g (4oz) milk chocolate

Heat oven to 350F.   Spray a 12 cup bundt pan with oil.

In a bowl, sift together flour, baking powder, baking soda and salt.

Cream the butter and sugar in a large bowl using an electric mixer on medium speed until light and fluffy. Add the vanilla and the eggs, one at a time, beating for 20 seconds after each addition. Slowly beat in the melted white chocolate. Scrape down the bowl.

Add the flour mixture to the butter in thirds, alternating with the Greek yoghurt. Beat for 45 seconds after each addition. You want to end with flour rather than yoghurt (improves the final texture of the batter). Place the batter in the pan in three layers, separating each layer with the white chocolate chips.

Bake for 55 to 60 minutes, but start checking after 45 minutes.   The top will be brown and a sharp thin knife inserted in the center will come out with a few crumbs on it. Allow the cake to cool in the pan for 15 minutes, then gently loosen around the edges before inverting onto a wire rack to allow the cake to finish cooling at room temperature.

Topping:  In a glass or ceramic bowl, heat the white chocolate with the cream until just melted. Stir until smooth. Allow to cool for 10 minutes, then drizzle over the cake.  In a separate bowl, heat the milk chocolate in the microwave until just melted. Stir until smooth.  Drizzle over the cake.

ENJOY!

to print the recipe, click here

Comments:  Things went extremely well with this cake from making the batter to inverting the pan to reveal a perfect cake in all its gorgeous glory!
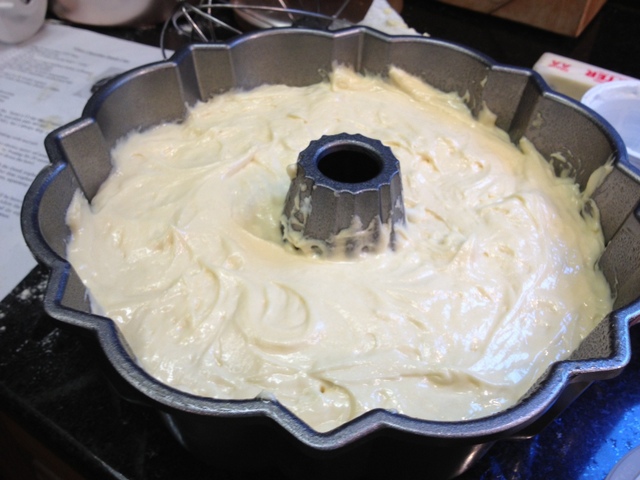
I was already thrilled because contrary to 99.5% of the cake recipes I’ve tried, this one actually produced enough batter to fill the pan to proper capacity.  Every other recipe leaves me wondering if my kitchen has some type of black hole that sucks cake batters and takes them to another dimension.  Now, this is a nice looking Bundt pan, ready to be baked.

photo(10)
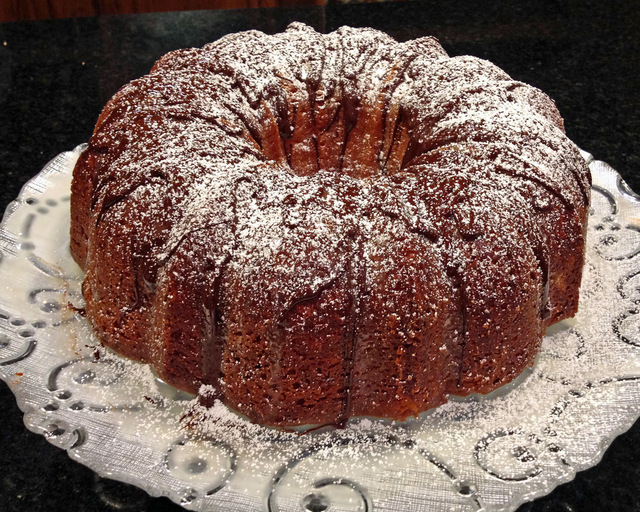
I baked the cake, allowed it to cool for 15 minutes in the pan, chronometer in hand, heart pounding fast. And voilá, when I inverted the pan, this is the vision I was rewarded with:

photo(7)
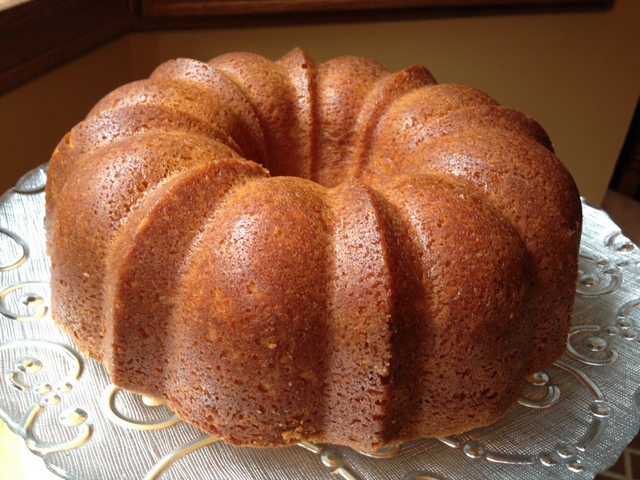
Is this a thing of complete beauty or what?  I BAKED THAT!  I know, I know, unreal…   I did several victory laps around the kitchen island, then a few around the house. Oscar followed me, wagging his tail, Buck got scared and ran away to hide.  Chief?  He slept through the whole celebration, but I won’t take that personally. A 14-year old dog earned his right to sleep through anything!

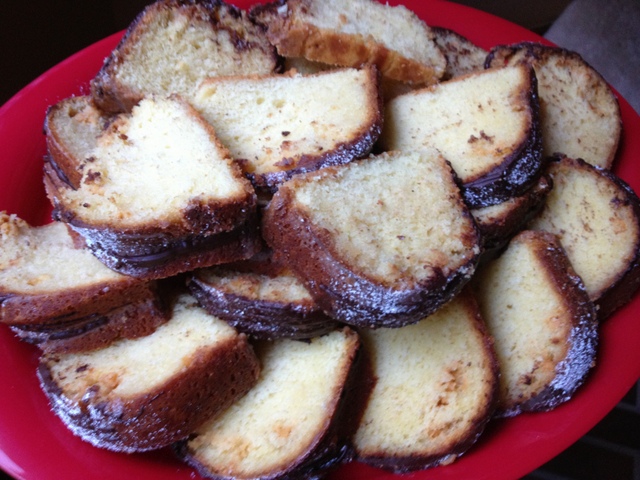
Time to ice the cake. That’s when the road got a little bumpy.  I should have read Celia’s post more carefully. She added a note to say that the white chocolate ganache is usually too liquid, so she prefers to simply melt the pure white chocolate to drizzle on top.  Well, my ganache was so liquid it disappeared into the cake.  I also did not do a very good job with the dark chocolate drizzle, so in the end I covered the whole cake with powdered sugar on top of the drizzle for cosmetic reasons.  Over-kill? Maybe.  I do agree with Celia, though. This cake is so amazing, a simple dusting with powdered sugar is more than enough.  We took a platter to the department and everyone loved it!

photo(13)
One thousand four-hundred and sixty-one days blogging.  Food blogging brings many wonderful things with it. First, the virtual connections made with readers and other bloggers. Too special for words.  Second, it provides a journal of our adventures: travels for work and/or pleasure,  a sabbatical with its nano-kitchen challenge, the move of our home and lab to Kansas.  Third, it is a valuable database of recipes we tried and enjoyed. I normally don’t blog on a recipe that didn’t work, unless I feel it’s worth re-visiting it.  Sometimes I like to pick a recipe at random from the index, and read about what was going on with us at the time. Were we in Los Angeles when I baked that? Was that post written during a dreadful ice storm in Oklahoma?  Was Pits, our beautiful dalmatian still hanging around in our kitchen, stealing butter and T-bone steaks from the countertop? Has it really been four years?  😉

A very wise and dear mentor, Leon Rosenberg once told me: “Memory fails. Keep a diary.  You will be glad you did”.  I am sure glad I started this site, the closest thing to a diary I can keep up with…

To my readers, followers, fellow food bloggers, friends in real and virtual life, thanks for stopping by and warming up this place with your presence!
Now, I invite you to join me as I start the fifth year of Bewitching Kitchen!

ONE YEAR AGO: The Bewitching Kitchen Turns Three!

TWO YEARS AGO:  The Bewitching Kitchen turns two!

THREE YEARS AGO:  Bewitching Birthday!

FOUR YEARS AGO: Welcome to my blog!