SAVORY OATMEAL WITH BACON AND CHEDDAR AND A COOKBOOK REVIEW

This is a long overdue post. I made this recipe last month, but have been meaning to write about this cookbook ever since I bought it, back in October. Seven long months ago. Shocking.  Oatmeal is definitely something associated with breakfast, and served on the sweet side. With milk, brown sugar, cream, maybe some stewed apples or bananas. In her book Adventures in Slow-Cooking, Sarah di Gregorio shares a version for savory oatmeal and raves about it. I had to try it. It was really tasty, and she gave me permission to share the recipe with you… So, without further ado…

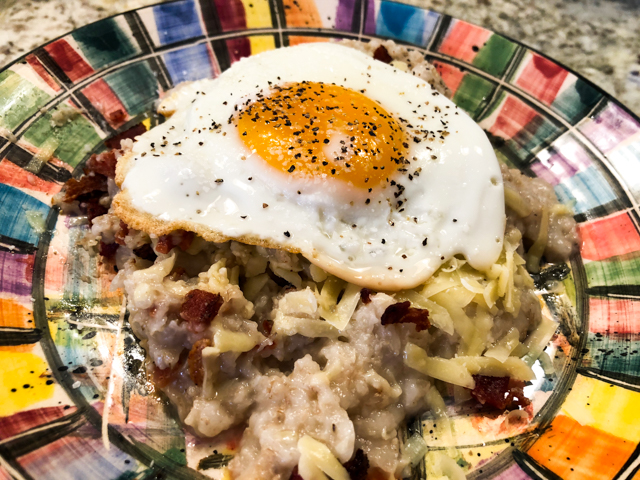
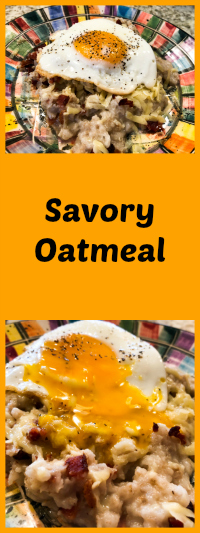
SAVORY OATMEAL WITH BACON, SCALLIONS, AND CHEDDAR
(published with permission from Sarah Di Gregorio)

1 cup uncooked steel-cut oats
Kosher salt
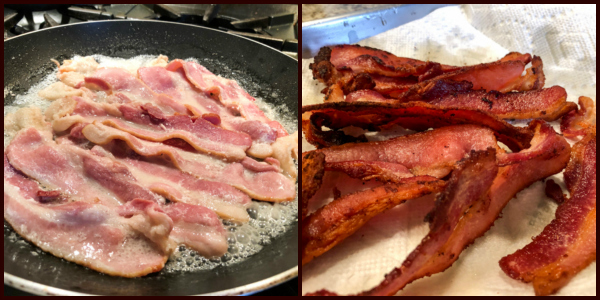
½ pound thick-cut bacon
5 scallions, trimmed, light green and white parts thinly sliced
8 ounces sharp cheddar, grated (about 2 heaping cups)
Freshly ground black pepper
Fried or poached eggs, for topping (1 per person)

Generously butter a 5- to 7-quart slow cooker. Add the oats, 4 cups water, and I teaspoon salt. Cook until the oatmeal is thick and tender: on LOW for 4 hours or on LOW for 2 hours followed by WARM for 6 to 7 hours.

Put the bacon into a cold large skillet and bring the heat to medium. Cook, flipping a couple of times, until the bacon has rendered a lot of its fat and is deeply browned and crisp, about 10 minutes. Drain on paper towels, then coarsely chop. You can do this right before serving the oatmeal or the day before, in which case store the crisped bacon in an airtight container in the refrigerator and bring it to room temperature before using.

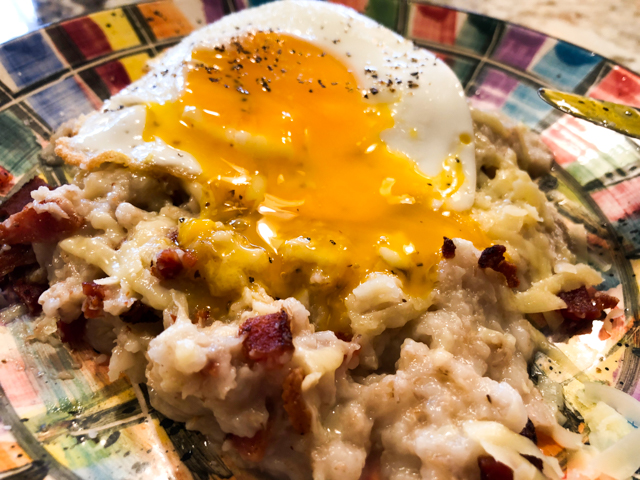
When the oatmeal is done, stir in the bacon, white and light green scallion slices, and about three-quarters of the cheese (about 6 ounces). Taste for seasoning and add more salt if necessary and a few grinds of pepper. Serve in bowls topped with the remaining cheese, the dark green sliced scallions, and eggs, if you like.

ENJOY!

to print the recipe, click here

Comments: I’ve always been intrigued by the use of oatmeal in savory dishes. I am not an oatmeal fan in traditional breakfast preparations, but decided to open my mind and give it a try. I don’t normally eat breakfast and found that this meal was perfect at lunch time. Kept me full until dinner, and was full of flavor.  I also made a vegetarian version using sautéed mushrooms instead of bacon. Worked great too, I made sure to brown them well and added a touch of soy sauce at the end. Delicious! In Sarah’s words:

Speaking of the egg: I know most people are tired of the image of egg yolk flooding whatever is served underneath, but forgive me… this was too good to skip…

OVERVIEW OF ADVENTURES IN SLOW-COOKING

by Sarah di Gregorio

First, let me share with you the review I wrote for it at amazon.com

I fell in love with this book at first page. I don’t have much patience for long introductions and considered just skipping that part to dive into recipes. Well, I could not stop reading. Sarah is a talented writer and definitely knows how to use the slow-cooker the way it is intended to be used. No dump and run approach. This is slow-cooking for gourmet cooks, those who will not accept anything with the “crock pot texture.” I bought this book even though there was only ONE review about it. Took a big risk, right? Well, I am so glad I did. I own more than 500 cookbooks, and this might very well be my favorite for slow-cooking. Awesome. Just awesome. Buy it and you will not be disappointed. Now, if you are part of the team of dump it and forget it, this book is NOT for you. This is not a criticism to you, just a warning that you might not like it that much….

That pretty much explains why I had to review it here, I think that anyone who owns a crock pot will benefit from this book. I have a file in my computer (way out of date) called “The Best from Each.” In that file I list recipes from my Kindle cookbooks that appeal to me. Sarah’s cookbook broke the record for the largest proportion of recipes that made into that folder. From 120 recipes, 35 made the cut. That’s almost one-third of them. Pretty impressive.  Here is a cut-and-paste job from my computer:

Classic Chicken Stock (wings)

Winter Tomato Sauce (Marcella Hazan)

Lentils, beans, chickpeas method

Grains, farro, barley, black rice etc method

Smoky Chipotle Ketchup (interesting)

Crisp Chicken Wings with Szechuan Caramel

Chawan Mushi (interesting savory custard)

Pistachios, Coconut, and Cardamon Granola

Savory Oatmeal with Bacon, Scallions and Cheddar

Crustless Quiche with Smoked Salmon

Summer Tomato, Basil and Burrata Grain Bowl

Roasted Red Pepper, Caper, Walnut and Tahini Grain Bowl

Creamy Barley with Corn and Green Chile-Lime Salsa

Farro Puttanesca

Shakshuka with Feta and Olives

Caramelized Cherry Tomatoes

Stuffed Meatballs in Lots of Sauce

Spiced Lamb Meatballs in Harissa Tomato Sauce

Smoky Barbecued Brisket

Chipotle Almond Braised Beef Tacos
(Quick Pickled Onions) – to go with it, very nice method

Orange, Olive and Fennel Chicken Tagine
(Turmeric Yogurt) – to go with it

Miso-Butter Roast Chicken and Potatoes

Buttery Duck Confit 

Harissa Pork Chili with Toppings Galore

Sticky Gochujang Pork

Za’tar Roast Chicken

Sticky Toffee Pudding with Maple Caramel

Coconut Banana Cake with Brown Butter Caramel Sauce

Matcha-White Chocolate Pots de Crème

Vietnamese Coffee Pots de Crème

Cannoli Cheesecake with Biscotti Crust

Dark Chocolate Cheesecake with Earl Grey Cream

Cardamon-Molasses Apple Upside-Down Cake

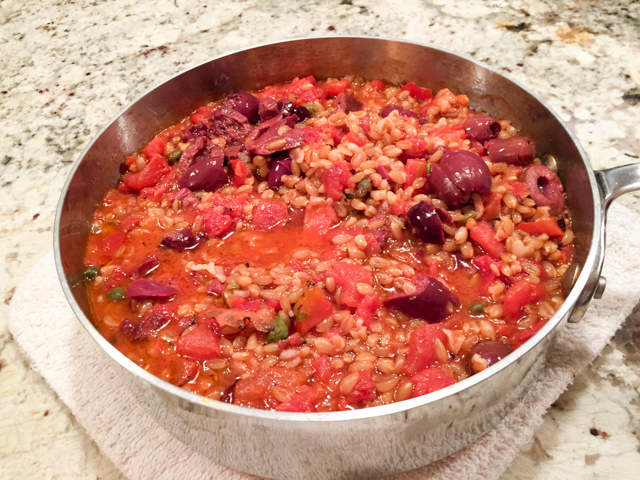
TEASER RECIPE:  from the list, I made the Farro Puttanesca. To die for! Farro cooked in the crock pot has perfect texture, this preparation was luscious, perfect by itself or as a side dish for roast chicken, grilled salmon, steak, pretty much anything you’d like. A very creative way to serve farro. Made a lot, but froze well too…


Sarah, thank you and your editors for allowing me
to publish one of your recipes.


ONE YEAR AGO: Air-Fried Carrots, Two Ways (most popular post on my blog!)

TWO YEARS AGO: Five Minutes in L.I.T (a tour of our laboratory!)

THREE YEARS AGO: Chicken Thighs with Artichokes and Capers

FOUR YEARS AGO: Pea Pancakes with Herbed Yogurt

FIVE YEARS AGO: Mushroom Stroganoff

SIX YEARS AGO: Tomato Sourdough

SEVEN YEARS AGO: Gamberetti con rucola e pomodori

EIGHT YEARS AGO: Flirting with Orzo


SaveSave

SaveSave

SaveSave

SaveSave

SaveSave

SaveSave

SaveSave

SaveSave

SaveSave

SaveSave

SaveSave

SaveSave

SaveSave

SaveSave

SaveSave

SaveSave

FLANK STEAK CARNITAS

FELIZ CINCO DE MAYO!

Carnitas are a favorite in our home…  All you need is to place some over a tortilla, add a few toppings and call it a day. Those who prefer a low-carb path can grab a hearty leaf of Romaine lettuce instead of tortilla, and enjoy it while apologizing to the Taco Gods that will certainly frown upon such heresy. In this preparation, we put the pressure cooker to play, giving the flank steak a very pleasant texture. I’ve made it three times already, after seeing the original post from Kalyn. My recipe is a slight modification of hers, with a little additional step at the end.

PRESSURE COOKER FLANK STEAK CARNITAS
(slightly modified from Kalyn’s recipe)

1 T olive oil
1 shallot, minced
1 tsp. ground cumin
1 tsp. chili powder
1 flank steak, about 1.5 pounds
1  cup salsa verde (like Herdez)
1/2 cup tomato salsa (like La Victoria)

Heat the oil in the pressure cooker, add the minced shallot and cook 2-3 minutes or until fragrant. Add  the ground cumin and chili powder and cook about a minute more.

Cut the steak lengthwise and then again crosswise.  Add the steak pieces to the pressure cooker with the red and green salsa, lock the lid in place,  and cook at high pressure for 45 minutes. Shut down the burner and let the pan cool for 15 minutes, then do a quick release of steam under the kitchen faucet, and open the pan.

Use a slotted spoon to scoop out the meat, leaving the sauce in the pressure cooker.  Let the meat cool for a few minutes on the cutting board, then use two forks to shred the meat apart. Right before serving,  place it on a non-stick skillet over medium-high heat and add small amounts of the sauce left behind in the pressure cooker. You can add as much liquid as you feel like it, but allow the pieces of meat to get a bit browned in the pan first.

Use it to top tortillas with all your favorite additions, guacamole, shredded cheese, shredded avocado. Or enjoy it with white rice and beans.

ENJOY!

to print the recipe, click here

Comments: We are not big on cooking with ready-made sauces but make an exception to bottled salsas, because there are so many great brands out there. We love La Victoria, although it is not the easiest one to find. Leftovers go in mini-muffin pans straight to the freezer, and then inside a plastic bag. They do get a bit watery in the freezing-thawing process, but we mainly use them as addition to guacamole or stir-fries, so that’s not too serious a problem.  Sometimes I defrost them over a small sieve, so that the excess water drips away. 

This is one example of a recipe I would never try if it did not come from Kalyn’s site. I can see myself twisting the  nose at something made opening two different bottled products… but she raved about it, and I totally trust her. Indeed, it is a big winner. I don’t know what happens in the mixture of the green and red salsa, but you definitely end up with something that is more than the sum of its parts. In a very good way…

You can make the flank steak in the pressure cooker, in the instant-pot, or in a slow-cooker. Stop by Kalyn’s site to get specific instructions for each method. It is a great way to tame the fibrous texture of this meat, and give it a lot of spice without making it overly hot. I suppose you could go for a very hot salsa if you so desire… I’ve been in a more mellow phase lately. Such is life.

ONE YEAR AGO: Sesame and Poppy Seed Sourdough

TWO YEARS AGO: Pecan-Crusted Chicken from Southern at Heart

THREE YEARS AGO: Lamb Shanks en Papillote with Cauliflower-Celeriac Purée

FOUR YEARS AGO: Chestnut Brownies and a Blog Award!

FIVE YEARS AGO: Quinoa with Cider-Glazed Carrots

SIX YEARS AGO: Celebrate Wednesday: Heirloom Tomatoes Steal the Show

SEVEN YEARS AGO: Pain de Provence

EIGHT YEARS AGO: Golspie Loaf, from the Scottish Highlands


SaveSave

SaveSave

SaveSave

SaveSave

SaveSave

SaveSave

SaveSave

SaveSave

SaveSave

SaveSave

SaveSave

SaveSave

UZBEK FLATBREAD

It is amazing how one can be a foodie (for lack of a better term) and still find “new” food items to dream about. Like the traditional bread from Uzbekistan, a fascinating country north of Afghanistan. A couple of months ago I stumbled on this blog post and could not stop thinking about the beauty of those flat breads. The dough can be very simple, although I found countless recipe variations for them. From type of flour to amount of yeast, duration of fermentation, type of fat added, it’s hard to find a common denominator. But the basic characteristic is the stamping of beautiful images on the dough right before baking. I found a beautiful bread stamp for sale at Etsy, and a few weeks later it joined our kitchen. I could not wait to try it!

LEPYOSHKA – UZBEK FLATBREAD
(adapted from this video)

1 + 1/2 cups water, at room temperature
1 cup yogurt, full-fat
1 tablespoon instant yeast
1 teaspoon sugar
2 cups whole-wheat flour (I needed to add quite a bit more)
1 tsp salt
2 tablespoons olive oil

Mix all ingredients in the order listed in a bowl. Knead by hand for 10 minutes, or if using a KitchenAid type mixer, knead at medium speed for 6 minutes. If the dough seems too slack, add more flour at this point. It should feel sticky, but hold together nicely.

Transfer dough to a clean bowl lightly brushed with oil. Cover and allow it to ferment at room temperature for 2 hours.

Divide the dough in 4 portions, shape each as a small ball. Cover and leave at room temperature for 5 minutes.

Flatten each ball into a round. Press the center, forming a thicker layer of dough all around the perimeter. Use a spoon and a bread stamp to decorate the surface.

Bake in a 375 F oven inside a Dutch oven for about 20 minutes. Remove the cover after 10 minutes. If you have a large enough Dutch oven, you can bake two at a time. If baking one at a time, leave the balls covered and make the decorations right before baking.

ENJOY!

to print the recipe, click here

Comments: The recipe I am sharing is in fact my second attempt at making Uzbek flat breads. For my first adventure, I had not found a detailed recipe, it was more a vague set of instructions, so I made my own formula and used the fermentation time suggested. It contained quite a bit of yeast, and the proof fermentation was short, only 40 minutes.  The result was a bread that rose so much during baking that the pattern of the stamp was lost.  Below you see before and after pictures.

I was a bit disappointed, even though the bread tasted pretty good. I wanted my pattern to show. I asked for help in a bread Facebook page, and got great advice. Including the link to that youtube video with the recipe I used.  Worked like a charm! For my next time I intend to use 75% white bread flour and 25% whole wheat or spelt. I think it would make a nice texture, and probably need a little less flour during kneading.

As to the decoration, you can do pretty much whatever you feel like it. I opted for the technique in the video. It uses a spoon all around the edge, then the stamp goes in the center. Next, you pinch the dough with two fingers around the stamp. But you can do several rounds of stamps in the center instead, leave the dough plain all around. I imagine that each family has their own way to decorate their bread.

My design was approved by all members of our family… 

The bread was delicious with hummus, with goat cheese, and black olive tapenade. Sliced like a pita, it was fantastic to deliver fresh tomatoes juicy with a drizzle of olive oil and oregano.  Since learning about Uzbek flat bread, also called Lepyoshka, I’ve been fascinated by that country. You can find some nice pictures of Uzbekistan in this link.   

ONE YEAR AGO: First Monday Favorite – Black Sesame Macarons

TWO YEARS AGO: Chocolate Orange Mini-Cakes

THREE YEARS AGO: In My Kitchen, May 2015

FOUR YEARS AGO: P90X3, a Review of Tony Horton’s Latest Fitness Program 

FIVE YEARS AGO: Pasta and Mussels in Saffron Broth

SIX YEARS AGO: Triple Chocolate Brownies

SEVEN YEARS AGO: Shanghai Soup Dumplings

EIGHT YEARS AGO: Bite-sized Chocolate Pleasure

SaveSave

SaveSave

SaveSave

SaveSave

SaveSave

SaveSave

SaveSave

SaveSave

SaveSave

SaveSave

SaveSave

SaveSave

SaveSave

MINNIE MACARONS: A FUN PROJECT WITH A HAPPY ENDING

It all started with a very innocent email from my daughter-in-law. Inside a simple phrase and a single picture… The phrase: Something for you to try… The picture: a gorgeous Minnie Macaron sold at Disney. Miss G, our grand-daughter is crazy about all things Minnie. Basically, the universe conspired to make me  bake a batch.

MINNIE MACARONS
(from the Bewitching Kitchen)

for the shells:
198 g powdered sugar
113 g almond meal
113 g egg whites at room temperature
a pinch of cream of tartar
100 g granulated sugar
Pink Gel color from AmeriColor
2 drops vanilla extract

for the filling:

280 g strawberries, stems removed
140 g sugar
1 lemon, juiced
250 g white chocolate, chopped fine
1/3 cup heavy cream (about 80g)
1 tablespoon butter

to decorate:
pink bows (melted Candy Melts with a drop of pink gel color)
gold and pink sparkling sugar

Make the filling:  Prepare fresh strawberry jam by mixing strawberries, sugar and lemon juice in a small saucepan. Cook for 30 minutes, mixing every once in a while. After 30 minutes cool and refrigerate. Reserve (you will not need the full amount). You can also use store-bough strawberry jam, if more convenient. Make a white chocolate ganache by mixing very hot heavy cream with the white chocolate cut into small pieces. Mix until fully dissolved. To that, add 1/4 cup of the strawberry jam prepared before, and the butter. Mix well and refrigerate until it’s time to fill the macarons. If too thick, bring to room temperature for an hour or so, whisking a few times.

Make the pink bows: Melt about 1/3 cup candy melts in the  microwave. Whisk until smooth, add a tiny drop of pink gel color. Place in a silicone mold and freeze until solid. Un-mold the decorations, make another batch until you have enough. I made 14 Minnie macarons with this batch, and 16 regular round macarons that did not need the bow on top.

Make the shells: Line 2 or 3 heavy baking sheets with parchment paper or Silpat mats. Layer the powdered sugar and almond meal   in a food processor. Pulse until the mixture looks like fine meal, about 15 seconds. Pass through a sieve and transfer to a small bowl. Set aside.

Place the egg whites and pinch of cream of tartar in the bowl of a stand mixer fitted with the whisk attachment. Make sure that the bowl and the whisk are impeccably clean. Starting on low-speed, whip the whites with the cream of tartar until they look like light foam. The whites should not appear liquid. The foam will be light and should not have any structure.

Slowly rain in the granulated sugar, trying to aim the stream between the whisk and the side of the bowl. Turn the speed up to medium-high. Continue to whip the meringue until it is soft and shiny. It should look like marshmallow creme. Add the gel color and the vanilla. Staying at medium-high speed, whip the egg whites until the mixture begins to dull and the lines of the whisk are visible on the surface of the meringue. Check the peak. It should be firm. Transfer the whites to a medium bowl.

Fold in the almond meal mixture in three increments. Paint the mixture halfway up the side of the bowl, using the flat side of a spatula. Scrape the mixture down to the center of the bowl. Repeat two or three times, then check to see if the mixture slides slowly down the side of the bowl. Divide the mixture (eyeballing is fine) in two piping bags, one fitted with a 1/2 inch piping tip, the other fitted with a 1/4 inch tip. Pipe macaron rounds using the bigger tip, filling one full tray. Pipe small rounds as ears on each round using the smaller tip. Finish one full tray before starting another one.

Slam each sheet hard four to six times on the counter. Then fist bump each end of the sheet’s underside twice. If using sparkling sugar, sprinkle over the macarons. Let the unbaked macarons dry until they look dull but not overly dry. Drying time depends on humidity. Ina dry climate, the macarons can dry in 15 to 20 minutes; in a humid climate, it can take 35 to 40 minutes.

While the macarons are drying, heat the oven to 300 F (170 C/gas mark 3). Bake one sheet at a time on the middle rack. Check in 11 minutes. If the tops slide, then bake for 2 to 3 more minutes. The macarons should release without sticking. Check one or two. If they stick, put them back in the oven for 1 to 2 more minutes. Let the macaroons cool for 10 minutes before removing from the pan.

Assemble the macarons: find two macarons similar in size and add a good amount of filling to the bottom of one of them. Place the other on top and squeeze gently to take the filling all the way to the edge.  Glue to each macaron one little pink bow using melted white chocolate.

Store in the fridge for 24 hours for perfect texture.

ENJOY!

to print the recipe, click here

Comments: The macarons sold at Disney seem quite large, I decided to make them smaller. As to the filling, I opted for strawberry and white chocolate ganache for two reasons. First, Miss G. loves strawberries, it is one of her favorite fruits. Second, a ganache probably stands shipping better than buttercream. I used a lower proportion of heavy cream to make sure the ganache would set, especially considering the added strawberry jam.  I think a little bit of red food color to the filling would have been nice, but I only thought about that when I was done assembling them. Oh, well…

I got a pretty cute silicone mold at amazon.com to make the bows. You can use fondant, real chocolate, or candy melts, whatever you prefer. I have a bit of fondant-phobia, and never worked with it, so Candy melts seemed like a safer option. Worked like a charm. The only problem is having to make several batches, but each needed only 10 minutes in the freezer to un-mold properly. I made the bows the day before and kept them all frozen in a little plastic bag. I know, so organized!  Who could imagine that?

I made half the batch as regular macarons (large image of the composite photo above), and half Minnie-shaped. Those who are very skilled with a piping tip might be able to get by piping the ears with the same size tip as the face. I decided to play it safe, and poured some of the batter in a piping bag fitted with a smaller tip. For the body of the macaron I used a Wilton 2A tip, for the ears, a Wilton 12. With a more complex shape, it is important that the macaronage step be performed correctly.

My tip for perfect macaronage:  when I think I am almost at the right point of deflating the almond-meringue mixture, I get a teaspoon of batter and drop it on parchment paper. I lift the teaspoon, and the little blob that forms must disappear in about 20 seconds. If it does, the batter is ready, if it is still visible, I fold a few more times. Remember that you can always fold a few more times, but if you go overboard, the batter will be ruined. The macarons will spread too much, spread too thinly and it will be impossible to keep the Minnie shape as piped. Plus, they won’t form nice feet.  At the very least you will need a box of Kleenex. If the situation persists, therapy might be your only option.

I cannot tell you how happy I was with this project! It was fun to plan, to get the tools for the job, to make it, and to imagine the look on Miss G’s face when she opened the box and found a bunch of Minnie cookies inside. The filling turned out just as I expected, sweet, but with the right amount of tartness given by the jam, which by the way, I made with a lot less sugar than store-bought versions.

AND FOR THAT HAPPY ENDING….

ONE YEAR AGO: Nigella Lawson in the Bewitching Kitchen

TWO YEARS AGO: Walnut-Raisin Bran Muffins

THREE YEARS AGO: Gingersnaps with White Chocolate Chips

FOUR YEARS AGO: Turkey Chili with Almond Butter

FIVE YEARS AGO: Secret Recipe Club: Leek and Cheese Tart

SIX YEARS AGO: Secret Recipe Club; Triple Chocolate Brownies

SEVEN YEARS AGO: Shaved Asparagus Salad

EIGHT YEARS AGO: Indonesian Ginger Chicken

SaveSave

SaveSaveSaveSave

SaveSave

SaveSave

SaveSave

SaveSave

SaveSave

SaveSave

SaveSave

SaveSave

SaveSave

SaveSave

SaveSave

SaveSave

SaveSave

SaveSave

SaveSave

SaveSave

SaveSave

SaveSave

ROASTED BUTTERNUT SQUASH WITH CASHEW NUTS

Recipes for roasted veggies are always so similar, coat veggies with olive oil, season any way you particularly like, roast. Done. But this one has a little unexpected (to me) twist. Instead of olive oil, you’ll use butter. I know, so out of fashion, so frowned upon by the Health Police. This method was featured on a recent America’s Test Kitchen TV show, and I was obviously intrigued. I modified it a bit to our taste. The butter helps that gorgeous browning and adds a nutty flavor that goes well with the cashews.  It all works beautifully.

ROASTED BUTTERNUT SQUASH WITH CASHEW NUTS
(inspired by America’s Test Kitchen)

1 medium butternut squash, peeled and cut in slices (about 2 pounds)
3 tablespoons unsalted butter, melted
½ teaspoon salt
½ teaspoon ground paprika
for cashew topping:
1 tablespoons butter
⅓ cup cashew nuts
2 tsp fresh lemon juice
salt and pepper to taste

Heat oven to 425 degrees.

Toss squash slices with melted butter, season with  salt and paprika until evenly coated. Arrange seasoned slices on a rimmed baking sheet, if possible in a single layer, but some overlapping is ok. Roast for about 25  minutes, flip pieces and roast 15 minutes longer.

While squash roasts, melt butter with cashew nuts in a small skillet.  Cook until cashews start to get golden, keep a close eye on the pan. It will burn if you leave it cooking for longer than a couple of minutes. Remove skillet from heat and stir lemon juice. Season lightly with salt and pepper.

Transfer roasted squash to a serving dish, mix with the sautéed cashews and serve.

ENJOY!

to print the recipe, click here

Comments: I talked about this recipe on my Facebook page, and a dear friend mentioned that she had a similar dish at a restaurant and loved it, but in that preparation they included crumbled feta on top. I know exactly how I’ll make it next time, and urge you to do so if you make it yourself. Sounds perfect to me.

The butter definitely makes the roast butternut quite special, as it cooks in the oven it gets that “browned butter” quality that is so wonderful both in savory and sweet dishes. I know many people are anti-butter these days, but there’s nothing wrong with using it every once in a while in a dish like this one. Totally worth it.

ONE YEAR AGO: Mississippi Roast and the Open Mind

TWO YEARS AGO: Walnut-Raisin Bran Muffins

THREE YEARS AGO: A Star is Born!

FOUR YEARS AGO: Chestnut Flour Sourdough Bread

FIVE YEARS AGO: Kinpira Gobo and Japanese Home Cooking

SIX YEARS AGO: Walnut Sourdough

SEVEN YEARS AGO: Thai Chicken Curry

EIGHT YEARS AGO: Zen and the art of risotto


SaveSave

SaveSave

SaveSave

SaveSave

SaveSave

SaveSave

SaveSave

SaveSave