SECRET RECIPE CLUB: TACO SALAD

This is the last Monday of August.  We are about to say goodbye to Summer, and I cannot stand the thought of it.  Only Reveal Day of The Secret Recipe Club can bring me some joy under the circumstances. My assignment this month was Flying on Jess Fuel, and I had a blast stalking it and making a list of possibilities to blog about today.  Jess met her husband Nick at a Mexican restaurant, and apparently he went nuts over her jalapeno-eating skills. What a great way to fall in love! They lived in many different places while Nick went to flying school for the Navy, including Enid, a location quite close to Norman, our former home in Oklahoma.

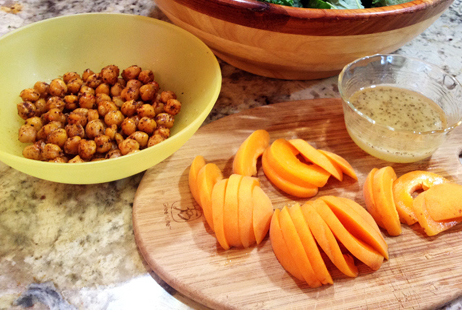
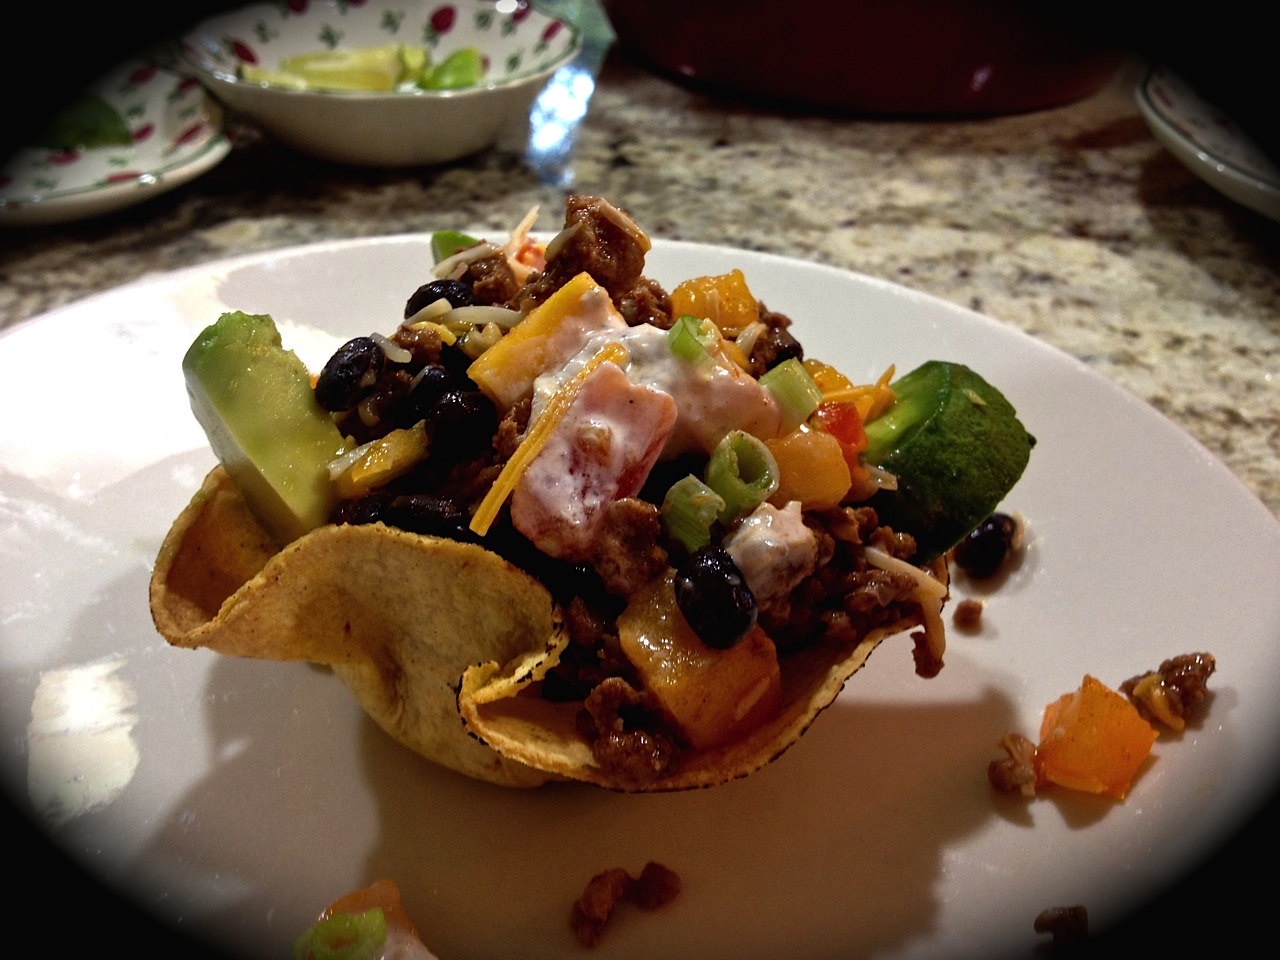
For some reason, I usually pick sweets for my Secret Recipe assignments, but this time I took the road less traveled and went with her Taco Salad, considering that Mexican food would be a fun way to celebrate the way they met.  I find it amusing that some recipes that I order in restaurants on a regular basis are never part of my own cooking at home. Taco Salad is one of those.  For the most part, Tex-Mex restaurants offer dishes over-loaded with cheese, and served with a humongous portion of rice, beans, plus a few flour tortillas for good measure.  Taco Salad is my default request to avoid feeling like a bloated whale as I leave the restaurant.  I made just a few changes in her recipe, and decided to pump up the presentation by making my own tortilla bowls.  Now, that was a ton of fun, but some unexpected problems were encountered.  As I was frantically trying to figure out which cups would be appropriate to shape the tortillas, one of my custard cups fell from the cabinet and crashed on the granite (yes, glass flew everywhere), but not without first hitting my head. OUCH!  And, going on with my usual modus operandi in the kitchen, I burned myself not once, but twice baking those tortilla bowls.  Sometimes I even amaze myself… However, I can tell you it was all worth it!  This recipe rocks, my friends….

TacoSalad

JESS’ TACO SALAD
(slightly modified from Flying on Jess Fuel)

1/4 cup sour cream
1/4 cup yogurt
1/2 cup salsa
1 Tablespoon grapeseed oil
1 lb ground beef
2 tablespoons bulk taco seasoning mix (or 1 packet)
1 can black beans, rinsed and drained
1 large head romaine, chopped
4 tomatoes, chopped
1 bunch scallions, chopped
Black kalamata olives, chopped (to taste)
Shredded Mexican blend cheese (to taste

To make the dressing, combine sour cream, yogurt and salsa in a small bowl. Set aside.

Heat the oil on a skillet and cook the meat for a few minutes. Season with salt (in case your taco seasoning doesn’t have salt already), then add either a packet of store-bought taco seasoning or 2 Tbs of a bulk product such as Penzey’s. Cook for a couple of minutes, add the amount of water recommended by the mix, and cook further just to thicken it slightly. Add the beans to the pan in the last 2 minutes of cooking.

If serving cold, let the meat and bean mixture cool to room temperature. In a large bowl, place half the lettuce, half the tomatoes, half the scallions and half the olives. Top with half the dressing. Top with the meat and bean mixture (you can reserve a little bit for decorating the top, if you want to be fancy). Sprinkle half the cheese on top. Add the rest of the veggies, dressing, and cheese (and meat mix if you reserved some). You can also serve it warm, adding the cold ingredients to the hot meat/beans mixture.

ENJOY!

to print the recipe, click here

IMG_5215

Here you can see some photos of my burning adventure with tortilla cups. You can do this in several ways, but I recommend the muffin tin + custard cup combo.  Using the two custard cups nested together requires that they both fit just right not to tear the tortilla, and also makes it a lot harder to remove the top cup to brown the tortilla in the final moments of baking.

compositeShells

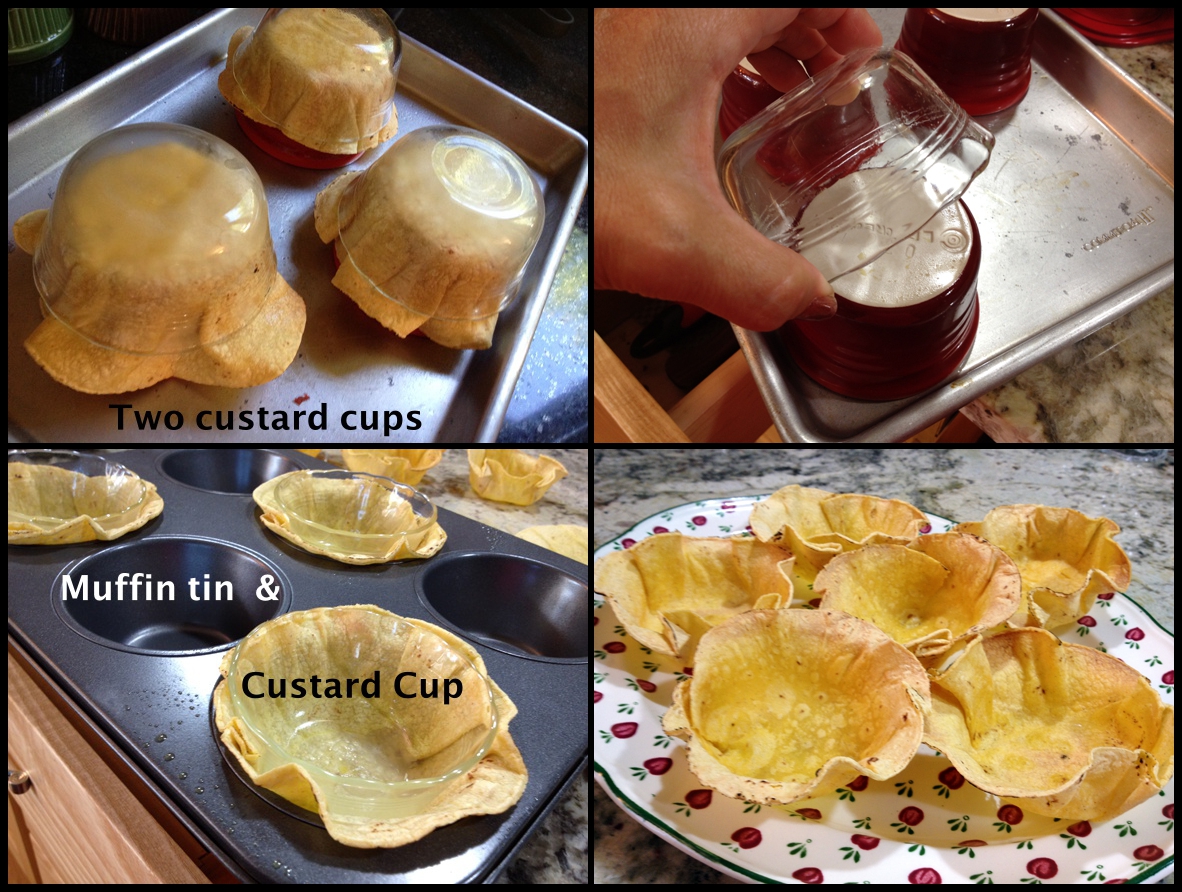
MAKING TACO BOWLS:  Warm a corn tortilla very quickly over an open flame on your stove (I heard you can also use the microwave, but I haven’t tried it).  Spray both sides of the warm tortilla very lightly with canola or olive oil spray.  Immediately place in the muffin tin (or over a custard cup), and place another container on top to keep the shape.  Bake in a 375 F for about 15 minutes, removing the custard cup in the final 5 minutes. Let cool over a rack.

We loved this recipe!  Actually, Phil was raving about it non-stop, and begging me to make it again, and do it soon.  The tortilla cups make it very festive, but the taco stands on its own without any problem, it is fresh, bright, the dressing mixing sour cream and salsa was incredibly tasty!  I used a home-made salsa given to us by Mr. and Mrs. K (thank you, guys!), and it had just the right amount of heat.  Use any store-bought salsa you are fond of, or make your own if you have a chance.

Jess, I loved being assigned to your blog!  This has been one super busy month for us, but I made sure to compose this post within one week of getting the email notification. I fell in love with this recipe right away, and you can bet this will be in a regular rotation in our Bewitching Kitchen! 

To my readers: if you want to see what the other members of my group cooked up this month, poke the blue frog at the end of the post.

ONE YEAR AGO: Semolina Sourdough Boule 

TWO YEARS AGO: Forgive me, for I have sinned

THREE YEARS AGOCracked Wheat Sandwich Bread

FOUR YEARS AGO:  Au Revoir, my Bewitching Kitchen

FIVE YEARS AGO:  French Bread

UP CLOSE AND PERSONAL WITH KALE

Before I urge you to go massage a kale (I admit it does sound a little naughty), let me tell you that not in a million years I would think this step to be necessary. In fact, I used to go into compulsive eye-rolling while reading recipes that call for “massaged kale”. I was not the only one, the lovely Kelly from Inspired Edibles had this to say about the process:

When I first encountered the term ‘massaged kale’ I found it not only pretentious but kind of silly too.
Had kale been elevated to such a precious status that it now required massaging?
I couldn’t just eat the stuff, I needed to pet it too?

I could not have said it better. But, surprisingly enough, she decided to give it a try, and was blown away by the outcome. You should definitely stop by her site to read about her experience.  I was skeptical, but after her endorsement, I dimmed the lights, put some music on, and fully engaged in the role of masseuse.

KaleSalad

MASSAGED KALE SALAD WITH FRESH APRICOT & SPICY SKILLET CHICKPEAS
(slightly modified from Kelly’s Inspired Edibles)

for the salad:
1 generous bunch kale leaves, washed and torn into smaller bite-sized pieces
1 (15 oz) chickpeas, thoroughly rinsed and dried
6 fresh apricots, sliced
1/3 cup shaved almond, slightly toasted

for the spice mix:
1/2 tsp ground cumin
1/2 tsp ground coriander
1/2 tsp curry powder
pinch smoked paprika
pinch of ground cinnamon
sea salt to taste

for the Massage Oil (aka salad dressing):
2 Tbsp olive oil
juice of one lime (about 2 Tbsp)
1 tsp honey
sea salt and coarse black pepper to taste

Warm a dry skillet over medium-high heat and toss chickpeas in warmed skillet for about two minutes to remove any residual moisture. Be sure to shake the pan and/or stir the chickpeas.

Sprinkle the chickpeas with seasonings of choice. including salt and pepper.  Stir seasoned chickpeas to mix the spices. After about two minutes, drizzle a little bit of coconut or olive oil over the seasoned chickpeas and toss to combine. Keep stirring the chickpeas and adjust seasonings as desired. When the chickpeas are well saturated with flavor, remove from heat and reserve.

Meanwhile, in a small bowl combine salad dressing ingredients and whisk well.

Place kale pieces in a large mixing bowl and drizzle with dressing. Simply use your fingers to work the oil/dressing into the kale leaves – watch and feel the color/texture transformation. After only two minutes your kale is beautifully seasoned and softened and all set to eat. You will also find that it’s easier during the massage stage to remove any excessively hard pieces from the center rib of the kale. The leaves will fall off the rib quite easily and your fingers will be in place to feel it happen and facilitate the process.

Place massaged kale in large serving bowl, or on individual serving plates, and dress with seasoned chickpeas, fresh apricot and almonds.

ENJOY!

to print the recipe, click here

composite

Doesn’t that look pretty amazing?
I wish I could massage my face in the morning and have that type of improvement!

ingredients2

 Even though the star of this show should be the kale, I have to say I fell in love with Kelly’s skillet chickpeas. In fact, I’ve been making them this way quite often, varying the spices according to my mood. Those are better than roasted, with the added bonus of being ready in minutes, and without turning the oven on.  I had a hard time not munching on half of them before assembling the salad.

chickpeas

I suppose this recipe will please even hard-core kale haters.  The massage mellows down the harsh texture of kale, bringing it closer to a butter lettuce, but with a more assertive taste.  Of course, joining fresh apricots with the incredibly tasty chickpeas made this salad a complete winner!

I hope you twill try it either as we did, or using different spices and fruits.  I think fresh peaches or even strawberries could be fantastic substitutions.

Kelly, thanks again for another super creative and fun recipe!

ONE YEAR AGO: Black Berry Cherry Sorbet

TWO YEARS AGO: Asparagus Pesto

THREE YEARS AGO: Chocolate and Chestnut Terrine

FOUR YEARS AGO: Under the spell of lemongrass

FIVE YEARS AGO: Greens + Grapefruit + Shrimp = Great Salad!

THE HEART OF BRAZILIAN COOKING

Heart of palm (palmito) is perhaps not appreciated enough outside Brazil, but back home people love it in many types of preparations: pies, pastéis, filling for pasta, and in its purest form: “salada de palmito“.  Let’s practice those words now, by repeating after me four or five times. Ready?   😉
.

.
I’ve always been quite fond of a simple salad along the lines of this one pairing fresh, juicy tomatoes with slices of heart of palm, often adding black olives for color contrast and that boost of brine flavor.  But, a few weeks ago Denise, a Brazilian blogger who lives in the US shared her take on salada de palmito, and I knew I had to make it right away.  Denise blogs exclusively on Brazilian recipes, so if you want to learn more about my home country cooking, stop by her blog, and enjoy the tropical ride!

HeartsPalmSalad


HEART OF PALM SALAD SKEWERS
(adapted from Denise’s blog, From Brazil to You)

for the skewers:
6 heart of palm stalks, cut each stalk in half or thirds
8 grape tomatoes
Arugula or spring mix leaves, or any green of your choice
fresh parsley leaves for decoration

for the Lemon-Za’tar Dressing:
2 tablespoons extra-virgin olive oil
2 tablespoons fresh lemon juice
½ teaspoon agave nectar
a good pinch of za’tar
salt and pepper to taste

To prepare the salad, assemble 4 salad skewers by inserting and alternating heart of palm chunks, grape tomatoes, salad greens of your choice.

Once skewers are assembled, chill in refrigerator for about 30 minutes, covered with a wet paper towel. Meanwhile, prepare the dressing. In a small bowl, whisk all the ingredients together well until obtaining a thick and homogeneous dressing.

Drizzle the heart of palm salad skewers with the dressing, and serve sprinkling parsley leaves on top.

ENJOY!

to print the recipe, click here

A little trivia about this post: recipe found on May 14th; enjoyed on May 17th; blogged on July 17th. 

Comments:  This was such a fun way to serve heart of palm! You can change it around in many ways, adding red onion chunks (like Denise recommends in her post), or black olives, maybe roasted zucchini slices. I can even envision some grilled halloumi cheese, making it a “Brazil meets Greece” version.

The lemony, acidic flavor of za’tar makes it a great addition to salad dressings. I added a touch of agave nectar to mellow things a little, but you should play with this basic vinaigrette idea and change it to suit your taste.

Denise, thanks for keeping Brazilian food always in my mind, every new post brings a smile to my face, and a sense of nostalgia for foods of my childhood.

+++++++++++++++++++

 This post had been scheduled for a while, but just a couple of days before going live, I learned that Denise got a very well-deserved prize: her blog was chosen as one of 50 of the best Mom-blogs!  You can read all about it here.  Denise, you deserve all the recognition, I am thrilled for you!

+++++++++++++++++++

ONE YEAR AGO: Potluck Frittata and Lavoisier

TWO YEARS AGO: Home-made Corn Tortillas

THREE YEARS AGO: Whole-Wheat Spaghetti with Peanut Sauce

FOUR YEARS AGO: Brigadeiros: A Brazilian Party!

FIVE YEARS AGO: Lemony Asparagus


CELEBRATE WEDNESDAY WITH A SPIRAL KICK

When I planned this dinner, I did not think it would turn out so delicious, and definitely not something that could go into my files of “Celebrate Wednesday“.  A simple grilled chicken served with a humble zucchini salad?   What could be so special about that?   Hard to pinpoint a particular reason, but I feel this meal was a gastronomic jackpot: the whole combination of flavors is perfect.  Refreshing, light, and satisfying.  You can change the salad around in lots of ways, as long as you add the dressing a few minutes before serving.  That will make sure the zucchini will get the right texture, losing some of its raw bite.  Fresh mint, shaved celery, shaved fennel, those are some of the ingredients that come to mind as add-ons. The chicken marinade will go with pretty much any protein. Including tofu, if you are so inclined…  😉

MisoChickenZucchini

GRILLED MISO CHICKEN
(adapted from Happy Food Happy Home blog)

4 boneless skinless chicken breasts
2 tablespoons Greek yogurt
2 teaspoons miso paste
2 teaspoons olive oil
2 teaspoons honey
juice of 1 lime (2-3 tablespoons)
1 tablespoon soy sauce
1/2 tsp black pepper
pinch of salt

Whisk together the marinade ingredients in a small bowl.

Place the chicken in a large ziplock bag and add the marinade. Toss everything around in the bag to coat all the chicken pieces. Marinade for at least 30 minutes and up to two hours.

Grill the chicken using the 7-6-5 method:  seven minutes on the first side, flip the pieces over, grill for 6 more minutes. Turn the grill off without opening the lid, and let the chicken stay inside for 5 minutes. Remove from the grill, let the meat rest for 5 to 10 minutes slightly tented with aluminum foil, slice and serve.

to print the Grilled Miso Chicken recipe, click here

sliced

SPIRALIZED ZUCCHINI AND CUCUMBER SALAD
(from the Bewitching Kitchen, inspired by Skinny Kitchen)

2 zucchini, ends trimmed, cut on a spiral cutter
1/2 English cucumber, end trimmed, cut on a spiral cutter
juice and zest of 1 lemon
1 Tablespoon olive oil or to taste
1 avocado, cut in pieces
handful of grape or cherry tomatoes, sliced in half
fresh cilantro
salt and pepper to taste

Use a spiralizer or a mandolin fitted with a julienne blade and cut the zucchini into very thin, spaghetti-like strands. Do the same for the cucumber, but place it over paper towels to drain excess liquid. To make it easier to serve,  trim the strands cutting with scissors or a sharp knife, so that they are about 8 inches long. Place both veggies in a large serving bowl.  Reserve.

In a small bowl, make a quick emulsion whisking the olive oil and lemon juice, a touch of salt and pepper.  When it’s all emulsified, add the lemon zest.

Drizzle the dressing all over the strands of zucchini, and toss to coat.  Allow it to sit at room temperature for 5 to 10 minutes.  Add the avocado pieces, the tomatoes, toss gently to combine.  Sprinkle cilantro, adjust seasoning, and serve.

ENJOY!

to print the salad recipe, click here

Comments:  First, my apologies for being unable to give immediate credit to the grilled chicken marinade.  I found it in the internet, thought I had bookmarked it, but instead I did a cut and paste of the ingredients and sent to myself by email.  (Palm hits the forehead!)  Since I clear my bookmark history every week, no luck tracking it down. (Head shake in disbelief…) Hopefully a lesson was learned. However, thanks to one of my dear readers, I could retrieve the source, and correct my mistake.  It came from Happy Food Happy Home. Cute name for a blog… 😉 Thank you, Nan, for finding the source for me.

The salad.  Of course, the spiralizer makes it super fun and interesting, but taste should come first, and in this category we also have a winner. However, depending on how watery your cucumber might be, you could run into problems.  One way around it would be spiralizing only the zucchini and adding the cucumber in small pieces together with the avocado & tomatoes. You can salt them very lightly and wait for a few minutes until the salt draws most of the excessive liquid out.  A brief rinse, a brief encounter with paper towels, and voilà: perfect cucumber!   This is harder to do with the strands, so keep this in mind if you try this salad.

The husband verdict: you can make this recipe ANYTIME. It is awesome!  

When you witness a man who loves pasta, rice, and potatoes giving such a compliment to zucchini, you know you got something special going…  As special as offering two recipes in a single post (wink, wink). Almost as special as a Wednesday evening rescued from the boring middle of the week…
.
ONE YEAR AGO: Carrot Flan with Greens and Lemon Vinaigrette

TWO YEARS AGO: Granola Bars

THREE YEARS AGO:  Awesome Broccolini

FOUR YEARS AGO:  A Twist on Pesto

FIVE YEARS AGO: Ciabatta: Judging a bread by its holes


BON BON CHICKEN: LIGHT AND SPECTACULAR!

Can I give a recipe 10 stars? How about a full constellation and a comet dashing through it? This recipe was sitting on my files for a while, but every weekend something would happen and prevent me from trying it.  That all changed on a cold Sunday morning last month.  You need to find a few special ingredients, but trust me, it will be more than worthy.  A constellation and a comet worthy.

Bon Bon Chicken
BON BON CHICKEN
(slightly modified from Serious Eats)

3 skinless chicken breasts
¼ cup Shaoxing wine
2 green onions, chopped
1 inch fresh ginger, chopped
2 + 1/2 teaspoons whole Sichuan peppercorns
1 pound cucumbers, peeled and sliced thin
3 tablespoons soy sauce
1 tablespoon Chinkiang black vinegar
1 tablespoon sesame oil
1 teaspoons Sriracha sauce
2 teaspoons sugar
1/2 cup finely chopped fresh cilantro

Place the chicken in a large pot. Add the wine green onions, 3/4 of the ginger, 1 teaspoon of the Sichuan peppercorns, and enough water to cover by 2 inches. Turn heat to high and bring to a boil. Immediately reduce heat to a simmer, cook for 3 1/2 minutes. Cover the pot, turn off the heat, and let sit for 30 minutes. Remove the chicken from the pot and let cool for a few minutes, then shred the chicken with your fingers or a couple of forks.

Combine the soy sauce, vinegar, sesame oil, Sriracha, the rest of the Sichuan peppercorn, rest of the ginger, sugar, and cilantro in a blender. Process until smooth.

Scatter the cucumber slices on a plate. Top with the shredded chicken, and pour on the sauce. Garnish with more cilantro, if you want.

ENJOY!

to print the recipe, click here

This recipe delivered all it promised and a little more!  I poached three chicken breasts, hoping to have some leftover for a couple of lunches, because I did not think Phil would care for it.  He usually prefers to have a yogurt smoothie for lunch, with a Wasa cracker and peanut butter, something along those lines.  But then, he tasted a piece of chicken, and his plans for lunch changed on the spot.  No leftovers, we polished this big bowl of deliciously poached chicken with a dressing that was like an explosion of contrasting flavors: the sesame oil was there, so was the ginger. But the black vinegar, the Szechuan peppercorns, those took this dish to unprecedented levels of goodness.  Poached chicken never ever tasted so great!  Please, make this recipe.  Make double amount, because you will be going back for more.   Very refreshing, very light, but at the same time it will leave you satisfied, probably because the taste is so intense.    I cannot wait to make this again, and again, and again…

ONE YEAR AGO: Seafood Extravaganza Pasta

TWO YEARS AGO: A Pearfect Drink

THREE YEARS AGO: Ming Tsai Under Pressure

FOUR YEARS AGO: Paris, Je t’aime