A SMASHING PAIR

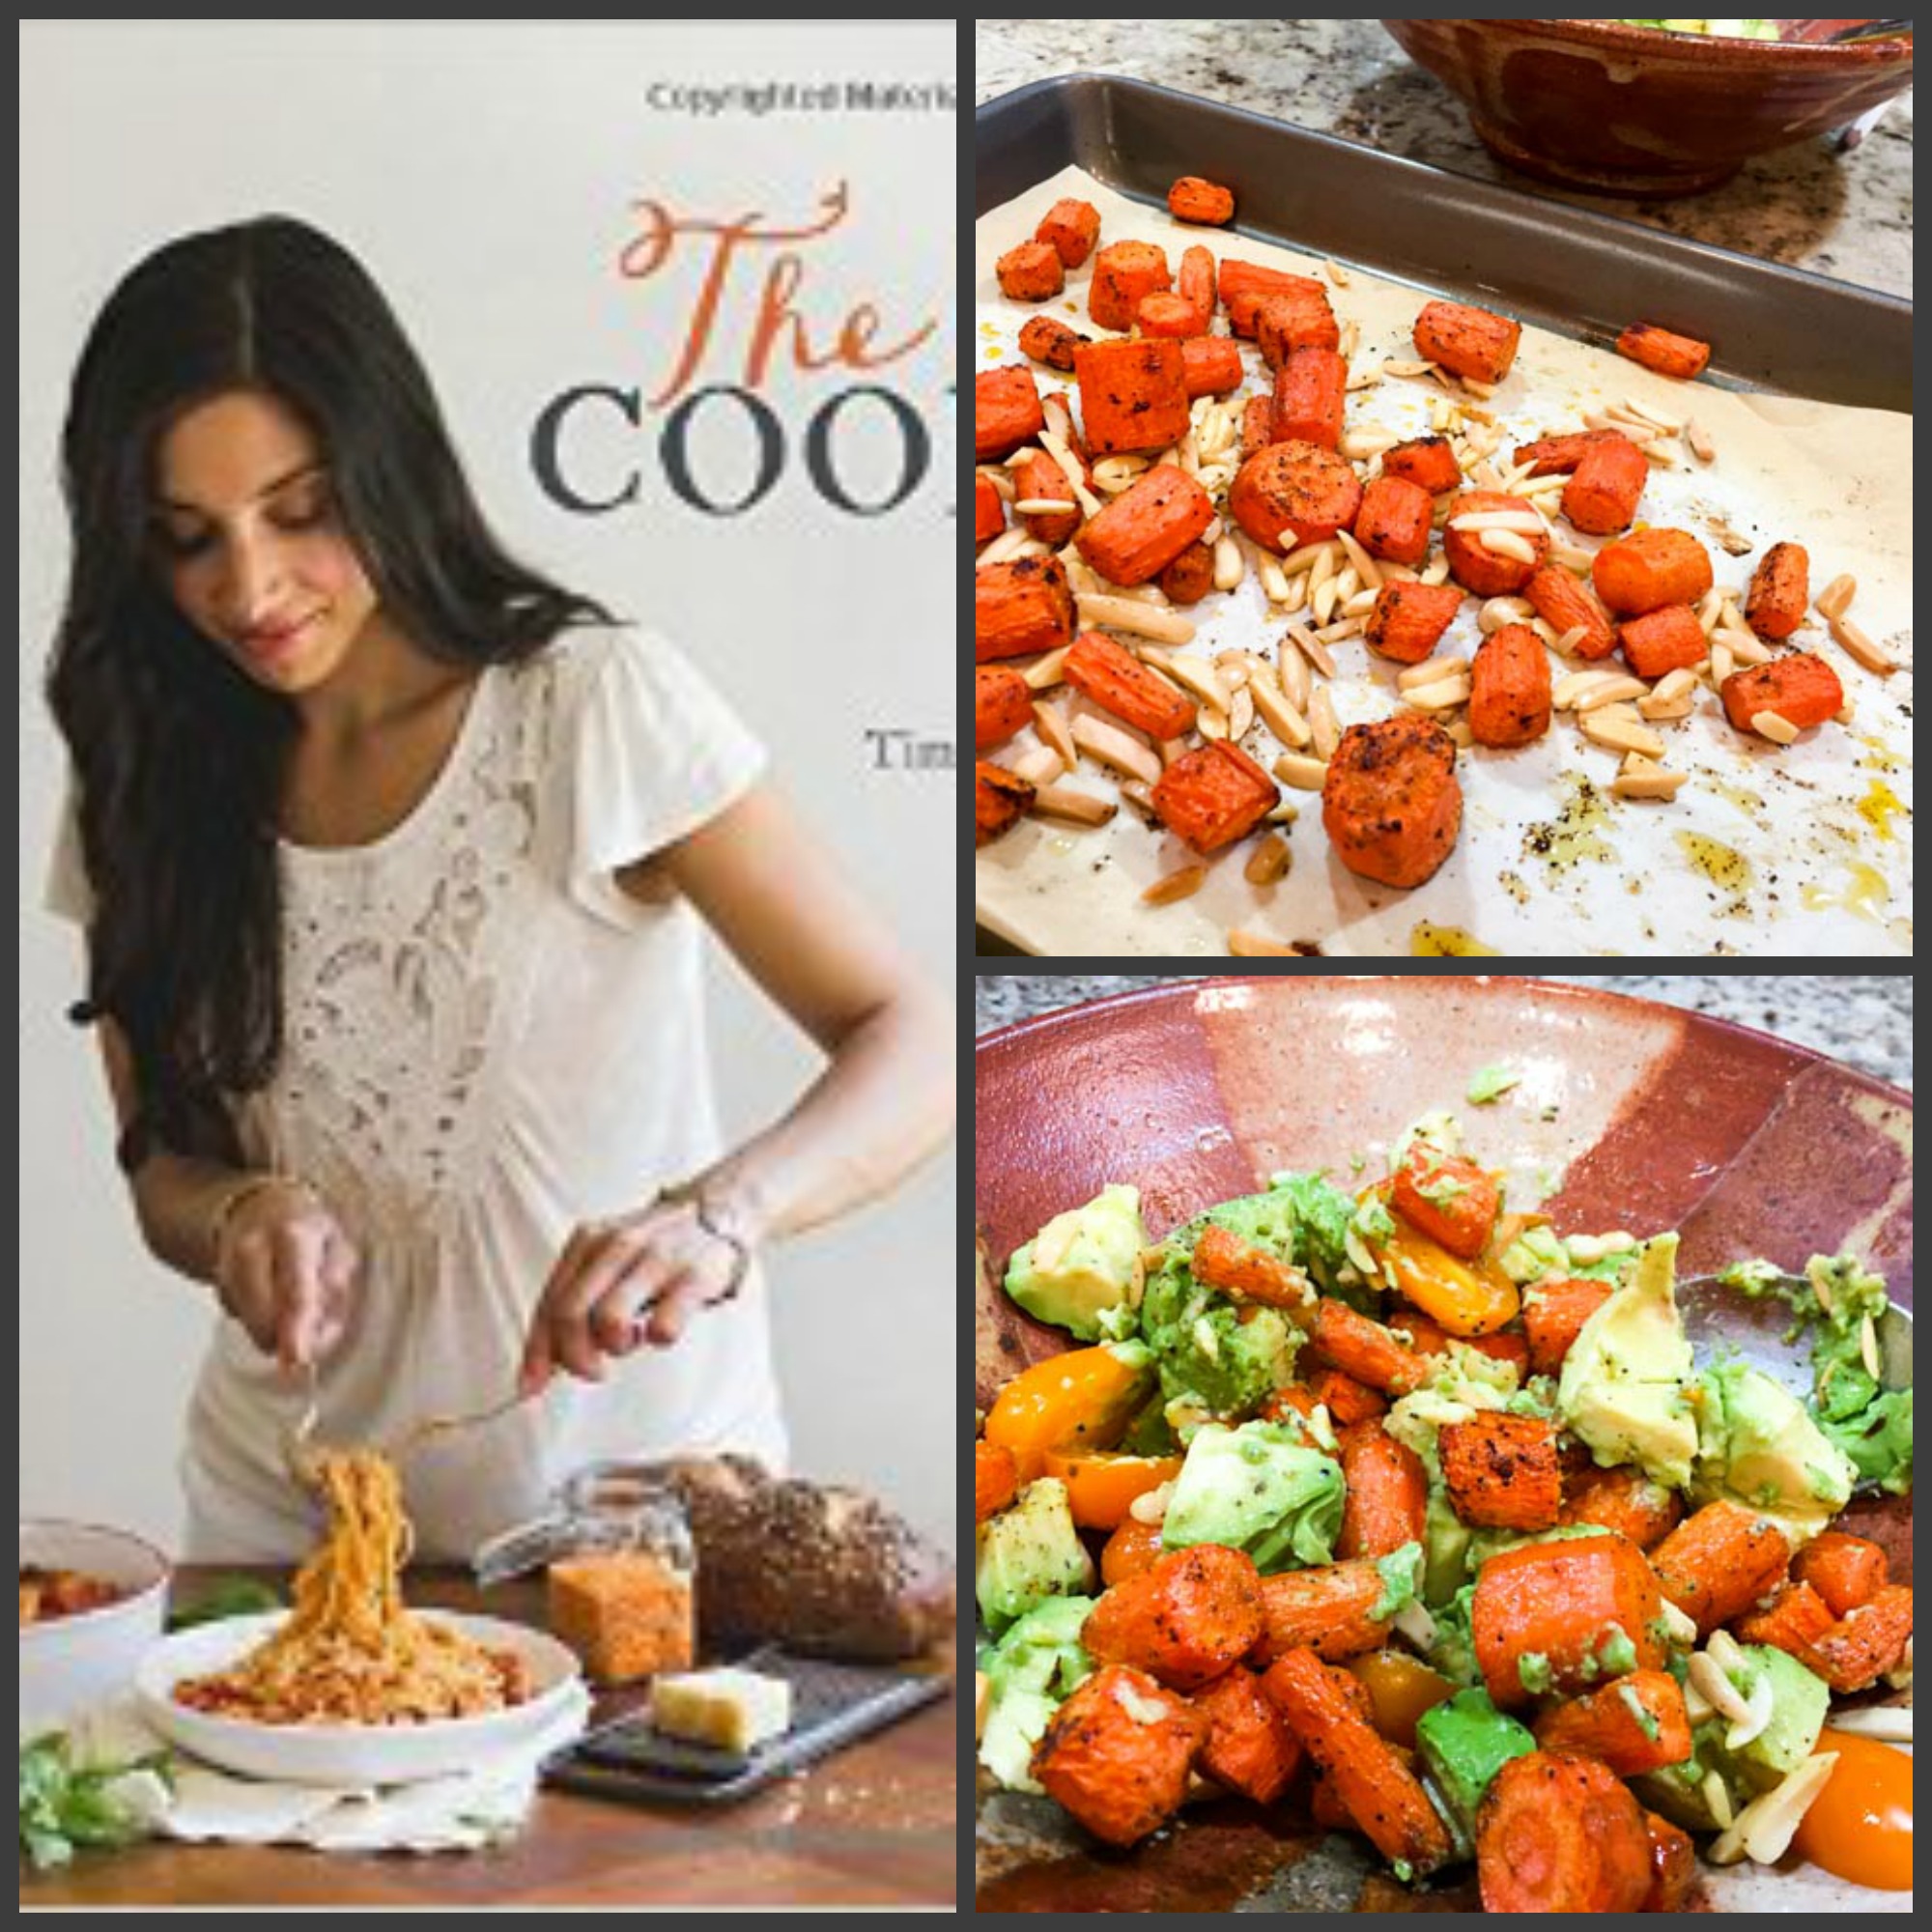
No, I am not talking about Phil and I, although the thought crossed my mind…  It is actually a quote from my newest cookbook:

Have you tried roasted carrots and avocados together?
What a smashing pair!

I don’t think I ever thought of mixing carrots with avocados, but the other day a simple email with notification of a new post by Kelly arrived, and I dropped everything I was doing to check it out. She shared the recipe for a gorgeous quinoa concoction found in  “The Clever Cookbook.”  Cute name, almost as cute as the blog hosted by the author, Emilie: The Clever Carrot. I can see you’re smiling now, it’s impossible not to smile at the name. I need another cookbook as I need a third eye, but my will power for certain temptations is non-existent. I don’t even try to put up a fight anymore, just go to amazon and get the job done.  Ordering the Kindle version minimizes the amount of guilt, in case you are wondering how I deal with my weaknesses.

That night I laid in bed for a long time reading the book,  and could not wait to make this salad, because who could resist getting acquainted with a smashing pair? Less than 24 hours later the salad was part of our dinner, and it was a tremendous success!  I urge you to try it too. I modified the recipe a bit, but you can find Emilie’s original in her book,  which by the way is a total delight! You need to have it, so don’t even bother resisting.

Spice Roasted Carrot and Avocado Salad

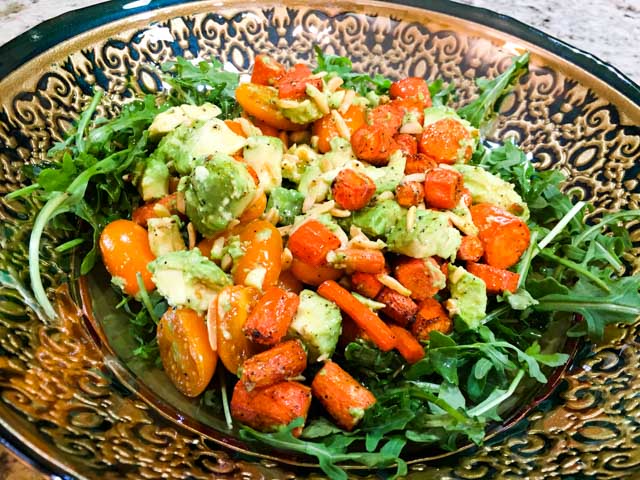
SPICE-ROASTED CARROT AND AVOCADO SALAD
(adapted from The Clever Cookbook)
printed with permission from Emilie Raffa)

4 medium carrots, peeled and cut into 1-inch pieces
1 tbsp olive oil, plus more for drizzling
1 heaped tsp Southwest spice blend (I used Penzey’s)
1/4 cup slivered almonds
a few yellow grape tomatoes, halved
1 ripe Hass avocado
Juice of ½ lemon
Pinch of salt
arugula leaves

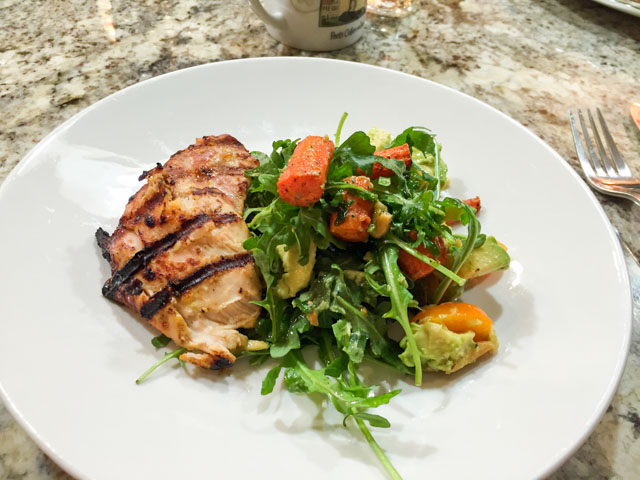
Heat your oven to 425 ° F. Line a rimmed baking sheet with parchment paper. Place the carrots in a large bowl. Add the olive oil and sprinkle with Southwest spice, and a little salt. Toss well to coat. Spread the carrots out on your sheet pan. Roast for about 20 minutes, or until the carrots are caramelized and tender. In the final 5 minutes, add the slivered almonds on top. Remove from the oven, add the tomatoes.  Give it a good stir. Allow the mixture to cool slightly while you dice the avocado and drizzle the pieces with lemon juice to prevent browning.

Add the avocados to the carrots, and toss gently to combine. Place the mixture on top of arugula leaves on a serving bowl, drizzle olive oil and some more lemon juice, adjust seasoning with salt. Toss very gently and serve at room temperature.

ENJOY!

to print the recipe, click here


clevercookbookcomp

Comments: Talk about a delicious dinner! It’s not everyday that a salad draws enthusiastic compliments from my beloved husband. We both went crazy for this one, and Phil in particular thought that the grilled chicken was a perfect match, making the meal worthy of a fancy French style bistrot. On a slight tangent: the chicken was super simple.  I marinated boneless, skinless chicken thighs early in the morning in a mixture of yogurt,  a touch of olive oil, lemon juice, paprika and turmeric. A smidgen of agave nectar just because. When it was time for dinner, I scraped the marinade off, seasoned the meat with salt and pepper, and grilled until done. The combination of sweet roasted carrots, the hint of spice, and the creaminess of the avocado was irresistible!

served
The salad has enough substance to stand proud on a fully vegetarian menu. Maybe paired with a hearty pasta dish, or next to crostini with mushrooms and cheese?  Or you can skip the greens and use the smashing mixture over grains such as farro or quinoa. Your call.

Emilie, thank you for allowing me to publish your recipe…
I must say you are absolutely right, roasted carrots and avocados are “a smashing pair!”

Now, a little bit about the book…

5118l1kcEiL._SX258_BO1,204,203,200_

The book is organized in a slightly unusual way. You won’t find chapters for Main Dishes, Appetizers, or even a particular kind of ingredient. Instead, her approach is to divide the book in strategies that make your life easier in the kitchen. For instance, the first chapter is called “Prep Ahead Vegetables”, and shows how if you invest a little time in prepping veggies they can help you out in many recipes. The chapter includes soups like 30 minute Broccoli and Feta Soup which immediately called my name.  The following chapter, “Back to Basics”  lists her “non-negotiable” items. Stuff that she always has around like toothpaste, chocolate, and the cell phone  (yeah, she is adorably witty). In that chapter, you’ll learn how to make her Triple Duty Chicken Stock, Basic Tomato Sauce, and Master Stir Fry Sauce. Well, you get the gist of it. A little investment of time to make batches of those, and cooking on a daily basis will be a breeze.   But my favorite chapter was one called “Process This.” Clever ways (it is a clever cookbook, after all) to use the food processor. I must try her Banana Cloud Cake included in the chapter, and the user-friendly No-Peel Butternut Squash Soup (sounds like a dream, right?).  Two other chapters that I was quite fond of: “Batch Cooked Grains” and “Freezer Marinades.” The Clever Cookbook is definitely one that will not sit collecting dust in your shelf.  If you are a busy person, with or without kids around, this book is a must-have. To order, follow this link. And while you are around the ordering process, go ahead and subscribe to Emilie’s blog too. I did, because I don’t want to miss her future culinary adventures…

Kelly, thanks for the heads up about Emilie’s cookbook and blog. Loved “meeting” her through you…

😉

ONE YEAR AGO: Spinach and Mushroom Stuffed Pork Tenderloin

TWO YEARS AGO: Crispy Chickpea and Caper Spaghetti

THREE YEARS AGO: Spring has Sprung!

FOUR YEARS AGO: Chickpea and Fire Roasted Tomato Soup

FIVE YEARS AGO: Double Asparagus Delight

SIX YEARS AGO:  Sun-dried Tomato and Feta Cheese Torte


QUINOA SALAD WITH RED GRAPES AND AVOCADO

This salad was based on a recipe by Katie Lee featured on the FoodTV show The Kitchen. It was originally made with green grapes, avocados, cucumbers, and a lime dressing. Obviously,  the idea was to have a sort of monochromatic green salad with bright and sharp flavors.  I changed things around by using red grapes instead. Red grapes are quite a bit sweeter, and added a contrast of color I found particularly pleasing. But, let me tell you, no matter what you decide to add to your quinoa salad, please try the cooking method I describe after the recipe.  It is nothing short of life-changing.  Yeah, you read me correctly. Life-changing. For better.

Quinoa SaladQUINOA SALAD WITH RED GRAPES AND AVOCADO 
(adapted from Food TV Network)

(as written, it makes a lot of salad, I more or less halved this recipe, eyeballing most ingredients. I kept the amount of dressing unchanged)

Zest and juice of 1 lime
3 tablespoons extra-virgin olive oil
Kosher salt and freshly cracked black pepper
4 cups cooked quinoa, cooled
2 cups green grapes, halved
1 1/2 cups diced cucumbers
fresh parsley, roughly chopped (or fresh cilantro)
1 avocado, diced

In a large bowl, whisk together lime zest, lime juice and olive oil. Taste and season with salt and pepper.

Toss the quinoa, grapes, cucumbers, parsley, and avocados together with the dressing. Serve chilled or at room temperature.

ENJOY!

to print the recipe, click here

Now, take a moment to look at the beauty of this  perfectly cooked quinoa.

cooked Quinoa
It is really too bad you cannot taste it through the screen, because the texture turned out sublime. The secret? Cooking the seeds in less water than most recipes recommend, and simmering them for only 6 minutes.  I cannot take credit for it, so here is the link to Elaine’s blog, where I found it.

++++++++++++++++++++++++++++++++++++++++++++++++++++++++

And here is what I did…

For each cup of quinoa, add 1 + 1/3 cup lightly salted water

Bring to a boil in a saucepan…

Reduce heat, simmer for exactly 6 minutes. That is 360 seconds. Do not open the pan. DO NOT. (I will slap your hand if you try to open it… )

Turn the heat off.  Wait 20 minutes with the pan covered. DO NOT PEEK. DO NOT.

Open the pan (finally!), be mesmerized, amazed, awed by the beauty of the perfectly cooked quinoa, fluff the seeds gently with a fork and use them in any preparation you like.

++++++++++++++++++++++++++++++++++++++++++++++++++++++++

For the salad, I simply allowed the cooked quinoa to cool to room temperature, and added all the ingredients plus the simple dressing. The salad keeps well in the fridge for several days and is a great option for a light lunch, if you so desire. Another tip I’d like to share with you: make sure the avocado has a firm texture and only add the pieces when you are about to serve the quinoa.  I did not care for the mushy texture of overly ripe avocados I used the first time I made this dish.  On my second time around, I also added sliced celery.  Turned out delicious, very refreshing. But, you know by now how much we love our celery…

Elaine, thanks so much for sharing your method for perfectly cooked quinoa!  
I won’t be cooking it any other way from now on…  
My life is changed. For better.

🙂

ONE YEAR AGO: Strawberry Coffee Cake

TWO YEARS AGO: Lemon-Poppy Seed Muffins

THREE YEARS AGO: Mascarpone Brownies

FOUR YEARS AGO: Salmon Tacos

FIVE YEARS AGOCinnamon Turban Bread

SIX YEARS AGO: Summertime Gratin

CAPRESE SALAD WITH CELERY AND TOASTED WALNUTS

I got the inspiration for this salad from Lidia Bastianich. In a recent cooking show she came up with a refreshing celery-mozzarella combo to which toasted walnuts were added for crunch. Lidia mentioned something I fully agree with: celery is a very under-utilized veggie. I know many people don’t like it because of its fibrous and harsh texture. However, if you use the best celery you can find (no need to search for the gigantic creature of my recent past) at the perfect stage of ripeness, and slice it thinly, chances are most of your objections to this stalky creature will go away. Some chefs recommend peeling it, but I don’t see that happening in our kitchen.  I find celery refreshing, bright, and use it all the time. For this salad, I adapted Lidia’s basic idea to make a departure on the classic Caprese, a favorite with us.

Caprese Celery Salad

CAPRESE SALAD WITH CELERY AND WALNUTS
(adapted from Lidia Bastianich)

perfectly ripe tomatoes, sliced
fresh mozzarella, sliced
celery stalks, thinly sliced
toasted walnut halves or pieces
lemon juice
olive oil
Dijon mustard
salt and pepper to taste

Make a simple dressing mixing olive oil, lemon juice, mustard. Season with salt and pepper. Amounts are pretty flexible, I add a lot of lemon juice probably 50/50 with the oil. Make enough to coat all the pieces of celery and have some extra so you can drizzle all over the assembled salad. In a small bowl, mix the celery pieces with the dressing and allow it to sit for 5 to 10 minutes.

Add the tomatoes and mozzarella to a serving platter,  place the celery and dressing all over. Scatter toasted walnuts, sprinkle salt to taste (Maldon flakes are a great option here).

ENJOY!

to print the recipe, click here

We loved this salad so much, I’ve been making it regularly now. Toasted hazelnuts go very well too, and sometimes I make the dressing with walnut oil.  The combination of celery with nuts is superb, I hope you’ll give it a try.  Now that the weather is wonderfully hot, this type of salad is the side dish to go with almost any protein of your choice. Roast chicken, grilled meats, grilled salmon. No need for anything else if you ask me…

Lidia’s show has everything I’d hope FoodTV Network would offer, but it doesn’t.  In our town it is broadcast by PBS. I set our Tivo to tape it and maybe twice per week there is a new episode waiting for me. She is very knowledgeable, fun to watch, and as a bonus often suggests the perfect wine to pair with her meals. I was surprised to learn that one of her restaurants is located in Kansas City, a couple of hours from home. Something to keep in mind if we ever decide to go for a special weekend trip to the “big city.”

ONE YEAR AGO: Oh, my God! I think I saw something!

TWO YEARS AGO: Celebrate Wednesday with Hoisin-Grilled Chicken and Soba Noodles

THREE YEARS AGO: The Manhattan Project

FOUR YEARS AGO: Carrot “Nib” Orzo

FIVE YEARS AGO:  A Sticky Situation

SIX YEARS AGO:  The Garden

OTTOLENGHI IN BRAZIL?

Was he really there?  Not that I am aware of, but his salads were part of my niece’s meals every single day we stayed there last Thanksgiving.  My youngest niece Raquel is a fantastic cook and has a ton of energy: with three young kids, she still finds time to make bread, bake all sorts of sweets (cakes included, she’s got the right genes), and exercise on a regular basis. Phil and I stayed with her, her hubby Celso and the kids during part of our last visit, and we were treated like royalty! She also hosted a lunch for our whole family that consisted of Brazilian classics like feijoada, pastéis, mandioca frita, farofa, mashed plantains, and a chocolate mousse with cachaça that swept Phil off his feet.  Almost literally. Not the type of dessert appropriate for kids, mind you…    Knowing that my goal was to leave Brazil with the exact same weight I had upon my arrival, she prepared several salads from Plenty, so that I could resort to a light meal every once in a while. My favorite was a salad with dates and chèvre, so when I arrived back home, I sat down with Jerusalem, Plenty, and Plenty More to be properly inspired.

unnamed1

BABY GREENS SALAD WITH DATES, ORANGES AND ALMONDS
(modified from Ottolenghi & Tamimi Jerusalem cookbook)

1 tablespoon white wine vinegar
3 ½ ounces pitted Medjool dates, quartered lengthwise
2 large navel orange segments
2 tablespoon olive oil
½ cup sliced almonds
¼ cup sesame seeds
2 teaspoons sumac
½ teaspoon red pepper flakes
5 ounces baby greens
2 tablespoon freshly squeezed lemon juice
sea salt

Put the vinegar and dates in a small bowl, add a pinch of salt and toss mixing well. Leave to marinate for about 15 minutes, then drain and discard any of the residual vinegar. Reserve.

Heat the olive oil in a non-stick skillet, add the slivered almonds, season lightly with salt, and cook until dark golden.  Place them on kitchen paper to absorb excess oil. Sprinkle with sumac and red pepper flakes. allow it to cool.

When ready to serve the salad, place the baby greens in a large bowl. Add one tablespoon of olive oil, lemon juice and a pinch of salt. Toss to coat the leaves with dressing. Add the oranges, and dates, tossing it all gently again. Top with the almond mixture and the sesame seeds.

ENJOY!

to print the recipe, click here

Comments:  if you have Jerusalem, this version was a departure from his spinach salad with dates and toasted pita bread.  I am sure it is even more delicious, but I kept it simple this time, and used a nice coating with sesame seeds, plus orange segments which I think go very well with the dates.  I love the unique flavor that sesame seeds impart to dishes.  We have an Oriental grocery store in town that sells HUGE bottles of plain, toasted, and black sesame seeds from the Middle East for a great price, so I make sure to never run out of them.

And now, time to share a few shots of that wonderful lunch that joined my whole family: two sisters, one brother-in-law, four nieces (two with their respective husbands), 5 of my 6 grandnephews, and of course, my Mom presiding like a Queen over all of us.

FeijoadaFeijoada, a Brazilian classic…

All the “usual suspects” that are mandatory to go with it…

FeijoadaStuffOrange segments, shredded “couve” (similar to kale), farofa, white rice…

MandiocaFritaMandiocaServedMandioca frita, to die for!

PasteisPastéis, of three kinds: ground beef, cheese, and hearts of palm…
Choose your ticket to paradise!

Plantains2My first time enjoying this delicacy:  mashed plantains… very very tasty!

SaladOne of Ottolenghi’s salads….  nice counterpart for so many rich dishes!

MousseChocolateLa pièce de resistance…. Chocolate Mousse with Cachaça….
a complete dream in chocolate form!

MomNailsMy Mom’s 91-year-old hands…
I guess it’s clear where my fascination with nail polish comes from…

Mom&Me2One more visit that went by too fast… Until next time, Keep Calm and Carry On…  

Before I say goodbye, a little note to tell you that I just started a Facebook page for the Bewitching. It is a bit strange to start a page for a blog that is almost 6 years old, but I joined a Facebook group of bloggers and they advised me to do so.  If you want to like the Bewitching on FB, just click on the link on the right side. Thank you!

ONE YEAR AGO: Roasted Winter Vegetables with Miso-Lime Dressing

TWO YEARS AGO: 2012 Fitness Report: P90X2

THREE YEARS AGO: Caramelized Bananas

FOUR YEARS AGO: Roasted Lemon Vinaigrette

FIVE YEARS AGO: Whole Wheat Bread

THE PERFECT BOILED EGG

What food blogger in his or her right mind would make a post on hard-boiled eggs?  If you are about to click away from this page, not without first canceling your subscription to my site, please stick around…  This is a life-changing method, I promise you.

I love hard-boiled eggs, they are often part of my lunch or dinner salads, but I hate when they are hard to peel. I have tried every single method around, including some recommended by cooking pros such as Ina Garten. In fact, her method used to be my default procedure: bring the water with eggs to a boil,  cover the pan, turn the heat off, wait 15 minutes. Let the eggs cool for a couple of minutes, peel and enjoy them.  The egg will be perfectly cooked, no green ring around the yolk, but peeling is another story. Most will be a nightmare to peel, some will behave well. Hit or miss.

Just last month my friend Cindy told me about steaming eggs instead of boiling them. She raved about the method from SeriousEats that she stumbled upon through eGullet. Having nothing to lose, I tried it.  It is AMAZING.  I recommended it in a cooking forum, and one of the members cooked 36 hard-boiled eggs, came back to say that every single one was perfectly cooked AND peeled flawlessly and easily.  Convinced yet?

I used the same method to make soft-boiled eggs, and it worked like a charm.  So here it is, plain and simply how to get Eggxhilaration in the kitchen.

HardBoiled

+++++++++++++++++++++++++++++++++++++++++++++++++++++++++++++++++++++

THE PERFECT BOILED EGG

Pour a couple of inches of water in a double-boiler and bring to a boil.

Carefully place as many eggs as you want from the fridge into the steamer basket, and add them on top of the boiling water, reduce heat to a simmer.

Immediately close the pan and start a timer.

For hard-boiled eggs, steam for 10 to 11 minutes, test to see how you prefer them.

For soft-boiled eggs, steam for 6 minutes. 

Have a bowl of cold water ready, when the time is up, use kitchen tongs to remove the eggs from the steamer, dropping them in the cold water to stop cooking. Store in the fridge to enjoy later, or peel right away.

Have a tissue nearby to wipe your tears of joy. 

+++++++++++++++++++++++++++++++++++++++++++++++++++++++++++++++++++++

What I love about the method is its simplicity.  Bring a little water to boil, place a steamer on top and cook to your level of liking, which is easily found in a couple of trials.  Imagine that you want to make a big batch of deviled eggs and would like them all to be gorgeous. Well, this method will save you a ton of grievance.

Messages to thank me can sent by email at sallybr2008 at gmail dot com.  I promise to share them all with Cindy.  😉

SoftBoiled

Steamed for 6 minutes, peeled and ready for an encounter with an Ak-Mak cracker…