CAPRESE SALAD WITH CELERY AND TOASTED WALNUTS

I got the inspiration for this salad from Lidia Bastianich. In a recent cooking show she came up with a refreshing celery-mozzarella combo to which toasted walnuts were added for crunch. Lidia mentioned something I fully agree with: celery is a very under-utilized veggie. I know many people don’t like it because of its fibrous and harsh texture. However, if you use the best celery you can find (no need to search for the gigantic creature of my recent past) at the perfect stage of ripeness, and slice it thinly, chances are most of your objections to this stalky creature will go away. Some chefs recommend peeling it, but I don’t see that happening in our kitchen.  I find celery refreshing, bright, and use it all the time. For this salad, I adapted Lidia’s basic idea to make a departure on the classic Caprese, a favorite with us.

Caprese Celery Salad

CAPRESE SALAD WITH CELERY AND WALNUTS
(adapted from Lidia Bastianich)

perfectly ripe tomatoes, sliced
fresh mozzarella, sliced
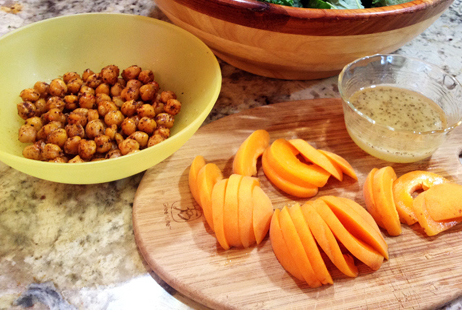
celery stalks, thinly sliced
toasted walnut halves or pieces
lemon juice
olive oil
Dijon mustard
salt and pepper to taste

Make a simple dressing mixing olive oil, lemon juice, mustard. Season with salt and pepper. Amounts are pretty flexible, I add a lot of lemon juice probably 50/50 with the oil. Make enough to coat all the pieces of celery and have some extra so you can drizzle all over the assembled salad. In a small bowl, mix the celery pieces with the dressing and allow it to sit for 5 to 10 minutes.

Add the tomatoes and mozzarella to a serving platter,  place the celery and dressing all over. Scatter toasted walnuts, sprinkle salt to taste (Maldon flakes are a great option here).

ENJOY!

to print the recipe, click here

We loved this salad so much, I’ve been making it regularly now. Toasted hazelnuts go very well too, and sometimes I make the dressing with walnut oil.  The combination of celery with nuts is superb, I hope you’ll give it a try.  Now that the weather is wonderfully hot, this type of salad is the side dish to go with almost any protein of your choice. Roast chicken, grilled meats, grilled salmon. No need for anything else if you ask me…

Lidia’s show has everything I’d hope FoodTV Network would offer, but it doesn’t.  In our town it is broadcast by PBS. I set our Tivo to tape it and maybe twice per week there is a new episode waiting for me. She is very knowledgeable, fun to watch, and as a bonus often suggests the perfect wine to pair with her meals. I was surprised to learn that one of her restaurants is located in Kansas City, a couple of hours from home. Something to keep in mind if we ever decide to go for a special weekend trip to the “big city.”

ONE YEAR AGO: Oh, my God! I think I saw something!

TWO YEARS AGO: Celebrate Wednesday with Hoisin-Grilled Chicken and Soba Noodles

THREE YEARS AGO: The Manhattan Project

FOUR YEARS AGO: Carrot “Nib” Orzo

FIVE YEARS AGO:  A Sticky Situation

SIX YEARS AGO:  The Garden

OTTOLENGHI IN BRAZIL?

Was he really there?  Not that I am aware of, but his salads were part of my niece’s meals every single day we stayed there last Thanksgiving.  My youngest niece Raquel is a fantastic cook and has a ton of energy: with three young kids, she still finds time to make bread, bake all sorts of sweets (cakes included, she’s got the right genes), and exercise on a regular basis. Phil and I stayed with her, her hubby Celso and the kids during part of our last visit, and we were treated like royalty! She also hosted a lunch for our whole family that consisted of Brazilian classics like feijoada, pastéis, mandioca frita, farofa, mashed plantains, and a chocolate mousse with cachaça that swept Phil off his feet.  Almost literally. Not the type of dessert appropriate for kids, mind you…    Knowing that my goal was to leave Brazil with the exact same weight I had upon my arrival, she prepared several salads from Plenty, so that I could resort to a light meal every once in a while. My favorite was a salad with dates and chèvre, so when I arrived back home, I sat down with Jerusalem, Plenty, and Plenty More to be properly inspired.

unnamed1

BABY GREENS SALAD WITH DATES, ORANGES AND ALMONDS
(modified from Ottolenghi & Tamimi Jerusalem cookbook)

1 tablespoon white wine vinegar
3 ½ ounces pitted Medjool dates, quartered lengthwise
2 large navel orange segments
2 tablespoon olive oil
½ cup sliced almonds
¼ cup sesame seeds
2 teaspoons sumac
½ teaspoon red pepper flakes
5 ounces baby greens
2 tablespoon freshly squeezed lemon juice
sea salt

Put the vinegar and dates in a small bowl, add a pinch of salt and toss mixing well. Leave to marinate for about 15 minutes, then drain and discard any of the residual vinegar. Reserve.

Heat the olive oil in a non-stick skillet, add the slivered almonds, season lightly with salt, and cook until dark golden.  Place them on kitchen paper to absorb excess oil. Sprinkle with sumac and red pepper flakes. allow it to cool.

When ready to serve the salad, place the baby greens in a large bowl. Add one tablespoon of olive oil, lemon juice and a pinch of salt. Toss to coat the leaves with dressing. Add the oranges, and dates, tossing it all gently again. Top with the almond mixture and the sesame seeds.

ENJOY!

to print the recipe, click here

Comments:  if you have Jerusalem, this version was a departure from his spinach salad with dates and toasted pita bread.  I am sure it is even more delicious, but I kept it simple this time, and used a nice coating with sesame seeds, plus orange segments which I think go very well with the dates.  I love the unique flavor that sesame seeds impart to dishes.  We have an Oriental grocery store in town that sells HUGE bottles of plain, toasted, and black sesame seeds from the Middle East for a great price, so I make sure to never run out of them.

And now, time to share a few shots of that wonderful lunch that joined my whole family: two sisters, one brother-in-law, four nieces (two with their respective husbands), 5 of my 6 grandnephews, and of course, my Mom presiding like a Queen over all of us.

FeijoadaFeijoada, a Brazilian classic…

All the “usual suspects” that are mandatory to go with it…

FeijoadaStuffOrange segments, shredded “couve” (similar to kale), farofa, white rice…

MandiocaFritaMandiocaServedMandioca frita, to die for!

PasteisPastéis, of three kinds: ground beef, cheese, and hearts of palm…
Choose your ticket to paradise!

Plantains2My first time enjoying this delicacy:  mashed plantains… very very tasty!

SaladOne of Ottolenghi’s salads….  nice counterpart for so many rich dishes!

MousseChocolateLa pièce de resistance…. Chocolate Mousse with Cachaça….
a complete dream in chocolate form!

MomNailsMy Mom’s 91-year-old hands…
I guess it’s clear where my fascination with nail polish comes from…

Mom&Me2One more visit that went by too fast… Until next time, Keep Calm and Carry On…  

Before I say goodbye, a little note to tell you that I just started a Facebook page for the Bewitching. It is a bit strange to start a page for a blog that is almost 6 years old, but I joined a Facebook group of bloggers and they advised me to do so.  If you want to like the Bewitching on FB, just click on the link on the right side. Thank you!

ONE YEAR AGO: Roasted Winter Vegetables with Miso-Lime Dressing

TWO YEARS AGO: 2012 Fitness Report: P90X2

THREE YEARS AGO: Caramelized Bananas

FOUR YEARS AGO: Roasted Lemon Vinaigrette

FIVE YEARS AGO: Whole Wheat Bread

THE PERFECT BOILED EGG

What food blogger in his or her right mind would make a post on hard-boiled eggs?  If you are about to click away from this page, not without first canceling your subscription to my site, please stick around…  This is a life-changing method, I promise you.

I love hard-boiled eggs, they are often part of my lunch or dinner salads, but I hate when they are hard to peel. I have tried every single method around, including some recommended by cooking pros such as Ina Garten. In fact, her method used to be my default procedure: bring the water with eggs to a boil,  cover the pan, turn the heat off, wait 15 minutes. Let the eggs cool for a couple of minutes, peel and enjoy them.  The egg will be perfectly cooked, no green ring around the yolk, but peeling is another story. Most will be a nightmare to peel, some will behave well. Hit or miss.

Just last month my friend Cindy told me about steaming eggs instead of boiling them. She raved about the method from SeriousEats that she stumbled upon through eGullet. Having nothing to lose, I tried it.  It is AMAZING.  I recommended it in a cooking forum, and one of the members cooked 36 hard-boiled eggs, came back to say that every single one was perfectly cooked AND peeled flawlessly and easily.  Convinced yet?

I used the same method to make soft-boiled eggs, and it worked like a charm.  So here it is, plain and simply how to get Eggxhilaration in the kitchen.

HardBoiled

+++++++++++++++++++++++++++++++++++++++++++++++++++++++++++++++++++++

THE PERFECT BOILED EGG

Pour a couple of inches of water in a double-boiler and bring to a boil.

Carefully place as many eggs as you want from the fridge into the steamer basket, and add them on top of the boiling water, reduce heat to a simmer.

Immediately close the pan and start a timer.

For hard-boiled eggs, steam for 10 to 11 minutes, test to see how you prefer them.

For soft-boiled eggs, steam for 6 minutes. 

Have a bowl of cold water ready, when the time is up, use kitchen tongs to remove the eggs from the steamer, dropping them in the cold water to stop cooking. Store in the fridge to enjoy later, or peel right away.

Have a tissue nearby to wipe your tears of joy. 

+++++++++++++++++++++++++++++++++++++++++++++++++++++++++++++++++++++

What I love about the method is its simplicity.  Bring a little water to boil, place a steamer on top and cook to your level of liking, which is easily found in a couple of trials.  Imagine that you want to make a big batch of deviled eggs and would like them all to be gorgeous. Well, this method will save you a ton of grievance.

Messages to thank me can sent by email at sallybr2008 at gmail dot com.  I promise to share them all with Cindy.  😉

SoftBoiled

Steamed for 6 minutes, peeled and ready for an encounter with an Ak-Mak cracker…


SECRET RECIPE CLUB: TACO SALAD

This is the last Monday of August.  We are about to say goodbye to Summer, and I cannot stand the thought of it.  Only Reveal Day of The Secret Recipe Club can bring me some joy under the circumstances. My assignment this month was Flying on Jess Fuel, and I had a blast stalking it and making a list of possibilities to blog about today.  Jess met her husband Nick at a Mexican restaurant, and apparently he went nuts over her jalapeno-eating skills. What a great way to fall in love! They lived in many different places while Nick went to flying school for the Navy, including Enid, a location quite close to Norman, our former home in Oklahoma.

For some reason, I usually pick sweets for my Secret Recipe assignments, but this time I took the road less traveled and went with her Taco Salad, considering that Mexican food would be a fun way to celebrate the way they met.  I find it amusing that some recipes that I order in restaurants on a regular basis are never part of my own cooking at home. Taco Salad is one of those.  For the most part, Tex-Mex restaurants offer dishes over-loaded with cheese, and served with a humongous portion of rice, beans, plus a few flour tortillas for good measure.  Taco Salad is my default request to avoid feeling like a bloated whale as I leave the restaurant.  I made just a few changes in her recipe, and decided to pump up the presentation by making my own tortilla bowls.  Now, that was a ton of fun, but some unexpected problems were encountered.  As I was frantically trying to figure out which cups would be appropriate to shape the tortillas, one of my custard cups fell from the cabinet and crashed on the granite (yes, glass flew everywhere), but not without first hitting my head. OUCH!  And, going on with my usual modus operandi in the kitchen, I burned myself not once, but twice baking those tortilla bowls.  Sometimes I even amaze myself… However, I can tell you it was all worth it!  This recipe rocks, my friends….

TacoSalad

JESS’ TACO SALAD
(slightly modified from Flying on Jess Fuel)

1/4 cup sour cream
1/4 cup yogurt
1/2 cup salsa
1 Tablespoon grapeseed oil
1 lb ground beef
2 tablespoons bulk taco seasoning mix (or 1 packet)
1 can black beans, rinsed and drained
1 large head romaine, chopped
4 tomatoes, chopped
1 bunch scallions, chopped
Black kalamata olives, chopped (to taste)
Shredded Mexican blend cheese (to taste

To make the dressing, combine sour cream, yogurt and salsa in a small bowl. Set aside.

Heat the oil on a skillet and cook the meat for a few minutes. Season with salt (in case your taco seasoning doesn’t have salt already), then add either a packet of store-bought taco seasoning or 2 Tbs of a bulk product such as Penzey’s. Cook for a couple of minutes, add the amount of water recommended by the mix, and cook further just to thicken it slightly. Add the beans to the pan in the last 2 minutes of cooking.

If serving cold, let the meat and bean mixture cool to room temperature. In a large bowl, place half the lettuce, half the tomatoes, half the scallions and half the olives. Top with half the dressing. Top with the meat and bean mixture (you can reserve a little bit for decorating the top, if you want to be fancy). Sprinkle half the cheese on top. Add the rest of the veggies, dressing, and cheese (and meat mix if you reserved some). You can also serve it warm, adding the cold ingredients to the hot meat/beans mixture.

ENJOY!

to print the recipe, click here

IMG_5215

Here you can see some photos of my burning adventure with tortilla cups. You can do this in several ways, but I recommend the muffin tin + custard cup combo.  Using the two custard cups nested together requires that they both fit just right not to tear the tortilla, and also makes it a lot harder to remove the top cup to brown the tortilla in the final moments of baking.

compositeShells

MAKING TACO BOWLS:  Warm a corn tortilla very quickly over an open flame on your stove (I heard you can also use the microwave, but I haven’t tried it).  Spray both sides of the warm tortilla very lightly with canola or olive oil spray.  Immediately place in the muffin tin (or over a custard cup), and place another container on top to keep the shape.  Bake in a 375 F for about 15 minutes, removing the custard cup in the final 5 minutes. Let cool over a rack.

We loved this recipe!  Actually, Phil was raving about it non-stop, and begging me to make it again, and do it soon.  The tortilla cups make it very festive, but the taco stands on its own without any problem, it is fresh, bright, the dressing mixing sour cream and salsa was incredibly tasty!  I used a home-made salsa given to us by Mr. and Mrs. K (thank you, guys!), and it had just the right amount of heat.  Use any store-bought salsa you are fond of, or make your own if you have a chance.

Jess, I loved being assigned to your blog!  This has been one super busy month for us, but I made sure to compose this post within one week of getting the email notification. I fell in love with this recipe right away, and you can bet this will be in a regular rotation in our Bewitching Kitchen! 

To my readers: if you want to see what the other members of my group cooked up this month, poke the blue frog at the end of the post.

ONE YEAR AGO: Semolina Sourdough Boule 

TWO YEARS AGO: Forgive me, for I have sinned

THREE YEARS AGOCracked Wheat Sandwich Bread

FOUR YEARS AGO:  Au Revoir, my Bewitching Kitchen

FIVE YEARS AGO:  French Bread

UP CLOSE AND PERSONAL WITH KALE

Before I urge you to go massage a kale (I admit it does sound a little naughty), let me tell you that not in a million years I would think this step to be necessary. In fact, I used to go into compulsive eye-rolling while reading recipes that call for “massaged kale”. I was not the only one, the lovely Kelly from Inspired Edibles had this to say about the process:

When I first encountered the term ‘massaged kale’ I found it not only pretentious but kind of silly too.
Had kale been elevated to such a precious status that it now required massaging?
I couldn’t just eat the stuff, I needed to pet it too?

I could not have said it better. But, surprisingly enough, she decided to give it a try, and was blown away by the outcome. You should definitely stop by her site to read about her experience.  I was skeptical, but after her endorsement, I dimmed the lights, put some music on, and fully engaged in the role of masseuse.

KaleSalad

MASSAGED KALE SALAD WITH FRESH APRICOT & SPICY SKILLET CHICKPEAS
(slightly modified from Kelly’s Inspired Edibles)

for the salad:
1 generous bunch kale leaves, washed and torn into smaller bite-sized pieces
1 (15 oz) chickpeas, thoroughly rinsed and dried
6 fresh apricots, sliced
1/3 cup shaved almond, slightly toasted

for the spice mix:
1/2 tsp ground cumin
1/2 tsp ground coriander
1/2 tsp curry powder
pinch smoked paprika
pinch of ground cinnamon
sea salt to taste

for the Massage Oil (aka salad dressing):
2 Tbsp olive oil
juice of one lime (about 2 Tbsp)
1 tsp honey
sea salt and coarse black pepper to taste

Warm a dry skillet over medium-high heat and toss chickpeas in warmed skillet for about two minutes to remove any residual moisture. Be sure to shake the pan and/or stir the chickpeas.

Sprinkle the chickpeas with seasonings of choice. including salt and pepper.  Stir seasoned chickpeas to mix the spices. After about two minutes, drizzle a little bit of coconut or olive oil over the seasoned chickpeas and toss to combine. Keep stirring the chickpeas and adjust seasonings as desired. When the chickpeas are well saturated with flavor, remove from heat and reserve.

Meanwhile, in a small bowl combine salad dressing ingredients and whisk well.

Place kale pieces in a large mixing bowl and drizzle with dressing. Simply use your fingers to work the oil/dressing into the kale leaves – watch and feel the color/texture transformation. After only two minutes your kale is beautifully seasoned and softened and all set to eat. You will also find that it’s easier during the massage stage to remove any excessively hard pieces from the center rib of the kale. The leaves will fall off the rib quite easily and your fingers will be in place to feel it happen and facilitate the process.

Place massaged kale in large serving bowl, or on individual serving plates, and dress with seasoned chickpeas, fresh apricot and almonds.

ENJOY!

to print the recipe, click here

composite

Doesn’t that look pretty amazing?
I wish I could massage my face in the morning and have that type of improvement!

ingredients2

 Even though the star of this show should be the kale, I have to say I fell in love with Kelly’s skillet chickpeas. In fact, I’ve been making them this way quite often, varying the spices according to my mood. Those are better than roasted, with the added bonus of being ready in minutes, and without turning the oven on.  I had a hard time not munching on half of them before assembling the salad.

chickpeas

I suppose this recipe will please even hard-core kale haters.  The massage mellows down the harsh texture of kale, bringing it closer to a butter lettuce, but with a more assertive taste.  Of course, joining fresh apricots with the incredibly tasty chickpeas made this salad a complete winner!

I hope you twill try it either as we did, or using different spices and fruits.  I think fresh peaches or even strawberries could be fantastic substitutions.

Kelly, thanks again for another super creative and fun recipe!

ONE YEAR AGO: Black Berry Cherry Sorbet

TWO YEARS AGO: Asparagus Pesto

THREE YEARS AGO: Chocolate and Chestnut Terrine

FOUR YEARS AGO: Under the spell of lemongrass

FIVE YEARS AGO: Greens + Grapefruit + Shrimp = Great Salad!