LADY BUG MACARONS

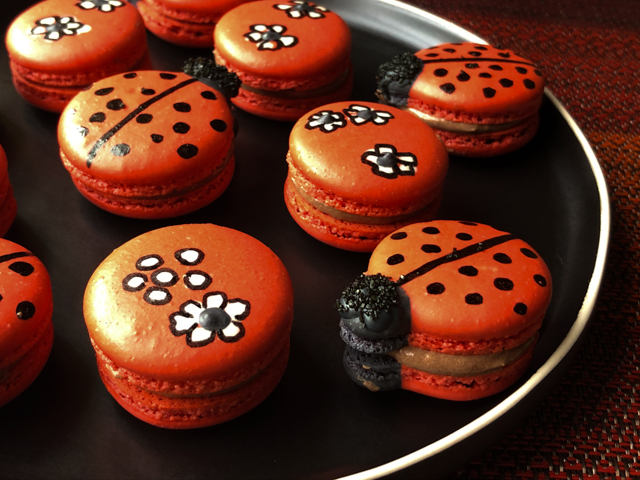
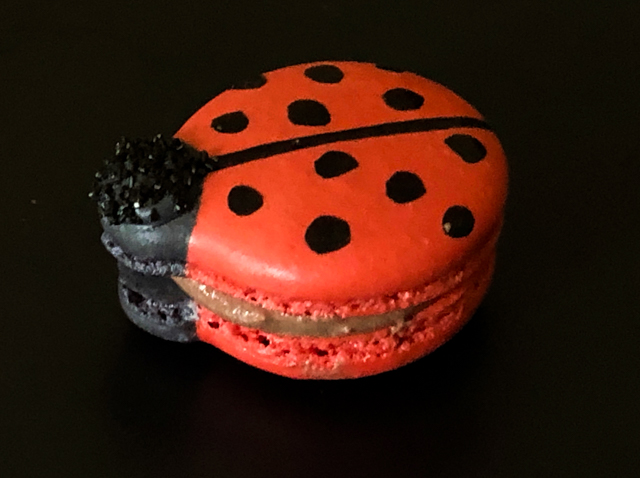
The other day I was minding my own business when a friend tagged me on Facebook. Quite nonchalantly – Caroline, I am looking at you! – she shared a video… “Sally, your next addiction, I mean… project?  ;-)”   The video was all about meringues and macarons, with amazing piping techniques made by a professional baker from Los Angeles. Truth is, this was not the first time a “friend” suggested baking projects for me. Usually they involve either macarons or mirror glazes, all with levels of complexity that make me tempted to ask “do you hate me that much?” or “what have I done to you?”  But, pandemic times do strange things to humans. Somehow, I decided to tackle one of the simpler projects from the video, macarons shaped as Lady Bugs. Having recently enraged Cheetahs, I figured I would be safer upsetting a small insect. I had a total blast with this adventure, and find them adorable… I hope you do too…
LADY BUG MACARONS WITH CHOCOLATE BUTTERCREAM FILLING
(from the Bewitching Kitchen)

For the shells:
200g Icing/powdered sugar
115 g almond flour
115 g egg whites at room temperature (approx. 4 eggs)
1/8 tsp of cream of tartar
100 g granulated sugar
1/4 tsp vanilla paste or extract
red and black food color

for the filling:
Chocolate Russian Buttercream Recipe
113g unsalted butter, room temperature  (1 stick)
1/2 tsp vanilla paste
1/8 tsp of salt
50g  unsweetened cocoa powder (1/2 cup)
200 g condensed milk (about 1/2 can)

to decorate:
Royal Icing (black) or Candy melts (black)
Black sanding sugar
food pen (black)

Make the shells:
Line 3 heavy baking sheets with parchment/baking paper or Silpat mats. Layer the powdered sugar, and ground almonds in a food processor. Pulse until the mixture looks like fine meal, about 12 pulses. Pass through a sieve and transfer to a small bowl or to a sheet of parchment/baking paper. Set aside.

Place the egg whites and cream of tartar in the bowl of a stand mixer fitted with the whisk attachment. Make sure that the bowl and the whisk are impeccably clean. Starting on medium speed, whip the whites with the cream of tartar until they look like light foam. The whites should not appear liquid. The foam will be light and should not have any structure.

Slowly rain in the granulated sugar in five additions, trying to aim the stream between the whisk and the side of the bowl. Turn the speed up to high. Continue to whip the meringue until it is soft and shiny. It should look like marshmallow creme (marshmallow fluff). Add the vanilla and the food color. Whip the egg whites until the mixture begins to dull and the lines of the whisk are visible on the surface of the meringue. Check the peak. It should be firm. Transfer the whites to a medium bowl.

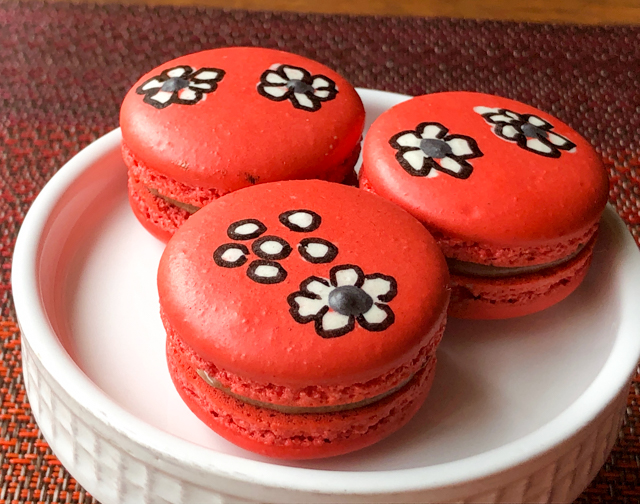
Fold in the ground almond/almond meal mixture in two increments. When the mixture is starting to get homogeneous, remove a small amount and dye black. Remove a small amount and leave it white. Dye the rest red.  Continue with the three portions of batter until you get proper mixing (macaronage).  Put the mixtures in a piping bag fitted with your choice of piping tip (large, 8mm for red, 4mm for black, white can be left without a piping tip, just make a cut in the bag with scissors. To make the lady bugs, pipe a regular round red shell, then a small black round where the head will be. To make the flowers, use the white batter right after piping the red shell, and do the decorations you want, as if working with Royal Icing, “wet on wet” technique.

Slam each sheet  four times on the counter/worktop. Let the unbaked macarons dry until they look dull but not overly dry. Drying time depends on humidity. In a dry climate, the macarons can dry in 15 to 20 minutes; in a humid climate, it can take 35 to 40 minutes.

While the macarons are drying, heat the oven to 300 F. Bake one sheet at a time on the middle rack. Check in 11 minutes. If the tops slide or move (independently of the ‘feet’ when you gently twist the top), then bake for 2 to 3 more minutes. Check one or two. If they move when gently touched, put them back in the oven for 1 to 2 more minutes until they don’t move when touched. Let the macaroons cool for 10 minutes before removing from the pan. The macarons should release without sticking. When the shells are cold, made the black decorations with a food pen, for the lady bug’s body and the outline of the flowers and hearts. If desired, paint the lady bug’s head  with Royal Icing or Candy melts dyed black. Before it sets, sprinkle black sanding sugar.

Make the Russian buttercream. Whip the room temperature unsalted butter on a medium-high speed with a whisk attachment for 5 minutes. The butter should lighten in color as you incorporate air into it. Add in the vanilla extract, salt, and sifted cocoa powder mix on the lowest speed until incorporated.  Pour very slowly the sweetened condensed milk as you whisk at medium-speed. Scrape the  bowl to make sure it is all very well incorporated. Refrigerate until needed to fill the shells.

Assemble the macarons: match two shells similar in size and add buttercream to the bottom of one of them. Place another shell on top and gently squeeze to take the filling all the way to the edge. Store in the fridge overnight before consuming.

ENJOY!

to print the recipe, click here
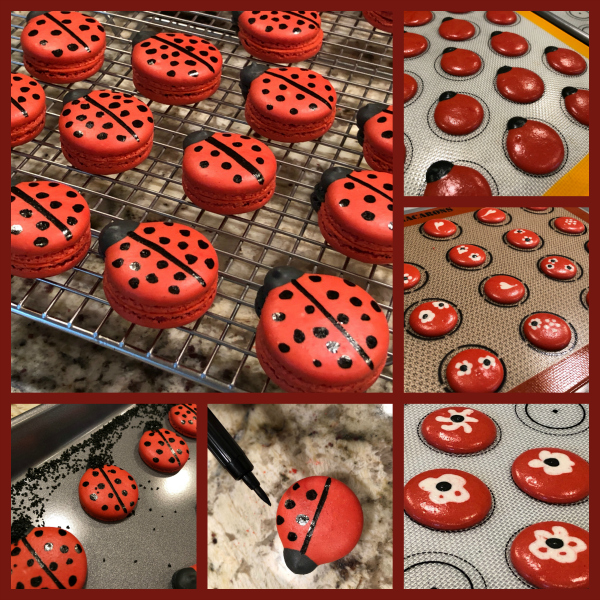
Comments: In the video, the decorations for the lady bugs were made with piped Royal Icing, but I decided that a food pen was simpler. Also, you can make antennas with candy melts piping them on parchment or acetate, allowing them to fully set, and then stick them in between the two shells, held by the filling. Some bakers use licorice strands cut in small pieces. Since my macs are donated and each must be wrapped individually, I skipped the antennas. My Lady Bugs are mutants, and I hope they don’t hate me for that.
The filling… My first time using Russian buttercream. I decided to try it because many people claim it to be less sweet than American and very easy to prepare. I will say that the texture is really nice, but it is still quite sweet. Of course, it is made with condensed milk, so what was I expecting?  I had a few problems with the texture too, I believe you need to get the butter temperature just right, not too cold, not too warm. My buttercream ended up a tad too soft. When opting for a chocolate filling for macs, I think I’ll stick with a ganache-base.

For the flowers and hearts decorations, the secret is to work fast. Pipe two or three red shells and immediately start to work on the details, because you want to make sure the design will set and dry homogeneously with the background.  It is exactly the same technique I used before, except that I used the food pen to outline the drawings. It does not have to be perfect, in fact I think that being a bit more lax with the outline makes them more interesting. That’s my story…  😉
I hope you enjoyed my little Lady Bug Macarons. Just want to make something abundantly clear: Unicorns are simply never ever happening.  There. I feel better.

ONE YEAR AGO: Five-Stranded Braided Bread

TWO YEARS AGO: Green Olive Salad

THREE YEARS AGO: Coffee Macarons Dressed up to Party

FOUR YEARS AGO: Blogging Hiatus

FIVE YEARS AGO: Tomato Tatin

SIX YEARS AGO: Headed to Colorado!   

SEVEN YEARS AGO: Farofa Brasileira

EIGHT  YEARS AGO: Thai-Inspired Pork Tenderloin

NINE YEARS AGO: A yummy Brazilian cake: Bolo de Fuba’

TEN YEARS AGO:  Summer’s Tomatoes

ELEVEN YEARS AGO: Leaving on a jet plane… 

HOME BAKERS COLLECTIVE: JULY PROJECT

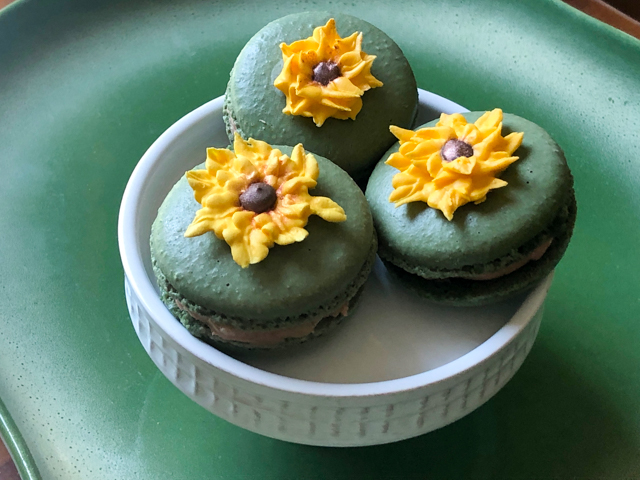
Every month me and several of my friends who shared the amazing experience of baking “in a certain tent” face a little group challenge. This month our challenge was set up by Marissa, a finalist in the Great American Baking Show. Her brief could not be simpler: BAKE YOUR STATE. We could do pretty much anything in all areas of baking, but the theme would be the state we grew up or live in. I coupled the state where I live with my usual state of mind. And the outcome was obvious: Macarons!  Kansas is The Sunflower State, so a bit of sunflower seed “flour” went into the shells. And black walnuts grow wild here, so the filling was a black walnut buttercream. A little dressing up, and here’s my contribution for this month:

KANSAS SUNFLOWER SEED AND BLACK WALNUT MACARONS
(from The Bewitching Kitchen)

For the shells:
200g Icing/powdered sugar
100 g almond flour
15 g sunflower seeds, ground to a fine powder
115 g egg whites at room temperature (approx. 4 eggs)
1/8 tsp of cream of tartar
100 g granulated sugar
1/4 tsp vanilla paste or extract
green food color (I used green, brown and black to get a forest type green)

for the filling:
4 ounces cream cheese (half a regular package), softened
1/2 stick (1/4 cup) butter, room temperature
1/4 teaspoon black walnut extract (or vanilla)
225 g powdered sugar
1/3 cup ground Black Walnuts

to decorate:
2 cups (about 1/2 pound) powdered sugar
2 tablespoons warm water
1 + 1/2 tablespoons meringue powder

Make the decorations, the day before. Beat all ingredients with a KitchenAid type mixer and the paddle attachment for about 7 minutes. Let the icing rest for 10 minutes, adjust consistency if needed. For piping rosettes, it must be thick but soft enough to squeeze through a small piping tip.

Color most of the icing yellow, color a small amount brown.  Use a small leaf tip to make the petals. Add the center with a small icing tip. Pipe your shapes over parchment paper and allow to dry. If desired, brush some of the petals with bronze dust.

Make the shells:
Line 3 heavy baking sheets with parchment/baking paper or Silpat mats. Layer the powdered sugar, and ground almonds in a food processor. Pulse until the mixture looks like fine meal, about 12 pulses. Pass through a sieve and transfer to a small bowl or to a sheet of parchment/baking paper. Set aside.

Place the egg whites and cream of tartar in the bowl of a stand mixer fitted with the whisk attachment. Make sure that the bowl and the whisk are impeccably clean. Starting on medium speed, whip the whites with the cream of tartar until they look like light foam. The whites should not appear liquid. The foam will be light and should not have any structure.

Slowly rain in the granulated sugar in five additions, trying to aim the stream between the whisk and the side of the bowl. Turn the speed up to high. Continue to whip the meringue until it is soft and shiny. It should look like marshmallow creme (marshmallow fluff). Add the vanilla and the food color. Whip the egg whites until the mixture begins to dull and the lines of the whisk are visible on the surface of the meringue. Check the peak. It should be firm. Transfer the whites to a medium bowl.

Fold in the ground almond/almond meal mixture in two increments. Paint the mixture halfway up the side of the bowl, using the flat side of a spatula. Scrape the mixture down to the center of the bowl. Repeat two or three times, then check to see if the mixture slides slowly down the side of the bowl. Put the mixture in a piping bag fitted with your choice of piping tip. Pipe shells, I like to count numbers in my head and use the same count for each shell so they end up similar in size.

Slam each sheet hard four to six times on the counter/worktop. Let the unbaked macarons dry until they look dull but not overly dry. Drying time depends on humidity. In a dry climate, the macarons can dry in 15 to 20 minutes; in a humid climate, it can take 35 to 40 minutes.

While the macarons are drying, heat the oven to 300 F. Bake one sheet at a time on the middle rack. Check in 11 minutes. If the tops slide or move (independently of the ‘feet’ when you gently twist the top), then bake for 2 to 3 more minutes. Check one or two. If they move when gently touched, put them back in the oven for 1 to 2 more minutes until they don’t move when touched. Let the macaroons cool for 10 minutes before removing from the pan. The macarons should release without sticking.

For the black walnut buttercream: Add the cream cheese, butter and vanilla to the bowl of a KitchenAid type mixer and beat until very smooth. Slowly add powdered sugar,  whisk until smooth and fluffy, then fold in the black walnuts.

Assemble the macarons: match two shells similar in size and add buttercream to the bottom of one of them. Place another shell on top and gently squeeze to take the filling all the way to the edge.

To decorate the macarons, add the Royal icing flowers on top using melted Candy melts or royal icing. Store the macs in the fridge for 24 hours for perfect texture.

ENJOY!

to print the recipe, click here

Comments:  I tried using exclusively sunflower seed as the component of the shell but it did not work. So I went with Plan B: added a small proportion to my regular recipe. It does bring a very interesting and noticeable flavor, I liked it a lot. As to the filling, black walnuts can be a bit of an acquired taste. They almost have a perfume quality to them. I am not too wild about extracts, but this one from Beanilla had nice reviews and worked well in the buttercream. If you cannot find or do not like black walnuts, use regular ones, slightly toasted.

The decorations were a lot of fun to make, although I realize the sunflower “look” is quite elusive. I used a very small leaf icing tip (this one) to pipe the petals, and a small icing tip (Ateco #2) for the center. It would be very hard to make the flowers without a little gadget to hold and rotate as you pipe. I made a template with parchment paper, clear acetate over it, and then glued squares of parchment on top with double-stick tape. Make a bunch of squares and have them ready, so you can pipe many flowers and then choose the best ones. Some will look like cabbages after a rabbit attack. Those you don’t use.


I find that the hardest part is getting the consistency of the Royal Icing right. It needs to be thick, but soft enough to flow smoothly without breaking, so it might take a few trials. Be patient. Once you get it all going, it’s quite mesmerizing to see each flower shaping up.

Marissa, thanks for choosing such a cool theme!  Amazing that we are publishing this on the 1st year anniversary of each of us stepping on a plane to the UK to start that incredible journey…

For my readers, make sure to stop by the Home Bakers Collective, to see what my friends baked for their states of choice… If the link is not yet published, try again a little later in the day.

ONE YEAR AGO: Curry Turmeric Sourdough

TWO YEARS AGO: Black Olive Tapenade and Deviled Eggs

THREE YEARS AGO: Blueberry Crumble Coffee Cake

FOUR YEARS AGO: Fresh Strawberry Yogurt Bundt Cake

FIVE YEAR AGO: Quinoa Salad with Red Grapes and Avocado

SIX YEARS AGO: Strawberry Coffee Cake

SEVEN YEARS AGO: Lemon-Poppy Seed Muffins

EIGHT YEARS AGO: Mascarpone Brownies

NINE YEARS AGO: Salmon Tacos

TEN YEARS AGOCinnamon Turban Bread

ELEVEN YEARS AGO: Summertime Gratin

ODE TO HALVA

My last post featured tahini, which is pretty much peanut butter made from sesame seeds. To my personal taste, it is perfection. If you join tahini with sugar and perform some magic tricks cooking them together, you’ll get halva. Until recently I was a halva-virgin, which means my life had a void I was unaware of. When I first tried a little bite, I thought it was quite unusual, with a bit of an unpleasant texture. But then, as the taste slowly developed, I was hooked. Today I share two recipes using halva, Ottolenghi’s Brownies and Cheetah Macarons with Halva Buttercream. Very hard to pick my favorite.

Starting with the brownies, the original recipe is from Ottolenghi’s Sweets. I used a halva containing pistachios, and loved the way every once in a while you bite into a little green gem with a burst of additional nut flavor.  The recipe is available in plenty of websites, I share the one published by Joanne, from Eats Well with Others.

FOR THE RECIPE, CLICK HERE

Comments: This is such a beautiful batter both before and after baking, it will sure give you a smile as you go through the preparation.  Some people might object to brownies because they are too sweet, so this recipe will almost certainly please those in that team. The tahini and halva completely change that aspect.

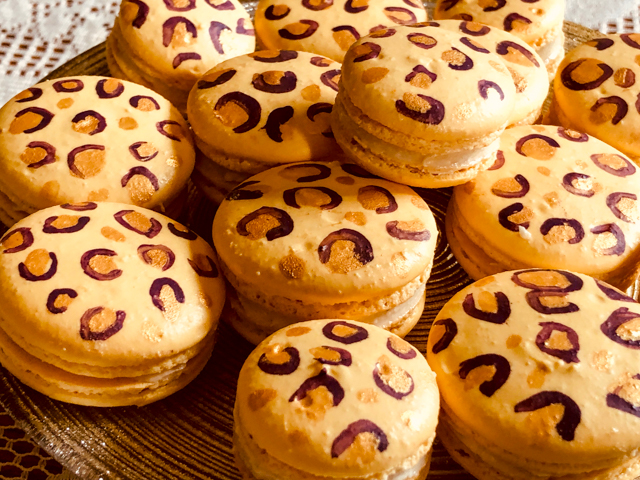
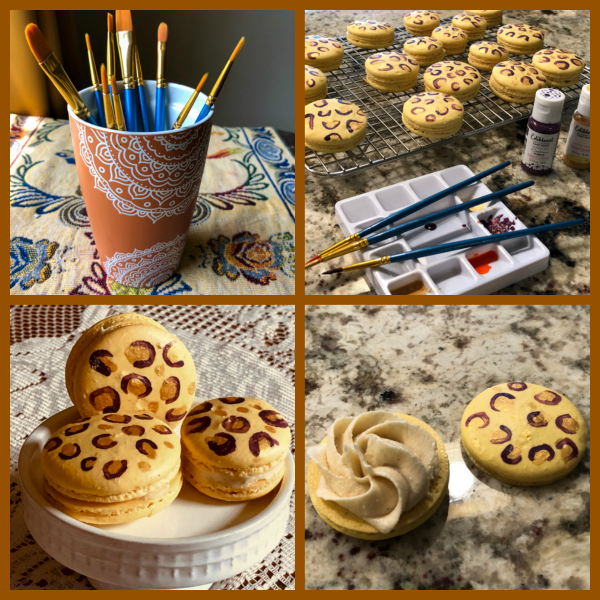
Moving on, let’s talk macarons. I was dying to try painting shells, even though I have exactly zero artistic skills. I watched many youtube tutorials, gathered the right tools for the job, took a deep breath, and went for it. Maybe they would make a cheetah fume, but I can tell you I had so much fun that I might offend other animals in the future.

CHEETAH MACARONS WITH HALVA BUTTERCREAM
(from The Bewitching Kitchen, inspired by Eats Well with Others)

For the shells:
200g  powdered sugar
115 g almond flour
115 g egg whites at room temperature (approx. 4 eggs)
1/8 tsp of cream of tartar
100 g granulated sugar
¼ tsp vanilla paste or extract
yellow or gold food gel dye (I used gold from Sunny Side Up Bakery)
Sweet Sticks purple and gold edible paint

For the halva buttercream:
7 oz vanilla halvah, cubed
2 oz white chocolate, melted
1 cup unsalted butter, room temperature
1 cup powdered sugar
½ tsp vanilla extract
½ tsp kosher salt

Make the shells:
Line 3 heavy baking sheets with parchment/baking paper or Silpat mats. Layer the powdered sugar, and ground almonds in a food processor. Pulse until the mixture looks like fine meal, about 12 pulses. Pass through a sieve and transfer to a small bowl or to a sheet of parchment/baking paper. Set aside.

Place the egg whites and cream of tartar in the bowl of a stand mixer fitted with the whisk attachment. Make sure that the bowl and the whisk are impeccably clean. Starting on medium speed, whip the whites with the cream of tartar until they look like light foam. The whites should not appear liquid. The foam will be light and should not have any structure.

Slowly rain in the granulated sugar in five additions, trying to aim the stream between the whisk and the side of the bowl. Turn the speed up to high. Continue to whip the meringue until it is soft and shiny. It should look like marshmallow creme (marshmallow fluff). Add the vanilla. Whip the egg whites until the mixture begins to dull and the lines of the whisk are visible on the surface of the meringue. Check the peak. It should be firm. Transfer the whites to a medium bowl.

Fold in the ground almond flour mixture in two increments. Paint the mixture halfway up the side of the bowl, using the flat side of a spatula. Scrape the mixture down to the center of the bowl. Repeat two or three times, then check to see if the mixture slides slowly down the side of the bowl. Put the mixture in a piping bag fitted with your choice of piping tip. Pipe shells, I like to count numbers in my head and use the same count for each shell so they end up similar in size.

Slam each sheet hard four to six times on the counter/worktop. Let the unbaked macarons dry until they look dull but not overly dry. Drying time depends on humidity. In a dry climate, the macarons can dry in 15 to 20 minutes; in a humid climate, it can take 35 to 40 minutes.

While the macarons are drying, heat the oven to 300 F. Bake one sheet at a time on the middle rack. Check in 11 minutes. If the tops slide or move (independently of the ‘feet’ when you gently twist the top), then bake for 2 to 3 more minutes. Check one or two. If they move when gently touched, put them back in the oven for 1 to 2 more minutes until they don’t move when touched. Let the macaroons cool for 10 minutes before removing from the pan. The macarons should release without sticking.

Make the halva buttercream: Place the halvah in the bowl of a food processor and blend until smooth. Drizzle in the melted white chocolate and again blend until smooth and incorporated.

Add the butter to the bowl of a stand mixer fitted with the paddle attachment along with the sugar. Beat on medium until fluffy, about 3-4 minutes. Scrape down the sides of the bowl, then add in the vanilla and salt and mix again until incorporated, about 1 minute. Add in the halvah paste and mix until smooth. Fill a pastry bag fitted with a star tip with the frosting. Use to fill macarons. Allow them to mature overnight in the fridge before consuming or freezing for storage.

ENJOY!

to print the recipe, click here

Comments: If you watch videos on how to paint the cheetah motif, some people do the outlining first and then paint the centers. It did not work well for me, the gold paint sipped into the outlining bit, so I prefer to add the centers first, let them dry and then go with the purple around it. Most bakers favor Sweet Sticks brand of edible paint because it is so user-friendly. You shake the bottle well, and it is ready to use. I got mine at Etsy.

The Halva Buttercream was straight from Joanne’s blog, she used it to fill shortbread cookies. I adjusted slightly the composition to accommodate the amount of halva I had. The recipe makes a lot, so you can conceivably make half and it will be enough to fill a full batch of macarons. Once again, the halva cuts through the excessive sweetness of buttercream, and goes well with the almond shells.

If you are interested in more uses for halva, I found these recipes that seem pretty tasty too.

Halva and Chocolate Babka 

Halva Sesame Ice Cream

Halva Chocolate Bark

Tahini Halva Truffles 

ONE YEAR AGO: Brazilian Pao de Queijo (re-blogged)

TWO YEARS AGO: Apricot Linzer Torte

THREE YEAR AGO: A Trio of Air-Fried Goodies

FOUR YEARS AGO: Focaccia with Grapes, Roquefort and Truffled Honey

FIVE YEARS AGO: Moroccan Carrot Dip Over Cucumber Slices 

SIX YEARS AGO: White Chocolate Macadamia Nut Cookies

SEVEN YEARS AGO: Cilantro-Jalapeno “Hummus”

EIGHT YEARS AGO: A Moving Odyssey

ELEVEN YEARS AGO:
 Shrimp Moqueca

4TH OF JULY INSPIRED BAKING

HAPPY 4th OF JULY!

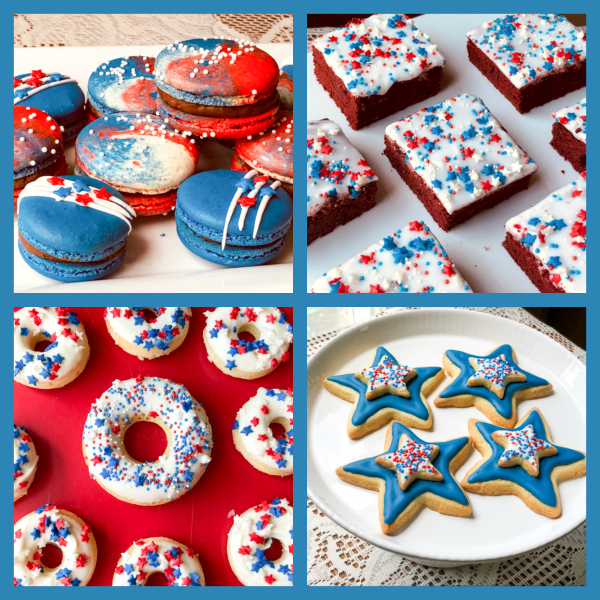
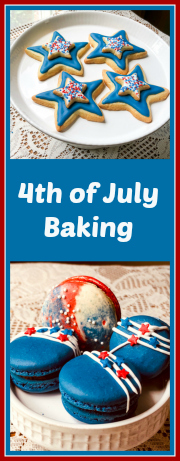
Just a couple of days ago I celebrated 11 years of my naturalization! It always gives me a smile the fact that it fell so close to such an important holiday. Today I share four bakes that celebrate the occasion: macarons, sugar cookies, red velvet brownies, and baked donuts. The common denominator? Sprinkles. I bet you are not surprised.

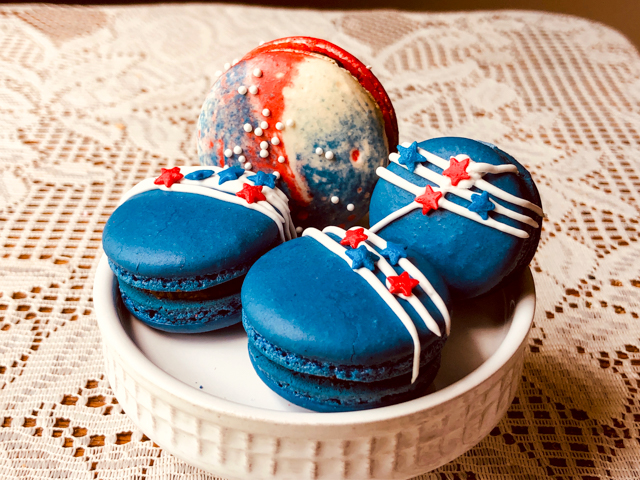
4th OF JULY MACARONS WITH CHOCOLATE COCONUT FILLING
(from the Bewitching Kitchen)

For the shells:
200g  powdered sugar
115 g almond flour
115 g egg whites at room temperature (approx. 4 eggs)
1/8 tsp of cream of tartar
100 g granulated sugar
¼ tsp vanilla paste or extract
red, blue, purple and black food gel dye

for the chocolate-coconut ganache:  
180g cream of coconut
1/8 tsp salt
200g chocolate, cut in small pieces (II used 70% Lindt)

to decorate:
white non-pareils

Make the shells:
Line 3 heavy baking sheets with parchment/baking paper or Silpat mats. Layer the powdered sugar, and ground almonds in a food processor. Pulse until the mixture looks like fine meal, about 12 pulses. Pass through a sieve and transfer to a small bowl or to a sheet of parchment/baking paper. Set aside.

Place the egg whites and cream of tartar in the bowl of a stand mixer fitted with the whisk attachment. Make sure that the bowl and the whisk are impeccably clean. Starting on medium speed, whip the whites with the cream of tartar until they look like light foam. The whites should not appear liquid. The foam will be light and should not have any structure.

Slowly rain in the granulated sugar in five additions, trying to aim the stream between the whisk and the side of the bowl. Turn the speed up to high. Continue to whip the meringue until it is soft and shiny. It should look like marshmallow creme (marshmallow fluff). Add the vanilla. Whip the egg whites until the mixture begins to dull and the lines of the whisk are visible on the surface of the meringue. Check the peak. It should be firm. Transfer the whites to a medium bowl.

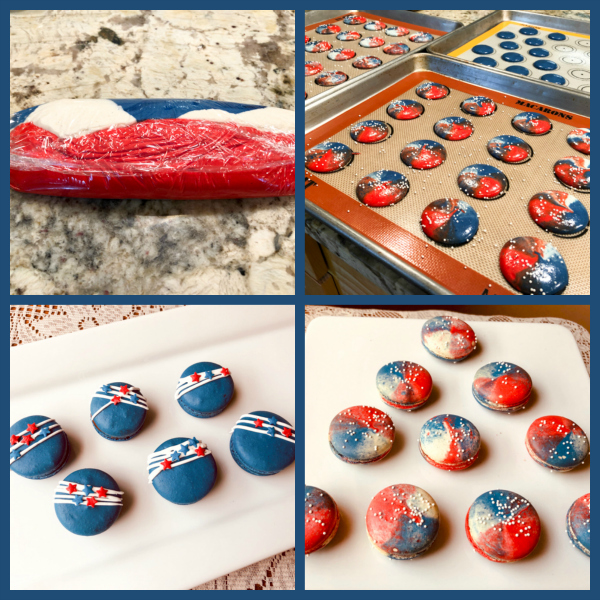
Fold in the ground almond/almond meal mixture in two increments. Paint the mixture halfway up the side of the bowl, using the flat side of a spatula. Scrape the mixture down to the center of the bowl. Repeat two or three times, then check to see if the mixture slides slowly down the side of the bowl.   Divide the batter in three parts, dye 1/3 red, dye 1/3 blue (using a mixture of blue, purple and black to get the tone of blue you like). Leave the final third white. Pour the three batters side by side over plastic wrap, enclose them wrapping the plastic around like a sausage. Drop the bag with the three colors inside a piping bag fitted with a round piping tip.  If you want to make a set of solid color, divide the batter to get a bigger amount of that color and place some of it in a separate piping bag.

Pipe rounds over Silpat or parchment paper in a half-sheet pan and then slam each sheet hard four to six times on the counter. Add sprinkles, if like.  Let the unbaked macarons dry until they look dull but not overly dry. Drying time depends on humidity. In a dry climate, the macarons can dry in 15 to 20 minutes; in a humid climate, it can take 35 to 40 minutes.

While the macarons are drying, heat the oven to 300 F (150 C/130C Fan oven/Gas Mark 2). Bake one sheet at a time on the middle rack. Check in 11 minutes. If the tops slide or move (independently of the ‘feet’ when you gently twist the top), then bake for 2 to 3 more minutes. Check one or two. If they move when gently touched, put them back in the oven for 1 to 2 more minutes until they don’t move when touched.   Let the macaroons cool for 10 minutes before removing from the pan.  The macarons should release without sticking.

Make the ganache. Bring the coconut puree and salt to the boil in a small pan. Remove from the heat and pour over the chocolate in a bowl. Stir well with a whisk until combined. Cover the ganache with plastic wrap touching the surface and leave at room temperature for at least 1 hour. Do not place in the fridge. Whip with a handheld blender for a minute or so to get a slightly thicker consistency for piping.

Match shells and add the filling (I used a piping bag cut open, no piping tip). Decorations for the small macarons were made with Candy Melts (white) and star-shaped sprinkles. Place the macarons in the fridge overnight to mature before enjoying or freezing them for later.

ENJOY!

to print the recipe, click here

Comments: For the tie-dye color effect, add the three batters to the same bag. The easiest way to do that is to open a large piece of plastic film on your countertop, lay the different colors in three large stripes, side by side. Roll the plastic wrap as a sausage and drop it inside a piping bag fitted with your favorite tip. That will make sure the colors get a random mixing as you pipe the shells. I reserved some blue batter to make smaller macarons, all blue. If you want the colors to be more separated, with clear margins (also a very cool effect), simply place them in three separate piping bags and drop them inside a larger one, after cutting their tips (easy to forget, don’t ask me how I know).

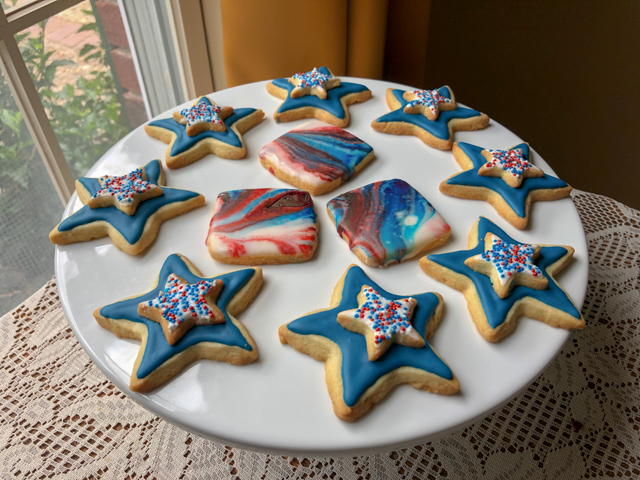
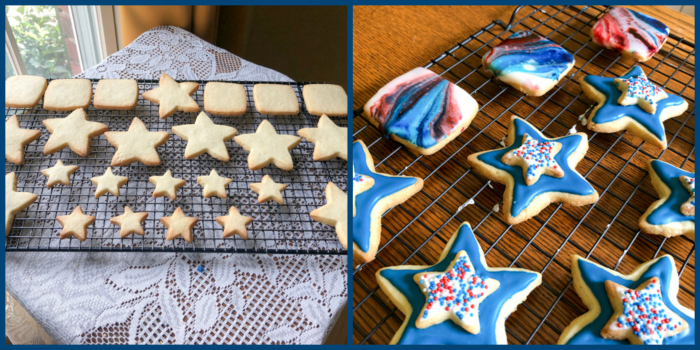
4th OF JULY CARDAMON-ORANGE COOKIES
(from the Bewitching Kitchen)

360 g all-purpose flour
2 teaspoons baking powder
215 g sugar
¼ tsp salt
227 g cup butter, cold and cut in pieces
1 egg
3/4 tsp Fiori di Sicilia extract
zest of 1 large orange
1/2 tsp cardamom

for the Royal Icing:
80 g egg whites
420 g powdered sugar
blue gel food dye

MAKE THE COOKIE DOUGH. Heat oven to 350 F. Combine the flour, baking powder and salt, set aside. Add the orange zest to the sugar and rub it all with your hands to release the fragrant oils. Cream the sugar and butter. Add the egg, Fiori di Sicilia and cardamom, mix well. Scrape the sides of the bowl. Add the flour mixture and beat just until combined.

Dough can be rolled right away in between sheets of parchment paper. Roll to about 1/4″ thick, and cut into shapes. I used large stars, small stars, and rectangles. Place on parchment-lined baking sheets, freeze for 5 to 10 minutes. Bake for about 12 minutes. Transfer to cooling rack and cool to room temperature before icing.

MAKE THE ROYAL ICING: whisk the egg whites and powdered sugar using a KitchenAid type mixer until fully smooth. Adjust if needed with sugar or a little milk. Color half of it blue, keep the other half white. Make the small stars first, flooding them with white icing. Add the sprinkles before the icing sets. As they sit on a rack, flood the large stars with blue icing. Keep the very center empty, all you need is a little icing to glue the small star on top. Since it is going to be a bit heavy, if you flood the whole extension of the cookie, it will risk pressing is too much and running down the edges. Place the small star on top and allow them to dry overnight.

For the painted cookie effect, see this post.

ENJOY!

to print the recipe, click here

Comments: This basic recipe for sugar cookies is the one I had planned to use in the Great American Baking Show. I’ve made it so many times now, that I don’t even need to look at the recipe anymore. It always works. My only advice for you is to use regular American butter, like the simple, humble Land-O-Lakes. That butter seems to be the best in terms of less spreading and less fat leaking during baking. And the cookies taste as good as those made with higher fancier brands. Come to think of it, if I had made it in the tent, who knows how they would turn out? I shiver to think.  😉

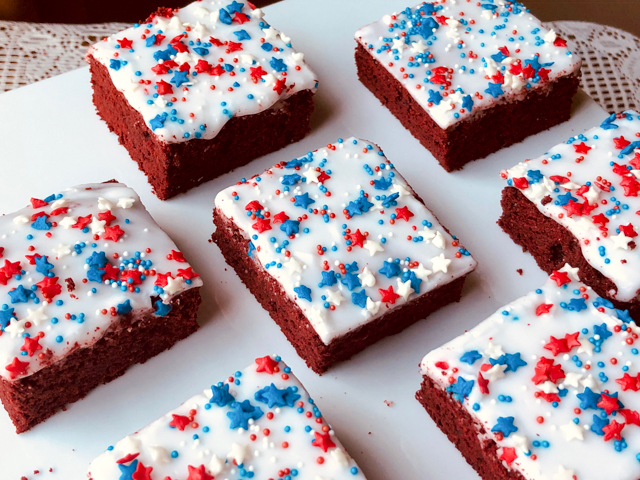
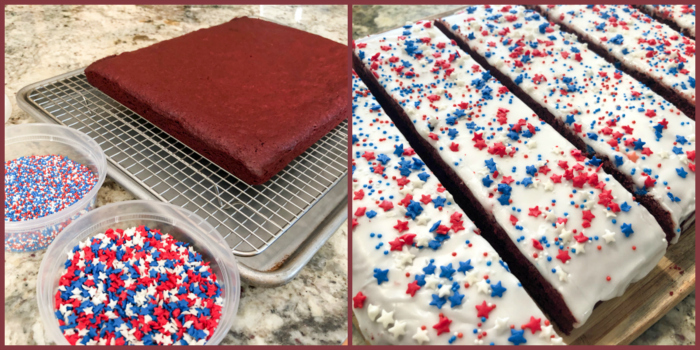
RED VELVET BROWNIE CAKE
(slightly modified from Mary Berry’s Fast Cakes)

300g semi-sweet chocolate, broken into pieces
200g  butter
200g sugar
4 large eggs
1 tsp vanilla paste
150g all-purpose flour
1 + 1/2  tsp baking powder
pinch of salt
8 g red gel color (I used Americolor Super Red)

for icing:
300g powdered sugar
3 tbsp very hot water
squeeze of lemon juice
sprinkles

Heat the oven to 325 F.  Grease a  12 x 9 in pan tin and line with parchment paper. Sift the flour with the baking powder and the salt. Reserve. Gently melt the chocolate and the butter together.  Let it cool slightly and add the sugar, eggs, vanilla and red gel dye. Mix well until smooth and shiny.  Add the flour mixture, stir until no dry bits remain.

Pour the mixture into the pan and level the top. Bake for 35–40 minutes, or until risen and a crust has formed on the surface. The middle should feel just firm when pressed with your fingertips. Leave to cool in the pan, then remove it.

Make the icing: Mix the powdered sugar, water and lemon juice together in a bowl to make a smooth paste, adjust consistency as needed. Spread over the cold cake and top with sprinkles. Cut in pieces to serve.

ENJOY!

to print the recipe, click here

Comments: Pretty much everything I bake these days go for Common Table meals, and they need to be wrapped individually. I am always tweaking the recipes so that they bake as flat and uniformly as possible, and if they have some type of icing, it is not too soft. Crusting buttercream and powdered sugar-based icings are the best.  I tend to use less baking powder than the recipes call for, so feel free to up a little the amount (up to 2 + 1/2 tsp)  if you don’t mind a certain dome effect in the center of your cake. For this recipe a 13 x 9 will give a cake a bit too thin, if that’s the only size you have, perhaps a 10 inch square pan will work better.

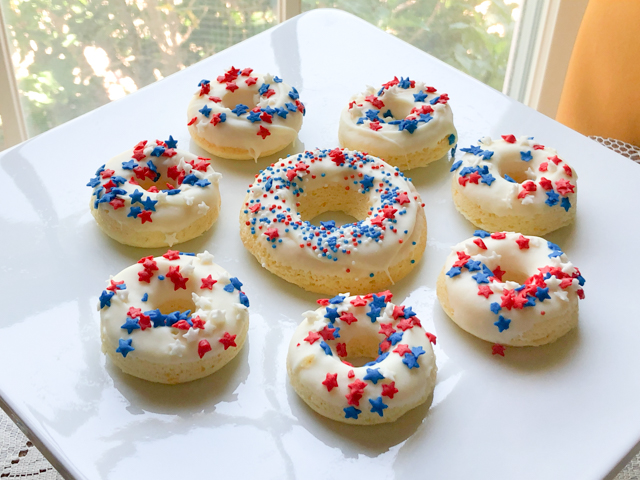
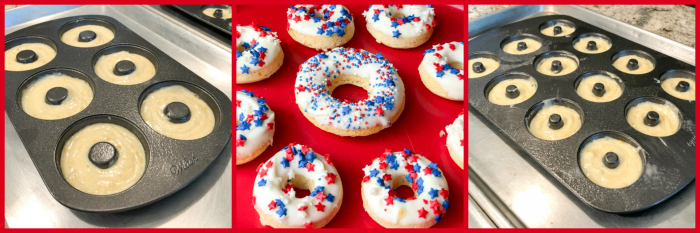
4th OF JULY BAKED ORANGE DONUTS
(from the Bewitching Kitchen)

100g granulated sugar
Zest of 1 large orange
160 g cake flour, sifted
1 + ¼ tsp baking powder
1/4 tsp salt
½ cup buttermilk
1 egg
1 tbsp butter, melted
½ teaspoon vanilla paste

Spray your donut pans with a very light coating of baking spray. I used one mini donut pan and one regular size.  Heat oven to 400 F.

In a small bowl combine sugar and orange zest until the sugar is moistened and fragrant. In a large mixing bowl, sift together cake flour, baking powder, and salt. Stir in sugar mixture.

Add buttermilk, egg, butter, and vanilla and stir until just combined. Add batter to a piping bag and fill each donut cup approximately one-half full.

Bake for about 10 minutes or until the top of the donuts spring back when touched.
Let cool in pan for 4–5 minutes before removing. Finish the donuts with melted Candy Melts and add sprinkles before it sets.

ENJOY!

to print the recipe, click here


Comments: I’ve made these donuts about a month ago using orange blossom water instead of vanilla paste, and to me they tasted a bit artificial. So this time I kept the orange theme exclusively in the zest. Maybe it depends on the brand of orange water you have. At any rate, they are very simple to prepare and have a nice texture. Fiori di Sicilia would probably be quite nice also, but I did not want to have two exact same flavors in the weekly bake. All these goodies were included in the same Common Table meal of July 3rd.

I hope you enjoyed this small collection of 4th of July bakes, and that you are having a nice weekend. Please stay vigilant, observe social distance, and wear a mask when outside. It is not a political issue, it is a matter of your health and that of those around you.

A mask is a sign that you care.

For a recent review on staying safe during this pandemic, visit this post.

ONE YEAR AGO: In My Kitchen, July 2019

TWO YEARS AGO: Brigadeiros for the 4th of July

THREE YEARS AGO: Kaleidoscopic Macarons

FOUR YEARS AGO: Zucchini Noodles with Sun-dried Tomato Pesto

FIVE YEARS AGO: In My Kitchen, July 2015

SIX YEARS AGO: Sous-vide Pork Chops with Roasted Poblano Butter

SEVEN YEARS AGO: Roasted Strawberry-Buttermilk Sherbet

EIGHT YEARS AGO: Amazing Ribs for the 4th of July!

NINE YEARS AGO: Baby Back Ribs on the 4th of July

TEN YEARS AGO: Blueberry Muffins

ELEVEN YEARS AGO: A Pie for your 4th of July


ONE TWO THREE MACARONS

One color, two colors, three colors, that is…  

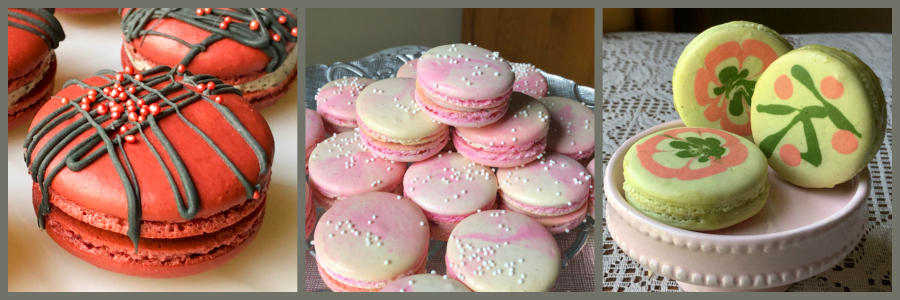
Starting from the simplest, the idea is to try to match the shell with the sprinkle, and then choose a contrasting tone for the drizzle. Easy-peasy. What I loved the most about these macarons? The filling. Black Sesame Ganache. It cuts the excessive sweetness of the white chocolate, and echoes the nut component of the shell. I will be making that again for sure. For all macarons, use the basic recipe below.

ONE COLOR

BLACK SESAME MACARONS
(from The Bewitching Kitchen)

For the shells:
200g  Icing/powdered sugar
115 g Ground Almonds/Almond Meal
115 g egg whites at room temperature (approx. 4 eggs)
1/8 tsp of cream of tartar
100 g granulated sugar
¼ tsp vanilla paste or extract

for the black sesame ganache:  
300 g white chocolate, cut in small pieces
100 g heavy cream
1 tablespoon black sesame powder
1 tsp black sesame seeds

 to decorate:
Candy melts + food gel dye + sprinkles

Make the shells:
Line 3 heavy baking sheets with parchment/baking paper or Silpat mats. Layer the powdered sugar, and ground almonds in a food processor. Pulse until the mixture looks like fine meal, about 12 pulses. Pass through a sieve and transfer to a small bowl or to a sheet of parchment/baking paper. Set aside.

Place the egg whites and cream of tartar in the bowl of a stand mixer fitted with the whisk attachment. Make sure that the bowl and the whisk are impeccably clean. Starting on medium speed, whip the whites with the cream of tartar until they look like light foam. The whites should not appear liquid. The foam will be light and should not have any structure.

Slowly rain in the granulated sugar in five additions, trying to aim the stream between the whisk and the side of the bowl. Turn the speed up to high. Continue to whip the meringue until it is soft and shiny. It should look like marshmallow creme (marshmallow fluff). Add the vanilla. Whip the egg whites until the mixture begins to dull and the lines of the whisk are visible on the surface of the meringue. Check the peak. It should be firm. Transfer the whites to a medium bowl.

Fold in the ground almond/almond meal mixture in two increments. Paint the mixture halfway up the side of the bowl, using the flat side of a spatula. Scrape the mixture down to the center of the bowl. Repeat two or three times, then check to see if the mixture slides slowly down the side of the bowl.   Put the mixture in a piping bag fitted with your choice of piping tip (for rosette macarons, use a Wilton 1M type).  If you don’t have a macaron mat, draw circles on baking/parchment paper about 2inches/5cm in diameter & turn the paper over before placing on the baking sheets.  Pipe shells, I like to count numbers in my head and use the same count for each shell so they end up similar in size.

I pipe inside the circles to about 1 ¾ inches/4.5cm but you can go to 1 ½ inches (3.8cm) & the macarons will spread & fill the circle while drying.

Slam each sheet hard four to six times on the counter/worktop. Do not slam the sheets if you are making rosette macarons, just let them dry. Let the unbaked macarons dry until they look dull but not overly dry. Drying time depends on humidity. In a dry climate, the macarons can dry in 15 to 20 minutes; in a humid climate, it can take 35 to 40 minutes. Rosette macarons benefit from longer drying time.

While the macarons are drying, heat the oven to 300 F (150 C/130C Fan oven/Gas Mark 2). Bake one sheet at a time on the middle rack. Check in 11 minutes. If the tops slide or move (independently of the ‘feet’ when you gently twist the top), then bake for 2 to 3 more minutes. Check one or two. If they move when gently touched, put them back in the oven for 1 to 2 more minutes until they don’t move when touched.   Let the macaroons cool for 10 minutes before removing from the pan.  The macarons should release without sticking.

For the black sesame ganache: 
Place the heavy cream in a small saucepan, add the black sesame powder (you can grind enough sesame seeds in a spice grinder until you get the right amount, or use store-bought powder).  Bring to a gentle boil, shut down the heat, cover the pan and allow it to sit for 20 minutes. Bring it gently back to a simmer again, drizzle on top of the chocolate. After a couple of minutes, gently mix with a spatula until the chocolate melts. Add the sesame seeds. Bring to room temperature or place in the fridge for a couple of hours. Use a handheld mixer to whip the ganache lightly before using to fill the shells.

Assemble the macarons: match two shells similar in size and add ganache to the bottom of one of them. Place another shell on top and gently squeeze to take the filling all the way to the edge.

To decorate the macarons,  melt Candy Melts in the microwave, add black food dye and use to drizzle the top. Add sprinkles before the candy melt hardens.

Store the macs in the fridge for 24 hours for perfect texture.

ENJOY!

to print the recipe, click here

Comments: The ganache made a little more than I needed for all the shells, I used it later to make some shortbread sandwich cookies, and it worked quite well also. The only thing to be concerned about when you do a white chocolate ganache is to make sure to increase the proportion of chocolate, or you will end up with a filling that is too soft, even if you whip it.  I hope you try this filling.

TWO COLORS

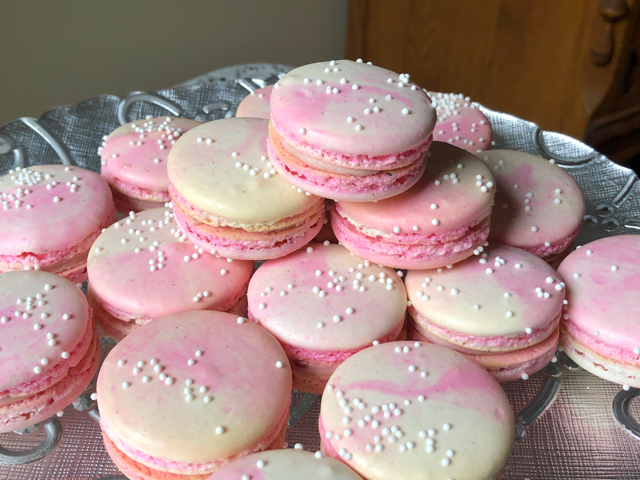
CHERRY BLOSSOM MACARONS
(from The Bewitching Kitchen)

basic macaron recipe above
Divide the batter in two portions, keep one white
Add a drop of pink food gel to the second portion

Place small amounts of batter in alternating colors over a layer of plastic wrap. Enclose the batter by wrapping the plastic around it, then place it inside a piping bag fitted with your choice of piping tip (see composite picture below).

Add sprinkles right after piping, before a skin forms.

for the filling:
8 ounces white chocolate
1/2 cup black cherry jam
3 tablespoons heavy cream
1/2 tsp Sakura essence

Place chocolate in a heatproof bowl and set over a pot of simmering water on low heat. Stir chocolate until melted. Remove from heat, and whisk in jam, heavy cream and Sakura essence. Cover and chill 2 hours, or until cold. Whip it with a hand-held electric mixer until it reaches a good consistency for piping. Transfer ganache to a piping bag and use to fill shells.

to print the recipe, click here

Comments: The way you place the different colors inside the piping bag will affect the final look of the shells. In this case, adding them in a random pattern, you’ll get quite unique swirls as you pipe along, it’s really a lot of fun. Yes, I know, I am too easily amused.  You could omit the sprinkles and go just for the swirl look, but I liked the added layer of decoration they provided. Plus, I need to justify my compulsion to buy sprinkles so if there is ANY chance of incorporating them into a cookie… there they shall be.

THREE COLORS

PISTACHIO MACARONS
(from the Bewitching Kitchen)

same basic recipe as above

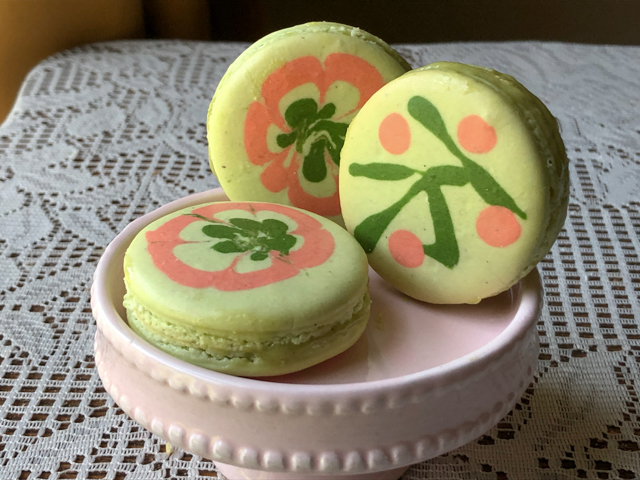
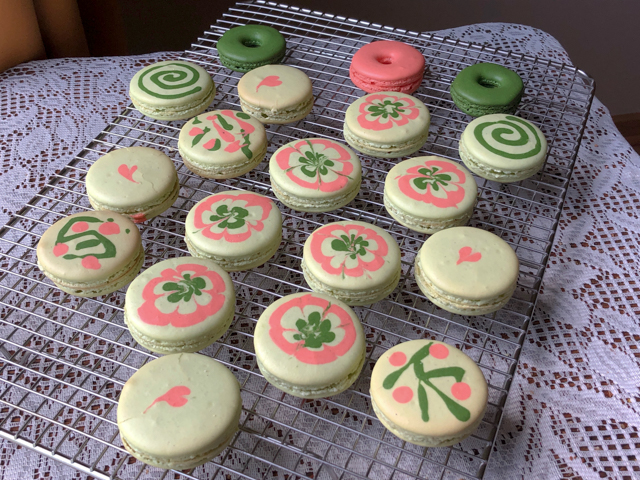
Divide the batter in 3 portions. 3/4 will be dyed very light green (I used Sugar Art Master Elite Kiwi); the remaining will be divided in two small portions, and dyed darker green (I used Artisan Accents Forest Green), and coral (I used Sugar Art Master Elite Flame). Place the light green batter in a regular piping bag fitted with your favorite tip. Place the other colors in small piping bags, no tips needed. Cut a small opening right before using.

Pipe a slightly smaller shell than you need using the light green batter. Make about 6 shells and stop. Immediately use the other two colors to make your chosen designs.  Continue piping until you use all the batter. If you have leftovers of any color, just pipe small macs or donut macs to use them up. Bang the tray very gently to release bubbles and bake.

for the pistachio ganache:
150 g white chocolate, cut in small pieces
40 g heavy cream
2 tablespoons pistachio paste
tiny amount of green food color (optional)

Bring the heavy cream to a gentle boil in a saucepan. Add to the chocolate together with the pistachio paste, and whisk until melted. You might need to use the microwave very briefly. Add green food dye if you like. Leave it at room temperature or in the fridge for a couple of hours, then whip lightly with a handheld mixer.  Use to fill the shells.

to print the recipe, click here

Comments: These are SO MUCH FUN!  A little departure on my first attempt at a similar decoration technique. Ok, I admit that if you are a beginner at macaron adventures, it might be better to practice a bit with a regular macaron, then move to the two-color version before attempting these. The only problem is that you need to work fast. But the possibilities for designs are endless, really.  I also think that for this particular type, you are better off with the French meringue method. It is a bit too convoluted to do the Italian meringue and divide it in three portions, considering you have to divide the egg whites and the colors in meringue and  almond-sugar portions, so the whole thing  becomes a bit too complex for my taste. Two-colors would be doable, but three or more? I prefer to stick with the French meringue. But if you find a way to do it and the Italian meringue is your favorite method, let me know your secrets…

My first post in the 12th year of blogging had to be my favorite thing to bake. No matter how many mirror glazes, mousse cakes, sourdough breads, or cookies I make, macarons will always have a special place in my heart.

ONE YEAR AGO: Marshmallow Macarons

TWO YEAR AGO: Fujisan Bread

THREE YEARS AGO: Air-Fried Tomatoes with Hazelnut Pesto & Halloumi Cheese

FOUR YEARS AGO: Red Velvet Layered Cake

FIVE YEARS AGO: Lemon-Lavender Bars

SIX YEARS AGO: Quinoa Fried Rice

SEVEN YEARS AGO: Carrot Flan with Greens and Lemon Vinaigrette

EIGHT YEARS AGO: The Secret Recipe Club: Granola Bars

NINE YEARS AGO:  Awesome Broccolini

TEN YEARS AGO:  A Twist on Pesto

ELEVEN YEARS AGO: Ciabatta: Judging a bread by its holes