For those who celebrate, Merry Christmas!
For those who don’t, Happy Holidays!
When I first arrived in the US for my post-doc (bringing with me a pretty broken English), I thought that a straight translation from Portuguese (Feliz Natal) would work quite well to greet my friends. I had no idea that Merry Christmas is the greeting of choice. There is a very interesting story behind it, if you are fond of this type of trivia click here. At any rate, if you happen to know a foreigner who is new to the US of A, do him or her a favor and make this point clear. My American colleagues were very sweet and graciously accepted my Happy Christmas, until a good soul pushed me to the side and explained that even though there was nothing fundamentally wrong with happy, merry was the way to go. Now, would it be too bad to wish you a Cran-Merry Christmas? I hope not. Cranberries are everywhere these days, they are appropriately red, cute, plump, go well in sweet and savory dishes, they are festive, and… I love them. Since it is the season of giving, I share not one but two recipes. Let’s start by sweetening up this festive day, shall we?
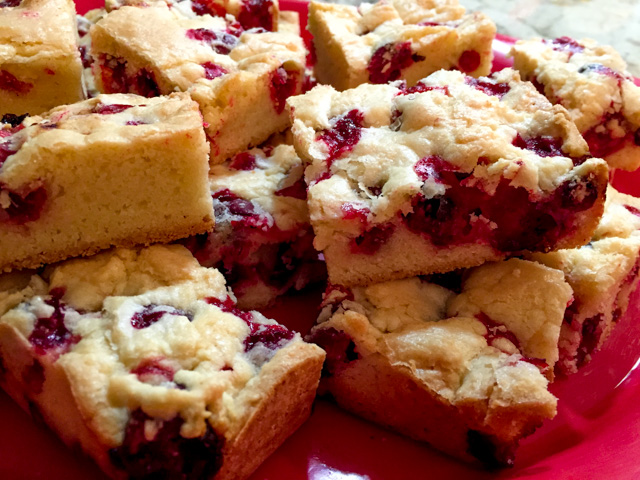
CRANBERRY CHRISTMAS CAKE
(from Barefeet in the Kitchen)
3 eggs at room temperature
2 cups sugar
3/4 cup butter, softened
1 teaspoon vanilla
2 cups all-purpose flour
12 oz fresh cranberries
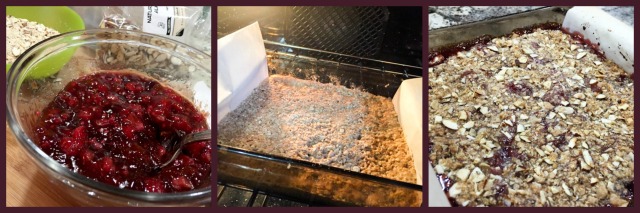
Heat oven to 350 degrees. With a mixer, beat the eggs with the sugar until slightly thickened and light in color, about 7 minutes. The mixture should almost double in size. The mixture should form a ribbon when you lift the beaters out of the bowl. Add the butter and vanilla; mix two more minutes. Stir in the flour until just combined. Add the cranberries and stir to mix throughout.
Spread in a buttered 9×13 pan. Bake for 45 to 50 minutes, or until lightly browned and a toothpick inserted near the center of the cake comes out clean. Let cool completely before cutting into squares.
ENJOY!
to print the recipe, click here

Comments: This cake is a must-make. Period. First there will be a bit of a surprise from the sharp tartness, but then everything mellows down into the perfect amount of sweetness. Quickly you’ll realize that behind its adorable face lies danger. One piece will very likely lead to a second one. Maybe a third… I baked it around 6pm for a small reception we were hosting a couple of hours later, so I could not quite let the cake cool completely before slicing it. No harm was done, though. Next day it was even better, I think the flavor of the cranberries permeated the crumb a little more. It was perfect to start the day with a cup of coffee. So there you have it, a very simple cake to prepare, huge pay-off in taste. You are very welcome….

And now that we got the sweetness taken care of, let’s take cranberries on another culinary adventure: Cranberry Sauce, a mandatory side dish at Thanksgiving. So tasty that it should never be limited to one day of your year. When it comes to cranberry sauce, you will find countless versions, often using ingredients like Port wine, dried figs, pomegranate molasses, all sorts of exotic additions that promise to make it truly memorable. Not that theres’s anything wrong with it, I even have one such version in the blog. However, when I saw Dorothy’s recipe and read her comments about it, I knew I had to try it myself. She went through many recipes, always coming back to this one. Simplicity, few ingredients, 15 minutes of your time.
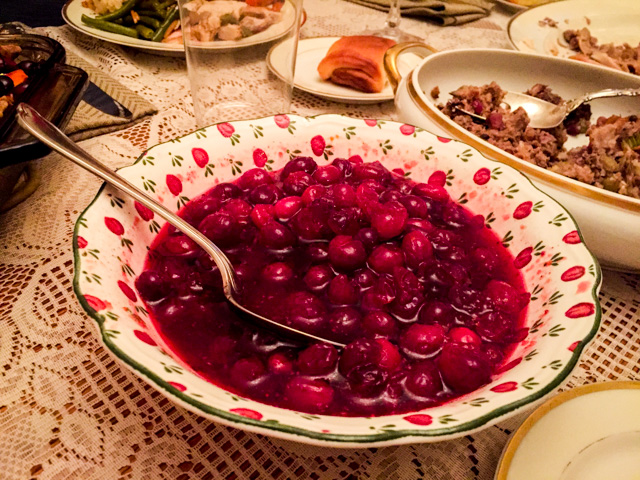
BEST EVER CRANBERRY SAUCE
(from Shockingly Delicious)
1 1/4 cups granulated sugar
3/4 cup water
1/4 teaspoon ground cloves
1/4 teaspoon ground allspice
1/2 teaspoon ground cinnamon
1 (12-ounce) bag fresh cranberries
Zest of 1 orange (orange part only)
In a large, heavy saucepan, add sugar, water and spices and cook, stirring often, until sugar dissolves, syrup is clear and comes to a rolling boil, about 3 minutes. In a colander, rinse and pick over the cranberries to remove any mushy ones. Add cranberries to boiling syrup and continue cooking, uncovered, just until they begin to pop, about 2-3 minutes (set the timer). Be careful not to cook them too long or they will get mushy.
Remove from heat, stir in orange zest and cool to room temperature, uncovered. Ladle into clean jars or plastic containers, label and refrigerate until serving time.
Makes about 2 1/2 cups sauce, enough to serve 6-8.
ENJOY!
to print the recipe, click here
Comments: I had no intention to blog on this recipe until I tried the sauce. It was everything Dorothy promised it to be. The spices are just right, and the texture of the cranberries spot on. I think I’ve always over-cooked my cranberries thinking that was the way to do it. Trust Dorothy’s directions, set the timer, stop the cooking even though you think it’s not nearly enough. We had one vegetarian guest at our home for Thanksgiving who arrived from India just a few months ago, so it was his first Thanksgiving and first contact with cranberry sauce. He absolutely loved it, in fact I almost wanted to take a picture of his plate, he had a bit of mashed potatoes and this humongous amount of cranberry sauce all around it… Made my day!
ONE YEAR AGO: Merry Christmas!
TWO YEARS AGO: The Avocado Mousse that Stole the Show
THREE YEARS AGO: Sourdough Popovers
FOUR YEARS AGO: Merry Christmas!
FIVE YEARS AGO: Sourdough Focaccia, with a twist
SIX YEARS AGO: Merry Christmas!