SECRET RECIPE CLUB: TEXAS SHEET CAKE

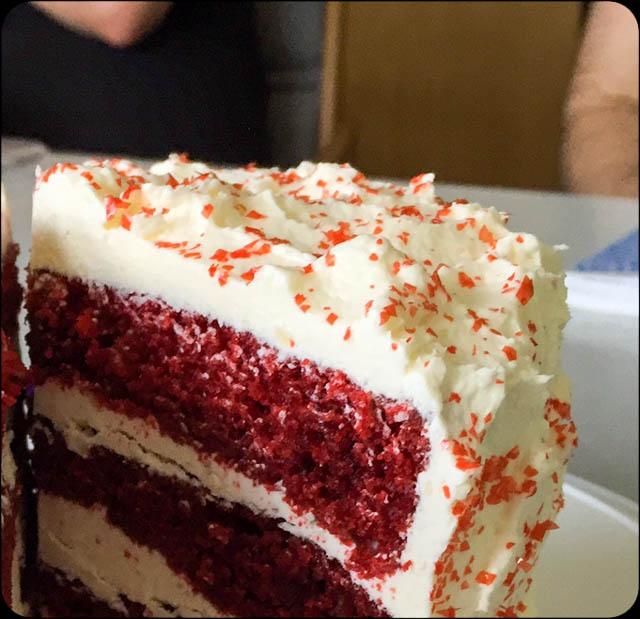
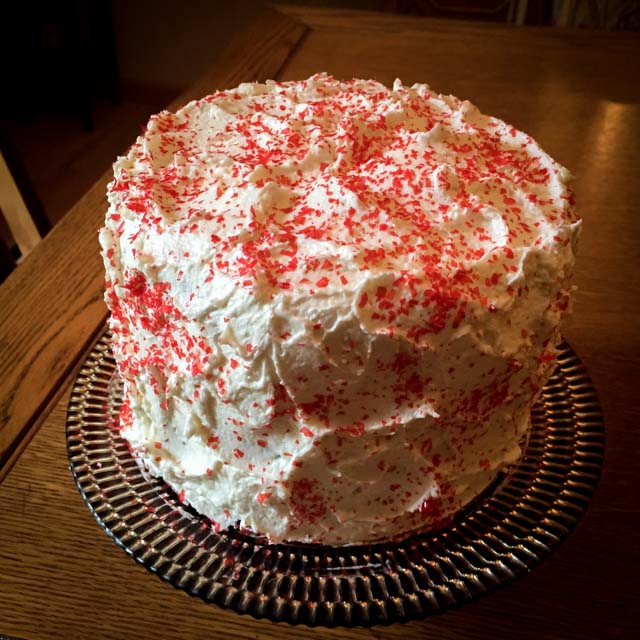
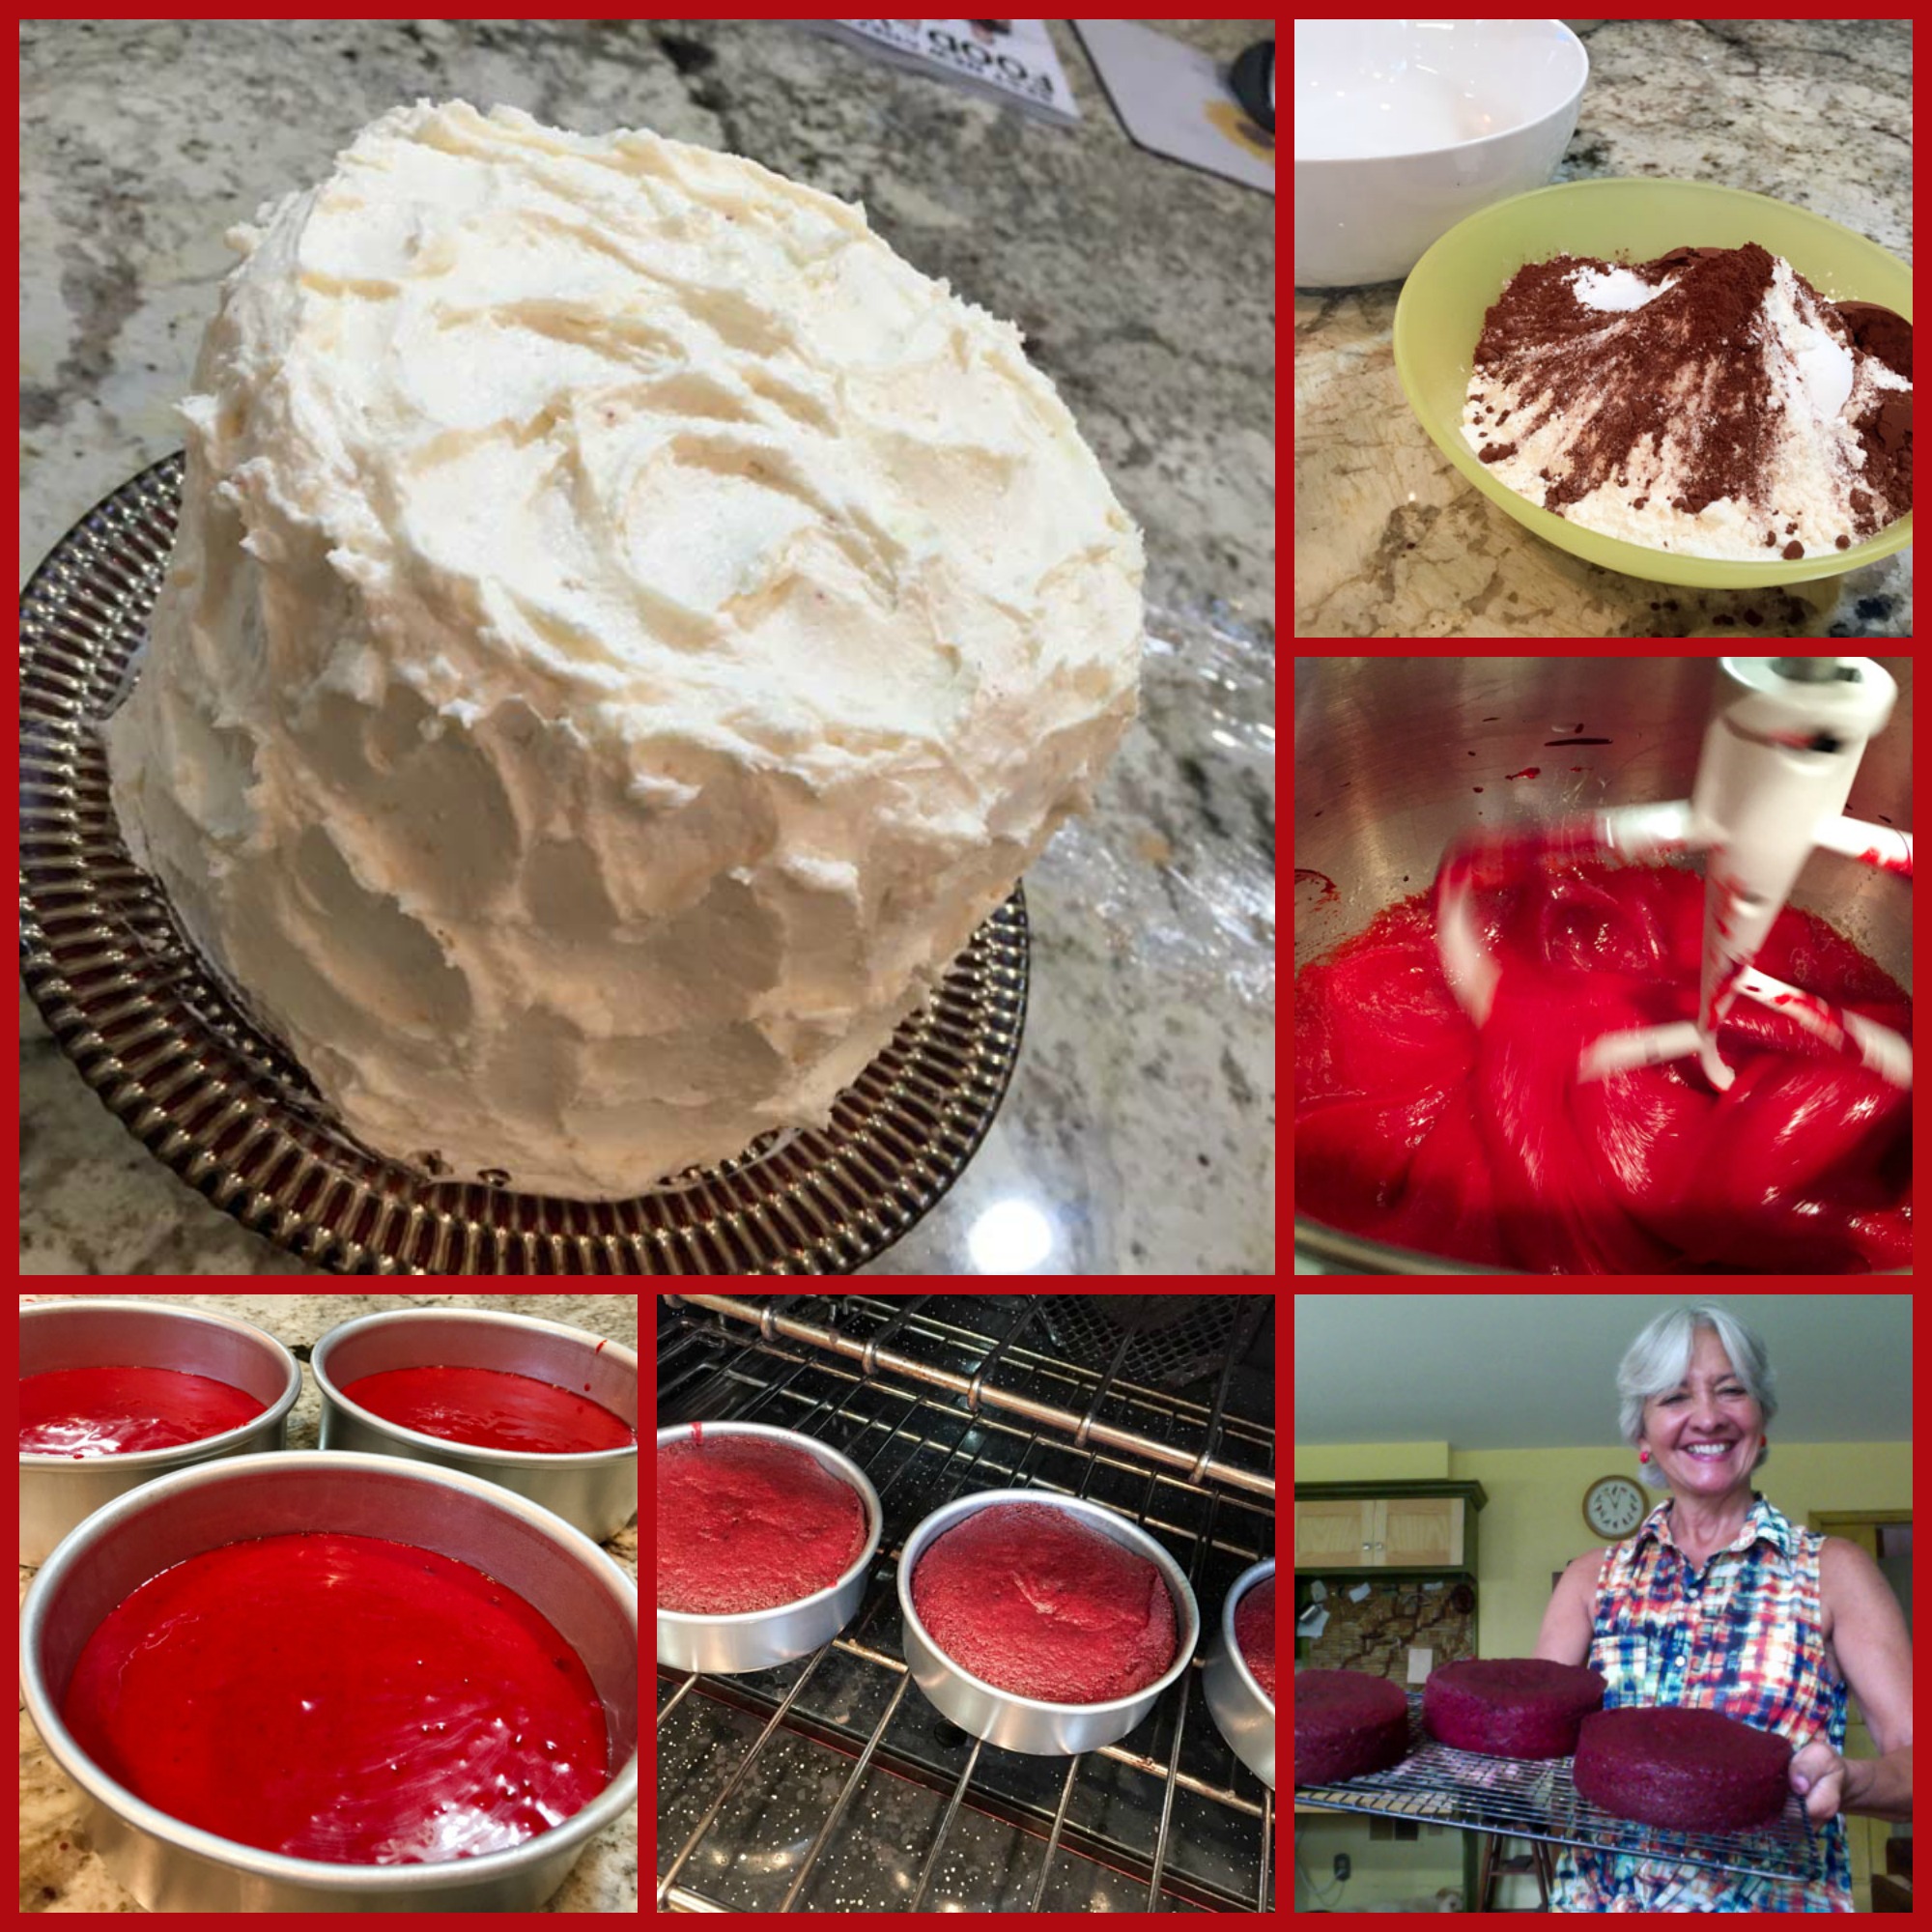
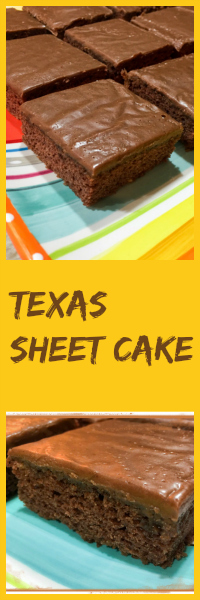
September is here!  The month that brings with it the end of the summer, and the beginning of Sally’s foul mood. Aren’t you thrilled? Well, I cannot let meteorology ruin the mood of my favorite event in the whole blogosphere: The Secret Recipe Club‘s Reveal Day is here, for us members of Group A.  My assignment was the blog Crazed Mom, hosted by Nicole, from St. Louis. Crazed Mom, what a cute name for a site, it tells it all. Nicole is a mom to five teenagers. Let’s make a brief pause to let that sink in. Five teenagers. She also takes care of a toddler and a newborn on a regular basis. Five teenagers. One toddler. One newborn. I have a full-time job that demands quite a bit of energy and commitment, but I am always in awe of women whose job is to take care of one or several kids. How do they do it? I know there are plenty of rewards, but imagine having to deal with kids at different phases, one going to school, dealing with homework, sleepovers, another too young to leave your radar, some very picky eaters, some with food allergies. And of course, you are also a woman, a wife,  a daughter, maybe a sister, with goals and dreams for yourself. Not easy to find balance.  But Nicole does it all and blogs about a ton of interesting stuff, in fact she’s been a presence online for 12 years! Unreal!  I had a lot of fun browsing her site, even if this past month was particularly sad and stressful for us.  I did not have as much time as I normally like to indulge in the stalking process, but still composed a list of possibilities to share with  you today. Here they are:  Chicken Kiev with a Twist,  The Best Blueberry Muffins,  Caramel Coconut Cupcakes, and Spicy Gingerbread with a Mocha Glaze (if that doesn’t make you go weak in the knees, you need therapy).  But once I saw her take on a Texas Sheet Cake, I decided I had to make it. I’ve often heard about it, but had never tasted or even seen one face-to-face. I had to take matters into my own hands, and jump on this opportunity to enlighten myself on this American classic.

Texas Sheet Cake

TEXAS SHEET CAKE
(from Crazed Mom)

for the cake:
1 cup butter
1 cup water
1/4 cup cocoa
2 cups sugar
2 cups flour
1/8 teaspoon salt
2 eggs
1 teaspoon baking soda
1/2 cup sour cream
1 teaspoon vanilla

for the icing:
1/2 cup butter
1/4 cup cocoa
1/4 cup plus 2 tablespoons milk
1 box (1 pound) confectioners’ sugar (sift it first to remove lumps – otherwise icing remains lumpy)
1/2 teaspoon vanilla

For the cake: In a saucepan, combine the butter, water and cocoa over med. heat until the butter melts. Don’t let it cook too long. In a separate bowl, combine the sugar, flour, salt, eggs, and baking soda. Add the butter mixture to the dry ingredients. Careful, it’s hot. Add the sour cream and vanilla and mix well. Pour into a sheet cake pan or jelly roll pan. Bake at 350 degrees for 20 minutes.

For the icing: In a saucepan, combine the butter, cocoa and milk over medium heat and bring to a boil. Immediately remove from heat and combine with confectioners sugar and vanilla. Mix well with a mixer to remove lumps. Spread over the sheet cake while it is still hot.

ENJOY!

to print the recipe, click here

compositesheet

Comments: This is a rich cake. Very rich. As Nicole says, eat a slice and go take a walk. But I tell you one thing, it is decadent delicious, it’s the kind of cake that with each bite you feel more and more naughty, which is a good feeling to have every once in a while.  I took it to our department and it was basically gone within 45 minutes. I also got several visits to the lab of colleagues thanking me and giving me hints of “you can bake this one again anytime!”  I guess by now they realized that a food blogger rarely repeats recipes and once something really good shows up in the mail room, they better enjoy. Be Zen. Savor the moment. Literally.

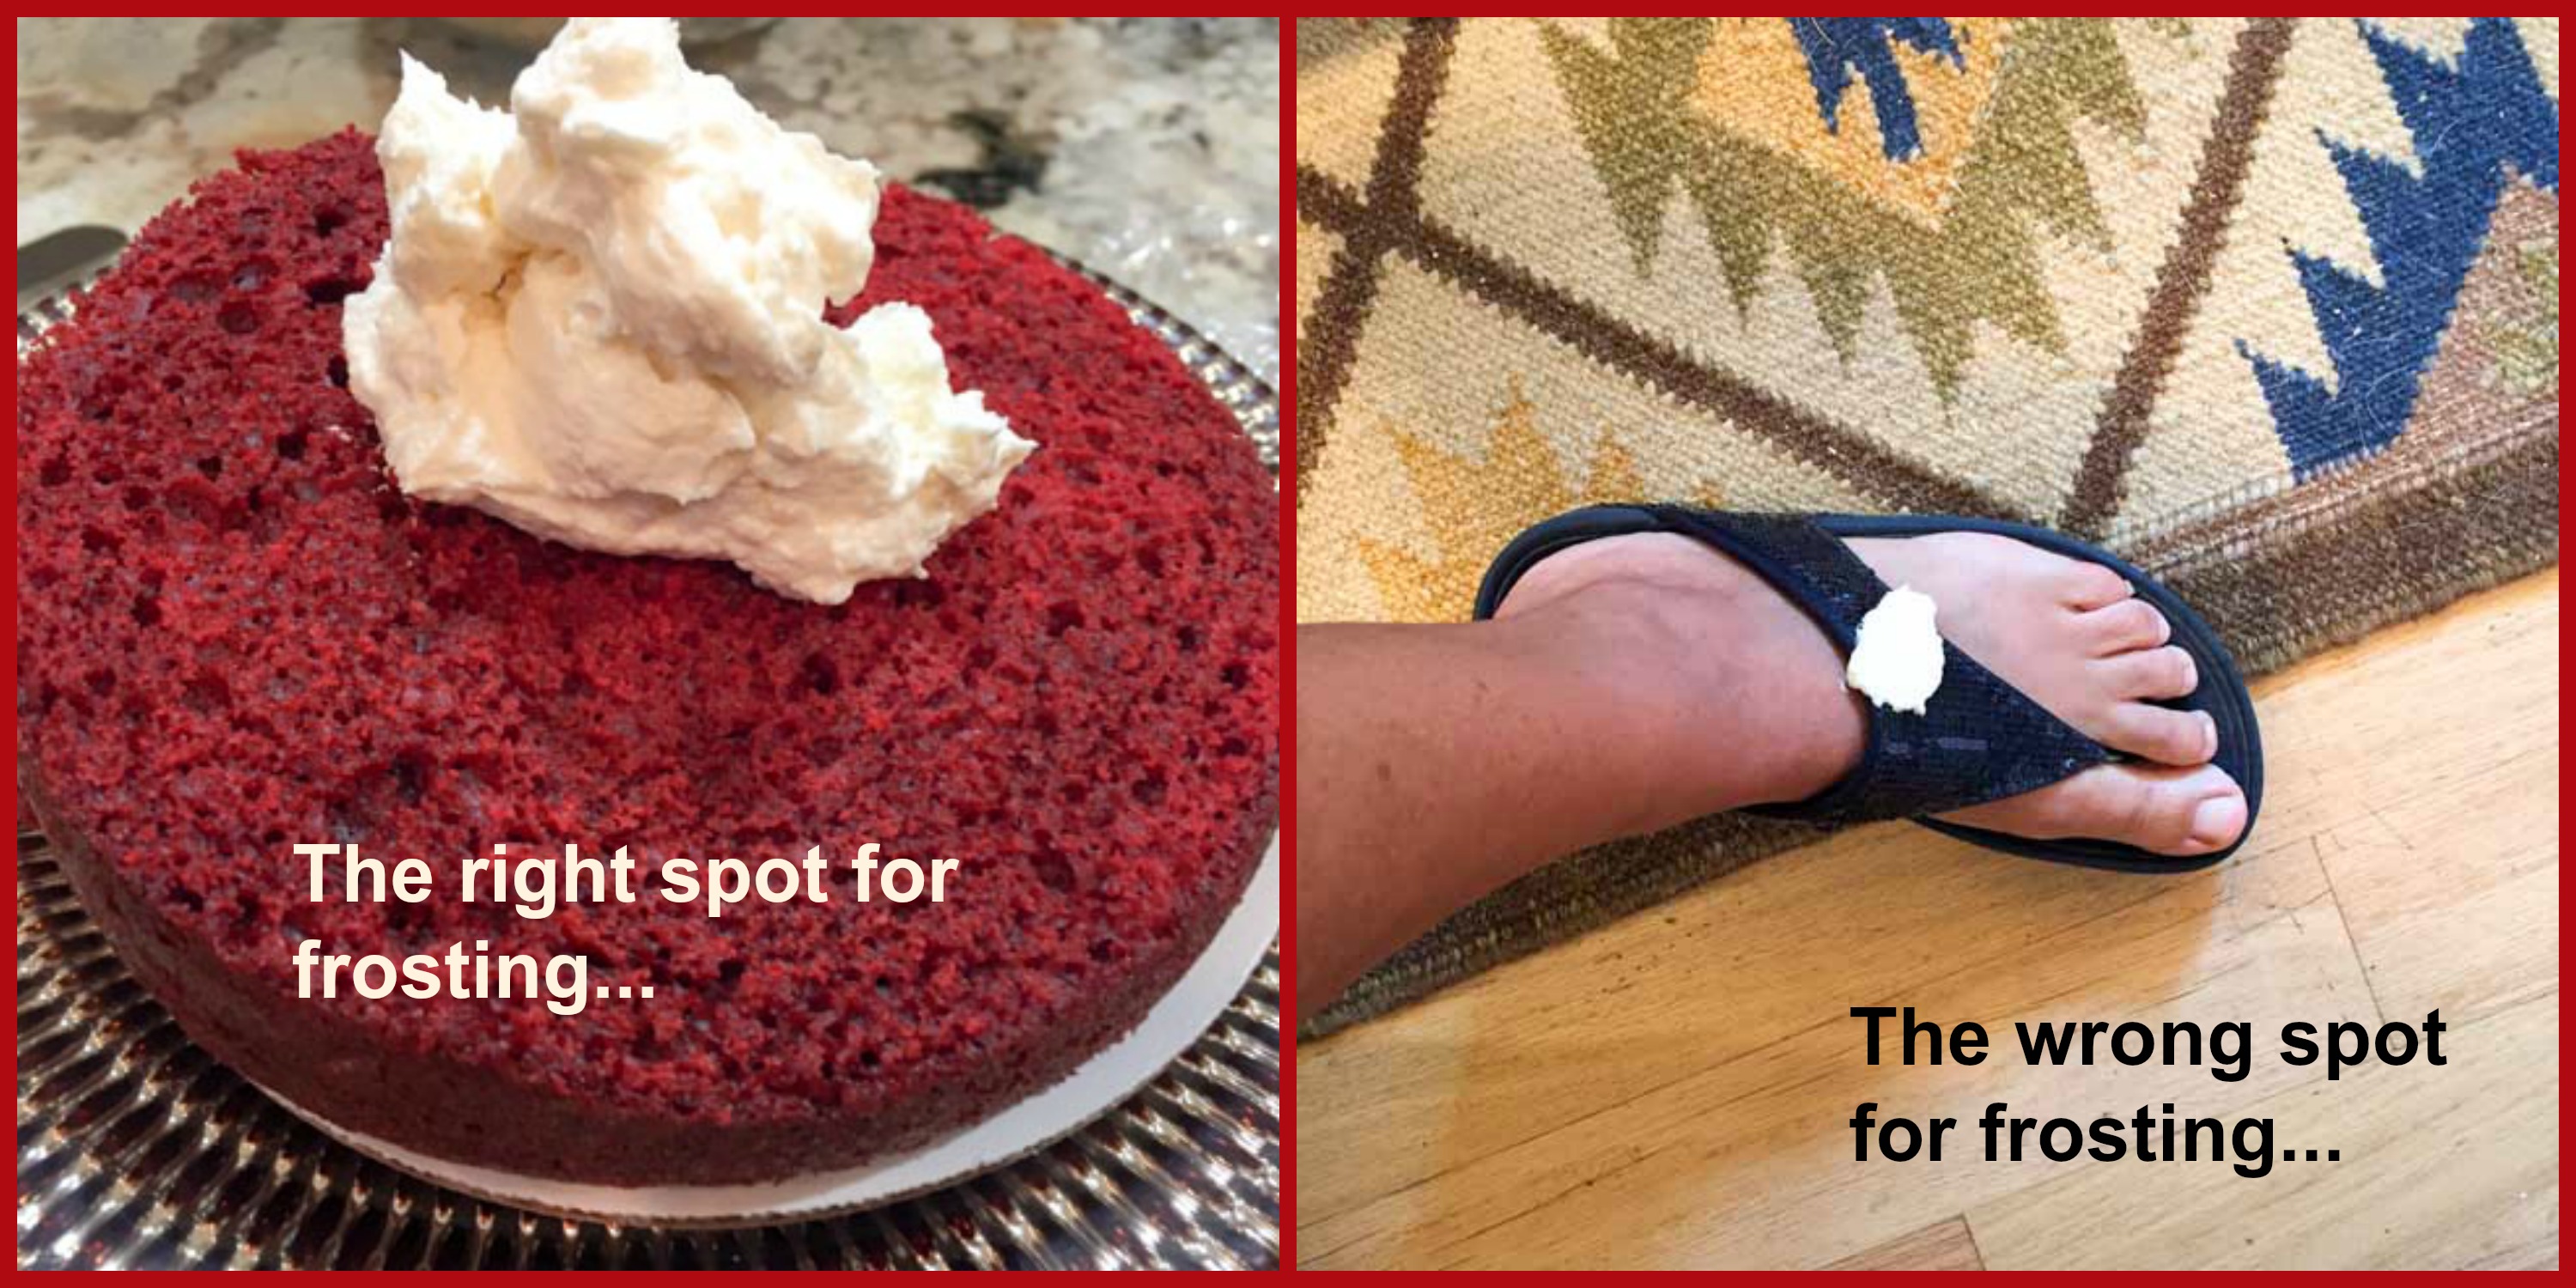
Confession time… My friend Gary is my guru for all things involving baking. I was wondering about the size of pan to use and wanted to run a question by him, so I texted.  Then I told Phil about it. I just texted Gary, I had a question about that sheet cake I’m making today.  Phil almost lost it, laughing so hard – “what kind of cake are you making????” It turns out that my spoken sheet apparently sounds exactly like another word that starts with SH.  It’s a good thing accents don’t travel by text.

Nicole, I loved stalking your site, and agree with you, this is one amazing cake, I am not surprised that you requested it every year for your Birthday. If we have to get one year older, might as well celebrate in style!  

And, for all my readers,  you can delight yourself with the recipes made by my virtual friends with a poke in the blue frog smiling quietly at the end of the post.

Texas Sheet Cake from Bewitching Kitchen

ONE YEAR AGO: In My Kitchen, September 2015

TWO YEARS AGO: Sour Cherry Sorbet: A Labor of Love

THREE YEARS AGO: In My Kitchen – September 2013

FOUR YEARS AGO: Raspberry Sorbet at Summer’s End

FIVE YEARS AGO: When three is better than two  (four years with Buck!)

SIX YEARS AGO: Grating Tomatoes (and loving it!)

SEVEN YEARS AGO: A Peachy Salad for a Sunny Day

RIO OLYMPICS 2016: A GOLD MEDAL MENU

Corcovado_statue01_2005-03-14By Klaus with K – CC BY-SA 3.0, https://commons.wikimedia.org/w/index.php?curid=1970179

Olympic games are going at full speed, these are two exciting weeks! So much to follow, we tend to stay up late trying to catch up with the events we enjoy the most: swimming, running, track and field, synchronized diving, gymnastics, volleyball, beach volleyball, soccer, and this time even golf  is keeping us glued to the TV screen… Three words for you: Simone Biles rocks. 

41XPB6v6T9L

In this post I share a full menu with Brazilian goodies published in previous years, but first I offer a new take on Shrimp Moqueca, adapted in honor of the games.


ShrimpMoquecaGolden

SALLY’S GOLDEN SHRIMP MOQUECA
(from Bewitching Kitchen)

1 pound large shrimp, peeled and deveined
2 tablespoons coconut oil (or dendê oil, if available)
1 onion, diced
1 clove garlic, minced
1 Serrano pepper, minced
salt and pepper
roasted bell pepper, cut in large squares (preferably yellow)
2 cans (15 ounce) yellow tomatoes, drained, briefly processed in blender
a lot of cilantro (a lot)
about 1/2 cup coconut milk (full fat, please)
lemon juice to taste
hot sauce to taste

Squirt a little lemon juice all over the shrimp and reserve.

Heat the coconut oil in a large saute pan with a lid. Add the onions and cook until golden and fragrant. Add the Serrano pepper and roasted bell pepper, cook for a couple of minutes, stirring often.  Add the garlic, cook for about 30 seconds, seasoning lightly with salt and pepper. Now pour the processed yellow tomatoes, season with salt, pepper, a dash or two of the hot sauce of your choice. Cover the pan and let it all simmer for about 10 minutes in very low heat.

Add the shrimp, simmer until cooked, just for a few minutes, then add coconut milk and cilantro to the pan, stirring until warm. Adjust seasoning with salt, pepper, and more hot sauce to taste.  If you’d like, sprinkle fresh lemon juice right before serving. Perfect over white rice.

ENJOY!

to print the recipe, click here

If you don’t have canned yellow tomatoes, use red.  I like to process them to have a smoother sauce. Yellow bell peppers would reinforce the golden color of the dish, but our store did not have any this time.

41XPB6v6T9L

A BRAZILIAN MENU TO CELEBRATE THE OLYMPIC GAMES

Let’s get a trio of appetizers going, starting with Pão de Queijo (Brazilian Cheese Bread).  This is a very easy recipe using a blender and a few minutes of your time. If you’ve never had Pão de Queijo, don’t blink. Make them right now!  They were born gluten-free, which is an added bonus to many.

cheesebread12

For the recipe, click follow this link.

Another great, traditional option,  Pastéis (a bit like empanadas, but fried).

pasteis1

for the recipe, follow this link.

And perhaps my favorite, the one that gets the Golden Medal of Appetizers,
Mandioca Frita (Fried Yucca Root)

mandiocafrita1For the recipe, follow this link. 

To serve with the Golden Moqueca I recommend basic white rice and a nice helping of Brazilian Farofa, to help soak up the flavorful tomato-coconut sauce.

farofa

For the recipe, follow this link.


You definitely need the Brazilian national drink to get into the Olympic spirit!

caipirinha1

recipe for Caipirinhas can be found here.

Finally, for dessert, let’s share a triple round of goodies, starting with Brigadeiros,
because how could you not have brigadeiros during a Brazilian feast?

ready12

For the recipe, click here

But it’s hard to beat the level of deliciousness of Cocada de Forno (Baked Coconut)

img_0129

to get the recipe for Cocada de Forno, jump here.


And perhaps my favorite of all, as Brazilian as Brazilian gets, Mangas Flambadas, served  comme il faut, with vanilla ice cream (but if you use Dulce de Leche it won’t hurt my feelings at all).

mango2

For the recipe, click here.

Top the meal with what my Dad used to call um cafezinho esperto (a smart coffee), and dream with Gold, Silver, and Bronze medals around the neck of your favorite athletes.
Let’s keep in mind that medals are great but the effort each athlete puts into being there to compete, that’s what impresses me the most. Imagine the personal ordeals they go through to finally be part of the Olympic team.  Commitment, hard work, mental and physical struggles most of us could never face.

Quoting a great phrase from an advertisement for Under Armour: 

Untitled
Watch the video in full here. It is moving, truly mesmerizing.

Golden Shrimp Moqueca, from Bewitching Kitchen

ONE YEAR AGO: Tomato Tatin

TWO YEARS AGO: Headed to Colorado! 

THREE YEARS AGO: Farofa Brasileira

FOUR  YEARS AGO: Thai-Inspired Pork Tenderloin

FIVE YEARS AGO: A yummy Brazilian cake: Bolo de Fuba’

SIX YEARS AGO:  Summer’s Tomatoes

SEVEN YEARS AGO: Leaving on a jet plane… 

RIO2016

Save

Save

Save

SECRET RECIPE CLUB: FRESH STRAWBERRY YOGURT BUNDT CAKE & A BONUS RECIPE

First Monday of August, summer going at full blast, many many days in the triple digits which means triple joy for yours truly. I know it will end too soon, but for the time being, allow me to celebrate the joys of this fantastic season…  Apart from the weather, I have even better reasons to celebrate: this month at The Secret Recipe Club I was paired with a food blogger who is very dear to my heart, Dorothy from Shockingly Delicious. Both Dorothy and I are “old timers”  with the group, we’ve been members for many years, together first in Group D, and now in Group A. A lot goes on behind the curtains in the club, did you know that? For instance, we have a closed Facebook page in which announcements are made, reminders are sent by the moderators so that no one forgets to sign up for next assignment, or to post on Reveal Day. And of course there is a bit of chit-chat that goes on.  Years ago I noticed that Dorothy is incredibly efficient. Assignments would go out, and within a day or two she would come back and say that her post was pretty much ready to go. Everyone else was perhaps only starting to stalk the assigned blog. To make a long story short, we  became fierce friendly competitors, every month trying to beat each other  in picking the recipe, cooking it and composing the post.  I always have a ton of fun with it, although she is pretty hard to beat. But seriously, now, she is a top-notch blogger, with 25 years of experience in food writing. Did you get that part? Twenty-five years. And she is quite active in recipe development, as you can tell by the many recipes listed here.  I urge you to read her About page, because it reflects so well the type of person she is: witty, positive, intelligent, upbeat. We almost met in person last month, but unfortunately she had family issues that prevented her from joining a fun lunch I had with two other fellow secreters, Karen, from Karen Kitchen’s Stories, and Lauren from Sew you Think you can Cook. We had a blast! Next time, I hope she can join us…   But, back to her blog, I’d like to quote one paragraph from her About page, one I could sign below with gusto (literally!):

Even if I trim the fat, or salt, or sugar, it has to taste fabulous. If it tastes like cardboard, I don’t care how healthy it is, no one will eat it. And where’s the joy in that?

I have a shockingly long list of stuff that I bookmarked as possibilities for this post. A few examples to water your mouth are: Farro Date Salad with Mango and ArugulaChicken Brie and Apple TurnoversSticky Lemon Oregano ChickenPopeye Pasta… World’s Best Smoky Burger (oh, yeah…), Angel Hair Pasta with Lemon, Kale, and PecansFlourless Oat Caramel Cookies (swoon!)…  Crunchy Granola Bars better than Nature Valley… or how about Slow-Cooker Paleo Ribs in Tablecloth Stainer Sauce? So, what did I pick? I had to go with two recipes, just because…. first, a Fresh Strawberry Yogurt Bundt Cake, because if you cannot face your cake baking demons in the name of a great food blog, there’s gotta be something wrong with you! And the following week I made the cutest meatloaves ever: Cherry Chipotle Meat Loaf Cupcakes.  Both were… how should I put it?  Shockingly Delicious!  

Fresh Strawberry Bundt Cake

FRESH STRAWBERRY YOGURT BUNDT CAKE
(from Shockingly Delicious)

for the cake:
2 1/2 cups all-purpose flour
1/2 teaspoon baking soda
1/2 teaspoon salt
Zest of 1 lemon
1 cup (2 sticks) butter, at room temperature
2 cups sugar
3 eggs
1 tablespoon lemon juice
1 teaspoon almond extract
8 ounces plain or vanilla Greek yogurt
12 ounces fresh strawberries, diced
for the glaze:
1 1/4 cups powdered sugar
1-2 tablespoons lemon juice
.
Heat oven to 325 degrees. Grease and flour a 10-inch Bundt pan and set it aside.
.
In a bowl, stir together flour, baking soda and salt. Mix in the lemon zest and set aside.
With an electric mixer, cream together the butter and sugar until light and fluffy. Beat in the eggs one at a time, then stir in lemon juice and almond extract. Alternate beating in the flour mixture and the yogurt, mixing just until incorporated. Gently stir strawberries into the batter.
.
Pour the batter into the Bundt pan. Bake for 70-75 minutes, or until a wooden pick inserted into the center of the cake comes out clean. Allow to cool 25 minutes in the pan, then turn out onto a wire rack and cool completely. Once cooled, whisk together the powdered sugar and lemon juice in a small bowl. Drizzle glaze over top of the cake, letting it drip down the sides.

Makes 12-16 slices.

ENJOY!

to print the recipe, click here

compositecake

Comments: One of the things I loved about this cake is that the recipe calls for enough batter to actually fill the Bundt pan to the appropriate level. More often than not, I face the problem of the disappearing cake batter: no matter how closely I follow the instructions, it seems the amount is never adequate. Not this time. And the smell, while baking was intoxicating, in the best possible way…   Of course, un-molding a cake from a Bundt pan can be quite stressful, I could feel my heart pounding as I negotiated the big hot pan, the rack underneath it, the kitchen cloth, and the hot pad. Tap, tap, tap, hope, hope, hope, and voilà the thing of beauty, smooth and fragrant, out of the pan in a single piece!  There was a happy dance. With a shriek (a la Karen).  I glazed the cake next morning, very early, then sliced it and took the full batch to our department, because the best part of baking a cake is sharing it. The cake disappeared fast. It was exactly what Dorothy promised it to be, very moist, excellent lemony flavor, the sweetness of the strawberries a perfect addiction to the smooth crumb.

pieces

Of course, where there is cake, there is agony. Turning the Kitchen Aid on with the paddle still up, that was a mistake. Flour in the eyebrows, anyone? And the correct place for icing is definitely not the human thigh, although the pups could disagree. They were following me around for a while even after I washed it all off.

compositecake2

Strawberry Bundt Cake, from Bewitching Kitchen

Before I say goodbye, one more featured recipe from Dorothy’s great blog!


BONUS RECIPE


Meatloave Cupcakes221

CHERRY CHIPOTLE MEATLOAF CUPCAKES
(slightly modified from Shockingly Delicious)

2 teaspoons olive oil
1 medium shallot, finely chopped
3 carrots, peeled, trimmed, finely chopped
2 celery stalks, trimmed, finely chopped
1 cup sliced mushrooms
1/2 yellow bell pepper, chopped mini sweet bell peppers, stemmed, finely chopped
1 teaspoon dried oregano
1 teaspoon dried thyme
1/2 teaspoon sea salt
A few grinds black pepper

1 pound organic ground grass-fed beef
1/4 cup almond flour (or almond crumbs, see notes)
1 tablespoon Dijon mustard
1 egg, beaten
1/4 cup Cherry Chipotle Not Ketchup
1/2 cup minced Italian parsley

Heat oven to 375 degrees. Make vegetable mixture: Heat oil in a skillet on medium heat. Add shallots, carrots, celery, mushrooms, peppers, oregano, thyme, salt and pepper and sauté until vegetables are soft, about 5 minutes.  Turn heat off and remove pan from burner; set aside to cool for 5-10 minutes.

Make meat loaf cupcakes: In a large mixing bowl, combine vegetable mixture, beef, almond flour, Dijon, egg, Not Ketchup, and parsley. Use hands to combine well. Lightly oil 8 muffin tins. Divide meat loaf mixture among 8 muffin cups. Bake for 25 minutes or until cooked through. Remove pan from oven and cool for a couple of minutes.

ENJOY!

to print the recipe, click here

quadruple

Comments: How could I resist meatloaves in cupcake format? User friendly, impossibly cute, and giving me the chance to try a new product, the “Not Ketchup”, praised by Dorothy in her blog. Not Ketchup comes in several flavors and is  produced by another food blogger I follow, Erika from Erika’s Kitchen.  It is very tasty, like a grownup ketchup with very complex flavor and not as sweet as your regular kind.  I loved it so much that I placed another order for her Tangerine Hatch Chile version, apparently even lower in carbs.  For the meatloaves I replaced regular breadcrumbs with Toasted Almond & Pecan Breading, a product that was a bit of an impulse buy on amazon. They often show a list of suggestions based on your previous searches, and I fell for this one. I do realize I could make my own almond-based crumbs, but every once in a while I like to splurge. I was very pleased by this product, actually. It smells amazing, and offered the right texture to the loaves, not dry at all.  If you’d like to try it, click here. (I am not affiliated with amazon, and will not make a single penny from your purchase).

We loved these little loaves!  The recipe made eight little servings, half of them were gone for our dinner, the others enjoyed for lunch two days in a row, they re-heat beautifully in the microwave. Between you and me, they taste fantastic straight from the fridge, but if you do that, be discreet and take tiny morsels from the bottom, so no one will notice.

Cherry Meatloaf Cupcakes, from Bewitching Kitchen

Dorothy, as you imagine, I could hardly contain  my excitement when the email arrived with your blog as my assigned site to stalk…  I hope you had a blast with yours too this month!  And be ready to jump on the next one, because I am revving my engines, baby…. 

As usual, my readers are invited to browse through the collection of recipes posted by other members of Group A of The Secret Recipe Club. Just poke the frog and be ready for some virtual fun!

ONE YEAR AGO: Quinoa Salad with Red Grapes and Avocado

TWO YEARS AGO: Strawberry Coffee Cake

THREE YEARS AGO: Lemon-Poppy Seed Muffins

FOUR YEARS AGO: Mascarpone Brownies

FIVE YEARS AGO: Salmon Tacos

SIX YEARS AGOCinnamon Turban Bread

SEVEN YEARS AGO: Summertime Gratin


A TALE OF TWO MACARONS

compositeMac
This post is long overdue. The Cinnamon Macarons were made 11 months ago with our friend Cindy, who traveled from Oklahoma to spend a weekend with us. It was our second adventure to perfect these finicky babies, and Cindy, being way more organized than yours truly, brought a bunch of notes about what should have been improved from our previous attempt.  Of course, we had so much fun cooking together that we barely paid attention to the notes, and managed to overlook a couple of tips given by Kathryn Gordon in her beautiful book Le Petits Macarons: Colorful French Confections to Make at Home.

Macarons3


CINNAMON MACARONS WITH CRUNCHY CACAO NIB FILLING

OVERVIEW OF THE RECIPE

Equal amounts of almond flour and confectioner’s sugar plus a pinch of salt are mixed with a little cinnamon in the food processor and pulsed a few times. Then some granulated sugar and powdered egg whites are added, pulsed a few more times. The whole mixture is sifted.

A French meringue is prepared with 4 egg whites and a bit of cream of tartar, added to the sifted ingredients, and piped into rounds.

Our filling of choice was a Crunchy Chocolate Ganache made with semi-sweet chocolate, light corn syrup, heavy cream, a bit of butter and – for the final pizzaz: roasted cocoa nibs.

(full recipe can be found in Les Petits Macarons)

oops

Comments:
The only problem we had in the making of this recipe was that  in some shells the feet “slipped out.”  It was hard to find a precise reason for that boo-boo, so we are left with the suspicion that macarons do not appreciate being watched during baking. Mea culpa, mea culpa, mea maxima culpa.  But, you want to know something funny? A little sharp knife worked wonders to trim the runaway feet, and the resulting crumbs go UNBELIEVABLY well over some ice cream. Life gives you lemons? Make lemonade! Macarons give you extra feet? Sweet crumbs it is!  Full-disclosure: Cindy and I nicknamed them  “toe nail clippings”, much to our husbands chagrin. Oh, well… We could not resist. They were mighty tasty, though.
.
Cindy, sorry it took me so long to compose this post!  That also means that you are overdue for a visit for take FOUR on macarons… Take four, you ask? Well, I made them again a few months ago, this time all by myself, which is not nearly as much fun!

Cinnamon Macarons, from Bewitching Kitchen


MACARONS, TAKE THREE


Back in February I felt the urge to make macarons again. You know, Valentine’s Day, romance in the air, but winter still lingering around. I wanted a batch of super bright and sexy macarons. Is there anything sexier than raspberries? Obviously not.  I opened all my macaron cookbooks (thanks to our friend Gary I own several), searched the net, but when I stumbled upon this recipe, I could not stop thinking about it.  Tricia shaped her macarons as little hearts!  Of course, knowing my limitations I did not even try to go there. They would end up more like rodent livers or something.  But maybe next time…

Raspberry Macarons2


RASPBERRY MACARONS

(adapted from Saving Room for Dessert)

for the shells:
150 grams almond meal, sift twice
150 grams confectioners’ sugar, sifted
55 grams egg whites, aged overnight

for the meringue:
150 grams granulated sugar
37.5 grams water
55 grams egg whites, aged overnight
gel food color, red

for the filling:
3 tablespoons unsalted butter, room temperature
1 ounce cream cheese, room temperature
1/2 cup fresh raspberries, pureed and strained
a few drops of vanilla extract
2 cups confectioners’ sugar, sifted (more or less as needed for desired consistency)

Prepare 2 sheets of parchment paper and two baking sheets. To ensure consistent sized cookies, trace a cookie cutter on the parchment paper as a template then turn it over before piping. Prepare a pasty bag fitted with a large round tip. Set aside.
.
Place the almond meal and the confectioner’s sugar in the bowl of a food processor and pulse a few times. In a large mixing bowl sift together the almond meal and confectioners’ sugar. Make a well in the center and add 55 grams of egg whites. Fold the mixture with a spatula until it becomes a thick, paste-like batter.
 .
Place the remaining 55 grams of egg whites in the large mixing bowl of a stand mixer fitted with the whisk attachment. Set aside. In a small saucepan combine the granulated sugar and water. Stir until the sugar is dissolved. Attach a candy thermometer to the pan and heat to 225 degrees. Once the syrup reaches 225 degrees, turn on the stand mixer and beat the egg whites on high. Continue to beat the whites while cooking the syrup until it reaches 239 degrees. You want the meringue to be at soft peak stage so if it reaches that stage before the syrup reaches 239 degrees, turn the mixer down to low. When the syrup hits 239 degrees remove it from the heat and slowly pour it into the egg whites while the mixer is running. Try to stream the syrup directly into the whites close to the side of the bowl so it won’t cool too quickly. Whip on high for a minute then reduce the speed to low and continue beating until the bowl has cooled slightly and glossy stiff peaks have formed.
.
Add about half the meringue to the batter, gently folding until combined and smooth. Gradually add the remaining meringue, and food color if using, and fold until the batter is smooth. To test consistency, pick up the spatula and if the batter ribbons back into the bowl, it is ready. It should be like lava blending back into itself after about a minute.
 .
Heat oven to 300 degrees. Fill pastry bags with the macaron batter. Pipe the batter into rounds. Once the first sheet is filled, rap the pan on the counter a few times to rupture any air bubbles trapped in the cookie. Rotate the pan and rap again. Set the baking sheet aside to allow a shell to form. This will take about 20-30 sitting out at room temperature. Pipe another sheet of cookies and repeat.
.
Bake for about 18 – 20 minutes for until you can lift the cookie off the parchment coming away clean. Remove the entire sheet of parchment paper with cookies intact to a wire rack to cool. Once completely cool, remove the macarons from the parchment and fill as desired.
 .
To prepare the buttercream, blend the butter and cream cheese together until smooth. Add the vanilla, raspberry puree, and about 2 cups of the confectioners’ sugar. Blend until smooth. Add the remaining confectioners’ sugar until you reach the desired consistency for the filling. It does not have to be as thick as cake icing as it will harden once refrigerated. Pipe mounds of buttercream on once cookie, top with a matching macaron and twist a little to spread the filling. Refrigerate macarons for 24-48 hours before serving for the best flavor. Allow them to rest at room temperature about an hour before serving.
 .
Makes 30 filled macarons, or about 60 individual shells.
.
ENJOY!

to print the recipe, click here

collage1

Comments: Definitely some major improvement this time, thanks to a new sifter with a slightly bigger mesh size. Sifting the almond flour/sugar mixture was a breeze, and I decided to simply discard the small mount of coarse bits left in the sieve. Every recipe insists on a fine mesh, but I suspect you don’t need to go too fine, unless you enjoy spending 20 minutes to sift 1 cup of stuff… Nope, not happening again. I am pretty happy with this arrangement. This is a OXO brand sieve, found in our grocery store for very cheap.  I love it!

composite22
The meringue worked very well, although I was in full hyperventilation mode trying to negotiate the temperature of the simple syrup and the beating of the egg whites all by myself. A second pair of friendly hands would be more than welcome…  The final batter had that flowing lava consistency, which always gives me a smile, after all, how many people have actually seen lava flowing? Hopefully not that many, not the type of stuff I’d like to face.  At any rate, I guess now it’s a matter of working on technique, piping circles more consistent in diameter, doing a slightly better job in the “macaronage step.”  I was afraid to deflate the batter too much and ended up with some spots where the flour mixture did not fully incorporate.  When that happened, the shells cracked during baking.  I was lucky that it happened to just a few. Being the magnanimous person I am, I quickly swallowed them before Phil even had a chance to see them. What can I say? I give, and give, and give.

Raspberry MacaronsAren’t we adorable?


Raspberry Macarons, from Bewitching Kitchen

I hope you enjoyed my little Tale of Two Macarons… I now realize how much I love making them, and hope to try a slightly different take on the subject by baking up a batch of…are you ready for it? Savory Macarons! Kathryn’s book has many variations.  Don’t you think Saffron Macarons with Tomato Confit Filling sounds amazing? I might just have to go for it…

ONE YEAR AGO: Chocolate Chip Shortbread Cookies

TWO YEARS AGO: Chicken in Green Pipian Sauce, Sous-vide Style

THREE YEARS AGO: Classic Shrimp Gobernador Tacos

FOUR YEARS AGO: A Walk Towards the Sunset

FIVE YEARS AGO: In My Kitchen

SIX YEARS AGO:  Heavenly Home-made Fromage Blanc

SEVEN YEARS AGO:  A Perfect Sunday Dinner

RED VELVET LAYERED CAKE FOR SEVEN YEARS OF BLOGGING!

closeup
Better late than never, I can finally share a little cake to celebrate my 7th year of  food blogging. I knew I wanted to make a layered cake this time and also knew it had to be from a new cookbook I fell in “love at first page.”  Granted, I have quite a few books dedicated to cake baking, but Layered might be my favorite now. Not only Tessa Huff’s explanations are detailed enough to give confidence to a cake-challenged person, but  many of her cakes have enticing, unexpected flavors. Sure, you will find a chocolate cake, a shortbread strawberry, a Boston cream pie, but she will also awe you with combinations that bring together Raspberry and Stout.Lavender and Olive Oil... Butterscotch and Bourbon...   Pink Peppercorn and Cherry… Those are included in a wonderful chapter called “Adventurous Cakes.”  I have The Cake Bible from Rose Beranbaum and love it too, but I’d say that about 1/4 of the recipes of that book appeal to me, whereas I would gladly try more than 80% of the recipes from Layered.  Funny thing is that I almost did not buy it because I’m not too fond of naked layered cakes, and that’s what I saw on the cover of the book. Clearly I am part of a minority, as they are very popular these days.  But reading the many great comments on amazon made me change my mind.  So, it’s now officially confirmed the wisdom of:  “Don’t judge a book by its cover.”  HA!

Red Velvet Cake

RECIPE OVERVIEW

Red Velvet Cake with Heritage Frosting, from Layered: Baking, Building and Styling Spectacular Cakes.

Originally this cake is supposed to have 6 layers, so you’ll make 3 red velvet cakes and slice each one crosswise in half. I baked three cakes, but as I started the assembly next day, I thought it was tall enough using only two of them. Plus, probably due to my inexperience and very limited skills, the amount of frosting I ended up with would not be enough to fill and cover a higher cake. Gravity plays tricks on me on a regular basis, perhaps it’s due to my last name. But, independent of the amount of available frosting, I liked the way it turned out as a 4-layer production, easier to slice and serve.

The cake component…  The cake batter uses grapeseed oil and sugar beaten together. To that, some eggs and red food coloring (preferably gel) are added and incorporated. Then, flour, cocoa powder, baking powder, a touch of salt are sifted and added to the oil mixture in batches, together with buttermilk. Once the batter is smooth, a bit of baking soda dissolved in vinegar gets into the mixer.  The batter is divided equally into three 6-inch cake pans, and baked until a toothpick comes out clean.

compositecake

The frosting… contrary to most Red Velvet Cakes, this frosting is not based on cream cheese. It is an old-fashioned recipe called “Heritage Frosting” that starts with a thick cooked paste made with milk and flour. That gets incorporated into butter and sugar creamed together with a touch of vanilla. Very unusual, I had never heard of this type of frosting but it was reasonably easy to work with.

compositefrosting
Normally, Buck would be right by my foot and ready to take care of any potential messes. However, having learned painful lessons in the past, I decided that red food coloring and a Jack Russell could be too fiery a match.  Both him and Oscar stayed outside for the duration of my baking adventure. However, they both developed a fascination with my sandal even long after I washed it. Scent of a Frosting. It has movie potential…

Well, for once I will say this cake baking experience was “almost painless.”  At least the cake itself. No problems. A little hyperventilation here, another there, but overall fine. The frosting is another story. Every time I try to frost a cake, I feel this intense respect for those who do it for a living.  I opted for a rustic look, because hell would have to freeze over twice before I could apply a smooth layer of frosting to the top of a cake, let alone its sides…   But even if there is room for improvement in my technique, I think this was one tasty cake!

sliced

Here’s what Phil had to say about it:

Quite often the frosting overpowers the taste of a cake, but this was not the case. The cake is flavorful, it has a very nice texture.  It’s substantial without being too heavy. Slices very well with a sharp knife without crumbling all over the place. The frosting is very creamy but stands well on the cake. It is much less sweet than buttercream or double-boiled white icing.  Enthusiastically approved!

Well, after getting enthusiastic approval from the resident cake critic, I enthusiastically invite you  to join me on my 8th year in the blogosphere… 

ONE YEAR AGO: Lemon-Lavender Bars

TWO YEARS AGO: Quinoa Fried Rice

THREE YEARS AGO: Carrot Flan with Greens and Lemon Vinaigrette

FOUR YEARS AGO: The Secret Recipe Club: Granola Bars

FIVE YEARS AGO:  Awesome Broccolini

SIX YEARS AGO:  A Twist on Pesto

SEVEN YEARS AGO: Ciabatta: Judging a bread by its holes