CLEMENTINES IN CINNAMON SYRUP

Three ingredients.  Four if you count water. It was one of the best things I’ve made in the last few months, though.  Slices of clementine soaking in a light caramel infused with cinnamon.  First, let me assure you it is not going to be too sweet. It is a perfectly balanced mixture, the clementines lose any of that harshness often found in the raw fruit, and the syrup is so good that I drank what was left in my small bowl after enjoying the fruit. Yes, I grabbed the bowl and drank from it as if it was a glass. What’s more amazing, I did it in the presence of members of our department gathered in our place for a get-together with a guest speaker. That should give you an idea how irresistible it was. I found this gem of a recipe on the fun blog hosted by Zach and Clay, The Bitten Word. If you don’t know about their site, make sure to stop by, you will become a regular visitor… 😉

ClementinesCinnamonSyrup
CLEMENTINES IN CINNAMON SYRUP
(seen at The Bitten Word, original recipe from Martha Stewart)

1 cup water
1/2 cup sugar
2 cinnamon sticks
8 clementines, peeled and thinly sliced crosswise

Bring water, sugar and cinnamon to a simmer in a small saucepan. Cook until sugar dissolves, about 1 minute.

Arrange clementines in a large bowl. Pour warm syrup over top, and let stand for at least 30 minutes.

Divide clementines and syrup among 4 bowls.

 ENJOY!

to print the recipe, click here

I hope you won’t let the simplicity of this “recipe” prevent you from making it, telling yourself that it cannot be worth it.  If you like fruit and a dessert that makes you feel light as a feather and pretty energized (must be all that vitamin C, and the cinnamon oils), this is it.  Maybe some might feel tempted to serve it as a topping for ice cream, but for my taste, nothing else is needed.  Just make sure you have enough caramel sauce to soak the slices, and to satisfy your desire to drink every single drop of it.  Slurping is optional, depending on the audience. 😉

ONE YEAR AGO: In My Kitchen, April 2013 

TWO YEARS AGO: Thrilling Moments (CROISSANTS!)

THREE YEARS AGO: Maple-Oatmeal Sourdough Bread

FOUR YEARS AGO: Pork Trinity: coffee, mushrooms, and curry


SECRET RECIPE CLUB: CHAI BROWNIES

March 31st. Last day of the month. Last Monday of the month. It can only mean one thing: it’s a food blog party, The Secret Recipe Club Reveal Day!  I knew that March was going to be a particularly busy month, with a trip abroad followed by Spring Break, which for us has little to do with a break, quite the contrary.  We profit from the fact that the students don’t have classes or TA duties to set the accelerator on experiments. So, I jumped on the assignment right away, and that was a good move because my secret blog, Healthy Delicious has been around for a long, long time!  Talk about a veteran food blogger, that is Lauren defined to a T. She is a recipe developer and food photographer, most of her recipes take less than 40 minutes to prepare, and are in perfect tune with her site’s name: healthy and delicious!  😉

I was having my share of secret fun bookmarking many options, but then I stumbled on her post on Chai Brownies and noticed the date of its publication. March 11th, 2007.  I know well a person who was born on March 11th.  No, not 2007, but who cares?  A few years here, a few there, compared to the time since the Big Bang, it’s a blink of an eye.  I looked no further.

Still, let me share with  you some of the other recipes I had in mind: Prosciutto and Artichoke Quiche (oh, my!), Baked Chicken and Spinach Flautas (check this recipe out, very nice interpretation of a classic), Lamb Meatballs in Cumin Scented Sauce over Spaghetti Squash (I must make this soon), Pasta with Brussels Sprouts, Pecans and Gorgonzola Cream Sauce , Mussels in Saffron Tomato Sauce (simple and irresistible), and her Lemon Chicken Soup with Tortellini.  But there’s a lot more, as you might imagine from a food blog that has been around for seven years!

And, before I move to the recipe, take a look at Dorothy’s site, Shocklingly Delicious, to see which recipe she chose from my blog (one of my favorite cakes ever and the most popular recipe of BK last year). She wrote such a wonderful post about it, I cannot stop smiling…. Thank you, Dorothy!
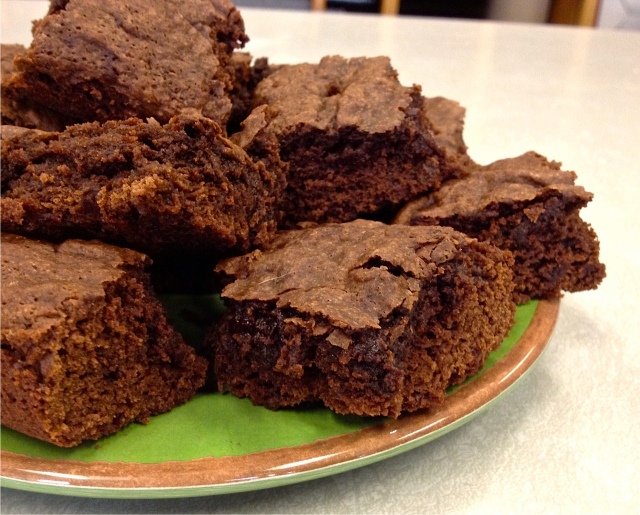
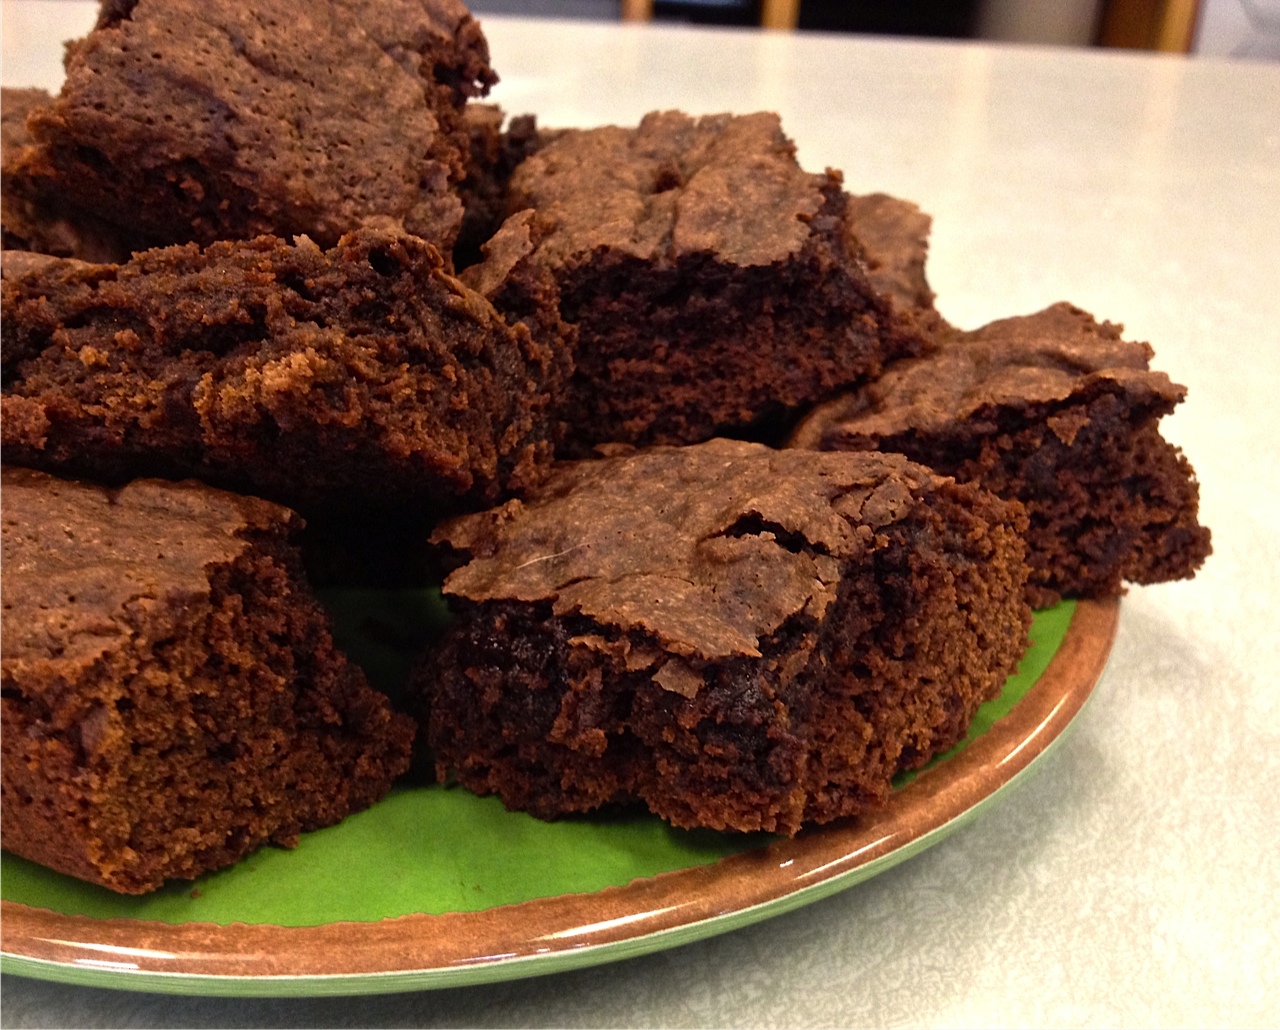
IMG_3922
CHAI BROWNIES
(slightly modified from Healthy Delicious)
.
for spice mixture:
1/4 cup low-fat milk
a dash of cardamom
3 whole allspice
a dash of cinnamon
3 cloves
.
for brownie batter:
1/4 cup chocolate chips
1/4 cup butter
1 egg
1 + 1/2 cup  flour
3/4  cup sugar
1/2 cup cocoa powder
1/3 cup brown sugar
1 teaspoon baking powder

Heat the oven to 350 F.

Add the ingredients for the spice mixture to a pot and bring to a quick boil. Remove from heat and let sit for 10 minutes. Strain into a large microwave safe bowl.

To the bowl of chai, add butter and chocolate. Microwave about 30 seconds until melted. Stir until smooth. Let cool for a minute. Add egg.  Sift in remaining dry ingredients and mix until it forms a stiff batter.

Bake in a Pyrex dish sprayed with oil, about 25 minutes until set. Let cool, and cut into pieces.

ENJOY!

to print the recipe, click here

IMG_4123
Language pet-peeve alert! Language pet-peeve alert!  😉

In the United States,  chai often describes what should be instead called masala:  a mixture of spices such as cardamon, cinnamon, allspice, ginger, that can be used to brew black tea, creating masala chai. By itself, “chai” is a word that means tea, and has its origins in Chinese. Interestingly enough, it is the same word used in Portuguese – chá –  although the pronunciation is slightly different in both languages.

I love the flavors normally associated with masala chai, and thought that the marriage of a good old-fashioned chocolate brownie with such warm spices would be perfect. And perfect it was!

I did not have whole allspice berries in my pantry, but decided it was worth getting a jar, so now I am the proud owner of two allspice products, one whole, one ground.  Gotta put them to good use before they lose their punch.

These brownies brought a lot of excitement to a cloudy and cold Monday morning in our department.  I loved the delicate flavor of cardamon in the background, and the texture of the cake, with a crackled surface was wonderful too.

Lauren, it was great to get to know your blog better, and I urge my readers to stop by her site and browse through, particularly if you like to see recipes that are lightened up without loss of flavor.

For those interested in joining our virtual monthly party, click on the crazy-looking amphibian smiling at the end of this post.

ONE YEAR AGO:  A Small Tribute to a Big Man

TWO YEARS AGO: Still got stout?

THREE YEARS AGO: The Real Vodka Sauce

FOUR YEARS AGO: Spring Rolls on a Spring Day

VALENTINE’S DAY: THE FINALE

Three days, three posts!  In my series of collaborative articles with Jamie, from Cooking in Red Socks, it is now time to share the dessert course of our romantic meal for two. But, before I do that, let me urge you to visit her site and check out her choice for the last course of her V-day extravaganza! She pulled all the stops and made some seriously gorgeous Strawberry Napoleons, heart shaped and all.  I am in complete awe! Wish I was one of the guests in her party… 😉

Now, to the finale of my dinner for two. It was hard for me not to think about chocolate when choosing a dessert for Valentine’s Day. Having settled on that, I needed something red and sexy to pair it with. Red and sexy like raspberries. All lightly dusted with a very light sprinkle of powdered sugar. For good measure.

DSC_0052
CHOCOLATE MOUSSE WITH RASPBERRIES
(from Good Food Magazine, May 2010)

85g dark chocolate, 70% (I used Trader Joe’s)
1 tbsp cocoa powder
½ tsp espresso powder (I used Spice House
½ tsp vanilla extract
2 egg whites
boiling water (enough to use 2 tablespoons)
1 tbsp sugar
50g full-fat Greek yogurt
raspberries, to decorate
powdered sugar

Chop the chocolate very finely and put it into a large bowl that will fit over a pan of simmering water. Mix the cocoa, coffee and vanilla with 2 tbsp cold water, and pour over the chocolate. Place the bowl over simmering water, give it all a stir, then remove from the heat. Leave the bowl still over the hot water, stirring occasionally until fully melted.  If necessary, place the water back on the stove for a minute or so.

Stir the melted chocolate, it will be quite thick. Stir in 2 tbsp boiling water and the chocolate will immediately thin down and become silky smooth. Leave to cool slightly.

Beat the egg whites to fairly soft peaks, then whisk in the sugar until thick and glossy. Beat the yogurt into the cooled chocolate. Fold about one-third of the egg whites into the chocolate mix using a large metal spoon, then very gently fold in the rest of the whites until they are evenly mixed in.

Spoon into 4 small cups or ramekins and chill for a couple of hours, or overnight.  Top with a few raspberries, then dust with a little powdered sugar.

ENJOY!

to print the recipe, click here

♥♥♥♥♥♥♥♥♥

Comments:  As far as chocolate mousse goes, this is one of the lightest options you will find. Because our cups were a bit large, the recipe made only two portions, each one  perfect to be shared.  As a result, we enjoyed this dessert two days in a row. Naughty naughty naughty…

The yogurt gives the mousse a little bit of a tang, cutting the richness of the chocolate.  If you are fond of that super rich feeling of a regular mousse, this could be too light for you.  But, if you rather play conservative with your sweets, this is a perfect way to end a romantic dinner.

Make sure to stop by Jamie’s site to see what she is sharing with her friends.

VDay2014

Jamie, it was great to collaborate with you on this joint virtual project!
Have a wonderful Valentine’s Day celebration!

ONE YEAR AGO: Almond Butter Chocolate Chip Cookies

TWO YEARS AGO: Dan Dan Noodles

THREE YEARS AGO: Sophie Grigson’s Parmesan Cake

FOUR YEARS AGO: Antibiotics and Food

PUMPKIN BRIGADEIROS

Closeup

Brigadeiros are the most popular Brazilian candy, mandatory item at Birthday parties. I blogged about them here, and shared a coconut variation here. This recipe has been sitting on my Pinterest cooking  board ever since I saw it on Denise’s site, From Brazil to You, around Halloween.  You should definitely stop by her site to see how she shaped each one as a cute little pumpkin.  Knowing my limitations, I simply rolled them as traditional “brigadeiros” and coated them with the shimmer sugar Phil recently bought for me, adorable husband that he is.  And, by the way, in Portuguese, pumpkin brigadeiros = brigadeiros de abóbora.  if you want to say it as a native Brazilian, listen to yours truly by clicking this audio link

PUMPKIN BRIGADEIROS
(slightly modified from Denise’s blog)

1 (14 oz or 396 g) can sweetened condensed milk
3/4 cup canned pumpkin puree
1 tablespoon unsalted butter
1/4 teaspoon ground cinnamon
1/8 teaspoon ground ginger
1/4 teaspoon pure vanilla extract
Granulated sugar for rolling

Grease a dish with unsalted butter and set aside. Place about 1 cup of granulated sugar on another plate and set aside.

Mix the condensed milk, pumpkin puree, butter, and spices in a saucepan over medium heat. Non-stick is best.  Cook, stirring constantly in order to avoid burning, until thickened enough that the bottom of the pan shows through briefly when the mixture is stirred, and runs to the sides of the pan slowly if gathered in the center of the pan with a wooden or plastic spoon– this should usually take approximately 10-12 minutes, depending on your stove.

Remove from heat, stir in the vanilla, and pour mixture into the greased dish. Let cool. The brigadeiro dough can be refrigerated for about 20 minutes before rolling into balls if desired. Then wet your hands with cold water and shape the brigadeiros into balls, using a tablespoon as measure. Roll each one in sugar, and place in small paper cups.

ENJOY!

to print the recipe, click here

prep

Comments:  This was a delightful take on a Brazilian classic!  They are sweet with all the condensed milk, but the pumpkin offers a nice counterpart.  I took a batch for a potluck dessert party,  and lots of people asked me for the recipe, so I guarantee that whenever you make these babies, they will please your guests!

I bet  you cannot eat just one… 😉

Pumpkin Brigadeiros

ONE YEAR AGO: Pumpkin Espresso Loaf

TWO YEARS AGO: Caramelized Carrot Soup

THREE YEARS AGO: Miso-Grilled Shrimp

FOUR YEARS AGO: A Special Holiday Fruitcake

THE STORY OF MY FIRST CREME BRULLE

burning
The year was 1991. I was in Paris (for the first time) all alone to take part of a workshop to launch the sequencing of the genome of Mycobacterium leprae. In those days sequencing the full genome of any organism was a daunting task, and I was thrilled to be a tiny part of that initial effort.  I had two free weekends to explore the city. One sunny Saturday I walked for about 6 hours with a stop for lunch in a small bistrot. I asked for a gratin dauphinoise.  Halfway through lunch, I bit into something very hard.  It was a piece of broken glass that somehow found its way into the gratin!  My French was rudimentary, but I felt I needed to inform the waitress because someone could  get hurt from it.  I did my best to communicate, and was absolutely non-confrontational. It is actually very hard to be confrontational if you are not fluent in a language, did you know that? Also impossible to tell a joke, so do not try that in French until you can read Proust without the help of a dictionary.  😉

The waitress was livid!  She profusely apologized, offered to bring me another meal, but I told it was not necessary.   She then said a bunch of things too quickly for me to comprehend,  ended with a question that I also could not quite get, so I just smiled.  I thought she was going to bring me the check and call it a day, but instead she came back with the owner of the bistrot, who asked if I had ever had crème brûlée.  Crème quoi????  She opened a huge smile, went back to the kitchen, and returned with a tray. On the tray, a small dish, a bowl of sugar, and….  a blow torch!  She caramelized the sugar right in front of me, filling the room with that unique aroma, and handing me the best dessert I had ever tasted in my 31 years of life!   Unforgettable! And, they did not let me pay a single franc for anything! 

Crème brûlée became my favorite dessert, I tried it at every opportunity since then, but they never quite matched my first encounter.  There was something about hitting the exact proportion of sugar crust to the smooth custard underneath, or maybe it was just the full experience, the fear of speaking up about the glass in my food, and the unexpected reward…  Who knows?

My version joins the French classic of my past with a Canadian-American flavor I’m quite fond of: maple syrup.

baked

MAPLE CRÈME BRÛLÉE
(inspired by a recipe from Jacques Torres)

1 cup heavy cream
1 cup half-and-half
1/2 vanilla bean
1 whole egg
4 egg yolks
1/4 cup sugar
7 tablespoons maple syrup
Turbinado sugar to caramelize the top

Heat the oven to 325 F.Pour the heavy cream and half-and-half into a  saucepan and place over medium heat. Slice the vanilla bean in half lengthwise, and scrape the seeds from the skin, adding them to the simmering cream, together with the leftover bean.
.
Scald the cream by heating it until bubbles start to form around the edge of the pan. Remove from the heat.In a large mixing bowl, whisk together the whole egg, egg yolks,  maple syrup and sugar until well blended. Continue to whisk while slowly pouring the hot cream into the egg mixture and whisk until the mixture is smooth and homogenous in color. Pour the mixture through a fine-mesh sieve to remove the vanilla bean pieces and any pieces of cooked egg.
.
Add the custard to ramekins filling them almost to the top.  Bake in the heated oven inside a large baking pan with hot water coming up halfway up the sides of the molds.  Bake for approximately 40 minutes.  Check after 35 minutes, the custard should tremble slightly when shaken, forming a little wave in the center of the ramekin, but not on the edges.Remove the molds from the water bath and place on a cooling rack for 30 minutes. Then refrigerate for 2 hours (or for to 3 days) before serving.
.
At serving time, sprinkle each custard homogeneously with turbinado (or demerara) sugar, and caramelize with a torch. Alternatively, you can broil the surface, but be very careful not to melt the custard underneath the sugar crust.  You can serve right away or refrigerate again.
.
ENJOY!
.
to print the recipe, click here
.
 In 1991, I fell in love with Paris.  The love only kept growing stronger.
Paris will always be my home away from home…
IMG_0626By the Seine,  March 2007
ONE YEAR AGO: Half-a-Million Page Views!
.
TWO YEARS AGO: Grilling Ribbons
.
THREE YEARS AGO: Peppery Cashew Crunch
.
FOUR YEARS AGO: Ossobuco Milanese