THE GREAT BRITISH BAKE OFF IS BACK!

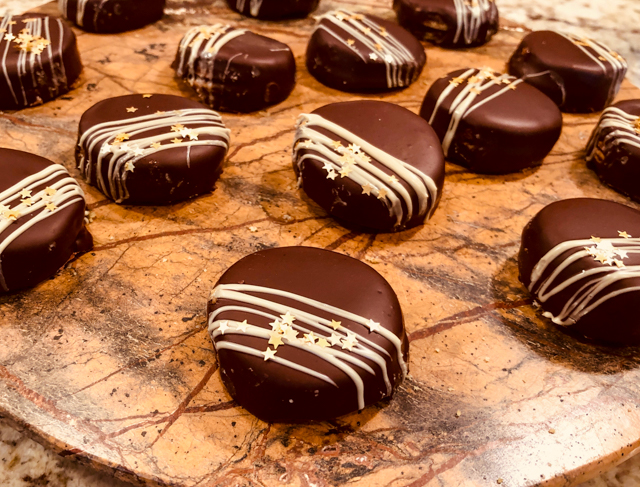
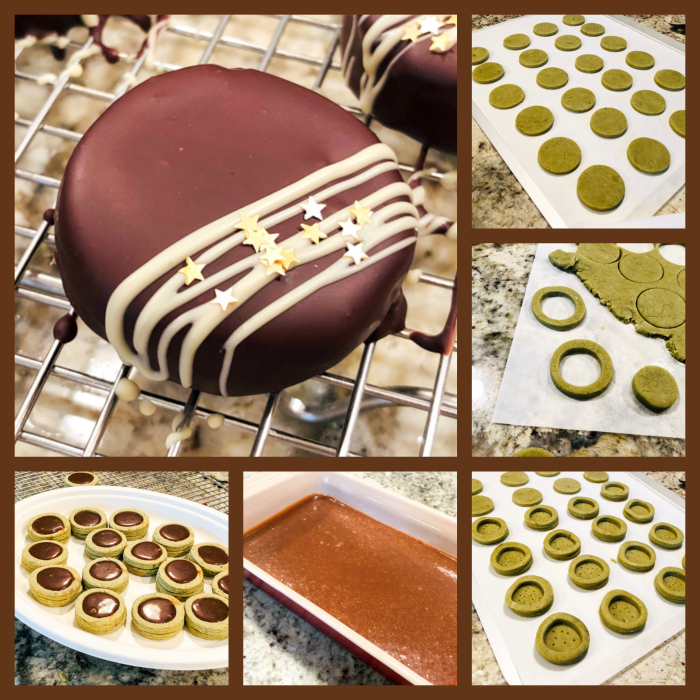
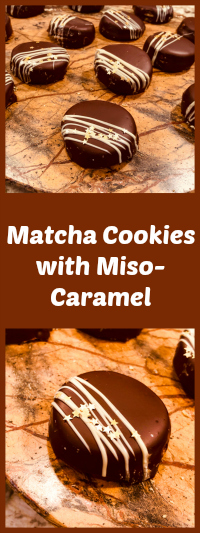
Americans who love the show will be very happy because Netflix is releasing each episode just a few days after they air in the UK. I was lucky enough to watch the opening show in London, but now I have to be patient and wait from Tuesday to Friday to indulge.  This year the group of contestants seems surprisingly young.  Or, does that mean I am getting so old that I noticed the trend? Hard to tell, but I have the feeling that in other seasons the ages were a bit more widespread. Still, they picked a bunch of folks with interesting personalities so it should be fun to watch. I decided to bake some of the challenges this year, and will start with the signature from episode 2, Biscuits. The theme is deceptively simple: make 12 chocolate-covered biscuits. I went Japanese with my interpretation. Matcha cookies with a miso-caramel filling. Coated with tempered dark chocolate.

CHOCOLATED-COATED MATCHA COOKIES WITH MISO CARAMEL
(inspired by Japanese Patisserie)

100 g all-purpose flour
150 g cornstarch
1⁄4 teaspoon baking soda
1 teaspoons baking powder
75 g  granulated sugar
113 g softned butter (1 stick)
2 egg yolks
3 g matcha powder
for caramel:
160 ml whipping cream
1 tablespoons corn syrup
1 tablespoon water
200 g granulated sugar
50 g miso paste
to coat and decorate cookies:
500 g dark chocolate, tempered
100 g white chocolate, gently melted and placed in piping bag
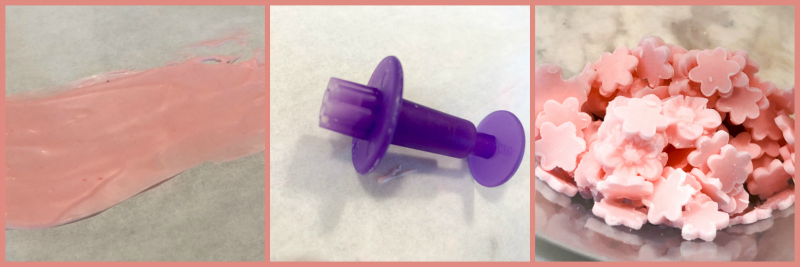
sprinkles of choice (I used edible golden stars)

To make the cookies, mix together the flour, cornstarch, baking soda and baking powder; set aside.

Beat the sugar with the softened butter in the bowl of a stand mixer with the whisk attachment until creamy. Add the egg yolks one at a time, then the matcha powder and beat until fully combined.

Gently fold in the flour mixture to form a crumbly dough. If the dough is too dry, sprinkle a few teaspoons of cold water, a little at a time until it forms a dough that adheres when you press portions with your fingers. Wrap the dough in plastic wrap and refrigerate it for 1 hour.  

Heat the oven to 350 F. Roll out the dough, using as little flour as possible on the work surface, to a thickness of around  1⁄4 inch (6mm). Stamp out rounds with the cookie cutter. Roll the scraps again and cut rounds of the same size, but use a smaller cookie cutter to remove most of the central part, so that you can form a barrier for the caramel to be poured inside (as shown in the composite picture). Place the top portion over the circles that will form the base, prick the surface with a fork. Bake in the preheated oven for around 12 minutes until set but not browned. Remove the cookies from the oven and leave to cool on a wire rack.

To make the miso caramel, place the whipping cream into a microwaveable bowl and warm gently for 30 seconds. Put the corn syrup, water and sugar in a small saucepan and heat gently, until it turns into a dark, golden brown caramel color.   Remove the pan from the heat and carefully add the warm cream, stirring constantly. Once the cream is fully incorporated, stir in the miso paste. Allow the caramel to cool and then scrape into a piping bag. Add the caramel to the center of the baked, and fully cooled cookies. Refrigerate several hours up to overnight.

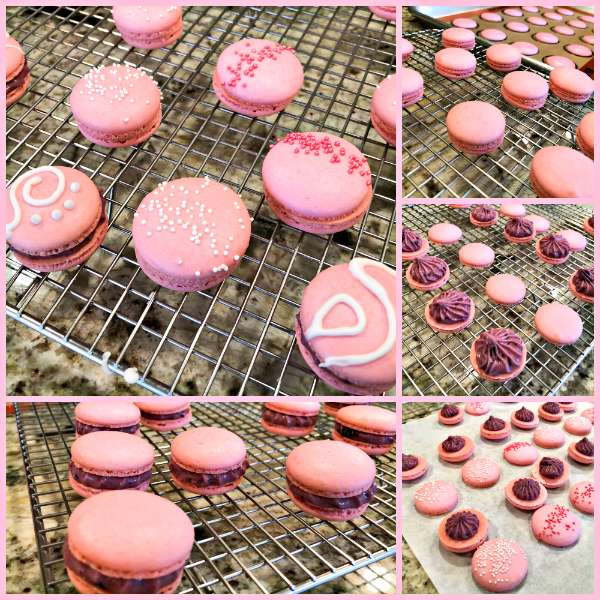
Temper the dark chocolate using your favorite method. Dip each cookie in the tempered chocolate, then drizzle melted white chocolate to decorate. Add sprinkles of your choice.

ENJOY!

to print the recipe, click here

Comments: Best component of this recipe is definitely the miso caramel. I could enjoy it by spoonfuls, staring at the trees in our backyard, daydreaming… Come to think of it, a drizzle over vanilla ice cream sounds pretty amazing also. Matcha is a flavor that not everyone is fond of. I like it because it cuts through excessive sweetness and since the caramel is obviously quite sweet, it pairs well with it. If you prefer a less sharp and assertive cookie, omit the matcha powder, add some vanilla or lemon zest. But please do try the miso caramel, it goes more or less along the lines of salted caramel, but more subtle in its savory nature.

After coating the cookies in tempered chocolate, avoid the temptation to put them to dry over a rack. They might stick to the rack, so the best way is to carefully lay them over parchment paper once the excess chocolate drips away. This tip is a courtesy of the one and only Philip, from Phil’s Home Kitchen… And since I mentioned him, stop by to see his recent takes on the technical challenges of this GBBO season with a click here and here.

ONE YEAR AGO: Queen of Sheba

TWO YEARS AGO: Brunch Burger

THREE YEARS AGO: Mango Salsa with Verjus

FOUR YEARS AGO: Raspberry Bittersweet Chocolate Chunk Brownies

FIVE YEARS AGO: Scary Good Pork Burgers

SIX YEARS AGO: Review of exercise program Focus25

SEVEN YEARS AGO: Celebrate Wednesday with a Thai Seafood Curry

EIGHT YEARS AGO:  Post-workout Breakfast

NINE YEARS AGO: Semolina Barbecue Buns

TEN YEARS AGO: Lavash Crackers


PURPLE STAR MACARONS

When it comes to macarons, people are divided in two teams, those who think the color of the shells should match the type of filling, and those who could not care less. I can go either way, but with this bake I joined the rebels. Shells are purple, filling is strawberry-based. My goal was to make macarons with the colors of KSU (purple and silver), but I wanted to use my made-from-scratch jam as part of the filling. So there you go, purple macarons with a strawberry-balsamic-black pepper buttercream.

PURPLE STAR MACARONS
(adapted from Colette Christian’s Craftsy version)

for the shells:
198 g powdered sugar
113 g almond meal
113 g egg whites at room temperature
a pinch of cream of tartar
100 g granulated sugar
purple food gel from Chefmaster
1/8 tsp vanilla extract

for the filling:
3 tablespoons (40gr) unsalted butter, softened
3/4 cup (100gr) powdered sugar
2 teaspoons heavy cream
2 tablespoon strawberry jam (I used this recipe)
½ teaspoon pure vanilla extract
1/8 teaspoon salt

to decorate:
white candy melts dyed purple
silver pearl dust
vodka or lemon extract

Line 2 or 3 heavy baking sheets with parchment paper or Silpat mats. Layer the powdered sugar and almond meal   in a food processor. Pulse until the mixture looks like fine meal, about 15 seconds. Pass through a sieve and transfer to a small bowl. Set aside.

Place the egg whites and pinch of cream of tartar in the bowl of a stand mixer fitted with the whisk attachment. Make sure that the bowl and the whisk are impeccably clean. Starting on medium speed, whip the whites with the cream of tartar until they look like light foam. The whites should not appear liquid. The foam will be light and should not have any structure.

Slowly rain in the granulated sugar, trying to aim the stream between the whisk and the side of the bowl. Turn the speed up to medium-high. Continue to whip the meringue until it is soft and shiny. It should look like marshmallow creme. Add the gel color and the vanilla. Staying at medium-high speed, whip the egg whites until the mixture begins to dull and the lines of the whisk are visible on the surface of the meringue. Check the peak. It should be firm.

Switch to paddle attachment. Add half the almond meal mixture, turn the mixer on low and mix for about 3 seconds. Stop and add the rest of the almond mixture, turn the mixer on low, and process for about 5 more seconds. It should still be reasonably thick, but the grains of almond should be more or less disappearing in the batter.  Remove the bowl from the mixer, and finish the macaronage by hand.  Put the mixture in a piping bag fitted with one of the tips listed above. Pipe on the prepared baking sheets.

Slam each sheet hard four to six times on the counter. Then fist bump each end of the sheet’s underside twice. Let the unbaked macarons dry until they look dull but not overly dry. Drying time depends on humidity. Ina dry climate, the macarons can dry in 15 to 20 minutes; in a humid climate, it can take 35 to 40 minutes.

While the macarons are drying, heat the oven to 300 F. Bake one sheet at a time on the middle rack. Check in 11 minutes. If the tops slide, then bake for 2 to 3 more minutes. The macarons should release without sticking. Check one or two. If they stick, put them back in the oven for 1 to 2 more minutes. Let the macaroons cool for 10 minutes before removing from the pan.

Make the filling:  Whisk the butter with the powdered sugar until creamy, slowly add the heavy cream and continue whisking until fluffy and smooth. I used a hand held electric beater. Add the vanilla, salt, and finally the strawberry jam. Whisk to incorporate, keep in the fridge until needed.  Place it in a piping bag fitted with a star tip like Wilton 1M.

Paint each shell before assembling.  In a very small bowl, mix silver pearl dust with vodka or lemon extract until it has a nice consistency to brush on the shells. Use a fan brush to get a nice effect. Assemble the macarons: find two macarons similar in size and add a good amount of buttercream filling on top of one shell, close with the other, and squeeze gently.

To make the stars, dye a small amount of melted candy purple. Spread on a piece of parchment as a thin layer. Let it set at room temperature, cut star shapes.  Right before using, add a bit of silver pearl dust and shake them gently around to cover lightly. Glue one or more stars to the top of each assembled macaron using candy melts.

Store in the fridge for 24 hours for perfect texture.

ENJOY!

to print the recipe, click here

Comments: The stars can be a bit tricky to make because the points are very fragile and tend to break, so make more than you think you’ll need.  I coated them with a bit of silver pearl dust, the same one used to brush the shells, except that I added them dry to the candy melt stars.

The strawberry jam is absolutely delicious, and I’ve used it in two other desserts that should be featured in the near future. The recipe comes from the most trustworthy baking website in the known universe: Pastries Like a Pro, from Helen Fletcher. If you want to improve your baking skills, you must follow her. Making the jam was a lot less complicated than I expected, so I see other jam adventures in my horizon. I have plans for a mango version to materialize in the Bewitching Kitchen sometime soon.

ONE YEAR AGO: Smoked Salmon, Fait Maison

TWO YEARS AGO: Kouign-Amann, Fighting Fire with Fire

THREE YEARS AGO: In My Kitchen, Yin and Yang

FOUR YEARS AGO: Chocolate Toffee Banana Bread

FIVE YEARS AGO: In My Kitchen, June 2014

SIX YEARS AGO:  Strawberry Frozen Yogurt

SEVEN YEARS AGO: Baked Coconut and “The Brazilian Kitchen”

EIGHT YEARS AGO: Honey-Glazed Chicken Legs

NINE YEARS AGO: French-Style Rolls


ISPAHAN MACARONS

Little annoucement: I edited my Index page, so that Macarons are now in a category by themselves, separated from other cookies.  I hope you find that helpful…


Pierre Hermé is the genius behind the combination of flavors known as Ispahan: lychees, roses, and raspberries. Nowadays you can find this sexy trio as a base for cakes, tarts, bonbons, but they were originally conceived many years ago as macaron filling. I read somewhere that Hermé designed them while working at Ladurée, but for one reason or another they were not a big hit then. Only when he opened his own shop and included Ispahan Macs in his regular production customers fell in love, head over heels. The rest is history.  You can find his original recipe here. I had a few issues with his macaron recipes in the past (operator error, I am sure), so to play it safe I used the method that almost never fails me.

ISPAHAN MACARONS
(inspired by Pierre Herme’s recipe)

for the shells:
198 g powdered sugar
113 g almond meal
113 g egg whites at room temperature
a pinch of cream of tartar
100 g granulated sugar
Teal food gel from Chefmaster
1/8 tsp vanilla extract

for the filling:
210g white chocolate, diced finely
200g lychees (preserved in syrup)
40g whipping cream
1/8 tsp rose extract
seedless raspberry jam

to decorate:
white candy melts dyed pink
brown food safe marking pen

Line 2 or 3 heavy baking sheets with parchment paper or Silpat mats. Layer the powdered sugar and almond meal   in a food processor. Pulse until the mixture looks like fine meal, about 15 seconds. Pass through a sieve and transfer to a small bowl. Set aside.

Place the egg whites and pinch of cream of tartar in the bowl of a stand mixer fitted with the whisk attachment. Make sure that the bowl and the whisk are impeccably clean. Starting on medium speed, whip the whites with the cream of tartar until they look like light foam. The whites should not appear liquid. The foam will be light and should not have any structure.

Slowly rain in the granulated sugar, trying to aim the stream between the whisk and the side of the bowl. Turn the speed up to medium-high. Continue to whip the meringue until it is soft and shiny. It should look like marshmallow creme. Add the gel color and the vanilla. Staying at medium-high speed, whip the egg whites until the mixture begins to dull and the lines of the whisk are visible on the surface of the meringue. Check the peak. It should be firm.

Switch to paddle attachment. Add half the almond meal mixture, turn the mixer on low and mix for about 3 seconds. Stop and add the rest of the almond mixture, turn the mixer on low, and process for about 5 more seconds. It should still be reasonably thick, but the grains of almond should be more or less disappearing in the batter.  Remove the bowl from the mixer, and finish the macaronage by hand.  Put the mixture in a piping bag fitted with one of the tips listed above. Pipe on the prepared baking sheets.

Slam each sheet hard four to six times on the counter. Then fist bump each end of the sheet’s underside twice. Let the unbaked macarons dry until they look dull but not overly dry. Drying time depends on humidity. Ina dry climate, the macarons can dry in 15 to 20 minutes; in a humid climate, it can take 35 to 40 minutes.

While the macarons are drying, heat the oven to 300 F. Bake one sheet at a time on the middle rack. Check in 11 minutes. If the tops slide, then bake for 2 to 3 more minutes. The macarons should release without sticking. Check one or two. If they stick, put them back in the oven for 1 to 2 more minutes. Let the macaroons cool for 10 minutes before removing from the pan.

Make the filling: Place the chopped white chocolate in a bowl. Process the lychees in a food processor to form a puree. Drain excessive liquid. Warm up the heavy cream almost to boiling, add the lychee puree, continue simmering until almost boiling again. Pour over the chocolate. Wait for a couple of minutes and gently mix the chocolate to dissolve it fully. Add the rose extract. Allow it to cool to room temperature and then whip it with a handheld mixer until fluffy.  Place in a piping bag fitted with a star tip such as Wilton 1M.

Assemble the macarons: find two macarons similar in size and add a good amount of lychee ganache to the bottom of one of them. Place a bit of raspberry jam in the center, and close with another macaron shell. Squeeze gently to take the filling all the way to the edge.

To make the decorations, dye a small amount of melted candy pink. Spread on a piece of parchment as a thin layer. Let it set at room temperature, cut flower shapes. You can also just fill tiny little silicone flower molds with the melted candy, and freeze. Make enough to have several flowers for each macaron shell. They can be made well in advance and frozen.

Decorate the top of each macaron with branches using a brown food-safe marker. Add flowers using melted candy to glue them on the cookie shell. Store in the fridge for 24 hours for perfect texture.

ENJOY!

to print the recipe, click here

Comments:  I don’t know for how long I’ve been flirting with this recipe, trying to imagine how the flavors would work together. Pierre Hermé makes a raspberry jelly from scratch, cuts in pieces and places that on top of the lychee ganache. I actually did that, but was a bit unsure of how well the gelatin did its job. My little discs of raspberry jelly seemed a bit too watery once removed from the freezer. I did not want to risk ruining my macs, so I used seedless raspberry jam instead. I guess it made them slightly sweeter than they should be, but I really liked the way they turned out. 


For the decoration, I used candy melts, but it’s of course totally optional, they would look pretty nice with a delicate brush of pink luster dust, for instance, making the whole decoration step a lot simpler and faster.  More or less along the lines of these from last year. Keep in mind that these little flowers keep very well in the freezer. In fact, I had made them three weeks earlier. I cannot take credit for the idea, though. I saw macarons similarly decorated on Pinterest a couple of years ago, and saved the idea. I think it was from a German food blog. Wish I could give credit, but a google search did not take me back there.

The lychee flavor is so unique, if you’ve never tried it please do so. It is exotic and mysterious, a great match for the rose extract. Hermé hit this one perfectly. I need to bake a Ispahan Entremet Cake sometime soon. Expect a mirror glaze. Because… Ispahan begs for it…

ONE YEAR AGO: Smokin’ Hot Meatloaf and Homemade Ketchup

TWO YEARS AGO: Banana Bread with Espresso Glaze

THREE YEARS AGO: Slow-Cooker Carnitas & Paleo Planet Cookbook Review

FOUR YEARS AGO: The Making of a Nobel Reception

FIVE YEARS AGO: Fennel Soup with Almonds and Mint 

SIX YEARS AGO: Green Curry Pork Tenderloin

SEVEN YEARS AGO: Farfalle with Zucchini and Ricotta

EIGHT YEARS AGO: Slow-baked Salmon with Lemon and Thyme

NINE YEARS AGO: Hoisin Explosion Chicken


COCONUT AND LIME MACARONS

So many macarons, so little time… These were made using my default recipe – French meringue, resting for about 30 minutes before baking (the macs, not the baker) – but with one small change in the method: I did most of the macaronage in the Kitchen Aid mixer with the paddle attachment. If you are new to making macarons, I don’t advise trying it on your first time, but as soon as you get a bit more familiar with the extent of mixing needed before piping, go for it. It is fast, a lot easier on your arms, and works like a charm. I must say these are fighting to sit in the position of Sally’s Favorite Macarons of All Times. Can you imagine that?

COCONUT AND LIME MACARONS
(from the Bewitching Kitchen)

for the shells:
198 g powdered sugar
113 g almond meal
113 g egg whites at room temperature
a pinch of cream of tartar
100 g granulated sugar
Green food gel from Chefmaster
1/8 tsp coconut extract

for the filling:
250 g white chocolate, chopped finely
50 g heavy whipping cream
50 g coconut milk (full-fat)
zest of 1 lime

to decorate:
melted white candy melts
sprinkles of your choice

Line 2 or 3 heavy baking sheets with parchment paper or Silpat mats. Layer the powdered sugar and almond meal   in a food processor. Pulse until the mixture looks like fine meal, about 15 seconds. Pass through a sieve and transfer to a small bowl. Set aside.

Place the egg whites and pinch of cream of tartar in the bowl of a stand mixer fitted with the whisk attachment. Make sure that the bowl and the whisk are impeccably clean. Starting on medium speed, whip the whites with the cream of tartar until they look like light foam. The whites should not appear liquid. The foam will be light and should not have any structure.

Slowly rain in the granulated sugar, trying to aim the stream between the whisk and the side of the bowl. Turn the speed up to medium-high. Continue to whip the meringue until it is soft and shiny. It should look like marshmallow creme. Add the gel color and the vanilla. Staying at medium-high speed, whip the egg whites until the mixture begins to dull and the lines of the whisk are visible on the surface of the meringue. Check the peak. It should be firm.

Switch to paddle attachment. Add half the almond meal mixture, turn the mixer on low and mix for about 3 seconds. Stop and add the rest of the almond mixture, turn the mixer on low, and process for about 5 more seconds. It should still be reasonably thick, but the grains of almond should be more or less disappearing in the batter.  Remove the bowl from the mixer, and finish the macaronage by hand.  Put the mixture in a piping bag fitted with one of the tips listed above. Pipe on the prepared baking sheets.

Slam each sheet hard four to six times on the counter. Then fist bump each end of the sheet’s underside twice. Let the unbaked macarons dry until they look dull but not overly dry. Drying time depends on humidity. Ina dry climate, the macarons can dry in 15 to 20 minutes; in a humid climate, it can take 35 to 40 minutes.

While the macarons are drying, heat the oven to 300 F. Bake one sheet at a time on the middle rack. Check in 11 minutes. If the tops slide, then bake for 2 to 3 more minutes. The macarons should release without sticking. Check one or two. If they stick, put them back in the oven for 1 to 2 more minutes. Let the macaroons cool for 10 minutes before removing from the pan.

Make the filling: Place the chopped white chocolate in a bowl. Warm up the heavy cream almost to boiling, add the lime zest and allow it to sit for 15 minutes, covered. Add the coconut milk, heat the mixture again to almost boiling, pour over the chocolate. Wait for a couple of minutes and gently mix the chocolate to dissolve it fully. White chocolate is very delicate, if you need to heat it in the microwave to fully dissolve it, do it in at most 10 second intervals using 50% power. Once it is fully dissolved, allow it to cool to room temperature and then whip it with a handheld mixer until fluffy. Do not do it for too long or the ganache will turn grainy.

Assemble the macarons: find two macarons similar in size and add a good amount of filling to the bottom of one of them. Place the other on top and squeeze gently to take the filling all the way to the edge.  Store in the fridge for 24 hours for perfect texture.

ENJOY!

to print the recipe, click here

Comments: Macarons inflict fear on bakers. Things can go wrong, and when they do, it’s pretty frustrating, although there are uses for ruined shells. Macawrongs, as some call them, can be crumbled and used to add texture in cake layers, can go over mousses or ice creams, no need to trash them. In fact, I have recently seen amazing macarons in which badly cracked shells turned into works of art. The clever baker simply used gold pearl dust dissolved in vodka and painted the cracks using a fine brush. The effect is stunning!  I’ve been hoping for cracked shells, but of course, once you want them, they don’t happen. Yeah, macarons. They know how to keep you on your toes. 

These macs delivered just what I wanted, a good taste of coconut with the delicate sourness of limes to go with it. The labor of love was separating the white and green sprinkles from the other colors, but it was worth it.  Since I used candy melts for the drizzle, I had to work fast because that tends to solidify quickly. So I drizzled four macarons at a time, decorated them and moved to the following set of four. I felt pretty fancy using tweezers to place the large sprinkles exactly where I wanted, but of course that slows things down. Baking: one of the most efficient ways to practice patience.

Summarizing what’s new about this post: you can do 90% of the macaronage in your Kitchen Aid, just change the whisk to the paddle, add the almond mixture in two installments. Beat 3 seconds after first addition, in low-speed, add the second half, and beat 5 seconds.  Finish by hand after that. And, to make a coconut flavored shell and filling, simply use coconut extract instead of vanilla in the shells, and a portion of coconut milk in place of heavy cream when you make the ganache with the white chocolate. You can use that as a basis for different flavors, maybe adding a touch of passion fruit, or mango instead of infusing the cream with lime zest.  Have fun with it… That’s what macs are for. Apart from sometimes driving you crazy.

ONE YEAR AGO: Flank Steak Carnitas

TWO YEARS AGO: Sesame and Poppy Seed Sourdough

THREE YEARS AGO: Pecan-Crusted Chicken from Southern at Heart

FOUR YEARS AGO: Lamb Shanks en Papillote with Cauliflower-Celeriac Purée

FIVE YEARS AGO: Chestnut Brownies and a Blog Award!

SIX YEARS AGO: Quinoa with Cider-Glazed Carrots

SEVEN YEARS AGO: Celebrate Wednesday: Heirloom Tomatoes Steal the Show

EIGHT YEARS AGO: Pain de Provence

NINE YEARS AGO: Golspie Loaf, from the Scottish Highlands

MACARONS FOR A LITTLE PRINCESS

Time goes by way too quickly. Not too long ago we were thrilled with the idea we would be grandparents, and all of a sudden, that sweet little baby turned four years old!  To celebrate the occasion, we wanted to send her a box of pink macarons, as pink is her favorite color. I settled on blackberry filling, and decided to try a bunch of different decorations, so she could choose her favorite.

BLACKBERRY MACARONS
(from the Bewitching Kitchen)

for the shells:
198 g powdered sugar (I used Cherry Bakewell flavored)
113 g almond meal
113 g egg whites at room temperature
a pinch of cream of tartar
100 g granulated sugar
pink gel color from AmeriColor
2 drops vanilla extract

for the filling:
8 ounces white chocolate
1/2 cup blackberry jam
2 1/2 tablespoons heavy cream

to decorate:
Royal icing
sprinkles of your choice
edible marker drawings
melted white chocolate

Line 2 or 3 heavy baking sheets with parchment paper or Silpat mats. Layer the powdered sugar and almond meal   in a food processor. Pulse until the mixture looks like fine meal, about 15 seconds. Pass through a sieve and transfer to a small bowl. Set aside.

Place the egg whites and pinch of cream of tartar in the bowl of a stand mixer fitted with the whisk attachment. Make sure that the bowl and the whisk are impeccably clean. Starting on medium speed, whip the whites with the cream of tartar until they look like light foam. The whites should not appear liquid. The foam will be light and should not have any structure.

Slowly rain in the granulated sugar, trying to aim the stream between the whisk and the side of the bowl. Turn the speed up to medium-high. Continue to whip the meringue until it is soft and shiny. It should look like marshmallow creme. Add the gel color and the vanilla. Staying at medium-high speed, whip the egg whites until the mixture begins to dull and the lines of the whisk are visible on the surface of the meringue. Check the peak. It should be firm. Transfer the whites to a medium bowl.

Fold in the almond meal mixture in three increments. Paint the mixture halfway up the side of the bowl, using the flat side of a spatula. Scrape the mixture down to the center of the bowl. Repeat two or three times, then check to see if the mixture slides slowly down the side of the bowl. Put the mixture in a piping bag fitted with one of the tips listed above. Pipe on the prepared baking sheets.

Slam each sheet hard four to six times on the counter. Then fist bump each end of the sheet’s underside twice. If using sprinkles, add them now, before the shells dry. Let the unbaked macarons dry until they look dull but not overly dry. Drying time depends on humidity. In a dry climate, the macarons can dry in 15 to 20 minutes; in a humid climate, it can take 35 to 40 minutes.

While the macarons are drying, heat the oven to 300 F. Bake one sheet at a time on the middle rack. Check in 11 minutes. If the tops slide, then bake for 2 to 3 more minutes. The macarons should release without sticking. Check one or two. If they stick, put them back in the oven for 1 to 2 more minutes. Let the macaroons cool for 10 minutes before removing from the pan.

Make the filling: Place chocolate in a heatproof bowl and set over a pot of simmering water on low heat. Stir chocolate until melted. Remove from heat, and whisk in jam and heavy cream. Cover and chill 2 hours, or until cold. Whip it with a hand-held electric mixer until it reaches a good consistency for piping. Transfer ganache to a piping bag fitted with a 1/4-inch star tip.

Assemble the macarons: find two macarons similar in size and pipe a good amount of filling to the bottom of one of them. Place the other on top and squeeze gently to take the filling all the way to the edge.  Decorate any way you want. Store in the fridge for 24 hours for perfect texture.

ENJOY!

to print the recipe, click here

Comments: The logistics of gifting macarons to someone living a thousand miles away is a bit complicated, but of course doable. Where there is a will, there’s a way, right?  Keeping in mind that macarons need to sit overnight in the fridge to “mature”, you must start the process a couple of days early.  The maturation process is essentially absorption of moisture from the filling into the shells. Macaron shells start pretty dry and crumbly, as you’ll notice if you bite into them right after they cool down. Once you add buttercream or ganache, the moisture slowly permeates into the shells and turns the cookie into perfect little morsels of sweetness, with the exact amount of chewiness. But anyway, back to the issue of gifting macs.

Her birthday fell on a Thursday, so we had to ship it overnight on Wednesday. You can conceivably do a 2-day shipping to save considerable cash, but this was a special occasion, so we splurged. With that in mind, baking day was set for Tuesday after work. I had my fingers firmly crossed for the Macaron Gods to smile on me, because that was it, I needed them to be perfect, no time to try again. Stars were properly aligned: success! By 22:45hs  they  were  going  into the fridge, and the baker into a warm bed…   😉  

I used royal icing decoration in some of them, sprinkles in others, went Jackson Pollock in some, and even tried my hands at free drawing with edible markers (first time I dared doing it). The markers are from Chefmaster and have a very soft tip, you have to still use a light hand on the very delicate macaron shell, but trust me, if I could pull this, anyone can.

and her favorite….  DRUM ROLL!!!!!!!!!!


ONE YEAR AGO: Gilding the Sourdough Loaf

TWO YEARS AGO: Lolita Joins the Bewitching Kitchen

THREE YEARS AGO: Cashew Cream Sauce

FOUR YEARS AGO: Blood Orange Margaritas

FIVE YEARS AGO: Smoked Salmon Appetizer

SIX YEARS AGO: Clementine Cake

SEVEN YEARS AGO: Springtime Spinach Risotto

EIGHT YEARS AGO: The end of green bean cruelty

NINE YEARS AGO: Torta di Limone e Mandorle