RIO OLYMPICS 2016: A GOLD MEDAL MENU

Corcovado_statue01_2005-03-14By Klaus with K – CC BY-SA 3.0, https://commons.wikimedia.org/w/index.php?curid=1970179

Olympic games are going at full speed, these are two exciting weeks! So much to follow, we tend to stay up late trying to catch up with the events we enjoy the most: swimming, running, track and field, synchronized diving, gymnastics, volleyball, beach volleyball, soccer, and this time even golf  is keeping us glued to the TV screen… Three words for you: Simone Biles rocks. 

41XPB6v6T9L

In this post I share a full menu with Brazilian goodies published in previous years, but first I offer a new take on Shrimp Moqueca, adapted in honor of the games.


ShrimpMoquecaGolden

SALLY’S GOLDEN SHRIMP MOQUECA
(from Bewitching Kitchen)

1 pound large shrimp, peeled and deveined
2 tablespoons coconut oil (or dendê oil, if available)
1 onion, diced
1 clove garlic, minced
1 Serrano pepper, minced
salt and pepper
roasted bell pepper, cut in large squares (preferably yellow)
2 cans (15 ounce) yellow tomatoes, drained, briefly processed in blender
a lot of cilantro (a lot)
about 1/2 cup coconut milk (full fat, please)
lemon juice to taste
hot sauce to taste

Squirt a little lemon juice all over the shrimp and reserve.

Heat the coconut oil in a large saute pan with a lid. Add the onions and cook until golden and fragrant. Add the Serrano pepper and roasted bell pepper, cook for a couple of minutes, stirring often.  Add the garlic, cook for about 30 seconds, seasoning lightly with salt and pepper. Now pour the processed yellow tomatoes, season with salt, pepper, a dash or two of the hot sauce of your choice. Cover the pan and let it all simmer for about 10 minutes in very low heat.

Add the shrimp, simmer until cooked, just for a few minutes, then add coconut milk and cilantro to the pan, stirring until warm. Adjust seasoning with salt, pepper, and more hot sauce to taste.  If you’d like, sprinkle fresh lemon juice right before serving. Perfect over white rice.

ENJOY!

to print the recipe, click here

If you don’t have canned yellow tomatoes, use red.  I like to process them to have a smoother sauce. Yellow bell peppers would reinforce the golden color of the dish, but our store did not have any this time.

41XPB6v6T9L

A BRAZILIAN MENU TO CELEBRATE THE OLYMPIC GAMES

Let’s get a trio of appetizers going, starting with Pão de Queijo (Brazilian Cheese Bread).  This is a very easy recipe using a blender and a few minutes of your time. If you’ve never had Pão de Queijo, don’t blink. Make them right now!  They were born gluten-free, which is an added bonus to many.

cheesebread12

For the recipe, click follow this link.

Another great, traditional option,  Pastéis (a bit like empanadas, but fried).

pasteis1

for the recipe, follow this link.

And perhaps my favorite, the one that gets the Golden Medal of Appetizers,
Mandioca Frita (Fried Yucca Root)

mandiocafrita1For the recipe, follow this link. 

To serve with the Golden Moqueca I recommend basic white rice and a nice helping of Brazilian Farofa, to help soak up the flavorful tomato-coconut sauce.

farofa

For the recipe, follow this link.


You definitely need the Brazilian national drink to get into the Olympic spirit!

caipirinha1

recipe for Caipirinhas can be found here.

Finally, for dessert, let’s share a triple round of goodies, starting with Brigadeiros,
because how could you not have brigadeiros during a Brazilian feast?

ready12

For the recipe, click here

But it’s hard to beat the level of deliciousness of Cocada de Forno (Baked Coconut)

img_0129

to get the recipe for Cocada de Forno, jump here.


And perhaps my favorite of all, as Brazilian as Brazilian gets, Mangas Flambadas, served  comme il faut, with vanilla ice cream (but if you use Dulce de Leche it won’t hurt my feelings at all).

mango2

For the recipe, click here.

Top the meal with what my Dad used to call um cafezinho esperto (a smart coffee), and dream with Gold, Silver, and Bronze medals around the neck of your favorite athletes.
Let’s keep in mind that medals are great but the effort each athlete puts into being there to compete, that’s what impresses me the most. Imagine the personal ordeals they go through to finally be part of the Olympic team.  Commitment, hard work, mental and physical struggles most of us could never face.

Quoting a great phrase from an advertisement for Under Armour: 

Untitled
Watch the video in full here. It is moving, truly mesmerizing.

Golden Shrimp Moqueca, from Bewitching Kitchen

ONE YEAR AGO: Tomato Tatin

TWO YEARS AGO: Headed to Colorado! 

THREE YEARS AGO: Farofa Brasileira

FOUR  YEARS AGO: Thai-Inspired Pork Tenderloin

FIVE YEARS AGO: A yummy Brazilian cake: Bolo de Fuba’

SIX YEARS AGO:  Summer’s Tomatoes

SEVEN YEARS AGO: Leaving on a jet plane… 

RIO2016

Save

Save

Save

FOCACCIA WITH GRAPES, ROQUEFORT AND TRUFFLED HONEY

Truffled honey. Can I get a group OMG going? I hope so… that stuff could probably be under a list of controlled substances…  I better use mine up before it does makes into the list.  But back to the focaccia. I wanted to bake something for a departmental get-together, scheduled for a Thursday evening. Weather forecast for that week was high 90’s, low 100’s, so turning the oven at 450F seemed wrong on many levels. But the weekend before we got a little break with some rain and cooler temps, so I decided to get the baking out of the way as early as possible on Saturday, then freeze my production until showtime.  I also wanted something a little different from the same old same old, and a grape focaccia came to mind. In Tuscany, it is called  a Schiacciata con l’Uva, a name that beats grape focaccia into submission. I found a recipe at epicurious, but ended up winging it myself. Rebel is my middle name.

Grape Focaccia

FOCACCIA WITH GRAPES, ROQUEFORT & TRUFFLED HONEY
(from The Bewitching Kitchen)

3/4 cup very warm water
1/8 cup milk, full-fat
1  teaspoons sugar
1 + 1/2  teaspoons active dry yeast
2 cups all-purpose flour
1/2 teaspoon salt
2 tablespoons olive oil for dough plus more to spread
seedless black grapes
Roquefort cheese, crumbled
dried thyme to taste (or fresh)
Maldon salt flakes
truffled honey (or regular honey)

In the bowl of a KitchenAid type mixer stir the warm water, milk, sugar, and yeast.  Add the flour, salt and  Add the flour, salt olive oil (2 tablespoons) to the bowl, then knead with the dough hook for about 5 minutes. Remove the dough from the bowl, and knead it by hand briefly, a minute or so longer.

Place the dough inside an oiled bowl, cover with plastic wrap and let it rise for 90 minutes. It will more than double, depending on the temperature of your kitchen.

Brush a half-sheet baking pan with olive oil, transfer the risen dough into it, and allow it to rest for a few minutes to relax the gluten. Add olive oil on top (about 3 tablespoons)  and spread the dough to cover the baking sheet.  Cover it again and let it sit for 45 minutes at room temperature.  While the focaccia is in its second rise, turn the oven to 450F.

Top the dough with grapes sliced in half, the crumbled Roquefort cheese, thyme, add coarse salt all over, then drizzle the surface with a little truffled honey.  Do not add too much, as the flavor is very potent.

Bake for 15 to 20 minutes. If the top is getting too dark, reduce the temperature to 425 F after 10 minutes.

Cool it on a rack before slicing in squares.

ENJOY!

to print the recipe, click here

compositeFocc

Comments: Before anyone criticizes me for taking liberties with the thickness of the schiacciata, let me state upfront that I like my focaccia to be thick and pillowy. If you want to stick to tradition, stretch the dough to the extension of a full baking sheet instead of half.  It will then be thinner and crispy. The combination of grapes with blue cheese is a classic, but when truffled honey was added to it, I’d say I hit that one out of the park. And I don’t even like baseball!  One word of caution, the stuff is potent. When you open the bottle, the intensity of the truffle smell will surprise you. Use it sparingly or it will overpower every other flavor in the focaccia. Of course, if you don’t have truffled honey, use a regular honey instead.  Maybe you own a bottle of truffle oil? In that case, put a small amount of it to use, maybe mix a few drops with regular honey… I suppose that could work well too.

pieces

Grab a piece or four… and be happy!

Grape Focaccia, from Bewitching Kitchen

ONE YEAR AGO: Moroccan Carrot Dip over Cucumber Slices

TWO YEARS AGO: White Chocolate Macadamia Nut Cookies

THREE YEARS AGO: Cilantro-Jalapeno “Hummus”

FOUR YEARS AGO: A Moving Odyssey

SEVEN YEARS AGO:
 
Shrimp Moqueca


Save

SECRET RECIPE CLUB: FALAFEL & A BONUS RECIPE

The Secret Recipe Club is an event that pairs two food bloggers in secret. Once we get our “assignment”, we have about 3 weeks to browse through the site, choose a recipe from it, cook and blog about it at midnight of Reveal Monday. I’ve been a member for a long time, but I still remember exactly how it felt when I joined. Those “newbie” feelings, never quite sure if your write-up, photos, chosen recipe were good enough. I got to know amazing food blogs through the SRC, and that is a bonus like no other. Long before I joined the club, I was a faithful follower of a very unique blog, called Chef in Disguise. At some point in the not too distant past, Sawsan, the hostess of that site, joined The Secret Recipe Club, and when I learned about that, my heart missed a beat, out of pure thrill. And then it missed another beat, from disappointment. Disappointment because she was not in my group. At that time there were four different groups. I was part of Group D, she was placed in Group A. Bummer. But it so happens that major changes took place, instead of four separate groups we now have three, bloggers moved around, and voilà: I found myself sitting in Group A.  But, what’s even better, today I have the greatest honor and pleasure of cooking from her site.  Those are incredibly big shoes to fill, Sawsan is an outstanding cook, photographer, and writer. But having interacted with her over many years through emails and comments I also know she is an amazing human being. Kind, generous, loving, devoted to her family, friends, profession, and culture. Through her blog, I learned so much more than cooking. Just to offer you a very small but representative example: in this post she explains Ramadan and does so in a beautiful, profound and touching way.  But that’s just one example. Sawsan’s mission is to open her kitchen and home to people all over the world. You’ll find stories of her family as she grew up, stories of her kids adventures in school or how they are all dealing with moving from Jordan to UAE.  You will also find recipes ranging from straightforward to incredibly sophisticated. There is simply nothing she won’t try and then excel at. You don’t believe me? Take a look at this cake she made for her son. Or this one for her daughter. And when she does this type of challenging projects, she makes sure that anyone can follow her steps, by writing very detailed tutorials.  These “how to” posts are amazing sources of information, a bit like having a teacher holding your hand.

As usual, I like to make a list of the recipes that I considered for this Reveal Day. From Chef in Disguise, my list was a mile long, but I will take a minimalist approach: Pão de Queijo (because I was thrilled to see her making a typical Brazilian concoction),  Date Bread Rings, Cheese and Anise Flat Bread,  Mille-feuille for home-made Napoleon, Braided Date Bread (almost made this one…), Lavender Chicken, Pavlova (always wanted to give this one a try), Kabsa (irresistible rice and meat concoction from the Arabian gulf).  But I also want to offer you four examples of tutorials that are a must-read: How to make Labneh Cheese How to make Feta Cheese…  How to make mozzarella and armenian string cheese… and another one very dear to my heart: Sourdough starter 101: how to create your sourdough starter from scratch.

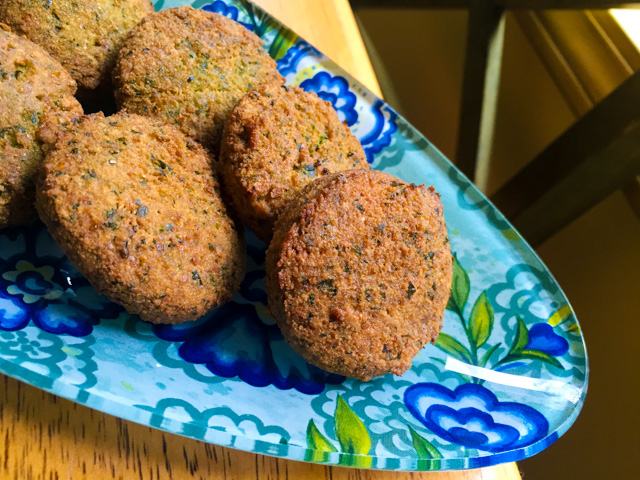
So, what did I pick? For starters, Falafel. Not an easy choice, because a couple of years ago I had an epic disaster in the kitchen attempting to make them. Our dear friend Cindy had traveled all the way from Oklahoma to visit us and one of our goals was to make falafel together. Things seemed to be going well, but when we got to the part of frying them, they disintegrated in the oil, every single one of them!  It was a royal mess, we had to resort to a plan B for our dinner. I confess that when I have this type of problem with a recipe, I usually avoid attempting it again for a while (in Sally’s speak: for a while = forever).  But Sawsan’s post was my chance to do it right.  I was quite nervous about it, but here I am to report back: HUGE SUCCESS!  A personal culinary demon has been exorcised for good!

(Just when I finished editing and scheduling this post, Sawsan published a new article.
I won’t say a word about it. Because once again, she’s said it all).

served-3


FALAFEL
(slightly adapted from Sawsan’s Chef in Disguise)

This recipe makes 35 falafel patties

500 g soaked chickpeas (measured after soaking)
125 g soaked peeled fava beans (measured after soaking)
½ cup parsley leaves (remove stems)
½ cup cilantro leaves (remove stems)
1 medium shallot
¾ teaspoons salt
¾ teaspoons ground cumin
¾ teaspoons ground coriander
½ teaspoon all spice
½ teaspoon black pepper

to add 10 minutes before cooking
¼ teaspoon baking powder
¼ teaspoon baking soda

for the tahini sauce:
2 Tablespoons of yogurt
1 tablespoon Tahini
1 teaspoon lemon juice
a dash of salt

Prepare the Falafel Mix: Soak the fava beans and the chickpeas in water in separate containers overnight. The following day drain the fava beans and the chickpeas, rinse them with fresh water. You should weigh them after soaking, and place the required amount in the bowl of a food processor. Process the grains together until smooth, remove from the processor and add the shallot, parsley, cilantro, salt, peppers, and spices to the empty processor. Process until a paste forms, add the grains back and process everything together until very smooth.  Scrape the sides of the bowl a couple of times so that  you’ll end up without large chunks of grains.  You can freeze the mixture at this point or place it in the fridge for a few days.

Ten minutes before frying, sprinkle baking soda and baking powder on the falafel mix, knead and let rest.

When ready heat 1 inch deep of cooking oil in the frying pan on medium heat. Scoop the falafel by using a specialized Falafel scoop, an ice cream scoop, or by using 2 spoons whereby you scoop the falafel paste in one, and press the other spoon against it to compact it into an oval shape. You can also use your hands to roll the falafel into balls. Drop the falafel gently into the frying pan. no more than 4-5 because if you add too many the oil will cool down and the falafel will fall apart Fry for a few minutes until the falafel turns brownish, flipping it once to brown both sides.  Take the falafel out and place it on a paper towel to get rid of excess oil.

Make the sauce: mix the Tahini sauce ingredients in a small bowl until you get the right texture, you can add a bit more water or lemon juice if necessary. Taste and adjust seasoning. Serve as a dip or spoon some over the falafel on your plate.

ENJOY!

to print the recipe click here 

falagelcomp

Comments: To make this wonderful recipe, you’ll need two special items. First dried, peeled fava beans (although you could use all garbanzo beans if you cannot find fava). I will add a little note here. Sawsan once offered to send me a bag of dried favas straight from Jordan, so that I could have the best possible product to make falafel from scratch!  Can you imagine? I told you she is very kind… So, for this recipe I searched for the very best product I could find through amazon.com as far as reviews from customers go.  The second item, which is not mandatory, is a falafel maker. You can see what it looks like in the photo below  I advise you to buy a large one, because some available are way too small. The one I got is this model. It is described as extra-large. Trust me, you don’t want anything smaller. Of course, you can make falafel shaped with spoons or your hands, but I wanted to make sure I did a good job. Remember, it’s Sawsan’s blog I am talking about…

gadget1
I made the falafel mixture two days before actually frying them.  Kept the bowl in the fridge, then kneaded the baking powder and baking soda right before cooking them, as instructed by Sawsan. To my amazement, not a single one dissolved in the oil, and the taste… out of this world delicious! I used a heavy hand with the herbs, so mine turned out a bit more green than Sawsan’s.

ontheplate

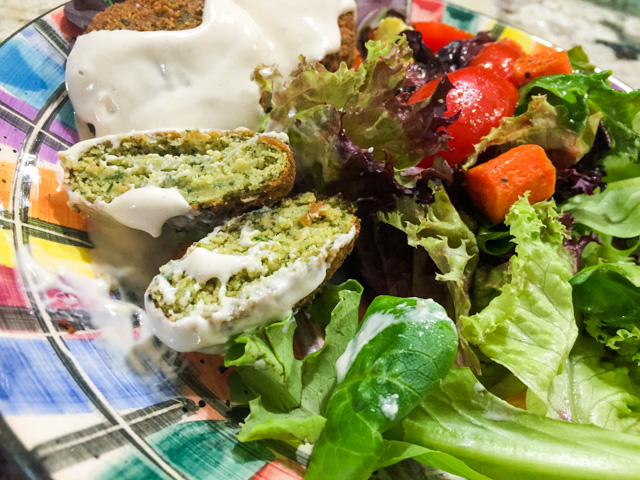
These tender, flavorful little morsels were perfect served with the tahini sauce…

Falafel, from Beiwtching Kitchen


BONUS RECIPE

And now that we got the Falafel talked about, I must share with you a bonus recipe. In part, I made it because I wanted to have a backup post in case the falafel turned into oily crumbs. But I am so glad I picked this salad, because it was one of the best things I cooked so far this year.  Grilled peaches ROCK!

Grilled Peach Salad with Lavender Dressing

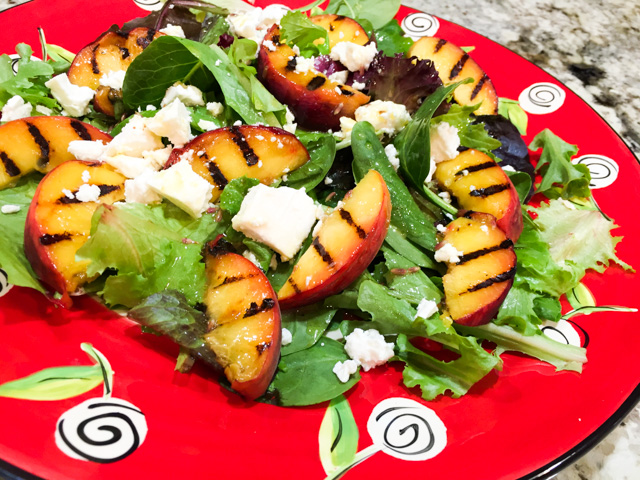
GRILLED PEACH FETA SALAD WITH LAVENDER DRESSING
(slightly modified from Sawsan’s Chef in Disguise)

for the salad:
3 cups greens (I used a spring mix)
3 tablespoons of feta crumbled, or to taste
2 peaches cut into segments

for the lavender dressing:
4 tablespoons lemon juice
5 tablespoons olive oil
1/2 teaspoon sea salt
1 teaspoon mustard
½ teaspoon dried lavender flowers
2 tablespoons balsamic vinegar (I used white balsamic)

Make the dressing: In a bowl add the lemon juice, salt, mustard ,lavender, and balsamic vinegar and whisk Slowly drizzle the olive oil while you continue whisking until you have added the entire amount.

Prepare the salad: On the grill or in a pan on the stove top, lightly grill the peach segments. In your serving plate, arrange the greens, topped with the grilled peach segments. Crumble the feta cheese on top.

Drizzle the dressing on the salad right before serving.

ENJOY!

to print the recipe, click here

saladcomp

Comments: What a wonderful salad this was!  I made the dressing one hour before dinner, because I wanted to make sure the lavender taste would sip through the dressing, and I think that was a good move… I coated the grill pan very lightly with a coconut oil spray, and the peaches were done in a couple of minutes, beautiful marks all around. I allowed the slices to come to room temperature before assembling the salad. A winner, all the way!  I am definitely incorporating grilled peaches in our diet, and might even be daring and grill some fresh apricots next time, use a mixture of the two fruits…


Grilled Peach Salad, from Bewitching Kitchen

Sawsan, I cannot tell you how happy I was to get your blog to cook from! Having been a reader for so long, your place feels like home in the blogosphere…  I hope you also enjoyed your assignment this month!  Happy Reveal Day!

I invite my readers to click on the blue frog. She will take you to the collection of recipes my virtual friends prepared this month. And of course, I wish everyone in the USA a Happy 4th of July!


ONE YEAR AGO: In My Kitchen, July 2015

TWO YEARS AGO: Sous-vide Pork Chops with Roasted Poblano Butter

THREE YEARS AGO: Roasted Strawberry Buttermilk Sherbet

FOUR YEARS AGO: Amazing Ribs for the 4th of July!

FIVE YEARS AGO: Baby Back Ribs on the 4th of July

SIX YEARS AGO: Blueberry Muffins

SEVEN YEARS AGO: A Pie for your 4th of July

TORTA DE LIQUIDIFICADOR

Come again? 

🙂


The best translation for this Brazilian recipe would be “Blender Pie.” First, let’s learn how to say it like a native. Repeat after me, three times:
.

Easy, right? I knew you could do it.

baked2
I have a sister in Brazil who is 16 years older than me. By the time I got into my teens she was already married, throwing parties, and pretty involved into cooking. One of the things she used to make was this blender pie, but her favorite filling was tuna with green peas, black olives and tomatoes. Being the mega picky girl I was, I never touched that kind, preferring instead more friendly (and austere) versions with ham and cheese, at most a touch of oregano. The basic process is always the same, a thick batter is made in the blender, half of it gets poured into a baking dish, the filling of choice scattered on top, and the rest of the batter spread all over. It is comfort food by default, or as we say in Portuguese, por definição. I won’t sugar coat the pill, it is a bit heavy. Accept it and move on. As an appetizer a couple of small squares will be enough for each guest. If you’d like to serve it as dinner with a salad on the side this full recipe feeds six hungry people.

Blender Pie

TORTA DE LIQUIDIFICADOR
(BLENDER PIE)
(from the Bewitching Kitchen)

for the “dough”
1 cup oil (I used canola)
2 cups milk (full-fat)
3 eggs
2 cups all-purpose flour
1/4 cup shredded Parmigiano cheese
1 teaspoon baking powder
1/2 teaspoon salt

for the filling
caramelized onions
sautéed mushrooms
shredded mozzarella cheese
diced tomatoes
(or any other filling you like to use)

Heat the oven to 375 F. Lightly grease or spray with oil a baking dish (9 x 13 or slightly smaller is fine).

Make the dough: add to a powerful blender all the ingredients, and blend for 5 minutes until completely smooth. Stop the blender and clean its sides a couple of times during the process.

Pour half of the batter in the prepared dish, add all ingredients for the filling on top, pour the rest of the batter, spreading gently with an offset spatula to enclose all the filling.

Bake for 45 minutes or until all puffed up and golden on top. Let it cool until just warm before cutting in slices. It can be prepared a couple of days in advance, to re-heat use a low oven, microwave is not recommended.

ENJOY!

to print the recipe, click here

compositeblender

The beauty of this recipe is its versatility. You can pretty much use any filling you imagine: shredded barbecued chicken, ground beef with taco seasonings, roasted veggies, maybe some grilled shrimp, all doable. One popular version in Brazil uses corn and peas, green and yellow like the colors of the country. I do think cheese is pretty much mandatory in any kind of blender pie. If using shrimp or roasted veggies I suppose a bit of crumbled feta would be a nice option. No need to measure anything, just cover the extension of the baking dish with a hearty amount of filling.

I made this particular version for a reception we hosted. Keep in mind that in the span of two weeks we hosted three receptions for faculty and one pizza-party for our whole lab. After the pizza party we had some toppings leftover, so this Brazilian concoction of my past was a perfect choice to use it all up. But to make it more special, I prepared a batch of  caramelized onions, following this recipe from my friend Elaine. She used a clever method that allows caramelization to be an almost hands-free process, by making them in a low oven. I added a smidgen of balsamic vinegar to the onions, together with salt, pepper and olive oil.

Here they are, in a before and after shot…
caramelizedonions1caramelizedonions
I intended to add black olives to the filling too, but found the bowl with pitted Kalamata staring at me right after shutting down the oven door. Not the first time I pull this type of trick on myself, I believe it won’t be the last. Black olives would have been wonderful… (sigh)

The little pie squares are irresistibly gooey due to all the cheese…

closeup1

So there you have it, a Brazilian concoction from my teenage years finally featured in the Bewitching Kitchen. I hope I made my sister proud!  

ONE YEAR AGO: Lamb Meatballs with Toasted Orzo

TWO YEARS AGO: Dulce de Leche Cheesecake Bars

THREE YEARS AGO: Penne with Trapanese Pesto

FOUR YEARS AGO: Superman

FIVE YEARS AGO: Spring Pasta

SIX YEARS AGO: Ice Cream Melts for Mango

SALMON RILLETTES, A CLASSY APPETIZER

My last post featured the main dish I chose for Phil’s birthday dinner. Now it’s time to share with you a nice appetizer from the same evening: salmon rillettes. When we lived in Paris, rillettes were a favorite item we ordered in restaurants. Often pork, sometimes duck rillettes. In one of the little neighborhood bistrots, Aux Artistes, they would serve them (as well as their country terrine) family style. A big dish would be brought to the table, so you could serve yourself some, then the waiter would take it away for others to enjoy. Very civilized in that unique French way. Hard to imagine the same situation in the US. What? You expect me to eat something that was already on someone else’s table?  Manipulated by other human beings? You must be out of your mind!  I say “Vive la différence!”  And pass me the rillettes, will you?

I found this recipe in Karen’s site. She loved it so much that she confessed to having it for breakfast, lunch, and dinner several days in a row. That, my friends, is what food endorsement is all about.  I knew I had to make it sooner rather than later.

Salmon Rillettes2

SALMON RILLETTES
(from Karen’s Kitchen Stories)

1 lemon
1/2 cup vermouth
1/2 cup water
1 bay leaf
1 jalapeno pepper, sliced in half, one half minced
5 to 10 white peppercorns
5 to 10 coriander seeds
2 to 3 green onions, cut into 3 inch slices
salt
1/2 pound salmon fillet, cut into 1/2 inch cubes
6 ounces smoked salmon (peppered coho smoked salmon, if available)
3 tablespoons unsalted and softened butter
salt and pepper to taste
1 large shallot, peeled and minced
1/2 tsp pink peppercorns, crushed
1/2 tsp crushed red peppers
With a vegetable peeler, cut off a strip of the peel of the lemon.  Finely zest the rest of the lemon and set the zest aside. Set the lemon aside.
.
Place the unchopped half of the jalapeno into a small saucepan. Add the vermouth, water, bay leaf, peppercorns, and coriander seeds. Bring the mixture to a boil over medium heat. Add the green onions and fresh salmon cubes. Reduce the heat to low, cover,  and simmer for three to five minutes. Drain in a colander. Discard the vegetables and place the salmon in a medium bowl.
.
Mash the salmon roughly with a fork. Add the smoked salmon and mash with a fork.  Add the butter and blend with a fork.  Add some of the juice from the lemon, the lemon zest, along with some salt and pepper to taste.  Add the shallots, minced jalapeno, crushed pink peppercorns, and crushed red pepper. Mix thoroughly. Stir in more lemon juice, to taste.
Pack the mixture into a canning jar or other container. Press the top with plastic wrap and refrigerate for at least 2 hours and up to a day before serving for the first time. The rillettes will last up to 3 or 4 days.
.

ENJOY!

to print the recipe, click here


rilletecollage

Comments: This was incredibly tasty, just as Karen promised it would be, and got better each day.  The mixture of smoked salmon with the lightly poached fish, the lemon, the spices, everything works together in perfect harmony. It is surprisingly mild in flavor. Plus, what a fun recipe to make!  I don’t know why I never attempted rillettes at home, but now that I did, I feel like trying my hands at some pork rillettes, served ‘comme il faut’, with those small cornichons, and a crusty baguette. I will be catapulted straight back to Aux Artistes, although between you and me, the place brings mixed feelings. Yeah, the food was awesome, prices affordable, great atmosphere. but the owner, a gorgeous blonde, tall, bright-blue-wandering eyes, could not – I repeat – could not stop flirting with Phil. Oh, well… as a mentor of mine used to say… attractive people attract.  I took it all with my best smile, sips of Bordeaux, and a few discreet but assertive kicks under the table.  Let’s keep in mind though, that two can play that game. Not that I would ever… you know, I am just not the vindictive type…

😉

I hope you try this recipe on your next dinner party. Not only it is unusual and elegant, but you will be better off making it in advance. It’s the hostess’ dream come true!
.

Karen, once again I should thank you for the constant inspiration!


ONE YEAR AGO: Special Important Announcement

TWO YEARS AGO: Pear, Blue Cheese and Walnut Salad

THREE YEARS AGO: Keema Beef Curry

FOUR YEARS AGO: Pork Tenderloin with Soy, Ginger, and Lime

FIVE YEARS AGO: No-Fuss Coffee Cake

SIX YEARS AGO: Swedish Limpa