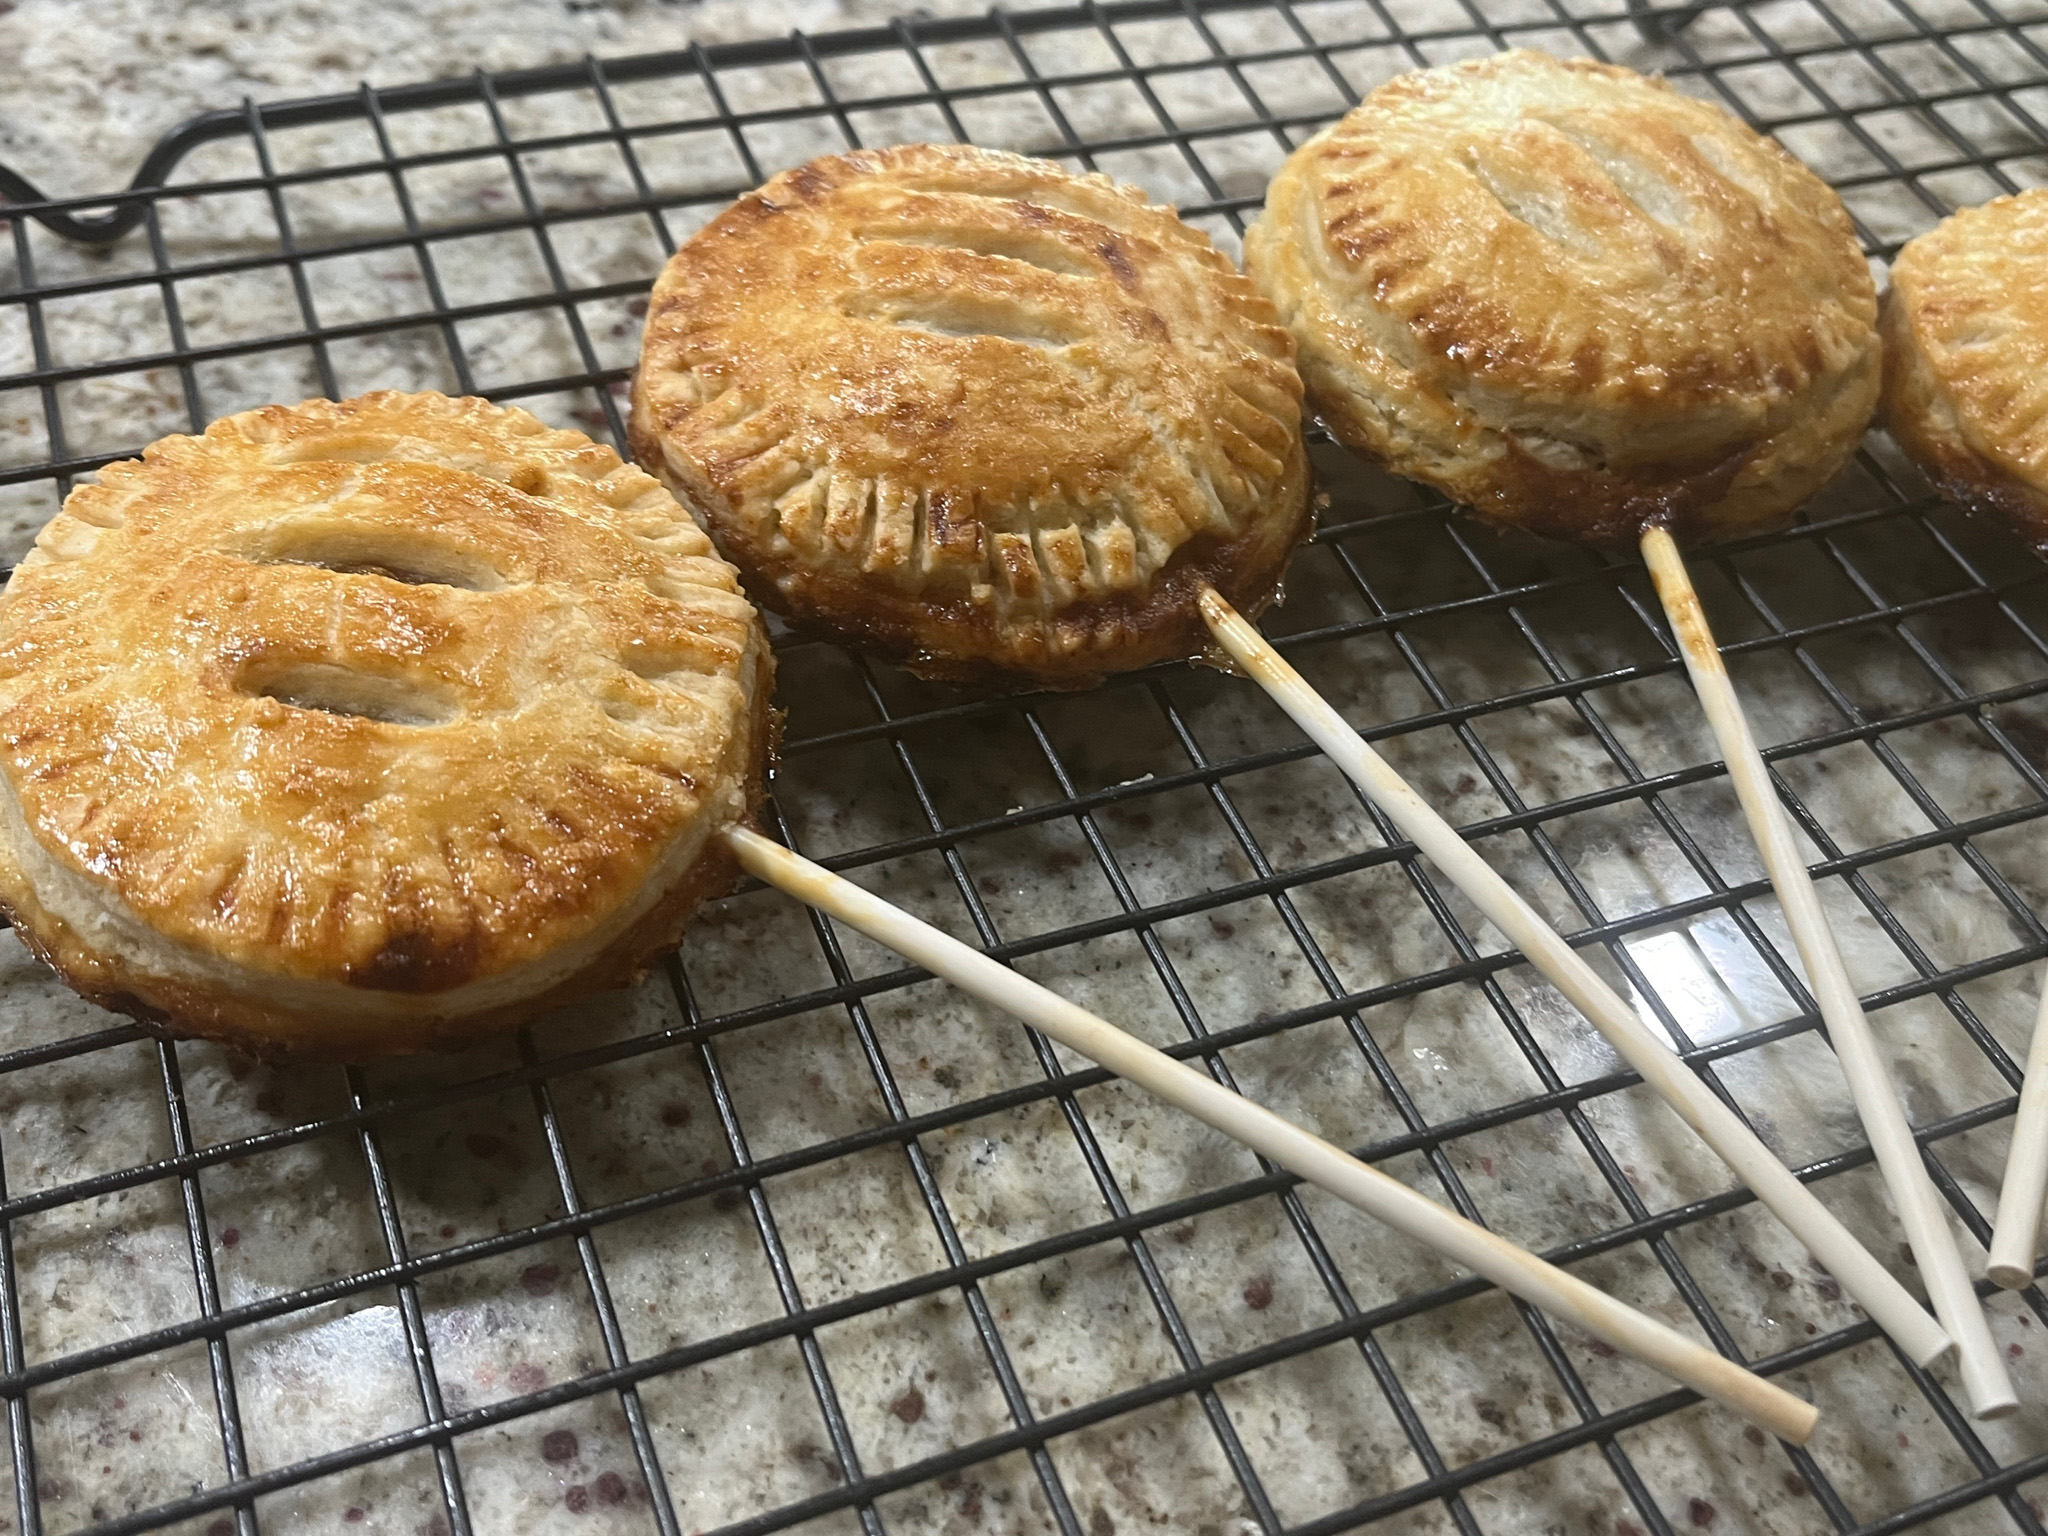
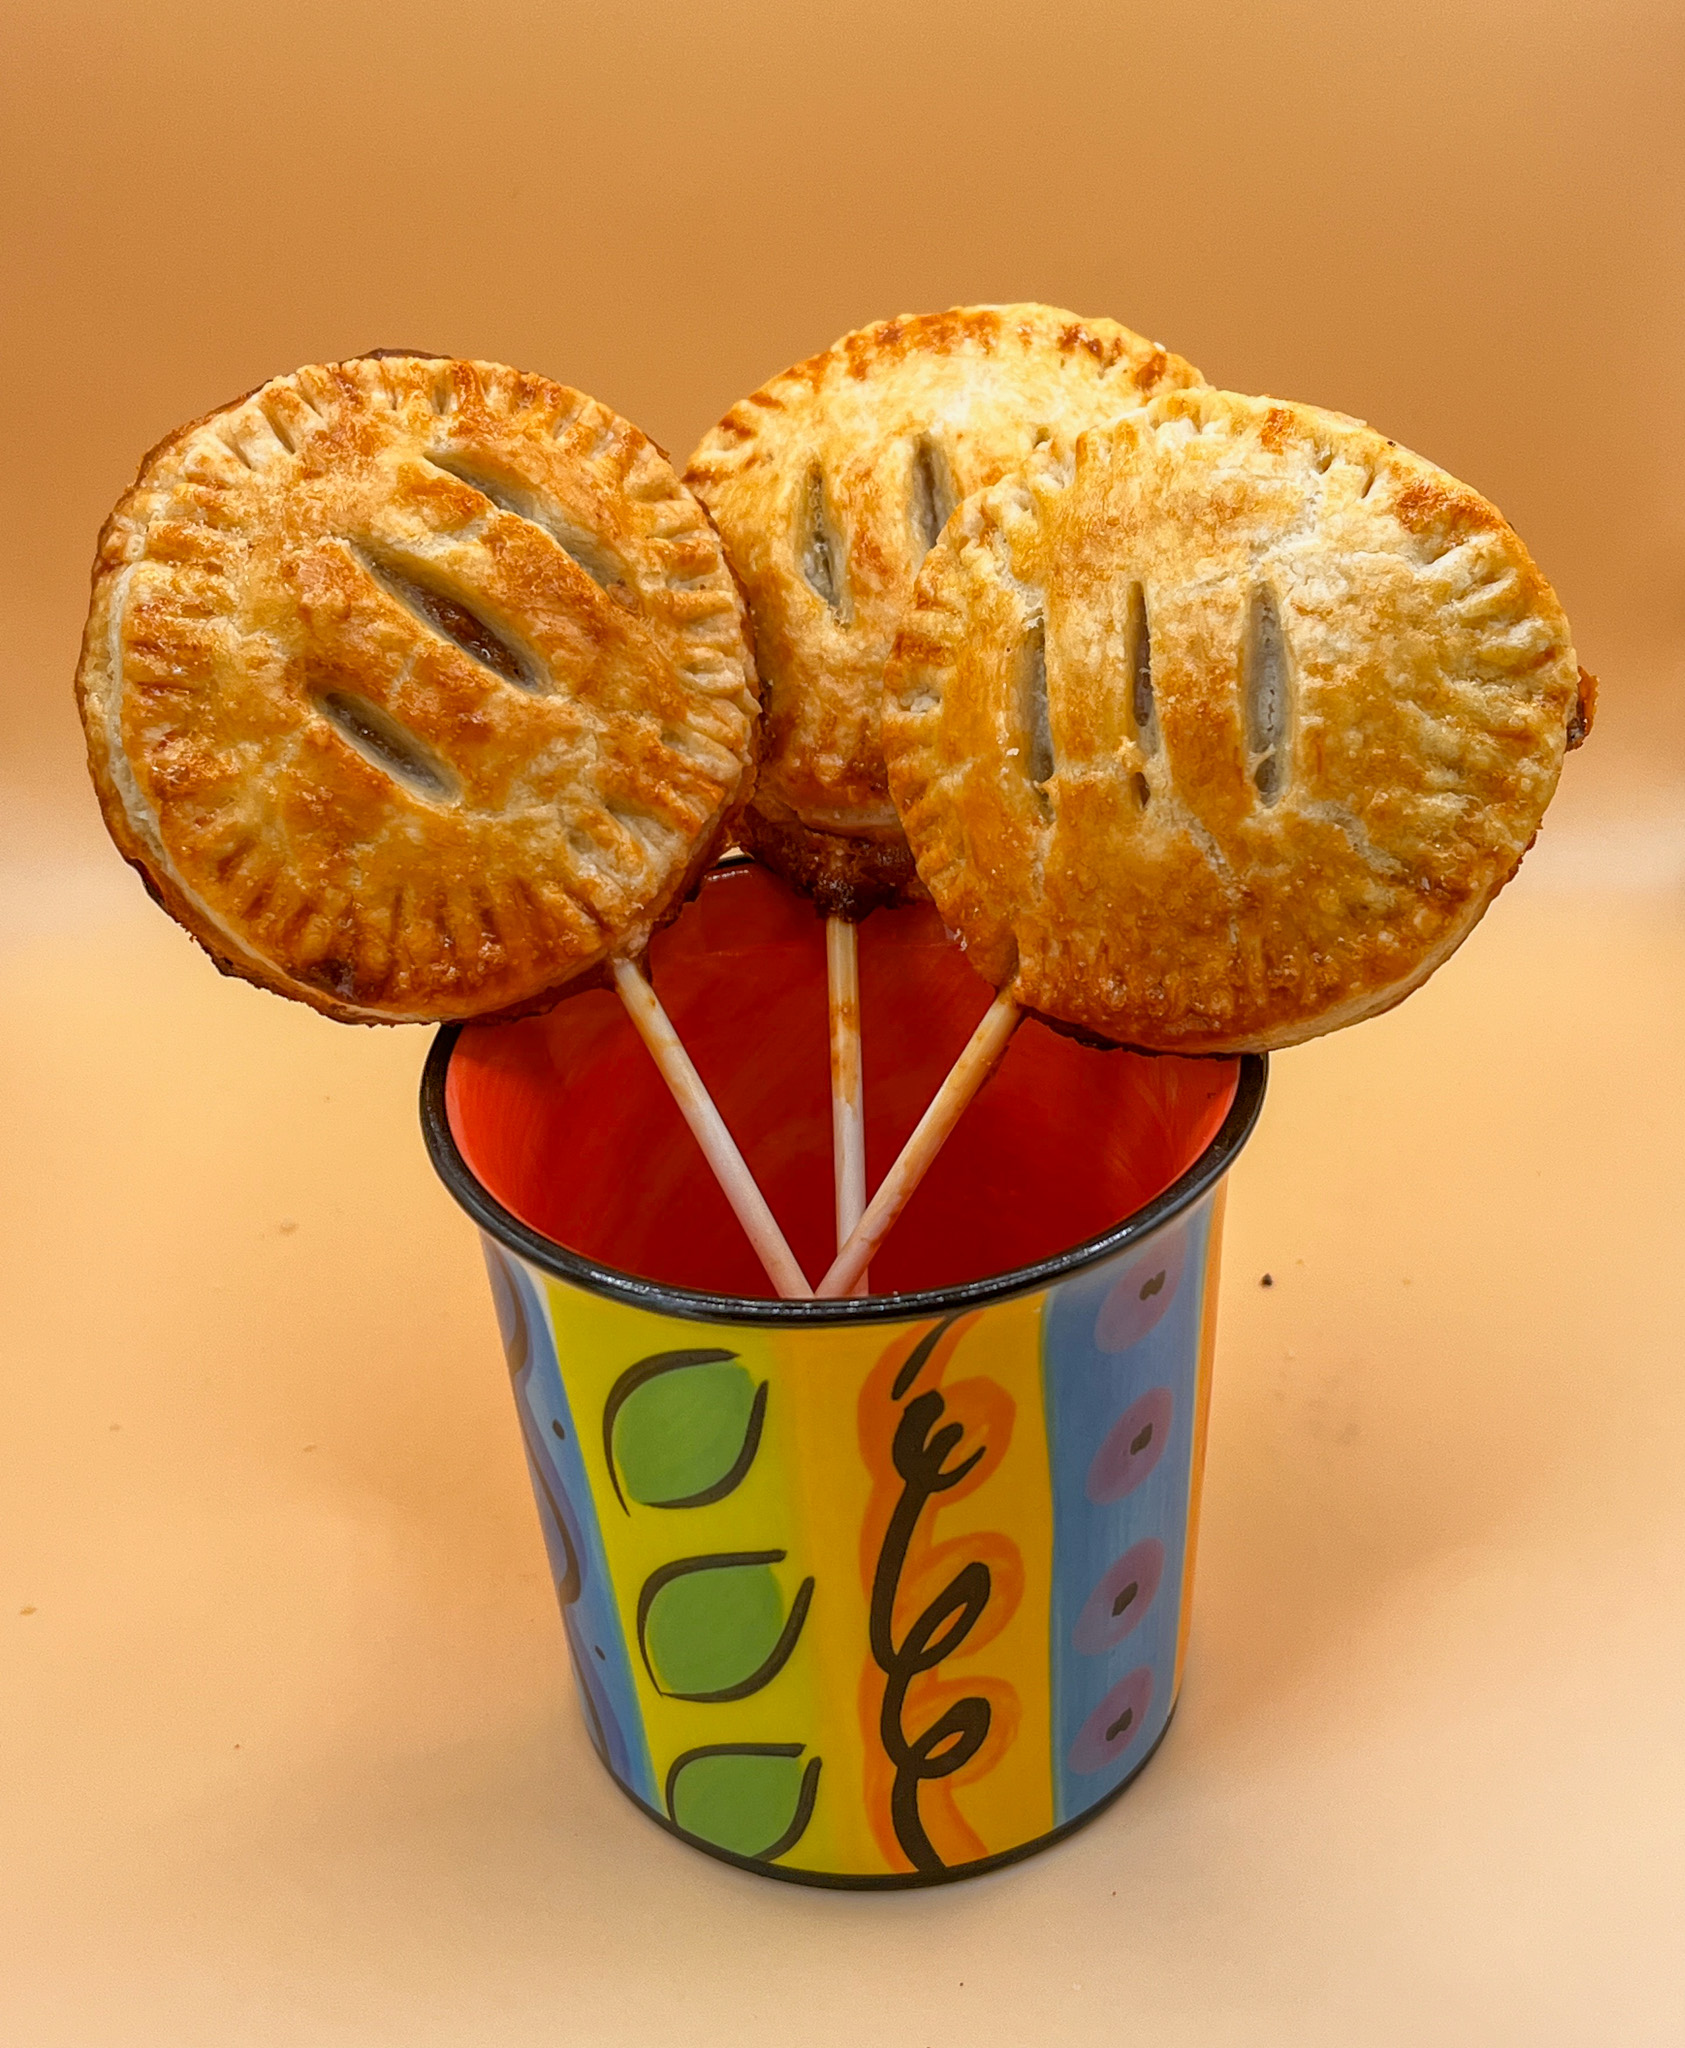
What a completely fun concept! Bake a pie, but make it small. Really small. And don’t forget to get a stick going, for that pop experience… The idea comes from Cook’s Desserts Illustrated (available at amazon.com), which is a must-have for any baker out there. I cannot publish the exact recipe and method from the book, but let me share the overall process.
Get your favorite, preferably all-butter pie crust recipe, roll it out thin, and cut 3 inch rounds…
Transfer half of the rounds to a large rimmed baking sheet, add a stick to it, and one tablespoon of the filling of your choice (I used apple butter + cream cheese, as suggested in the book).
Freeze that for 10 minutes, then brush egg wash on the edges and add the second set of pie rounds on top. Crimp the edges, cut small slits with a sharp knife, brush with more egg wash…
and bake them at 375F for about 25 minutes…
You can conceivably use any filling but make sure it is not too wet. Keep in mind these are to be enjoyed just holding on the stick, no plate, nothing. You don’t want to have filling running all over the place. It is such a cute concept, and perfect to share! I hope you’ll give this method a try soon…
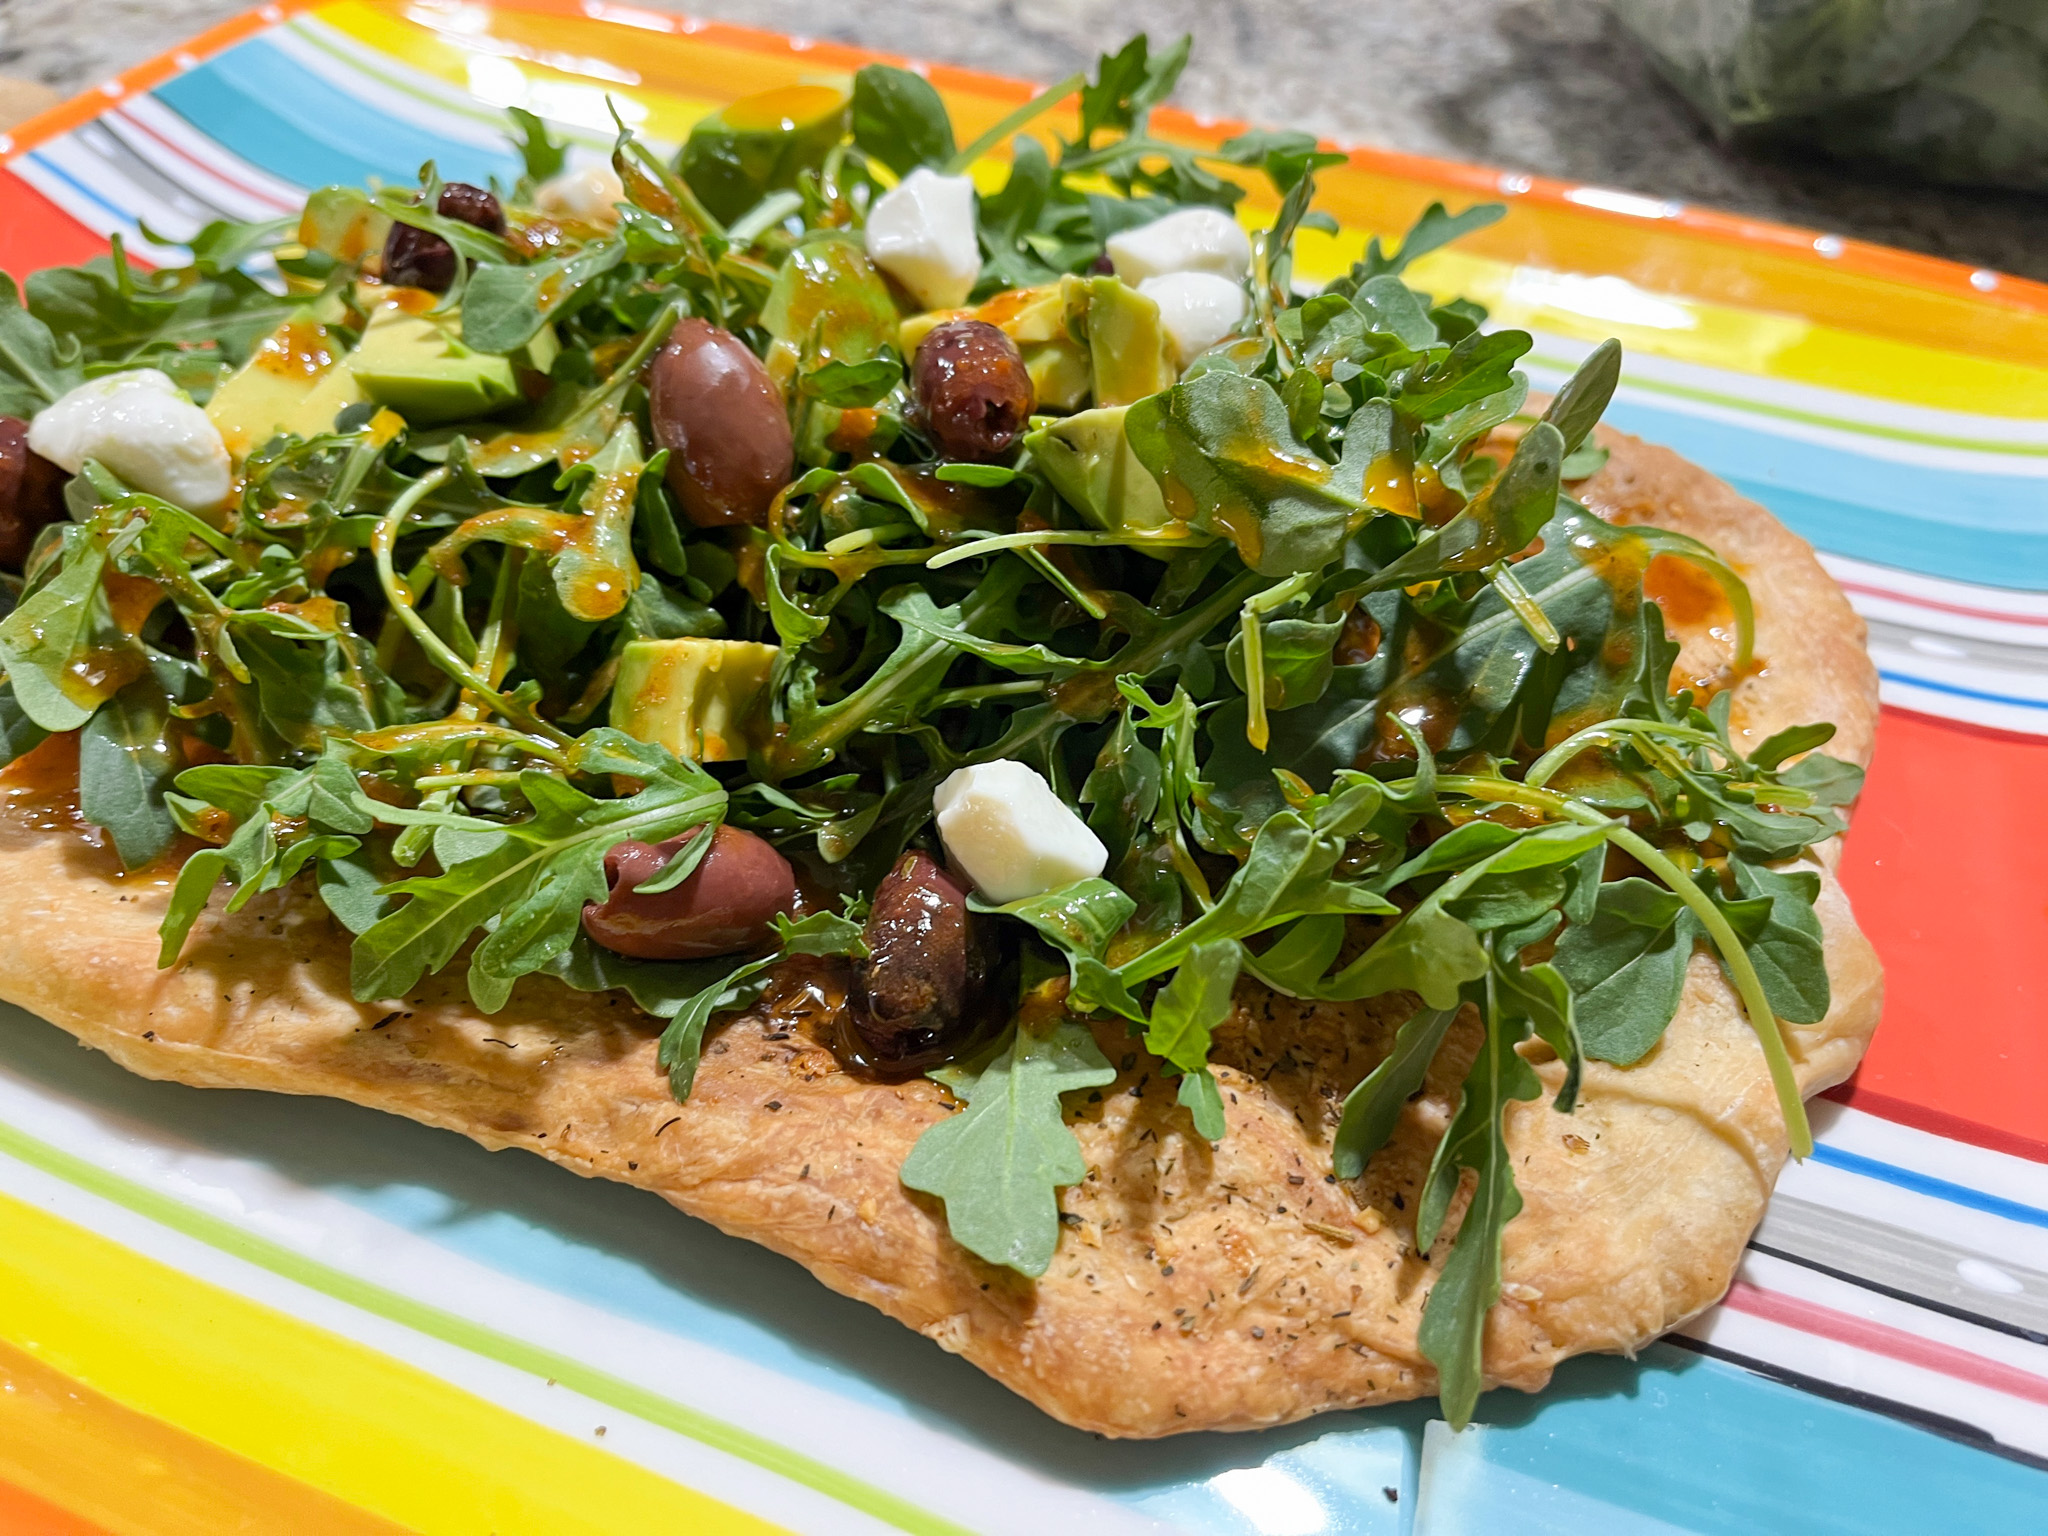
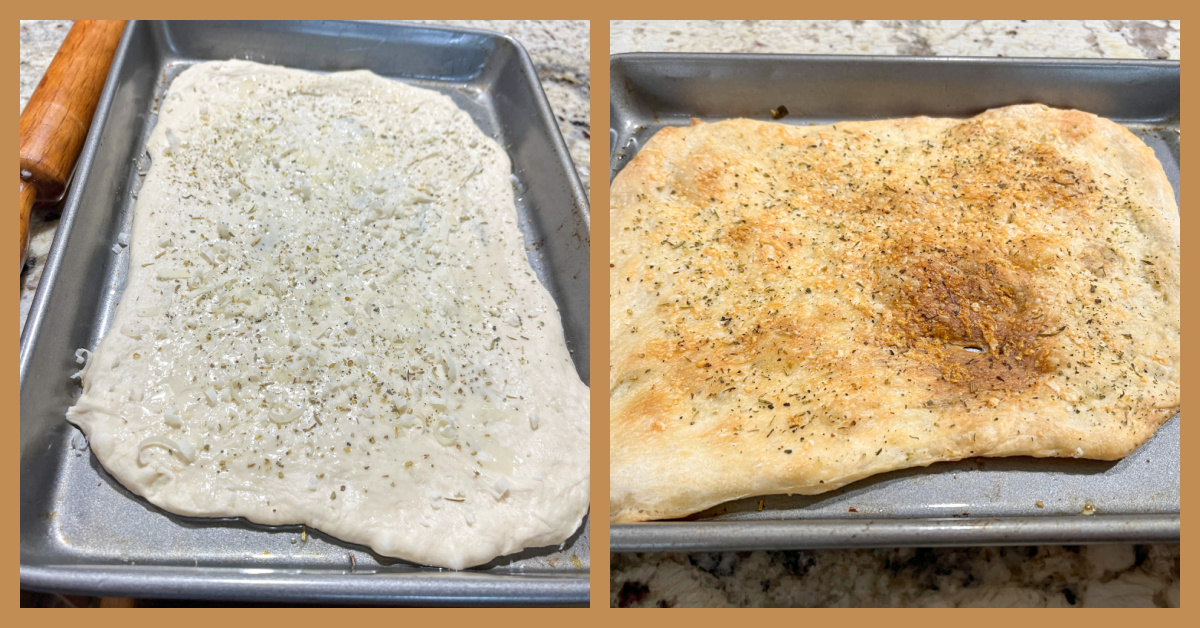
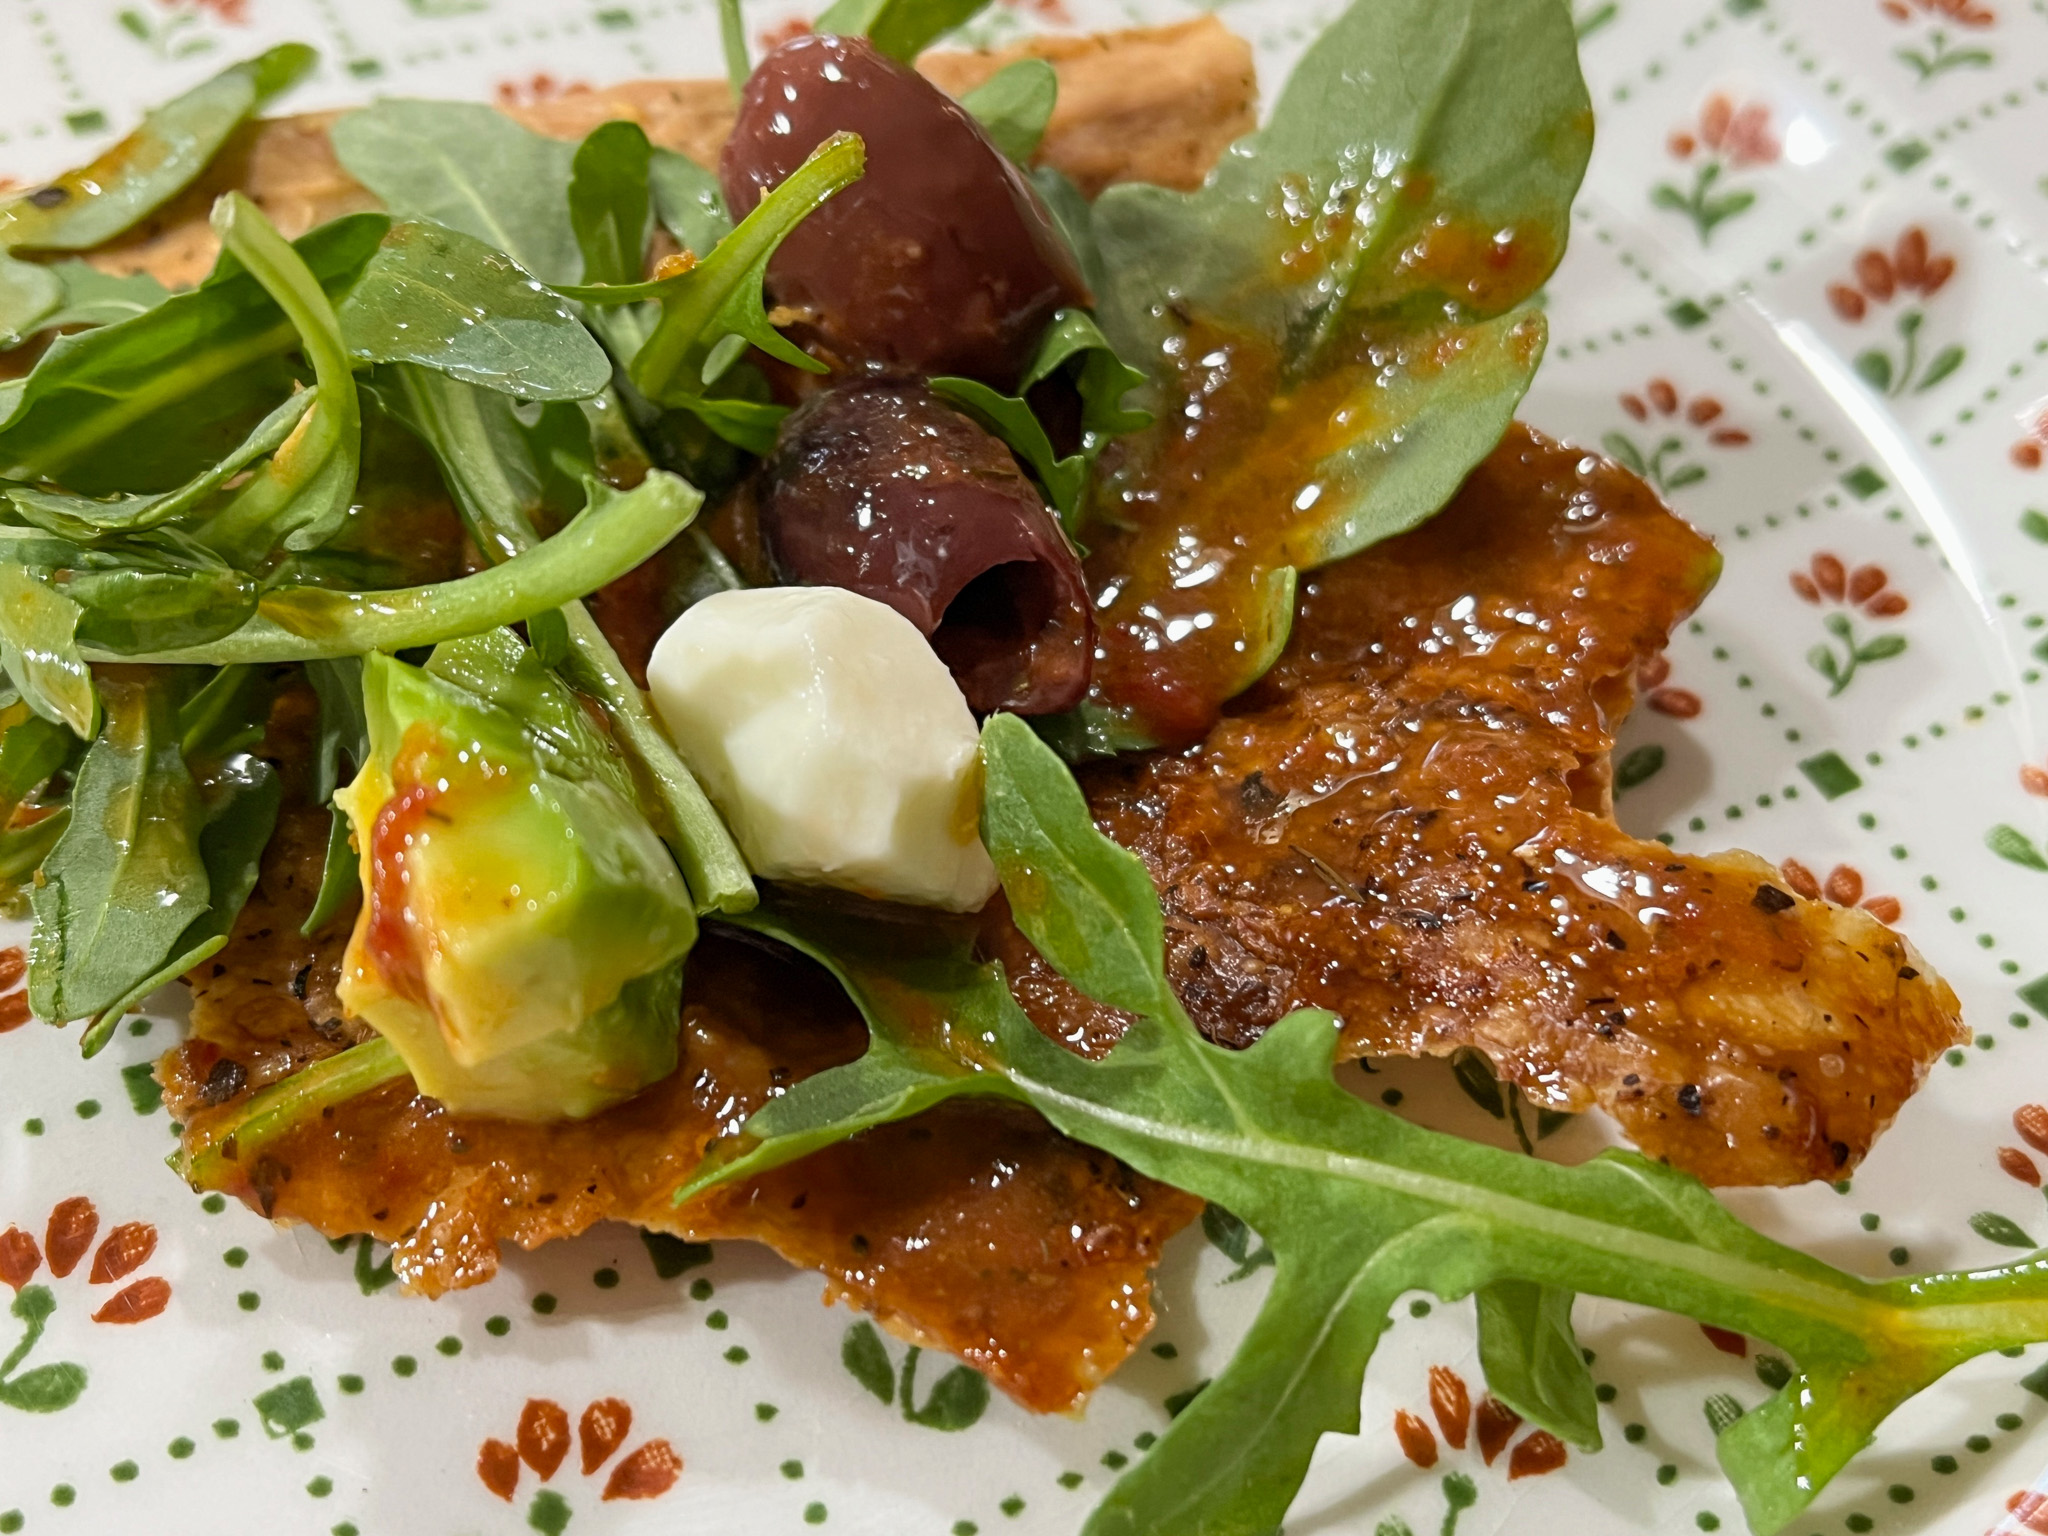
Apologies. I admit, that kind of hurt. This is salad on pizza crust. I saw this recipe on the FoodTV show The Kitchen, that I used to watch all the time but then lost interest. Lately I’ve been adamant about NOT tuning into the news 24/7 because… well, I just can’t take it anymore. Soooo, I got into browsing all the stuff taped on our TiVo, and that episode was waiting for me. Katie Lee loves salad, and she came up with a way to join her love for salad and pizza on a single serving. I was intrigued. She used store-bough thin crust pizza (those sold in a tube), but I went with my default pizza recipe from the good and old Fine Cooking (click here for all details).
pizza dough (I used 1/4 of my default recipe) olive oil, grated Parmigiano, Herbes de provence for crust)
dressing: 1/4 cup sherry vinegar or red wine vinegar 2 tablespoons chopped sun-dried tomatoes 1/2 teaspoon dried oregano 1 tsp honey 1/4 cup olive oil salt and pepper to taste
For the salad: arugula mozarella pearls tomatoes black olives avocados
For the dressing: In a blender, combine the vinegar, sun-dried tomatoes, oregano, and sugar. Pulse to combine. With the motor running, drizzle in the olive oil. Season to taste with salt and pepper.
For the pizza-cracker base: Heat the oven to 425 degrees F. Drizzle 1 tablespoon olive oil on a rimmed baking sheet. Use a pastry brush to evenly coat the baking sheet with the oil. Stretch the pizza dough to cover the baking sheet (I used a 9 x 13 size). Drizzle more olive oil on top and use a pastry brush to spread the oil evenly on the dough. Sprinkle with the cheese and Herbes de Provence. Bake until golden brown, about 12 minutes. Remove from the oven and let cool until just warm or room temperature on the baking sheet.
Assemble the salad over the pizza and drizzle the dressing all over. Toss is gently and wait about 15 minutes to serve it.
Comments: This is messy to eat, I won’t lie to you. I advise you to allow the dressing soak on the pizza component a bit, it won’t make it soggy at all, if you bake it until it is crispy. But it will be a delicate balance – do not bake it too dark or it will be super hard and difficult to cut. If you go into the FoodTV website, some of the comments about Katie are very hurtful, and I find it all so sad. She is a very sweet person and I’ve tried and enjoyed many of her recipes. This salad reminded me of fatoush, which is a classic I am quite fond of. I don’t think I would serve it for company because it is a little tricky to eat, but if it is perfect for an informal meal. The dressing is absolutely delicious, and I recommend you give it a try on a regular salad, independent of the pizza part.
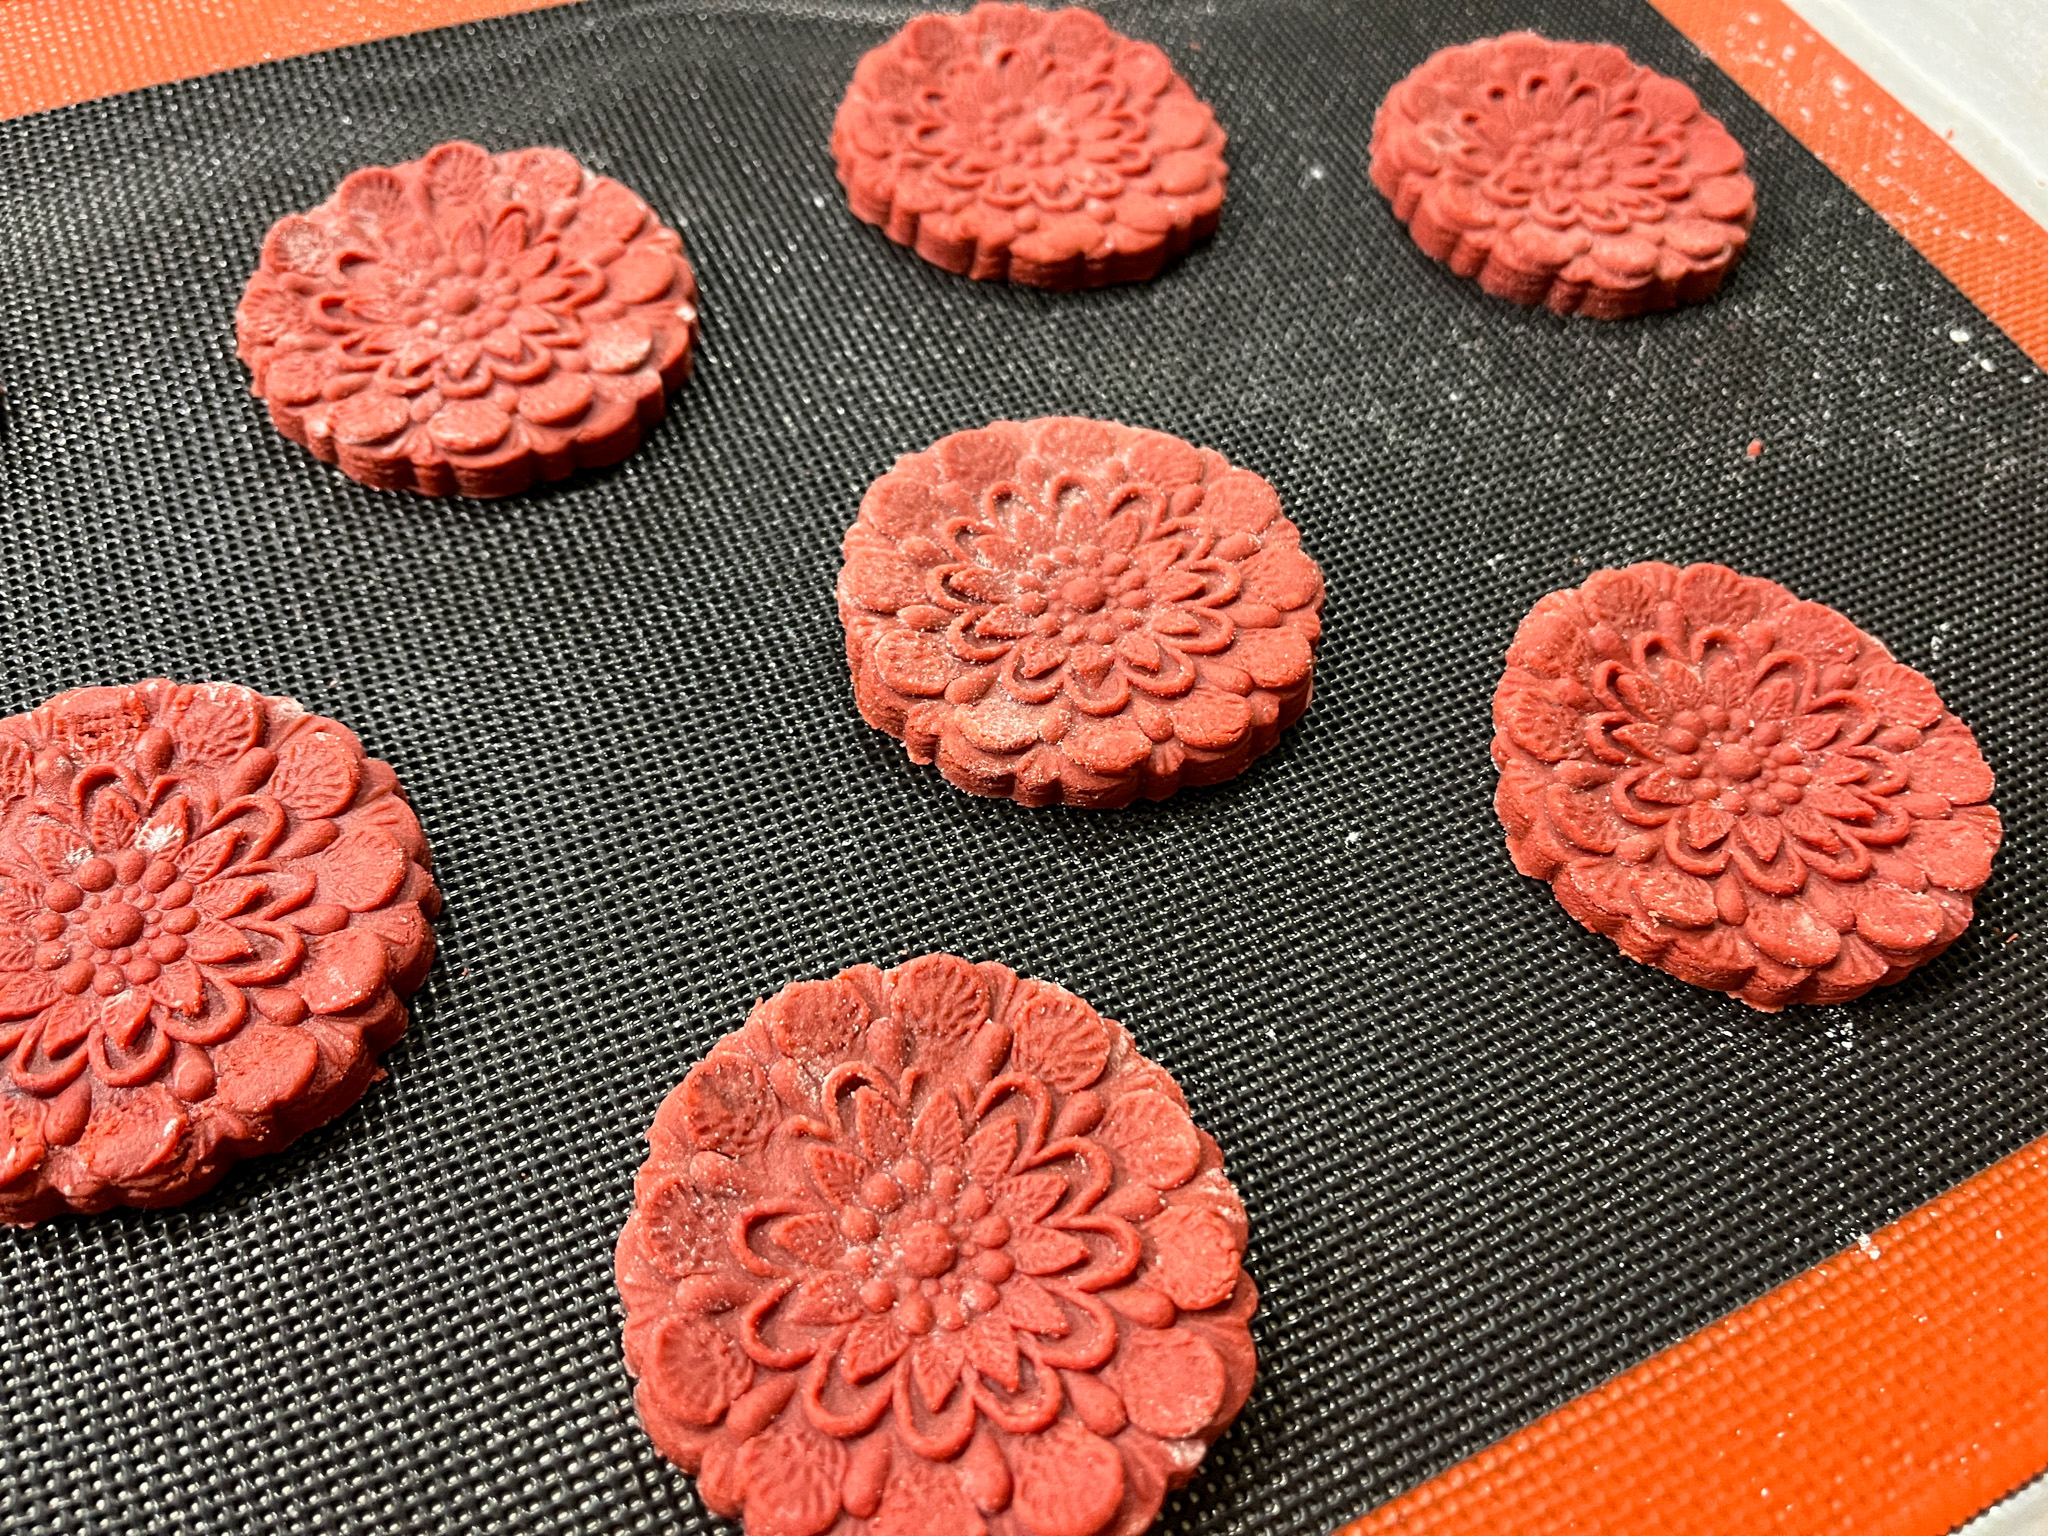
This dough will work well for stamps or to roll out thin or thick. Delicious, nice texture, and a very small amount of baking powder to make sure your design will stay nicely imprinted. Embossed rolling pins will be another option, so keep that in mind.
RED VELVET SUGAR COOKIES (slightly modified from Fancy Flours)
1 cup butter at room temperature (226g) 1 + 1/2 cups powdered sugar (170g) 1 large egg 1 tablespoon Red Velvet Emulsion 1 tablespoon cocoa powder (I used Dutch processed) 1/4 cup melted chocolate chips 3 cups flour (360g) 1/4 tsp baking powder 1 tablespoon dry buttermilk powder 3/4 tsp salt
Mix flour, baking powder, buttermilk powder and salt in a large bowl. Reserve. Cream butter and sugar in the bowl of a standing mixer with a paddle attachment. Add egg. Mix in red velvet emulsion, vanilla, cocoa, and melted chocolate.
Blend in the dry ingredients reserved. Mix until dough pulls away from the paddle and begins to form a ball. Dust the surface of your counter and rolling pin with flour and roll out the dough to a thickness of approximately 3/8 inch to 1/2 inch. (If your dough is too soft to work with, refrigerate it for an hour or so.
Dust the surface of your dough and your cookie mold with flour. Press the mold into the dough just far enough down to fill the mold cavity. Remove your mold and cut out the cookie. Brush off the excess flour on the top of your cookie. Excess flour will appear white on the surface if not removed. Place your cookies on a cookie sheet lined with parchment paper.
Freeze your cookies for 15 minutes, bake from frozen in a 350F oven until done, depending on the size, 10 to 13 minutes.
Very simple to make, just roll, press the stamp and bake. I bake most of my cookies over a perforated mat. After baking, I sprayed a little bit of PME pearl luster over the surface, but that is optional.
.
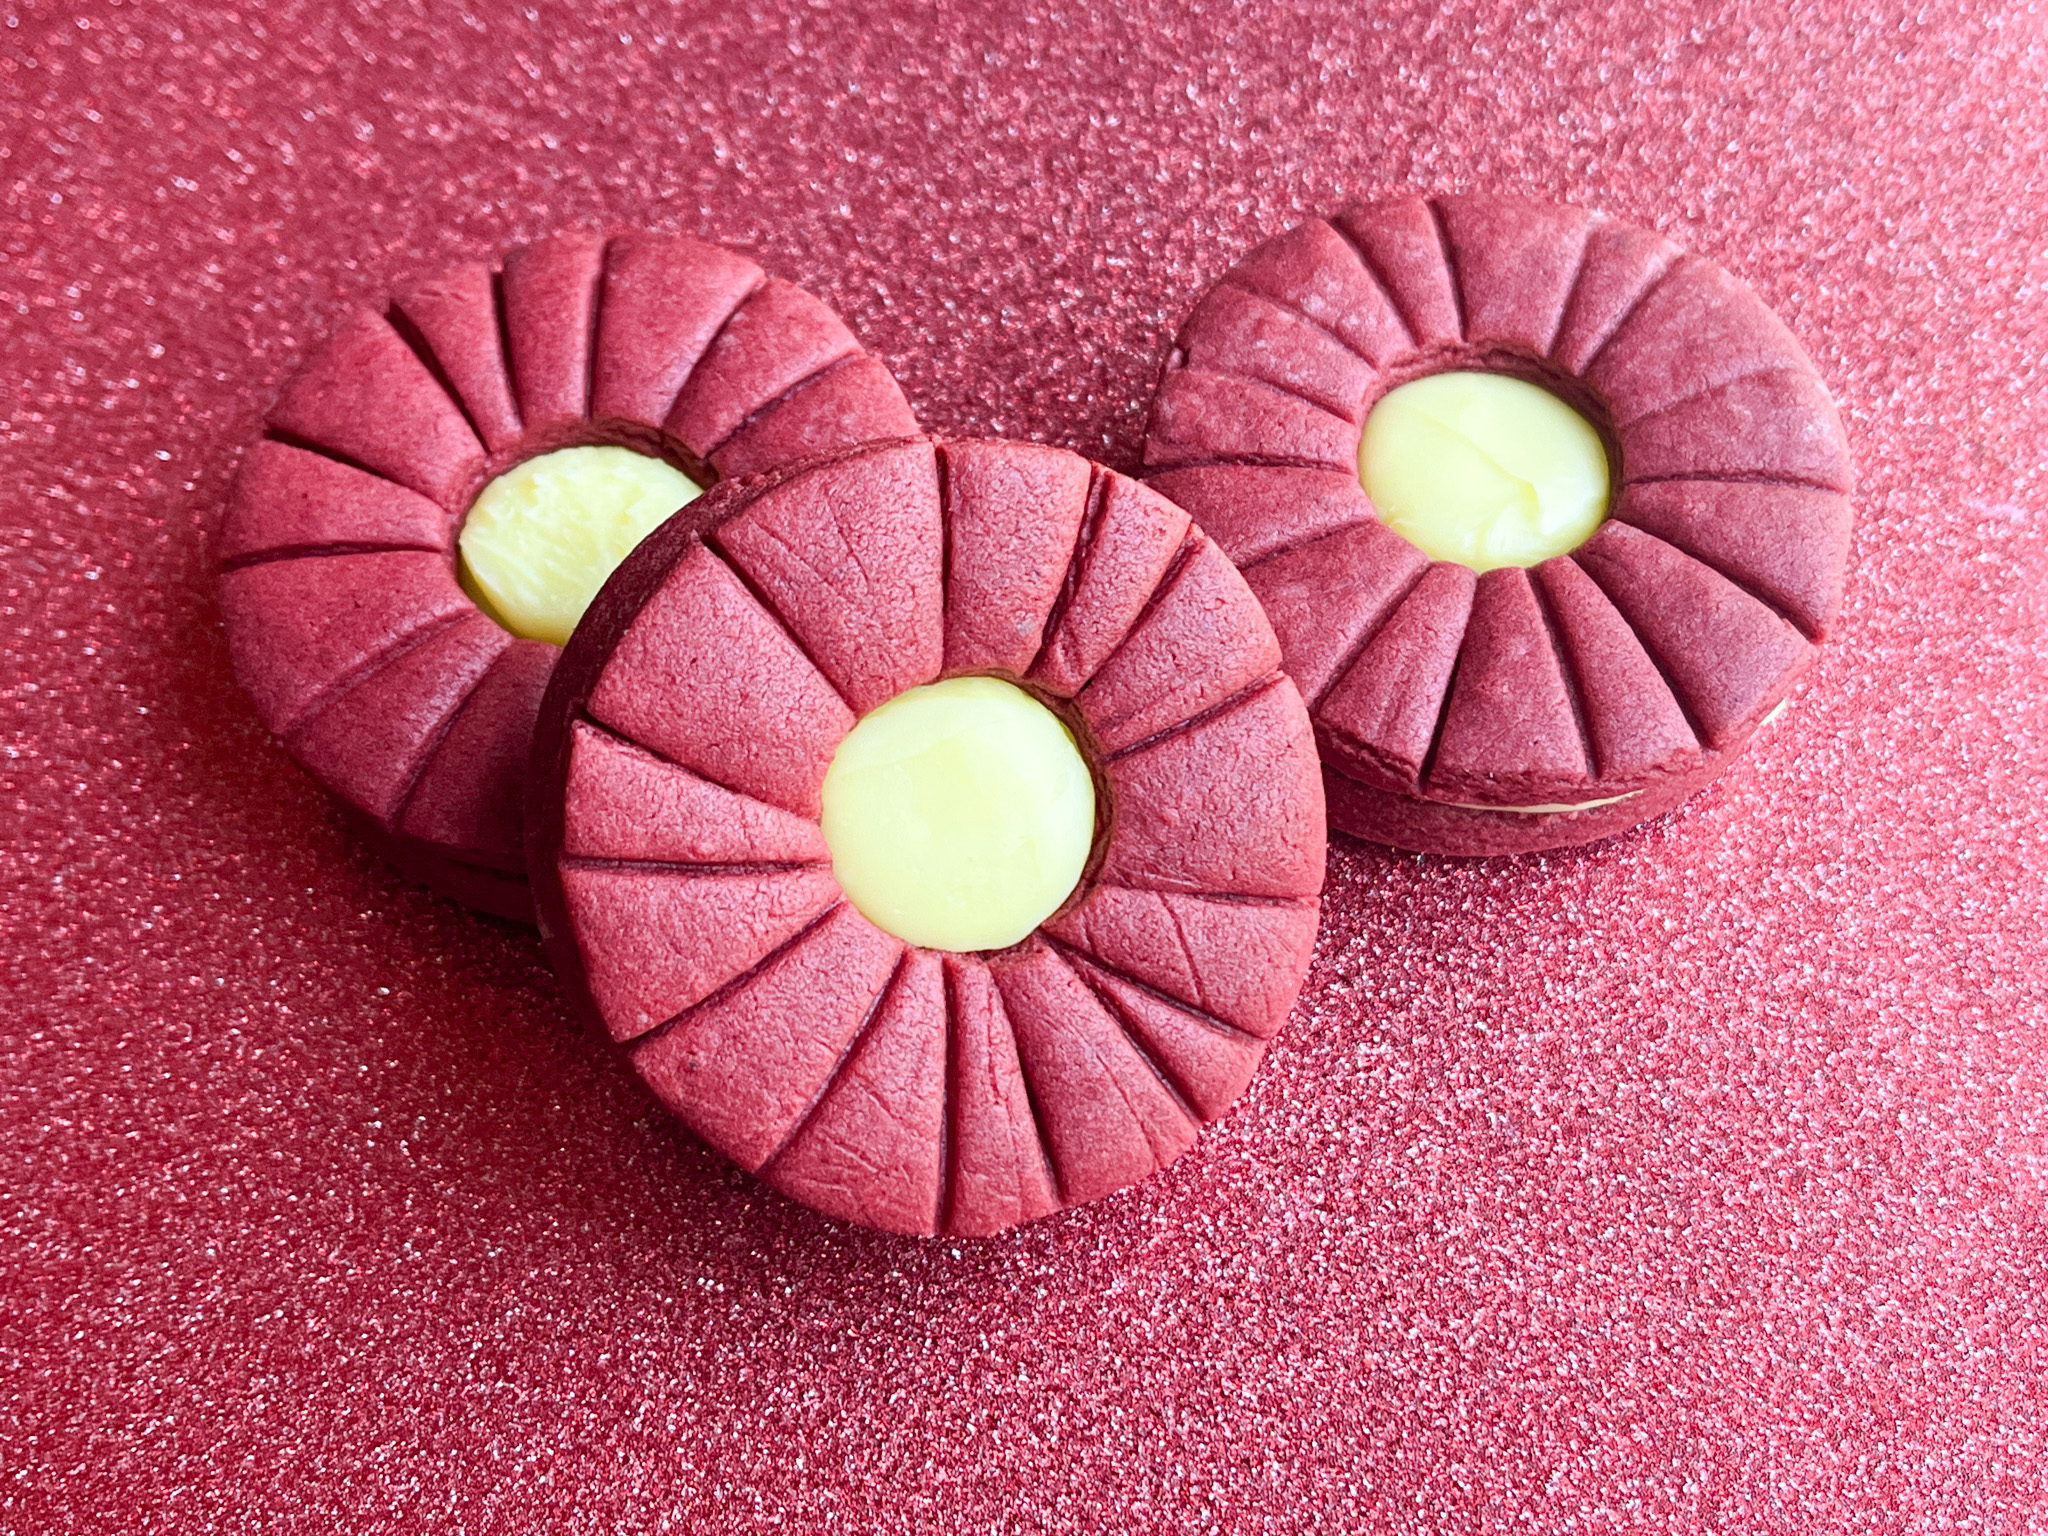
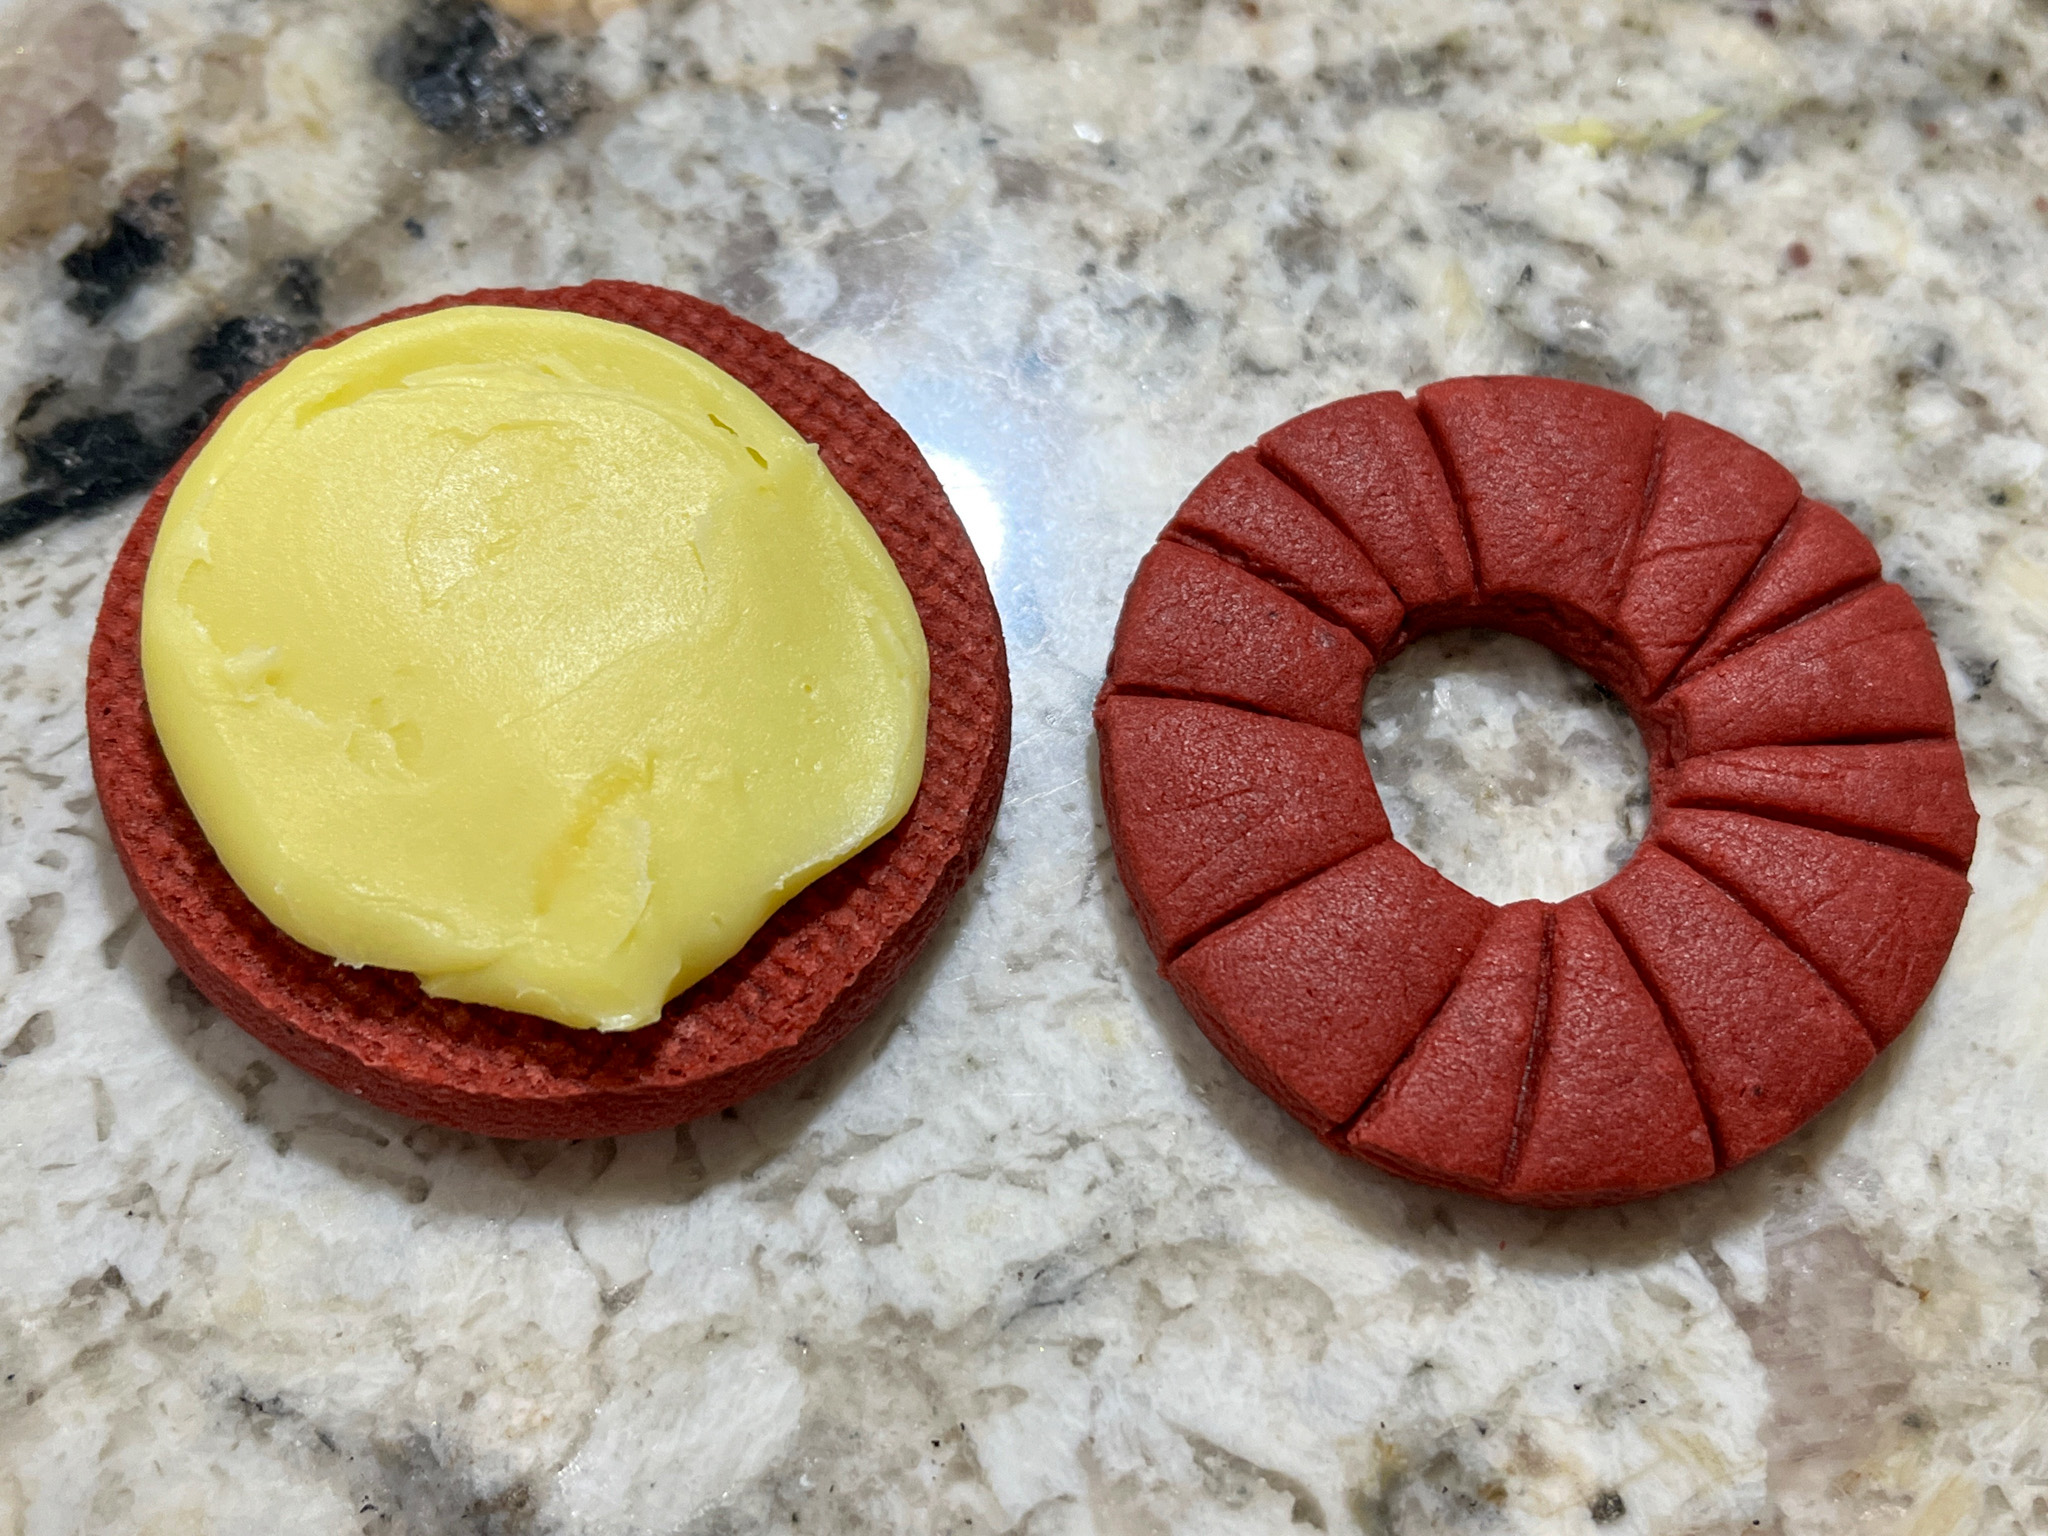
LEMON GANACHE SANDWICH COOKIES.
I rolled them a little thinner, cut circles from half the cookies, and used a bench scraper to create a design on the cookies with a hole in the center. The lemon ganache I used is from this macaron post.
.
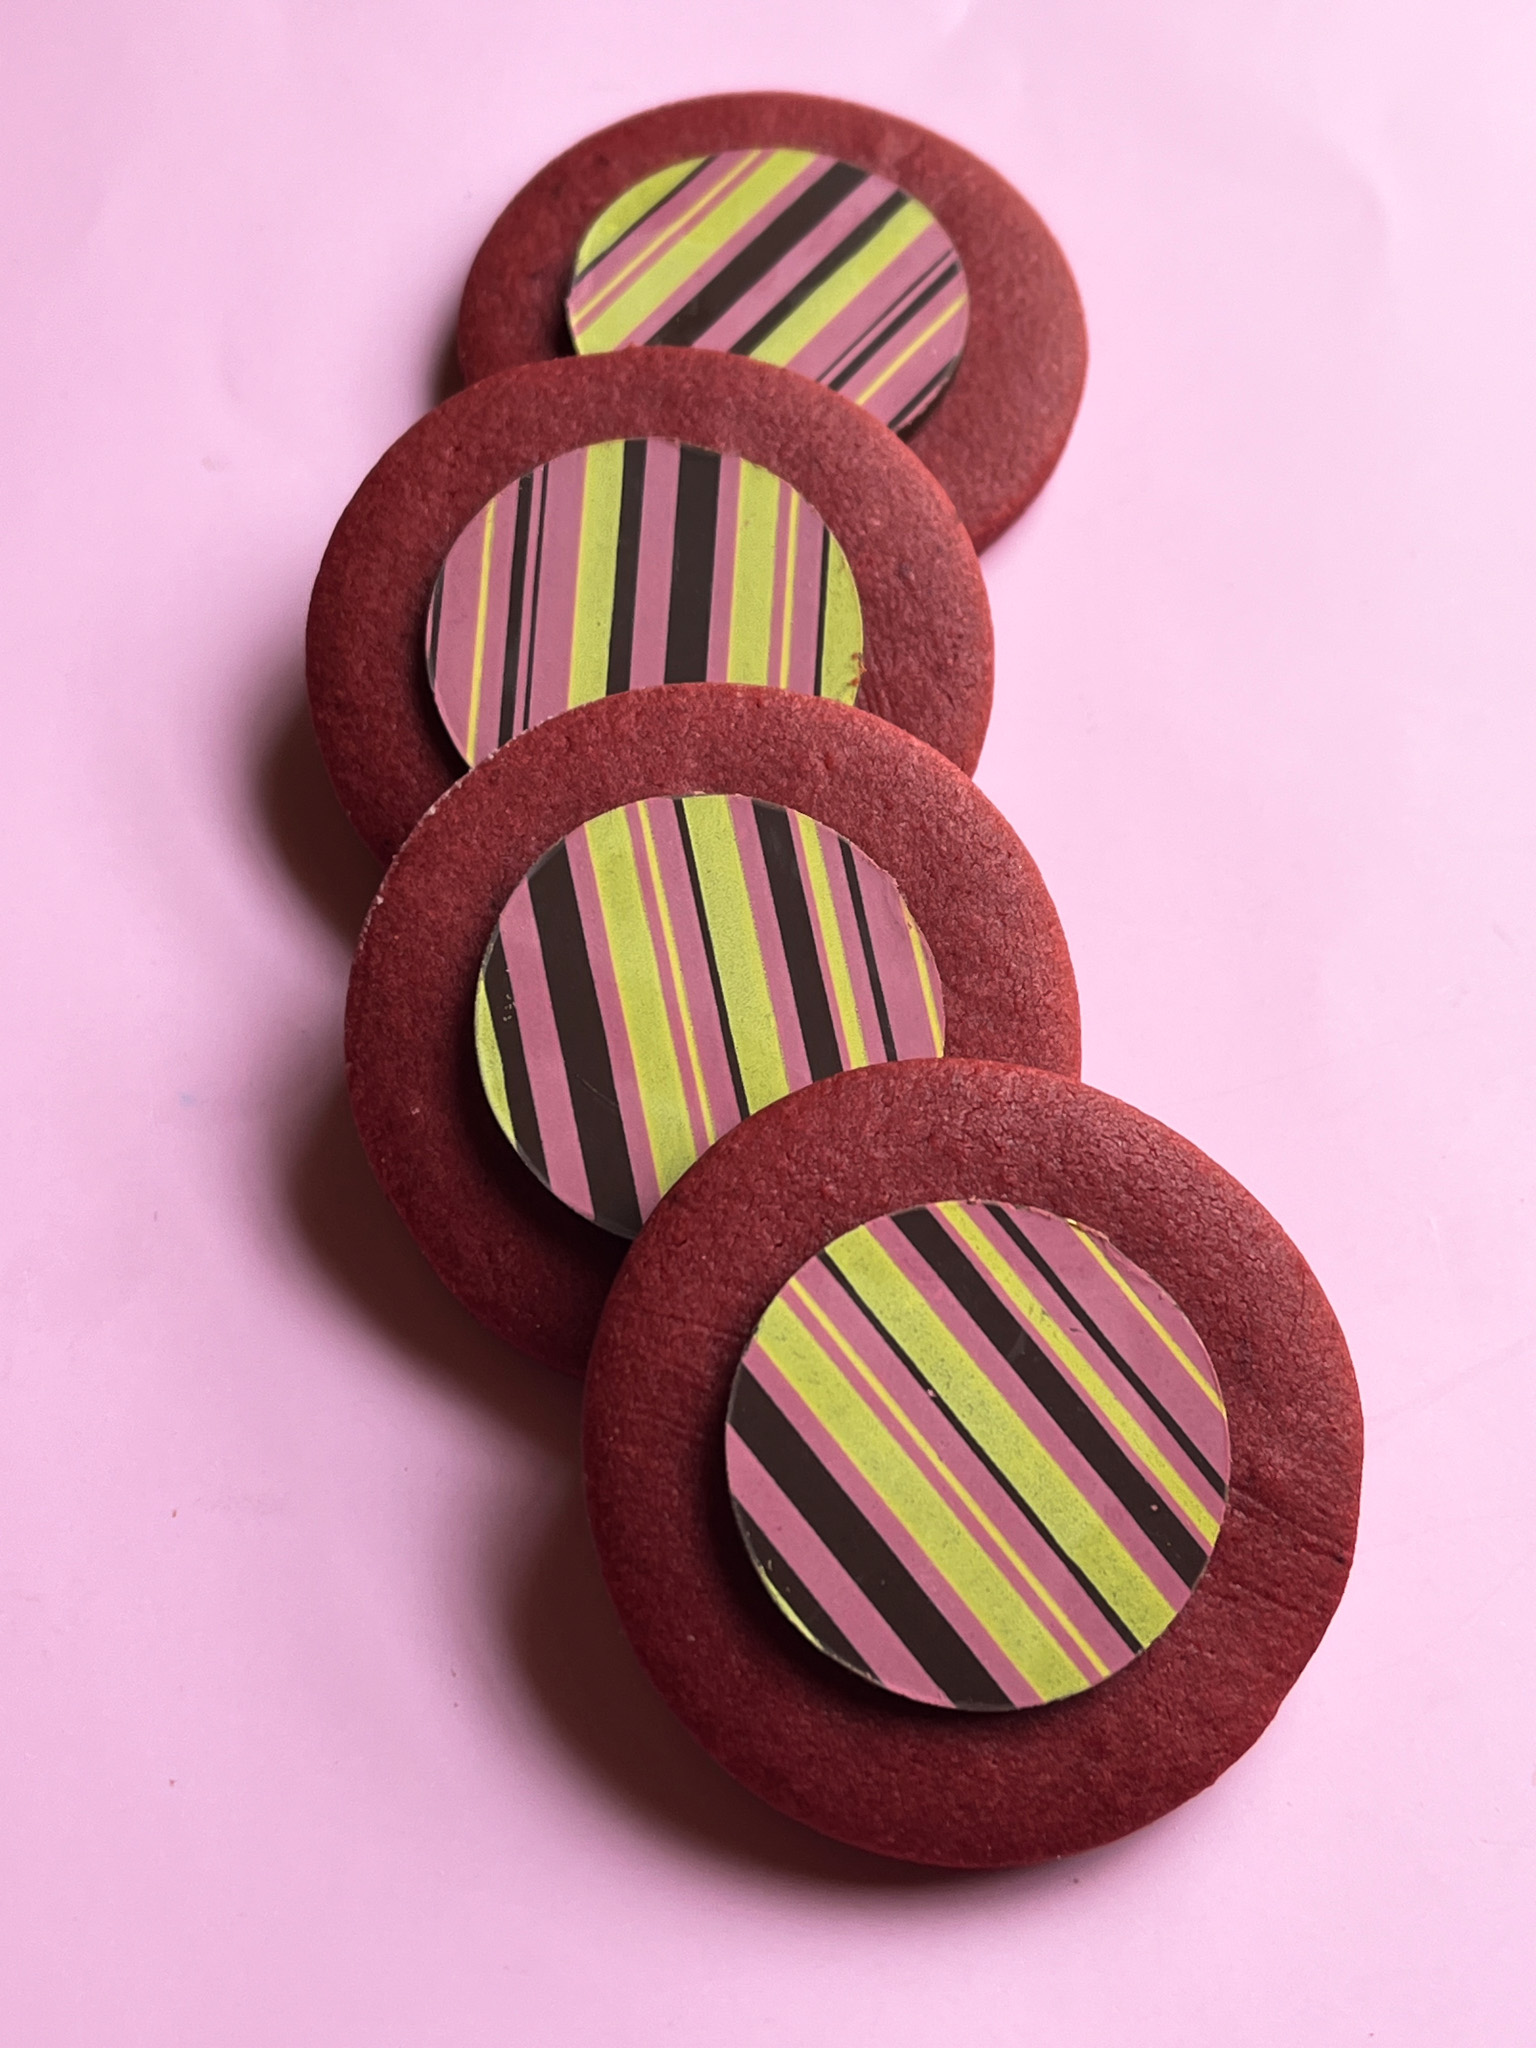
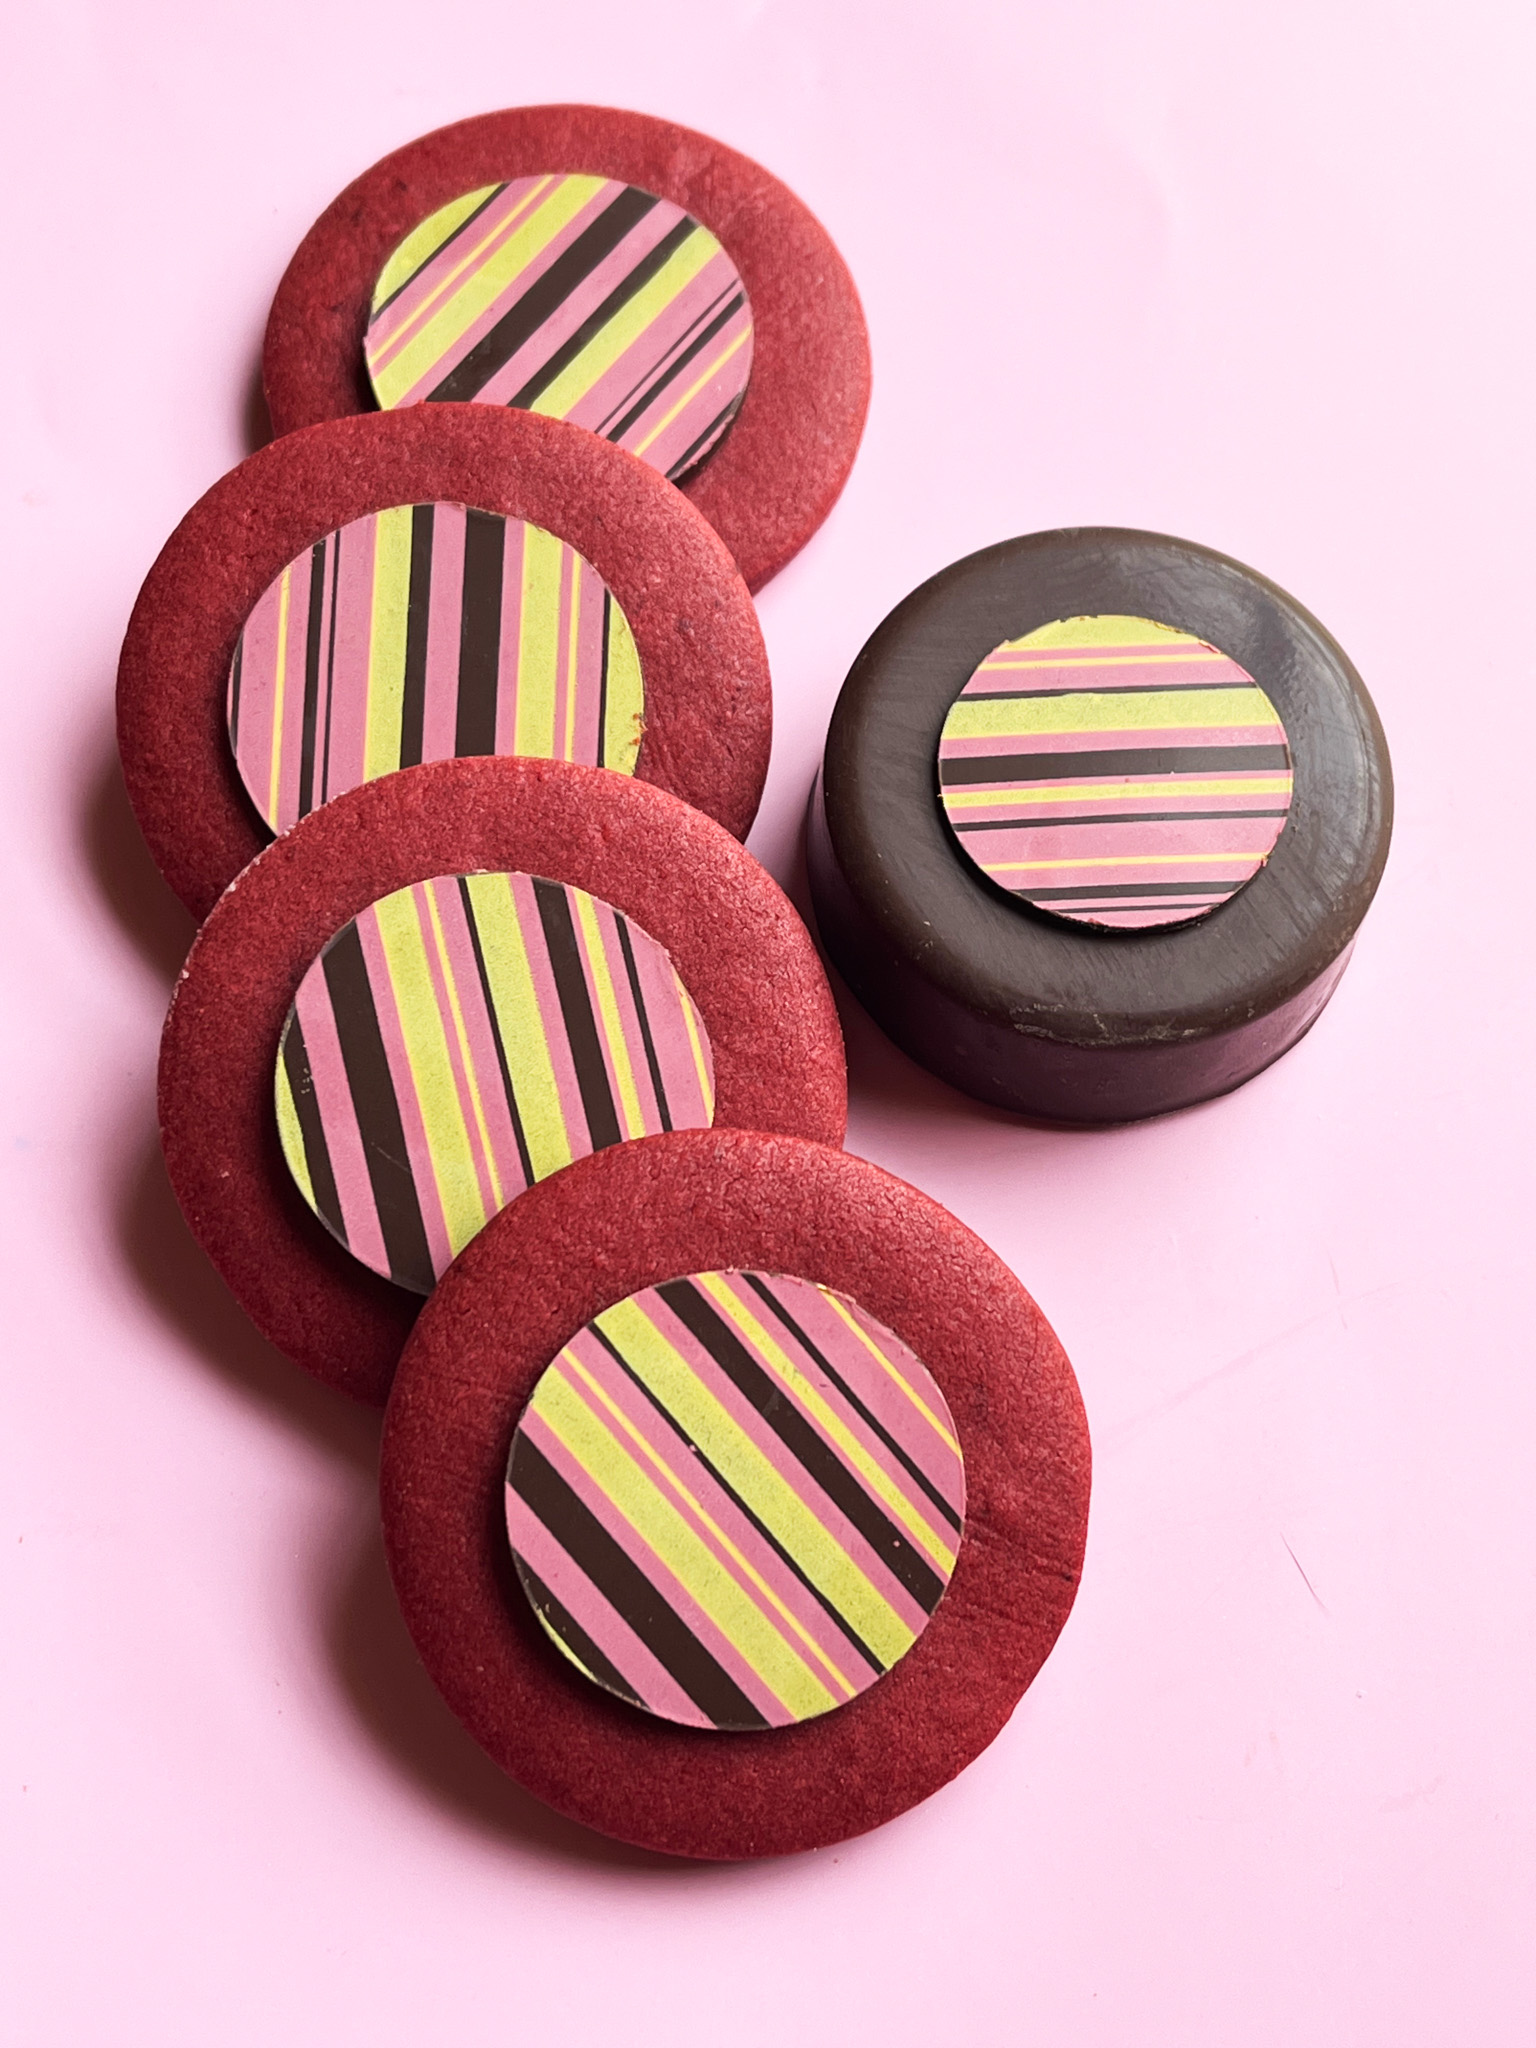
MODERN DESIGN
Cookies were simple rounds. To decorate them, I used compound chocolate spread over chocolate transfer sheets, a method I use often for Chocolate-covered Oreos. Let the chocolate set, cut circles smaller than the diameter of your cookies. Glue the disc to a cooled cookie with a bit of Royal icing or melted chocolate. Below the cookies and a little Chocolate-covered Oreo with the same “outfit”.
I love the texture and flavor of these cookies, and intend to use them often in the future. And guess what? You can also use Royal icing to decorate them! Designs inspired by The Graceful Baker.
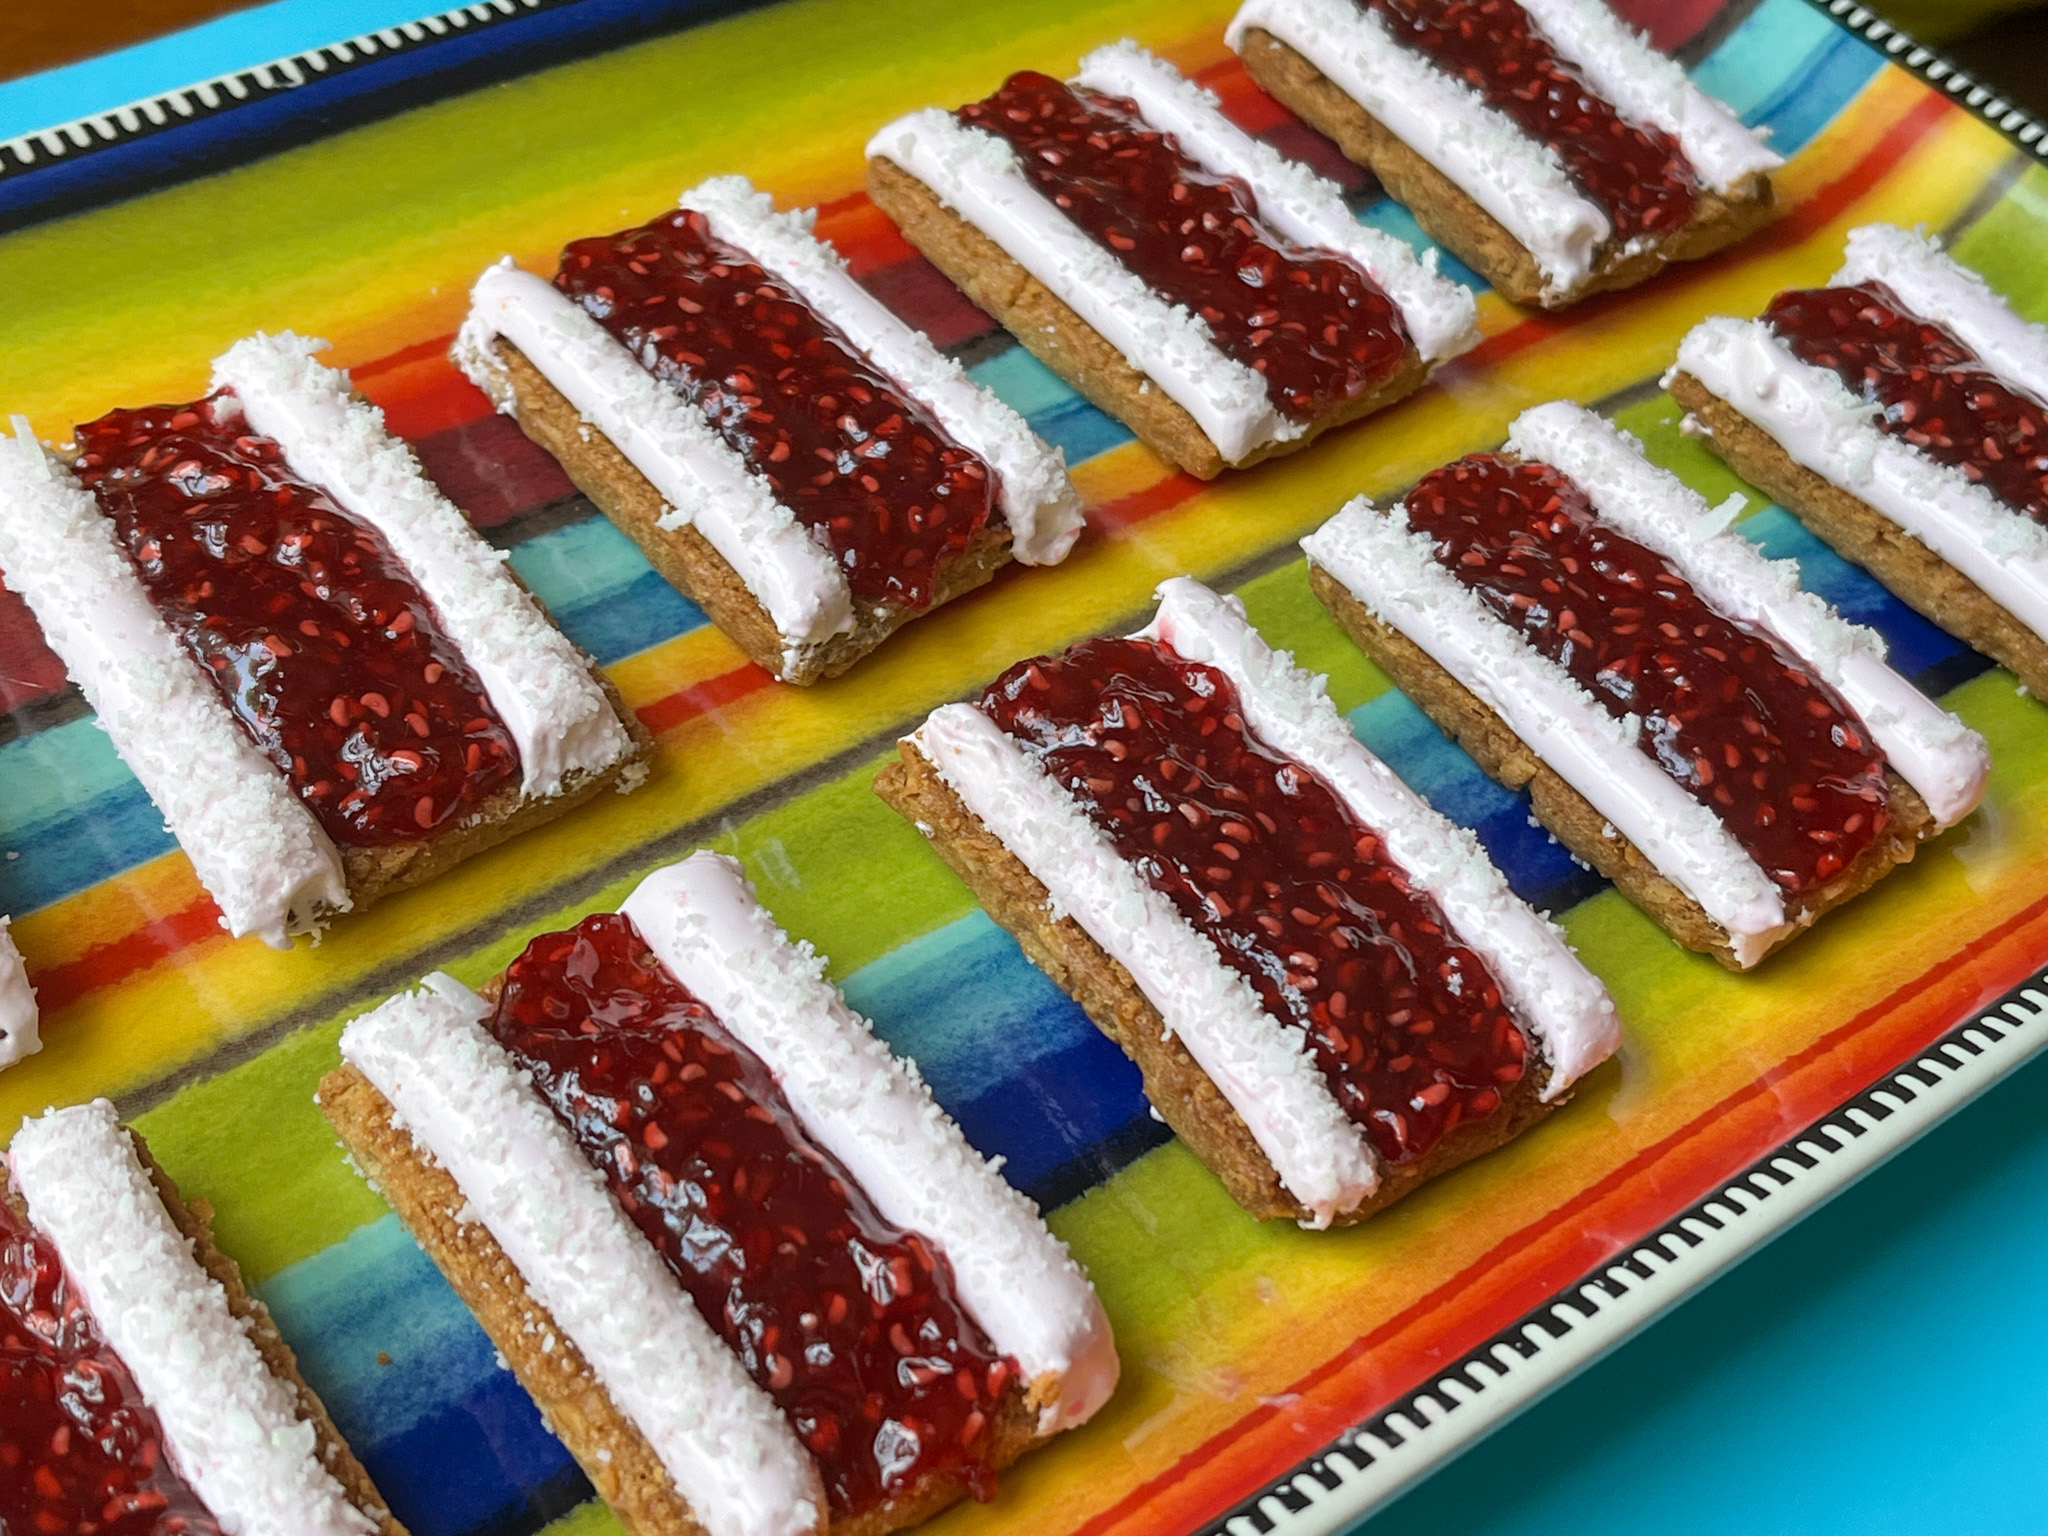
Coconut biscuit, raspberry jam, and marshmallow. Those three together are the key to a treat to make you smile. Looks adorable, tastes amazing… What’s not to like? Well, if you are not fond of coconut, make a plain biscuit, it will still be wonderful. I cannot share the exact recipe I used, because it is part of Savour Cooking School, but similar recipes can be found online. Like this one.
I’ve been a member of Savour for a long time. In fact, I joined just a couple of months after they launched the site. Kirsten Tibballs – pure royalty in the Australian Patisserie World – is the founder and the major engine behind the school. Classes are super detailed, and divided in “beginner, intermediate, and advanced levels”. I will not lie to you, the beginner level can be quite involved, and the advanced a sure ticket to hyperventilation and despair. But of course, totally worth it! Even if I don’t bake a lot of the things they teach, I learn a lot by watching the videos. If you’d like to join, visit the site with a click here. I cannot share their recipes, but today I show you three bakes I’ve made following Kirsten’s classes.
.
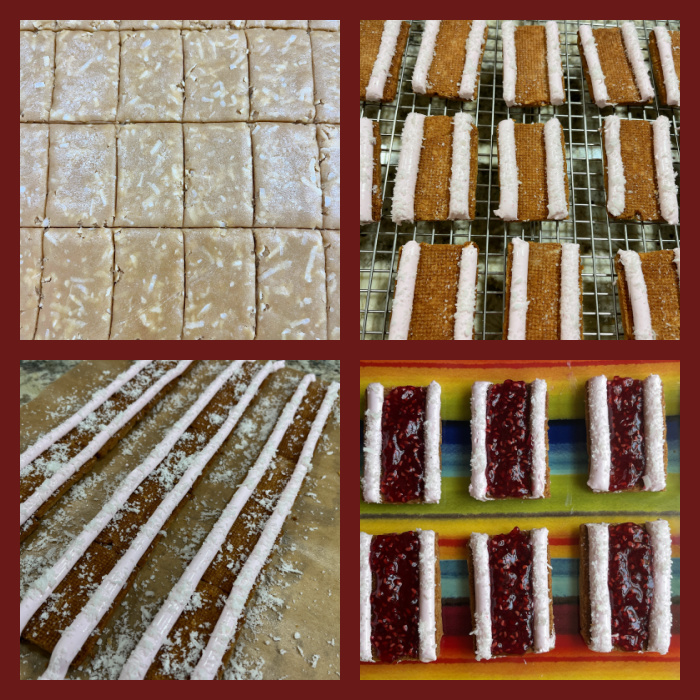
RASPBERRY VOVO
These are just outstanding. Reading about them, it turns out that there are two versions, one from Australia, one from Ireland (called Mikado). The Australian version uses fondant and the Irish calls for marshmallow, which is what Kirsten taught in class. You can read more about it here. I find it intriguing that the name (vovo) means “grandpa” in Portuguese, but could not quite find the origin of the name in Australia. The recipe starts with baking some coconut shortbread, then making raspberry jam, and the delicious raspberry marshmallow that gets piped at the edges. A little warm knife is the secret to get the marshmallow cut nicely in between the cookies. Some of the steps are shown below…
Recently Kirsten launched a challenge, picking one recipe from the hundreds available and asking members to make it and share the pictures. I participated of two of these monthly challenges.
.
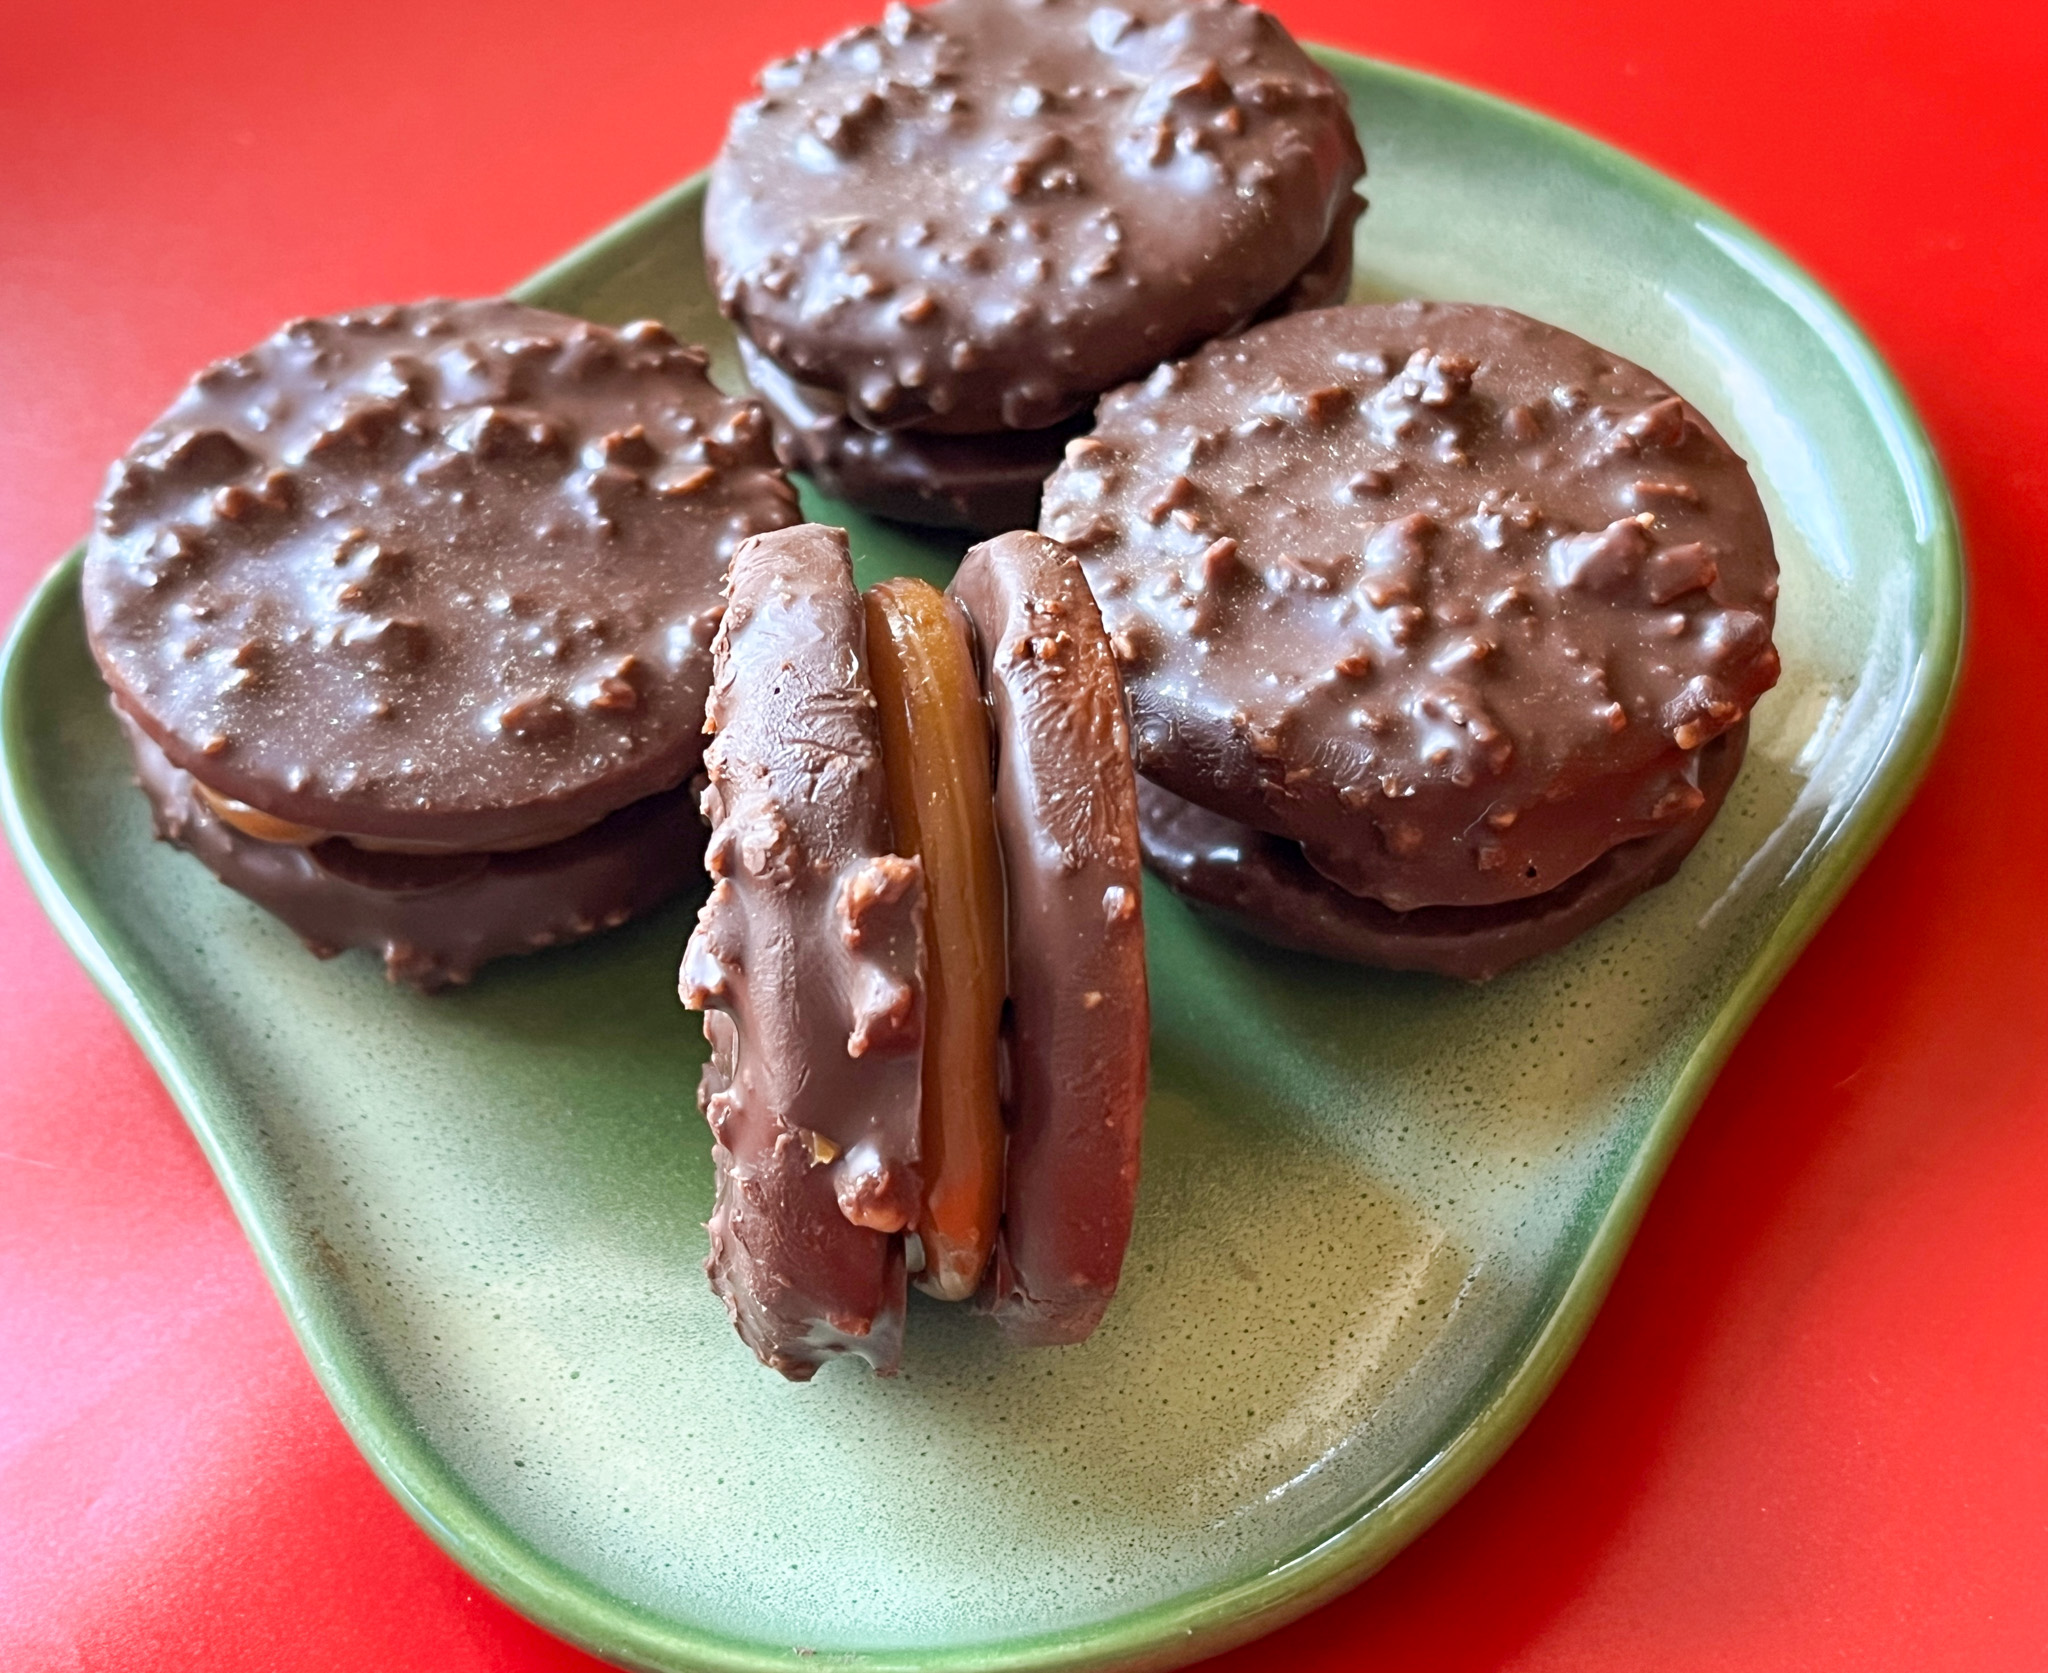
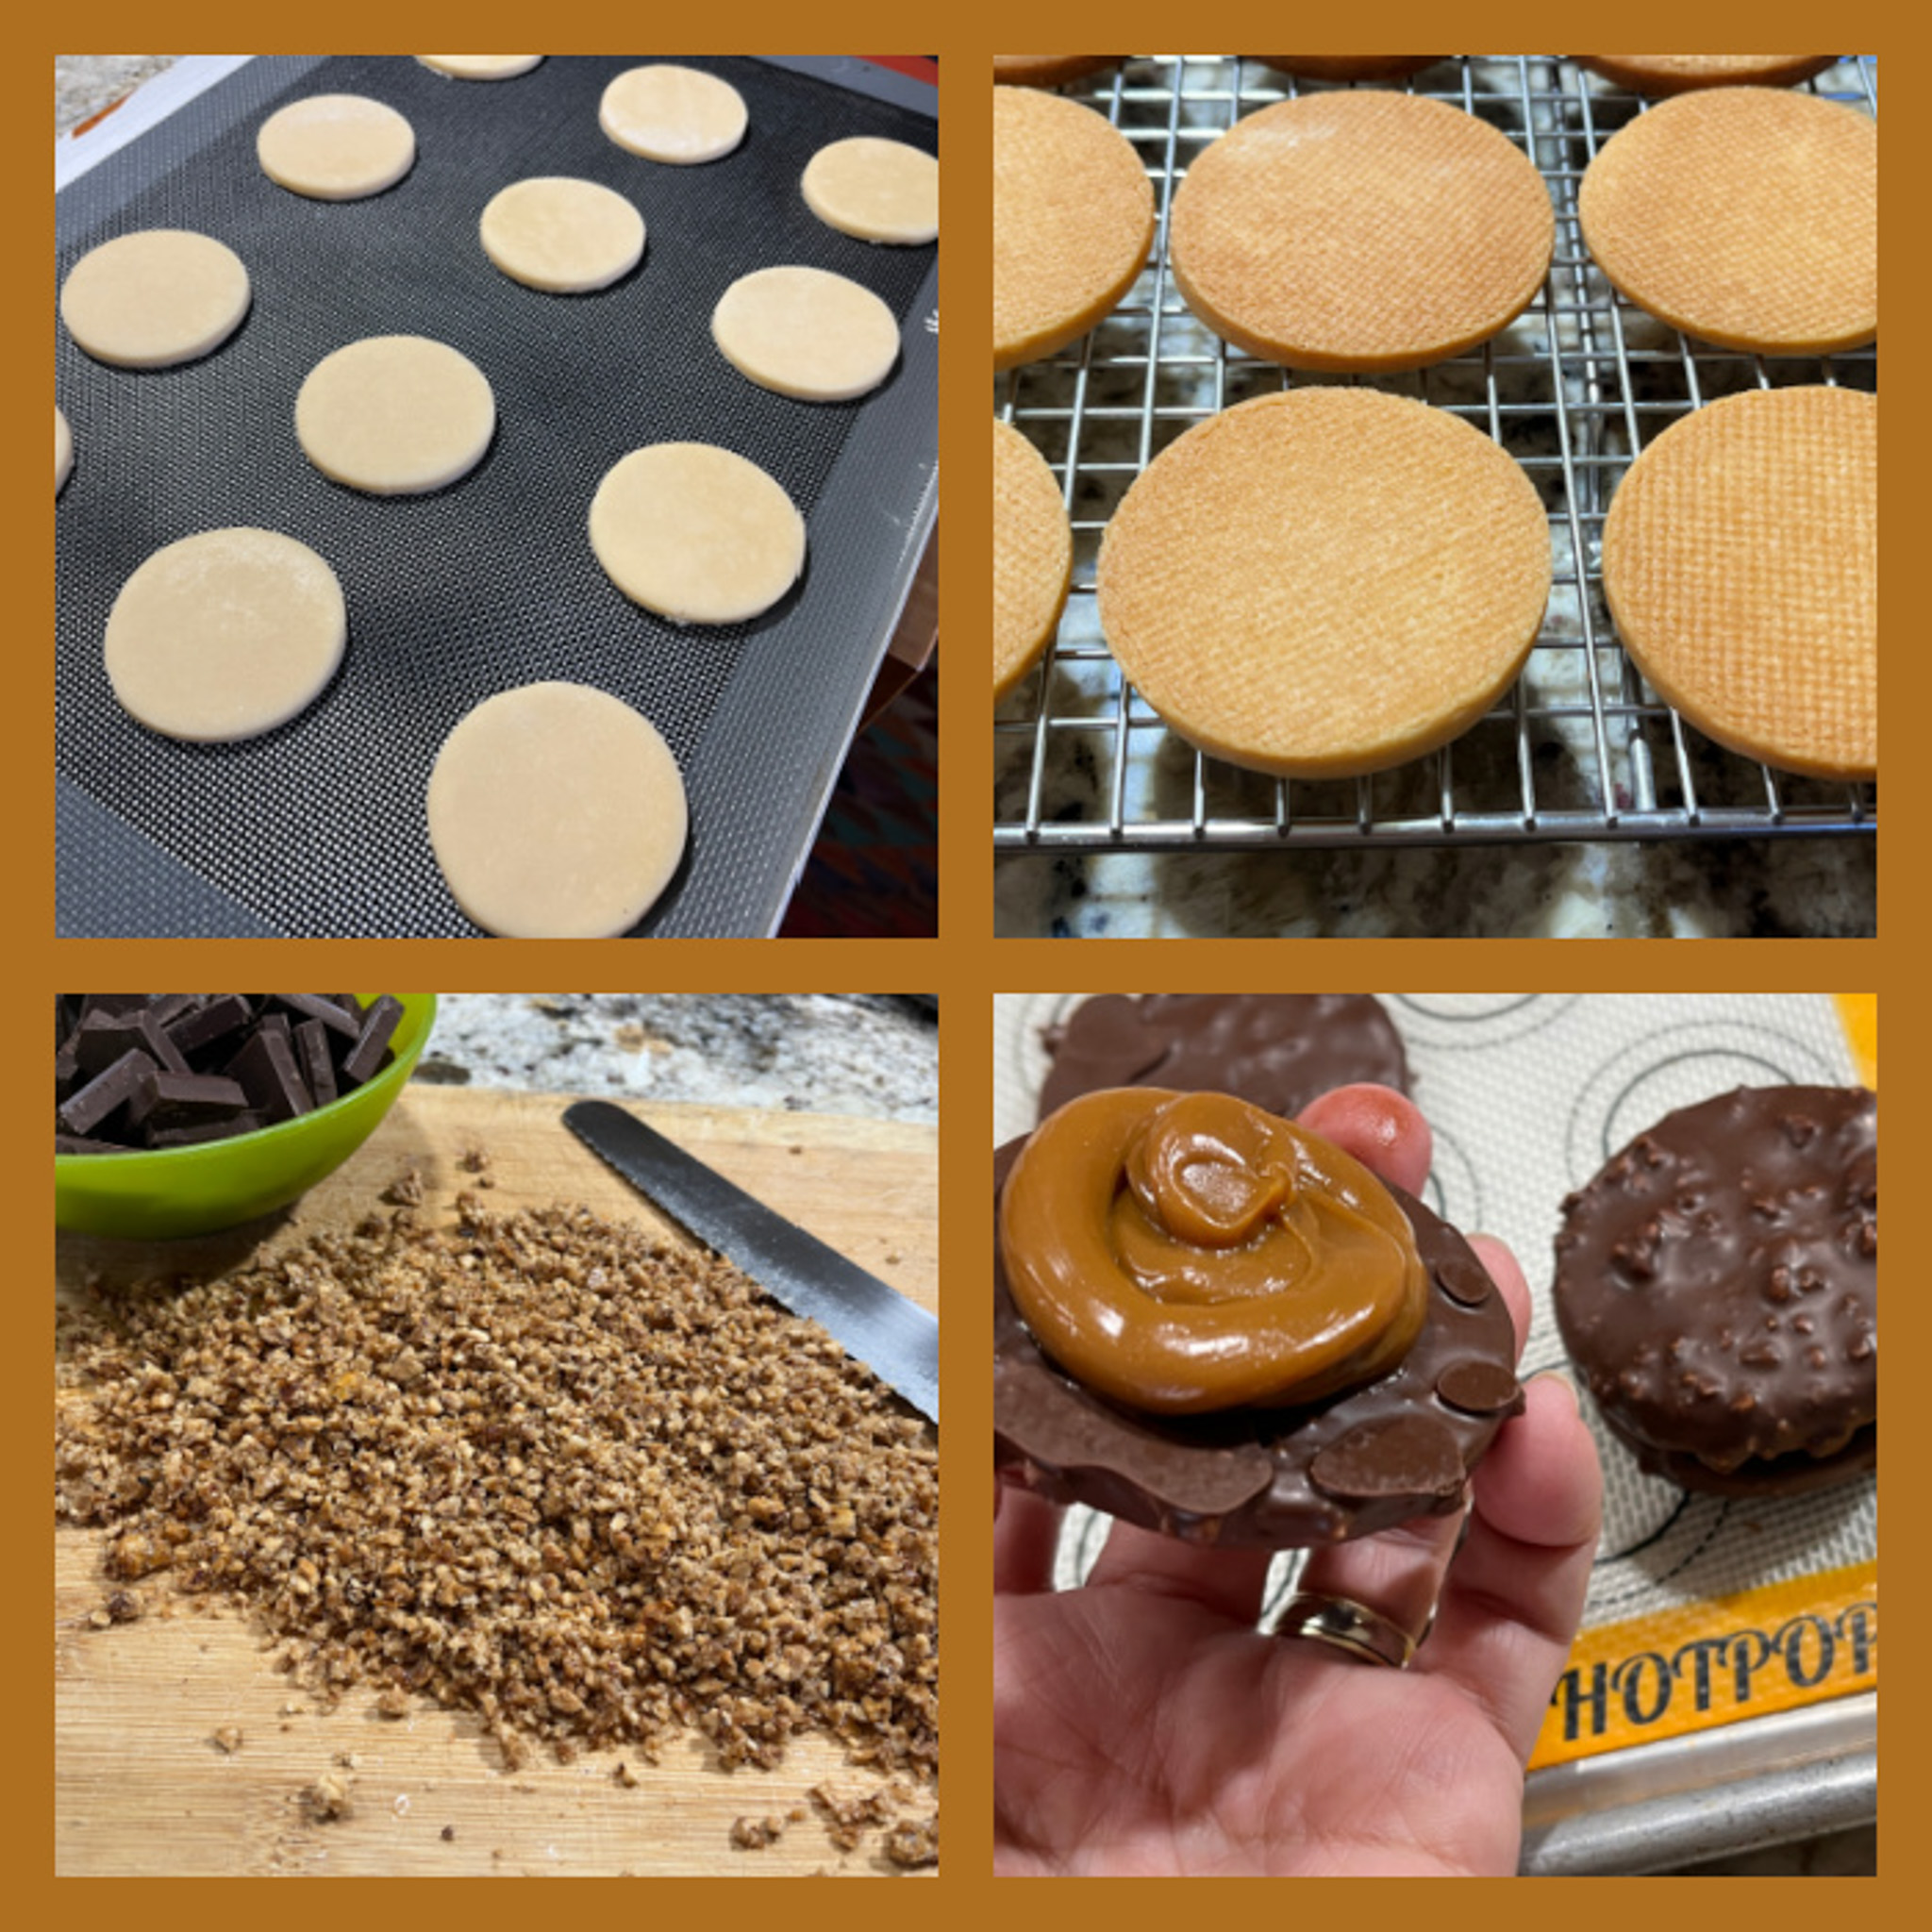
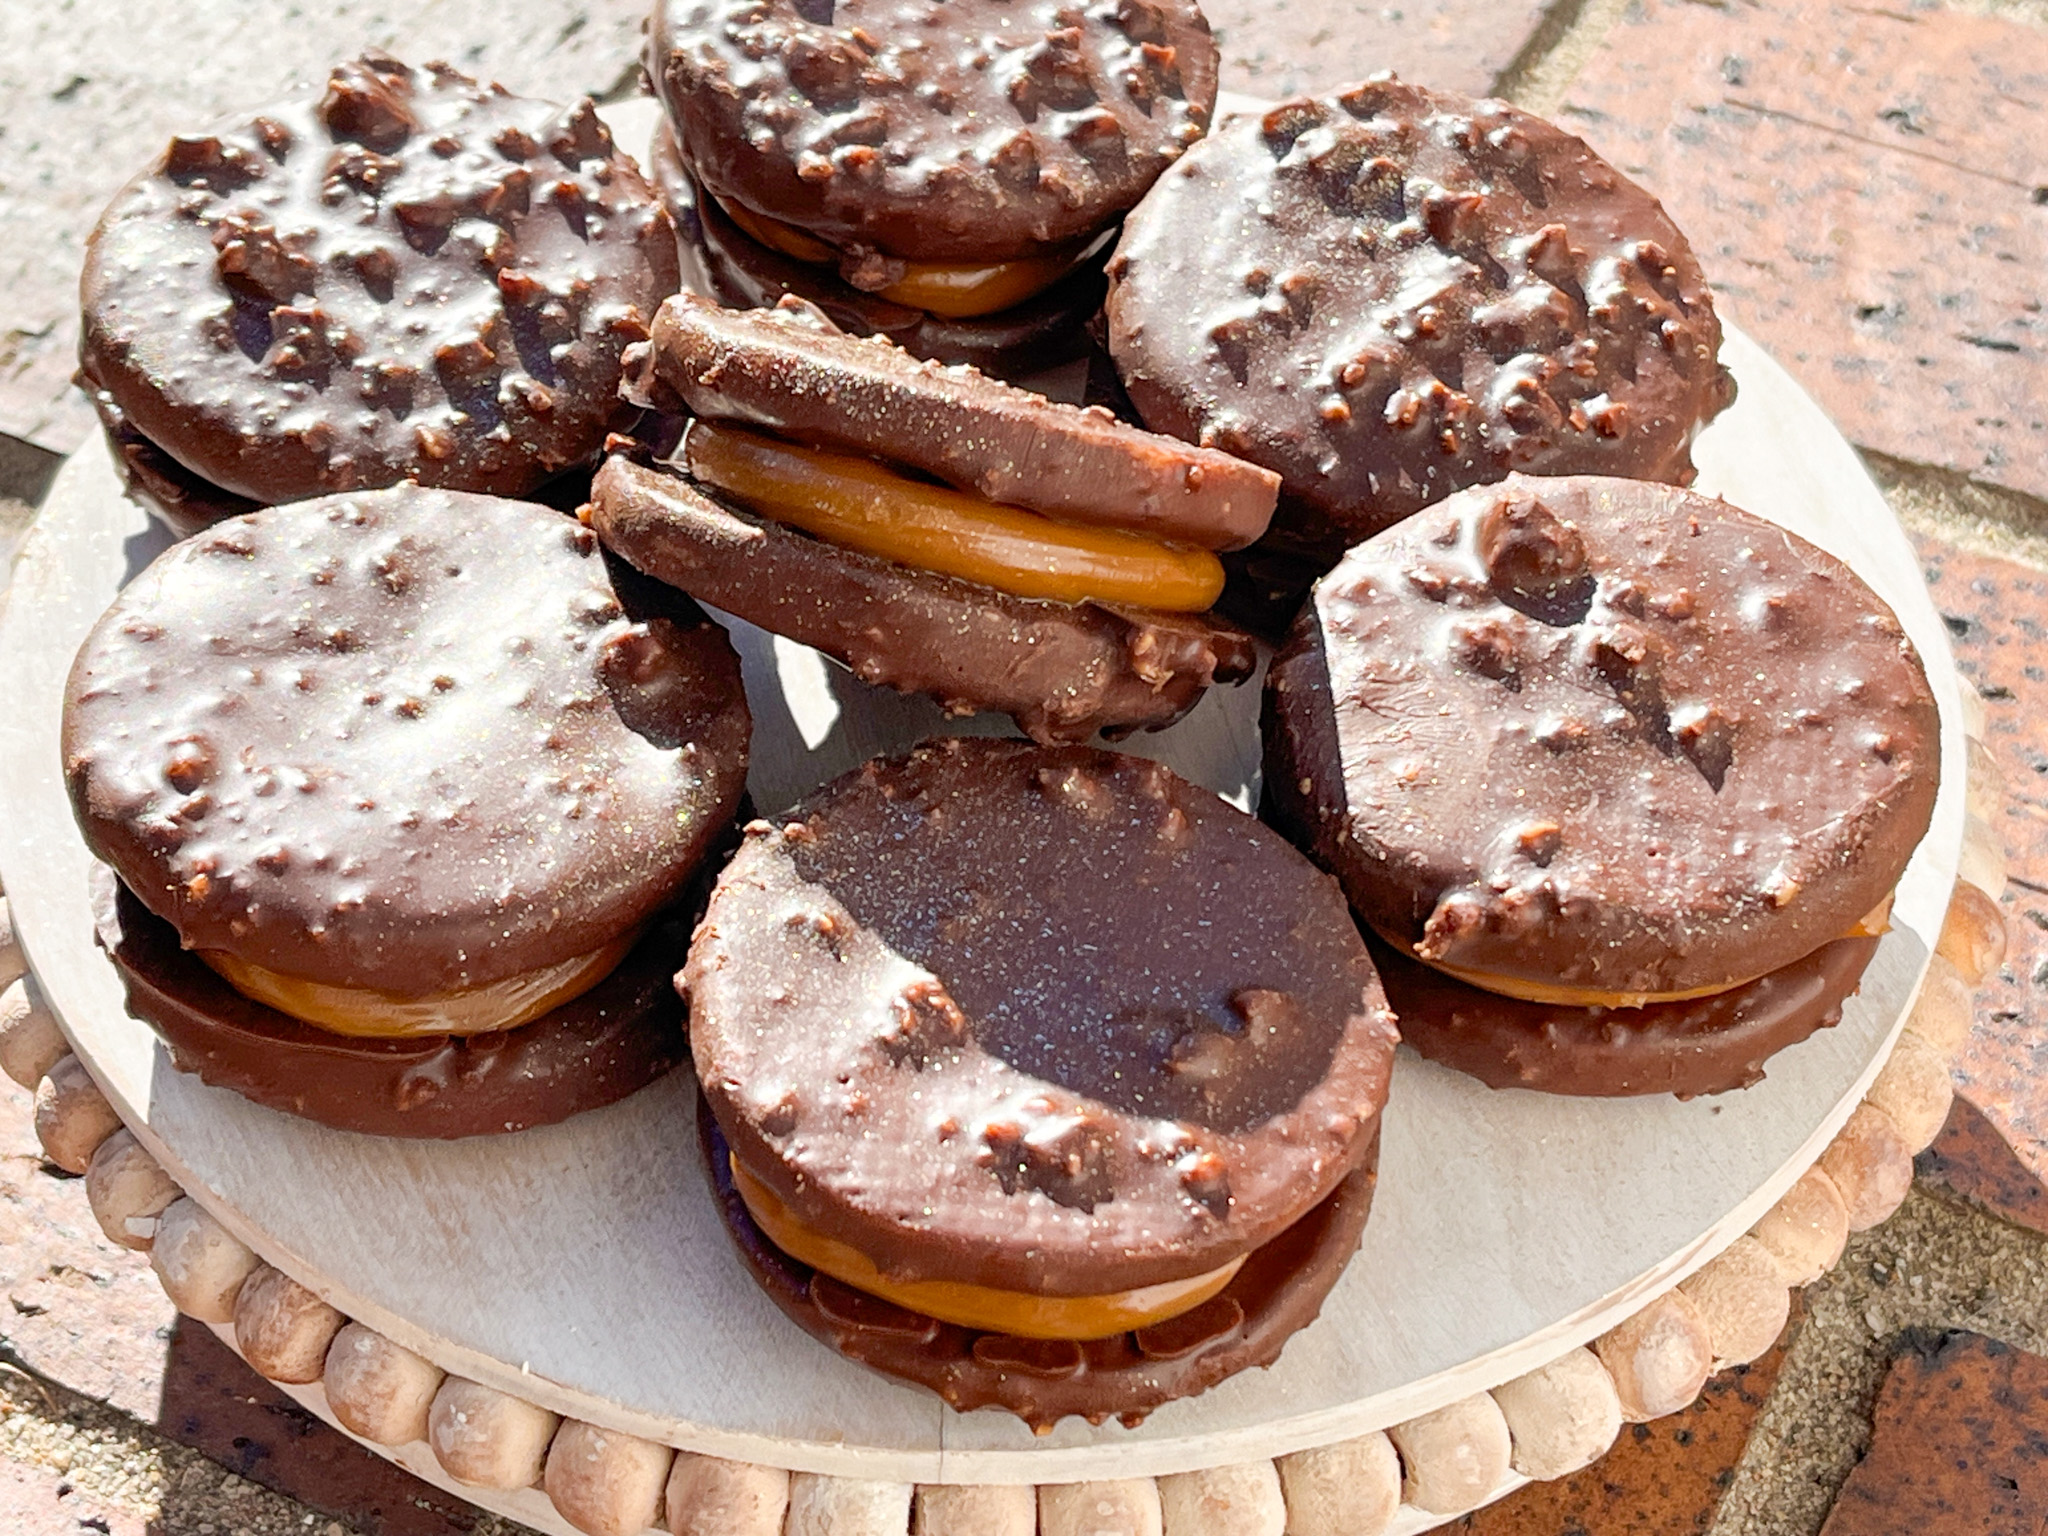
DULCE ROCHER
These are considered “beginner” level at Savour. You will make a shortbread cookie, a whipped caramel for the filling, sugar-coated hazelnuts for the coating, and finally temper some milk chocolate. I loved making these but a word of caution: since each cookie will be coated in chocolate/nuts, make sure they are rolled thin to start with, or you will end up with a massive sandwich cookie. Finesse matters here! Some of the steps are shown below…
Can you imagine the taste of all that caramel plus the cookie, chocolate, and the crunch of the sugared hazelnuts? It is a dream in cookie shape! Lots of members participated of the challenge, the person who won made them super cute in square shape, she really deserved the prize (in that case it was quite a bit of high quality chocolate, and, yes, I would have loved to be the winner!).
.
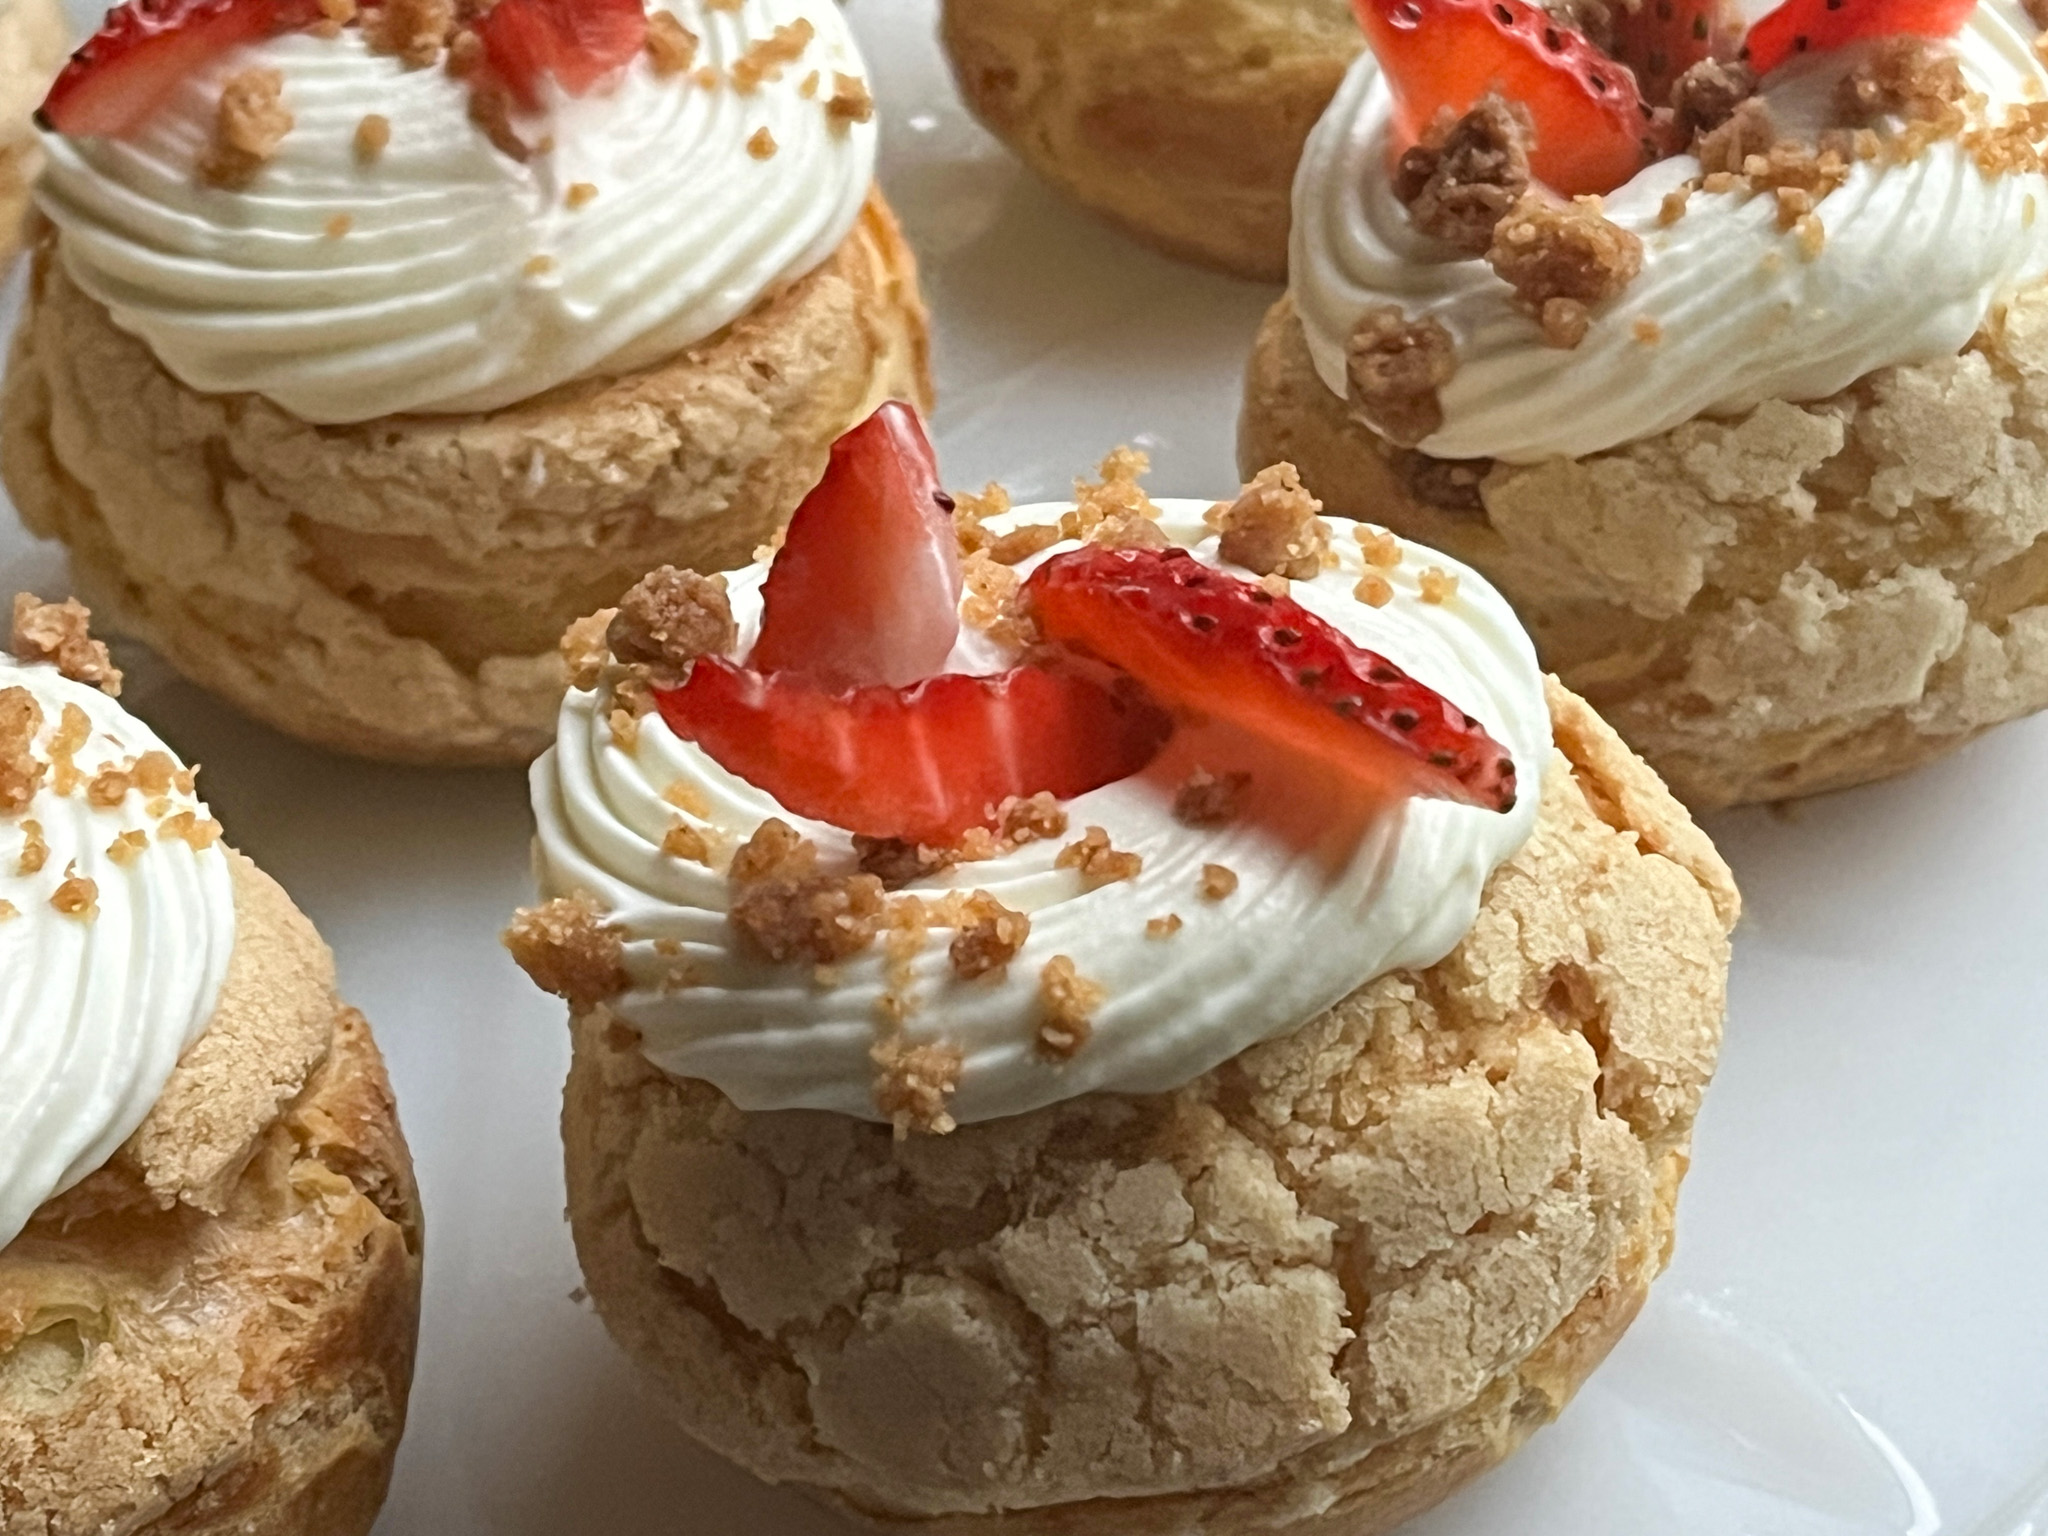
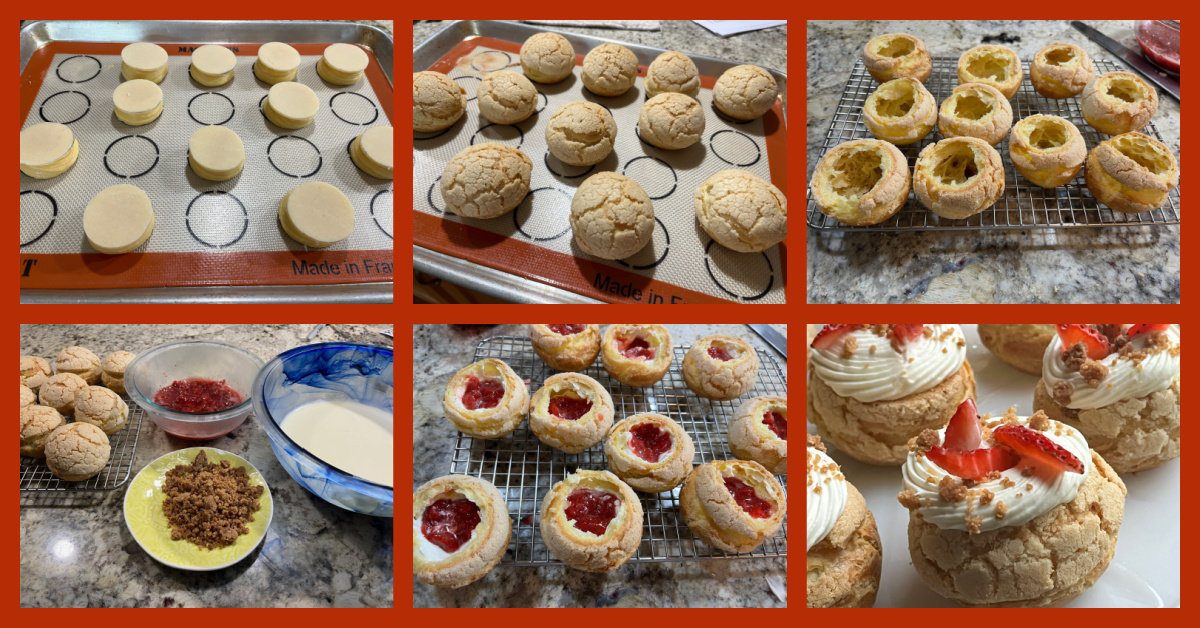
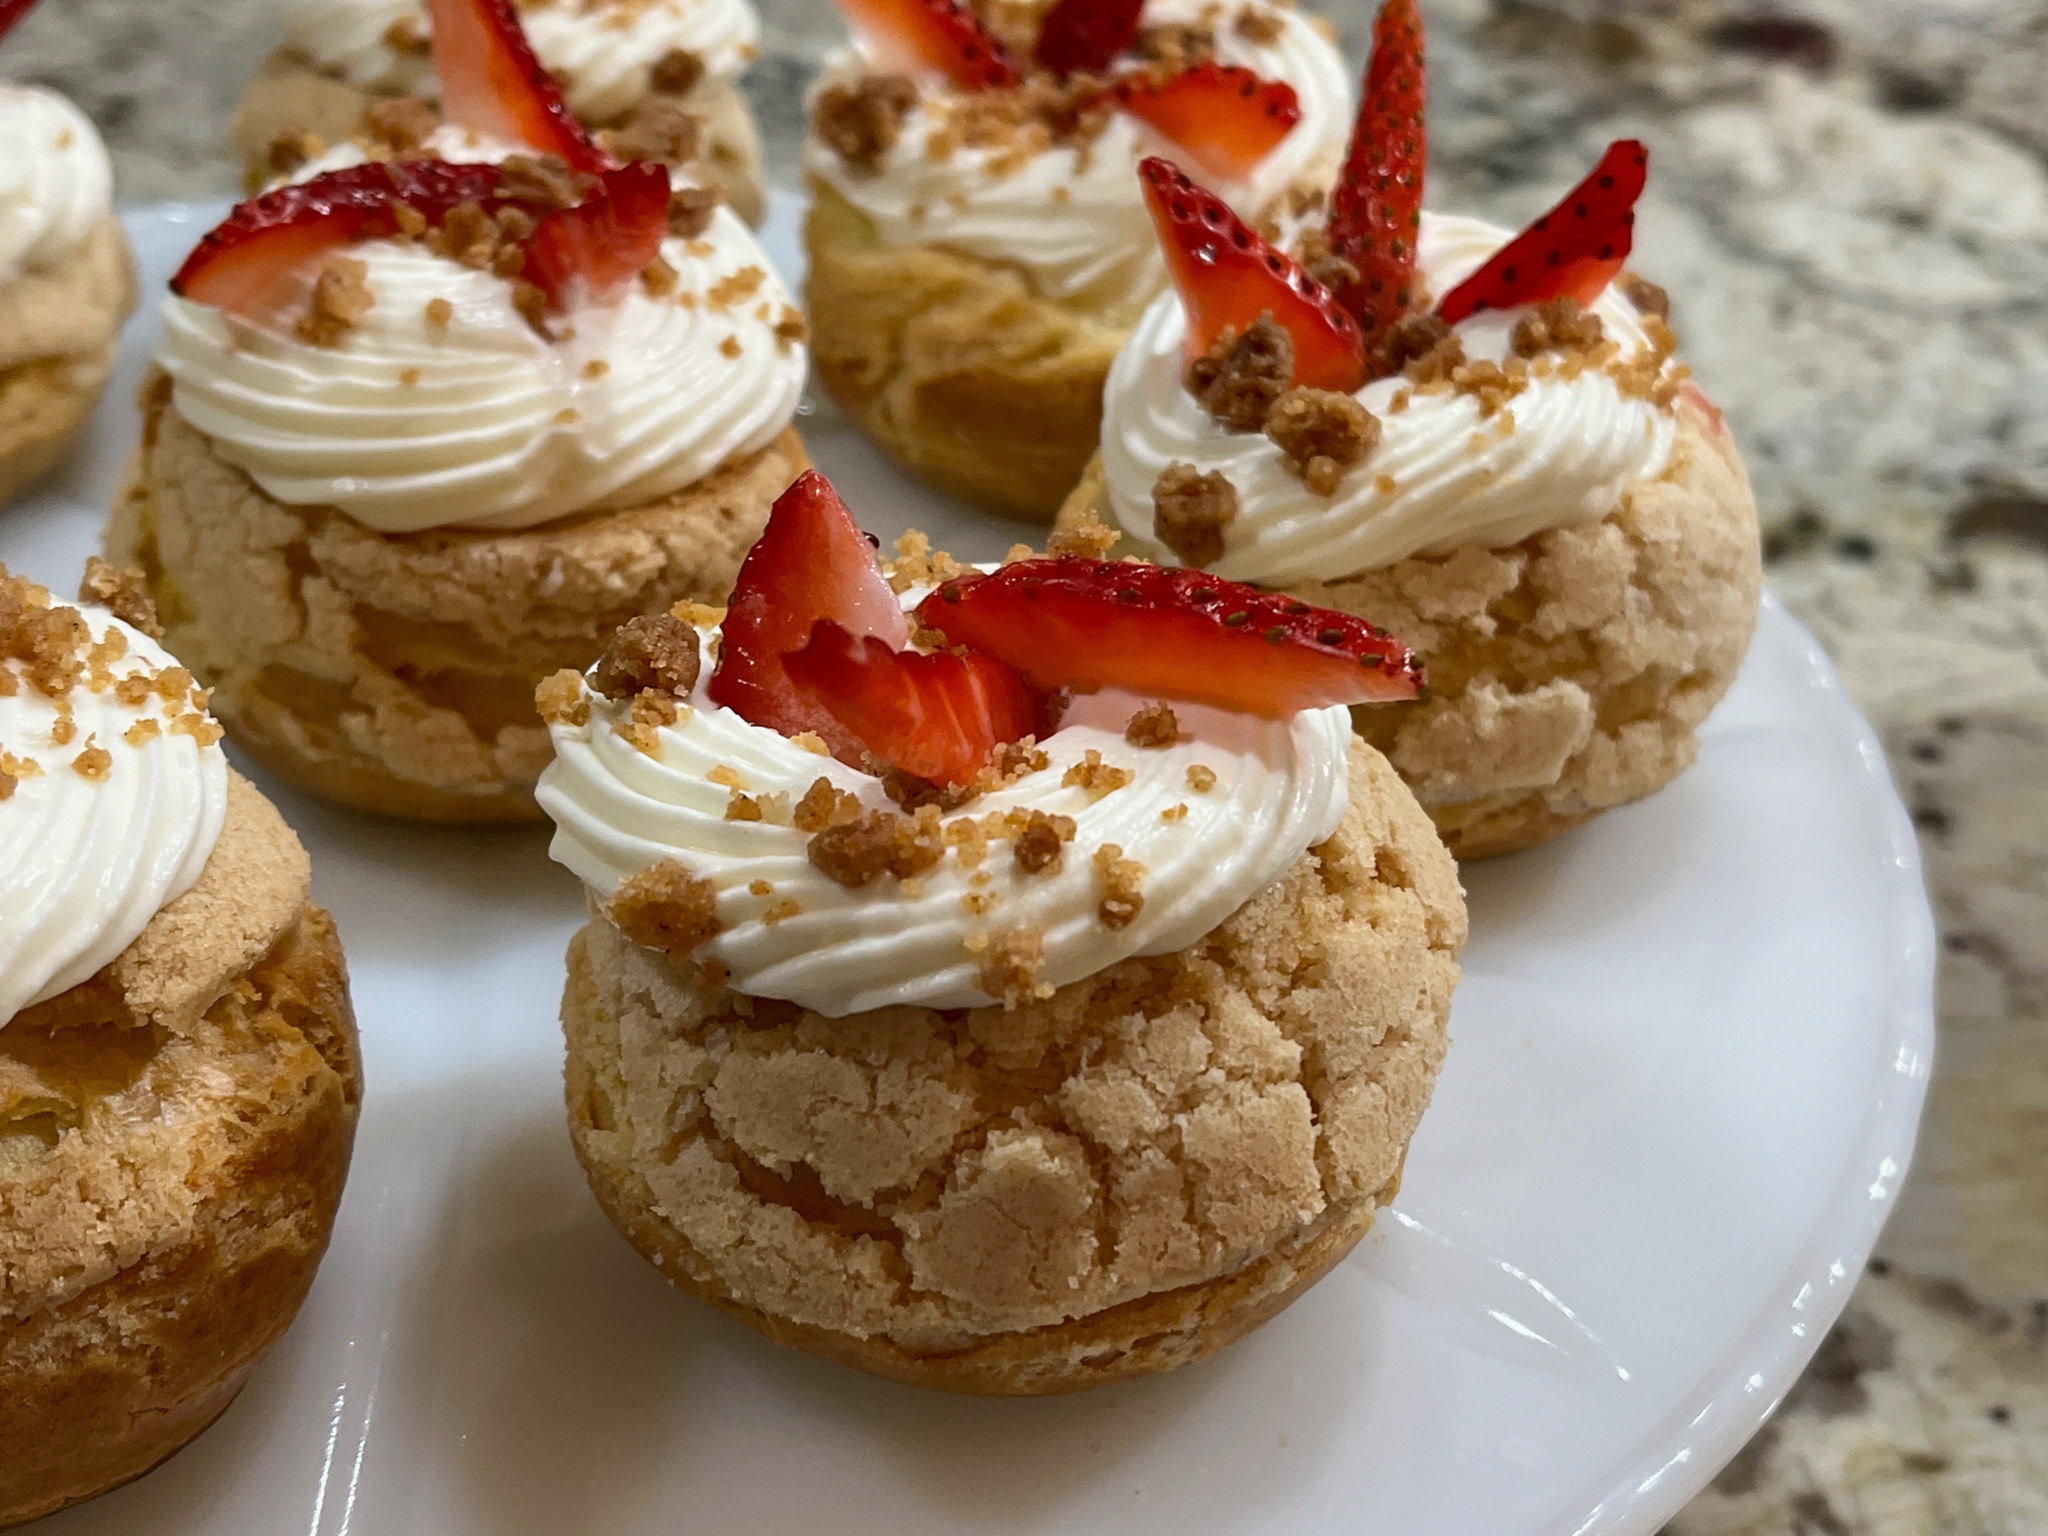
STRAWBERRY AND CREAM CHOUX BUNS
If you can believe it, this is also considered beginner level (cough, cough). Components to make these beauties: choux buns with a craquelin coating, strawberry compote, cinnamon crumble, and white chocolate chantilly. The result is totally worth the work, trust me. Since they are too messy to donate to the homeless, I took them to our department and well, let’s say there were a bunch of super happy Professors and graduate students. Mission accomplished!
If you like to take your baking up several notches, I highly recommend joining Savour (click here). Plus there is a nice community online through their Facebook page, where you can see what everyone else is baking, and share kitchen adventures.
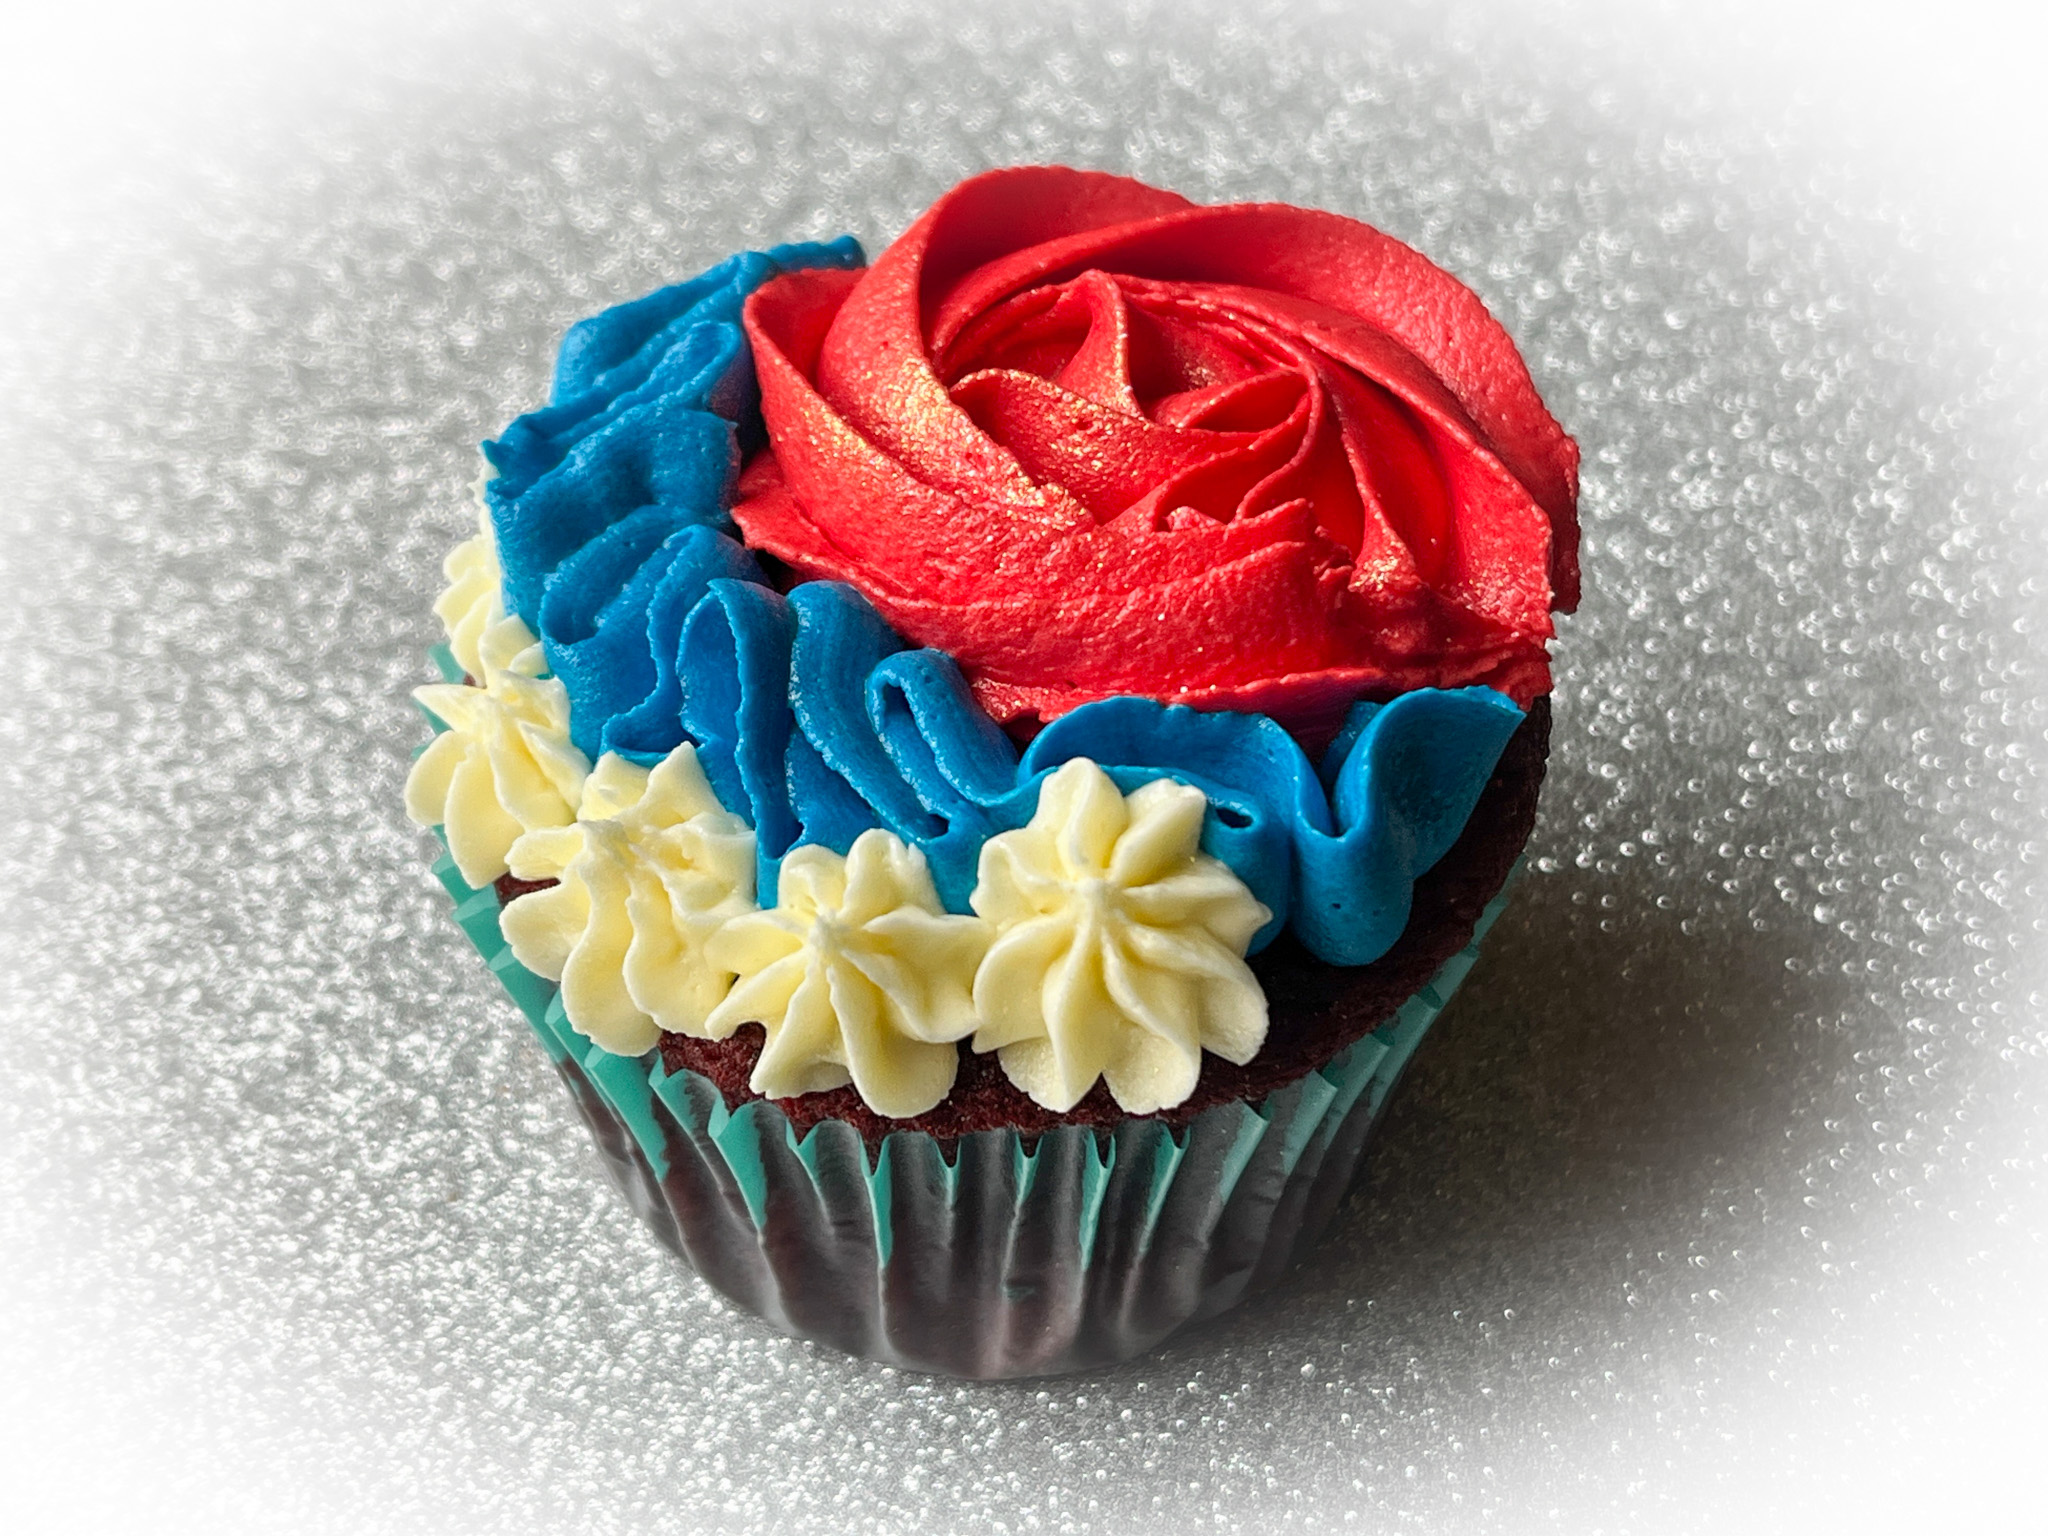
Please consider skipping fireworks, they bring chaos to so many! How about cupcakes instead?
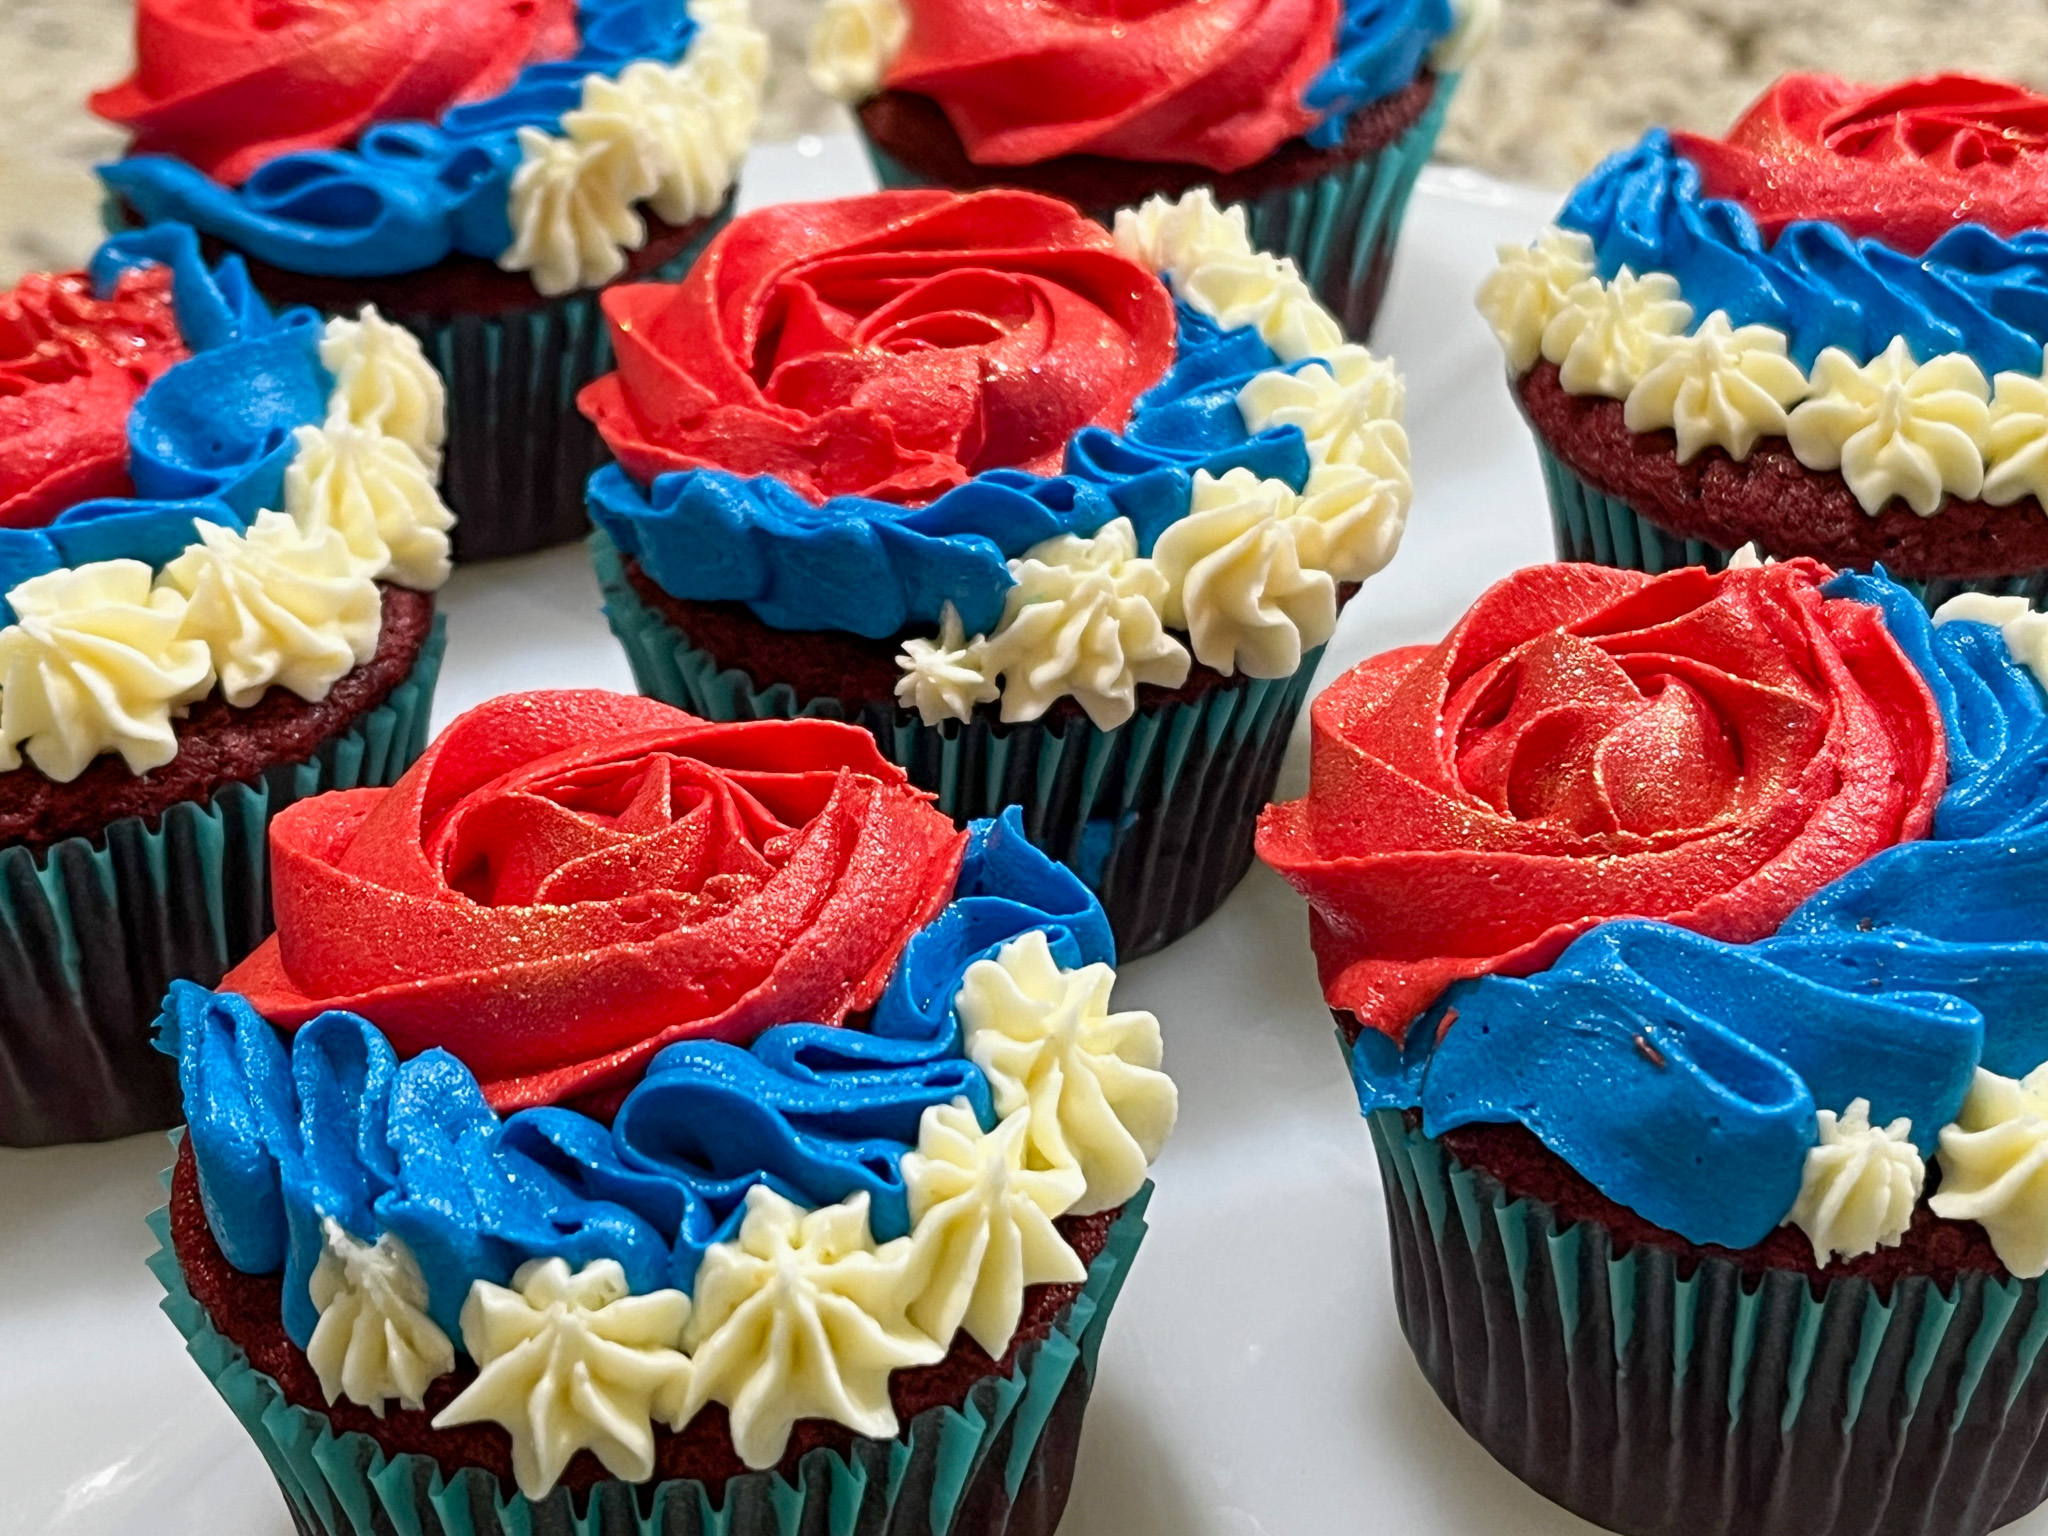
RED WHITE AND BLUE CUPCAKES (from The Bewitching Kitchen)
150g granulated sugar 60g butter 1 egg 10g cocoa powder red food gel 150g all-purpose flour 1/2 tsp salt 120ml buttermilk 1 tsp white vinegar 1/2 tsp baking soda 1/2 tsp red velvet emulsion (or vanilla extract)
Heat the oven to 350F.
Mix the flour with the salt. Reserve. Those are your dry ingredients.
Cream butter and sugar in a stand mixer with the paddle attachment, until light and fluffy, about 3 minutes in high-speed. Add the egg, beat until the mixture is fully incorporated and light. Add the cocoa and the red food dye.
Add 1/3 of the dry ingredients, then 1/2 of the buttermilk, 1/3 more of the dry ingredients, followed by the rest of the buttermilk. Add the rest of the dry ingredients. Mix well. In a small bowl whisk the baking soda with the vinegar. Add to the cake batter and mix for a few seconds on high-speed. Finish by mixing the batter by hand, then add portions to regular cupcake tins, do not fill more than half the volume.
Bake for about 15 minutes until a toothpick comes out mostly clean. Cool completely before decorating.
BASIC BUTTERCREAM FOR CUPCAKES (from The Bewitching Kitchen)
226g butter, unsalted, softened 452g powdered sugar pinch of salt Vanilla extract, about 1 tsp or more to taste a couple or more tablespoons of milk (to adjust consistency)
Place the softened butter in the bowl of a KitchenAid type mixer with the paddle attachment, add the pinch of salt, and whip at high speed for about 7 minutes. It needs to be really soft and lighter. Stop the mixer. Eyeball the amount of powdered sugar, add 1/3 and mix at low speed at first, once the sugar is starting to get incorporated, increase the speed to medium-high.
Add the second portion of the sugar, and incorporate the same way. Add the final portion, start at low speed, clean the sides of the bowl well with a spatula, add the vanilla and increase the speed slowly all the way to high. Whip it until very smooth. Add milk to desired consistency. Divide the buttercream into three bowls and dye one with red, one with blue, leave the third one clear.
Fill piping bags fitted with the icing tips of your choice. Ice fully cooled cupcakes.
Comments: For these cupcakes I used a 1M tip for the red rose, a 102 petal tip for the blue swirl, and an open star tip 4B for the white decorations. All cupcakes were donated, so I don’t have a picture of the cake crumb but I got nice feedback about them. I think red velvet goes perfectly well for the 4th of July theme…
Just a couple of days ago I celebrated 15 years as an American citizen!