VALENTINE’S SOURDOUGH, THREE WAYS

You can use any formula for your sourdough bread, it is all about the scoring, or scoring & painting, if you are so inclined. I offer a simple recipe, that you can flavor with different spices or leave plain.

BE MY VALENTINE SOURDOUGH
(from the Bewitching Kitchen)

475g bread flour
25g spelt flour
365g water
70g sourdough starter at 100% hydration
10g salt
1 tsp spice flavoring (Garam masala, Ras-El-Hanout, Za’atar)

Make the levain mixture about 6 hours before you plan to mix the dough. It should be very bubbly and active.

When you are ready to make the final dough, place the water in the bowl of a KitchenAid type mixer and dissolve the starter in it, mixing with a spatula briefly, then add the two types of flour, and salt. Turn the mixer on with the hook attachment and knead the dough for 4 minutes at low-speed all the time. You will notice the dough will gain quite a bit of structure even with just 4 minutes in the mixer. Remove from the machine, and transfer to a container lightly coated with oil, cover lightly with plastic wrap and allow it to ferment for 4 hours, folding every 45 minutes or so. Because the dough is already a bit developed from the initial time in the mixer, you should get very good structure after 3 and a half hours, or even sooner than that.

After four hours bulk fermentation, shape the dough as a ball, and place, seam side up, in a lightly floured banetton. Leave at room temperature one hour, and then place in the fridge overnight, from 8 to 12 hours.

Next morning, heat the oven to 450F.

Place three strings over the dough nicely spaced, and touch the strings to glue them lightly to the bottom of the bread. Place a parchment paper on top, a flat baking sheet, and invert the dough, flipping it out of the banneton. Flour the surface of the dough, and tie the strings on top as shown in the composite picture. Score as desired, forming a heart pattern. You can paint with an air-brush, if desired.

Bake at 450F for 45 minutes, preferably covered for the first 30 minutes to retain steam. I cut the strings quickly after 30 minutes when I open the pan, and moved them gently out of the bread. Don’t worry if some parts of the string stay glued to the bread, you can remove later. Cool completely over a rack before slicing.

ENJOY!

to print the recipe, click here

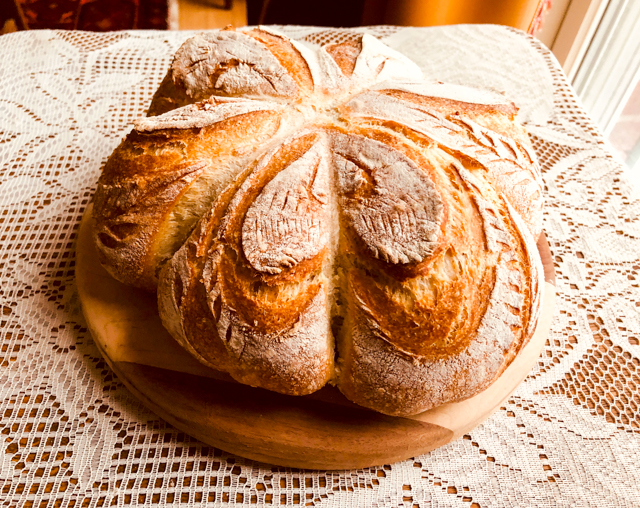
The first bread is a flash-back from a couple of years ago, and you can read all the details here.

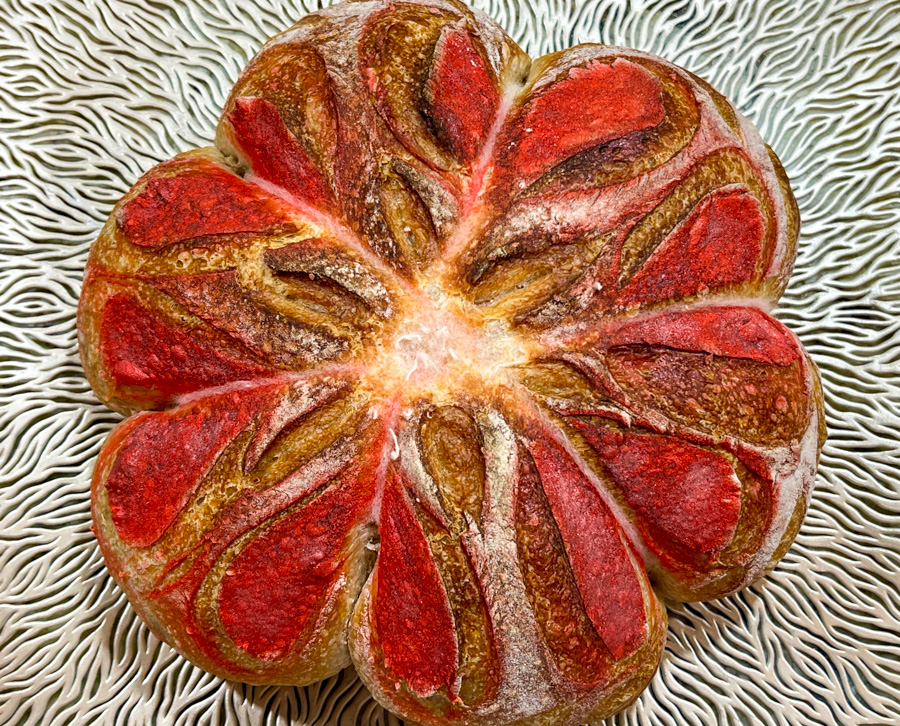
If you like to add some color to this basic scoring, here’s how to do it…

Simply tie the bread as explained in the recipe, score the heart shapes, and carefully air-brush the design with red. This particular loaf was smaller (400g total flour instead of 500g), so I did not have much space to work on additional details with the razor blade. But I still like the end result…

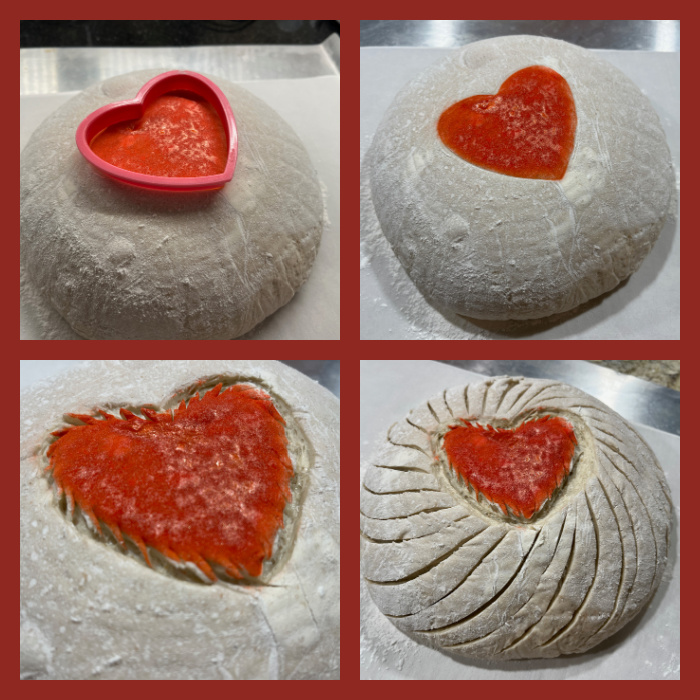
And the third design, might be the simplest, as you won’t need to tie strings around the shaped dough before baking.

I floured the top of the bread, placed a cookie cutter on top, air-brushed the inside with red dye, removed the cookie cutter and cut the heart with a razor blade first, then used the scissors to clip all around it. A little spiral scoring all around, and that was all!

Comments: I am not sure which design is my favorite, maybe the last one, although the bread had such strong oven spring that the spiral scoring ended up a bit removed from the heart design on top. If you don’t have an air-brush, you can paint with a regular brush, diluting the food dye with a little vodka or water, depending on how fast you want the paint to dry (vodka or any other alcohol will dry faster than water). You can also just score the heart and leave it plain.

ONE YEAR AGO: Embossed Chocolate-Cherry Sourdough Loaf

TWO YEARS AGO: Springerle Painting 101

THREE YEARS AGO: Mincemeat Pies, when the third time is a charm

FOUR YEARS AGO: Shibari Bread]

FIVE YEARS AGO: Incredibly Simple Times Four – January 2018 

SIX YEARS AGO: Two Salads and a Blog Award!

SEVEN YEARS AGO: When Three is Better than Two

EIGHT YEARS AGO: Somebody Stop Me!

NINE YEARS AGO: Zucchini Pasta with Cilantro-Cashew Pesto

TEN YEARS AGO: Bran Muffins, Take Two

ELEVEN YEARS AGO: Brown Butter Chocolate Chip Cookies

TWELVE YEARS AGO: Mogo Mojo

THIRTEEN YEARS AGO: Slow-Roasted Chicken Thighs: an Ice-Breaker

ALMOND-RASPBERRY SANDWICH COOKIES

THIS IS MY 1,600th POST!

These are fun to make and even more fun to share, as they will bring a smile to those on the receiving end. Sprinkles are optional, but how could I think of skipping them?

ALMOND-RASPBERRY SANDWICH COOKIES
(from the Bewitching Kitchen)

for cookies:
240 grams all-purpose flour
1/2 teaspoon kosher salt
1/4 teaspoon baking powder
2 sticks (226 grams) unsalted butter, at room temperature
75 grams sugar
1 tablespoon agave nectar
1 large egg
1 teaspoon vanilla extract
1/4 teaspoon almond extract
raspberry jam to fill the cookie sandwiches

for chocolate coating:
4 ounces bittersweet chocolate, chopped
1 teaspoons unrefined coconut oil
Sprinkles, for decorating

Heat oven to 350F. Line 2 rimmed baking sheets with parchment paper and set aside.

Whisk together the flour, salt and baking powder in a mixing bowl. Reserve. Cream the butter with the sugar in a KitchenAid type mixer with the paddle attachment in low-speed. Add the agave nectar and incorporate. Add the egg, vanilla and almond extracts and beat until light and smooth. Add the flour mixture. Beat until just combined.

Transfer the dough to a piping bag fitted with a large open star tip. Pipe the dough onto the prepared baking sheets in 2-inch lines, spaced 1-inch apart. If the dough is too stiff to pipe comfortably, protect the metal tip with a paper towel and microwave the whole bag in increments of 10 seconds, until it is soft enough to pipe, but be very careful and do not allow any of the dough to melt. It might be safer to use the microwave at 50% power. Bake until the cookies are set on top and golden around the edges, 12 to 15 minutes. Cool completely, match cookies of similar size and fill with a small amount of jam.

Melt the chocolate and coconut oil in a microwave in 15 second increments. Dip the lower part of the cookies in the chocolate letting the excess drip back into the bowl. Sprinkle with the sprinkles. Lay back on a parchment lined baking sheet and place the cookies in the refrigerator to let the chocolate fully set, which will happen quite quickly.

ENJOY!

to print the recipe, click here


Comments: Let me just reinforce what is the most important thing to consider in the recipe: if you try to squeeze the bag and it is too hard, STOP. Cover the metal tip with a paper towel and place the whole thing in the microwave, 50% power, for 10 seconds. Massage the bag, test to see if it is easier to pipe, if it isn’t do it again. Do not give yourself grievance and a sore hand. Just make sure you don’t warm the dough too much, and all will be fine. It must be easy to pipe, but still form the ridges of the open star tip.

These cookies are a little bit of work, but not too bad, and the pay-off is huge! The delicate almond flavor pairs well with the raspberry jam, and of course…. chocolate! Make it on a weekend when you are in that great Zen mode, and you will thank me later…

ONE YEAR AGO: Cole-Slaw with Almond Dressing

TWO YEARS AGO: Busy Bee Sugar Cookies

THREE YEARS AGO: Mincemeat Pies, when the third time is a charm

FOUR YEARS AGO: Shibari Bread]

FIVE YEARS AGO: Incredibly Simple Times Four – January 2018 

SIX YEARS AGO: Two Salads and a Blog Award!

SEVEN YEARS AGO: When Three is Better than Two

EIGHT YEARS AGO: Somebody Stop Me!

NINE YEARS AGO: Zucchini Pasta with Cilantro-Cashew Pesto

TEN YEARS AGO: Bran Muffins, Take Two

ELEVEN YEARS AGO: Brown Butter Chocolate Chip Cookies

TWELVE YEARS AGO: Mogo Mojo

THIRTEEN YEARS AGO: Slow-Roasted Chicken Thighs: an Ice-Breaker

PFEFFERNÜSSE

Pfeffernüsse translates in English as “pepper nuts”, and they are one of the most traditional cookies made during the holidays in many countries in Northern Europe. It is a perfect cookie to offer as a gift, as they are best when consumed a few days after baking. The recipe is found in the cookbook “Classic German Baking“, but it is also available online (click here). I made half the amount of spice mix, and still had plenty leftover.

PFEFFERNÜSSE
(as published in Tasting Table)

For the Lebkuchengewürz spice mix:
5 tablespoons ground cinnamon
1½ tablespoons ground cloves
1 teaspoon ground allspice
1 teaspoon ground cardamom
1 teaspoon ground ginger
1 teaspoon ground mace
¾ teaspoon ground star anise

For the cookie dough:
2½ cups all-purpose flour
1 teaspoon cocoa powder
¼ teaspoon kosher salt
½ cup honey
¼ cup, plus 2 tablespoons, granulated sugar
2 teaspoons lebkuchengewürz
⅛ teaspoon white pepper
1 teaspoon baker’s ammonia
1 tablespoon rum, slightly warmed
1 egg

for glazing:
¾ cup confectioners’ sugar
lemon juice added to desired consistency

Make the lebkuchengewürz: In a small bowl, whisk together the lebkuchengewürz spices until well combined. Makes about ½ cup. Store in an airtight container.

Make the pfeffernüsse: Heat the oven to 375° and line a sheet pan with parchment paper. In a medium bowl, whisk together the flour, cocoa powder and salt to combine. In a small saucepan, combine the honey and granulated sugar over medium-high heat. Stir until the sugar is completely dissolved, 2 minutes, then remove from the heat and stir in the lebkuchengewürz and white pepper.

In a small bowl, dissolve the baker’s ammonia in the rum, then stir into the honey mixture. Transfer this mixture to a large bowl and add the flour mixture and the egg. Stir until a smooth dough forms.

Roll the dough into 1-inch balls and place ½ inch apart on the prepared sheet pan. Bake until the cookies have domed and dried, 10 minutes.

Meanwhile, in a small bowl, whisk together the confectioners’ sugar and lemon juice. If you want a thick glaze, add very little juice, if you want a transparent, thin glaze, add lemon juice and thin further with water. When the cookies come out of the oven, immediately brush them with the glaze. Let the cookies cool completely, then store in an airtight container for 2 days before serving.

ENJOY!

to print the recipe, click here

Comments: I have a very warm spot in my heart for any sweets containing spices, Speculaas probably being at the very top. These cookies were a huge hit with my beloved husband and his golfing friends. You can approach the glaze in two different ways, thick as I made, or very very thin. Some say that the traditional type has super thin glaze, but I prefer the way they look with a thicker coating. Your kitchen, your rules, do whatever feels right for you. They pack a lot of flavor, and because they are so small, you don’t really feel guilty having one. Maybe two. I would advise you to stop before you inhale the fifth one. That might be harder than you anticipate…

ONE YEAR AGO: Clay Pot Pork and Tomatillo Braise

TWO YEARS AGO: Vegan Chocolate-Dipped Cinnamon Cookies

THREE YEARS AGO: Lemony Barley with Shrimp and Spinach

FOUR YEARS AGO:Black Rice with Roasted Cauliflower

FIVE YEARS AGO:
La Couronne Bordelaise

SIX YEARS AGO: A Special Birthday Dinner

SEVEN YEARS AGO: Duck Confit for a Special Occasion

EIGHT YEARS AGO: Tuscan Grilled Chicken and Sausage Skewers

NINE YEARS AGO: Celebrate Wednesday with Pork Tenderloin & Apples

TEN YEARS AGO: Salmon Wellington

ELEVEN YEARS AGO: The Green Chip Alternative

TWELVE YEARS AGO: Weekend Pita Project

THIRTEEN YEARS AGO: Let it snow, let it snow, eggs in snow

ZUCCHINI-PROSCIUTTO PARCELS

Two ways to make these delicious little morsels, perfect as a little appetizer or even as a side-dish, which is how we served them. You can use a creamy cheese, such as ricotta, perhaps mixing a bit of egg yolk for added structure, but I opted for halloumi cheese, that retains its texture quite well during baking. The first method requires a mandolin to slice the zucchini, as you need really thin slices so that they bend. You could slice it thicker and blanch them before forming the parcels, but I prefer to skip that additional step.


ZUCCHINI-PROSCIUTTO PARCELS
(from The Bewitching Kitchen)

1 or 2 large zucchini
prosciutto slices, one per appetizer
1/4 cup olive oil
juice of half a lemon
salt and pepper to taste
halloumi cheese cut in pieces, one per roll

Whisk the olive oil with lemon juice, season with salt and pepper. Reserve.

If using ribbons, cut the zucchini in very thin slices, as thin as your mandolin will go. If using zucchini pieces, cut them in squares of a size similar to the cheese. Brush the zucchini with the emulsified oil-lemon. Assemble each little package, either rolling or stacking.

Place over aluminum foil on a baking sheet and bake at 400F util the prosciutto is golden brown (about 25 minutes, depending on size). The zucchini will release a lot of juice during baking but it will dry out as it continues roasting. Do not panic, it will look a little hopeless before it looks great…

Serve while warm.

ENJOY!

to print the recipe, click here

Comments: I don’t know which version I prefer. The one with very thin zucchini slices looks a little more elegant but the zucchini pretty much disappears as far as taste and texture are concerned. The second way to do it makes the zucchini more prominent, but it does not look as good, so it’s really a matter of deciding which path you want to take. I do like the use of halloumi. If you go with a melting cheese, definitely do the zucchini ribbons to wrap the whole thing better.

ONE YEAR AGO: Double Peanut Sourdough Loaf

TWO YEARS AGO: Fennel-Rubbed Shrimp in Light Coconut Sauce

THREE YEARS AGO: Puff Bread Balls, Two Salads and a Cookbook Review

FOUR YEARS AGO: Pistachio-Caramel and Apple Mousse Cakes

FIVE YEARS AGO: La Couronne Bordelaise

SIX YEARS AGO: A Special Birthday Dinner

SEVEN YEARS AGO: Duck Confit for a Special Occasion

EIGHT YEARS AGO: Tuscan Grilled Chicken and Sausage Skewers

NINE YEARS AGO: Celebrate Wednesday with Pork Tenderloin & Apples

TEN YEARS AGO: Salmon Wellington

ELEVEN YEARS AGO: The Green Chip Alternative

TWELVE YEARS AGO: Weekend Pita Project

THIRTEEN YEARS AGO: Let it snow, let it snow, eggs in snow