
And this virtual spot is now officially a teenager! Thirteen years. One thousand, five hundred and forty-six posts published. Over twenty-nine thousand comments. But how do we measure all the joy I get from keeping this site alive? Impossible. For thirteen years I’ve been doing it with the exact same enthusiasm of the first week. I don’t think I could keep at it, if I was not fully in love with the whole process. To celebrate, I share a little entremet with mirror glaze, the kind of bake I adore, but with the limitations of the pandemics I’ve been unable to do. Since it was just the two of us, I went with individual portions, very small cakes with a combination of cherry, pistachio, and mascarpone. Plus the mandatory bling!

CHERRY AND PISTACHIO MINI-ENTREMET CAKE
(from the Bewitching Kitchen)
for the cherry-pistachio centers:
20 g egg yolk
8 g caster sugar
3 g cornstarch
20 g milk
60 g whipping cream
10 g pistachio paste
4 Amarena cherries in syrup
Heat the oven to 200F (yes, very low temperature). In a small bowl, whisk the egg yolk with the sugar and cornstarch. Put the milk, cream and pistachio paste in a saucepan and heat while whisking. As soon as it boils, pour it over the egg yolk mixture and whisk. Put one cherry in each of 4 holes of a small half-sphere mould (about 1 inch in diameter). Pour over the pistachio mixture. Bake for 30 minutes, or until the center is almost fully set. Cool to room temperature, then freeze for several hours to overnight, to be able to un-mold them.
for the sponge:
70 g icing sugar
70 g almond meal
100 g egg
10 g all-purpose flour
10 g pistachio paste
70g egg white
10g granulated sugar
melted white chocolate for brushing cake circles
Heat the oven to 375F. Using a KitchenAid mixer, whip together the icing sugar, almond meal and the eggs. The mixture should double in volume, so whip it for at least 8 minutes. Reserve.
Make a meringue, gently beating the egg white until soft peaks form. Increase the speed of the mixer and add the sugar, a little bit at a time. Beat until firm peaks form. Fold one-third of the meringue into the whipped egg mixture, followed by the flour. When the mixture is smooth, gently fold in the remaining meringue. Spread the mixture on a half-sheet pan covered with parchment paper, and smooth the surface with an off-set spatula. Bake for about 10 minutes, until dry to the touch. Dust a sheet of baking paper with a little powdered sugar and invert the baked sponge over it. Peel off the parchment paper that it baked on. Using two cookie cutters, cut out 4 discs that will fit inside the mold that will hold the dessert, and 4 discs that will fit inside the little mold used for the cherry inserts. Melt the white chocolate and apply a very thin coat over one side of the larger piece of sponge. Reserve.
for the mascarpone mousse:
6 g Platinum gelatin (3 sheets)
80 ml whipping cream
55 g egg yolks
80 g granulated sugar
160 g mascarpone cheese
1/4 tsp vanilla paste
320 g heavy cream
Bloom the gelatin in cold water for 10 minutes. Combine egg yolks with sugar, whisking well and set aside. In a saucepan, heat 80 ml of cream until it boils. Remove from heat, and slowly pour a bit of the hot liquid into the egg yolk mixture, to temper it gently. Add the rest of the cream and transfer all the mixture to a saucepan.
Over low heat, cook until 180 F stirring constantly. Remove from heat, drain the gelatin, and add to the mixture, stirring until completely dissolved. Let the mixture cool down to around 140 F. Add the mascarpone cheese, mix until the cheese is incorporated. Process with a hand mixer, to emulsify. Add the vanilla paste, and let it cool to around 95 F. Meanwhile, whip the 320 ml of cream to soft peaks. Incorporate the cream gradually to the mascarpone mixture.
ASSEMBLE THE DESSERTS. Place a small amount of mascarpone mousse inside each of 4 cavities of a semi-sphere silicone mold (3 to 3.2 inches in diameter). Drop the cherry insert inside. Place the small circle of sponge on top. Cover the cavity with mousse, leaving a little space on the top, so you can place the larger circle of sponge on top, with the chocolate painted side facing up. Smooth the surface, adding a little more mousse if needed. Freeze overnight, or for a minimum of 6 hours.
for mirror glaze:
3 sheets Platinum grade sheet gelatin
120ml water
150 g liquid glucose
150 g granulated or caster sugar
1 tsp agar-agar
100 g condensed milk
150 g white chocolate, chopped fairly small
½ tsp titanium oxide (optional, but advisable)
red and purple gel food coloring
Prism powder to sprinkle in the end (optional,I used Tourmaline Pink)
Put the water, sugar, liquid glucose and agar-agar in a small pan and bring to simmering point, stirring occasionally to dissolve the sugar. Remove from the heat and let it stand for about 5 minutes. This is the base syrup for the glaze. Meanwhile, soak the gelatin in some cold water for about 5 minutes. Squeeze out the excess water and stir into the hot water, sugar and liquid glucose mixture to dissolve. Stir in the condensed milk and the titanium oxide.
Put the chocolate in a medium bowl and pour this hot mixture slowly over the chocolate, stirring gently to melt it, avoid making bubbles. Add the red food gel dye. A stick immersion blender works great, but you must keep the blades fully submerged at all times. If bubbles are present, pass the mixture through a fine sieve.
The ideal temperature to glaze is 92 to 94 F. Un-mold the cakes, immediately pour the mirror glaze over the frozen surface. Sprinkle with Prism powder or golden luster powder. Cake should sit in the fridge for a couple of hours before serving.
ENJOY!
to print the recipe, click here

Comments: I love making entremet cakes. They seem complicated but the nature of these cakes pretty much forces you to do everything in steps, over a period of a couple of days. No rushing is advisable, not even feasible. Just take your time and enjoy the ride. This version calls for a baked center. That part of the recipe came from a great cookbook, Patisserie at Home, from Melanie Dupuis. Once that is made (and it can sit in the freezer until you are ready to proceed with the recipe), it is all very straightforward. A sponge bake, some assembling, freezing everything and then my favorite step, mirror glazing!

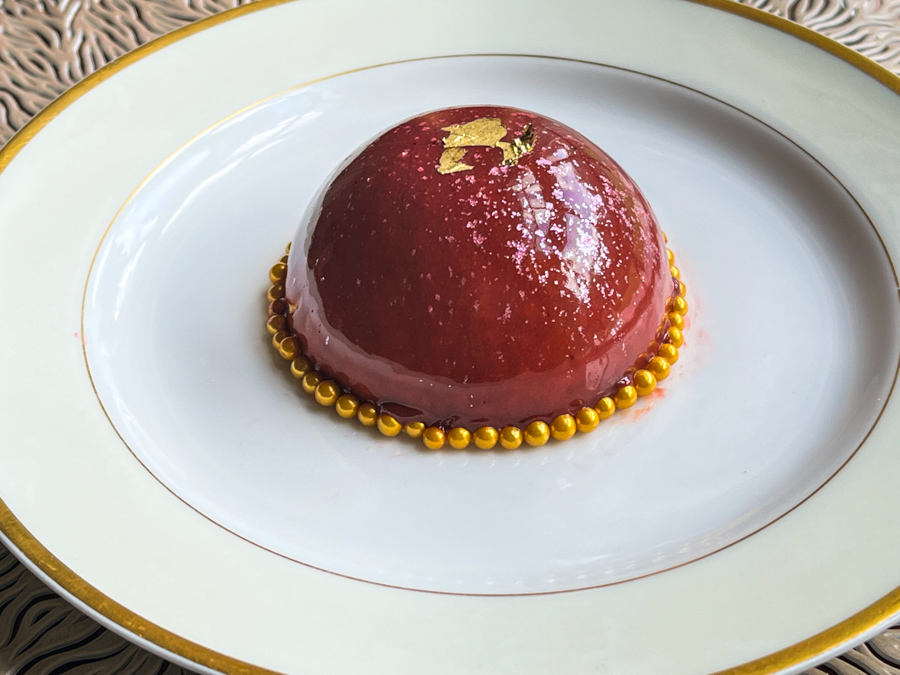
I used two different ways to present the mini-cakes. In the first version the cake was placed on a small plate and little chocolate covered candy added around the base. A little gold leaf for a final touch on top.
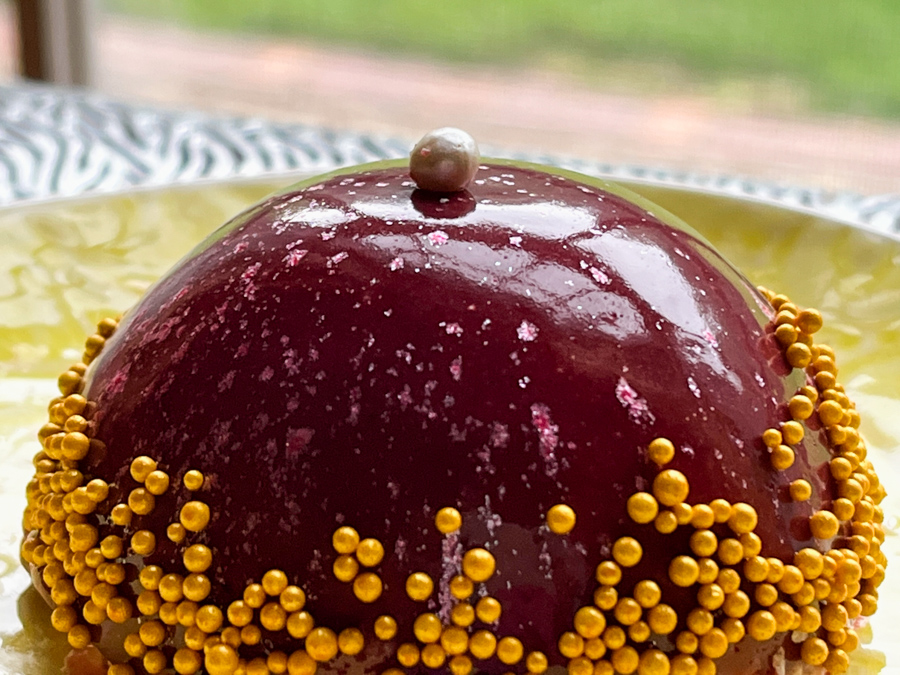
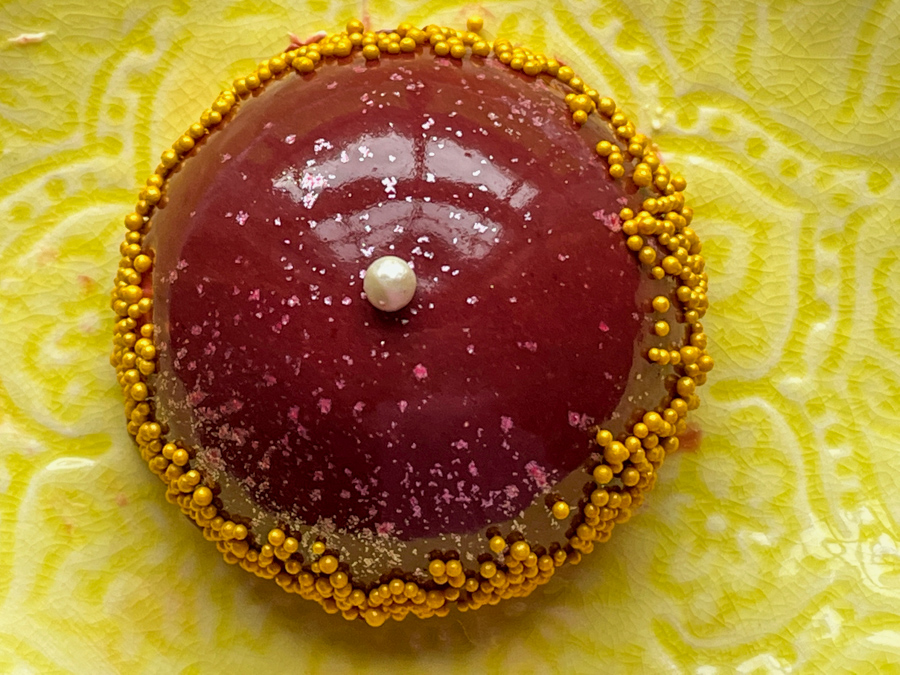
The second version was a little less time-consuming, I just carefully added golden non-pareils around the edge, in a random pattern, and a little white pearl on top.
I imagine you are curious to see the cake cut… So here it is, the different components of this very tasty dessert…
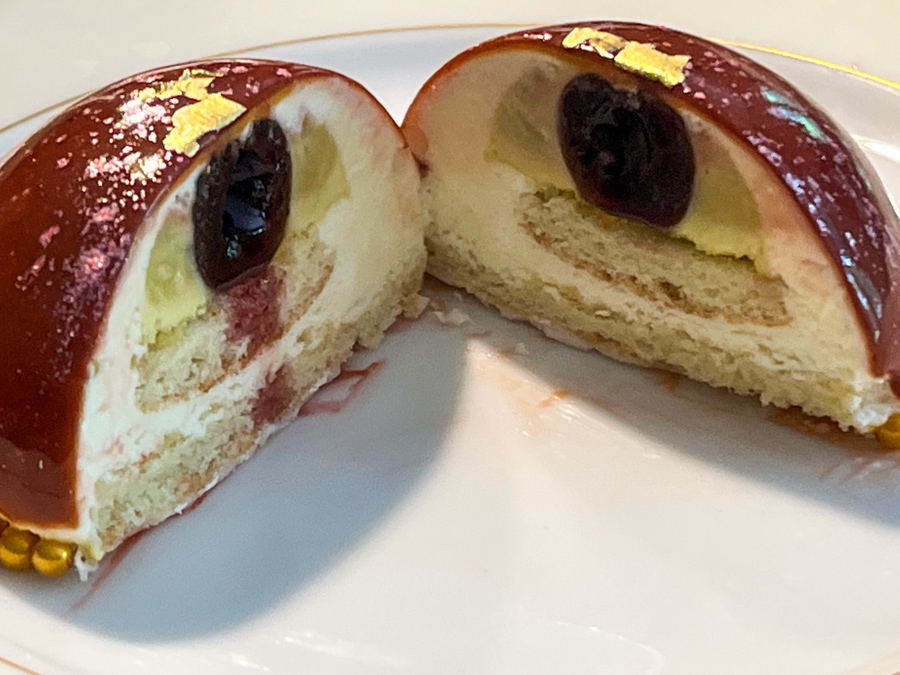
I must say that of all the entremets I’ve made, this ranks very high in the deliciousness level. The cherry, when cooked to make the center, gets a very nice texture and the taste seems concentrated. Lovely. If you make mirror glazes, I want to point out that I add a touch of agar-agar to my recipe. That makes the layer cut more nicely, without slipping, as it is common with gelatin-only formulas. There is no change in taste.
Without further ado, I invite you to step with me
into the 14th year of my blogging adventure!
ONE YEAR AGO: The Bewitching Kitchen Turns 12!
TWO YEARS AGO: The Bewitching Kitchen turns 11!
THREE YEARS AGO: The Bewitching Kitchen Turns 10, and a Giveaway…
FOUR YEAR AGO: The Bewitching Kitchen turns 9!
FIVE YEAR AGO: The Bewitching Kitchen turns eight!
SIX YEARS AGO: The Bewitching Kitchen Turns Seven!
SEVEN YEARS AGO: Bewitching Kitchen Turns Six!
EIGHT YEARS AGO: The Bewitching Kitchen turns Five!
NINE YEARS AGO: The Bewitching Kitchen turns Four!
TEN YEARS AGO: The Bewitching Kitchen Turns Three!
ELEVEN YEARS AGO: The Bewitching Kitchen turns Two!
TWELVE YEARS AGO: Bewitching Birthday!
THIRTEEN YEARS AGO: Welcome to my blog!
