THE POWER OF CHEMISTRY: RED BEET SOURDOUGH

I will start by blowing your mind. Below, same exact recipe for sourdough bread, with or without vitamin C added to the formula.

For the past year I’ve been playing with adding beets to bread, both using beet powder and roasted beets, but my experiments failed in the color department. Everything tasted pretty good, but the beautiful red color of beets was consistently lost during baking. I had resigned myself to brownish breads until I remembered using vitamin C to preserve the color of basil for freezing. Works like magic. Sorry, it is actually pure science. Vitamin C is a powerful anti-oxidant, and the browning reaction is simply oxidation of compounds during storage or cooking.  I searched Google University and found out that others had already figured it all out and many bakers use vitamin C in their beet-containing breads.

RED BEET SOURDOUGH
(from the Bewitching Kitchen)

Comments: I was absolutely shocked by the results! You might think that the same outcome could be achieved by using some lemon or orange juice, as those fruits are loaded with vitamin C. It turns out that a whole lemon has about 20mg of vitamin C, so clearly not enough to do the job. I used purified ascorbic acid, borrowed from our lab, but I know home bakers use vitamin C tablets, usually each one contains 500 mg, so one or two tablets will be what you need. I intend to use that in the future and report back.
.

.
Same bread without vitamin C, nothing wrong with it, except that the beautiful red color is lost during baking. Even though, as you see in the composite below, until you put the bread in the oven, all seems totally fine.
.

.
I hope you consider playing with vitamin C if you had issues with your bakes using beets.  It would be interesting to add it to other things that involve color, be it spinach or butterfly pea flower.
.

And let me tell you, Red Beet Sourdough makes amazing croutons!
.

.

.


FITNESS POST: THE POWER OF SHORT EXERCISE VIDEOS


It’s been a very long time since I did one of my fitness-related posts. If you are interested in my previous reviews, you can jump here for a review of all Tony Horton’s P90X systems (link leads to the last one, but from there you can go back to the P90X2 and the first, original which is still a favorite of mine). You can jump here for a review of Focus_T25 and here for Jessica Smith.  The common denominator of all those systems is that they involve at least 30 minutes, some are quite a bit longer (P90X yoga will require 90 minutes to of your time).

For the most part these days, my exercises involve Jessica Smith and P90X (either several of my favorite videos from the original series (Kenpo, Plyometrics, Shoulders and Arms, Legs and Back, Ab-Ripper), or a few from P90X3 like Incinerator and The Challenge).

However, I find myself doing quite a bit of short videos available for free on youtube. They are great to add on a day in which I already went on the treadmill for a while, or walked our 3.5 mile route with the pups. Here are my favorites and why I like them.

MADONNA’s ARMS
This 10-min routine is perfect to tone the arms. It is amazing what you can do with just 2 sets of dumbbells, a 5 pound and a 3 pound. It is all based on fast repetitions with no rest. By the end of it, you know you challenged your biceps and triceps.

TANK TOP ARMS
Another 10-min routine by the same trainer. I must tell that my friend Elaine (sourdough bread baker extraordinaire) also does this one as well as many others (we are fitness buddies 6 thousand miles apart). We joke that this is the “Okaaaaaay” exercise. You will have to watch it to understand. Anyway, if you do this one right after the Madonna’s Arms you won’t need to exercise your upper body for another week. I promise you.

8-MINUTE TONING ARMS
This is a very interesting routine, only 8 minutes long. You use NO weights whatsoever but your arms will be moving non-stop and it is surprisingly challenging. And a lot of fun.

JESSICA’S SMITH 12-MINUTE ARM WORKOUT
If you are familiar with Jessica’s workouts, this is a typical short-video that is not going to kill you or even leave you too sore, but will do the job. Jessica has countless exercises for free in her youtube channel, you can search by time, body part, or level of difficulty. I highly recommend her videos.

10-MIN STANDING ABS
I am very fond of standing ab routines (although in my opinion nothing beats the original P90X Ab-Ripper), and this is a very good example of how to target your abdominal region in a short time. It requires a bit of flexibility in the hip region and could be a problem if you have issues with your lower back. But totally doable.

10-MIN ABDOMINALS
A more classic approach with exercises performed on the floor. Nice and not too challenging.

10-MIN BIKINI-READY WORKOUT
I really like this one a lot. I starts with planks in a few different ways, which sets me in the right mood for ab-exercises. I love doing planks because they are surprisingly efficient and all you have to do is hold your body in a certain position.

10-MIN FULL BODY WORKOUT
This is a very nice, short and sweet routine. It covers pretty much the whole body, and it is not too challenging.

10-MIN LEGS EXERCISE
This one targets mostly the legs, again not too challenging, but gets the job done.

I hope you will find these links useful. There is a whole universe of videos out there, for free. You can definitely find instructors that motivate you and exercises that target a particular type of exercise you need. I did not include yoga or flexibility-geared videos because I use exclusively Jessica Smith systems as well as P90X yoga for that. But you can easily find them searching youtube.


THE QUASI-VEGAN QUICHE

As you know, we are members of the Omnivores Without Guilt Club, but what you probably don’t know is that I own many cookbooks on Vegan cooking. I like the concept and the challenge of preparing food that tastes great but is more limited in the ingredients used.  I had very good intentions to make a fully vegan quiche for our dinner, but ended up adding 1 egg to the filling. Oh, well. It turned out very good, and even the resident critic, who considers tofu to be penitence, loved it!

ALMOST VEGAN TOFU QUICHE
(inspired by The Minimalist Baker)

1 rectangular pie pan, 8 x 11 in

for the olive oil crust:
for the pie crust:
250g all-purpose flour (260 grams)
1/8 teaspoon salt
50g olive oil (50 grams)
125 g cold water

for the filling:
12.3 ounces extra-firm silken tofu (patted dry)
2 Tbsp nutritional yeast
3 Tbsp hummus
Sea salt and black pepper (to taste)
1 egg
2 medium zucchini (thinly sliced)
1 Tbs olive oil medium diced onion per 2 leeks)
3/4 cup cherry tomatoes (halved)
1 stalk asparagus
Herbes the Provence (as much as you like)

Make the crust. Whisk together the flour and salt in a large bowl, then add the olive oil, stir with a fork until the flour gets coated with it, forming a crumbly ness. Slowly add cold water and knead gently just until the dough starts to comes together.  Wrap the dough in plastic and refrigerate one hour before using.

Roll it over plastic wrap lightly coated with flour, then use it to cover a rectangular pie pan (8 x 11 in) with removable bottom (or a 9-inch round quiche pan). Reserve in the fridge until you have the filling ready to bake. No need to blind-bake.

Make the filling. Roast slices of zucchini coated with olive oil and seasoned with salt and pepper for about 15 min in a 420F oven. Reserve. Add drained tofu to a food processor with nutritional yeast, hummus, egg, and a heaping 1/4 tsp each sea salt and black pepper. Process until fully smooth.

Spread the zucchini slices in the bottom of the pie crust. Spread the hummus mixture, gently spreading it over it with a small offset spatula. Distribute the cherry tomatoes over the filling, then the asparagus (if they are too thick, sprinkle them with water and microwave for 60 seconds to soften ever so lightly).

Bake quiche at 375 degrees F total of 30–40 minutes or until the top appears golden brown and firm. If the crust begins to get too brown, loosely tent the edges with foil. Let cool for 10 minutes before slicing.

ENJOY!

to print the recipe, click here

Comments: If you remember my previous post on a pie using olive oil crust, you will notice that I blind-baked it at that time. Now I tried without this step, and was quite pleased with the result. Omitting the blind baking makes this dish even easier to bring to the table. You can roll the crust hours earlier, or even a day before and keep it in the fridge, protected with plastic wrap.

I promise you, there is no “tofu-taste” in the filling. Until I added the egg, it seemed a bit too coarse and grainy, but the egg smoothed things out and I guess made it all a bit lighter during baking. If you want to make it fully vegan, just omit the egg. One interesting idea to lighten it up but keep it vegan could  be folding into the tofu mixture some whipped aquafaba. Hummmm… something to try. Leftovers were delicious on day 2 and day 3. After that? After that they were gone.

ONE YEAR AGO: Not Quite Moqueca

TWO YEARS AGO: Roasted Butternut Squash with Cashew Nuts

THREE YEARS AGO: Mississippi Roast and the Open Mind

FOUR YEARS AGO: Walnut-Raisin Bran Muffins

FIVE YEARS AGO: A Star is Born!

SIX YEARS AGO: Chestnut Flour Sourdough Bread

SEVEN YEARS AGO: Kinpira Gobo and Japanese Home Cooking

EIGHT YEARS AGO: Walnut Sourdough

NINE YEARS AGO: Thai Chicken Curry

TEN YEARS AGO: Zen and the art of risotto

HAPPY SWIRLS TONKA MACARONS

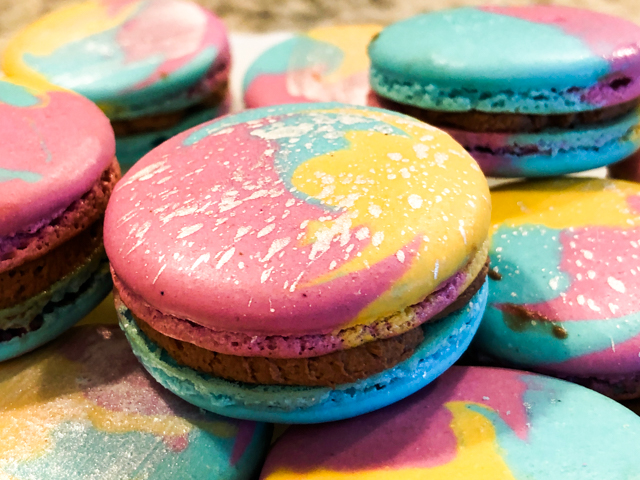
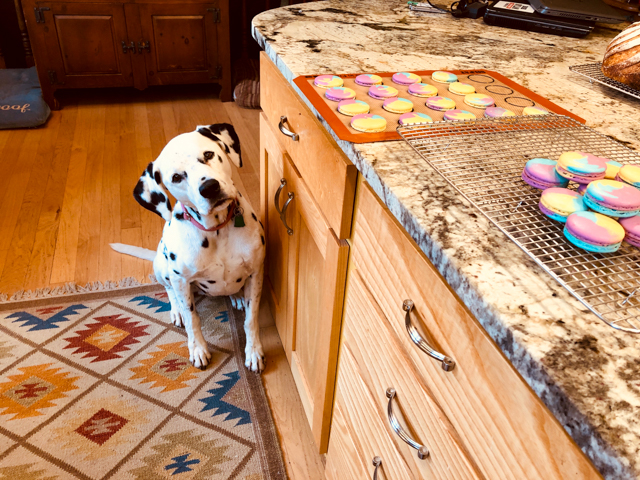
Remember when I shared the video that was going to be used for a bake-along in the Great British Bake Off Fan page? Well, that happened this past weekend. I did not know exactly what to expect, but I can tell you this was one of the most rewarding experiences ever for me!  Many, many bakers took the challenge of baking French macarons, most doing it for the first time, and I kept following their pictures and questions as they did it. I know macarons are finicky, I have bakes that turn into epic disasters, but everybody seemed to have fun and made some pretty awesome-looking macs! Of course, seeing so  many macarons popping on my screen, made me itchy to bake some. I wanted them to be colorful, fun, with a happy aura, because happy is how I still feel about the bake-along. Thank you to all who participated, thank you Caroline and Christine for making it happen… I am still in awe.

HAPPY SWIRLS TONKA MACARONS
(from the Bewitching Kitchen)

For the shells:
200g  Icing/powdered sugar (1 ⅔ cups)
115 g Ground Almonds/Almond Meal (1 + scant ¼ cup)
115 g egg whites at room temperature (approx. 4 eggs)
1/8 tsp of cream of tartar (optional)
100 g granulated sugar (½ cup)
¼ tsp vanilla paste or extract
pink, blue, and yellow gel food color

Line 3 heavy baking sheets with parchment/baking paper or Silpat mats. Layer the powdered/icing sugar and ground almonds/almond meal  in a food processor. Pulse until the mixture looks like fine meal, about 12 pulses. Pass through a sieve and transfer to a small bowl or to a sheet of parchment/baking paper. Set aside.

Place the egg whites and cream of tartar in the bowl of a stand mixer fitted with the whisk attachment. Make sure that the bowl and the whisk are impeccably clean. Starting on medium speed, whip the whites with the cream of tartar until they look like light foam. The whites should not appear liquid. The foam will be light and should not have any structure.

Slowly rain in the granulated sugar in five additions, trying to aim the stream between the whisk and the side of the bowl. Turn the speed up to high. Continue to whip the meringue until it is soft and shiny. It should look like marshmallow creme (marshmallow fluff). Add the vanilla. Whip the egg whites until the mixture begins to dull and the lines of the whisk are visible on the surface of the meringue. Check the peak. It should be firm. Transfer the whites to a medium bowl.

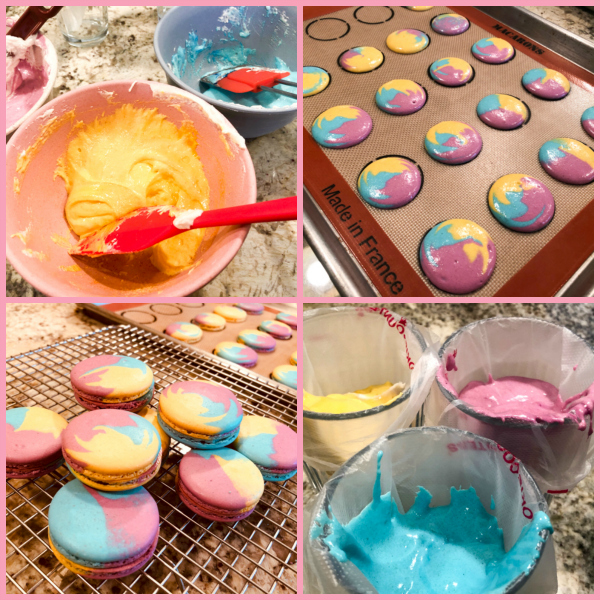
Fold in the ground almond/almond meal mixture in two increments. Paint the mixture halfway up the side of the bowl, using the flat side of a spatula. When the mixture is starting to get incorporated but still looks a bit rough, divide in three equal amounts in small bowls (eyeballing is fine). Add color to each bowl and proceed to finalize the macaronage with the color mixed in. With such a small portion, they get to the smooth stage quickly, so be careful, the moment you can do a figure 8 as you pour the batter from the spatula, stop folding it.

Put the mixtures in three different small piping bags.  Prepare a large piping bag with a large round piping tip (WILTON 1A) and place the three smaller bags inside after cutting them open.   Pipe shells, I like to count numbers in my head and use the same count for each shell so they end up similar in size.

I pipe inside the circles to about 1 ¾ inches/4.5cm but you can go to 1 ½ inches (3.8cm) & the macarons will spread & fill the circle while drying.

Slam each sheet hard four to six times on the counter/worktop. Let the unbaked macarons dry until they look dull but not overly dry. Drying time depends on humidity. In a dry climate, the macarons can dry in 15 to 20 minutes; in a humid climate, it can take 35 to 40 minutes.

While the macarons are drying, heat the oven to 300 F (150 C/130C Fan oven/Gas Mark 2). Bake one sheet at a time on the middle rack. Check in 11 minutes. If the tops slide or move (independently of the ‘feet’ when you gently twist the top), then bake for 2 to 3 more minutes. Check one or two. If they move when gently touched, put them back in the oven for 1 to 2 more minutes until they don’t move when touched.   Let the macaroons cool for 10 minutes before removing from the pan.  The macarons should release without sticking.

Assemble the macarons: find two macarons similar in size and add a good amount of filling to the bottom of one of them. Place the other on top and squeeze gently to take the filling all the way to the edge.  Store in the fridge for 24 hours for perfect texture.

for the filling: use the tonka bean whipped ganache as described in this post.

ENJOY!

to print the recipe, click here

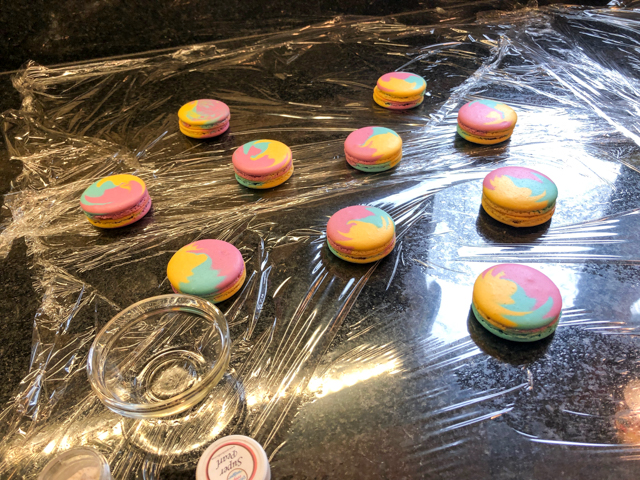
Comments: I am still debating whether I like the additional decoration of the silver “splash.”  Sometimes less is more, right? But I wanted to take them into the “galaxy environment.  Basically you mix pearl dust powder with alcohol, and use a brush or a toothbrush to flicker little spots on the shells, after they are cold. Keep in mind that it is going to be messy, so I advise you cover your working surface with some plastic wrap and then space the shells a bit to work on each one independently.

I think that the splashing effect is better with a solid color or maybe with two colors only.  Still, it was fun to do it.  The tonka bean ganache was hanging around in the fridge since my last adventure with it (remember the bonbons?) so I just used it all up for this little project.


One more thing to keep in mind if you mix three colors. In my tutorial video I tell you to keep the piping bag vertical and just pipe the shells without moving it. Well, if you want to get a more swirled effect with the colors, you should VERY GENTLY make a circular movement with the tip as you pipe. Be gentle, it is a very subtle movement.  You can do that for some shells, pipe vertically for others, pretty soon you’ll realize how to get the effect you like.

Macarons are just so much fun! Everybody agrees….

If you did the bake-along and for some reason your macs did not turn out the way you wanted, don’t be discouraged. They are finicky creatures and often small details can make them fail. Just try to do another batch as soon as possible, while you have all the boo-boos fresh in your mind. Send me an email if you need help at sallybr2008 at gmail dot com.

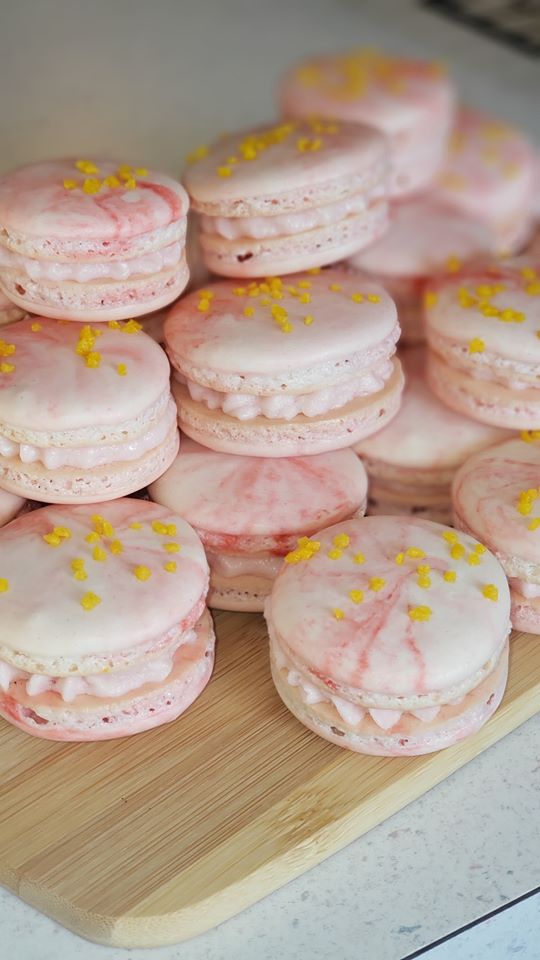
Before I leave you, I would like to share a photo of macarons made by Amanda, who participated of the bake-along. The reason I picked her photo when there were so many wonderful ones made in the group?  She failed at her first attempt, they did not turn out good. She went back next day, after going over the video and the recipe again, and made these babies, that would make Pierre Herme’ proud.


They are delicate, perfectly shaped, elegant, with perfectly piped filling.  I swear she made me do a Super Extended Version of the Very Happy Dance.

Again, thank you to all who participated, I had no idea it would be so exciting to be the hostess of a bake-along.  I might have to come up with another tutorial at some point. Just let me make one thing clear. Gingerbread sculptures are OUT of the question!

ONE YEAR AGO: Chocolate Tartlets with Honey-Caramel Filling

TWO YEAR AGO: Zucchini Soup with Tahini

THREE YEARS AGO: Black Sesame Macarons

FOUR YEARS AGO: Fine Tuning Thomas Keller

FIVE YEARS AGO: Cauliflower Tortillas

SIX YEARS AGO: Majestic Sedona, Take Two

SEVEN YEARS AGO: Secret Ingredient Turkey Meatballs

EIGHT YEARS AGO: Swedish Meatballs and Egg Noodles

NINE YEARS AGO: Italian Easter Pie

TEN YEARS AGO: Black Olive Bialy

366 DAYS

Today it’s been one full year since a bright star left us. I’ve lived long enough to witness plenty of unfairness in life, plenty of horrible things happening to wonderful people. But your story was particularly sad and tough and difficult to witness. Little things pop up in my mind. The way you moved your head to get that incredibly beautiful hair out of the way as you worked on your bench right there by mine. You walking around the lab with headphones singing (probably a bit louder than you imagined) those beautiful songs you were soon going to perform on stage. Your laughter that involved your whole body. Not very many people laugh like that. I think about you a lot, and I think about your Mom and Dad a lot too. I am not sure how a parent survives the loss of a child. I hope they find some comfort in knowing you’ve touched the lives of many.

Dr. Aritri Majumdar, December 2018

(comments are shutdown for this post)