CHOCOLATE CHIP COOKIES FROM NATURALLY SWEET

Does the universe need another recipe for Chocolate Chip Cookies?  

Let me think about that for a second….

The answer is obviously YES!

A few months ago I ordered the book Naturally Sweet from America’s Test Kitchen. “Bake all your classics with 30 to 50% less sugar.”  I do trust them to develop recipes that do not lack in taste. They definitely test all variables tirelessly, and I’ve never had a bad outcome. Yes, sometimes every single pot and pan in the kitchen gets dirty, but… if you don’t mind doing dishes – I definitely do not – it’s not that big a deal.   My first adventure with the book, a real American classic: chocolate chip cookies. And no, you won’t dirty a ton of dishes. Surprisingly enough, it is a one-bowl adventure.


OVERVIEW OF THE RECIPE

Butter is creamed with sucanat, a type of sugar that I mentioned recently in my In My Kitchen post. As you open the bag, the smell is enough to make you dream. Think brown sugar with benefits. The texture is different from any other sugar I’ve played with. Coarse, a bit harsh-looking. It will not cream the same way white or brown sugar will, it offers a bit more resistance to the blade of the mixer. Do not worry about it, just keep beating for 3 minutes or so.

One egg and one egg yolk are added, then the other regular suspects, flour, leavening agents, vanilla, and finally Ghirardelli 60% cocoa in pieces, not too small, you need to go for those assertive pieces as you bite into these babies.

America’s Test Kitchen is quite reluctant to give permission to share recipes online, and I gave up on that waiting game.  If you don’t have the book, the recipe is available online here.  By the way, Sally’s site is a must-visit, and her cookbooks great too.


Comments: I really like these cookies. Phil defined them pretty well:

They have this texture that at first you think it’s crunchy, then you think it’s chewy,
and then you realize it’s in a perfect spot in between…

Got it?  Well, I think the cookies will please both camps, although I am partial to the Chewy Cheerleading Team. The sucanat gives a very nice sweetness, reminding me of some cookies that call for brown butter to be incorporated in the dough. That type of added complexity.  It makes about 16 cookies (I actually managed to get 17).  I don’t think it’s a good idea to try and make them smaller, they will have the perfect texture baked exactly as ATK suggests. Indeed, those guys test their formulas. Extensively. And we all profit from their work. I took them to the department and was considering grabbing one mid-morning, but found the empty platter staring at me. It was 9:48am. That is the sign of a good batch of cookies.

ONE YEAR AGO: Little Bites of Paradise

TWO YEARS AGO: Maple-Glazed Pumpkin Bread

THREE YEARS AGO: In My Kitchen, October 2014

FOUR YEARS AGO: Grilled Steelhead Trout

FIVE YEARS AGO: Brown Butter Tomato Salad

SIX YEARS AGO:  Spelt and Cornmeal Rolls

SEVEN YEARS AGO: Roasted Potato and Olive Focaccia

EIGHT YEARS AGO: Multigrain Bread Extraordinaire

SaveSave

SaveSave

SaveSave

SaveSave

IN MY KITCHEN: OCTOBER 2017

Bogey Art, courtesy of our dear friend Denise, from UK

Time to invite my readers for another virtual tour of our kitchen, a tour that usually takes place every three months, so there’s a lot to talk about.  As I mentioned many times, credit should go to Celia who started the IMK series many years ago, and to Sherry from Sherry’s Pickings, who is hosting the event now. Stop by her site to say hello.

Starting with gifts…

From a former graduate student, Lorne

Straight from New Zealand, a honey infused with kiwi. Spectacular… Not sure how he was able to find it, but I’m sure glad he got a bottle for us

From a colleague in our department….

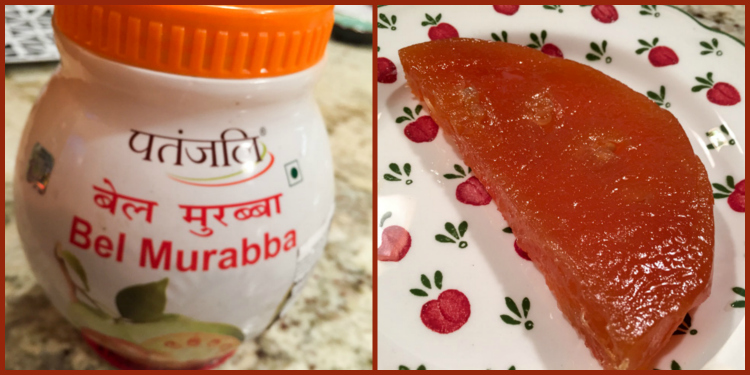
Bel Murabba, something I had never even heard about. You can learn more about it here. This one is a type of apple that is used exclusively in this type of preserve in India. It is stored in a heavy syrup, you simply rinse it well and enjoy a slice of the fruit. Apparently it is great for improving digestion.  It reminded me of a Brazilian delicacy called ‘goiabada” which is made from guava fruit.

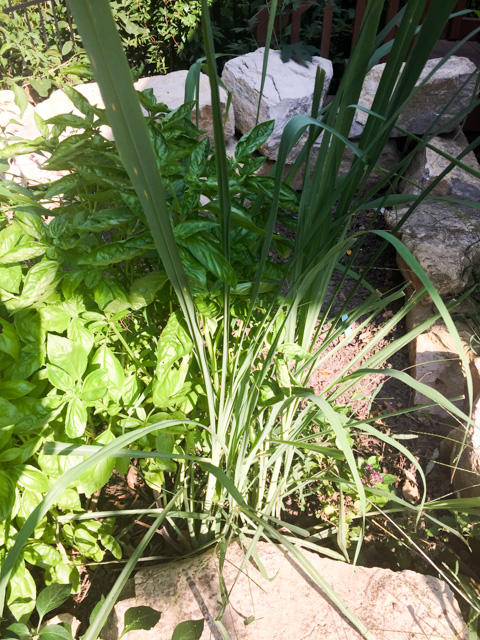
From our friend Cindy…

A lemongrass plant she brought when she visited us a few months ago. Phil took good care of it, and it really exploded into a huge, healthy plant in our backyard, living in perfect harmony with our basil and a few Serrano pepper plants. I feel incredibly virtuous when a recipe calling for fresh lemongrass has me walking outside with a pair of scissors. Thank you, Cindy, for making it possible.

From one of our graduate students…

The best caviar I ever tasted. The best. You know how caviar can taste fishy sometimes? I don’t “do” fishy very well. Well, this one is the smoothest, most amazing, creamy, luscious, delicious caviar ever. Cannot thank him (and his parents who actually brought it) enough.

From Phil…

Four little vintage plates he found at an antique store in Norman, Oklahoma, during a visit last July. I love them!

Moving on to regular items…

In our kitchen…

Small vintage Pyrex dishes I bought at the same antique store. They have a full room devoted to those, I wanted to grab a lot more pieces, but storage is a problem, so I settled for these.  Adorable…

In our kitchen…

Sucanat, a sweetener derived from cane sugar with a bit of molasses taste to it, but not exactly like brown sugar. It is similar to jaggery and rapadura (the Brazilian homolog of piloncillo). America’s Test Kitchen great book “Naturally Sweet” uses sucanat in plenty of their recipes. A fun ingredient to play with.

In our kitchen…

Humongous caper berries. They are not very easy to find, so when I saw them for sale at Marshalls I pounced on the bottle like Buck on a snake.
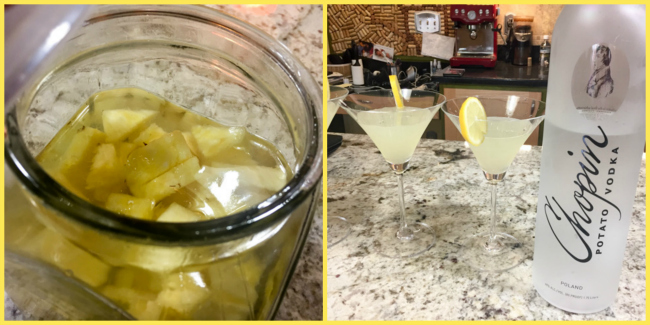
In our kitchen…

Pineapple-infused vodka. We saw this concoction on a cookbook and Phil was intrigued. Basically you cut up a pineapple, add vodka to cover, keep in the fridge for 2 weeks. Drain the vodka, discard the pineapple pieces. The now pineapple-infused vodka can be used to make pineapple-tinis or any other drink your imagination comes up with.

In our kitchen…

Makoto Japanese Ginger Carrot dressing.  I don’t normally go for bottled salad dressing, but my friend Tracy recommended it. It is very tasty! Not too sweet, in fact in terms of carbs this dressing is quite moderate:   Excellent on cole-slaw, spinach salads, or squirted with abandon over turkey burgers.
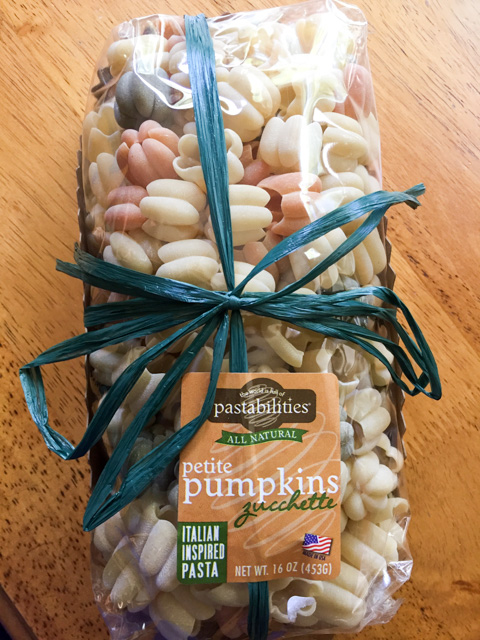
In our kitchen…

That time of the year. Pumpkin time. How could I resist this bag of pasta? No need to answer that. I could not. I did not.
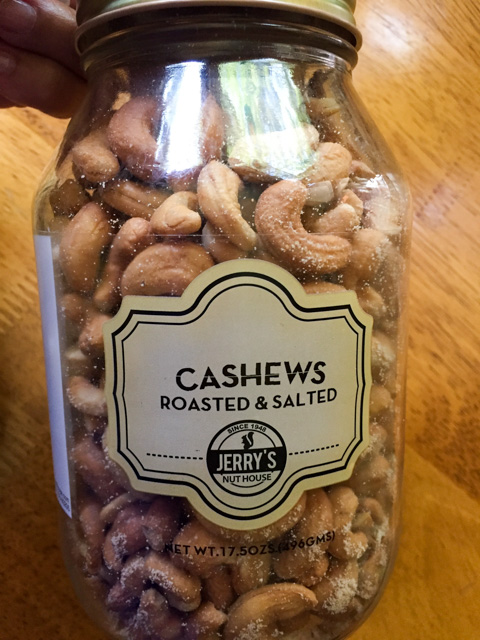
 

In our kitchen…

Another Marshalls gem. A huge bottle of fantastic roasted cashews. When I am hungry while making dinner, a few of those do a great job tidying me over until the meal is finally ready to be devoured.  Phil will often have a Wasa-cracker smeared with peanut butter and some of those cashews on top for lunch. Very delicious.

In our kitchen…

Fresh basil from our backyard, almost at the point of harvest before the first frost (these two simple words are like a couple of sharp swords stabbing my heart).

In our kitchen…

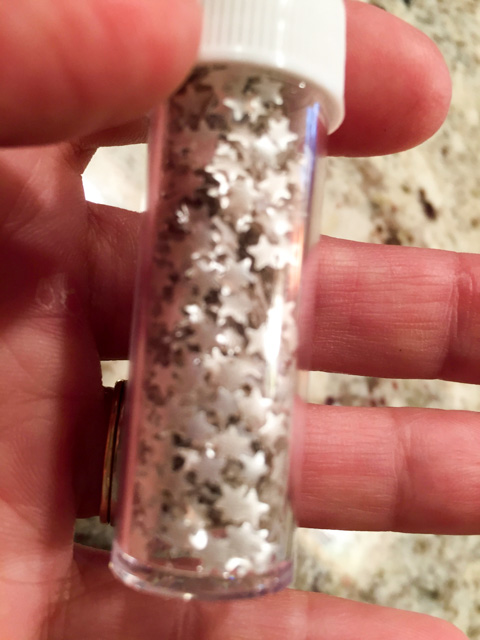
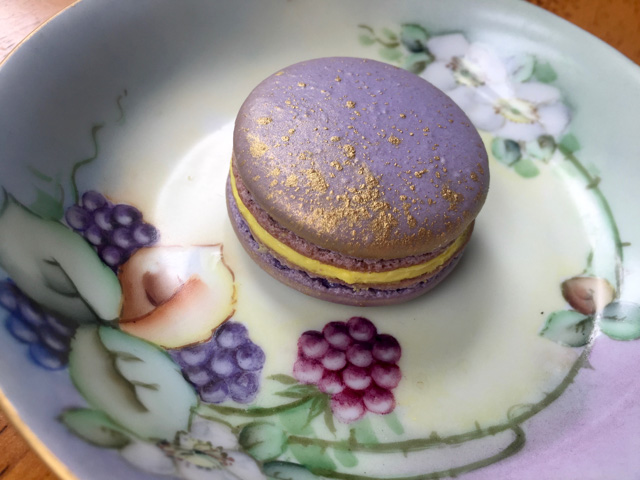
Star-shaped edible glitter… Because, macarons… (stay tuned)

In our kitchen…

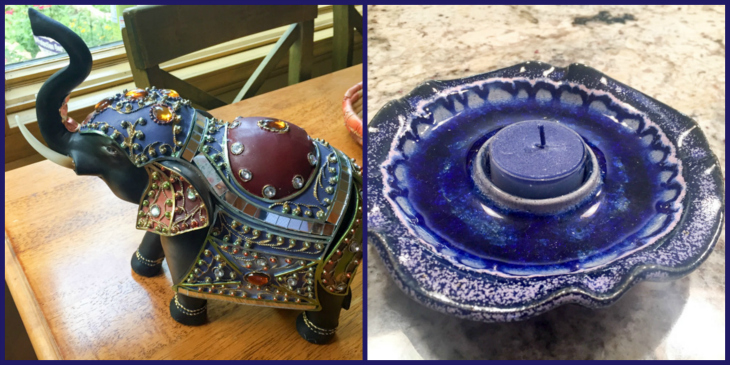
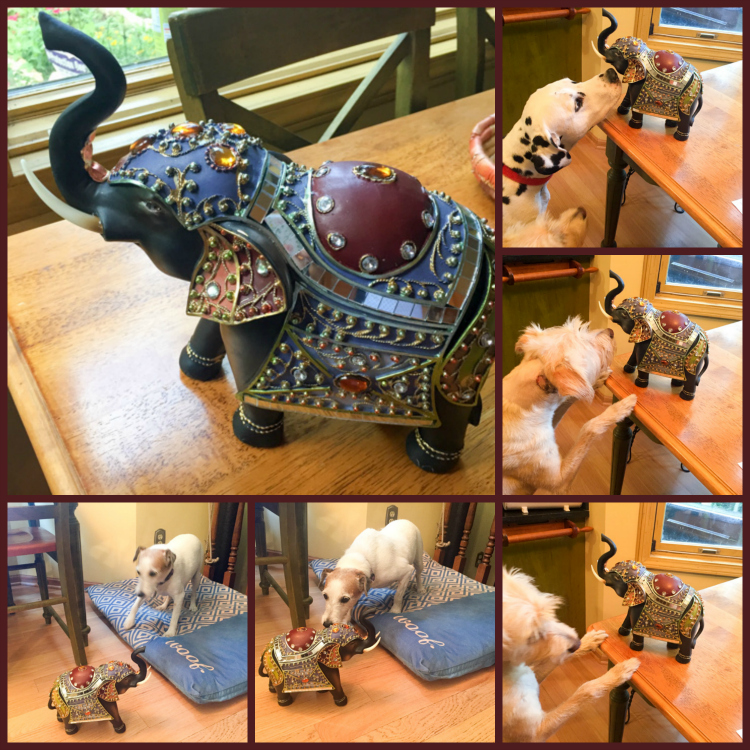
Two new decorative items… a cute (perhaps slightly kitschy) elephant, and a small candle holder I found at a store in Silverthorne, Colorado last month. The elephant had high hopes for a warm welcome to our pack, but sadly, it was not exactly the case (read on).

In our kitchen…

A little bit of public service, in the form of a picture (taken in the lab, actually) to show you how much sugar is present in ONE can of Coca-Cola. Thirty-nine grams. Nobody, absolutely nobody needs this amount of sugar in one sitting. Or two..  Or three… A full 20-ounce bottle packs 65 grams. Shocking, isn’t it? Now, back to our regular programming.  😉

In our kitchen…

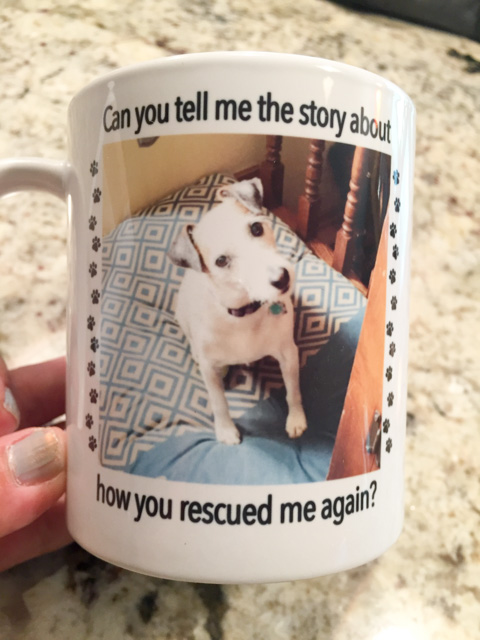
A mug that I ordered from gearbubble, with a favorite picture of Buck, my little Tim-Tam, my little munchkin…  Isn’t that adorable? It melts my heart every time I take a sip of my evening tea. And since I spoke of Buck….

 IT’S DOGGIE TIME!

For three months the pups patiently waited to say hello, but now, tails furiously wagging, here they are!

The morning routine changes very little in our home… Bogey’s food bowl is always full to the top, and not a molecule of nutrient is left behind when he is done, 2 and a half minutes later.

Oscar seems to find new objections to food items with every passing month…


But poor Oscar had some bad karma flowing his way…
He’d developed a small abscess on his neck that had to be drained.

Hi, friends… My name is Oscar For the Love of God Stop, and I am here all groggy from my torture at the vet. They said I will be ok, not sure I believe them.

Mom and Dad gave me lots of treats and petting… Maybe I should go back to the vet next week again?

Maybe Mom and Dad gave my brother a lot of attention, but Mom dressed to complement MY beautiful fur, not theirs! How about that for special attention?

Plus, Dad helps me stretch in the morning!  I don’t see him helping my two silly brothers.


Well, I can stretch on my own. What matters is, I am the one with the photo on the mug, and Mom told me she got this necklace made to match MY beautiful paws. So there!

I am just sexy. And I know it….


Seriously, Osky?  You must be kiddin’ me!

Mom brought a new friend home…  We are not quite sure what to make of him.
Something about his smell does not feel right to us. Any of us.


But into every life, a little rain must fall…

Yes, unfortunately we’ve had quite a few trips lately, and the pups had to endure some time in The Dark and Scary Place, as my friend Jill describes it. But they know that this is their forever home, and Mom and Dad never leave  for too long…

They all promised to be very well-behaved forever. Which, in dog time is a bit tricky to determine.
Should we trust them? 

Would we ever lie to our humans? What do you think?


Thank you, Sherry for hosting! I invite my readers to stop by Sherry’s Pickings to take virtual tours of many kitchens around the world!

ONE YEAR AGO: Little Bites of Paradise

TWO YEARS AGO: Coxinha de Galinha: A Brazilian Delicacy

THREE YEARS AGO: Prosciutto-Wrapped Shrimp Skewers

FOUR YEARS AGO: A Simple Dinner

FIVE YEARS AGO: Brown Butter Tomato Salad

SIX YEARS AGO:  Spelt and Cornmeal Rolls

SEVEN YEARS AGO: Roasted Potato and Olive Focaccia

EIGHT YEARS AGO: Multigrain Bread Extraordinaire

SaveSave

SaveSave

SaveSave

SaveSave

SaveSave

SaveSave

SaveSave

SaveSave

SaveSave

SaveSave

SaveSave

SaveSave

SaveSave

SaveSave

SaveSave

SaveSave

SaveSave

SaveSave

SaveSave

SaveSave

SaveSave

SaveSave

SaveSave

SaveSave

SaveSave

SaveSave

I SAY TOM KHA GAI, YOU SAY TOM KHA KAI

As you may have noticed, I have a soft spot for all things language. Frustration took place as I tried to figure out the correct spelling for the name of this delicious Thai soup. It is often tricky to go from a language such as Siamese  to something that would convey the correct pronunciation in English. After a lot of searching around, I found a video that made me even more puzzled. In the video, they spell it as Tom Kha Kai, but when I listen to the girl my ears detect a clear sound of G for the third ideogram, making Tom Kha Gai my preferred way to spell it.  You can listen for yourself and decide. Click here and fast forward to 1 min and 50 seconds. No matter how you decide to spell it, this is a delicious and very simple soup with all the contrasting flavors that are typical for the cuisine of Thailand.

TOM KHA GAI
(adapted from Marta Stewart)

1 lemongrass stalk, tough outer layers removed, bruised with back of a large knife
3 cups chicken broth
1/8 cup fish sauce
1 tablespoon brown sugar
1 piece of ginger, about 1 inch long, peeled and minced
1/2 tsp dried galangal powder
salt and pepper to taste
zest and juice of 1 lime, separated
1/2 Serrano pepper, sliced thin
1 + 1/2 pound chicken thighs, boneless, skinless, cut into strips
4 ounces shiitake mushrooms, stems removed, caps sliced thin
2 medium carrots, shredded
1 can (about 13 oz) full-fat coconut milk
fresh cilantro leaves

In a slow-cooker, combine chicken stock, lemongrass, fish sauce, brown sugar, galangal,  lime zest, chicken and mushrooms. Cover and cook on high for 2 ½ hours (or on low for 4 hours). Add coconut milk and shredded carrots, and cook on high 30 minutes longer (or on low for 1 hour). Stir in lime juice and cilantro leaves.  Serve topped with additional fresh cilantro, if desired. You can also save the soup without the coconut milk and carrots, and add those when re-heating on top of the stove for about 15 minutes, until the carrots are just cooked.

Serve while pretty hot, with a squeeze of fresh lime juice right on the bowl to brighten up the flavors even more.

ENJOY!

to print the recipe, click here

Fishing out the lemongrass…

Comments: What a delicious soup!  Oddly enough, I am not too fond of shiitake mushrooms in stir-fried preparations, even if they are quite popular in Oriental recipes. Something about their texture turns me off a little. But in soup or risotto, I love them. They do impart a lot more flavor than regular mushrooms do, and in this soup they are definitely a must.  Lemongrass is also a favorite flavor of mine, and we are lucky to have a very healthy lemongrass plant growing in our backyard. When I need it, I go out with a pair of scissors and cut a stalk very close to the ground.  The smell is just amazing…

I made this soup on a Sunday and as so often happens, it was my lunch three days in a row. I ran out of cilantro on day 2, but it was not a big deal. At all. Adding the coconut milk at the very end of the cooking time together with the carrots make sure that the carrots retain some of their bite, and the coconut flavor seems brighter than if it cooked for hours from the beginning. Little details matter, especially when using the crock pot. That dump and forget approach is definitely not the tastiest path…

No slow-cooker? A regular pan will work, just keep the soup at a simmer until the chicken is cooked through, then add the coconut milk and the carrots for a while longer.


ONE YEAR AGO: Zakarian’s Prosciutto-Wrapped Chicken Breast

TWO YEARS AGO: Amazing Apricot Bars

THREE YEARS AGO: Spiralizer Fun

FOUR YEARS AGO: Linguine with Cauliflower Pesto

FIVE YEARS AGO: Carriage House Apple-Walnut Pie

SIX YEARS AGO: Chicken Marsala

SEVEN YEARS AGO:  Home, sweet home

EIGHT YEARS AGO: Levain Bread with Caramelized Onions

SaveSave

SaveSave

SaveSave

SaveSave

SaveSave

SaveSave

SaveSave

SaveSave

SaveSave

ELDERFLOWER MACARONS AND MUSINGS ON THE SUBJECT

My last macaron post was on August 15th, so the clock was ticking for another batch of these babies I am still obsessed with. Keep in mind I have two more batches ready to blog about. so if you are also a macaron-lover, stick around.  Once again, I used my default recipe from Craftsy although I’ve been playing with the formula from Philip (at Baking Fanatic) that has calls for less sugar. For this batch I used a lavender gel color, and something called Egyptian gold dust, which I talked about before. I also added a little bit of yellow color in the elderflower buttercream, to have a nice effect with the gold details. Very happy with this batch, which we enjoyed while my stepson Alex was visiting us from New York.

ELDERFLOWER MACARONS
(adapted from Craftsy.com)

for the shells:
198 g powdered sugar
113 g almond meal
113 g egg whites at room temperature
a pinch of cream of tartar
100 g granulated sugar
Purple Gel color from AmeriColor
2 drops vanilla extract

for the filling:
120 g softened butter
200 g confectioner’s sugar
1/2 teaspoon elderflower syrup
tiny amount of yellow gel food coloring

to decorate:
gold dust (optional)

Line 2 or 3 heavy baking sheets with parchment paper or Silpat mats. Layer the powdered sugar and almond meal   in a food processor. Pulse until the mixture looks like fine meal, about 15 seconds. Pass through a sieve and transfer to a small bowl. Set aside.

Place the egg whites and pinch of cream of tartar in the bowl of a stand mixer fitted with the whisk attachment. Make sure that the bowl and the whisk are impeccably clean. Starting on medium speed, whip the whites with the cream of tartar until they look like light foam. The whites should not appear liquid. The foam will be light and should not have any structure.

Slowly rain in the granulated sugar, trying to aim the stream between the whisk and the side of the bowl. Turn the speed up to medium-high. Continue to whip the meringue until it is soft and shiny. It should look like marshmallow creme. Add the gel color and the vanilla. Staying at medium-high speed, whip the egg whites until the mixture begins to dull and the lines of the whisk are visible on the surface of the meringue. Check the peak. It should be firm. Transfer the whites to a medium bowl.

Fold in the almond meal mixture in three increments. Paint the mixture halfway up the side of the bowl, using the flat side of a spatula. Scrape the mixture down to the center of the bowl. Repeat two or three times, then check to see if the mixture slides slowly down the side of the bowl. Put the mixture in a piping bag fitted with one of the tips listed above. Pipe on the prepared baking sheets.

Slam each sheet hard four to six times on the counter. Then fist bump each end of the sheet’s underside twice. Let the unbaked macarons dry until they look dull but not overly dry. Drying time depends on humidity. Ina dry climate, the macarons can dry in 15 to 20 minutes; in a humid climate, it can take 35 to 40 minutes. If using edible gold powder,  sprinkle a little with a brush and use a hand-held fan to spread it over like dust.

While the macarons are drying, heat the oven to 330 F (170 C/gas mark 3). Bake one sheet at a time on the middle rack. Check in 11 minutes. If the tops slide, then bake for 2 to 3 more minutes. The macarons should release without sticking. Check one or two. If they stick, put them back in the oven for 1 to 2 more minutes. Let the macaroons cool for 10 minutes before removing from the pan.

Make the filling:  Cream the butter with the powdered sugar in a KitchenAid type mixer until it reaches the correct consistency for piping. Add the elderflower syrup and beat for a few seconds longer to incorporate.

Assemble the macarons: find two macarons similar in size and add a good amount of filling to the bottom of one of them. Place the other on top and squeeze gently to take the filling all the way to the edge.  Store in the fridge for 24 hours for perfect texture.

ENJOY!

to print the recipe, click here

Comments: I had two goals with this recipe. First, to make a filling using elderflower flavor because the thought of it made me dream. Elderflower… even the name is musical! Second goal, to use a gold dust powder that I featured back in July in my In My Kitchen post. Small problem. I do not have an air-brush thingie, so decided to search for improvised ways to turn the powder into dust. A small, hand-held fan could potentially work, but we do not own one. Then I remembered the air-compressed can that we sometimes use to clean computer keyboards and small crevices in all sorts of gadgets and equipments. Here it is, in case you don’t know what I’m talking about.

I don’t know if you can read the name of my file by clicking on it, but it doesn’t matter. I will tell you right now. I called it not_the_right_tool. Yeap. Capisci?  It is way too strong, even if you try to  maneuver very delicately the little gun, it will spray air with too much enthusiasm. Which led to Sally having golden eyebrows two months before Halloween. Quite inappropriate. I don’t see an air-brush thingie in my future (pretty expensive little gadget), so I might search for a more well-behaved hand-held fan before I attempt using the powder dust again.  The effect is pretty nice, once you get it correctly. Live and learn. Even if my decorative effect did not have the exact look intended, the macarons were delicious.  The elderflower buttercream worked very well, and I imagine it would be perfect to ice cupcakes too. 


And now, I share a few thoughts on macarons, probably one of the most-feared concoctions by bakers everywhere. So many things can go wrong when you prepare the batter and then bake them. All recipes involve three basic ingredients, egg whites, almond flour, and sugar (usually in two different forms).  Basically egg whites are beaten to form a stable meringue that is next mixed with almond flour and, if desired, food coloring and flavoring agents. The method to form the meringue will range from French (egg whites are beaten with sugar at room temperature), Swiss (sugar is dissolved in egg whites gently warmed up and then whipped into meringue), to Italian (most stable meringue, formed by beating a simple syrup at the exact right temperature into egg whites).

The fact that macarons are so finicky would make one think that the proportions of ingredients are set in stone. Any variation, and you are doomed for failure. Well, that’s really not the case. In the table below, I offer you a few formulas, the first uses a Swiss meringue, all others are for the basic French method. You will immediately notice that the variation is not trivial. Particularly the amount of total sugar left me a bit surprised. Each of these recipes have many people who swear by them. They are often described as ‘my default recipe’ because “it never fails.”  I’ve tested two of them, Craftsy and Philip’s, and yes they both worked great. I like Philip’s formula because the shells are less sweet, and complement better some fillings like caramel and chocolate ganache.

All amounts given in grams.Original sources for above formulas, keep in mind my table normalized them all to 100 g egg whites:

Broma: Broma Bakery Craftsy: Craftsy online  tutorial Philip: Baking Fanatic Mimi: Indulge with Mimi Sue: You can do it… at home!  J.O.B. Joy of Baking Tiffany Macarons by Tiffany

The take-home lesson is: focus on technique. The ingredients are a lot more forgiving than we would think. As to aging the egg whites, trust me on this: you can bake a perfect batch of macarons with egg whites brought to room temperature without any need for aging.  I did the experiment myself, and others did too. I know many experts will swear it makes a difference. I would love to have them do a blind experiment baking a batch with aged whites another with room temperature eggs, no aging, and tell me which is which.  If you want to bake a batch of macarons on a whim, go for it. Technique trumps everything else for these finicky babies.  Watch videos showing proper macaronnage, and you will be on your way to success. And, of course use a scale so that you know how many grams of egg whites you are starting with, and adjust the proportions accordingly.

From my friend G.P.E. (Gary Patissier Extraordinaire) I got this nice lesson on macaron basics:

The important ratio in macarons is the sugar to egg ratio. At a 1:1 sugar/egg ratio, the meringue will bake up soft – think lemon meringue pie topping. At a 2:1 ratio, the meringue will bake up crisp – think meringue cookies. So for macarons, you are looking at a 2:1 ratio. Extra sugar ( > 2:1) will make the surface shinier and crisper and, of course, sweeter.  Note how there are two separate additions of sugar – one combined with the eggs and the other combined with the almond flour. That is intentional. Sugar stabilizes the meringue which is good. Stabilizing also means it inhibits formation of the foam. So to optimize stability versus volume, the maximum amount of sugar you want to add with the eggs is 1:1. Furthermore, you add the sugar late in the whipping process; I was taught to gently add the sugar when the egg whites are 75% done. Once you finish whipping the eggs, additional sugar (in this case, that mixed with the almond flour) can be added without affecting volume.


So there you have it, mine and Gary’s  little musings on a subject very dear to my heart: French Macarons… love making them, love thinking about making them, imagining colors and flavors together. Love bringing them to our department when maybe they make it easier to face that experiment that refuses to work, the upcoming exam, the preparation of that grant proposal…


or sharing with a very handsome (and very tall) stepson!

ONE YEAR AGO: A Duet of Sorbets

TWO YEARS AGO: Sobering Peach Sorbet

THREE YEARS AGO: Spiralizer Fun

FOUR YEARS AGO: Beer-Marinated Grilled Skirt Steak

FIVE YEARS AGO:  Secret Recipe Club: Corn Chowda

SIX YEARS AGO: Page-A-Day Calendar (Pits and Chief 5 minutes of fame…)

SEVEN YEARS AGO: Home Sweet Home (our beloved Pits in one of his last photos)

EIGHT YEARS AGO: Marbled Rye


SaveSave

SaveSave

SaveSave

SaveSave

SaveSave

SaveSave

SaveSave

SaveSave

SaveSave

SaveSave

SaveSave

SaveSave

SaveSave

SaveSave

SaveSave

SaveSave

SaveSave

SaveSave

SaveSave

SaveSave

SaveSaveSaveSave

SaveSave

COTTAGE LOAF, MY VERY OWN TECHNICAL CHALLENGE

Many years ago, I baked a bread called “Cottage Loaf” for a wonderful friend of ours, who was born and raised in England. I had never heard about it, never seen or tasted this special bread that elicited fond memories in our friend. Come to think of it, pretty naive of me to try and bake a special loaf having zero knowledge about it. I was so nervous about the shaping – it involves dividing the dough in two unequal portions, balancing the smaller one on top of the bigger one, so I completely forgot to slash it before baking, as you can see with a jump to my old post.  Seven and a half years went by (!!!), I never attempted it again. To my surprise, last week’s episode of The Great British Bake Off featured that very bread of my past as the technical challenge.  I simply had to go for it, particularly after witnessing so many talented bakers having all sorts of issues with the challenge. Not because they lack skills, mind you. But because the instructions given in the show for every technical challenge are pretty minimal. One of the contestants had his top loaf collapse into the lower one, and in despair he said “my dough ate itself!” I could feel his pain…  Anyway, without any more tangential talk, here is my Cottage Loaf. Too bad we now live 312 miles away from our friend Glenn. I suspect he would enjoy a slice or two…

COTTAGE LOAF
(adapted from Celia’s blog) 

(recipe in metrics at the end of the post)

Pre-ferment:
140g all-purpose flour
140g bread flour
1/2 tsp sea salt
1/2 tsp instant yeast
170g water

Mix the two kinds of flour, salt, and yeast in a bowl. Add the water, mix briefly and let it rest for 10 minutes. Knead the dough briefly, allow it to rise for 1 hour at room temperature, then stick it in the fridge overnight.

Final dough:
All the preferment
225g bread flour
45g rye flour
3/4 tsp sea salt
1 tsp instant yeast
170g water, at room temperature

Remove the pre-ferment from the fridge 1 hour before making the dough, cutting it into pieces to speed up warming up to room temperature. Place in a large bowl. Cut it into pieces with a knife or pastry cutter, and place them in a large mixing bowl.

Add the water and yeast, and stir together, then add the flours and salt. Combine everything into a shaggy mass, allow it to sit for 20 minutes undisturbed. Let the dough rise for 90 minutes, folding the dough at 20 and 45 minutes. Dough should rise not more than double its original size.

Weigh the dough (it should be around 900g), divide in two pieces (600g and 300g each), form each piece into a tight round. Allow them to sit for 15 minutes at room temperature, then coat the large ball with a little olive oil, cut a cross on top. Cut a cross on the bottom part of the smaller ball, and place it on top of the large one.

Now insert your finger or chopsticks in the center of the round, going almost all the way to the bottom, opening the whole outwards slightly to join both loaves. Allow them to rise for 10-15 minutes more before baking.

Slash the dough all around cutting through both levels. Place the bread in a the oven (430F), cover it with an inverted roasting pan moist with hot water, bake it for 30 minutes, uncover and allow it to bake for another 15 minutes (if top layer is browning too much, protect it with aluminum foil). If you don’t have a roasting pan large enough to cover the dough, follow the baking method explained here.

Allow to completely cool on a rack before slicing through.

ENJOY!

to print the recipe, click here

Comments: I was so happy with this baking adventure! I haven’t baked a loaf of bread in many months, my poor sourdough starter is totally neglected. This bread – that takes a simple pre-ferment made the day before – was a nice way to warm me up for more baking ahead. All things considered, it is not a difficult recipe. The bulk rise of 90 minutes is followed by simple shaping, less than 30 minutes more and into the oven it goes.  Once again I used a 600 g to 300 g ratio of lower ball to upper ball, but I think that 650:250 could work even better, more stability for the upper component. Keep that in mind if you try it. Cutting a cross on top and bottom before joining the two balls is very important to ensure they will stay glued during baking, probably a step that was not included in the instructions for GBBO contestants.

I think my technical challenge went very well. At least our judge Paula Hollywood seemed pleased with it… If you are ready for some serious silliness, click on the video. At your own risk…

Please note Bogey circling around from the get go, and Buck getting up the moment he hears the knife in action… Oscar? He rather not have anything to do with so much non-sense going on in the kitchen. What a fun killer!

😉

Pinning is caring, go ahead and pin away!

NOTE ADDED AFTER PUBLICATION:  

Measurements in cups:
For the pre-ferment, mix 1 cup all-purpose flour to
1 + 1/3 cup bread flour. To that add 3/4 cup water

For the final dough: 1 + 1/2 cups of regular flour, 3/8 cup rye flour, and 3/4 cup water

ONE YEAR AGO: Pork Ribs: Sticky, Spicy and Awesome

TWO YEARS AGO: Sobering Peach Sorbet

THREE YEARS AGO: Buttermilk-Blueberry Breakfast Cake

FOUR YEARS AGO: Silky Cauliflower Puree with Almond Milk


SEVEN YEARS AGO:
 Popeye-Pleasing Salad
.
EIGHT YEARS AGO: Summer’s Finale

SaveSave

SaveSave

SaveSave

SaveSaveSaveSave

SaveSave

SaveSave

SaveSave

SaveSave

SaveSave

SaveSave

SaveSave

SaveSave

SaveSave

SaveSave