NIGELLA LAWSON IN THE BEWITCHING KITCHEN

Did I get your attention? Well, unfortunately she was not here in person. I would love to have her over for dinner, but this time it was just virtually through one of her tasty recipes.  Nigella is clearly a person who is happy in her own skin,  someone who enjoys life to the fullest. Watching her cooking shows brings me that “I’ll have what she’s having” feeling… And, to make things even better, her recipes are never too fussy.  I have several of her cookbooks, but for some reason forgot all about them for a long time. The other day, talking to my friend Denise, she reminded me of one of Nigella’s recipes, a favorite of hers. A chicken and sausage one pan kind of deal. I immediately remembered making it years ago, before my blogging life started. Got this absurd craving for it, made it next day (!!!), fell in love with it all over again.  Sent a picture to Denise, and that’s when we realized we were talking about two different recipes.  Obviously, I now have another one to try. They both join poultry with sausage, but one takes Italian sausage, the other chorizo. One has potatoes, the other doesn’t. And a few more departures on the overall flavor. Anyway, I sense a Nigella-phase in our kitchen.  Yeah, I must have what she’s having…

ROAST CHICKEN THIGHS WITH SAGE AND SAUSAGE
(modified from Nigella Lawson)

1 medium shallot
1/3 cup olive oil
2 teaspoons English mustard
1 tablespoon dried sage
Freshly ground black pepper
1 tablespoon Worcestershire sauce
2 lemons
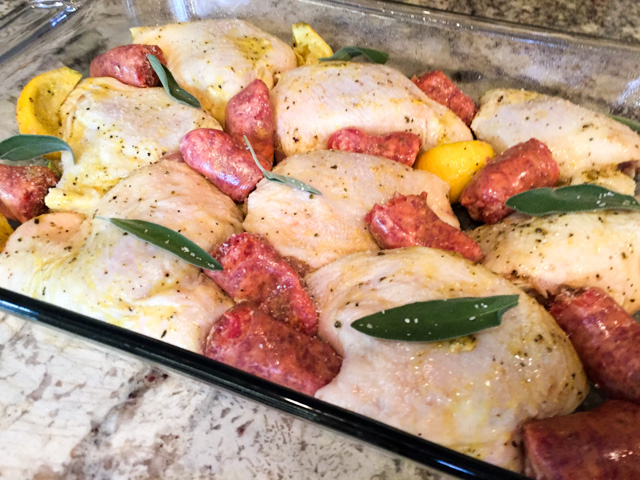
8 chicken thighs, bone and skin in
6 Italian sausages
salt to taste
2 tablespoons fresh sage leaves

Peel and cut the shallot into four pieces, and put into a freezer bag with the oil, mustard, dried sage, a good grinding of pepper, and Worcestershire sauce. Cut lemons in half, squeeze juice into bag, and then cut the halves into eighths and add them. Squeeze everything around to mix, then add the chicken pieces. Leave to marinade in the refrigerator for a few hours (overnight is perfect).

Heat oven to 325 degrees F. Allow the chicken to come to room temperature in its marinade. Arrange the chicken pieces in a roasting tin skin side up with the marinade, including all the bits and pieces, and tuck the sausages around them. Season with salt. Sprinkle the fresh sage leaves over the chicken and sausages and then put the pan into the oven, covered with aluminum foil for  to cook for 1 hour. Remove the foil, increase heat to 425 F and keep roasting until the skin turns golden brown and starts to crisp up.

ENJOY!

to print the recipe, click here

Comments: This is such an easy recipe to put together! It is originally from her cookbook Feast, but she featured the recipe in one of her shows back in the good old times of FoodTV Network. I modified it quite a bit not so much in terms of ingredients, but cooking method, because as I’ve mentioned a few times in the past, I think nothing beats the texture of chicken that starts cooking low and slow. For weeknights this would be a bit tricky, this is the type of cooking I reserve for weekends.

Phil loved this so much that he started getting nervous about the possibility of not enjoying it again for another 8 years. He kept dropping hints:  ” I would not mind having this chicken every couple of weeks… Actually, you “could” make it weekly, you know?”  So there you have it, it’s really a wonderful way to enjoy chicken, with the spicy tasty bits of sausage, and the flavors of sage and lemon. A keeper.
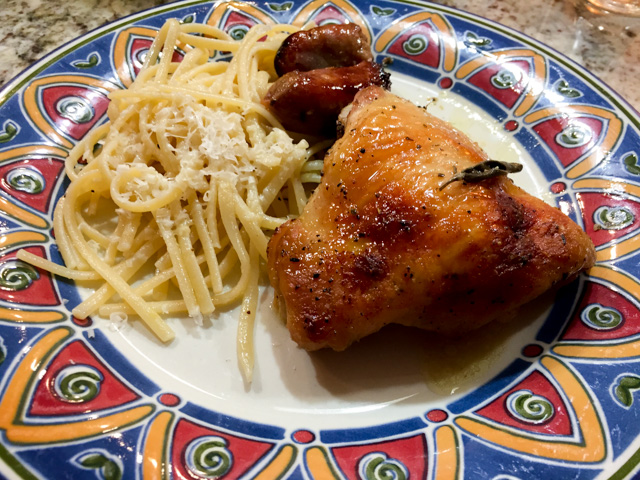
Dinner is served!
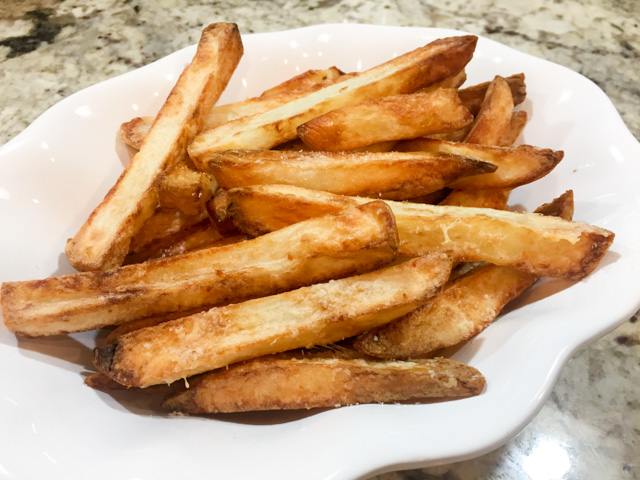
A little pasta with olive oil and grated cheese was all we needed…

Add to FacebookAdd to DiggAdd to Del.icio.usAdd to StumbleuponAdd to RedditAdd to BlinklistAdd to TwitterAdd to TechnoratiAdd to Yahoo BuzzAdd to Newsvine

ONE YEAR AGO: Walnut-Raisin Bran Muffins

TWO YEARS AGO: Gingersnaps with White Chocolate Chips

THREE YEARS AGO: Turkey Chili with Almond Butter

FOUR YEARS AGO: Secret Recipe Club: Leek and Cheese Tart

FIVE YEARS AGO: Secret Recipe Club; Triple Chocolate Brownies

SIX YEARS AGO: Shaved Asparagus Salad

SEVEN YEARS AGO: Indonesian Ginger Chicken

Save

Save

Save

Save

MISSISSIPPI ROAST AND THE OPEN MIND

As I’ve mentioned before, I am a huge fan of FoodTV’s The Kitchen. The crowd brings a mixture of different types of talent and cooking styles, they are funny, witty, it’s a great way to spend an hour on Saturday mornings. Often they will have guests, but for the most part I don’t care that much for them. Usually they are hosts from other cooking shows in need to advertise their cookbook, some are so in love with themselves that they get me into that state of non-stop eye-roll.  A particular OMG-We-ARE-So-Cool American-Italian couple comes to mind. I had to fast-forward that one, I have my limits. A few months ago they featured Robin Chapman, a nice older woman to share her recipe for a slow-cooker concoction called Mississippi Roast. I know, roast in the slow-cooker seems like a contradiction in terms, but that’s how the recipe goes. Anyway, apparently Mississippi Roast got stellar reviews all over the internet, went fully viral on Pinterest, to the point of calling the attention of Sam Sifton from The New York Times. He went searching for the original author. And that’s how she ended up at FoodTV. As I watched her preparing it, my shock and horror kept growing. I could not picture myself making it for us. A real dump and forget approach to the slow-cooker, involving a bag of powdered ranch dressing to make things more “interesting.”  The fun part was watching Geoffrey Zakarian trying to keep his cool. I would love to know his real thoughts as the cooking went on. Of course, I promptly removed the recipe from my mind. Then, one day I got notification of a new post by Mike, the blogger behind The Iron You. My chin dropped. He made it. He raved about it. He tweaked it with a few modifications (taking it on the same path Sam Sifton suggested), which definitely improved the recipe. No more powdered ranch (wink, wink). I caved. I made it. I absolutely loved it. Have already made it three more times. If you are a meat lover, grab your slow-cooker, and try this one.

MISSISSIPPI ROAST
(slightly modified from The Iron You)

3 lbs boneless chuck roast or top or bottom round roast
2 teaspoons fine grain salt
1 teaspoon ground black pepper
3 tablespoons grapeseed oil
3 tablespoons butter
8 pepperoncini peppers (I used jarred)
2 tablespoons mayonnaise
2 teaspoons apple cider vinegar
1 tablespoon chopped fresh dill
¼ teaspoon sweet paprika

Rub salt and pepper all over the roast.

Heat oil in a large pan over high heat until it is shimmering and almost starts smoking. Place the roast in the pan and brown on all sides, about 4 to 5 minutes per side, to create a crust. Remove roast from the pan and place it in the insert of the crock pot.

Make the ranch dressing by mixing mayonnaise, vinegar, dill and paprika. Whisk well to emulsify.  To the meat in the crock pot add butter, pepperoncini, and the ranch dressing. Cook on low for 6 to 8 hours.

Using two forks, shred the meat and mix it with the gravy surrounding it.

ENJOY!

to print the recipe, click here


Comments: This was scrumptious. As usual, brown food is pure ordeal to get a nice picture, so you better trust my words. I had never tried pepperoncini and was not sure what kind of flavor they would contribute. It is a very nice pepper, mild, almost lemony. One of the changes I made from Mike’s version was to omit the cornstarch coating of the meat. My sauce turned out a bit thin, but we don’t mind that. I served this “roast” with mashed cauliflower (shown in the picture). with spaghetti squash the second time around, and with rice and beans on the third. Leftovers were always consumed with corn tortillas for a Tex-Mex version. Some Cotija cheese crumbled on top, a little guacamole and we were all set. The original version from Robin Chapman uses a full stick of butter on top of the meat. To me, that is overkill, but if you’d like to try it as initially conceived, jump to the FoodTV link and check it out.

I am very fond of any type of meat that you can shred with a fork, to me it says comfort food right away, and holds the promise of many tasty meals ahead.

So there you have it. I learned a lesson with this one. Don’t twist your nose at something just because it’s not exactly your style of cooking. A few tweaks here and there, and you might end up with a recipe that will win a spot in your regular rotation.  Of course, now I’m wondering if there’s really anything to be said for ham braised in Coca-Cola. Hey, I’m not making that up. It is a real thing!

😉

Add to FacebookAdd to DiggAdd to Del.icio.usAdd to StumbleuponAdd to RedditAdd to BlinklistAdd to TwitterAdd to TechnoratiAdd to Yahoo BuzzAdd to Newsvine

ONE YEAR AGO: Walnut-Raisin Bran Muffins

TWO YEARS AGO: A Star is Born!

THREE YEARS AGO: Chestnut Flour Sourdough Bread

FOUR YEARS AGO: Kinpira Gobo and Japanese Home Cooking

FIVE YEARS AGO: Walnut Sourdough

SIX YEARS AGO: Thai Chicken Curry

SEVEN YEARS AGO: Zen and the art of risotto

BLACK SESAME MACARONS

My macaron obsession goes on and on. I would love to bake a batch each weekend, but must keep in mind that even the most understanding departmental colleagues might say enough is enough. Plus, if I only make macarons…  brownies, cakes, and cookies will get jealous. So here I am to share with you a batch I am quite proud of: Black Sesame Macarons. Because, although I’m addicted to colors, we all know that black is beautiful…


BLACK SESAME MACARONS
(from the Bewitching Kitchen)

for the shells:
198 g powdered sugar
100 g almond meal
15 g black sesame powder (or you can grind black sesame seeds to a powder)
113 g egg whites (aged for three days)
1 g or a pinch of cream of tartar
100 g granulated sugar
Black Gel color  (about 1/2 teaspoon, add 1/4 to start and adjust as you mix)
for the filling:
8oz (227g) cream cheese
⅔ cup (134g) brown sugar
1 tsp (5g) vanilla extract
½ cup (122g) heavy whipping cream

Line 2 or 3 heavy baking sheets with parchment paper or Silpat mats. Layer the powdered sugar, almond meal and black sesame powder in a food processor or mini processor. Pulse until the mixture looks like fine meal, about 15 seconds. Pass through a sieve and transfer to a small bowl. Set aside.

Place the egg whites and pinch of cream of tartar in the bowl of a stand mixer fitted with the whisk attachment. Make sure that the bowl and the whisk are impeccably clean. Starting on medium speed, whip the whites with the cream of tartar until they look like light foam. The whites should not appear liquid. The foam will be light and should not have any structure.

Slowly rain in the granulated sugar, trying to aim the stream between the whisk and the side of the bowl. Turn the speed up to medium-high. Continue to whip the meringue until it is soft and shiny. It should look like marshmallow creme. Add the gel color and the vanilla. Staying at medium-high speed, whip the egg whites until the mixture begins to dull and the lines of the whisk are visible on the surface of the meringue. Transfer the whites to a medium bowl.

Fold in the almond meal mixture in three increments. Paint the mixture halfway up the side of the bowl, using the flat side of a spatula. Scrape the mixture down to the center of the bowl. Repeat two or three times, then check to see if the mixture slides slowly down the side of the bowl. Put the mixture in a piping bag fitted with one of the tips listed above. Pipe on the prepared baking sheets.

Slam each sheet hard four to six times on the counter. Then fist bump each end of the sheet’s underside twice. Let the unbaked macarons dry until they look dull but not overly dry. Drying time depends on humidity. In a dry climate, the macarons can dry in 15 to 20 minutes; in a humid climate, it can take 35 to 40 minutes.

While the macarons are drying, heat the oven to 330 F (170 C). Bake one sheet at a time on the middle rack. Check in 11 minutes. If the tops slide, then bake for 2 to 3 more minutes. The macarons should release without sticking. Check one or two. If they stick, put them back in the oven for 1 to 2 more minutes. Let the macaroons cool for 10 minutes before removing from the pan.

Make the filling:Whip the cream in a clean bowl till stiff peaks. In another bowl, whip the cream cheese, sugar, and vanilla extract.   Gently fold in the whipped cream into the bowl until well combined. Reserve.

Assemble the macarons: find two macarons similar in size and add a good amount of filling to the bottom of one of them. Place the other on top and squeeze gently to take the filling all the way to the edge.  Ideally, store in the fridge for 24 hours before digging in…

ENJOY!

to print the recipe, click here


Comments:  I am definitely not the first person to bake black macarons. A quick google expedition will show you a few other examples. Some recipes go to extent of using exclusively powdered sesame seeds as you would use almond meal for the shells. I did not want to do that, fearing that the change would be too much of a departure from the classic. So I used a small amount of black sesame powder (15 g in 115 g total seed/nut component). We could definitely taste it in the final product and I thought it was just right. More could have been overpowering.  My intention was to use a white chocolate filling, but I ran into problems and my filling never set enough to use. White chocolate is a temperamental creature. So I quickly whipped up (literally) a vanilla cream cheese filling and used it instead. It complemented well the sesame flavor of the shells, and the slight hint of caramel color given by the brown sugar looked good with the black surrounding it.

I was very happy with the way these turned out. Not a single shell cracked during baking, and the surface was for the most part pretty smooth. Beautiful, well-formed feet, and the black food coloring rose to the challenge. I am almost to the point of trying the Italian  meringue method, but want to tackle this simpler version a few more times. You know, build confidence first before facing the combination of hot syrup with egg whites.


I have yet another macaron post for you, shockingly green…  Stay tuned!

Add to FacebookAdd to DiggAdd to Del.icio.usAdd to StumbleuponAdd to RedditAdd to BlinklistAdd to TwitterAdd to TechnoratiAdd to Yahoo BuzzAdd to Newsvine

ONE YEAR AGO: Fine Tuning Thomas Keller

TWO YEARS AGO: Cauliflower Tortillas

THREE YEARS AGO: Majestic Sedona, Take Two

FOUR YEARS AGO: Secret Ingredient Turkey Meatballs

FIVE YEARS AGO: Swedish Meatballs and Egg Noodles

SIX YEARS AGO: Italian Easter Pie

SEVEN YEARS AGO: Black Olive Bialy

SOUP SATURDAY: ROOT VEGETABLES

Third Saturday of the month, which means it’s time for soup! This month’s Soup Saturday Event event is hosted by Wendy, from A Day in the Life on the Farm. She chose Root Vegetables as the theme.  I thought about making a potato soup I’ve had in my files sitting for 6 years. Yes, I checked. That soup calls for two kinds of potatoes and it also involves shrimp. Unusual, right? I definitely have to make it before another 6 years go by. But then, another option called my attention, one that features a veggie that doesn’t get much praise. The parsnip. Inspiration for the recipe came from  the cookbook The New England Soup Factory, but I modified it quite a bit. Parsnips paired with tomatoes, a tasty idea. No matter your stance on this humble looking root veggie, I am certain you will love this soup.


PARSNIP AND TOMATO SOUP

(inspired by New England Soup Factory)
2 tablespoons olive oil
1 large shallot, diced
2 ribs celery, sliced
8 medium parsnips, peeled and cut in chunks
1 can (28 ounces) whole tomatoes, peeled, with liquid
1 bottle V8 juice (12 ounces)
2 cups water
1/4 cup half and half
salt and pepper
fresh dill
.
Add the olive oil, shallot and celery pieces into a pan, and saute until soft and fragrant in low heat, about 5 minutes. Add the parsnips, increase heat to medium and cook, stirring often, until it get a bit of color.
.
Add the tomatoes with the liquid, stir to release brown bits from the pan.  Transfer to a pressure cooker, add the V8  juice and 1 cup of the water. If you don’t have a pressure cooker, cook on top of the stove until the parsnip pieces are tender, around 50 minutes.  If you use a pressure cooker, cook for 20 minutes and release pressure under cold running water.
.
Transfer contents to a high-powered blender, and blend until smooth. Return to the pan. If too thick, thin with additional water. If too thin, simmer to thicken it. Add the half and half, some fresh dill and simmer gently for a couple of minutes. Ladle into soup bowls and add fresh dill right before serving it.
.
Sprinkle some more fresh dill as a garnish.
.
ENJOY!
.
to print the recipe, click here
.

Comments: I was really pleased with this soup. I love tomato soup but sometimes find it a bit too intense. The parsnips mellow the flavor of the tomato and give the whole thing a more earthy flavor. It’s important to use a very powerful blender, otherwise you could get a bit of  a fibrous texture. I ran the blender for a few minutes to make sure it was absolutely smooth. Oranges and tomatoes are great together, so when I enjoyed the soup again for my lunch next day, I added a bit of orange zest and squeezed some orange juice while warming it. Very nice, and the dill doesn’t fight with the citric flavor. I had never used V8 as a cooking ingredient, but will definitely keep it around, maybe even the spicy version for added kick. Often vegetable soups include chicken stock, but for the most part I prefer to use either water of a veggie stock. The half and half could be omitted, I suppose, if you like to keep it lower in fat, but it is such a small amount, I say go for it…
 .

Wendy, thanks for hosting! I invite my readers to click on the link feast below, to see what my virtual friends cooked up this month…

.


Add to FacebookAdd to DiggAdd to Del.icio.usAdd to StumbleuponAdd to RedditAdd to BlinklistAdd to TwitterAdd to TechnoratiAdd to Yahoo BuzzAdd to Newsvine

https://static.inlinkz.com/cs2.js

ONE YEAR AGO: A Retro Dessert

TWO YEARS AGO: Cauliflower Tortillas: Going low-carb and loving it!

THREE YEARS AGO: Clementines in Cinnamon Syrup

FOUR YEARS AGO: In My Kitchen, April 2013 

FIVE YEARS AGO: Thrilling Moments (CROISSANTS!)

SIX YEARS AGO: Maple-Oatmeal Sourdough Bread

SEVEN YEARS AGO: Pork Trinity: coffee, mushrooms, and curry

Save

Save

LOLITA JOINS THE BEWITCHING KITCHEN!

Please allow me to introduce the newest member of the family,
Lolita, our air-fryer!

She arrived last week, after a lot exchanges between me and my niece Raquel in Brazil, who owns the exact same model and had been twisting my arm to get one. Then, my friend Karen joined forces with Raquel, even though they’ve never met. A virtual conspiracy of sorts. Karen brought her air-fryer to play and teased me with drool-inducing chicken wings. Take a look at them here. So, I went back and forth, back and forth, bought a cookbook to help me decide, lost hours of sleep tossing in bed. Turn to the left, I’m going to buy it. Turn to the right, do I really need it?  Of course, Phil was close witness to my personal drama. It is possible that he got a bit tired of some of my evening monologues as I walked around the kitchen, cookbook in hand, reading some of the recipes out loud. Although, seriously, who could get annoyed by that? Right? Anyway, all I know is that one morning he informed me that a Philips air-fryer was on its way. Sorry, ladies, the husband is taken.

First experiment: Russet Potato Fries

This is really a non-recipe.  Get Russet potatoes and cut them in slices, mine were around 1/2 inch, but quite variable. I wanted to see how the fryer behaved and optimize the size for the next time around. To a pot of salted boiling water, add the slices and parboil them for 4 minutes. Drain and dry. Once they are dry, place them in a bag or container and gently toss with a couple of teaspoons of olive oil, a sprinkle of salt (you will add more salt later once they come out of the fryer).  Try to coat each slice with oil, but no need to go crazy with it. Some recipes recommend you shake them in a bag, I was afraid they would start breaking, so I just tossed them with my hands inside a bowl.

Add them to the fryer set at the highest temperature, which in my model is 390F. Set the timer for 25 minutes, place the potato slices in the basket, and fry away. Shake the basket every 5 minutes or so, and keep an eye on them. Depending on the thickness of the slices and the power of your machine, they can take a little more or a little less to get brown and cooked.

Remove the fries to a serving dish, season with more salt and pepper to taste, and ENJOY!

Comments: I was over the moon with these fries, because of course I was worried about my beloved’s investment. They were really good. One thing that becomes evident is how much oil we consume when enjoying “regular”, deep-fried potatoes. These have a nice crust, but the inside feels more like a boiled potato, creamy, no taste of fat. You know how when you grab fries your fingers get all oily, and your lips might end up a bit oily too? None of that happens here. Are they as good as regular fries? That is a tough question. In all honesty, when you have regular fries for some reason it is easy to over-indulge. These are satisfying but don’t make you compulsively inhale them. I made three Russet potatoes into fries, they were not very big, medium size. We had enough for our dinner and offered some to certain four-legged beings that were nearby. Happy tail wagging was observed. Experiment concluded.

Second experiment: Sweet Potato Chips

Or, if you happen to be in Great Britain, Sweep Potato Crisps. I confess I like that name even better…


For this adventure, I enlisted help of another interesting kitchen gadget, the spiralizer. I used the ribbon blade to cut two sweet potatoes. With regular veggies, you’ll end up with long ribbons, perfect to mimic pasta, think of a very large pappardelle. The sweet potato is hard, so the ribbons break and turn into pieces quite suitable for frying.

Of course, you can use your knife skills and cut them uniformly. After slicing, I decided to soak them in cold water. Some recipes skip that step, but it’s clear that doing it results in crisper chips, which was my ultimate goal. I did that on a Sunday afternoon, just placed them in the bowl of water and there they stayed for a few hours. You could do the step of soaking and drying several hours in advance, if pressed for time. Then it’s all a matter of adding the slices to a bowl, coating them with olive oil, seasoning with salt, or any other spices you’d like, smoked paprika, cumin, cayenne, chili. I set the temperature to 360F, which is what I saw recommended in the Phillips manual. They were ready in about 25 minutes, with shaking at several time points, as I could not stop opening the basket and peeking inside.  The photo below gives a glimpse into their frying progression. Loads of fun.


From top to bottom, clockwise… The slices just ready to start air-frying, then after 5 minutes, 10 minutes and 15 minutes (ten minutes left on the timer). They were actually ready before the timer went off, for a total air-frying of 22 minutes. Not bad at all…  If you get your prep work done in advance, sweet potato chips can be enjoyed pretty quickly. And yes, they were very crispy and delicious!  The Philips model heats up very fast, they advise you to wait 2 to 3 minutes before placing the food inside. Experiment concluded. Scientists happy and well-fed.

I have quite a few recipes lined up for future experiments. If you have an air-fryer, I highly recommend this cookbook by Meredith Laurence. it is the one with the best reviews at amazon, and I can understand why. Very creative use of the fryer, with recipes that might surprise you a little. Like Molten Chocolate Almond Cakes… See? I told you!

Add to FacebookAdd to DiggAdd to Del.icio.usAdd to StumbleuponAdd to RedditAdd to BlinklistAdd to TwitterAdd to TechnoratiAdd to Yahoo BuzzAdd to Newsvine

ONE YEAR AGO: Cashew Cream Sauce

TWO YEARS AGO: Blood Orange Margaritas

THREE YEARS AGO: Smoked Salmon Appetizer

FOUR YEARS AGO: Clementine Cake

FIVE YEARS AGO: Springtime Spinach Risotto

SIX YEARS AGO: The end of green bean cruelty

SEVEN YEARS AGO: Torta di Limone e Mandorle

Save

Save

Save

Save

Save