IN MY KITCHEN – AUGUST 2011

…. a Brazilian extravaganza!
Celia, from Fig Jam and Lime Cordial, is the inspiration behind “In My Kitchen”, as she started this type of post in her blog many moons ago, and now many bloggers are doing the same.   😉

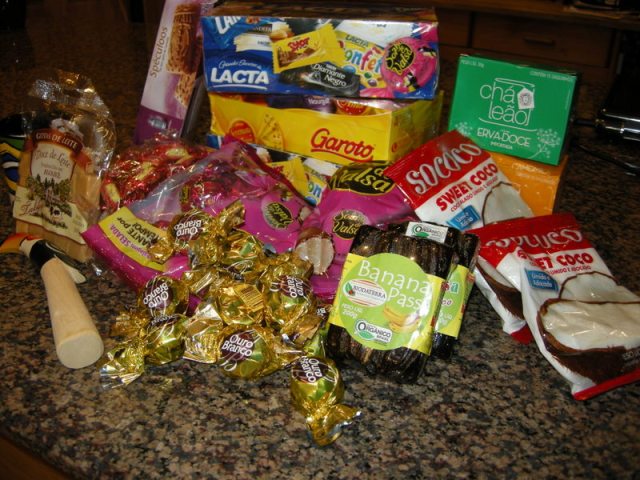
These are just some of the goodies we brought home with us from our trip, and most of it brings back memories of my childhood.  You ‘ll notice that I definitely had more appreciation for sweets then.

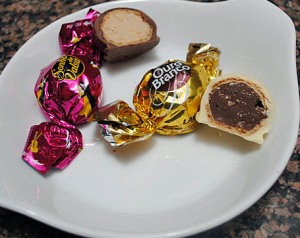
To start off… Bombons Sonho de Valsa (A Dreamy Waltz).   These (in the pink wrappers) are by far the  most popular chocolate concoction in Brazil. They were created in 1938 by Lacta, and the label hasn’t changed much since then.  Kraft Foods later acquired Lacta, and the new company came up with a few variations, but none as popular as the original.  It has a center of cashew nut cream, surrounded by a thin layer of waffle crust,  and the whole thing covered in milk chocolate.  I grew up savoring these, and my favorite part was the creamy center, so if no one was around I’d carefully nibble the chocolate and the waffle, to enjoy the cashew nut filling all by itself!

Later, much much later, the same company created “Ouro Branco”  (White Gold), the exact opposite of Sonho de Valsa, in that white chocolate forms the outside layer, with a dark chocolate/nutty cream lays inside.  Ouro Branco  arose in the mid 70’s, and die-hard fans of Sonho de Valsa (me included) would not touch one.  But, one day I happened to try it, and concluded that they have their well-deserved spot on Earth!  With their older brother they make a great yin-yang pair… 😉

Ovinhos de Amendoim
(little peanut eggs).  You can’t give these little delicacies enough praise.  It’s impossible to eat just one.  They are addictive and incredibly delicious!  But don’t just take my word for it,  here’s what an American traveling for the first time in Brazil had to say about them…  😉

They were a mandatory snack at my parents’ home to nibble before a Sunday  lunch, or when friends came to visit.  Japanese immigrants deserve all the credit for these little jewels.  The outside layer is made of manioc (cassava) flour, which crumbles in your mouth and dissolves with a salty/sweet taste that’s perfect for the roasted peanut inside. They bring me memories of my Dad, because we’d sit down to watch TV and share a bag, fighting hard for the last ones.  😉

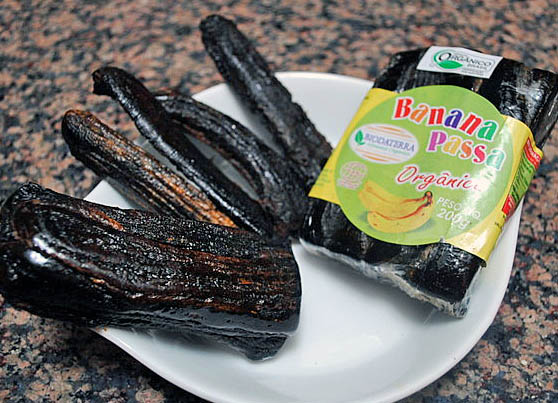
BANANA-PASSA (Raisin Banana) – Or, as Phil calls them “bananinhas.”   Don’t hold their look against them. Ugly? …maybe, but sooooo tasty!  Each one is a full grown banana, dried down (with or without additional sugar, depending on the brand), until they are about 1/5 of their size, and each packs a ton of banana flavor.  They’re perfect for a hiking trip, but don’t forget each one you wolf down is an entire piece of fruit.  Imagine what will happen if you eat 6 bananas!  So, pace yourself, and stay with a maximum of two of these.
BALAS DE LEITE KOPENHAGEN.  I have very few addictions. NutellaHaagen Dazs Dulce de Leche ice cream, and Balas de Leite (milk candy)  from Kopenhagen.  When I was young all the products from Kopenhagen were too expensive, and not a good match for my allowance.  But when I had a little bit of extra cash, I’d indulge myself and buy a small bag of these candies, which put me in personal heaven for a while.  Every time we now land in Brazil my sister gives me several bags to bring home!
The outer shell is hard; you can either bite it right away or let it slowly dissolve in your mouth until it breaks and releases its treasure: sweetened, condensed milk!  I’m partial to the second protocol, but sometimes I’ll devour one just to get that mixture of crunchy shell with the condensed milk… aaahhh the simple pleasures…

CHA’  de CAMOMILA & ERVA DOCE.  My Mom’s evening tea is a new found love.     When I tried it I thought it was the best I’d ever had, but I could not figure out what kind it was.  She finally told me her “secret recipe” – a mix of two herbal teas, chamomile and fennel,  brewed together.   Their flavors combine into something else, something  soothing and smooth, a perfect way to end the day.   I’ve been making it before going to bed, so me and my Mom share a similar routine, only a few thousand miles apart from each other…

and, finally, also in our kitchen, precious gifts from loved ones….
A painting of a Brazilian flag, which was a gift from my niece and her daughter.  The center of the flag shows a flowering tree called “quaresmeira“, typical of Brazil, that is thought to bring everlasting happiness…
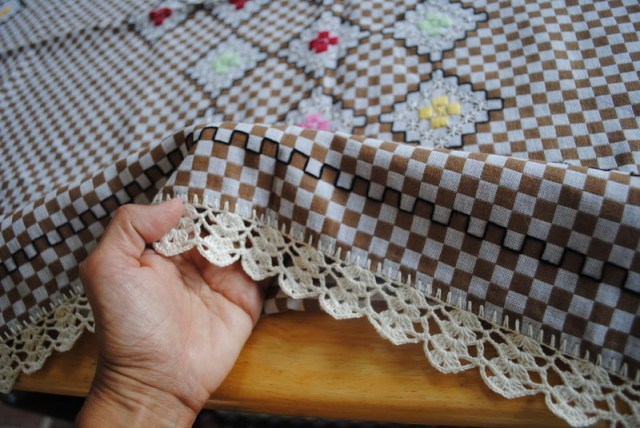
A beautiful tablecloth made by our friend Alice….
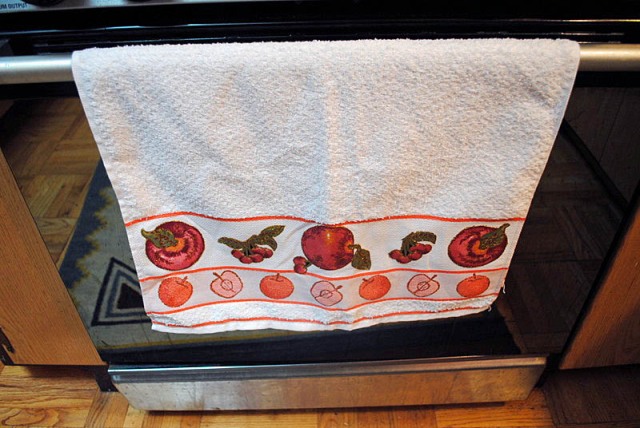
A nice kitchen towel made by my Aunt….
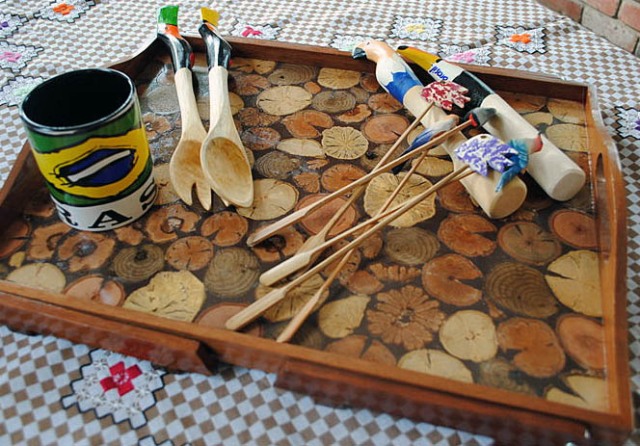
Wooden items, salad servers, lime mashers for caipirinhas, drink stirrers, all sitting on a beautiful wooden tray, a gift from my sister.

I hope you enjoyed the glimpse into our kitchen this month…

ONE YEAR AGO: A Journey to a New Home

TWO YEARS AGO:  Pork medallions in mustard-caper sauce

Add to FacebookAdd to DiggAdd to Del.icio.usAdd to StumbleuponAdd to RedditAdd to BlinklistAdd to TwitterAdd to TechnoratiAdd to Yahoo BuzzAdd to Newsvine

CHOCOLATE GELATO

Maybe it’s the alignment of the planets, or the record-breaking heat  this  summer in Oklahoma.  But, the fact is I’m posting another sweet production from our kitchen.  This time it’s a second attempt at “something chocolate” with our ice cream maker.  I haven’t given up on chocolate sorbet, but this recipe from one of my favorite blogs moved all the others to a secondary position in line.   Use the best chocolate you can find and you’ll make a gelato that stands up shoulder to shoulder with those sold in Italy… 😉

CHOCOLATE GELATO
(from The Italian Dish, original recipe from A16)

1 quart whole milk
1 tablespoon + 1.5 teaspoons cornstarch
1/2 cup light corn syrup
1/3 cup sugar
1/2 teaspoon kosher salt
8 ounces bittersweet chocolate (70% cocoa)
1 teaspoon vanilla extract

Place 2 tablespoons of the milk in a small bowl, whisk in the cornstarch to make a slurry and set aside.

Add the remaining milk into a heavy saucepan and bring to a boil over medium heat. Pour in the slurry, corn syrup, sugar and salt, stirring gently. Return the mixture to a boil and whisk in the chocolate until completely smooth. Transfer into a bowl and let cool to room temperature. Once cooled, mix in the vanilla extract. Cover and refrigerate for at least 3 hours or preferably overnight to make sure it is completely chilled.

Whisk the base and then pour it into your ice cream maker and churn. The gelato should be the consistency of soft-serve ice cream, so don’t churn it as long as you would to make a regular type ice cream. Store in the freezer, with plastic wrap pressed onto the top, and let it be at room temperature for 10 minutes before serving, to make scooping out easier.

ENJOY!

to print the recipe, click here

Comments: If you are a chocolate lover, you’ll love this recipe! It feels rich in your mouth, even though it contains no heavy cream in the base. The proper way to indulge it is with eyes closed, paying attention to the many changes in taste and texture as the gelato melts in your mouth, and brings happiness to your soul.

Have you ordered your ice cream maker yet? 😉

ONE YEAR AGO: Au Revoir, My Bewitching Kitchen

TWO YEARS AGO: Teriyaki Chicken Thighs

Add to FacebookAdd to DiggAdd to Del.icio.usAdd to StumbleuponAdd to RedditAdd to BlinklistAdd to TwitterAdd to TechnoratiAdd to Yahoo BuzzAdd to Newsvine

CRACKED-WHEAT SANDWICH BREAD

My original idea was to do a sourdough cracked-wheat bread, I had the recipe printed out, and my starter going. Woke up on Saturday bright and early, in great spirits to attack the preparation. Surprise number 1: recipe called for a whole-wheat starter. Mine wasn’t. Surprise number 2: recipe suggested an overnight fermentation in the fridge before baking, but I absolutely had to start and finish the bread on the same day.   Not sure how many times in my life I’ve made the mistake of NOT reading a recipe carefully enough before baking day, and/or before shopping for ingredients  (sigh). Plan B had to be set in place, and quickly.  I found a recipe for cracked-wheat bread with a very interesting technique: spreading a dry mixture of flour, sugar and yeast over a fermenting “sponge”, forming a sort of a protective blanket over it.  All of a sudden my Saturday was bright again, and the best was that the bread turned out fantastic!


CRACKED-WHEAT SANDWICH BREAD
(adapted from The Bread Bible, by Rose Levy Beranbaum)

To make the sponge:
1/2 cup bread flour (78 g)
1/2 cup  whole wheat flour (72 g)
3/4 tsp instant yeast (2.4 g)
1/2 tbsp sugar (6.2 g)
1 tbsp nonfat dry milk (8 g)
1 tbsp agave nectar (20 g)
1 cup plus 2 tbsp  water at around 80F (266 g)

Flour mixture for topping the sponge:
2 cups bread flour (312 g)
1/2 tbsp sugar (6.2 g)
1/4 tsp instant yeast (0.8 g)

For the final dough:
1/2 cup cracked-wheat
1/2 cup  boiling water
1 tbsp vegetable oil
1 + 3/4 tsp salt
1 tbsp melted butter

In a medium bowl combine the sponge ingredients and whisk until very smooth, about 2 minutes, trying to incorporate as much air as possible as you stir.

 In another medium bowl, whisk together the flour mixture ingredients. Sprinkle on top of the sponge to cover it completely. DO NOT MIX TOGETHER. Cover tightly with plastic wrap and allow it to ferment for 1-4 hours at room temperature. The longer you allow it to ferment, the better. I fermented mine for 2 hours.

Place the cracked-wheat in a small bowl and pour the boiling water over it. Cover with plastic wrap and allow to sit in the water until all the water is absorbed, about 1 hour.

With your stand mixer, add the bulghur  and the oil  to the bowl and then add the dough and starter. Mix with the dough hook on low speed for a couple of minutes, until no dry bits remain, but do not overmix.  Cover with plastic wrap and allow the dough to rest for 20 minutes. Sprinkle on the salt and knead the dough on medium speed for 12  minutes. The dough should be very elastic  but still slightly moist.

Scrape the dough into a  greased container. Lightly spray or oil the top of the dough. Cover with lid or plastic wrap and let it rise until doubled in size, 1 to 2 hours (mine took 90 minutes).  Scrape the dough onto a floured surface and press down very gently to form a rectangle, don’t try to get all the air out of it. Give it a business letter fold, turn it 90 degrees and do another business letter type fold. Smooth the edges and return the folded dough to the bowl.  Cover, and rise until doubled, 1 to 1.5 hours (mine took only 45 minutes).

Turn the dough onto a lightly floured surface and shape it as a loaf.  Place into oiled loaf pan. Cover loosely with oiled plastic wrap and let it rise until the center is about 1 inch higher than the rim of the pan.

Preheat the oven to 350 degrees for 30 minutes before baking. Place oven rack at the lowest shelf and place baking stone on top. Place a sheet pan on the floor of the oven and  have some ice cubes handy.

Once the dough has risen, brush the top with the melted butter, then cut a 1/2″ deep slash down the middle of the dough. Quickly set the load pan on the baking stone. Take a 1/2 cup of ice cubes and quickly throw them onto the sheet pan. Bake for 45-55 minutes, until golden brown and the internal temperature is 200 F.  Remove pan from oven, remove bread from pan and set on wire rack. Brush with remaining melted butter. Let it cool completely (yeah, right… 😉 before eating.

ENJOY!

to print the recipe, click here

Comments:  Cracked-wheat (an ingredient similar, but not exactly the same as bulghur, for a nice explanation click here), gives this bread a perfect texture, and just the right amount of ‘grain-feel’.  You can substitute bulghur if you have trouble finding cracked wheat.

It is a very easy dough to handle, as most of the kneading is done with a mixer. It would be possible to knead by hand, but it would take a lot longer and you must develop the gluten fully to get the right texture – go for the Kitchen Aid, is my advice.   It is fun to make, the photos below show the sipping of the fermenting sponge after 1.5 hours, the addition of cracked-wheat, and the amazing first rise, probably due to the temperature in our home these days.

If you make this bread during warm weather, as soon as you shape the dough  start heating your oven, because mine took only 35 minutes to fully rise. You don’t want to risk overproofing, so that the bread will still rise during baking. Catch it around this stage, brush it with butter, slash the top and place it in the oven.

Sandwiches with cheese, ham, lettuce, a light touch of mustard were absolute heavenly!

I’m submitting this post to Susan’s Yeastspotting event…  Nice to be able to join that party after what seemed like too long a break!  😉

ONE YEAR AGO:  Au Revoir, My Bewitching Kitchen (hard to  believe it’s been one year already!)

TWO YEARS AGO: Teriyaki Chicken Thighs

Add to FacebookAdd to DiggAdd to Del.icio.usAdd to StumbleuponAdd to RedditAdd to BlinklistAdd to TwitterAdd to TechnoratiAdd to Yahoo BuzzAdd to Newsvine

WATERMELON SORBET

A few weeks ago I inaugurated my Cuisinart ice cream maker by making chocolate sorbet. Not my best performance, the texture was off, a bit grainy. I guess I didn’t melt the chocolate well enough before chilling the base.  I must try another recipe, as it is Phil’s favorite flavor, but in the meantime I picked his second favorite flavor and went to work. Watermelon sorbet was a lot more forgiving, refreshing and light, perhaps a tad too sweet. Next time I’ll up the lemon juice and reduce the sugar slightly.

WATERMELON SORBET
(from Culinary Philosopher)

1 + 1/4 cup sugar
1+ 1/4 cup water
1 quart cubed watermelon (seedless)
4 Tbs fresh lemon juice

In a medium saucepan, bring the sugar and water to a boil. Reduce the heat and simmer  without stirring until the sugar is completely dissolved.. Place in a bowl to cool to room temperature.

Put the watermelon chunks and the lime into a blender or food processor. Pulse about 20 times to chop the melon, then process until the watermelon is completely pureed. Press the watermelon through a mesh strainer,  and combine with the cooled sugar syrup. Chill in the refrigerator for at least one hour.

Pour the mixture into the frozen bowl of your ice cream maker and mix it for 25 to 30 minutes, or according to the instructions on your machine.  The sorbet will have soft serve texture. You can enjoy right away or put the sorbet into an airtight container and place in the freezer until firm for about 2 hours to firm it up.

ENJOY!

to print the recipe, click here

Comments:  I am in love with our Cuisinart ice cream maker!  The watermelon mixture seemed VERY liquid to start with,  I wasn’t sure it would ever turn into a sorbet, but the machine kept churning, the crystals started forming, and in a little less than 30 minutes I had a delightful batch of watermelon goodness!  A little liquid stayed at the bottom of the machine, I am not sure if one should open it midway through the churning and scrape the bottom, but it did not compromise the results.

Watermelon is by nature very sweet, so next time I’ll  use 3/4 of the amount of sugar, perhaps even half, and see how it goes.

If you are over the fence about getting an ice cream maker, don’t debate with yourself for 3 years as I did.  Get one while Summer is still smiling at you!  😉

ONE YEAR AGO: Under the Spell of Lemongrass

TWO YEARS AGO: Greens + Grapefruit + Shrimp = Great Salad

Add to FacebookAdd to DiggAdd to Del.icio.usAdd to StumbleuponAdd to RedditAdd to BlinklistAdd to TwitterAdd to TechnoratiAdd to Yahoo BuzzAdd to Newsvine

CHOCOLATE AND CHESTNUT TERRINE

This delicacy deserves THE spotlight on the Hall of Fame of Desserts, perfect for closing with a golden key a very special dinner.  It is classy, looks absolutely gorgeous, and according to Claudio, our dear friend who prepared it, it’s not too complicated to make.  Granted, Claudio is a fantastic cook, so I wasn’t quite sure what to expect until he showed me the recipe.  In this case, I must agree with him: if you have access to canned pureed chestnuts, this will be one of the simplest desserts you’ll ever make, but even if you don’t,  making the puree is worth the effort, so you can taste this masterpiece and swoon with each bite.

TERRINE OF CHOCOLATE AND CHESTNUT PUREE
(from Le Cordon Bleu – Receitas Caseiras)

185 g  (6.5 oz) semisweet chocolate, chopped
90 g  (3.2 oz) butter, at room temperature
90 g (3.2 oz) granulated sugar
400 g (14 oz) canned chestnuts puree
¼ tsp instant coffee, diluted in 1 tsp warm water
¼ tsp vanilla
30 ml  (1/8 cup) rum
shaved semisweet chocolate
fresh fruits of your choice (strawberries, blueberries, aguaymantos)

Lightly grease a loaf type pan with oil, cover the bottom with parchment paper, and oil the paper.

Melt the chopped chocolate in a bowl over simmering water (without letting the water touch the bottom of the bowl), stirring often.  Once it is completely melted and smooth, allow it to cool for 5 minutes.

Beat the butter with the sugar in a KitchenAid type mixer until creamy.  Incorporate the chestnut puree, and the melted chocolate.  When the mixture is very smooth, add the vanilla, coffee, and rum.  Pour into the prepared loaf pan, smooth the surface with the back of a spoon or a small icing spatula, cover with plastic wrap and place in the fridge for at least 12 hours.

To unmold, carefully run a spatula around the edges, invert the terrine on a serving platter, and decorate with fresh fruits of your choice, shaving chocolate all over.

Cut in slices, and serve.  Count the seconds until the first compliment!   😉

ENJOY!

to print the recipe, click here

Comments:  This recipe is from a Brazilian edition of a Le Cordon Bleu publication from many years ago. I could not find a link to the specific book, but if you click here, you’ll be directed to the huge LCB  collection available at amazon.com.

Both Phil and I were blown away by this dessert!  It is creamy, rich, and even though I was firm on my intention of having a very small slice after the great dinner they had served us, I was powerless, unable to resist a second (bigger) slice.  It melts in your mouth, with the fresh fruits balancing the intense chocolate flavor.  The aguaymantos (fisalias in Portuguese) were a terrific touch, with their slightly tart taste and exotic look, they added extra pizazz to the dessert.
That’s what their garden looks like at winter time…  a tropical paradise indeed!

ONE YEAR AGO: Bewitching Farro Salad

TWO YEARS AGO: From sea to table: sushi

Add to FacebookAdd to DiggAdd to Del.icio.usAdd to StumbleuponAdd to RedditAdd to BlinklistAdd to TwitterAdd to TechnoratiAdd to Yahoo BuzzAdd to Newsvine