OLIVE OIL BRIOCHE

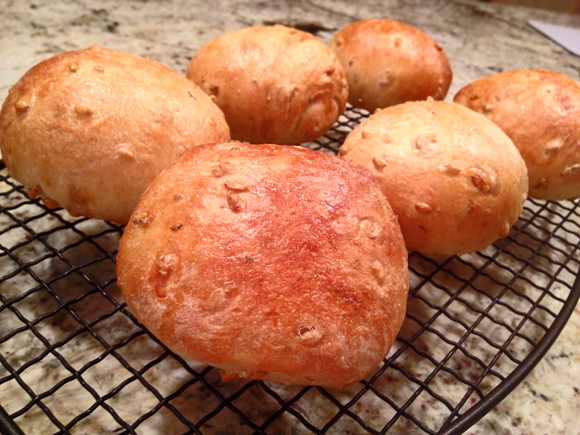
Karen from Karen’s Kitchen Stories is a source of endless inspiration for me. Particularly on anything related to bread, she finds the most unusual, exotic, unique recipes, and then bakes them like it’s no big deal at all.  Just to give you a recent example, look at this incredible concoction for which she used 12-ounce empty soda cans wrapped with foil as a baking “pan.”  Amazing, isn’t it? Today I share with you my adventure with her Olive Oil Brioche. I made only half the recipe and still had a ton of dough to play with. Enough for a large loaf and 6 buns. For reasons that will be discussed in the comments, if you make it, be ready to have one loaf and 8 buns. The amount for the loaf pan was a tad too much.

OLIVE OIL BRIOCHE
(slightly modified from Karen’s Kitchen Stories)

for the poolish:
100 grams all purpose flour
100 grams water
1.5 grams instant yeast

Mix the ingredients, cover with plastic wrap, and place in the refrigerator over night.

for the levain (Sourdough)
1 tablespoon starter
110 grams all purpose flour
110 grams water

Mix the ingredients, cover with plastic wrap, and let sit overnight at room temperature until bubbly.

for the final dough: 
200 grams poolish
150 grams levain
500 grams bread flour
12 grams salt
7.5 grams instant yeast
250 grams eggs
120 grams milk
80 grams honey
Zest of one Meyer lemon (optional)
25 grams water
220 grams extra virgin olive oil
For the egg wash: 1 egg plus one tablespoon milk

In a stand mixer, combine the flour, salt, yeast, eggs, milk, levain, poolish, honey, lemon zest, and water and mix on low for about 5 minutes. Cover and let rest for about 20 minutes.

Mix the dough with the spiral hook on medium to high speed for 8 minutes.
With the mixer running on medium,  add the oil slowly, pausing so that the oil is absorbed. I did it in three additions. Incorporation of the oil will take time, so exercise patience.  Add a sprinkle of bread flour to speed incorporation if you so desire, but do it only in the second and third addition. The dough should end up very smooth and not tear when  you stretch it.

Allow the dough to bulk ferment (in a large bowl covered in plastic wrap) for 2 hours at 70 degrees F. Do three stretch and folds during the first 90 minutes, one every thirty minutes.  When the dough is ready, remove three pieces of about 250g each and braid them. Place in a slightly oiled 9 x 5 loaf pan for final proofing. Divide the rest of the dough in 8 portions, shape as buns, and proof.

Heat the oven to 425 degrees F.  After the bread has been proofing for 1 and a half to 2 hours (until doubled), brush with egg wash and bake until golden brown, 30 to 40 minutes, until internal temperature is 200 F. You can sprinkle sesame seeds on the buns if you so desire.

Un-mold the large loaf and cool on a wire rack together with the buns.

ENJOY!

to print the recipe, click here

Comments: I will not lie to you, this is a project. The bread requires a sourdough starter, a poolish (fermented flour using small amount of commercial yeast and prepared the day before), and commercial yeast in the final dough. But it is a total pleasure to work with, rises like a rocket and the texture and taste? You will not miss the butter, that’s for sure. As Karen said, it keeps a lot better than the traditional version. And freezes beautifully too.

When you start adding the olive oil, you will be sure the whole thing is ruined, and might have a few rude thoughts directed at me. It seems impossible for the dough to come together. Have bread faith. And here is a little tip that might help: as you add the olive oil and the mixer is going and going, with a puddle of oil all around and looking hopeless, add just a sprinkle of bread flour on top. It will help things get in shape faster. But just a sprinkle, I say 1 tablespoon or so. If you add the olive oil in three additions, do that in the final two, when the dough will have more trouble incorporating it.

For a 9 x 5 loaf pan, I advise you to make three strands with about 250g of dough in each. Then divide the rest in 8 buns. When you do that, you will be able to let the shaped loaf proof for closer to 2 hours and it will not rip a bit like mine did. I had no choice but to bake after 1 hour and 10 minutes, the dough wanted to leave the pan and explore the kitchen. No bueno. That’s because I used 300g per strand, a bit too much. Don’t be put off by the complexity of this recipe, once you have the starter and the poolish prepared the day before, it is just a matter of weighing all other ingredients and having some fun.

Karen, thank you for the inspiration, I know I tell you this all the time but it’s so true… Your blog is a pleasure to follow!

ONE YEAR AGO: Coconut and Lime Macarons

TWO YEAR AGO: Flank Steak Carnitas

THREE YEARS AGO: Sesame and Poppy Seed Sourdough

FOUR YEARS AGO: Pecan-Crusted Chicken from Southern at Heart

FIVE YEARS AGO: Lamb Shanks en Papillote with Cauliflower-Celeriac Purée

SIX YEARS AGO: Chestnut Brownies and a Blog Award!

SEVEN YEARS AGO: Quinoa with Cider-Glazed Carrots

EIGHT YEARS AGO: Celebrate Wednesday: Heirloom Tomatoes Steal the Show

NINE YEARS AGO: Pain de Provence

TEN YEARS AGO: Golspie Loaf, from the Scottish Highlands

THE DAISY: A BREAD WITH BRIOCHE ALTER EGO

This bread is made with a very simple dough. No wild yeast, no extensive cycles of kneading, just your trusty commercial yeast, a few minutes in the Kitchen Aid, and a nice sleep in the fridge. It’s all about the shaping, that results in a flower-shaped bread. Think daisy. But both times I’ve baked it, the oven-spring was so spectacular that I thought I had made a brioche instead.

THE DAISY BREAD
(adapted from Craftsy online class by Ciril Hitz)

430 g bread flour
50 g spelt flour
320 g water
2.5 g instant yeast
10 g salt

Mix all the ingredients on low-speed in a stand mixer fitted with a dough hook. Start at low-speed for a couple of minutes, increase to medium-speed and mix for 6 minutes more.

Transfer the dough to a lightly oiled bowl, cover loosely with plastic wrap, and leave at room temperature for 30 minutes.  Place the bowl in the fridge overnight, but after two hours, punch the dough down, and cover again.

Next morning, remove the dough from the fridge and let it sit at room temperature for 30 minutes. Remove a small portion of about 35 g of dough and roll as a ball.  Shape the rest of the dough as a large ball.

Use a wooden dowel to press down the sections of a daisy flower. Add the small ball to the center.  Sprinkle a nice coating of flour, and let the dough proof for 60 to 90 minutes.

Bake at 470 F  in an oven with initial steam for 30 to 35 minutes. Cool completely before slicing.

ENJOY!

to print the recipe, click here

Comments: This is another nice shaping I learned taking the online class offered by Craftsy with Ciril Hitz (link under the recipe title, in case you missed it). I still have one more bread from that class to tackle, but that one is a bit more involved. The Daisy shaping is simple and fun. However, his bread was happy to be a flower, had no hidden intentions of imitating a brioche. He told me that perhaps a longer proofing after shaping would take care of that. I haven’t re-visited the issue. There are so many breads out there waiting for me…. But if you try it, keep that in mind.

I love Ciril’s class, he has a very serene personality, which goes well with bread baking. Come to think of it, it’s a bit of a stretch to apply serene to my own self, but that might explain why you don’t see me making videos of what happens as I bake. If you are over the fence about getting Craftsy classes, give them a try.  I think they are fantastic. Just make sure you read the reviews about each one. Also, they often have specials with huge discounts. I wait for those before  indulging.

The crumb is on the tight side, as expected for a lower hydration dough. It is a delicate balance to achieve when you want to focus on shaping. Higher hydration bread gives you a lighter texture, but it will be tricky to make them hold the shape.  I think both kinds of bread have their spot in the kitchen. And, between you and me, a tighter crumb is perfect to grab the last bit of a lusciously flowing egg yolk…

ONE YEAR AGO: Pork Tenderloin, Braciole Style

TWO YEARS AGO: Raspberry Buckle

THREE YEARS AGO: Seafood Gratin for a Special Dinner

FOUR YEARS AGO: Cooking Sous-Vide: Sweet and Spicy Asian Pork Loin

FIVE YEARS AGO:  Farewell to a Bewitching Kitchen

SIX YEARS AGO: In My Kitchen. June 2012

SEVEN YEARS AGO: Goodbye L.A.

EIGHT YEARS AGO: 7-6-5 Pork Tenderloin


SaveSave

SaveSave

SaveSave

SaveSave

SaveSave

SaveSave

SaveSave

SaveSave

SaveSave

KA’KAT, A MIDDLE EASTERN SNACK BREAD

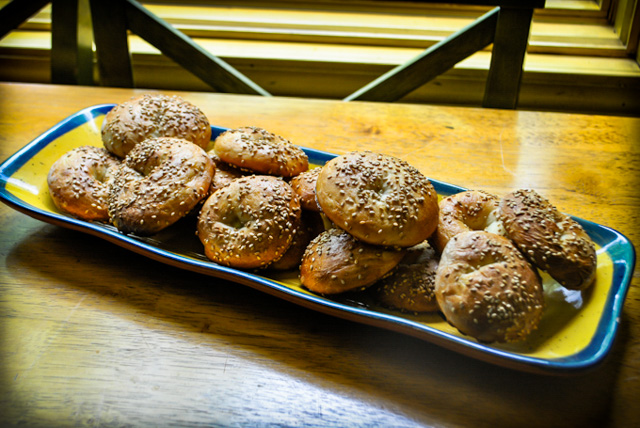
These are serious contenders for the prize of World’s Cutest Bread… Plump, golden brown, topped with sesame seeds, they are simply irresistible! I found the recipe in Karen’s site, and fell in love at first sight.  I almost made them for the Nobel reception we hosted, but that day was frantic enough without bread baking. In a way, I’m glad I did not push the envelope and tried squeezing in one more culinary project.  But a couple of weeks later, I rolled my sleeves up and went to work.  Not only these are adorable little entities, but they are a ton of fun to make. Surprisingly easy too. I hope I convinced you to bake a batch soon.  You’ll need one exotic ingredient, though. Mahlab. Totally worth searching for, or if you want to make it easy on yourself, click on this link. 

KaKat Snack Bread

KA’KAT BREAD
(from Karen’s Kitchen Stories)

2 T sugar
2 tsp active dry yeast
2 cups warm (105 to 115 degrees F) water
17 to 21 ounces of bread or unbleached all-purpose flour, divided
1 1/2 tsp salt
1/4 tsp ground mahlab
1 large egg, beaten
3 to 4 tsp sesame seeds
.
In the bowl of a stand mixer, whisk the sugar, yeast, and water. Add 12 ounces of the flour, and mix on low with the dough hook for about 3 minutes. Cover the bowl with plastic wrap and let it sit for about 10 minutes.
.
Add the salt and mahlab, mix on low. Gradually add flour until you have a dough that is cohesive (I used all of the flour). Mix on low for about 10 minutes. Let the dough rise in an oiled bowl until doubled, about 60 to 120 minutes.
.
Line two baking sheets with parchment. Divide the dough into 32 equal pieces. Roll each piece into a 6 inch rope. Form the ropes into rings and place them onto the baking sheets. Keep the rings covered with oiled plastic wrap. Cover and let rise for about 30 minutes.
.
Heat the oven to 400 degrees F and place the oven racks in the upper third of the oven. Brush the Ka’kat with the egg wash, and sprinkle with sesame seeds. Bake the Ka’kat for about 20 minutes, until golden. Rotate the pans halfway through.  Let cool on the pans for about 5 minutes before serving warm.
.
Leftovers can be reheated in a hot oven.
.
ENJOY!
to print the recipe, click here
.
composite

.
As you know, I have way too many cookbooks, and quite a few are related to bread baking. Still, I could probably get rid of all of them and be happy baking along Karen’s yeast-steps. Yeap, I made up the word. How’s THAT for taking liberties with a second language? Daring is my middle name! Seriously, though. Karen bakes the most amazing breads, and I find myself bookmarking almost every single one of her posts “to make very soon.” Ka’kat was such a nice baking adventure! The dough is smooth, pliable, the smell of the mahlab giving that subliminal message… this is going to be one tasty bread…

Shaping the rings is very easy, although when the dough rises the central hole may or may not be closed… As Karen, I decided not to even worry about it…

Shaped-2
A nice coating with egg wash followed by sesame seeds sprinkled on top…

ShapedSprinkled

And there you have it, a batch of Ka’Kat ready to be enjoyed, shared with friends, or stored in the freezer for later…

KaKat Platter

I cannot recommend this recipe highly enough, it would be a great project to tackle with kids, they would have fun forming the little dough ropes and then the rings. If you don’t have mahlab, don’t let that stop you from making the bread, but I must say the seeds add a flavor that will leave everybody wondering “what’s in it?”


Karen, thank you once again for inspiring me!  I have so many breads I want to bake from your site, it’s not even funny… but I bet you knew that already…
.

ONE YEAR AGO: Spinach and Chickpea Curry

TWO YEARS AGO: Sautéed Zucchini with Sun-dried Tomatoes and Basil

THREE YEARS AGO: Orzo with Heirloom Tomato Relish

FOUR YEARS AGO:  Headed to Brazil!

FIVE YEARS AGO: The Rhubarb Brouhaha: Revelation Compote

SIX YEARS AGO: Love me tender…

JOSEY BAKER’S OLIVE BREAD

You would think that I’m done talking about gifts. Sorry, there is one more, a super special gift received from Celia, the bread baking Goddess Extraordinaire from Australia, hostess of the equally extraordinaire food blog Fig Jam and Lime Cordial.  She found out that it was my birthday last month (full disclosure: I told her), and sent me a bread cookbook: Josey Baker Bread.   I was traveling at the time, but could not wait to get my hands on some flour, salt, and yeast to put my gift to use.  Of course, my first thought was sourdough, but we’ve been so busy lately, that every Wednesday would come and go, and I never remembered to revive my starter, hibernating in a – 20°C freezer.  Finally, I could not wait any longer, and tried one of the simpler recipes using commercial yeast.  This is by far one of the easiest breads you can make. All it takes is preparing a pre-ferment with whole-wheat flour, allowing that to sit at room temperature overnight, then proceed with a no-knead formula next day.

unnamed-12

OVERVIEW OF THE RECIPE: to make this bread, you will start by mixing whole wheat flour with water and a little commercial yeast.  That mixture will bubble away overnight, and will be part of the final dough, which contains only white flour, a little salt, lemon zest, fresh rosemary, and of course black olives.  I actually omitted the rosemary because I did not have any at home then.  I increased the amount of lemon zest, but other than that the recipe was followed to a T.

It is essentially a no-knead bread, with a very flexible schedule as far as preparing the dough and baking it. This is one of the things I loved the most about his cookbook: Josey offers a timetable for all his recipes, so that you can adjust making bread to your own schedule, no matter how busy you are. If you rather stay up late to bake, follow one particular timing. If you prefer to bake first thing in the morning, follow another one. Baking in the end of the afternoon? At lunch time? It’s all doable. Part of the beauty of working with yeast. If you are new to bread baking, this book will be perfect for you, because it totally demystifies the process. Reading the book is the closest thing to having a class on bread baking given by a pro who behaves more like a friend, not a snotty professor. Yeap, that is what Josey Baker’s book is all about.

If you want the full recipe, it is available online, reprinted with permission from Josey on this site.


unnamed-13
For a no-knead bread, the crumb has quite a nice structure, and the taste is wonderful!  The lemon zest was very prominent, and I think rosemary would make this bread perfect. But I would never substitute dried rosemary because I dislike its texture. In fact, one of the spices I rarely use in dried form is rosemary for that very reason.  Unless it is part of mixes such as Herbes de Provence, but in that case it is pretty much pulverized and the drawback of harsh texture is eliminated. Still, get your hands on some fresh rosemary, grab your bag of flour and make this bread. The smell while it bakes is out of this world delicious! And refrain from grabbing one of those olives that will be peeking on the surface of the loaf.  It is bad bread etiquette, and resisting that temptation builds character. HA!

Celia, thanks so much for the thoughtful gift! Special friends make getting one year older “almost’ painless…
😉

ONE YEAR AGO: Almonds, a Cookbook Review

TWO YEARS AGO: Pumpkin Shrimp Curry

THREE YEARS AGO: In My Kitchen, April 2012

FOUR YEARS AGO: A Dutch Tiger

FIVE YEARS AGO: Banana Bread


WHEAT BERRY CARAWAY BREAD

Time running out to enter the Bewitching giveaway… click HERE to join the fun!

WheatBerryCarawayBreadMom and her kids…

This bread was featured by the bloggers at Bread Baking Babes. I do not participate of this group event, but Ilva – from Lucullian Delights – does and when she blogged about this recipe, I made it on the following weekend, no time wasted.  The original recipe from Peter Reinhart called for wild rice and onions, but she decided to use barley and caraway.  I went with a modified version of her modified recipe, keeping the caraway but replacing the barley with wheat berries.  A soft crumb, permeated with just enough crunch with the wheat berries, and that great flavor given by caraway seeds.  You would almost think about rye bread as you savor this bread, since caraway is so often used in European rye concoctions. But it is definitely different.  A wonderful dough to work with, rose like a balloon…. what a great sight this is for a bread baker, whether or not she is a babe…   😉

risen2

WHEAT BERRY AND CARAWAY BREAD
(adapted from Ilva’s recipe)

6 cups (765 g) bread flour
2 + 1/4 teaspoons (17 g) salt
2 tablespoons (19 g) instant yeast
1 cup (170 g) cooked wheat berries
1/4 cup (56.5 g) brown sugar
1+1/2 cups (340 g) lukewarm water
1/2 cup (113 g) lukewarm buttermilk
1 Tablespoon caraway seeds
1 egg white, for egg wash (optional)
1 tablespoon water, for egg wash (optional)

The day before baking:
Combine all of the ingredients, except the egg wash, in a mixing bowl. If using a mixer, use the paddle attachment and mix on the lowest speed for 1 minute. If mixing by hand, use a large spoon and stir for 1 minute. The dough should be sticky, coarse, and shaggy. Let the dough rest for 5 minutes. Switch to the dough hook and mix on medium-low speed, or continue mixing by hand, for 4 minutes, adjusting with flour or water as needed to keep the dough ball together. The dough should be soft, supple, and slightly sticky.

Transfer the dough to a lightly floured work surface. Knead the dough for 2 to 3 minutes, adding more flour as needed to prevent sticking. The dough will still be soft and slightly sticky but will hold together to form a soft, supple ball. Place the dough in a clean, lightly oiled bowl, cover the bowl tightly with plastic wrap, and immediately refrigerate overnight or for up to 4 days.

On Baking Day:
Remove the dough from the refrigerator about 2 hours before you plan to bake. Shape the dough into one or more loaves, in any shape you like, free form or in a loaf pan (if using a 5 by 9 inch pan, use 1kg of dough). For sandwich loaves, proof the dough in greased loaf pans. For freestanding loaves and rolls, line a sheet pan with parchment paper or a silicone mat and proof the dough on the pan.

Mist the top of the dough with spray oil and cover loosely with plastic wrap. Let the dough rise at room temperature for 1.5 to 2 hours, until increased to about 1.5 times its original size. In loaf pans, the dough should dome at least 1 inch above the rim. If you’d like to make the rolls more shiny, whisk the egg white and water together, brush the tops of the rolls with the egg wash just before they’re ready to bake.

Heat the oven to 350°F and bake the loaves for 10 to 15 minutes, then rotate the pan. Total baking time is 45 to 55 minutes for loaves, and only 20 to 25 minutes for rolls. The bread is done when it has a rich golden color, the loaf sounds hollow when thumped on the bottom, and the internal temperature is above 185°F in the center.

Cool on a wire rack for at least 20 minutes for rolls or 1 hour for loaves before slicing.

ENJOY!

to print the recipe, click here

Rolls1
Comments:  This recipe makes A LOT of dough…  Peter recommended using only 2 ounces (around 57g) dough per small roll.  My rolls were definitely bigger than that.  Normally I do not weigh dough when shaping. For this recipe I more or less cut the dough in half, shaped one as a large ball, and divided the remaining dough in 6 pieces, eyeballing the process.   For hamburger-type sandwich, they were the perfect size.

shaped
The crumb is super soft, and since I used a reasonably small amount of caraway seeds, the flavor was not overpowering.  I love caraway, but in breads I like it to be a mild presence.  This bread was perfect with our Black Bean Burgers of a recent past…

crumb
FINAL REMARK:  Remember that this bread takes TWO days to prepare.  On the first day you will mix the dough, and place it in the fridge.  Next day you resume shaping and baking.  The fact that the dough can be kept in the fridge for a few days will make it easy to have freshly baked bread on a whim.  Or almost on a whim…


I thank Ilva for the inspiration, and Susan for her Yeastspotting venue so I can share this bread with other bread baking “babes’…


ONE YEAR AGO: Mexican Focaccia 

TWO YEARS AGOSunny Kamut Salad with Roasted Lemon Vinaigrette

THREE YEARS AGO: Pane de Casa & Crostini

FOUR YEARS AGO: Down-home Dig-in Chili

FIVE YEARS AGO:  Cinnamon Rolls