AUVERGNE COURONNE FROM LOCAL BREADS

First bread post of 2013!

closeup

A change from the usual boule or batard, this bread is fun to make, beautiful to look at, and a pleasure to eat!   The recipe comes from Local Breads, by Daniel Leader (with Lauren Chattman), a book that any serious bread baker should own.  I actually have his first book too, Bread Alone, and keep both volumes together on the shelf as lovely siblings.  Bread Alone is an excellent starting point for beginner bread bakers as well as those who want to try their hands at baking with wild yeast. Local Breads is perhaps slightly more “advanced”,  lots of sourdough, with formulas that  focus on regional recipes that Leader collected through his  travels around Europe. Reading his books is like having a master bread baker giving you a private lesson, going through the details that make a difference between a so-so loaf of bread and one that makes you dream.

I wanted my first bread post for 2013 to be special, and this loaf surpassed my expectations. It is surprisingly simple, no special flours, no grains, no seeds.  Just a well-fed sourdough starter, the best quality flour you can find, and a little tender loving care to shape the dough and bake it.
bread2AUVERGNE CROWN
(formula from  Local Breads, published with permission from Daniel Leader)

Levain Starter (you will not use the full amount prepared):
45g levain starter, firm (about ¼ cup)
95g unbleached all-purpose flour
5g stone-ground whole wheat flour
50 g tepid water

for the bread:
500g  unbleached all-purpose  flour
340g water
125g levain (less than the amount prepared above)
10g sea salt

Prepare the levain: Pinch ¼ cup of your stiff levain and place in a bowl with 50 mL water.  Mash the levain with a whisk  until it dissolves, then add both types of flour and stir.  Turn the mixture onto a work surface and knead to fully incorporate the flour.  Place the levain in a covered container and let it sit at room temperature (70 to 76°) for 8-12 hours or until it has doubled in volume and the surface is domed.

Make the bread: Pour the water into a large mixing bowl or the bowl stand mixer. Combine the flours until all the ingredients are incorporated. Cover and let it rest for 20 minutes, while the flour hydrates.Uncover the dough, add the salt and the levain and incorporate with your hands or a spatula using a fw firm strokes.  Knead the dough with the dough hook by mixing on low-speed (2 on a KitchenAid) for a minute.  Increase speed to medium (4 on a KitchenAid) and knead until smooth and muscular; an additional 8 to 9 minutes. Transfer the rounded dough to a lightly oiled container, preferably clear, so you can mark the level of the dough with a masking tape.  Let the dough ferment until doubled in size, 3 to 4 hours at a temperature of 70 to 75 F.

Shape the crown.  Cover a surface with a little flour.  Place the risen dough over the counter and roll it very gently into a long fat rope, about 8 inches long and 3 inches wide. Connect the ends of the rope overlapping by about 4 inches. Press the ends together to seal. Dust a ring baking pan with flour and carefully drop the shaped dough inside.  Allow it to proof at 70 to 75 F until it looks “pillowy”,  1 to 1 and a half hours. When you press your finger tip into the dough, it should spring back slowly.  As the bread proofs, heat your oven to 425 F and place a large roasting pan, without the lid, inside.

Bake the bread. Once the bread is proofed, slash the outer edge of the round with a razor blade, and place the ring pan inside the roasting pan, and close with the lid slightly moist with tap water.   Bake covered for 30 minutes, uncover, remove the ring pan from the oven, carefully invert it to remove the bread, and finish baking the bread sitting on the oven rack, for 15 to 20 more minutes.

Let it cool completely on a rack before slicing through.

ENJOY!

 to print the recipe, click here

bread1
Comments: In the past, I’ve made a few loaves of ring-shaped breads, and had problems moving the bread to the oven after the final rise. I ended up deflating the dough too much and also messing its shape.  This time, I tried something a little different: after shaping the loaf, I placed it in a well-floured ring baking pan, and let the dough go through the final proofing in the pan.  When it was time to bake, I quickly scored the outside edge of the dough, and placed the pan and all inside a pre-heated, large roasting pan.   The next couple of photos should help explain my strategy, which, I am thrilled to inform, worked quite well!
doughbakingpan
After 30 minutes baking with the lid closed, I removed the lid, took the ring pan carefully out, inverted it quickly over the counter to release the bread, and placed the bread on the oven rack, without any baking sheet underneath, so that the crust would get a final roasting free of constraints.   I like to bake my bread until it’s really dark, because that’s when the taste of the crust delivers the punch I like, the one that transports me to a Parisian bakery…

ABOUT LOCAL BREADS: Ten years passed between Leader’s publication of his first book, Bread Alone, and Local Breads. During that period, he worked with many master bakers in Germany, Italy, and Eastern Europe. In the first chapter of his book, he talks about his bread journey and how he’s gained a special respect for simple but crucial details such as the choice of flour. After a couple of chapters devoted to general lessons on equipment and technique (a must read, by the way), he shares his many recipes in sections divided  according to region. He will take you from France to Italy, stop in Germany, Poland, Austria, and the Czech Republic, sampling some of their unique yeast concoctions.

If you enjoy baguettes, you’ll be happy to know that Leader offers recipes for French, Italian, and German baguettes, so you can bake them all and compare their “personalities”. He also shares his recipe for the famous miche from Pain Poilane in France, as well as German Rye Sourdough, two examples of bread that, in my humble opinion,  can be quite intimidating.  With his detailed instructions, you’ll feel ready to tackle any project, Pain Poilane included!  So, if you don’t have Local Breads on your shelf, correct this severe cookbook handicap with a simple click here.  😉

I would like to thank Dan Leader for his permission to publish this great recipe. This post goes straight to Susan’s Yeastspotting!

ONE YEAR AGO: Orange-Pomegranate Chicken

TWO YEARS AGO: The Getty Museum

THREE YEARS AGO: Crowd-Pleasing Pulled Pork
SOURDOUGH MINI-ROLLS

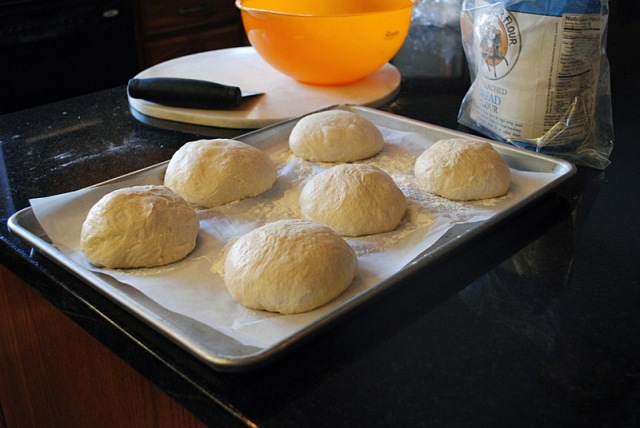
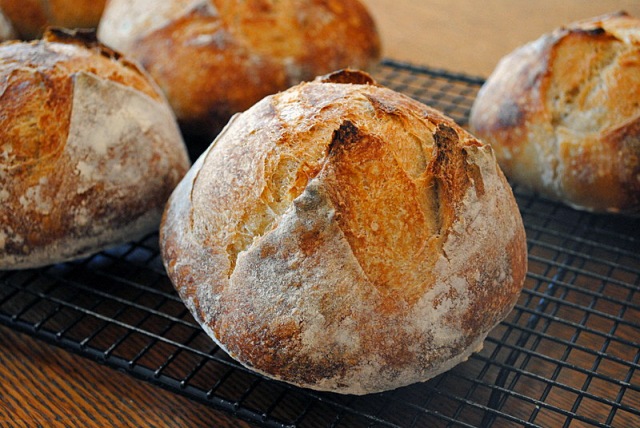
Those who follow my baking adventures know that my favorite type of bread is a sourdough boule, medium to large size.  For some odd reason, when I want to bake small rolls, I always opt for recipes that use  commercial yeast, and result in a softer, more buttery bread.  That is now changed.  I used one of my favorite basic sourdough recipes to bake 6 small rolls, shaped exactly like a large one, and similarly scored.   They turned out so good, I might switch to this type of format for a while. Plus, each roll can be frozen for later, brought to room temperature for a few minutes, then placed in a very low oven (250 F) for 15 minutes or so.  Perfect bread whenever you feel like it!  😉
mini1

SOURDOUGH MINI-ROLLS
(adapted from Hamelman’s Bread)

for starter mixture (make 12 hours in advance)
100 g bread flour
80 g rye flour
110 g water
40 g active sourdough starter (at 100% hydration)

for the bread:
all sourdough made as above
700 g bread flour
20 g rye flour
470 g water
15 g salt

Prepare your sourdough mixture about 12 hours before making the dough.  Heat the water slightly in a microwave until it is lukewarm, and place it in the bowl of a KitchenAid type mixer.  Add the sourdough into the water and mix with your hands to dissolve it. Add both flours, and mix at low-speed until the ingredients form a shaggy mass.

Cover the bowl and let the dough rest for 20 minutes.   Sprinkle the salt over, turn the mixer back on low-speed and knead for about 4 minutes.  Transfer the dough to an oiled bowl and let it rise for about 2 and a half hours, folding the dough every 50 minutes. For a more detailed explanation on folding, click here. You will do a first folding cycle at 50 minutes, another one at 1 hour and 40 minutes, then leave it undisturbed for additional 50 minutes, for a total of 2 and a half hours fermentation.

Heat your oven to 450 F. Divide the dough in 6 equal pieces.   Shape each one as a small boule.  Place over floured parchment paper on a baking sheet, flour the surface lightly and cover.  Allow the rolls to proof for 45 minutes.  Score the surface,  and bake for 25 minutes (with initial steam) or until golden brown and the internal temperature over 205 F.   Cool completely on a rack.

ENJOY!

to print the recipe, click here

risingComments:  Depending on the method of steam you use for your oven, these rolls can be a breeze to bake.  I decided to use my usual method of inverting a damp roasting pan over the rolls, and to do that I needed to bake three rolls at a time.  Let’s say it was a bit too convoluted and the second batch was slightly over-proofed.  Next time I might just go for a less complicated method, and use a baking pan with hot water at the bottom of the oven.  Whatever method you choose, the steam provides a nicer crust.
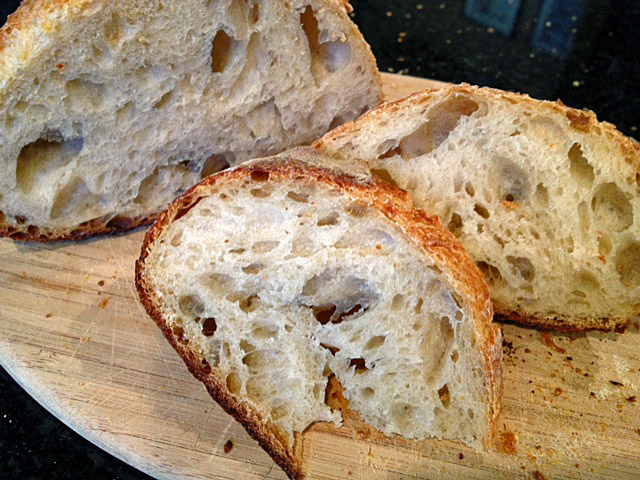
The crumb was moist and creamy, the way we like it, and the crust reminded us of the fantastic baguettes we used to enjoy while living in Paris…  What’s not to like?   😉
crumb

I am submitting this post to Susan’s Yeastspotting

ONE YEAR AGO: Do you eat your books?

TWO YEARS AGO: Mediterranean Skewers

THREE YEARS AGO Fettuccine with Shrimp, Swiss Chard, and Tomatoes

OCTOBER 16: WORLD BREAD DAY!

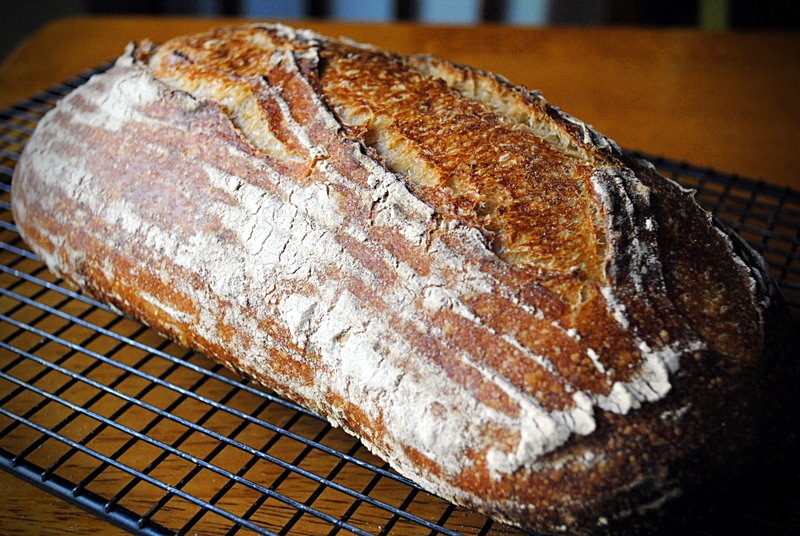
Six years ago, Zorra started an event called “World Bread Day“. Bakers from all over the world would bake a loaf of bread and blog about it.  This year I am thrilled to participate and chose my favorite type of bread to join the party.  The recipe comes from a very nice book, Artisan Baking, written by Maggie Glezer.  A country French-style loaf called Essential’s Columbia.   The formula comes from George DePasquale, from Seattle’s Essential Baking Company.

The perfect Sunday starts with a batch of sourdough starter all puffed up from getting fed 12 hours earlier.  Before I even have my morning capuccino, the kitchen still dark, I look at my ingredients waiting, and get all excited anticipating the thrill of getting a nice loaf of bread from our oven.   It does help a lot to weigh it all the night before, all you have to do is heat the water in the microwave for 30 seconds or so,  and you are ready to go…

In Glezer’s book, this bread is listed as “advanced”, but it’s actually quite simple to prepare.  It calls for all purpose flour, bread flour, whole wheat, and a little rye.  Also in the formula a small amount of toasted wheat germ, and barley malt syrup.   It uses a very firm starter, probably the firmest I’ve ever seen in a recipe, it is actually more like a dough that ferments for 12 hours and then is incorporated in the mixture of flours, salt, and water.    A very slow and long fermentation, with the help of my bread proofing box.  Amazing how the two banettons fit just right inside!

After shaping, the oblong loaf proofed for 3 hours, and the round one for almost 4 hours, as I could not bake them at the same time.  Not much difference in the crumb, which was a bit surprising to me. I expected the round loaf to have a slightly more airy inner structure.  But bread is bread,  its temperamental nature one of the things I love the most about it.

I could not find a way to contact Maggie Glezer to get her official ok to publish the full recipe, but it is available online in a couple of blogs, so you can find it.  But the book is a must-have for anyone with a passion for wild yeast, so consider providing that little boost on the economy.

My batard shaping was a little better than usual, but still needs improvement… gotta keep going at it!

The perfect Sunday ends with a couple of loaves resting on the counter….

and the perfect Monday starts with a small gift to the Department!   😉

I am submitting this post to Susan’s Yeastspotting…    and I invite you to visit the roudup of breads at Zorra’s site!

ONE YEAR AGO: The US Listeria Outbreak 2011

TWO YEARS AGO: 36 Hour Sourdough Baguettes

THREE YEARS AGO: October 16 is World Bread Day

THERE WILL BE BREAD


Drum roll, please…  

This post officially inaugurates the new kitchen in The Little Apple!  What better than a loaf of bread to start things on a nice track?  So, let me share with you a golden bread perfumed with the special saffron I received as a gift from our friend Steve. The bread looked like a blast of sunshine sitting on the black granite, and it made nice cracking noises as it cooled, the promise of a nice crumb underneath a hearty crust.

GOLDEN SAFFRON & FENNEL LOAF
(from the Bewitching Kitchen, inspired by Flo Makanai)

125 g  sourdough starter (at 100% hydration)
250 g water (divided)
large pinch of saffron
375 g bread flour
7 g salt
1 tsp fennel seeds

Heat 50 ml (no need to be precise) of water in a microwave until almost boiling, add the saffron and let it sit until it cools to almost room temperature, stirring every now and then.  Strain the saffron water through a fine mesh colander, and add to the rest of the water for a final volume of 250ml. Reserve.

Add the active starter to a large bowl, mix it with the water until it dissolves more or less smoothly. Add the flour and the fennel seeds, and briefly do a few kneading moves to form a shaggy mess.  Cover loosely with plastic wrap for 20 minutes.

Sprinkle the salt over the dough and incorporate by kneading lightly and folding the dough on itself.  You can keep the dough in the bowl, or transfer to a surface.  After 20-30 seconds of kneading/folding, cover the dough again and let it sit for 40 minutes (total rising time up to this point: 1 hour).

Repeat cycles of quick kneading/folding two more times, spacing them 40 to 50 minutes.   After the third and final kneading cycle, let the dough sit for 20 to 30 minutes, shape it as a round or oval loaf, and leave it at room temperature  30 minutes longer.  Total rising time from beginning to end: about 3 and a half hours.  Place it in the fridge overnight.

Remove the dough from the fridge 2 hours before baking (see my comments). Heat the oven to 450F. If using a clay pot, place it in the cold oven as you turn it on. Bake the bread covered for 30 minutes, remove cover, and allow it to fully bake (reducing the temperature to 425F if the bread seems to be browning too fast) for 12 to 15 minutes longer.  Remove to a rack to cool completely before slicing.

ENJOY!

to print the recipe, click here

Comments:  It’s been a while since I baked a loaf of bread that made me as happy as this one! I’d been refreshing my starter for weeks in a row, but placing it back in the fridge, unable to squeeze bread baking in our crazy schedule.  My cookbooks are not unpacked yet, so I decided to go with the simple but very efficient method devised by Flo Makanai years ago: her famous 1, 2, 3 recipe.   One part starter, 2 parts water, 3 parts flour.  You can adapt and use any liquid or flour, but that’s the basic formula.   I wanted to incorporate saffron in the dough, and fennel seemed like a good match too.  Considering that it was not a tried and true recipe, and that it would be my first time using the oven in our new home, I admit I was  pushing the envelope. Interesting expression, by the way, I learned its origin not too long ago, and was a bit surprised. No Post Office material was used in its making.  Live, and learn.

Live, learn, and bake!  😉

To add a bit more emotion to the adventure, I could not find my banettons to proof the dough after shaping.  I actually have two, one round, and one oval, but they are both MIA, probably hidden inside one of the unpacked boxes.  I ended up using a copper colander, lined with a white cloth.

Necessity is the mother of invention.

I pushed the envelope once more by removing the dough from the fridge only 30 minutes before placing it in the 450F oven, trying to minimize the time our kitchen would be exposed to such insanely high temperature. Still, the bread had an impressive oven spring, and the beautiful, golden open crumb I hoped for.  It would be amazing with paella or a bowl of bouillabaisse, but until the weather cools enough for those dishes, we’ll enjoy it with fresh, juicy tomatoes and a sprinkle of Maldon salt.   Simple pleasures. Golden pleasures.

A final remark: I wish I could take credit for the title of this post, but my beloved husband was the genius behind it…  Sorry, ladies, he’s mine, all mine!

I am submitting this post to Susan’s Yeastspotting.

ONE YEAR AGO: In My Kitchen, July 2011

TWO YEARS AGO: Heavenly Homemade Fromage Blanc

THREE YEARS AGO: A Perfect Sunday Dinner

BLACK OLIVE SOURDOUGH BREAD

Inspired by a bread from Hamelman (Olive Levain), which I’ve made a few times in the past, I improvised on the basic sourdough method from Emmanuel Hadjiandreou and his “How to Make Bread“, that I recently blogged about.  You want this bread to deliver real big olive flavor, so keep the olives in large pieces, you can even leave some whole (but pitted, of course! 😉

BLACK OLIVE SOURDOUGH
(adapted from Emmanuel Hadjiandreou)

400 g (3 + 1/2 cups) bread flour
10 g (2 tsp) salt
200 g (3/4 cup) warm water
300 g (1 + 1/2 cups) sourdough starter (100% hydration)
4-5 ounces black olives (preferably Kalamata, pitted and chopped in large pieces – roughly 1 cup, loosely packed)

Add into one bowl the flour and the salt.   This is your dry mixture.

In another, larger bowl, mix the  water and the sourdough starter. This is  your wet mixture.

Add the dry mixture to the wet mixture and mix until it all comes together. Cover with a plastic wrap and let it stand for 10 minutes.  After 10 minutes, add the pieces of olives and knead the dough in the bowl, by pulling one portion of the dough from the side and pressing it down in the middle.  Repeat it turning the bowl slightly at each kneading, doing this kneading motion about 8 times and covering the full circumference of the ball of dough. The whole process should take about 20 seconds.   Cover the dough again and leave it resting for 10 minutes.

Repeat this kneading cycle three more times, 10 minutes apart.  Cover the bowl and let it rest for one hour.

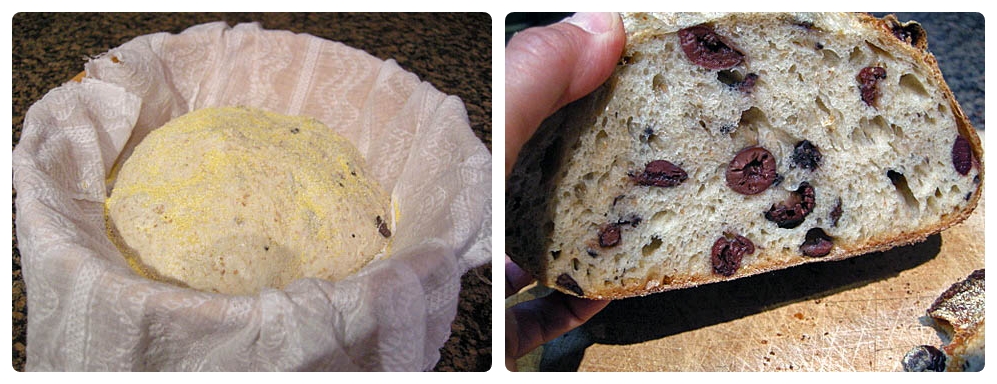
Turn the dough onto a floured surface, and shape it  as a round ball,  coat the surface lightly with cornmeal or rice flour, and place it in a suitable container for the final rise.  Let the dough rise until doubled in size, which should take from 3 to 6 hours, depending on how active your starter was.

Heat the oven to 475 F, and have your method to generate steam ready.   Slide the bread on a parchment paper or a wooden peel, slash it, and place it in the oven.  I like to bake it over tiles, and place an inverted roasting pan moist with hot water over it for about 30 minutes, then remove it.   Once the bread is in the oven, reduce the temperature to 425 F.  Bake for a total of 40 minutes, or until the internal temperature is over 200F.

Let the bread cool completely before slicing.

ENJOY!

to print the recipe, click here

Comments:  I confessed before that I am a kalamata-cheerleader,  so this bread is obviously a favorite of mine.  I already have a spicy kalamata sourdough in the blog,  but in this version I took a minimalist approach and used only olives, nothing else.

Don’t worry if when you start kneading the dough, the pieces of olive insist on poking out, just let them be.   In the end, they will find their perfect spot in the crumb.   Try not to squish the pieces too much as you fold or knead the dough.

I used cornmeal to coat the surface of the bread during proofing, because I ran out of rice flour, but in the end it turned out pretty good, the cornmeal gave the bread an interesting golden hue, and did a good job releasing the proofed bread from the banetton.

I am sending this post to Susan’s Yeastspotting, make sure you stop by to get inspired by all the baking going on this past week…   😉

ONE YEAR AGO: Buttermilk Cluster

TWO YEARS AGO: Farfalle, Farfalle

Add to FacebookAdd to DiggAdd to Del.icio.usAdd to StumbleuponAdd to RedditAdd to BlinklistAdd to TwitterAdd to TechnoratiAdd to Yahoo BuzzAdd to Newsvine