SILKY CAULIFLOWER PUREE WITH ALMOND MILK

I am not sure why it took me so long to try almond milk, but  I fell in love with it the moment I tasted it.  This one is my favorite, the plain and lighter version made by Silk.   It is part of my daily routine now, half a glass of almond milk right before going to work, and another half after lunch.  Shockingly cold is best, by the way.   Phil used it in his lunch smoothies in place of  yogurt and loved it too. My passion for almond milk started me on a virtual expedition in the internet chasing for recipes using it in cooking.   I was pleasantly surprised to find quite an extensive number of possibilities.  My first adventure with Silk was a winner:  cauliflower puree.  I share with you the recipe,  inspired by Food and Wine.

AlmondCauliPuree1

SILKY CAULIFLOWER PUREE WITH ALMOND MILK
(from the Bewitching Kitchen)

1 medium-sized head of cauliflower
1 tbsp grapeseed oil
1 celery stalk, diced
1/2 red bell pepper, diced
1 shallot, diced
Half gallon Light Almond Milk (or slightly less)
salt and pepper

Prepare the cauliflower by removing the outer leaves and the central core.  Cut the florets off, slicing the large ones in two or three pieces.

Heat the oil on a skillet. Saute the celery, onion, and red bell pepper until the onion is golden, and the mixture is very fragrant. Season with a little salt and black pepper.   Add the cauliflower to the skillet and cook it on high heat for a couple of minutes, stirring often.  Transfer the mixture to a saucepan so that the cauliflower fill it no more than halfway up.   Add almond milk to the saucepan and bring the mixture to a boil.   Reduce the heat, cover the pan keeping the lid slightly ajar, and simmer for 15 to 20 minutes, until the cauliflower is tender.

Transfer the cooked cauliflower to the bowl of a food processor, keeping the almond milk in the pan.  No need to drain it completely, the amount of liquid that stick to the florets will help ensure a nice texture.   Process until smooth.  If necessary, add a little more warm almond milk.   Test for seasoning.   Serve warm.

ENJOY!


to print the recipe, click here

As I said, my first adventure with almond milk in cooking won’t be the last. In fact, I have this recipe on my “to try soon” folder, and hope I can actually switch it into the “tried and true”  in the near future.  One store in town normally carries Marcona almonds, which is the only tricky ingredient to find. With that in hand, I should be good to go.

Probably because I used light almond milk instead of full fat, the liquid seemed to separate a little as the cauliflower cooked. It definitely did not harm the dish, so if you use the light version, ignore its looks.  It will all come together in a silky happy ending!

dinner

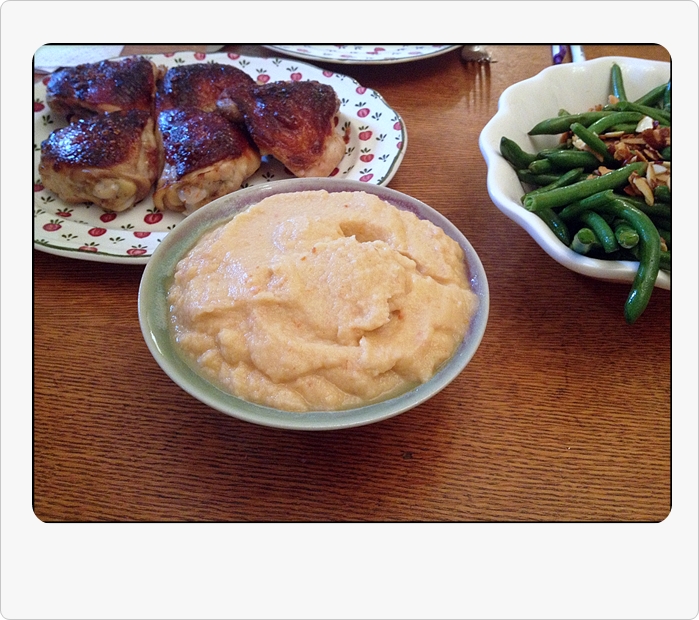
Our dinner felt quite special, considering it took place at the height of our kitchen renovation. Here is the full menu for that evening:  roasted chicken thighs marinated in beer-soy-orange (marinade to be blogged about soon), green beans with almonds, and the cauliflower puree.  Mr. Hamilton roasted the chicken thighs, Mr. Breville broiled the skin for a couple of minutes, and our single burner induction stove took care of the rest.  A few sautéed almonds on top of the puree tied both side dishes together quite nicely… even if I say so myself…   😉

plate

.
THREE YEARS AGO:
Popeye-Pleasing Salad
.
FOUR YEARS AGO: Summer’s Finale

AWESOME BROCCOLINI

Ah, the bliss, the joy, the thrill of a stove with hot burners!  Stir frying, and any  other cooking style that imparts a wonderful, golden brown color – promises of great flavor ahead – just can’t materialize without intense heat.  I look at the powerful flame on our stove, and discreetly wipe a tear from my eye … Some things get to me.  A big sink to wash dishes.  An oven with three racks and the capability of 500 F.  Stuff like that.  But, back to food.  I found  some organic broccolini at the grocery store.  It’s a great veggie, a perfect side dish for anything from poultry to seafood.  BTW, it’s not baby broccoli,  but a cross between broccoli and  kai-lan, a Chinese leafy cabbage.  The cross mellows the broccoli character, almost yielding the flavor of asparagus, which explains one of its alternative names: asparation (I’m glad this name didn’t stick!  ;-))

My take on broccolini is a slight departure from the stove-top version of broccoli that I posted a year ago.

BROCCOLINI WITH GINGER AND LEMON
(from the Bewitching Kitchen)

2 small bunches of broccolini, preferably organic
2 tsp olive oil
red pepper flakes
1 tsp grated ginger
zest and juice of half a lemon
salt and pepper
splash of water (if needed)

Heat the olive oil in a large stainless steel skillet (that will hold the veggies without crowding), when smoking hot add the red pepper flakes, swirl for a couple of seconds and immediately add all the broccolini. Do not move them around, let them get a nice brown color at the bottom. Season with salt and pepper. After a couple of minutes, add the ginger and lemon zest, and shake the pan to move the broccolini and coat well all sides with the ginger, lemon zest, and oil.

Cover the pan, let it cook for 2-3 minutes more, then add the lemon juice – test the broccolini with a fork to see if it’s done to your liking.  If it’s not, and the pan is too dry, add a splash of water and cover the pan again, checking after a minute.  Once it’s cooked al dente, transfer to a serving dish and…

ENJOY!

to print the recipe, click here

Comments:  If you are anti-broccoli and think broccolini resembles it too much, please reconsider!  There’s absolutely none of the broccoli flavor/smell that many object to.  Avoid over cooking it, and buy young broccolini, with a bright green color and a firm flesh. This recipe is low in carbs and fat, but sky-high in flavor!  Lemon, ginger & red pepper flakes might very well be my favorite flavor mix right now: good on everything!

ONE YEAR AGO: Pizza! Pizza!

TWO YEARS AGO:  From Backyard to Kitchen

Add to FacebookAdd to DiggAdd to Del.icio.usAdd to StumbleuponAdd to RedditAdd to BlinklistAdd to TwitterAdd to TechnoratiAdd to Yahoo BuzzAdd to Newsvine

SLOW-BAKED SALMON

Let’s suppose that you find the flavor of salmon a bit strong, as I used to feel about anchovies and related items of a fishy persuasion. This recipe might just change your mind and begin a new gastronomic love affair.  With salmon, slow-baking until the meat is barely cooked gives the fish an almost mousse-like consistency, and flavor as mild as “salmon-ly” possible.   Plus, the lemon zest and thyme seasoning add a delicious counterpoint!   From the latest issue of Bon Appetit, this one goes into my favorites folder.

SLOW-BAKED SALMON WITH LEMON AND THYME
(adapted from Bon Appetit, May 2011)

1 + 1/2 Tbs olive oil, divided
4 salmon filets or 1 large piece, skin on
2 Tbs fresh thyme leaves, chopped
zest of 1 large lemon + juice
salt and pepper

Heat the oven to 275 F.  Line a baking dish with aluminum foil, coat it lightly with 1/2 Tbs of olive oil, and place the salmon filet over it, skin side down.

In a small bowl, mix the remaining tablespoon of olive oil with the thyme and lemon zest.  Rub this mixture all over the salmon, season with salt and pepper and squeeze a little lemon juice over it.   Let it rest for 10-15 minutes, then place it in the oven for 18-20 minutes, until the fish is just cooked.

Serve with lemon  wedges, and…

ENJOY!

to print the recipe, click here

Comments:  We eat salmon on a weekly basis, but almost always grilled.  Phil, the expert,  makes it exactly the way I love, with the center still moist, never over-cooked.  The high heat of the grill, however, doesn’t mellow the salmon character at all, quite the contrary. We both love it, but it’s nice to have a change of pace.

This method can be adapted to all sorts of seasonings. In fact, when we move back home next month I’ll grab my Jacques Pepin‘s  “Fast Food My Way“, and re-visit one of my favorite recipes in that book, a salmon filet cooked at an even lower temperature, for about 40 minutes.   If I remember correctly, he coats the filet with breadcrumbs and ground hazelnuts.  It is outstanding, like so many of Pepin’s recipes.

Stay tuned!  😉

ONE YEAR AGO: Farfalle, Farfalle

This slideshow requires JavaScript.

Add to FacebookAdd to DiggAdd to Del.icio.usAdd to StumbleuponAdd to RedditAdd to BlinklistAdd to TwitterAdd to TechnoratiAdd to Yahoo BuzzAdd to Newsvine

DOUBLE ASPARAGUS DELIGHT

Here’s a clever approach that Michel Richard published in his cookbook “Happy in the Kitchen” :  asparagus spears paired with an asparagus “vinaigrette.”   If you love green vegetables, as I do, you will delight in this recipe.  It’s a model of simplicity because it involves so few ingredients, but you must pay attention to the details, and above all, avoid overcooking the spears.  I can’t imagine a better way to welcome Spring!

ASPARAGUS ON ASPARAGUS
(from Happy in the Kitchen)

24 large asparagus
2 Tbs extra virgin olive oil
1 tsp Dijon mustard
1 Tbs fresh lemon juice (I used Meyer lemons)
pinch of  sugar
pinch of salt

Set aside 4 whole spears for the dressing. Cut off the tough bottom ends of all asparagus spears and set those aside for the as well. With a vegetable peeler, peel the remaining asparagus starting about one inch below the tip.

Have a bowl with ice cold water ready.  Steam the asparagus spears for 5 to 6 minutes only, until they are just tender when gently pierced with the tip of a knife.  knife. When the asparagus is cooked, lift the spears with a pair of tongs and plunge them in the ice bath to cool, then remove and dry on kitchen paper or a towel.

Make the asparagus sauce: cut the 4 reserved spears into 1-inch pieces. Place them in a small saucepan with the trimmed asparagus bottoms and add ¼ cup water and the olive oil. Bring it to a simmer, cover, and gently cook for 8 to 10 minutes, or until the asparagus is completely softened. The water should have evaporated, leaving the asparagus  stewing in only the oil.

Transfer the asparagus to a blender or food processor and puree it until completely smooth. Transfer the puree to a small bowl and whisk in the mustard, lemon juice, salt, and pepper. Serve the asparagus on a platter, with the vinaigrette in a small dish or ramekin on the side for dipping or dousing the spears.

ENJOY!

to print the recipe, click here

Comments:  Peeling the asparagus may seem like work, but don’t skip it.   Use large asparagus for this dish, and the peeling will ensure a wonderful texture and even cooking.  I enjoyed them as a light lunch with homemade bread and a sunny-side egg, but the dish is also a perfect option as an appetizer at a dinner party.  The asparagus lovers among your guests will never forget it!

The sauce or dressing is an excellent adaptation for the tough ends of the spears, so consider making some whenever you cook asparagus.  I imagine that it will also complement other dishes, like grilled salmon, with a sprinkle of fresh dill on top.  Must try that soon.

The beginning of asparagus season always makes us happy!

ONE YEAR AGOSundried Tomato and Feta Cheese Torte

Add to FacebookAdd to DiggAdd to Del.icio.usAdd to StumbleuponAdd to RedditAdd to BlinklistAdd to TwitterAdd to TechnoratiAdd to Yahoo BuzzAdd to Newsvine

MISO-GRILLED SHRIMP

A simple recipe loaded with flavor!   This was the main dish for one of our dinners last week, but it would be excellent as an appetizer course, or as part of a cocktail party.   The original recipe, from Food and Wine magazine, suffered some adaptations to accommodate what we had available in the nano-kitchen. Our day had been so busy we could not conceive of the idea of stopping at the grocery store on our way home.  No ginger?  Use cilantro instead… 😉

MISO-GRILLED SHRIMP
(adapted from Food and Wine magazine)

1 pound of large shrimp, peeled
3 T lime juice
2 T yellow miso paste
2 T olive oil
1 cube frozen cilantro leaves (Dorot, or use 1 T fresh minced leaves)
1 + 1/2 tsp brown sugar

for dipping sauce (optional)
sour cream
Sriracha sauce

Mix all the ingredients for the marinade to make a thick paste.  Thread the shrimp onto wooden or metal skewers,  place in a tray with the marinade spread all over to coat them well.   Let it stand for 10 minutes while you heat the grill.

Remove the shrimp from the marinade, add to the hot grill, cook for 5 minutes total, flipping them around midway through.

Mix sour cream with Sriracha sauce (or other hot sauce of your preference); make it as hot as you like, and drizzle over the shrimp or use it as a dipping sauce.

ENJOY!

to print the recipe, click here

Comments: Even though we’ve been in Los Angeles for almost 4 months, I still try to find stuff in a drawer, only to realize the item in question is 1,200 miles away.   That is precisely what happened while attempting to make this recipe – my nice set of metal skewers did not make it to LA.  Plan B was quickly put to work: I spread the shrimp all over the grill, working as quickly as possible.   Voila‘: success!

The frozen cilantro thing… The first time I bought Dorot frozen cubes, I only did it because the tray of ginger looked impossibly cute, AND the store did not have fresh ginger for sale. I used it, and loved it.  Later I tried the basil. Loved it too. Now, cilantro joined the party.  I don’t like to cut too many corners in cooking, but these products are excellent.

Miso & Sriracha sauce…  Don’t think you should only use miso for soups:  it  is also great in marinades, sauces, even salad dressings.  I am always searching for new ways to use it, because I love its complex, funky-chic flavor.  The dipping sauce with Sriracha – the best hot pepper sauce in the known universe – adds a fiery tone to the juicy shrimp.  Adjust the amount of Sriracha to your liking.  I confess to drizzling pure Sriracha on my shrimp – proving the point that, indeed, some like it hot...  😉

ONE YEAR AGO: Pain Poilane (the King of Breads…)

Add to FacebookAdd to DiggAdd to Del.icio.usAdd to StumbleuponAdd to RedditAdd to BlinklistAdd to TwitterAdd to TechnoratiAdd to Yahoo BuzzAdd to Newsvine

receita em portugues na pagina seguinte