RASPBERRY RICOTTA CAKE

This cake recipe was published in a recent issue of Bon Appetit magazine, and I wanted to make it right away.  I subscribe to several cooking magazines but they tend to accumulate by my bedside table, untouched. Then, a trip comes up and they go with me in the plane. I read and rip the pages that interest me, tossing the magazine before coming back home. I know that for some this might be a huge no-no, but ever since we moved from OK to KS and I donated my collection of Fine Cooking magazines, I stopped saving them. The cut out recipes are glued in a notebook, a system that works great for me.  Anyway, as I was reading that issue on a flight to Hawaii (yeah, you got that right…. we’ve been to paradise last month), this recipe screamed at me: MAKE ME! MAKE ME! MAKE ME! Glad I finally did, it’s a great cake, moist, tender, and not overly sweet, thanks to the natural tartness of raspberries.

RaspberryRicottaCake

RASPBERRY RICOTTA CAKE
(from Bon Appetit, March 2015)

Non-stick vegetable oil spray
1½ cups all-purpose flour
1 cup sugar
2 teaspoons baking powder
¾ teaspoon salt
3 large eggs, at room temperature
1½ cups ricotta
½ teaspoon vanilla extract
½ cup (1 stick) unsalted butter, melted
1 cup frozen raspberries, divided

Heat oven to 350°. Line a 9”-diameter cake pan with parchment paper and lightly coat with nonstick spray. Whisk flour, sugar, baking powder, and salt in a large bowl.

Whisk eggs, ricotta, and vanilla in a medium bowl until smooth; fold into dry ingredients just until blended. Then fold in butter, followed by ¾ cup raspberries, taking care not to crush berries. Scrape batter into prepared pan and scatter remaining ¼ cup raspberries all over the surface of the batter.

Bake cake until golden brown and a tester inserted into the center comes out clean, 50–60 minutes. Let cool at least 20 minutes before removing from the pan.

ENJOY!

to print the recipe, click here

Composite
Comments: This cake was so easy to make that I got into hyperventilation from excessive confidence. Basically, there is no way out for me, cakes make me suffer, even when nothing goes wrong. I thought that the raspberries sitting on top of the batter looked awfully cute, but after a few minutes in the oven, I pushed some of them a little into the batter, just in case.  I bet it made no difference whatsoever, the cake experts might be shaking their heads at my naiveté.  Oh, well.

As you know, food blogging is a very social activity. We leave comments, we follow food bloggers we enjoy, sometimes for their cooking alone, sometimes for the “whole package”.  I love bloggers who are witty (hard to beat Maureen on that category) make me laugh, make me think, teach me something. I normally stay clear from sites that push endless surveys or advertisements. But, anyway, some bloggers seem to always cook stuff I want to make. One such example is Steve, from Oui, Chef.  He subscribes to the same magazines I do, so quite often I bookmark a recipe and, being the slow self I am, next thing I know, the recipe is on his site!  This is exactly what happened with this cake. Take a look at Steve’s post by clicking here.  Obviously, great minds read alike, bookmark alike, and bake alike.

This cake was absolutely delicious! I added a sprinkle of powdered sugar on top because I felt the raspberries would be happy. And everyone who tried this cake in our department seemed to be happy too.  Such a great simple treat to celebrate spring…  Make it, and tell me what you think.
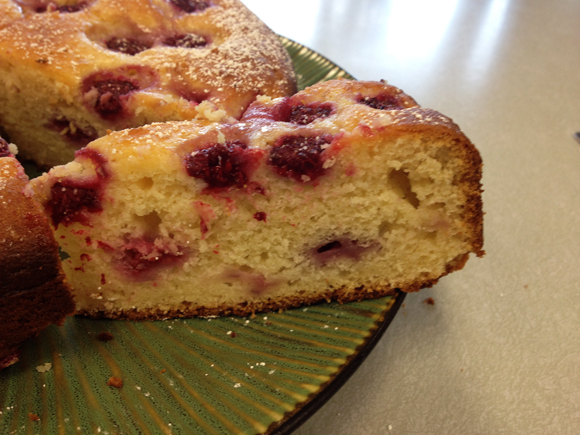
sliceHow about a slice?
😉


ONE YEAR AGO:
In My Kitchen, April 2014

TWO YEARS AGO: Whole-wheat Pasta with Lemony Tomatoes and Spinach

THREE YEARS AGO: Blood Orange Duck: A work in progress

FOUR YEARS AGO: Grilled Mahi-mahi with citrus marinade

FIVE YEARS AGO: Memories of Pastéis (and my Dad)

CHICKEN-APRICOT SKEWERS

skewers11
We grill pretty much the whole year, including this past winter, definitely the hardest I’ve endured, but somehow survived.  I actually feel I survived against all odds, but my beloved (rolling his eyes to the ceiling) insists that “it wasn’t that bad”.  We fully disagree on this. Anyway, as I was saying, we use our grill all the time. If necessary, we brush the snow off and go to work.  Of course, it’s much nicer to grill when the sun is shinning and the temperature starts to get where I like it, mid 90’s.   We are not quite there yet, but the sun has been shinning as bright as the apricots for these skewers.  The recipe from Bon Appetit is absolutely delicious!  Coconut milk, peanut butter, and cilantro make a marinade-sauce combo very hard to beat.

composite

CHICKEN-APRICOT SKEWERS
(slightly adapted from Bon Appetit, August 2012)

3/4 cup canned light unsweetened coconut milk
1/2 cup plain Greek yogurt (I used non-fat)
1/2 cup smooth peanut butter
1/4 cup fresh lime juice
2 teaspoons dark brown sugar
3/4 teaspoon kosher salt plus more for seasoning
1/4 cup cilantro leaves
2 tablespoons coarsely chopped jalapeño (about 1 large)
1 pound skinless, boneless chicken breasts, cut into 24 chunks
12 firm ripe small apricots, halved, pitted
Freshly ground black pepper

Purée first 6 ingredients and 3/4 tsp. salt in a blender until smooth. Add 1/4 cup cilantro leaves and jalapeño and blend briefly to combine. Transfer 1/2 cup marinade to a small bowl; cover and chill for serving. Place remaining marinade in a resealable plastic bag; add chicken, seal bag, and turn to coat. Chill for at least 3 hours or overnight.

Heat your grill to high. Holding 2 skewers parallel to each other and 1/2″ apart, thread 1 piece of chicken onto skewers, then 1 apricot half. Repeat with 1 more chicken piece and 1 more apricot half (using 2 skewers helps hold the meat and fruit together). Repeat with remaining skewers, chicken, and apricots for a total of 12, each holding 2 pieces of chicken and 2 apricot halves. Season with salt and pepper. Brush apricots with some marinade from bag; discard remaining marinade.

Grill skewers on one side until chicken is well browned, 3—4 minutes. Turn and grill until other side is well browned, 3—4 minutes longer. Move to a cooler part of grill. Cover grill and cook until chicken is cooked through, about 2 minutes longer. Transfer to a serving platter, and serve drizzled with the reserved marinade (bring it to room temperature before serving).

ENJOY!

to print the recipe, click here

served1
Not sure if it is my Brazilian nature, but I have a real soft spot for anything with coconut milk. As I mentioned before, I normally go for the light version that has a lower fat content, unless specified in the recipe that it won’t work.  For sauces and marinades the lower-fat performs as well as the regular one.  My preference is for the brand Thai Kitchen.   I had a small problem making the marinade because unexpectedly there was no cilantro in our fridge.  I made the marinade without it, and next day got some cilantro, shredded the leaves and  added to the sauce reserved for serving the skewers. I actually think it turned out very good, the cilantro retained a fresher flavor this way.   If you make this dish, consider my tweaked version.  😉

The apricots were pretty soft after grilling, in fact some bits stayed behind on the grill, but I am not sure this could be avoided.  Maybe apricots a little less ripe than the ones I used would stand the heat better.  If you prefer a firmer fruit, consider grilling the apricots by themselves, just for a couple of minutes.  I actually did not mind their softness, they almost turned into a component of the coconut sauce.  Delicious!

ONE YEAR AGO:  Asparagus Quiche

TWO YEARS AGO: Two-stage Pea and Prosciutto Risotto

THREE YEARS AGO: Mellow Bakers: Corn Bread

SLOW-BAKED SALMON

Let’s suppose that you find the flavor of salmon a bit strong, as I used to feel about anchovies and related items of a fishy persuasion. This recipe might just change your mind and begin a new gastronomic love affair.  With salmon, slow-baking until the meat is barely cooked gives the fish an almost mousse-like consistency, and flavor as mild as “salmon-ly” possible.   Plus, the lemon zest and thyme seasoning add a delicious counterpoint!   From the latest issue of Bon Appetit, this one goes into my favorites folder.

SLOW-BAKED SALMON WITH LEMON AND THYME
(adapted from Bon Appetit, May 2011)

1 + 1/2 Tbs olive oil, divided
4 salmon filets or 1 large piece, skin on
2 Tbs fresh thyme leaves, chopped
zest of 1 large lemon + juice
salt and pepper

Heat the oven to 275 F.  Line a baking dish with aluminum foil, coat it lightly with 1/2 Tbs of olive oil, and place the salmon filet over it, skin side down.

In a small bowl, mix the remaining tablespoon of olive oil with the thyme and lemon zest.  Rub this mixture all over the salmon, season with salt and pepper and squeeze a little lemon juice over it.   Let it rest for 10-15 minutes, then place it in the oven for 18-20 minutes, until the fish is just cooked.

Serve with lemon  wedges, and…

ENJOY!

to print the recipe, click here

Comments:  We eat salmon on a weekly basis, but almost always grilled.  Phil, the expert,  makes it exactly the way I love, with the center still moist, never over-cooked.  The high heat of the grill, however, doesn’t mellow the salmon character at all, quite the contrary. We both love it, but it’s nice to have a change of pace.

This method can be adapted to all sorts of seasonings. In fact, when we move back home next month I’ll grab my Jacques Pepin‘s  “Fast Food My Way“, and re-visit one of my favorite recipes in that book, a salmon filet cooked at an even lower temperature, for about 40 minutes.   If I remember correctly, he coats the filet with breadcrumbs and ground hazelnuts.  It is outstanding, like so many of Pepin’s recipes.

Stay tuned!  😉

ONE YEAR AGO: Farfalle, Farfalle

This slideshow requires JavaScript.

Add to FacebookAdd to DiggAdd to Del.icio.usAdd to StumbleuponAdd to RedditAdd to BlinklistAdd to TwitterAdd to TechnoratiAdd to Yahoo BuzzAdd to Newsvine

ANCHO-CHILE MARINADE: PLEASED TO MEAT YOU!

This marinade rocks…and roll, hootchie koo!  And it has all sorts of cool moves on the dance floor…     In a single week, I made it twice, once for butterflied leg of lamb, and again  a few days later  for flank steak.   Published in the June issue of Bon Appetit, it was just what the author promised:  “this smoky grilled meat will be a delicious addition to your barbecue repertoire”.

GRILLED FLANK STEAK WITH ANCHO-CHILE MARINADE
(adapted from Bon Appetit, June 2010)

1/2 cup dry white wine
1/4 cup olive oil
2 garlic cloves, peeled
4 Tbs fresh oregano leaves
2 Tbs ancho chile powder
2 Tbs lemon juice
2 green onions
1 Tbs brown sugar
2 + 1/2 tsp salt
2 + 1/2 tsp black pepper
1 flank steak

Add the wine, oil, garlic, oregano, ancho chile powder, lemon juice, green onions, salt and pepper into a blender.  Blend the mixture until smooth.   Marvel at its color, and take a deep breath to indulge in the aroma…

Make very shallow diamond-shaped cuts on the surface of the flank steak.  Transfer the marinade to a large dish that can hold the meat, place the meat inside  and rub the marinade all over.   Let it sit in the fridge from 2 to 12 hours.

Prepare a hot grill, cook the meat until medium-rare (5 minutes per side maximum).  Let the meat rest for 10 minutes before slicing it thinly.

ENJOY!

to print the recipe, click here

Comments: Ancho chile powder might be my new found love in the kitchen.   Smoky, funky and hot, but very pleasantly so.   The brown sugar promotes a beautiful browning on the surface, and I’ve often been including it in my marinades these summer days.  This ancho-chile version might go equally well on salmon, chicken, or even prawns.   If you’re cooking a butterflied leg of lamb, allow the meat to marinade for a full 24 hours before grilling.

The flank steak?  What a joy it is to eat!   A succulent piece of tender, flavorful beef!  We enjoyed ours  with some simple zucchini sticks: this recipe without the yogurt sauce.

It was a tasty meal in less than 20 minutes,  and my name isn’t even Ray! 😉

ONE YEAR AGO:  The Handmade Loaf

Add to FacebookAdd to DiggAdd to Del.icio.usAdd to StumbleuponAdd to RedditAdd to BlinklistAdd to TwitterAdd to TechnoratiAdd to Yahoo BuzzAdd to Newsvine

DOWN HOME DIG-IN CHILI

Get ready for a big spicy spoonful of  chili!  In the winter, give me chili with cornbread and cabernet; in the summer I’ll have chili with tortillas and tequila (or cold beer).  What a flavorful, succulent meal it is!   You’ll find chili everywhere, north, south, east and west; in cookbooks, food magazines and websites (like this one), with many of those authors claiming to divulge “the authentic” recipe.   Particularly in the Southern US, chili recipes provoke  discussions almost as heated as the peppers they contain.  But, I’m ready to jump into the fire, by sharing with you my husband’s favorite recipe.  It’s not the hottest or the spiciest chili you’ll find, but it’s meaty, delicious and the best  he’s ever encountered.  He made it for me for the first time when we started dating and we’ve cooked it together many, many times since then.


DOWN HOME DIG-IN CHILI

(from Bon Appetit, 1988)

1/4 cup vegetable oil
2 medium onions, finely chopped
2 green bell peppers, chopped
1 celery stalk, chopped
2 garlic cloves, minced
2 1/2 lbs stewing beef, chopped
2 lbs pork shoulder (Boston butt), chopped
4 cans (14 1/2 ounce) stewed tomatoes, drained, liquid reserved
salt and pepper to taste
1 bottle pale ale (12 ounce)
7 Tbs chili powder
4 jalapeno chilies, seeded
1 tsp cayenne pepper
1 tsp cumin
Hot pepper sauce (Tabasco type), to taste

Heat the oil in heavy large pot over medium heat. Add finely chopped onions, bell peppers, celery, and garlic and saute until onions are translucent, about 10 minutes. Remove vegetables using slotted spoon and set aside.

Increase heat to high. Add beef and pork; sprinkle with salt and pepper. Cook until browned, stirring frequently, about 10 minutes. Return vegetables to pot. Add tomatoes, ale, chili powder chilies, cayenne and cumin. Reduce heat, cover partially and simmer 2 hours, adding reserved tomato liquid if chili appears dry. Taste and adjust seasoning with salt and pepper. Uncover and simmer until thickened and meat is tender, 2 more hours.

Season chili with hot pepper sauce. Serve with green onions, cheddar cheese, avocado and sour cream.

Makes at least 8 servings.

ENJOY!

to print the recipe, click here

Comments: This favorite version of ours might very well be  “middle-of-the-road” in the debate about what should (or should not) be in a pot of chili. It doesn’t include beans, pleasing many, but it uses tomatoes, upsetting other purists.

We usually make it with  beef and pork, and we recently tried a mixture of lamb and pork.    We prefer this version, exactly as published 22 years ago (!!!) in Bon Appetit, by far. Some markets sell ground beef  for chili, but it’s better to buy a large cut of beef chuck,  some pork shoulder and cut them by hand into 3/4  inch cubes. The final texture is well worth the extra work.

Chili is ideal for entertaining, as it gets better when it sits in the fridge for a day.   Sometimes we make a full batch, enjoy “chili for two,” and save leftovers in the freezer for an encore another time.

This dish deserves recognition as a “Perfect Saturday Night Dinner” !


ONE YEAR AGO…    CINNAMON ROLLS

Add to FacebookAdd to DiggAdd to Del.icio.usAdd to StumbleuponAdd to RedditAdd to BlinklistAdd to TwitterAdd to TechnoratiAdd to Yahoo BuzzAdd to Newsvine

receita em portugues na pagina seguinte…..

Continue reading