Back in December, I made a batch of cookies and “decorated” them. After that experience it became clear that the road to hell is paved with Royal icing. Since it was a real roller coaster, I decided I was done with it for the rest of my existence. Having said that, I don’t know exactly why I woke up one day thinking that the combination of sugar cookies with Royal icing would be the best way to start Valentine’s week. A real sucker for punishment I am. Was it that bad? Sort of. Let’s say it had some ups and some dark and scary downs.

SWEETHEART SUGAR COOKIES WITH ROYAL ICING
(adapted from Alton Brown and Sweet Sugarbelle)
what you’ll need:
heart-shaped cookie cutter
scribe tool
piping bags
icing tips size 2 or 3
rubber bands for piping bags (2 per bag)
paper towels and water for constant clean-up
a Zen attitude
a very understanding partner in case you run out of previous item
for the cookie dough:
3 cups all-purpose flour (360 g)
3/4 teaspoon baking powder
1/4 teaspoon salt
1 cup unsalted butter, softened (225 g)
1 cup sugar (225 g)
zest of 1 lemon
1 egg, beaten
1/2 tsp vanilla paste
1 tablespoon milk
for the icing:
2 pounds confectioner’s sugar {907 grams}
5 tablespoons meringue powder {approximately 53 grams}
2 teaspoons vanilla bean extract (I used clear vanilla extract)
1/2-3/4 cups warm water
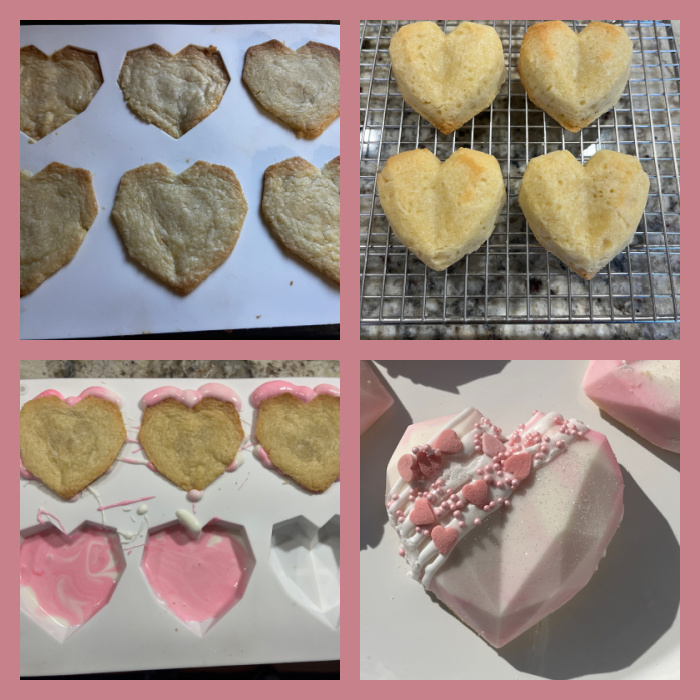
Sift together flour, baking powder, and salt. Set aside. Place butter and sugar in large bowl of electric stand mixer and beat until light in color. Add egg, lemon zest, milk and vanilla, beat to combine. Put mixer on low-speed, add flour, and mix just until the mixture starts to form a dough. Do not over mix or your cookies might be tough. Remove the dough from the mixer and finish mixing it by hand, gently. Divide the dough in half, flatten each portion as a square or rectangle and wrap in plastic foil. Refrigerate for 1 hour minimum.
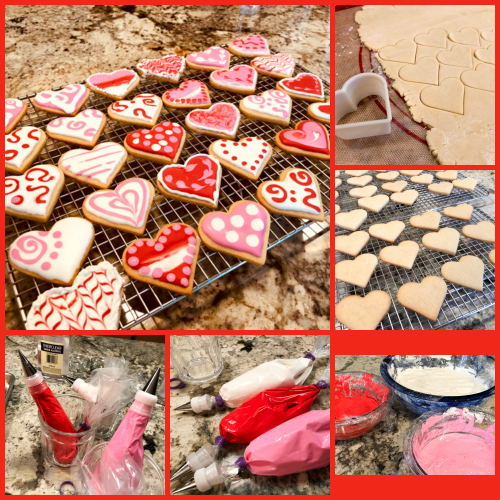
Heat oven to 350 degrees. Remove one wrapped pack of dough from refrigerator at a time, sprinkle rolling-pin with powdered sugar, and roll out dough to 3/8-inch thick. Cut into heart shapes, place on baking sheet over parchment paper, and refrigerate for 30 minutes. Bake for 10 to 12 minutes or until cookies are just beginning to turn brown around the edges, rotating cookie sheet halfway through baking time. Let sit on baking sheet for 2 minutes after removal from oven and then move to cool on a rack. Ice the cookies when completely cool, or on the following day.
Make the icing (you can make the day before and store well covered at room temperature). Stir the vanilla into half of the water and reserve. Keep the other half of the water measured and ready to go.
Using a paddle attachment gently mix the sugar and meringue powder. With the mixer on the lowest setting slowly add the water/flavoring mix to the dry ingredients. As the water is added, the icing will become thick and lumpy. Continue to add the remaining water {this may or may not be the entire amount} until the mixture reaches a thick consistency. At this point, turn the mixer to medium speed and whip 2-4 minutes until the mixture is thick and fluffy. When it forms a soft peak, it has been beaten enough. Avoid mixing further, as you don’t want to incorporate too much air in the icing. Too much air might result in bubbles forming after icing.
Adjust the consistency that you need for flooding the cookies, separate the icing in portions, add dye according to your planned decoration. Store in air-tight containers at room temperature. If needed, re-adjust the consistency before piping.
Add the different colors of icing to piping bags fitted with the appropriate icing tips. I like number 3 for the basic color used for flooding, and a number two for the details. Flood each cookie, make the edges as neat as possible with the scribe tool. Decorate with the design you like, one cookie at a time, as the base color needs do still be wet, unless you prefer to do a wet-on-dry method. In this case, the base needs to dry for several hours before proceeding with the decoration.
Dry the cookies for at least 6 hours before handling them.
ENJOY!
to print the recipe, click here
Comments: I had no issues with the cookie component, I prefer the taste of a sablé type cookie, but as far as sugar cookies go, these are very nice. They retain a little chewiness upon baking (especially if you don’t let them get too dark), and the lemon zest brightens them up considerably. Now let’s talk Royal icing. I watched online classes and youtube videos. I read cook books.
Here is my advice for those who are as inexperienced as myself and for some irrational motive decide that a naked cookie must be dressed for party.
- Make the icing and the cookies the day before decorating them. Not only it is better to ice cookies that are not freshly baked (I am echoing some experts here), but it will save you a lot of trouble and make decorating day easier.
- Keep things simple. White icing plus two or at most three colors. Trust me on this. You will need bags and icing tips for each color you want to work with. Some people can make those cute piping bags from parchment paper. I am not one of those people. Sometimes I get them right, more often than not there is drama.
- Prepare all materials you will need and have them ready on a neat and clean counter top. Paper towels and a bowl with water are two best friends of the rookie-decorator.
- Tie your hair up if you have long hair. Wear gloves if you prefer to avoid stained fingers.
- Get rubber ties for your piping bags like these. They are indispensable and work better than improvised methods. Tie the bag close to the icing tip before you fill it. Tie the top after you fill it (see my composite image, middle photo in the bottom row). Remove the band closest to the tip when you are ready to ice your cookies. This simple measure prevents quite a bit of mess from happening.
- Have a rack ready to spread the freshly iced cookies with enough surface to accommodate them all. They take hours to fully set and should not touch each other. Be very careful not to grab them touching the icing. Often the surface looks dry but it’s still soft and fragile (don’t ask me how I know).
- Let your inner Rembrandt fly. Or Monet. If all fails, go Pollock. Not that there’s anything wrong with him. Obviously not.

But, the most important thing is obviously the most elusive for beginners: the consistency of the icing. Nothing is more frustrating than filling the piping bag and realizing the icing is a tad too thick. Or worse yet, too thin, which will cause the icing to roll off the cookie and tears to roll down the baker’s face. There are tricks to judge the perfect consistency. For instance you can run a spatula or small knife into the icing bowl, and in about 15 seconds it should go back to a smooth, leveled surface. I was probably off by 20 seconds on my first attempt, which led me to say a few choice words, empty the bag, thin the icing, and start all over. Sadly, it was still a bit thick, but I could not bring myself to empty the bag again. So the white icing used to flood most of the cookies was not top-notch. Getting the consistency perfect is probably something that comes with practice. Perhaps I’ll get there before 2019 is over.
I developed a huge respect for those who do this type of stuff for a living. It is really time-consuming, and I imagine the profit margin is very low. Especially if a baker uses the best ingredients and does intricate decorations, he or she will have to charge a lot more than the stuff you can by at the grocery store in those big plastic boxes. But I guess that is a problem professional bakers are forced to deal with.
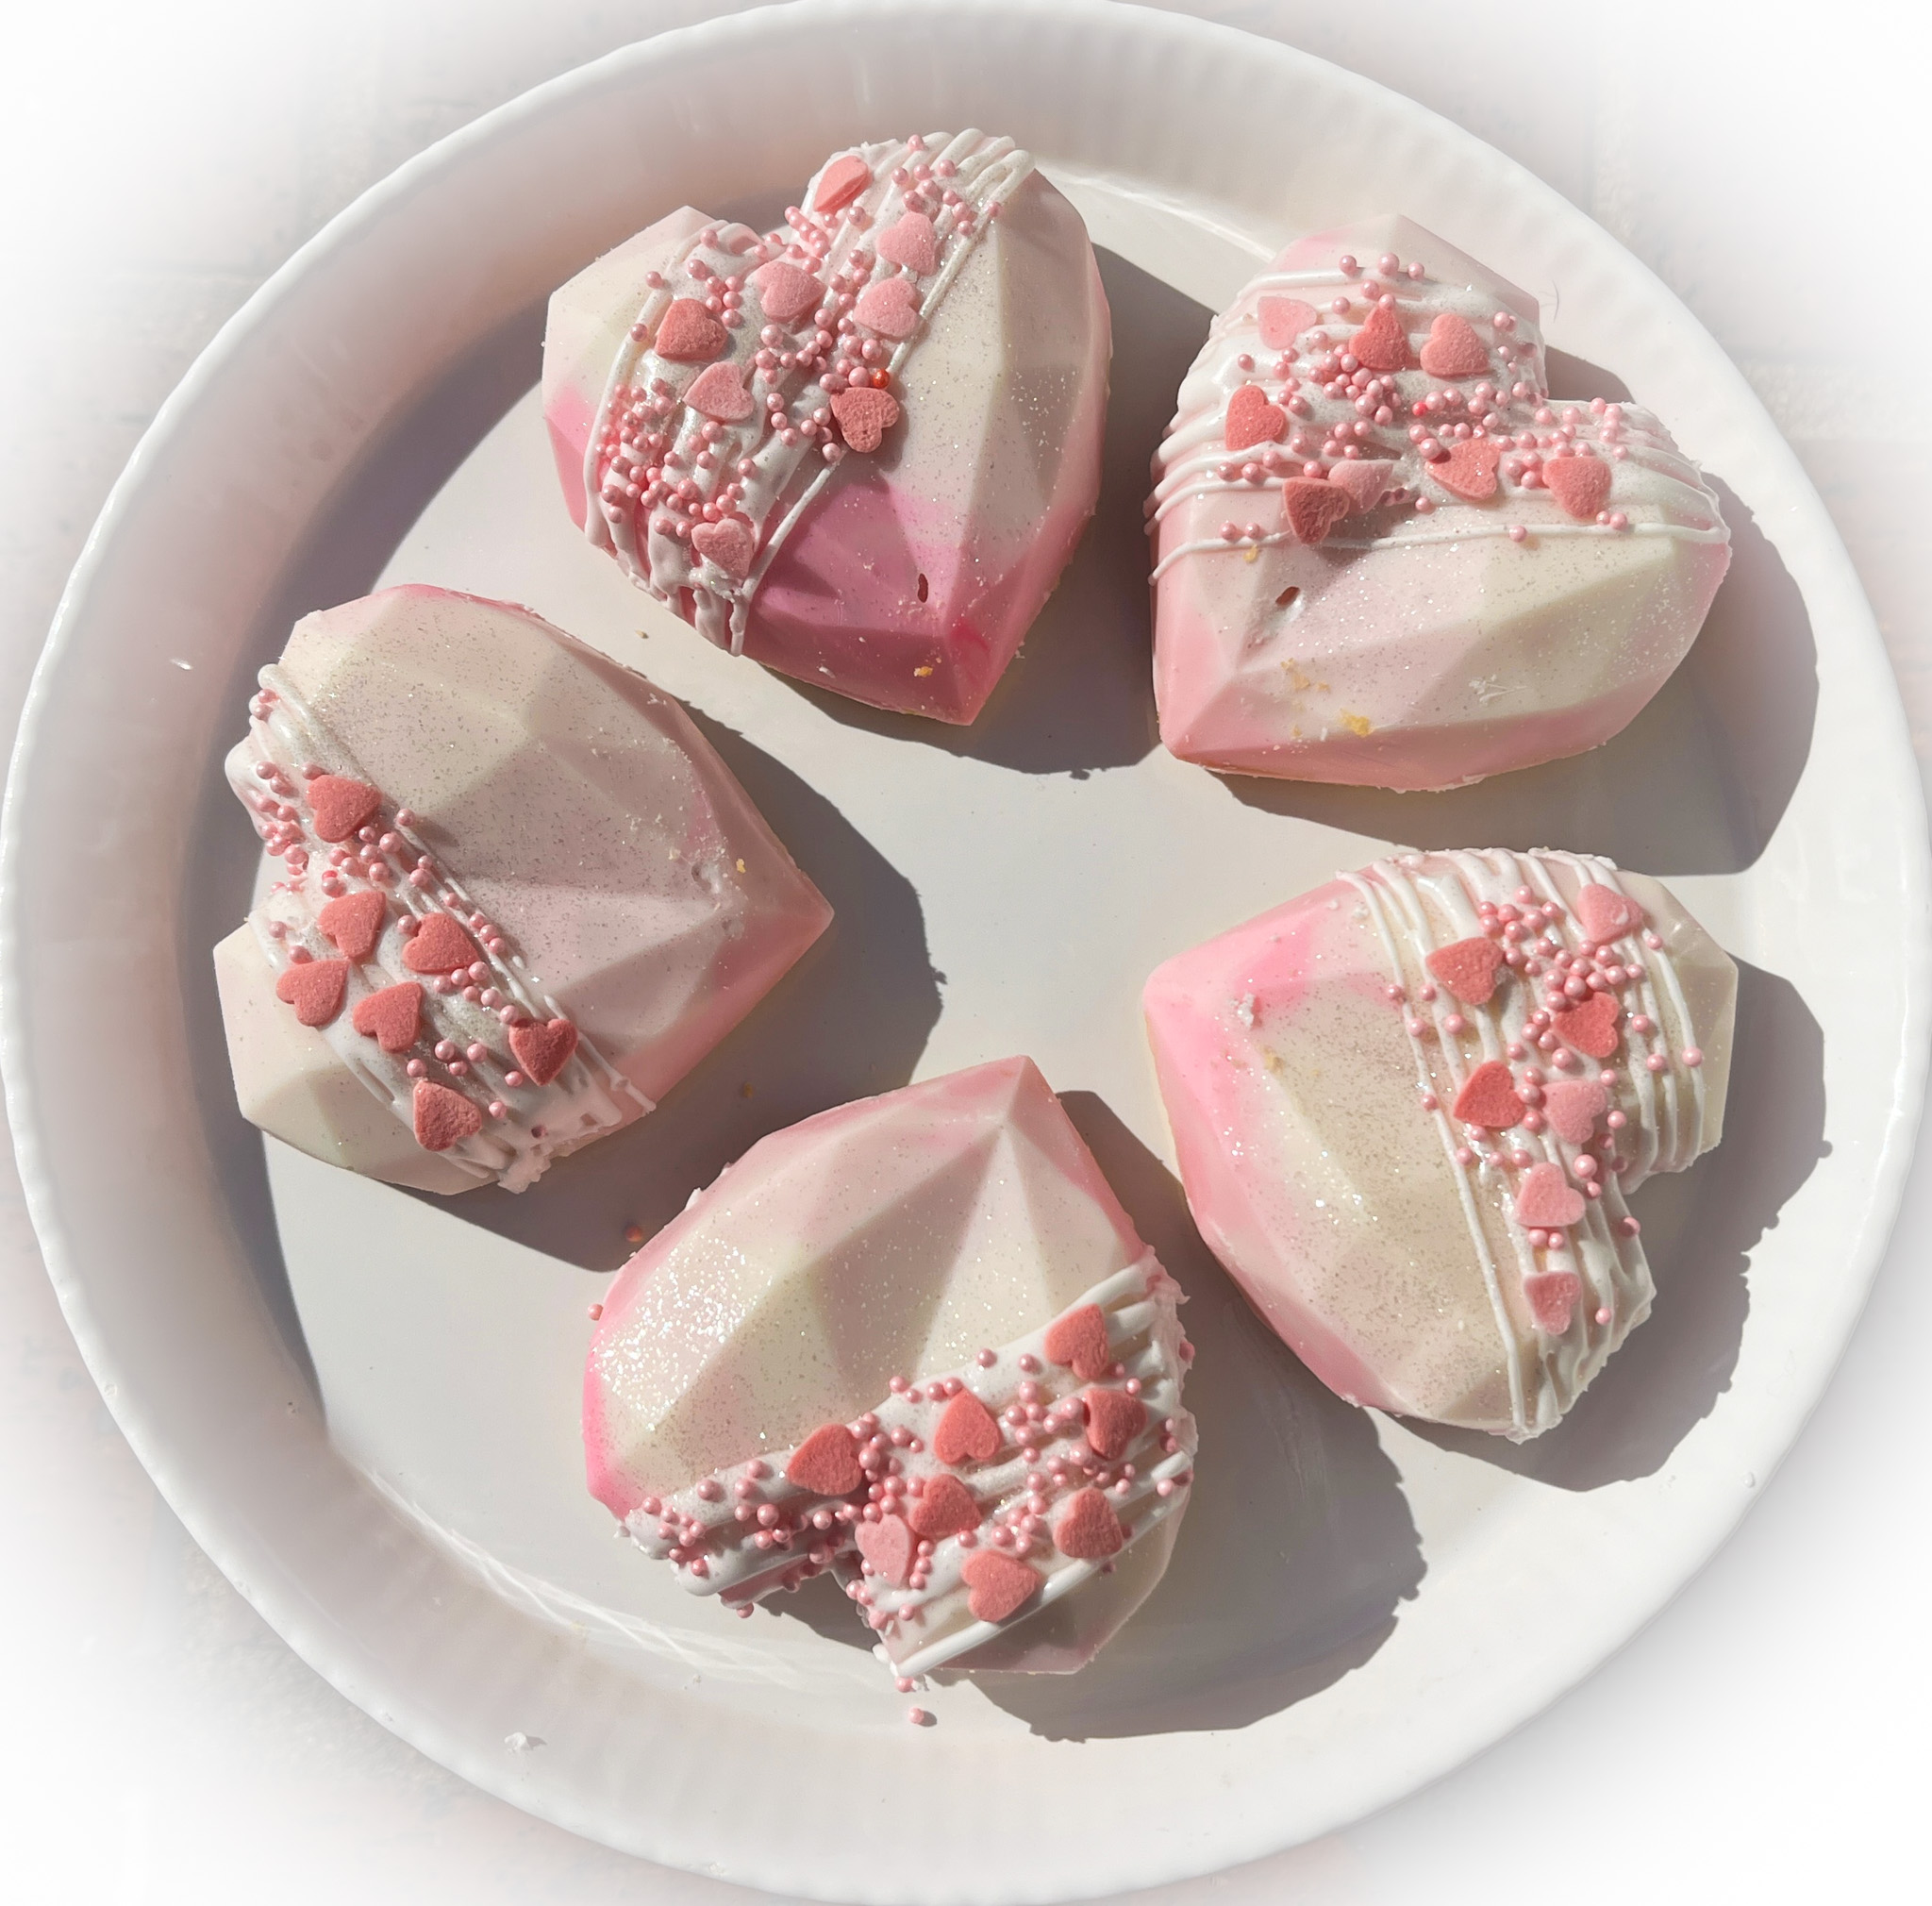
Several of my cookies had small boo-boos, but some made me very happy. So happy that I created a little composite photo with them.

HAPPY VALENTINE’S DAY!

ONE YEAR AGO: Fesenjan, Fast-Food Style
TWO YEARS AGO: Lavender Macarons with White Chocolate Ganache
THREE YEARS AGO: Raspberry Chocolate Truffles
FOUR YEARS AGO: Red Velvet Cupcakes
FIVE YEARS AGO: Happy Valentine’s Day!
SIX YEARS AGO: A Few Blogging Issues
SEVEN YEARS AGO: Dan Dan Noodles
EIGHT YEARS AGO: Sophie Grigson’s Parmesan Cake
NINE YEARS AGO: Antibiotics and Food