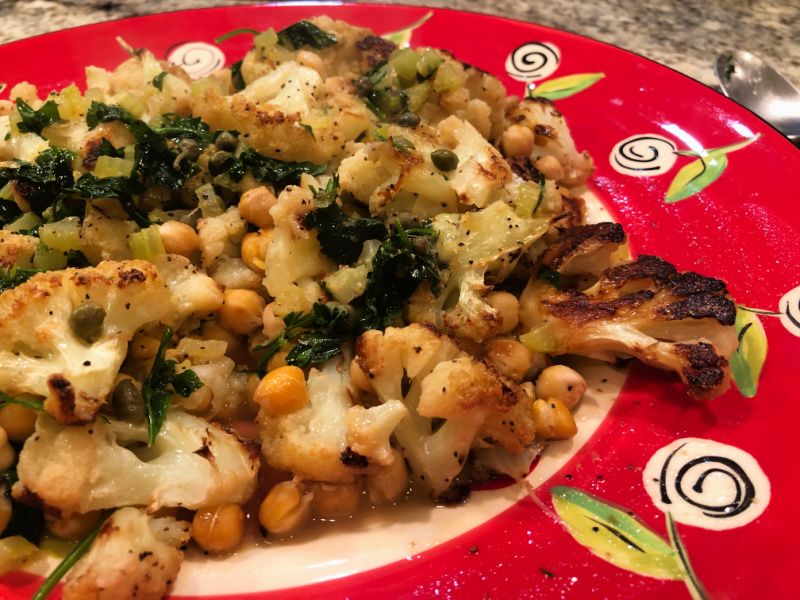
CAULIFLOWER-CHICKPEA PICCATA

I saw this recipe not too long ago at The New York Times and knew I was going to love it… I wasn’t sure how the husband would feel about it, but decided to take my chances. Glad to report he thought it was “totally blog-worthy.”

CAULIFLOWER-CHICKPEA PICCATA
(slightly adapted from The New York Times)

1 cauliflower, cut into large 2-inch florets
grapeseed oil, about 2 tablespoons
Kosher salt and black pepper, to taste
1 (15-ounce) can chickpeas, drained
2 tablespoons olive oil
1 shallot, finely diced
3/4 cup vegetable stock
3 tablespoons unsalted butter
2 tablespoons capers, drained
Zest and juice of 1 lemon
Parsley, chopped

Heat the oven to 425 degrees. Place the cauliflower florets onto a sheet pan and drizzle with 2 tablespoons of grapeseed oil. Season with kosher salt and black pepper, and roast for 25 minutes, add the chickpeas and roast for 5 minutes more. Reserve.

Heat a medium skillet to medium-high. Add 1 tablespoon of olive oil and the shallot, and sauté until soft and fragrant, about 1 minute. Pour the stock into the pan and simmer until reduced by half, about 4 to 5 minutes. Reduce heat to low, then stir in the butter, capers, parsley, lemon zest and juice. Season with 1/2 teaspoon of kosher salt and a few turns of black pepper.

To serve, place the cauliflower and chickpeas on a serving plate. Top with the lemon caper sauce. Serve.

ENJOY!

to print the recipe, click here

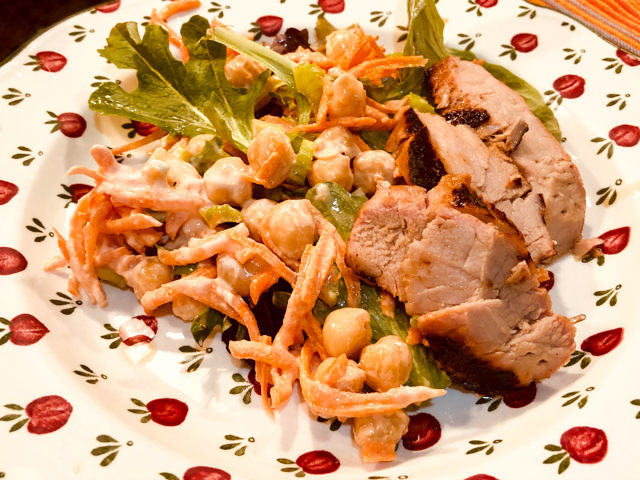
Comments: The preparation of this recipe goes a bit against logic. Why roast the cauliflower until it’s all crispy and brown, and then soak it with sauce? Seems counterproductive. BUT it works. Roasting concentrates the flavors and make the veggies stand better to the luscious lemony sauce. We loved it! For vegetarians, a little couscous on the side would make it a pretty nice meal. We enjoyed it with grilled pork tenderloin and a bit of tahdig rice, made in my favorite, quick way. A great mid-week dinner…

ONE YEAR AGO: Sarah Bernhardt Cookies

TWO YEARS AGO: A Really Big Announcement

THREE YEARS AGO: Stir-Fried Chicken in Sesame-Orange Sauce

FOUR YEARS AGO: Monday Blues

FIVE YEARS AGO: A New Way to Roast Veggies

SIX YEARS AGO: Two Takes on Raspberries

SEVEN YEARS AGO: Spice Cake with Blackberry Puree

EIGHT YEARS AGO: Own Your Kitchen with Cappuccino Panna Cotta

NINE YEARS AGO: Chicken Parmigiana, the Thriller

TEN YEARS AGO: Wild Mushroom Risotto

ELEVEN YEARS AGO: Tartine Bread:  Basic Country Loaf 

TWELVE YEARS AGO:  Pugliese Bread

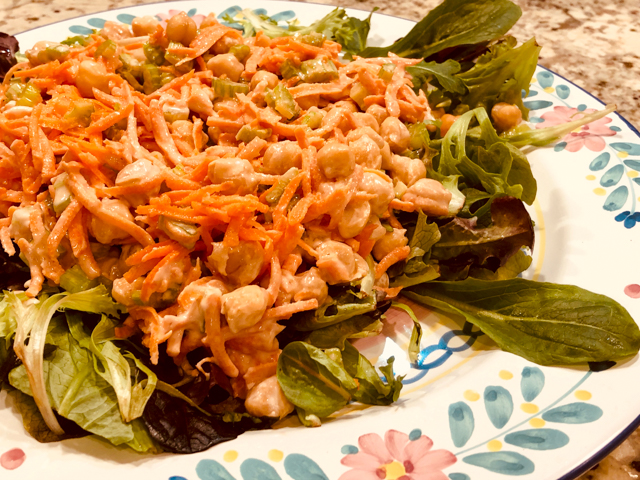
BUFFALO CHICKPEAS

This could be served cold as a salad or right after mixing the cooked chickpeas with the other ingredients. It is delicius on its own for a light lunch. Chickpeas have that earthy flavor I find addictive, and when paired with the heat of Sriracha – another passion of mine – it gets even better… And let’s not even mention the tahini, so I don’t lose my composure.

BUFFALO CHICKPEAS
(adapted from Skinnytaste)

15- oz can chickpeas, drained and rinsed
1 Tbsp olive oil
1/2 tsp kosher salt
2 large carrots, shredded on a food processor
2 stalks celery, diced small
1 Tbsp Sriracha (or to taste)
3 Tbsp plain Greek yogurt
juice of 1 lemon
1 Tbsp tahini
mixed baby greens to serve alongside (optional)

In a large bowl, mix the carrots with the celery, squirt a little lemon juice, season lightly with salt and mix gently. Reserve.

Heat a large nonstick skillet over medium-high heat and add the oil. Once it begins to shimmer, add the chickpeas, spreading them in a single layer, and let cook undisturbed for 1 to 2 minutes, or until they brown a bit. Stir, season with salt and cook for a minute more. Transfer the chickpeas to the bowl with the veggies.

Make the dressing by mixing the yogurt, lemon juice, Sriracha and tahini. Add to the bowl of chickpeas and veggies, and fold gently. Serve with baby spinach/lettuce right away, or refrigerate and enjoy later as a salad, but in that case do not add the greens.

ENJOY!

to print the recipe, click here

Comments: Depending on the thickness of your yogurt, you might have to add a little water to thin the dressing a bit. Mix it as described, then adjust if needed. As I mentioned, this dish could stand on its own for a vegetarian meal, but we enjoyed it with grilled pork tenderloin for a nice and easy weeknight dinner. Leftovers were my meat-free lunch two days later, barely passed by the microwave just to break the cold from the fridge. The carrots mellow quite a bit after a couple of days in the fridge, so if you like a bit more texture, grate additional raw carrots on top. Crumbled blue cheese would be quite appropriate also…

ONE YEAR AGO: Bi-Color Croissant and Pain au Chocolat

TWO YEARS AGO: Lemon-Blueberry Entremet Cake

THREE YEARS AGO: Walk Strong3: Jessica Smith’s latest workout program

FOUR YEARS AGO: Pork Medallions with Black Berry Compote

FIVE YEARS AGO: Indian-Spiced Chicken with Chickpeas and Spinach

SIX YEARS AGO: Curry Cardamon Cookies

SEVEN YEARS AGO: In My Kitchen, March 2014

EIGHT YEARS AGOBoeuf Bourguignon for a Snowy Evening

NINE YEARS AGO: Chickpea Salad

TEN YEARS AGO: Soft Spot for Chevre

ELEVEN YEARS AGO: Roasted Onion and Asiago Cheese Miche

INCREDIBLY SIMPLE TIMES FOUR: OCTOBER 2020

It’s been a while since I shared with you recipes that are super simple but tasty enough to justify being featured on a blog post.

INCREDIBLY SIMPLE #1
EGGS WITH ZA’ATAR AND LEMON

This very simple “recipe” is from a wonderful cookbook called “Falastin.”  Gently boil as many eggs as you want, but just for 6 minutes. The idea is to get the yolk still pretty creamy. Now in a small bowl, whisk olive oil, lemon juice, and za’tar. Peel the eggs, and chop them coarsely, drizzle your little sauce and sprinkle salt on top. Amounts are totally flexible, I usually go with 2 eggs, 1 tablespoon olive oil and then improvise.  I don’t know how many times I’ve called this lunch, with Ak-Mak crackers or a slice of sourdough bread. So good!


INCREDIBLY SIMPLE #2
SMOKY CHICKPEAS

Inspiration for this recipe came from Steeped: Recipes Infused with Tea (I adore it). You will need some smoked tea (Lapsang Souchong), but it is totally worth it to get some and keep in your pantry, even if you don’t enjoy it as a regular tea. I use it in chocolate ganache and quite often in cooking. It gives the food a very nice, subtle smoky flavor.

Slice open one bag of smoked tea, mix its contents with some cumin, smoked paprika, and salt. Open a can of chickpeas, drain and rinse well. Add into a bowl, drizzle some grape seed oil all over it, add the dry spice mixture and mix.  Spread on a baking sheet lined with aluminum foil, and roast in a 400F oven for 25 minutes until golden brown.  Once again, amounts can be totally eye-balled, no need for precision here. Relax and have fun with it.


INCREDIBLY SIMPLE #3
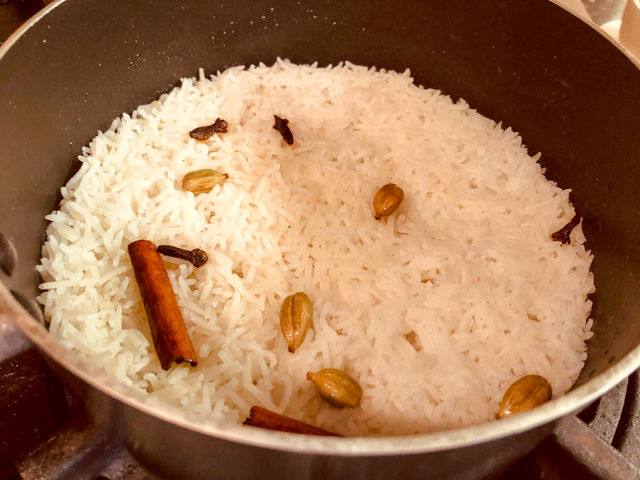
AROMATIC BASMATI RICE

I found this gem of a recipe at Spice House website and made it four times in a row. That tells you how much we enjoyed it. It just turns a regular batch of rice into something special.  I made some adjustments to their recipe as I felt that the rice was turning out a bit too underdone for our taste.

AROMATIC BASMATI RICE
(adapted from Spice House)

1 cup Basmati rice, rinsed
1 Tablespoon grape seed oil (or another mild-flavored oil)
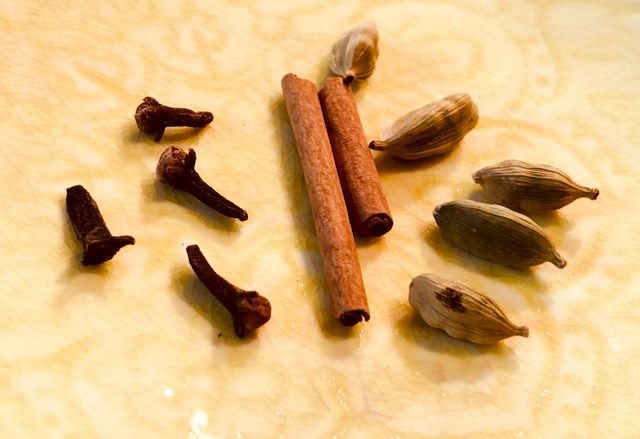
5 whole cardamom pods
2-3 whole cloves
1 cinnamon stick
salt to taste
2 cups cold water  

Add oil to a non-stick saucepan and place the pan over medium heat. When the oil is hot, add the cardamon (you can lightly crush them if you want more flavor), cloves and cinnamon stick to saute briefly. When fragrant, add rice and salt. Saute a minute or so to coat the grains of rice with the flavored oil. Add water, but don’t put the lid on yet.

Once the water boils, turn the heat down and simmer uncovered for 7 minutes. Cover the pan, and let it cook on very gently heat for 7 more minutes. Turn the heat off and let the rice sit in the pan for 10 minutes before removing the spices and fluffing the rice for serving.

ENJOY!

to print the recipe, click here

Make sure to count how many little spice pieces you add to the pan so you can be sure to remove them all, although they are pretty visible on the cooked rice later.  There is so much flavor in this recipe, I guarantee you will be hooked on it.

.

INCREDIBLY SIMPLE #4
BAKED SALMON WITH SOY-GINGER GLAZE

BAKED SALMON WITH SOY-GINGER GLAZE
(inspired by At Home with Natalie)

3 salmon filets
1/4 cup soy sauce
1/4 cup mirin (sweet rice wine)
1 Tablespoon brown sugar
1 Tablespoon freshly grated ginger
1 tsp sesame oil (do not add more, it is powerful stuff)
salt to taste
sesame seeds to sprinkle on top

Place the salmon filets (skin side down) over a baking sheet covered with aluminum foil leave at room temperature while you heat the oven to 350F and reduce the sauce for glazing.

Mix the soy sauce and mirin in a small non-stick saucepan, add the ginger, brown sugar and sesame oil. Simmer gently for a few minutes, until it starts to get a little thicker.   Brush the top of the filets with some of the glaze, season very lightly with salt, and place in the oven for 20 minutes. Reserve the rest of the glaze.

Remove the pan from the oven, brush with more glaze and sprinkle sesame seeds. Return to the oven, and cook until done to your liking. Serve immediately.

ENJOY!

to print the recipe, click here

We eat salmon every week, but usually the husband is the seafood cook in our house. I rarely venture into his department, but was tempted to try this very simple preparation. I know I’ll be making it regularly, the only key thing is to get the fish cooked to the exact point you want (which is easier to do with sous-vide, but sometimes it’s nice to simplify things further).  Probe the filet with a paring knife, and remove from the oven when it reaches your personal Nirvana level.

ONE YEAR AGO: Halloween Entremet Cake

TWO YEAR AGO: Pork with Prunes, Olives and Capers

THREE YEARS AGO: Kansas Corn Chowder

FOUR YEARS AGO: Impossibly Cute Bacon and Egg Cups

FIVE YEARS AGO: Pulling Under Pressure

SIX YEARS AGO: Cooking Sous-vide: Two takes on Chicken Thighs

SEVEN YEARS AGO: Miso Soup: A Japanese Classic

EIGHT YEARS AGO: On my desk

NINE YEARS AGO: A must-make veggie puree

TEN YEARS AGO: Vegetarian Lasagna

ELEVEN YEARS AGO:  Brazilian Pão de Queijo


PICKLED-ROASTED CHICKPEAS WITH CASHEW CREAM

I share with you today another slightly unusual side dish, or main dish if you add to it a nice helping of couscous. It starts with chickpeas simmered in white vinegar, then roasted with smoked paprika. After pairing them with juicy tomatoes, the whole thing was dressed with the number one choice for vegans when they crave sauces like bechamel: cashew cream.  It has the advantage of being very low in saturated fat, so those who are watching their intake of all things butter and cheese, can indulge without worries.

PICKLED-ROASTED CHICKPEAS WITH CASHEW CREAM
(from the Bewitching Kitchen)

1 (15-ounce) can chickpeas, drained and rinsed
2 cups white vinegar
drizzle of olive oil
1/2 tsp salt or to taste
1/2 tsp smoked paprika or to taste
fresh tomatoes, cut into slices or small pieces
cilantro leaves (optional)

for the cashew cream:
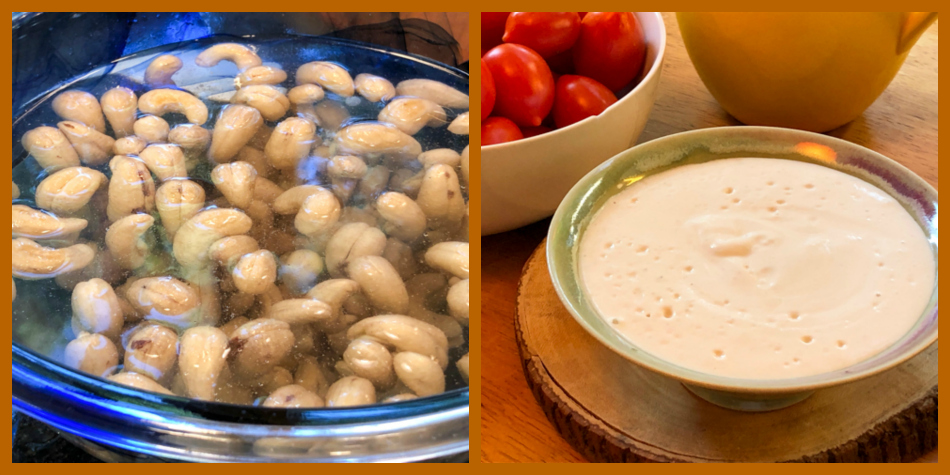
1 cup cashews, soaked for 4 hours to overnight in a large volume of cold water
2 tablespoons lemon juice
salt to taste
1 cup water

Heat oven to 420F.

Bring the vinegar with a pinch of salt to a boil in a sauce pan. Immediately add the chickpeas, boil for 30 seconds, close the pan and remove from heat. Leave the chickpeas in the hot vinegar for 20 minutes. Drain.

Place the drained chickpeas in a roasting pan covered with aluminum foil. Drizzle the olive oil, season with salt and smoked paprika, rubbing them gently to coat well. Roast for about 25 minutes, until dark golden.  Remove them to a paper towel lined plate to cool.

Make the cashew cream. Place the drained cashews with lemon juice and salt into a Vitamix type blender, blend until almost smooth (it won’t turn completely smooth until you add water). Add the water slowly with the motor running. Add as much water as you like to achieve a smooth, creamy consistency.

Assemble the dish: place tomatoes on a serving platter, season lightly with salt, pepper, and a drizzle of olive oil. Spoon the roasted, cold chickpeas on top, and drizzle with the cashew cream. Decorate with cilantro leaves if desired.

ENJOY!

to print the recipe, click here

Comments: If you love pickled things, you will enjoy this take on chickpeas. If you are not too fond of the sharp taste of vinegar, simply skip that step and roast the chickpeas without simmering first. They will still be delicious, and complement the tomatoes well.

The cashew cream. This is a simpler version of one I made a few years ago.  I actually made a double batch and enjoyed it over smoked chicken fajitas, drizzled over roasted butternut squash, and replacing cheese on eggplant Parmigiana. The secret is to soak the cashews for several hours. You can speed up the process by using boiling water and letting them sit for 30 minutes or so, but I find that the taste is brighter and the texture better if you take the longer route. Next on my list is to use cashews as a base for “buttercream” in macaron filling. Perhaps with matcha flavor. Stay tuned.

ONE YEAR AGO: Twice-Baked Goat Cheese Souffle

TWO YEARS AGO: A Star from England in the Bewitching Kitchen

THREE YEARS AGO: Hommage to the Sun


BULGUR AND CHICKPEA SALAD WITH POMEGRANATE SEEDS

I’ve been on a bulgur kick lately. It is such a nice grain, cooks in less than 10 minutes and you can enjoy it warm or cold. In the version I share today, it showed up as salad, with a very simple lemony dressing with fresh mint from our own garden. Disclaimer: I take zero credit for any fruits, legumes or herbs grown in our backyard. The husband is the gardener in charge, and for that I am forever grateful. I am a certified mint-killer.

BULGUR AND CHICKPEA SALAD WITH POMEGRANATE SEEDS
(from the Bewitching Kitchen)

1 cup bulgur
1/2 tsp salt
1 can chickpeas, drained and rinsed
1/4 tsp paprika
2 Tablespoons olive oil
juice of 1 lemon
fresh mint leaves
fresh pomegranate seeds
1/2 preserved lemon, cut in small pieces (optional)
salt and pepper for final seasoning

Cook the bulgur in a large volume of salted water for 8 to 10 minutes. Drain and rinse briefly with cold water. Reserve.

Place the drained chickpeas in a microwave-safe bowl, sprinkle some paprika and microwave for 15 seconds or so. Let them cool briefly.  Add the chickpeas to the bulgur in a serving bowl. Add mint leaves to taste, drizzle olive oil and lemon juice, mix everything well. Finally add pieces of preserved lemons (if using) and pomegranate seeds. Adjust seasoning, and serve.

ENJOY!

to print the recipe, click here

Comments: The little step of microwaving the chickpeas for just a few seconds with a touch of spice is absolutely worth it. I read about it a long time ago and now I just incorporate in every recipe that calls for canned chickpeas. It brightens up the flavor, and since it is such a short “cooking” time, it does not affect the texture. It exorcises  that “tinned” feel out of them.

I added preserved lemons because I made some from scratch back in April and this salad was a perfect opportunity to bring them to play. You can omit or add orange segments together with the pomegranate seeds. Leftovers keep quite well, in fact I think the salad was better at lunch next day. I added a squeeze of fresh lemon juice, and a touch of additional salt. This will be in our regular rotation, I am sure.

ONE YEAR AGO: Purple Star Macarons

TWO YEAR AGO: Smoked Salmon, Fait Maison

THREE YEARS AGO: Kouign-Amann, Fighting Fire with Fire

FOUR YEARS AGO: In My Kitchen, Yin and Yang

FIVE YEARS AGO: Chocolate Toffee Banana Bread

SIX YEARS AGO: In My Kitchen, June 2014

SEVEN YEARS AGO:  Strawberry Frozen Yogurt

EIGHT YEARS AGO: Baked Coconut and “The Brazilian Kitchen”

NINE YEARS AGO: Honey-Glazed Chicken Legs

TEN YEARS AGO: French-Style Rolls