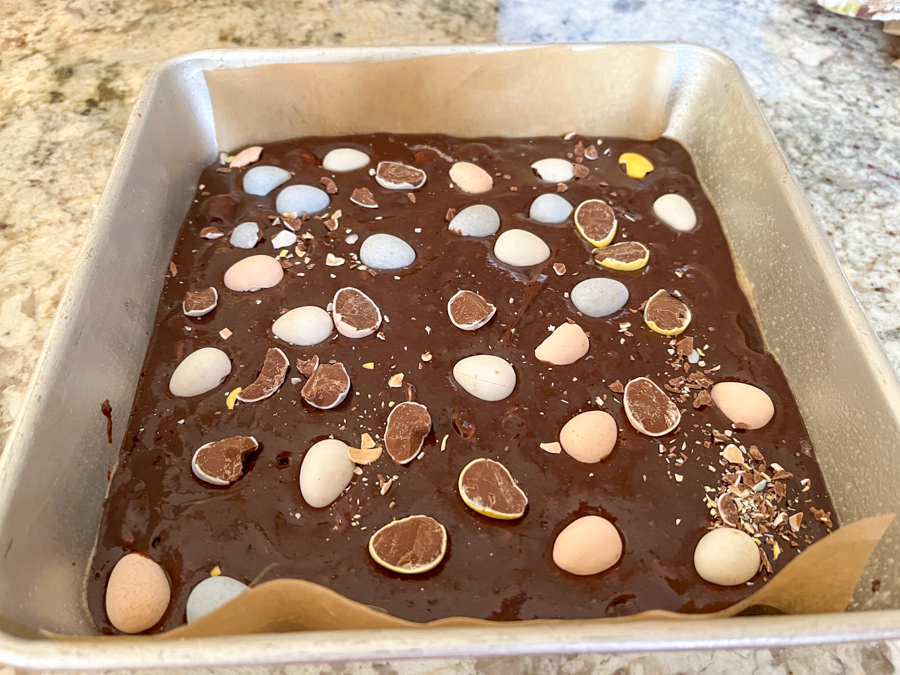
This is a super simple bake, perfect for the season. Toughest part of the recipe? Cutting the mini-eggs in half. But don’t skip that step, it makes them better dispersed in the brownie batter and easier to cut after baking. Just be careful.
MINI-EGG BROWNIES (slightly modified from Kitchen Mason)
Lightly grease and line an 8 inch square baking pan with parchment paper, and heat the oven to 350F.
Measure half of the mini-eggs and cut in half.
Melt the butter with the chocolate in a microwave, gently. Let it cool slightly and add the eggs, whisking until fully smooth. Add the sugars, and beat until fully dissolved. Add the vanilla, salt, and sift the flour and cocoa powder on top. Gently fold the batter until no dry bits remain. Add HALF the mini-eggs preciously cut and HALF the whole mini-eggs. Mix briefly and pour the batter into the pan.
Distribute the remaining eggs (cut and whole) over the surface, gently pressing them a little bit into the batter.
Bake for 25 to 30 minutes, until the top is crispy and dry. Do not over-bake. Allow to fully cool before cutting in small squares.
Comments: Hard to come up with a simpler bake, apart from slicing the mini-eggs, it’s something you could do with kids. You can definitely use any brownie recipe you are fond of, and incorporate the mini-eggs the way this one does. But keep the basic recipe simple, this will be all about the little eggs dispersed in the brownie. Adorable little bake!
This is a recipe I used to make all the time and for some odd reason disappeared from our menu. The other day I was searching the blog for ideas, and fell on this post from twelve years ago! I made it twice, two in a row, and tweaked it slightly. This is a lower-carb version, and if you skip the breadcrumbs on the topping it can also be gluten-free.
LOW-CARB TORTA DI ZUCCHINI (from the Bewitching Kitchen)
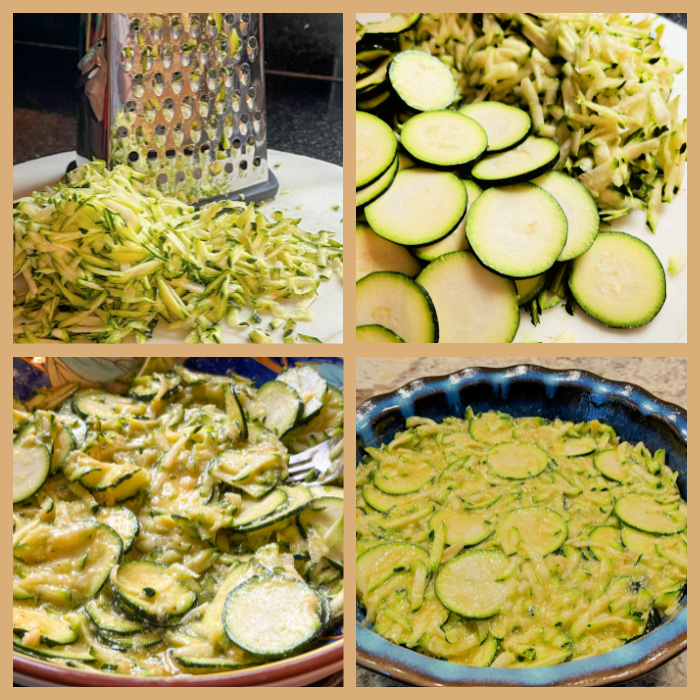
4 zucchini, 2 grated, 2 thinly sliced 4 eggs zest of 1 lemon 1/2 tsp Herbes de Provence 1/2 tsp salt or to taste black pepper, to taste 1/4 cup almond flour plus more to sprinkle on plate 1/4 cup finely grated Parmigiano cheese topping: 1/4 cup breadcrumbs + 1/8 cup Parmigiano cheese drizzle of olive oil
Grease a pyrex pie dish with butter. Sprinkle some bread crumbs or almond flour to coat.
Mix the beaten eggs with the lemon zest, herbs, Parmigiano cheese, 1/4 cup of almond flour, salt and pepper. In another bowl, place the grated and sliced zucchini. Shake the dish carefully to distribute the slices more or less evenly. Add the egg mixture to it, mix gently, and pour into the prepared pie dish. Sprinkle the remaining mixture of bread crumbs (or you can use almond flour) and cheese on top, forming a very light coating. You may not need to use it all. Drizzle a bit of olive oil.
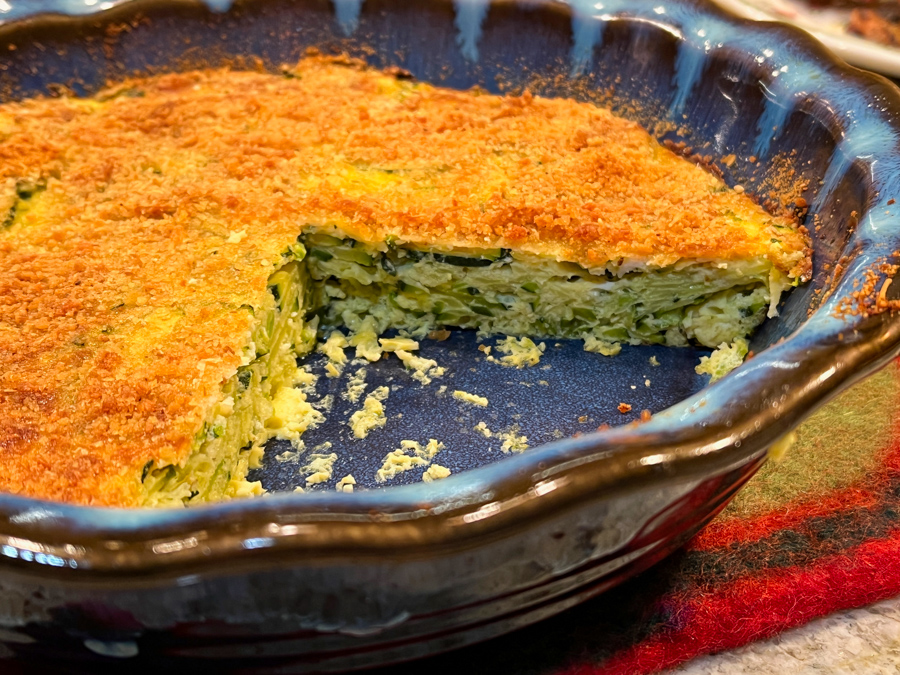
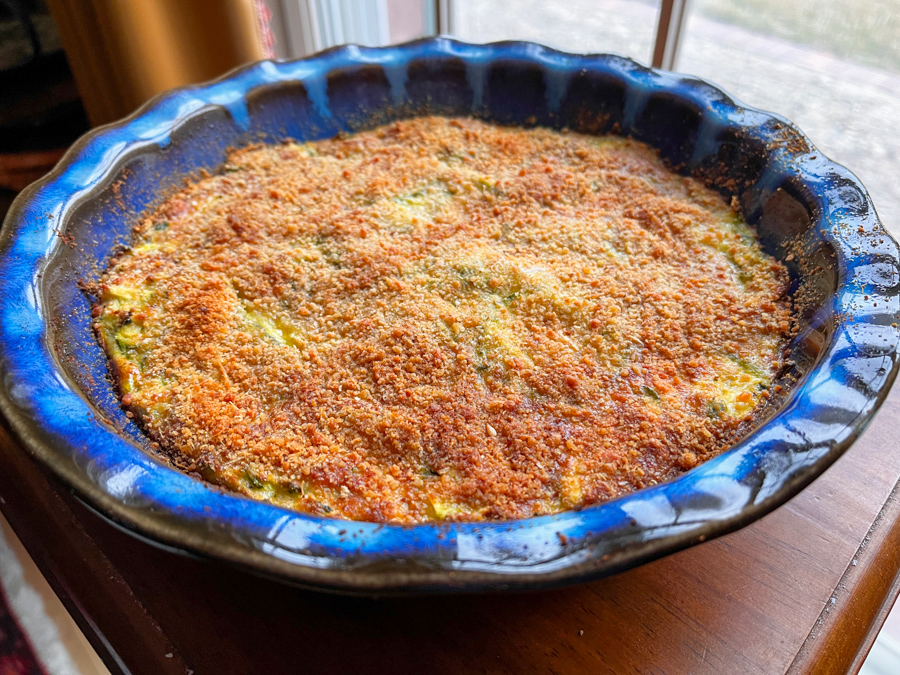
Bake in a 375F until set and golden on top, 25 to 30 minutes. Allow it to cool for at least 15 minutes before serving. Serve warm or at room temperature.
Comments: This is the type of recipe that makes the cook a bit nervous. As you put it together, it seems impossible to work. But trust me, it does. Normally recipes using zucchini tell you to squeeze the liquid, but this one does not. The mixture of grated zucchini with the slices is what makes the whole texture perfect. Think about a baked frittata, but without that intense eggy flavor that some people object to. I used almond flour in place of bread crumbs in the body of the recipe, but added some bread crumbs to the topping. You can just use almond flour instead for an even lower in carb concoction.
It is very important to let the torta rest for at least 15 minutes before slicing. I actually like to leave it for about half an hour and enjoy it barely warm. That’s when everything sets nicely. I don’t know why this delicious side dish left our rotation, but it is so simple and so tasty, I felt it was worth re-blogging, with the minor modifications I introduced in this version. I hope you give it a try… Next on my plans? To make a mixture of carrots and zucchini. Stay tuned!
Baking in silicone pans can be tricky, so my advice is to always use a good quality product. I stand by Silikomart, all the way. If you’ve been around my blog for a while, you know that I never accept products to review, and only recommend things I love. This little pan makes the cutest, two-bite size cakes. I share today four different bakes using it. The most important thing is to bake a little longer than you would in a metal baking pan, and allow the cakes to fully cool before trying to un-mold them. You can even let them come to room temperature and then place the pan in the fridge for 10 minutes to ensure a perfect release. For all these bakes I used the Silikomart Savarin Mold, medium. Available here. I always spray the inside very lightly with PAM baking spray.
CHOCOLATE CHIP FINANCIER MINI-CAKES
CHOCOLATE CHIP FINANCIER MINI-CAKES (adapted from foodohfood)
80 g unsalted butter, diced 50 g almond flour 140 g powdered sugar 60 g all-purpose flour 1/2 tsp baking powder 1/2 tsp salt 150 g egg whites 50 g mini chocolate chips chocolate ganache, or melted chocolate and sprinkles for decoration
Heat oven to 360F.
Make the brown butter. Put the diced butter in a pan and melt it over low heat. Simmer the butter until the water is evaporated, it should get a light caramel color and a nutty smell. Pass it through a sieve and allow it to cool.
In a bowl, mix the almond flour, powdered sugar, flour, baking powder and salt. Mix on low speed with the electric mixer or with the leaf attachment and gradually add the egg whites and then cold brown butter. Finally, add the chocolate chips. The batter is quite liquid, so use a piping bag to distribute it in the pan, filling almost 3/4 height.
Bake until a toothpick comes out clean, 15 to 20 minutes, depending on your oven. Let it cool completely before un-molding. Fill the center with ganache or melted chocolate, or leave it plain. Decorate with sprinkles, if desired.
Comments: For the financier, filling not quite to the 3/4 height was perfect. I love the texture of these mini-cakes. You need tiny chocolate chips for this recipe (I’ve featured the ones I like in my last In My Kitchen post) If you don’t have it, cut regular chips in very small pieces. It is hard to pick a favorite, but these were truly delicious on all counts.
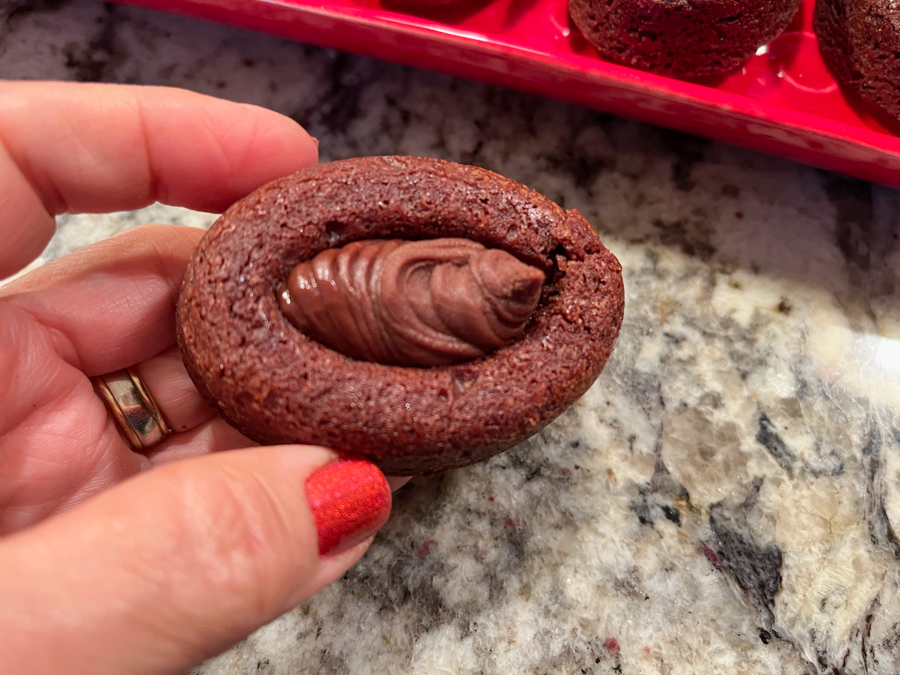
RED VELVET MINI-CAKES
Recipe used: America’s Test Kitchen Red Velvet as published in their book The Perfect Cake. I could not get permission to publish the recipe. If you have the book, my only change was to make half the amount. I still had batter leftover after making 10 mini-cakes, and that was enough for two regular size cupcakes. Recipe for the frosting below.
SMALL BATCH CREAM CHEESE FROSTING (adapted from several sources)
2 ounces cream cheese softened 2 ounces unsalted butter, softened 1/4 teaspoon vanilla extract 80g powdered sugar, or more if you prefer a stiffer frosting Pinch of salt
In a medium bowl, combine cream cheese, butter, and vanilla extract. Beat until well-mixed and fluffy.
Add powdered sugar and salt and continue to beat until sugar is completely incorporated and frosting is smooth and creamy. For a stiffer frosting, add more powdered sugar. Add the frosting to the cavity of the mini-cakes, and decorate with sprinkles, if desired.
I used my default recipe for brownie cupcakes and it worked very well in this shape. I filled the center with ganache and added sprinkles, because as you know, sprinkles make life better.
Chop the chocolate and butter in pieces, place them in a microwave-safe bowl and melt at 50% power just until the chocolate is almost fully melted. Finish melting by whisking gently until smooth. Allow it to cool for 5 to 10 minutes.
In another bowl, mix flour, salt and baking powder. Reserve.
To the melted chocolate, add the sugar and mix with a handheld mixer, when the sugar is incorporated (it won’t be smooth), add the eggs, one at a time, then the vanilla extract. Whisk until smooth, for a couple of minutes medium-speed. Gently sift the flour mixture on top, whisk just until the flour is incorporated and no dry bits can be found.
Fill each cavity of the savarin mold a little less than 3/4 full. Bake for 15 to 20 minutes, until a toothpick inserted in the center comes out slightly moist. Cool completely before un-molding.
Any of the icings I shared in my original post will work for these cupcakes, just pick sprinkles that match the flavor. But, for a simpler bake you can just dust them with powdered sugar. The shape is beautiful no matter now you finish it.
BLACK SESAME & CHAI MINI-CAKES
These cakes were made from a recipe found in the cookbook Masala and Meatballs, by Asha Shivakumar. I’ve had this book for several years and everything I made from it turned out excellent. I highly recommend it. For these mini-cakes, the batter takes black sesame paste, and I used my own icing from the Chai-Brownie Cupcake in this post. In Asha’s recipe, the icing was made with sweetened condensed milk as a base plus powdered sugar, so I opted for something a little less sweet.
I hope you’ll consider baking with little savarin molds, especially if you are sharing these with friends or co-workers. They are very small, and the format allows for just a little icing. I am always impressed by the beauty of iced cupcakes, but they can be quite over-indulgent. If you like to enjoy sweets but prefer some moderation, these have your name written all over…
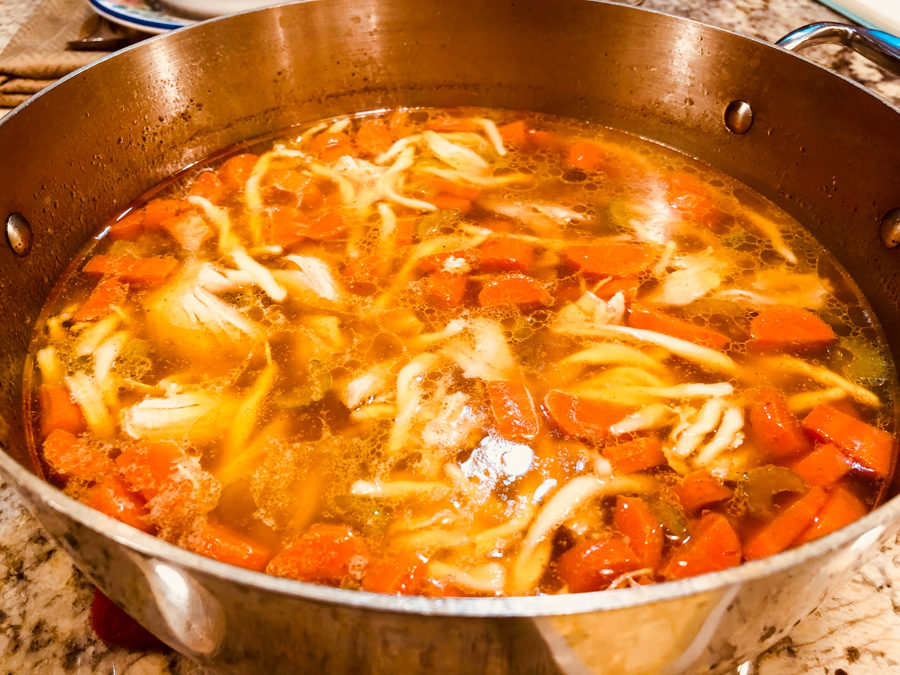
I use the pressure cooker a lot, pretty much the whole year. I wanted to make chicken soup under pressure (the soup, not the cook), so I started by checking a few cookbooks and websites. I shall name no names, but a very very reputable source gave me a recipe that disappointed on many levels. I used it as a very loose starting point. My version got two thumbs up from me and the man I’ve been happily married with for 21 years, 11 months and 3.5 weeks. Yes, almost anniversary time for us!
CHICKEN NOODLE SOUP (from the Bewitching Kitchen)
2 tablespoons olive oil 2 shallots, halved 6 medium carrots, 3 halved crosswise and 3 peeled and cut into half-moons 4 stalks celery, 2 halved crosswise and 2 cut into half-moons 10 black peppercorns 2 bay leaves 1 large chicken, cut into 8 to 10 pieces, with the skin removed, wings left with skin on 2 quarts water 1/4 cup soy sauce 1 piece ginger (about 1 inch) 2 tablespoons kosher salt Freshly squeezed lemon juice, to taste, optional Freshly ground black pepper, for serving noodles of your choice, amount to taste
Heat the oil in your pressure cooker, add the shallots, and the large pieces of carrots and celery, season lightly with salt and pepper. Sautee until fragrant.
Add the chicken pieces, but do not include the breast. Add water, peppercorns, soy sauce and ginger. Make sure the water covers all the pieces of meat. Close the pressure cooker, and cook under pressure for 30 minutes. Release the pressure by running cold water over the lid, or if using the Instant Pot, use the rapid release method.
Strain the liquid passing it through a fine sieve. Discard all solids. You should have at least 8 cups of stock, if you have less, add water to complete the volume. Place the liquid back in the pressure cooker, or use another large stockpot. Add the breasts to the stock, then the pieces of carrots and celery reserved earlier. Simmer very gently until the breast is cooked through – it might take 20 minutes, depending on the size of the breasts.
Cook the noodles al dente and rinse them in cold water. Reserve. You’ll need about 2 cups cooked noodles for the full amount of soup.
When the breast meat is cooked, remove to a plate and shred the meat with a fork. Add it back to the stock, and add the cooked noodles. Adjust seasoning with salt and pepper, and squirt a little lemon juice right before serving.
Comments: I made this soup three times during this winter. First time I was worried that the noodles would get too mushy if left in the broth for a day or two, so I was trying to add them to just the amount of soup we would consume in that meal. But, there’s really no need to do that. It turns out they hold pretty well in the fridge. I just try to cook them JUST to the al dente stage.
The pressure cooker does a beautiful job intensifying flavors, so the soup is very satisfying and has a bright flavor due to the ginger and lemon. I hope you give it a try, either with a pressure cooker or the Instant Pot.
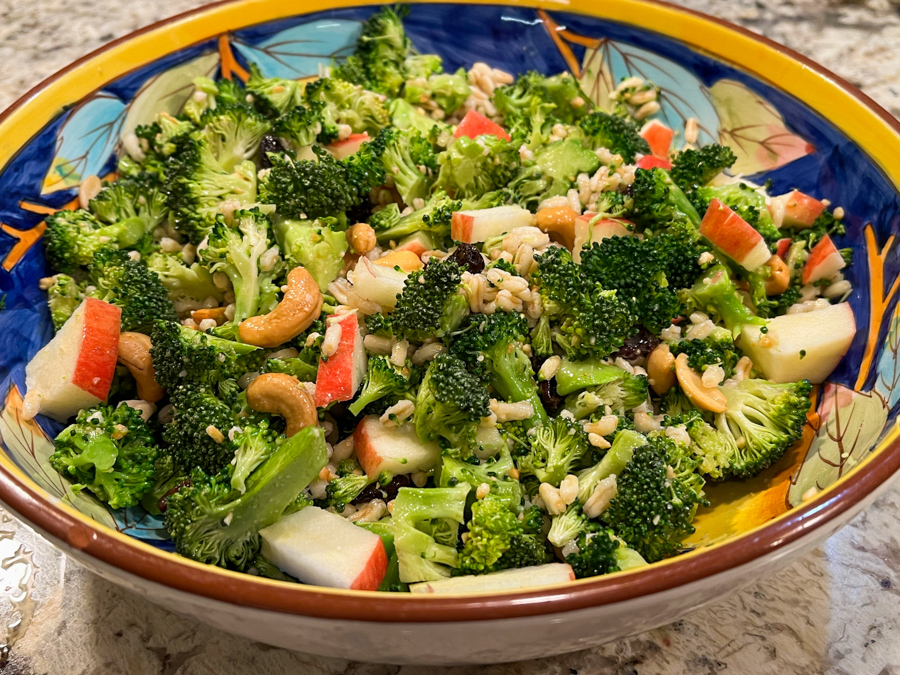
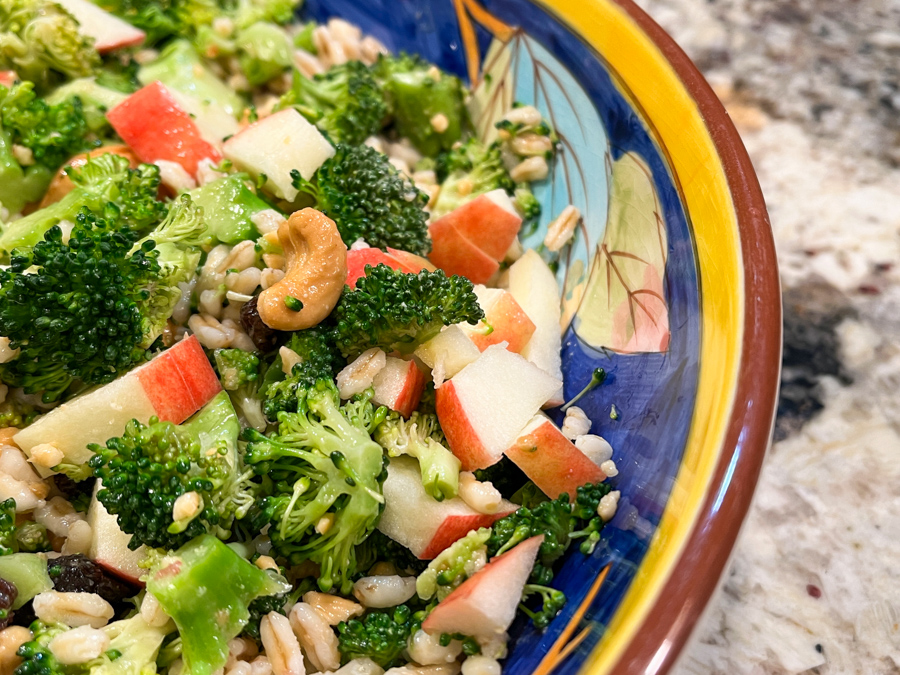
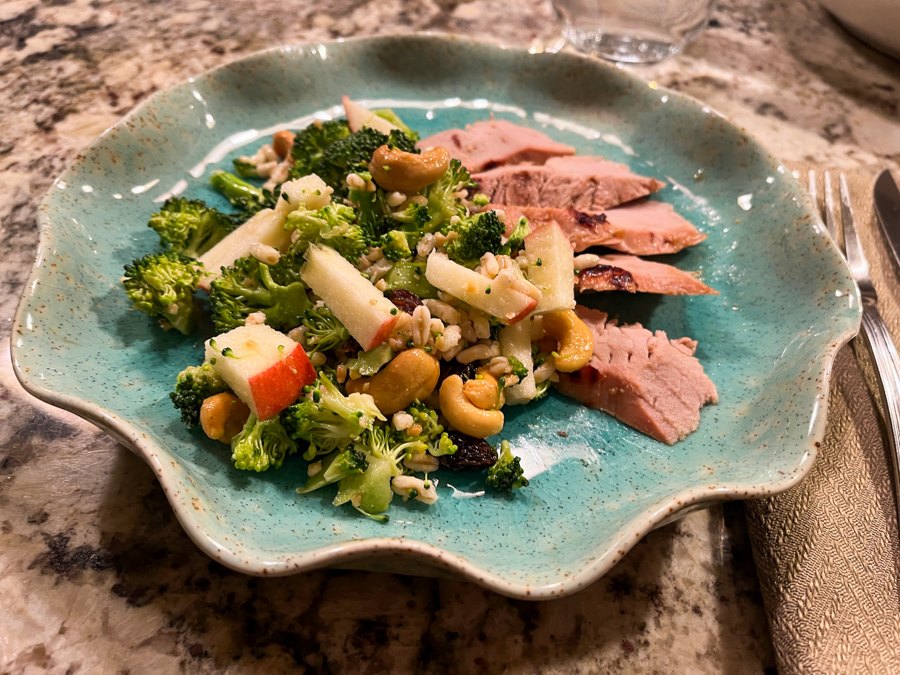
If I am going to have a salad, my preference is a salad with substance, and a variety of textures and colors. No need to go all the way into a Chicken Caesar or a Steak Salad, but the addition of grains is more than welcome. I used quick-cooking kamut, but any type will work, just pay attention to the timing. Also, any other will be fine: barley, cracked wheat, or the beautiful farro.
KAMUT & BROCCOLI SALAD (adapted from many sources)
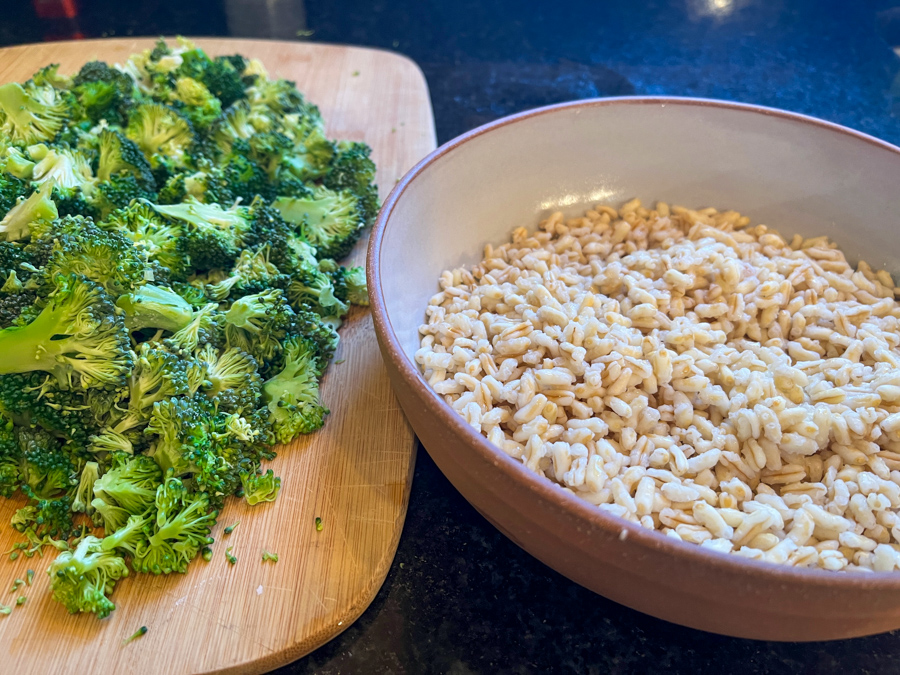
1 cup cooked kamut, or amount to taste 2 broccoli heads, or amount to taste 1/2 cup roasted, salted cashews 1/4 cup raisins 1/2 apple, cut in pieces (I used Pink Lady) 1/4 cup olive oil juice and zest of 1 lemon grated ginger to taste salt and pepper to taste
The kamut can be prepared a day in advance if you like. Make sure it is cold when you make the salad. If you make it in advance, drizzle just a touch of olive oil to prevent the grains from sticking together. Separate the broccoli into florets and steam them for 3 minutes. Immediately run very cold water to stop the cooking. Cut the steamed broccoli into pieces. Reserve.
Make the dressing by whisking the olive oil with lemon juice, add ginger, salt and pepper.
In a large serving bowl, add all the ingredients for the salad, pour the dressing and mix gently. Adjust seasoning with salt and pepper if needed. Allow the salad to sit for 30 minutes before serving, if possible.
Comments: The main inspiration for this recipe came from a cookbook I own, but that version served the broccoli raw and passed by the food processor. The pieces of raw broccoli were very small and lost in the middle of the grain, all acquiring the same green color. The way I chose to make it, was barely steaming the broccoli. This simple step tames its raw sharpness. Next, I cut the pieces with a knife, in small chunks. In my opinion, this makes the final product much more appealing not only visually, but as far as texture goes.
The apples and raisins are a must, and the cashews give that extra crunchiness that will leave you smiling… peanuts, walnuts, or pecans, can be used instead.
The added bonus of this salad: it holds quite well in the fridge. I made such a big portion that in fact it lasted two days, and on the second day I decided to warm it in the microwave for a minute. Perfect! A light lunch that needed absolutely nothing else to go with it.