A BOUQUET OF MACARONS

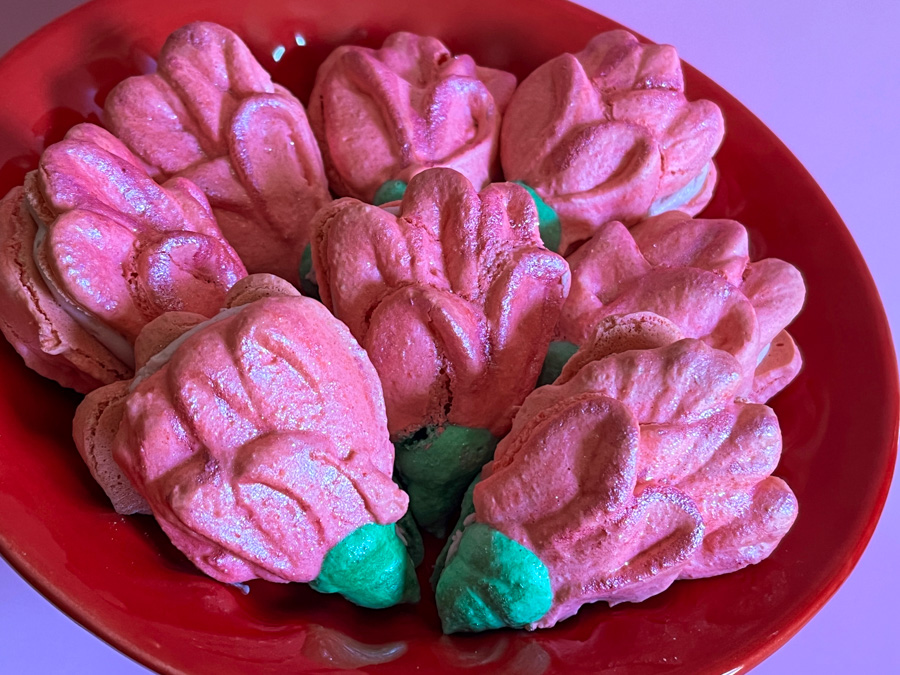
Last month I was minding my own business when my friend Vy sent me a message with a little macaron-design-teaser. This amazing baker – check her page here – shared some carnation macarons that were simply spectacular, and Vy thought I should try to make them (don’t I have great friends????). I resisted for a while, but then decided to go for it. I attempted two floral designs, first using my regular French meringue method, but that did not work well. So I am sharing the exact recipe I used for both, a Swiss-meringue version that is slightly sturdier and performed better to hold shape. The tulip-shape template for piping was from this site. I used it for the larger, pink flowers, the others were free-hand over a circle shape. 


MACARON FLOWERS
(from The Bewitching Kitchen)

100g almond flour
100g powdered sugar
100g egg whites
100g granulated sugar
1/2 tsp vanilla extract
pink, red, green gel food color

Process almond flour and powdered sugar in food processor, about 10 pulses, then pass through a sieve. Reserve.

Bring the sugar and egg whites to the top of a pan with simmering water and whisk until the sugar is fully dissolved and the mixture feels smooth if you rub your fingers into it, 2 to 3 minutes. Immediately transfer it to a KitchenAid bowl and whisk on medium-high until the meringue form solid peaks that fold just slightly as you hold the whisk up. This will take 8 to 12 minutes. Add vanilla. Add the almond flour/powdered sugar mixture, put the blade beater and mix for a few seconds. Mix a little more by hand, remove a small amount do dye green, and dye most of the meringue pink or red. Proceed to do the macaronage but do not take it as smooth as normally for regular macs, you need to hold it back so that the mixture is thicker and holds its shape when piped.

Place the red meringue in a piping bag fitted with a leaf icing tip (104 works well). Place the green meringue in a piping bag fitted with a small round tip, maybe 1/4 inch.

Pipe petals in the shape you desire, then a little green stem. Do not bang the sheet. Let them fully dry until the surface is not moist at all. These need to dry more than round shells, or they will explode. Some cracks will happen, but they usually do not interfere too much with the design.

Fill the shells with the filling of your choice. I used raspberry buttercream (from this post, but regular butter instead of vegan).

Leave the macarons in the fridge for 24 hours before serving.

ENJOY!

to print the recipe, click here

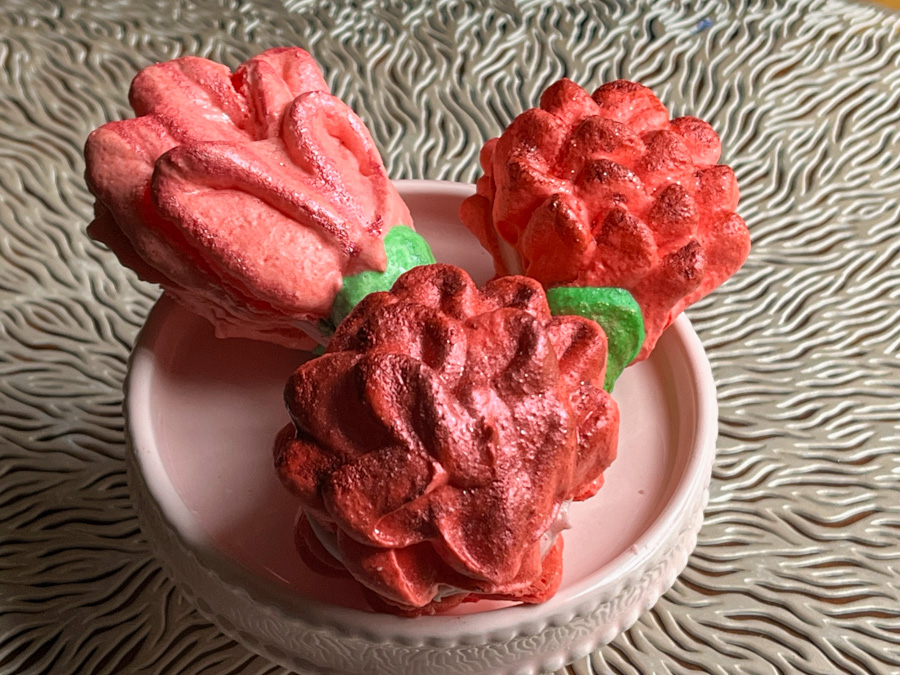
Comments: The larger, pink version had a slight curve in the shape, so it is important that you print the template in two orientations, and then pipe half the shells in one particular way. The smaller, red flowers were symmetrical, so no need to worry about that.

The more you hold back the macaronage, the sharper the shape will be, and I could have made my batter slightly thicker, but it is hard to judge when to stop. I think it was a good compromise and I did not have that many cracks or explosions. All the shells were painted with a little luster powder and vodka but that step is of course optional. It is hard for me to leave cookies alone, as you know…..

If you enjoy making macarons, consider trying some alternative ways to pipe the batter, there are so many possibilities, I am thinking of autumn leaves next, so stay tuned!

ONE YEAR AGO: Chocolate-Hazelnut Tartlets

TWO YEARS AGO: Turkey Taco Salad

THREE YEARS AGO: Cheese and Pesto Emmer Roll-ups and Elaine’s Cookbook Review

FOUR YEARS AGO: Mango-Hazelnut Entremet Cake

FIVE YEARS AGO: Lebanese Lentil Salad and a Cookbook Review

SIX YEARS AGO: Cottage Loaf

SEVEN YEARS AGO: Sourdough Loaf with Cranberries and Walnuts

EIGHT YEARS AGO: Sichuan Pork Stir-Fry in Garlic Sauce

NINE YEARS AGO: Our Green Trip to Colorado

TEN YEARS AGO: Ditalini Pasta Salad

ELEVEN YEARS AGO: Celebrate Wednesday with a Thai Seafood Curry

TWELVE YEARS AGO:  Post-workout Breakfast

THIRTEEN YEARS AGO: Semolina Barbecue Buns

FOURTEEN YEARS AGO: Lavash Crackers

HAVE A HEART

A wordless post.

For last year’s version, click here

.

.

.

.

.

.

.

.

.

ONE YEAR AGO: Chocolate-Hazelnut Tartlets

TWO YEARS AGO: Turkey Taco Salad

THREE YEARS AGO: Cheese and Pesto Emmer Roll-ups and Elaine’s Cookbook Review

FOUR YEARS AGO: Mango-Hazelnut Entremet Cake

FIVE YEARS AGO: Lebanese Lentil Salad and a Cookbook Review

SIX YEARS AGO: Cottage Loaf

SEVEN YEARS AGO: Sourdough Loaf with Cranberries and Walnuts

EIGHT YEARS AGO: Sichuan Pork Stir-Fry in Garlic Sauce

NINE YEARS AGO: Our Green Trip to Colorado

TEN YEARS AGO: Ditalini Pasta Salad

ELEVEN YEARS AGO: Celebrate Wednesday with a Thai Seafood Curry

TWELVE YEARS AGO:  Post-workout Breakfast

THIRTEEN YEARS AGO: Semolina Barbecue Buns

FOURTEEN YEARS AGO: Lavash Crackers

FETA EGGS WITH ZUCCHINI

Please don’t judge this recipe by its looks, it would be unfair because it is delicious and so very simple! I eat a lot of eggs, my lunch is often a scrambled egg wrapped in a tortilla, or some type of omelette made by the husband, who is a pro at those. I am always searching for new ways to enjoy my favorite lunch item, and this is my newest obsession.

FETA EGGS WITH ZUCCHINI
(slightly modified from Skinnytaste)

2 teaspoons olive oil
1/2 cup grated zucchini, squeezed dry
Chili crisp hot sauce, any amount you like (I used this one)
2 large eggs
1 ounce feta cheese
ground black pepper to taste
salt to taste


In a small nonstick skillet, heat the oil and add the chili crisp sauce and zucchini, sautee on medium heat until the zucchini gets soft and starts to get some color. Add the feta cheese evenly over the zucchini and cook until it starts to melt a bit.

Carefully drop in the eggs, season with salt and pepper and cover. Cook on low until the yolks are runny and set, or cooked to your liking. Use a silicone spatula to transfer the eggs to your plate.

ENJOY!

to print the recipe, click here


Comments: I have made it with other cheeses (Cotija and goat cheese), and they all work great. It is such a nice way to enjoy eggs, a slice of sourdough is the perfect way to deliver it to your mouth, but if you want to keep the carb index low, just enjoy the layer of zucchini to give it texture. It gets all crispy and cheesy underneath the egg, giving it that bit of texture that the fried egg by itself lacks. If you don’t have the chili crisp sauce, just use red pepper flakes.


If you love eggs, try this preparation. I imagine it could work well with finely grated carrots, or even some shredded cabbage in place of the zucchini. Worth playing with!

ONE YEAR AGO: Poilane-Style Bread, a simplified version

TWO YEAR AGO: Broccoli Salad with Pomegranate Seeds and Tahini Dressing

THREE YEARS AGO: Turkey-Spinach Meatballs with Cardamon-Tomato Sauce

FOUR YEARS AGO: British Baps, a Technical Challenge

FIVE YEARS AGO: Japanese-Style Cupcakes with Cherry Blossom Icing

SIX YEARS AGO: Quick Weeknight Soups

SEVEN YEARS AGO: Sourdough Loaf with Cranberries and Walnuts

EIGHT YEARS AGO: Sichuan Pork Stir-Fry in Garlic Sauce

NINE YEARS AGO: Our Green Trip to Colorado

TEN YEARS AGO: Ditalini Pasta Salad

ELEVEN YEARS AGO: Celebrate Wednesday with a Thai Seafood Curry

TWELVE YEARS AGO:  Post-workout Breakfast

THIRTEEN YEARS AGO: Semolina Barbecue Buns

FOURTEEN YEARS AGO: Lavash Crackers

MISO CARAMEL CRACKER COOKIES

If you like salty-sweet things, these are for you. If you are not into baking, or – dare I say – if you describe yourself as a total bake-o-phobe, these are for you. No baking involved. A little stirring, a little melting, a lot of fun. Beware: they are addictive!


MISO CARAMEL CRACKER COOKIES
(from Molly Yeh)

11 ounces store-bought caramels (Like these)
2 tablespoons heavy cream
1 + 1/2 tablespoons miso paste
About 2 1/2 sleeves butter crackers, such as Ritz (about 72 crackers)
8 ounces chopped dark chocolate or dark chocolate chips (see my comments)
Sprinkles, for topping


In a medium pot, combine the caramels and heavy cream. Heat over medium low, stirring, until the caramels are melted and the mixture is smooth, about 7 minutes. Stir in the miso and remove from the heat. Let cool for a few minutes, so the caramel can thicken slightly.

Arrange half of the crackers salty-side down on a baking sheet lined with parchment and drop about 1 teaspoon caramel per cracker. Top each with another cracker salty-side up. Refrigerate for 30 minutes.
In a double boiler or a microwave in 30-second increments, melt the chocolate, stirring until smooth. Let cool slightly.

Dip the crackers halfway into the chocolate and place back on the baking sheet. Add sprinkles. Let set in the refrigerator or at room temperature until the chocolate is firm, about 30 minutes.

ENJOY!

to print the recipe, click here

Comments: These got super nice reviews from our departmental colleagues. You can change the caramel by omitting the miso, adding orange, or anything you might fancy. Maybe use white chocolate to coat and different types of sprinkles. But the combination of miso caramel with the dark chocolate and the crackers is hard to beat. To coat, I used a 50:50 mixture of bittersweet chocolate with compound chocolate, which gives a little more smoothness to the coating and also tends to dry harder than untempered chocolate would. Feel free to temper chocolate if you prefer, or use any coating you like. The soft caramel with a hint of salt from the miso goes very well with the cracker and the intense chocolate coating. Truly delicious!

If you are looking for something to take for a potluck party, or to serve to friends watching a football game, or to sweeten up your book club reading, consider making a batch.

ONE YEAR AGO: Mooncakes for Mid-Autumn Festival

TWO YEARS AGO: Almond-Raspberry Triangles and a Special Cookbook Review

THREE YEARS AGO: Sweet and Spicy Roasted Cauliflower

FOUR YEARS AGO: Roasted Cauliflower Salad over Hummus

FIVE YEARS AGO: Queen of Sheba

SIX YEAR AGO: Brunch Burger

SEVEN YEARS AGO: Mango Salsa with Verjus

EIGHT YEARS AGO: Raspberry Bittersweet Chocolate Chunk Brownies

NINE YEARS AGO: Scary Good Pork Burgers

TEN YEARS AGO: Review of exercise program Focus25

ELEVEN YEARS AGO: Celebrate Wednesday with a Thai Seafood Curry

TWELVE YEARS AGO:  Post-workout Breakfast

THIRTEEN YEARS AGO: Semolina Barbecue Buns

FOURTEEN YEARS AGO: Lavash Crackers

TOMATO AND FRESH PEACH SALAD

You cannot go much simpler than this… Two main ingredients, juicy tomatoes and fresh yellow peaches, a simple dressing, and you are done. Not to mention the presentation that makes it all shine. You definitely need this salad in your life…

TOMATO AND FRESH PEACH SALAD
(very slightly modified from Mother Would Know)

2 Large fresh tomatoes, cut into 1/2-inch slices, each slice halved in half-moons
2 Large peaches, cut into half, then cut each half into 1/2-inch half-moons
1 tablespoon Olive oil
2 teaspoons balsamic vinegar
Pomegranate molasses to taste
Handful of fresh basil leaves, torn or cut in half if large
2-3 Large pinches Maldon sea salt
Freshly ground pepper


I used yellow and red tomatoes, alternating colors. Arrange the slices of tomatoes and peaches in a circular pattern around a dinner plate (mine was 8 inch in diameter), and place basil leaves in between some of the slices, any amount you like.

Whisk the olive oil and balsamic vinegar together in a small bowl, add to the tomato-peach mixture. Season with salt and pepper, drizzle a little pomegranate molasses all over. If you have time, allow it to sit at room temperature for 20 minutes before serving.

ENJOY!

to print the recipe, click here

Comments: I love peaches but do not care for the texture of the skin when I eat the fresh fruit, however in this preparation the dressing takes care of my “issues” and I enjoyed it without reservation. Peaches and tomatoes are yet another match made in heaven, this one new to me. Huge thanks to Laura for bringing this into my cooking world!

ONE YEAR AGO: Chicken and Zucchini Stir-fry

TWO YEARS AGO: The Never Again Folder

THREE YEARS AGO: Chai-Butterfly Macarons

FOUR YEARS AGO: Roasted Cauliflower Salad over Hummus

FIVE YEARS AGO: Sous-vide Egg Bites

SIX YEARS AGO: Paul Hollywood, The Weekend Baker

SEVEN YEARS AGO: Texas Sheet Cake

EIGHT YEARS AGO: In My Kitchen, September 2015

NINE YEARS AGO: Sour Cherry Sorbet: A Labor of Love

TEN YEARS AGO: In My Kitchen – September 2013

ELEVEN YEARS AGO: Raspberry Sorbet at Summer’s End

TWELVE YEARS AGO: When three is better than two  (four years with Buck!)

THIRTEEN YEARS AGO: Grating Tomatoes (and loving it!)

FOURTEEN YEARS AGO: A Peachy Salad for a Sunny Day