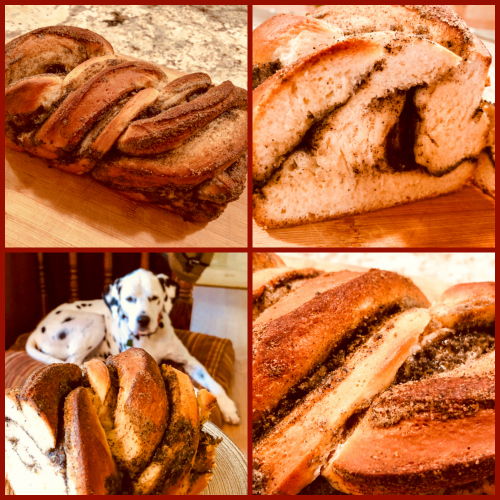
BLACK SESAME JAPANESE MILK BREAD

Have you heard of the tangzhong method to make bread? It is a Japanese technique that cooks part of the flour before incorporating it into the dough, causing the starch to suffer a change in structure that retains water more efficiently, so the bread will be very soft and have a longer shelf life. This recipe was on my friend’s Dana blog and I jumped on it almost immediately because the way she spoke about the black sesame paste made me realize I needed that in my life. Badly. The bread ends up with airs of a showstopper creature, but it’s really not complicated to make. And the flavor? My gosh. You need that black sesame paste in your life also.

BLACK SESAME JAPANESE MILK BREAD
(slightly modified from Wakeandbakemama)

for the black sesame paste (can be made the day before):
½ cup toasted black sesame seeds, finely ground
½ cup granulated sugar
½ cup unsalted butter, softened

for the tangzhong:
6 tablespoons
water
2 tablespoons bread flour

for the dough:
1/4 cup whole milk
1 + 1/2 teaspoons active dry yeast
320 grams bread flour, plus up to 30 grams more
1 teaspoon salt
1/4 cup sugar
1/4 cup heavy whipping cream
1 tablespoon powdered milk (optional)
2 eggs, 1 for the dough and 1 for the egg wash
2 tablespoons butter, softened
splash of milk or water, for the egg wash

Make the sesame paste.Finely grind the black sesame seeds in a spice grinder. Add the sugar and softened butter. Pulse to make a paste. Transfer to a small bowl, cover, and set aside. You can refrigerate this in advance. Before using, bring to room temperature to ensure it has a spreadable consistency.

Make the tangzhong. In a small saucepan, whisk together 6 tablespoons of water and 2 tablespoons of bread flour until no lumps remain. Heat the mixture over medium-low heat, whisking constantly. It should thicken to a gel-like consistency after just a few minutes. As soon as lines appear in the mixture when stirred, remove it from the heat and transfer it to a small, clean bowl. Let cool to room temperature.

Make the dough. Heat the milk briefly to just above room temperature, about 110° F or lukewarm to the touch. Sprinkle the yeast over the milk and set it aside for 5 minutes for the yeast to activate.

In the meantime, whisk together 2 1/2 cups of the bread flour, salt, and sugar in a large bowl. In a smaller bowl or a measuring cup, whisk together the tangzhong, cream, milk powder (is using), and one egg.

Add the yeast mixture to the wet ingredients, and whisk gently, just to incorporate. Make a well in the dry ingredients and pour in all of the wet ingredients. Stir with a wooden spoon until the mixture forms a loose, shaggy dough, then switch to using your hands. Knead for 4 to 5 minutes, or until the dough forms a semi-smooth ball. The dough will be quite sticky — sprinkle the extra 1/4 cup flour, a tablespoon or so at a time, over the dough and your hands as you knead to keep it from sticking too much. I usually use at least 2 tablespoons and often up to the full amount, but you may not need it all.

Add the butter to the dough, one tablespoon at a time, kneading after each addition. Add the second tablespoon of butter only after the first has been evenly incorporated. The dough will be slippery and messy at this point, but just keep kneading and it should eventually form a soft and pliable dough that’s easy to work with. Knead for an additional 4 to 5 minutes, or until the dough becomes smooth and elastic. Place the dough in a large bowl and cover the bowl with plastic wrap or a damp towel. Let rise for 1 to 2 hours, or until doubled.

Once the dough is doubled gently deflate the dough and roll it out as a large rectangle. Spread the black sesame paste all over it, leaving a small border free of paste. Roll the dough from the long side, forming a cylinder, with the seam down. Using a sharp knife, slice the dough almost all the way through, and open the halves, exposing the center.  Twist the two strands around, making sure the inner layers are facing up.  Carefully drop it inside a loaf pan (9 x 5 in works fine), and allow it to rise covered for another hour, hour and a half.  Meanwhile, heat the oven to 350F.

Whisk your second egg with a splash of milk or water, and brush the egg wash over the dough. Bake for about 30 minutes, or until golden-brown on top. Internal temp should be 200 degrees F. Let it cool completely before slicing.

ENJOY!

MOROCCAN CARROT SALAD

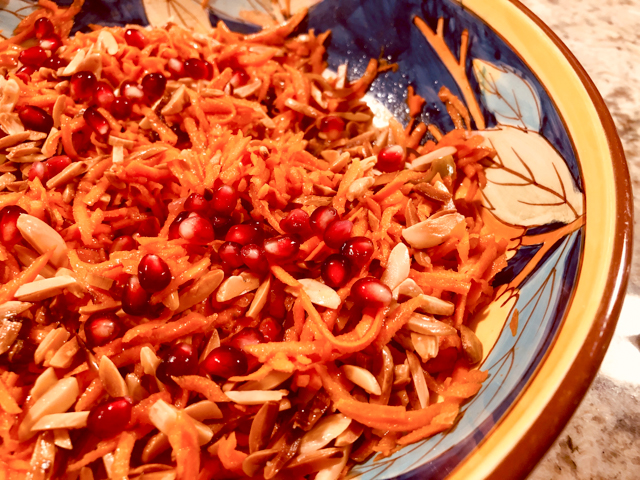
I love carrots but have a problem with eating them raw, cannot quite wrap my mind around the harsh texture. In fact, when I see carrot sticks playing as crackers next to a nice bowl of hummus, I feel a bit sad. In this salad, raw carrots are grated and mellowed down by spending some time in a nice dressing with one of my favorite ingredients, pomegranate molasses.  It is absolutely delicious, and even a person with my anti-raw carrot approach will love it. Trust me.

MOROCCAN CARROT SALAD
(adapted from many sources)

2 tablespoons lemon juice
1 tablespoon pomegranate molasses
½ teaspoon ground turmeric
1/8 tsp smoked paprika
Kosher salt
¼ cup extra-virgin olive oil
⅓ cup dried dates, thinly sliced
1 pound carrots, peeled and shredded
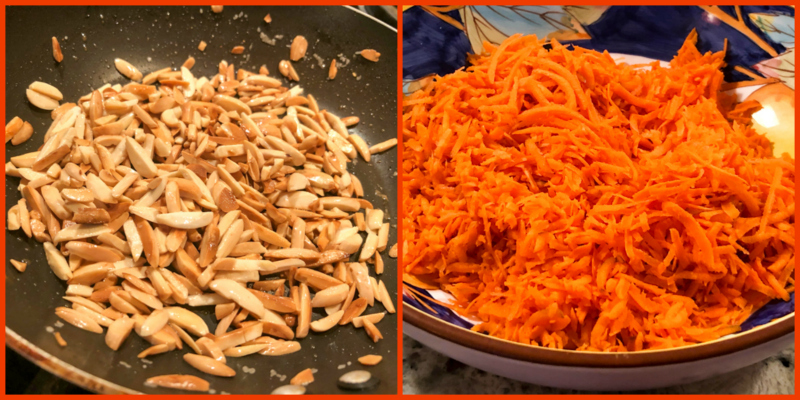
3/4 cup slivered almonds, toasted
1/2 cup pitted green olives, chopped
1/2 cup pomegranate seeds

Prepare the dressing by mixing in a bowl the lemon juice, pomegranate molasses, turmeric, paprika and salt.  Pour the olive oil whisking constantly. Add the chopped dates. Reserve while you process the carrots.

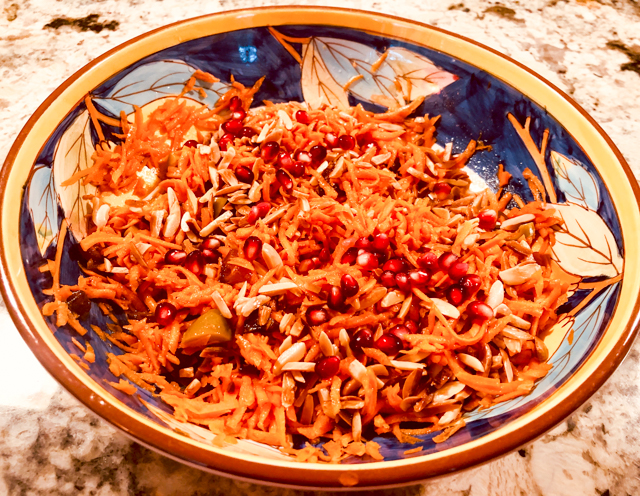
Shred the carrots in a food processor or grating by hand.  Add the carrots and olives to the dressing/dates mixture, and mix well. Leave it to stand at room temperature for about 10 minutes. Add the toasted almonds, sprinkle the pomegranate seeds on top, adjust seasoning and serve.

ENJOY!

to print the recipe, click here

Comments: Cannot praise this simple salad enough. One of the things I love most about it is that it is still good next day. How many salads stand an overnight sleep in the fridge? Not that many. Well, maybe if you have more rabbit genes than me, you could find the texture next day a bit too soft, but I doubt it. Still delicious. Pomegranate molasses brings the right amount of sharpness and sweetness, it all goes together beautifully. And don’t skip the pomegranate seeds, they please the eyes and the palate!

Between writing this post and publishing it, I made this salad again. Second time around I used Ras-El-Hanout instead of turmeric, skipped the paprika, and added thinly sliced green apples instead of green olives. Another version, same deliciousness…


ONE YEAR AGO: Pumpkin Sourdough

TWO YEARS AGO: First Monday Favorite

THREE YEARS AGO: Secret Recipe Club: Paalak Paneer, a Farewell Post

FOUR YEARS AGO: In My Kitchen, November 2015

FIVE YEARS AGO: Helen Fletcher’s Oatmeal Cookies

SIX YEARS AGO: Thai-Style Pesto with Brown Rice Pasta

SEVEN YEARS AGO: Shrimp with Spicy Orange Sauce

EIGHT YEARS AGO:  A Simple Appetizer (Baked Ricotta)

NINE YEARS AGO: Sour Cream Sandwich Bread

TEN YEARS AGO: Pasta with Zucchini Strands and Shrimp

SCARY GOOD RECIPES FOR YOUR NEXT HALLOWEEN

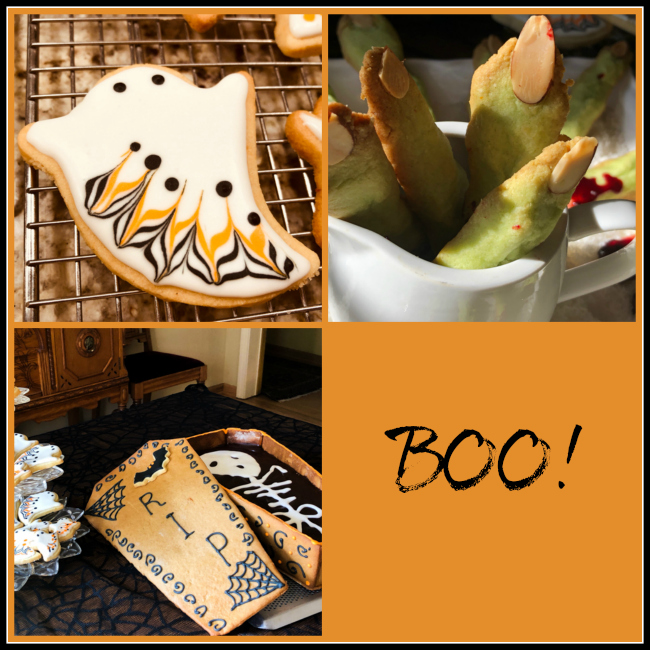
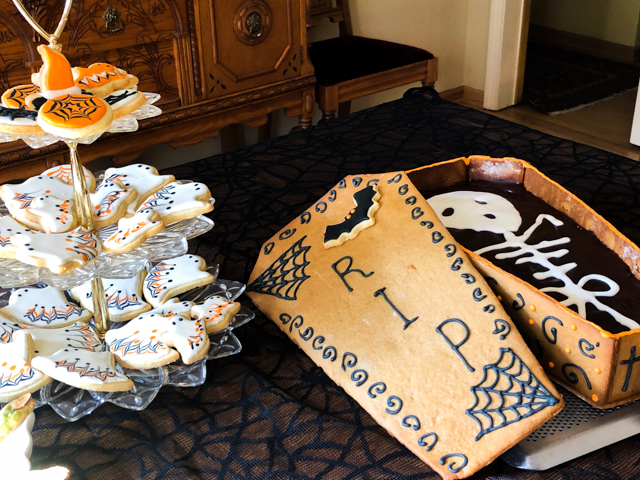
Halloween will be back in only 361 days, so I am here to help you get into proper mood for it. Truth is, I had so much fun making these recipes, I cannot stand the idea of waiting for months and months to share. Let me introduce you then to some Friendly Ghost Cookies, Witches’ Fingers, and a Gingerbread Coffin with a chocolate cake inside so delicious that a dead body will rest forever happy.

FRIENDLY GHOST SUGAR COOKIES
(from the Bewitching Kitchen)

360 g all-purpose flour (about 3 cups)
2 teaspoons baking powder
215 g granulated sugar
2 tsp orange zest
¼ tsp salt
227 g cup butter, cold and cut in pieces
1 egg
3/4 tsp Fiori di Sicilia extract
1/2 tsp cardamom

for icing:
4 Tablespoons meringue powder
½ cup water
1 pound powdered (confectioner’s) sugar
1 tsp light corn syrup (such as Karo)
a few drops of almond extract

Heat oven to 360F.  Make the cookie dough. Combine the flour, baking powder and salt, set aside. Cream the sugar and butter. Add the egg, Fiori di Sicilia, orange zest and cardamom, mix well. Scrape the sides of the bowl. Add the flour mixture and beat just until combined.

Dough can be rolled right away in between sheets of parchment paper. Roll to about 1/4″ thick, and cut into shapes. Place on parchment-lined baking sheets, freeze for 5 minutes. Bake for about 12 minutes. Transfer to cooling rack and cool to room temperature before icing.

Make the Royal icing. In the bowl of a KitchenAid type mixer, with paddle attachment the water and meringue powder for a couple of minutes. Add the powdered sugar (sift over the bowl), corn syrup and almond extract. Beat on high speed for about 5 minutes.

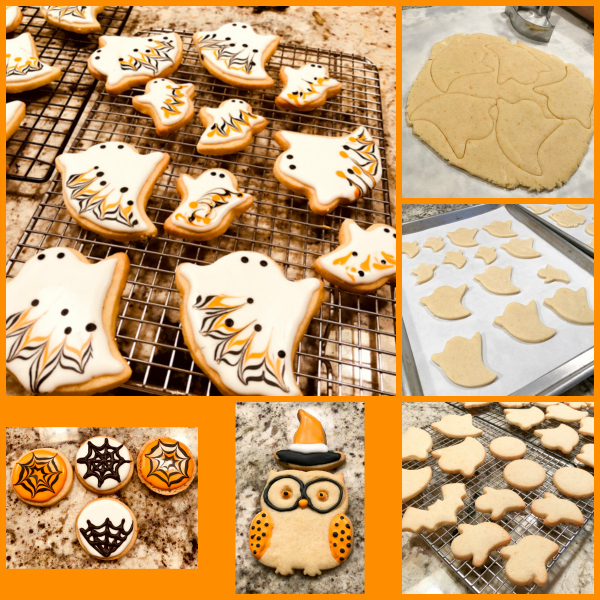
Divide the Royal icing in three portions, one large will be left white. Two small portions will be dyed black and orange.  Flood the cookies with white icing and decorate with black and orange details as shown in the pictures.  Allow to fully dry before serving them.

ENJOY!

to print the recipe click here

Comments: The recipe makes quite a bit of cookies, feel free to halve them if you prefer. Rolling the dough and baking is not a big deal, but of course the decoration demands a bit of time. I made them one evening after work and had this little voice talking to myself “why didn’t you make just half?”

The composite picture below shows you how easy it is to make the decoration for the little ghosts. Three lines, wet on wet, and a needle to pull the lines through, first in one direction, then in the opposite direction.  I cannot take credit for it, I saw a similar design somewhere in Pinterest world.


The combination of orange zest, fiori di Sicilia and cardamon is really wonderful. I need to think about those flavors for macaron filling.

Moving on……


WITCHES’ FINGERS

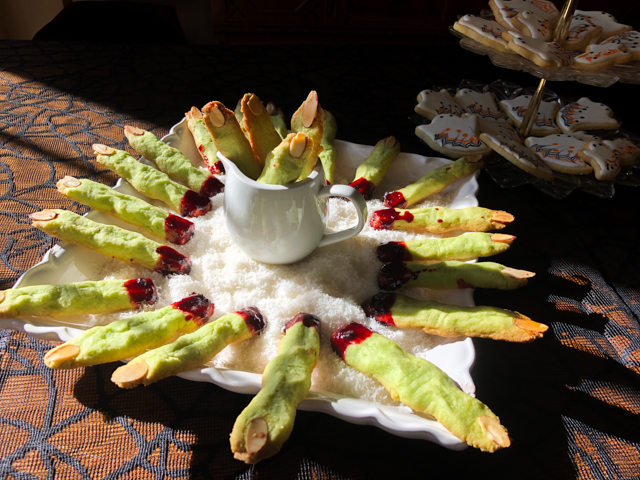
Recipe from my friend Karen over at Karen’s Kitchen Stories. Click here to get all the details.

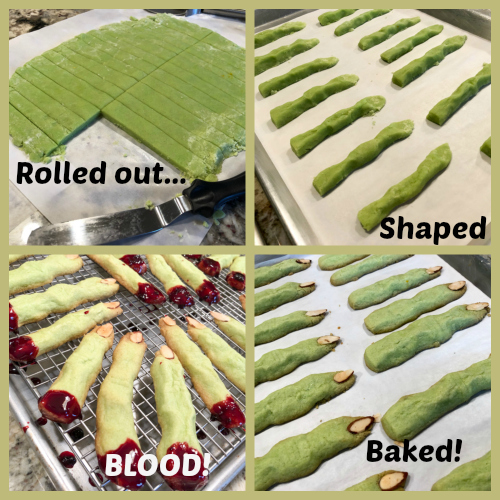
RECIPE STEPS IN PICTURES

Comments: At first I was a bit insecure about how much green dye to use (secret is to use less than you think you need), and how to exactly shape the fingers. Well, don’t worry too much about it, no matter how you do it, the result will be gruesome and horrific. Which is pretty much the goal of the bake, right?  They taste delicious, and the nails  almonds add a nice flavor to them. As to the jam, I used raspberry jam with a tiny drop of red food color to intensify the effect. The jam by itself was not as red as I wanted.

Moving on to the final bake…


GINGERBREAD COFFIN WITH CHOCOLATE CAKE
(from Bewitching Kitchen, inspired by many sources)

for the gingerbread dough:
660 g all-purpose flour
1 teaspoon Kosher salt
1/2 teaspoon baking soda
4 teaspoons ground ginger
2 teaspoons ground cinnamon
1 teaspoon freshly grated nutmeg
1 teaspoon ground cloves
2 sticks (227 g) unsalted butter, room temperature
200 g granulated sugar
2 large eggs
3/4 cup honey
3/4 cup unsulfured molasses

for icing:
4 Tablespoons meringue powder
½ cup water
1 pound powdered sugar
1 tsp light corn syrup
a few drops of almond extract

for the caramel glue:
200 g sugar
60 mL water
1 tsp corn syrup
1/2 tsp lemon juice

for the chocolate cake:
463 g sugar
1/2 teaspoon salt
70 g Dutch process cocoa powder
1 teaspoon baking soda
1 cup (237 g) water
3/4 cup canola oil
2 teaspoons vanilla paste
220 g all-purpose flour
4 large egg yolks
2 large eggs
1/4 cup buttermilk

for the chocolate icing:
8 ounces bittersweet chocolate (I used Lindt 70%)
1/2 cup unsalted butter
1 Tablespoon light corn syrup

for the Royal icing decoration:
(same recipe as sugar cookies)

Make the gingerbread dough. In a large bowl, whisk together flour, salt, baking soda, and spices. In another large bowl, with an electric mixer on medium-high, cream butter and sugar for about 3 minutes. Beat in eggs, one at a time, then honey and molasses.

Slowly add the flour mixture until well combined. Divide the dough into 3 pieces, wrap each in plastic wrap, and refrigerate for about one hour.

Heat oven to 350°F. Working with a third of dough at a time, roll out to ¼-inch thickness on parchment paper well dusted with flour. Cut the pieces you need for the coffin, and transfer the cut pieces to the freezer for about 10 minutes. Bake cookies for 12 to 15 minutes. They must be crisp and dry but not getting dark.

Cool them completely before icing and once the icing is dry, assemble the coffin using caramel.

Make the caramel. Put the sugar and water in a large, low-sided frying pan over a medium-high heat. Without stirring, bring to 320 F.  If you don’t have a thermometer, the syrup is ready when the sugar has dissolved and it turns a golden color, not too dark.  Swirl the syrup gently in the pan to even out the color. Take the pan off the heat and leave to cool for a few moments to thicken slightly to the consistency of honey. Dip the edges of the pieces you intend to glue and assemble them. Drizzle additional caramel if needed using a small spoon. 

If the syrup begins to harden in the pan, put it back over a gentle heat until it has returned to the required consistency.

Make the chocolate cake. Heat oven to 350F.  Spray a 13 x 9 pan with nonstick cooking spray. Line the pan with parchment paper, extending the paper out of the pan to facilitate removal of the cake after baking.

In a saucepan, stir together the sugar, salt, cocoa, and baking soda. Add to it 1 cup of boiling water, stir well and let it sit for 15 minutes.

Pour the hot cocoa mixture into a mixing bowl, add the oil and vanilla and beat on low speed until combined. On low speed, mix the flour into the batter and then add the eggs, egg yolks and buttermilk. Do not over-mix. Pour the very thin batter into the prepared pan.

Bake for about 35 minutes, rotating the pan after 15 minutes. A toothpick should come out clean when tested in the center of the cake.  Allow to cool in the pan for about 10 minutes on a rack. Run a thin knife around the edge and jar the edge of the pan to loosen. Invert onto the serving platter. Cool completely, then cut in pieces to fit inside the gingerbread coffin. You will have to do some assembling to fit some of the cut pieces in the bottom of the coffin.

Make the chocolate icing. Place the chocolate and butter in the top of a double boiler. Add corn syrup and set over a pan of simmering water. Stir occasionally until melted and smooth. use immediately, pouring it gently over the cake, once it’s inside the gingerbread coffin.  Allow it to set for a few hours at room temperature.  Use Royal Icing to draw a skeleton inside, if you so desire, or use powdered sugar and a stencil.

ENJOY!

to print the recipe, click here

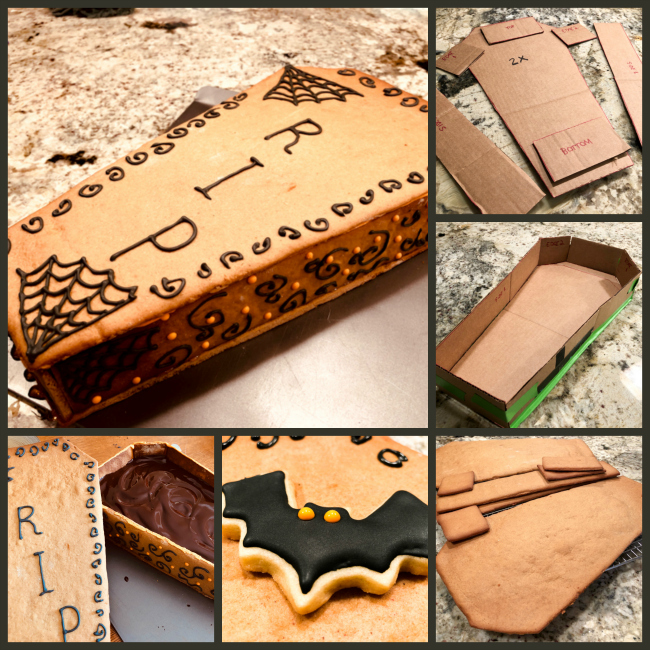
Comments: Your cake will be baked in a 13 x 9 rectangular pan. You should draw a design for the coffin that makes the lid no bigger than 12.5 inches in length. The sides should be 2.5 inches in height.  It is a pretty easy design, I made the pieces in cardboard and used those to cut the gingerbread dough. The recipe has a reasonably small amount of baking powder, so that the dough does not change much during baking, but you can always use a Microplane grater to bring the edges into better shape.

Most gingerbread sculptures are assembled with very thick Royal icing. It has its problems – I will discuss those a bit more in a future post. Caramel sounds dangerous because it’s so hot and if you burn yourself it’s not fun at all, but the advantage is that it glues quickly and you don’t have the white stuff joining every piece. That is nice for a house or other structures, but I prefer the coffin to be more austere.  Apart from having to clean the pan after making the caramel, I liked the method better than Royal icing for assembling.  Live and learn.

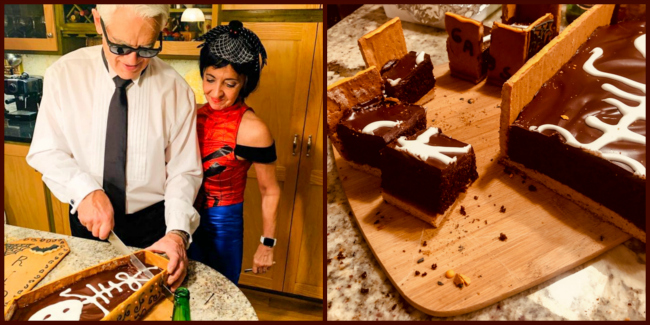
The cake was absolutely wonderful even next day, moist, intense, it gave a bit of moisture to the gingerbread base, which I did not roll as thin as I should have. I need a lot more practice with this type of dough, and find that particularly to roll large pieces, I have issues keeping it thin and uniform. At any rate, Karl Lagerfeld did not seem to mind cutting pieces for Spider Woman. And she was delighted for catching him in her dangerous web. They do make a nice match, even if I say so myself. Biased, who moi?

I hope you enjoyed this little roundup of Halloween recipes. It is a scary job, but someone has to do it.

ONE YEAR AGO: Devil Wears Chocolate

TWO YEARS AGO: Slow-Cooker Pot Roast with Potatoes, Carrots, and Fennel

THREE YEARS AGO: The Best, the Very Best Hummus

FOUR YEARS AGO: Cheddar Cheese Crackers

FIVE YEARS AGO: A New Take on Cauliflower Puree

SIX YEARS AGO:
 In My (NEW!) Kitchen

SEVEN YEARS AGO:
 
The Lab Move and New Beginnings

EIGHT YEARS AGO:
 Honey-Oat Pain de Mie

NINE YEARS AGO:
 Carrot and Leek Soup

TEN YEARS AGO:
 Chicken Parmigiana 101


BLOODY CUPCAKES FOR A SPOOKY HALLOWEEN

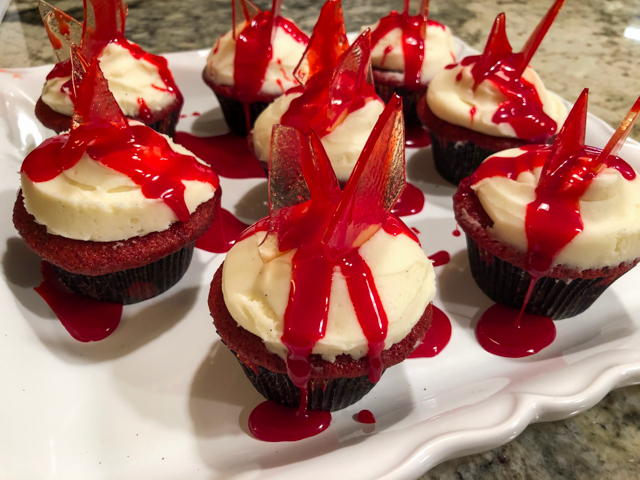
Red Velvet cake and Halloween is a match made in heaven. Heaven and Halloween? What have I done here? Oh, well. To make them even better, stab each cupcake with “broken glass” and make them “bleed!”

BLOODY RED VELVET CUPCAKES
(decoration from Recipes by Carina)

for the cupcakes:
160g all-purpose flour
3/4 tsp baking soda
pinch of salt
85 g (6 tablespoons) butter, softened
150g granulated sugar
1 egg
2 T cocoa powder (I used natural)
1/2 cup buttermilk
1 tsp white vinegar
1 tsp vanilla paste
1 tablespoon red food dye

for the frosting:
170 g unsalted butter, softened
500 g cream cheese, cut in pieces, at room temperature
260 g powdered sugar
1 tsp vanilla paste

for the broken glass decoration:
200g sugar
2 Tbsp water
2 tsp corn syrup
1 tsp lemon juice

for the fake blood:
½ cup light corn syrup
1 Tbsp cornstarch
2 Tbsp water
1-4 tsp red food gel
drops of blue food gel

Heat oven to 350 F. Sift flour, baking soda and salt in a bowl. Reserve. Cream softened butter with sugar using a KitchenAid type mixer with paddle attachment.

Meanwhile, in a small bowl whisk the buttermilk, vinegar, egg, and red food color. When the butter and sugar are well mixed and the mixture is pale, add the egg, mix briefly and add the cocoa powder. Once the mixture more or less smooth, add the flour in three additions, and the liquids in two, beginning and ending with the dry ingredients. Mix well. Add the  batter to regular size cupcake pans, lined with paper.  Bake for 20 minutes or until a toothpick inserted in the center comes out clean. Cool completely before frosting.

Make the frosting. Put the softened butter in the bowl of a KitchenAid type mixer with the paddle attachment and mix until smooth.  Add the pieces of softened cream cheese to the mixing bowl, a small amount at a time. When all cream cheese is added and combined, beat for about 1 minute then add the powdered sugar in three portions, adding the vanilla after the last third portion.

Beat for 2 to 3 minutes more, but do not over-mix or the mixture can become loose.

Make the decorations. In a saucepan measure out the sugar, corn syrup, lemon juice and water. Place the saucepan over medium-high heat. Boil for 3-5 minutes until the sugar starts to change colour or until it reaches 300F.

Pour the melted sugar out onto a baking sheet lined with Silpat.  Leave to cool for 10 minutes before transferring to the fridge for a few hours to harden.  Break shards when ready to decorate the cupcakes.

Make the fake blood. In a bowl mix together the syrup and cornstarch until combined. If needed, add water to reach proper consistency. Add the food gel, small amount at a time until you have a deep dark red shade. Spoon the blood over the cupcakes.

ENJOY!

to print the recipe, click here

Comments: Once these cupcakes were done, I thought that another cute way to present the same idea would be a red velvet jelly roll type cake, with little blobs of cream cheese frosting on top and the glass shards properly stabbed here and there. And blood. A lot of it. Obviously.

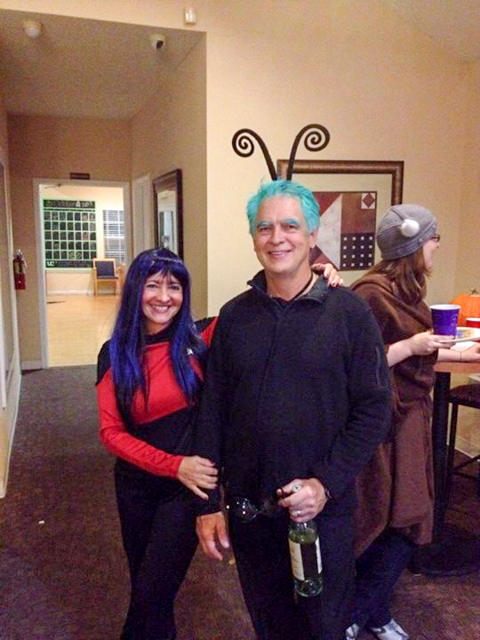
Have a great Halloween celebration, whatever scary thing is on your menu.  I leave you with a shot from 2013, when we went to a party with the graduate students from our department. Halloween was Aritri’s favorite holiday and this week I cannot take her out of my mind.


Star Trek Captain finds Handsome Alien and brings him all the way to her planet where they’ve lived happily ever after…

ONE YEAR AGO: Lamb Meatballs, Slow-Cooker Version

TWO YEARS AGO: Elaine’s Sourdough Boule

THREE YEARS AGO: Zucchini, Lemon and Walnut Cake

FOUR YEARS AGO: Paleo Energy Bars

FIVE YEARS AGO: Pecan-Crusted Chicken with Honey Mustard Dressing

SIX YEARS AGO: Mozzarella Stuffed Turkey Burgers

SEVEN YEARS AGO:  Cashew Chicken Lettuce Wraps

EIGHT YEARS AGO: Clay-pot Pork Roast

NINE YEARS AGO: Panmarino

TEN YEARS AGO: A Classic Roast Chicken

FALL-INSPIRED BAKING

Everyone who knows me is well-aware I am a summer-creature all the way. But there’s something about the colors of autumn that fascinate me. I suppose they fascinate all human beings. Growing up in Brazil, I had never seen trees turning color, but used to marvel at photos from Vermont or other places famous for having the most spectacular color change in their trees. Now I enjoy them in our own backyard, Phil planted a beautiful maple tree that is thriving nicely, each year more magnificent, with a more intense red tone in the leaves. Gorgeous. Today I share with you a series of recent bakes inspired by the season.

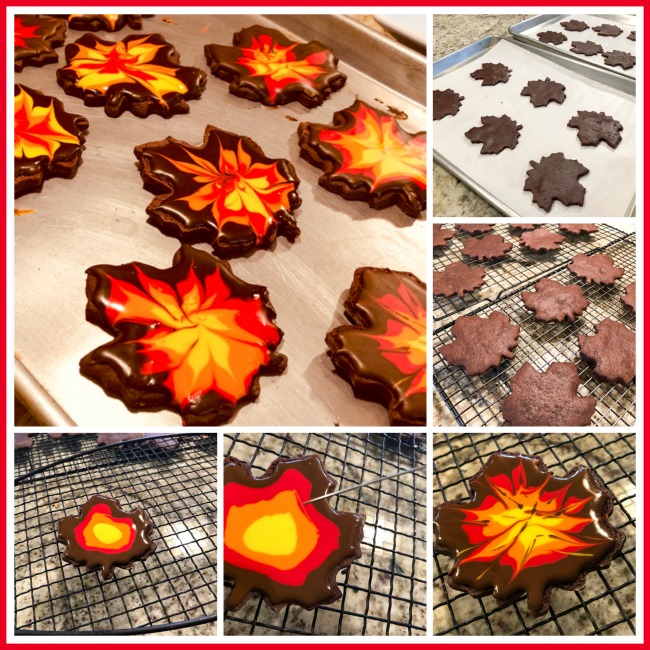
I will start with the Maple Leaf Chocolate Sugar Cookies, because I loved making them.

MAPLE LEAF CHOCOLATE COOKIES
(cookie recipe from Lilaloa and decoration technique from Salt and Serenity)

for the cookie dough:
227 g (1 cup) slightly softened unsalted butter
43 g vegetable shortening (43 grams)
300 g granulated sugar
2 large eggs ( about 100 grams)
1 teaspoon vanilla paste
1/2 teaspoon salt
3/4 teaspoon baking powder
80 g unsweetened cocoa powder
490 g all-purpose flour
(if saving the dough to roll at a later time, use 420 g flour)
for the Royal Icing:
80 g egg whites
420 g powdered sugar
food dye (brown, red, orange, and yellow)

Heat oven to 375 F. Line two baking sheets with parchment paper.
Cream butter, shortening and sugar together in the bowl of a KitchenAid type mixer with the paddle attachment. Add eggs, vanilla, baking powder and salt and mix well.
Stir in the cocoa until well blended.

Add flour and mix until the flour is completely incorporated and the dough holds together in a ball. Roll out on lightly floured surface, cut in the desired shapes.I like to place the baking sheet in the freezer for 5 minutes or in the refrigerator for 15 min before baking. Bake for 7 to 10 minutes, cool completely before icing.

Make the Royal icing: whisk the egg whites and powdered sugar using a KitchenAid type mixer until fully smooth. Adjust if needed with sugar or a little milk. I like to have it at around 15 second-icing consistency, because it works both for piping the edge and flooding, which is all I need for this design.

Pipe the four colors starting with brown, finishing with yellow, but feel free to play with them in other arrangements. Pull the colors with a needle or toothpick, watch the tutorial online for details. Allow the icing to fully set at room temperature.

ENJOY!

to print the recipe, click here

Comments: I urge you to visit Salt and Serenity and watch Cindy’s video explaining how to make this eye-catching design. It is one of those things that seem very complicated until you see how it’s done. Basically, if “I” could do it, you will be able to do it also. Trust me. It is important to use a cookie recipe that holds its shape well, and I was happy with the one I used, especially because you can roll the dough without resting it in the fridge. You know I am not the most patient baker out there.

Moving on to Halloween Brigadeiros…

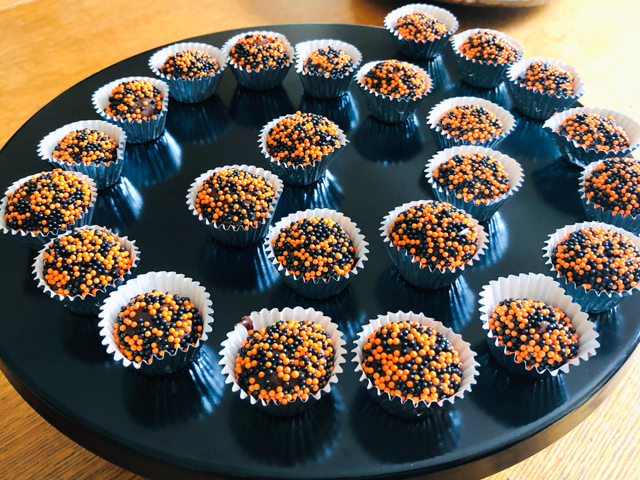
Brigadeiros are the most typical candy from Brazil, and totally addictive.  I used my default recipe and simply coated them with orange and black non-pareils. For the recipe and to read more about them, visit my old post with a click here.

PUMPKIN CUPCAKES
(adapted from many sources)

for the cupcakes:
170 g granulated sugar
130g brown sugar
225 g all-purpose flour
1 + 1/2 tsp baking powder
½ teaspoon baking soda
2 teaspoons ground cinnamon
3/4 teaspoon ground ginger
1/2 teaspoon ground nutmeg
1/4 tsp salt
320 g canned pumpkin (about 3/4 of a small can)
150 ml grapeseed oil
3 large eggs
for the icing:
120g unsalted butter, softened
190 g cream cheese, at room temperature
675 g powdered sugar
sprinkles to decorate

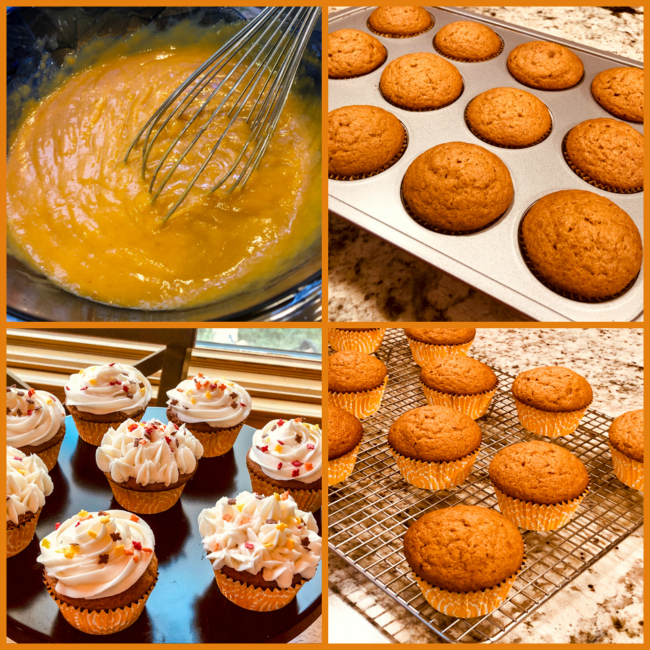
Heat the oven to 375 F.  Place both sugars in the bowl of a KitchenAid type mixer and blend with the whisk so that no lumps remain in the brown sugar. Sift all other dry ingredients and mix well with the sugars.

In another medium bowl mix well the pumpkin, oil and eggs. Add to the KitchenAid bowl and mix with the paddle attachment until smooth. Place paper liners in a 12-muffin baking pan, and fill each about 3/4 of the volume.

Bake until a toothpick comes out clean, about 18 minutes.

Make the icing while the cupcakes bake and cool. Beat the butter and cream cheese with an electric mixer until pale and very smooth. Sift the icing sugar into a large bowl, then add to the butter mixture in three additions, beating well each time. 

When the cupcakes are completely cool, frost them using the icing tip of your choice. I used Wilton 1M.  Decorate with your favorite sprinkles.

ENJOY!

to print the recipe, click here

Comments: These are deliciously soft cupcakes, with the perfect amount and combination of spices. I used two different styles of piping trying to change things a bit, but the traditional swirl still gets my vote. I suppose if you want to go the more austere route, these cupcakes will shine with just a dusting of powdered sugar, so keep that in mind.

And finally, how could I possibly make a Fall inspired baking post without French macarons?

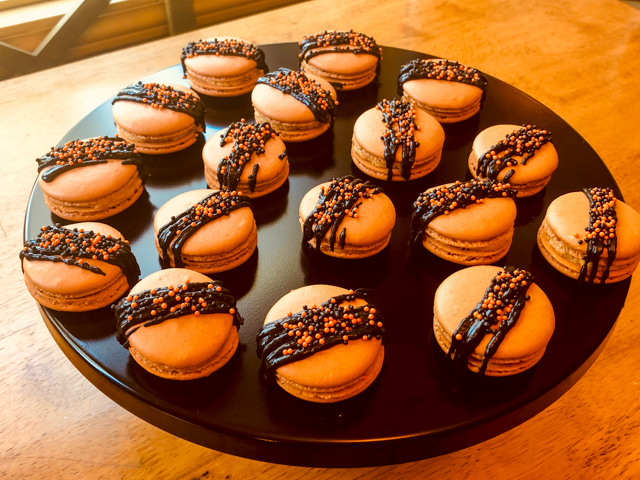
I used my default recipe, which you can find here, but added orange and brown food color at 4:1 proportion.

PUMPKIN MACARON FILLING

1/2 cup butter, softened
1/4 cup canned pumpkin pureed
2 cups powdered sugar (220 g)
1 tsp vanilla
1/2 tsp cinnamon
1/4 tsp ground ginger
1/8 tsp nutmeg
pinch of allspice
to decorate:
White Candy melts (about 3/4 cup)
black gel food dye
sprinkles of your choice

Cream the butter and pumpkin puree with an electric mixer. Add in the sugar and spices. Mix well and scrape down side of bowl. If needed, thin with a very small amount of milk or heavy cream.

Add a small amount of buttercream to a macaron shell, top with another shell. Melt the Candy melts in a microwave or double boiler. Add black food dye. Place in a piping bag, cut a very small hole in the plastic. Pipe lines on top of the macarons, immediately add sprinkles before the drizzle sets.

As always, leave the filled macarons in the fridge overnight before serving them.

ENJOY!

to print the filling recipe, click here

Comments: This is my second version of a pumpkin macaron, and I like this filling better, it has a more complex flavor. For the drizzle with black candy melts I did something a bit different, and unfortunately I am not quite sure how reproducible it is. You are welcome to try it, but if it does not work for you, don’t get mad at me. A couple of months ago I was heating candy melts and used too high power in the microwave. The suspension kind of broke, and I simply tossed it and started all over. Later I learned that you can recover the broken suspension if you add a bit of oil such as grapeseed or safflower. Something mild in flavor, obviously. This time I made the suspension break and brought it back but not to the point that it was fully smooth. I wanted some texture, and I think it worked well, at least it was close to what I had in mind.  So, next time Candy Melts play a trick on you, consider using it to your advantage…

I hope you enjoyed my quartet of bakes. Since summer is over, I might as well embrace what’s good about cooler weather: BAKING WITH ABANDON!


ONE YEAR AGO: On a Halloween Roll

TWO YEARS AGO: Pumpkin Macarons

THREE YEARS AGO: Zucchini, Lemon & Walnut Cake

FOUR YEARS AGO: Paleo Energy Bars

FIVE YEARS AGO: Pecan-Crusted Chicken with Honey Mustard Dressing

SIX YEARS AGO: Mozzarella Stuffed Turkey Burgers

SEVEN YEARS AGO:  Cashew Chicken Lettuce Wraps

EIGHT YEARS AGO: Clay-pot Pork Roast

NINE YEARS AGO: Panmarino

TEN YEARS AGO: A Classic Roast Chicken