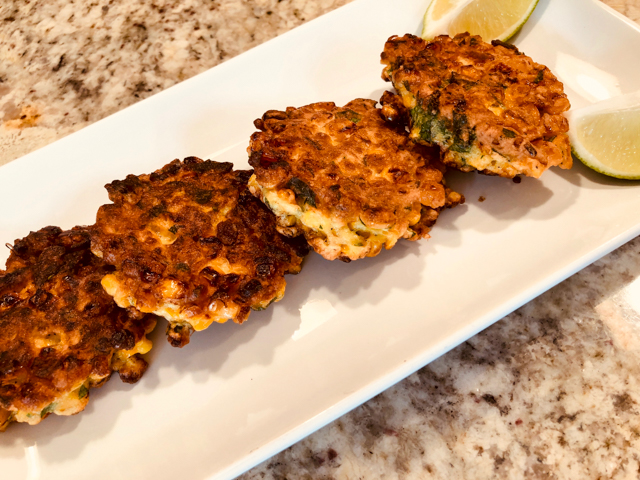
CORN FRITTERS

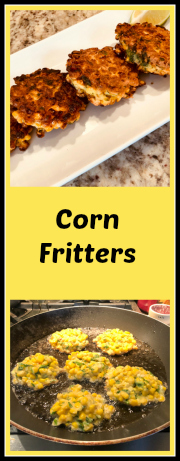
I have deep aversion for frying things, and since getting the air-fryer I almost never do it on top of the stove. This recipe appealed to me, and I could not quite see it working in the air-fryer, so I took a deep breath and embraced the job.  Absolutely worth it. And since it is shallow frying, it was not that bad at all.  It all starts with a can of corn. Yes, corn from a can. Trust me, it works beautifully…

CORN FRITTERS
(adapted from Tin Can Magic)

1 can (340g) corn in water, drained
about 1/4 cup parsley leaves, minced
zest of 1 lemon
3 tablespoons all-purpose flour
2 eggs
½ teaspoon salt
grapeseed oil for shallow frying

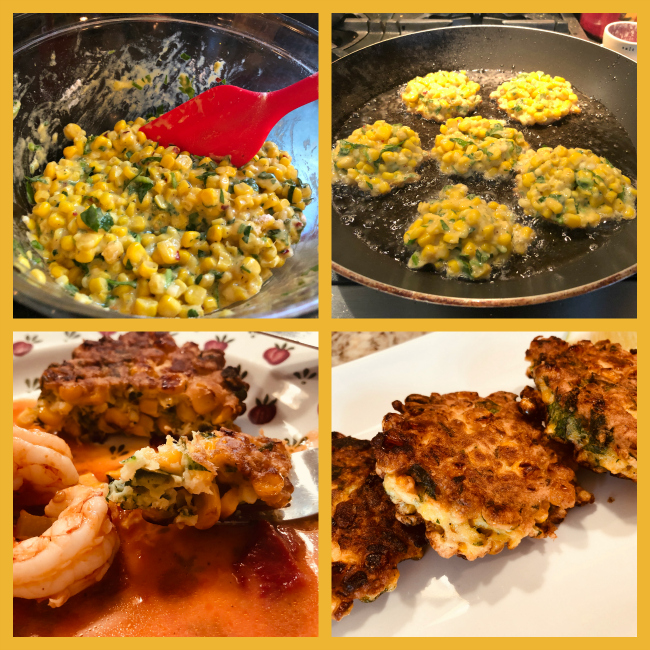
Stir together the corn, minced parsley, flour, eggs, zest and salt in a large mixing bowl. Reserve.

Heat a wide, non-stick frying pan over high heat, then pour in enough oil to coat the pan. When the oil is almost starting to smoke,  spoon the corn mixture into the pan, leaving enough space between the portions. You will have enough for about 8 fritters, so eye-ball the amounts.

Allow the fritters to cook on one side for 3–4 minutes, then carefully flip and fry for another 4 minutes. Transfer the fritters to a plate lined with paper towels, and keep warm in a low oven as you fry the second batch.

ENJOY!

to print the recipe, click here

Comments: This is one of those recipes that I thought could have a high chance of failure. Most batters for fritters get some type of leavening agent for extra lift, this one did not. I was pleasantly surprised by the resulting texture. My only advice is to leave it alone as you pour the portions on the hot oil. You need that beautiful brown crust to form, that will set the cake and allow the interior to get all creamy. Could you use fresh corn? I am sure you could, but the beauty of this recipe is the simplicity. Plus, using canned corn makes this simple recipe easy to make the whole year.  We had it with shrimp in a spice tomato-based broth. A very tasty dinner.

ONE YEAR AGO: Minnie Macarons

TWO YEARS AGO: Air-Fried Mexican Meatloaf

THREE YEARS AGO: Mimi’s Sticky Chicken, a Call from my Past

FOUR YEARS AGO: Perfect Soy-Grilled Steak

FIVE YEARS AGO: The Devil’s Bread

SIX YEARS AGO: Heart of Palm Salad Skewers

SEVEN YEARS AGO: Potluck Frittata and Lavoisier

EIGHT YEARS AGO: Home-made Corn Tortillas

NINE YEARS AGO: Whole-Wheat Spaghetti with Peanut Sauce

TEN YEARS AGO: Brigadeiros: A Brazilian Party!

ELEVEN YEARS AGO: Lemony Asparagus


ODE TO HALVA

My last post featured tahini, which is pretty much peanut butter made from sesame seeds. To my personal taste, it is perfection. If you join tahini with sugar and perform some magic tricks cooking them together, you’ll get halva. Until recently I was a halva-virgin, which means my life had a void I was unaware of. When I first tried a little bite, I thought it was quite unusual, with a bit of an unpleasant texture. But then, as the taste slowly developed, I was hooked. Today I share two recipes using halva, Ottolenghi’s Brownies and Cheetah Macarons with Halva Buttercream. Very hard to pick my favorite.

Starting with the brownies, the original recipe is from Ottolenghi’s Sweets. I used a halva containing pistachios, and loved the way every once in a while you bite into a little green gem with a burst of additional nut flavor.  The recipe is available in plenty of websites, I share the one published by Joanne, from Eats Well with Others.

FOR THE RECIPE, CLICK HERE

Comments: This is such a beautiful batter both before and after baking, it will sure give you a smile as you go through the preparation.  Some people might object to brownies because they are too sweet, so this recipe will almost certainly please those in that team. The tahini and halva completely change that aspect.

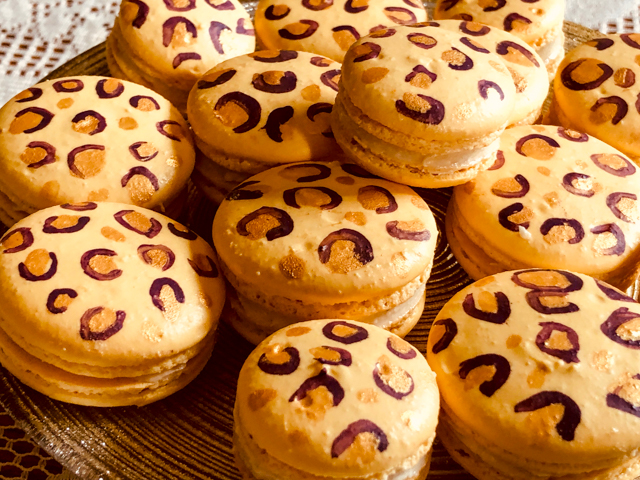
Moving on, let’s talk macarons. I was dying to try painting shells, even though I have exactly zero artistic skills. I watched many youtube tutorials, gathered the right tools for the job, took a deep breath, and went for it. Maybe they would make a cheetah fume, but I can tell you I had so much fun that I might offend other animals in the future.

CHEETAH MACARONS WITH HALVA BUTTERCREAM
(from The Bewitching Kitchen, inspired by Eats Well with Others)

For the shells:
200g  powdered sugar
115 g almond flour
115 g egg whites at room temperature (approx. 4 eggs)
1/8 tsp of cream of tartar
100 g granulated sugar
¼ tsp vanilla paste or extract
yellow or gold food gel dye (I used gold from Sunny Side Up Bakery)
Sweet Sticks purple and gold edible paint

For the halva buttercream:
7 oz vanilla halvah, cubed
2 oz white chocolate, melted
1 cup unsalted butter, room temperature
1 cup powdered sugar
½ tsp vanilla extract
½ tsp kosher salt

Make the shells:
Line 3 heavy baking sheets with parchment/baking paper or Silpat mats. Layer the powdered sugar, and ground almonds in a food processor. Pulse until the mixture looks like fine meal, about 12 pulses. Pass through a sieve and transfer to a small bowl or to a sheet of parchment/baking paper. Set aside.

Place the egg whites and cream of tartar in the bowl of a stand mixer fitted with the whisk attachment. Make sure that the bowl and the whisk are impeccably clean. Starting on medium speed, whip the whites with the cream of tartar until they look like light foam. The whites should not appear liquid. The foam will be light and should not have any structure.

Slowly rain in the granulated sugar in five additions, trying to aim the stream between the whisk and the side of the bowl. Turn the speed up to high. Continue to whip the meringue until it is soft and shiny. It should look like marshmallow creme (marshmallow fluff). Add the vanilla. Whip the egg whites until the mixture begins to dull and the lines of the whisk are visible on the surface of the meringue. Check the peak. It should be firm. Transfer the whites to a medium bowl.

Fold in the ground almond flour mixture in two increments. Paint the mixture halfway up the side of the bowl, using the flat side of a spatula. Scrape the mixture down to the center of the bowl. Repeat two or three times, then check to see if the mixture slides slowly down the side of the bowl. Put the mixture in a piping bag fitted with your choice of piping tip. Pipe shells, I like to count numbers in my head and use the same count for each shell so they end up similar in size.

Slam each sheet hard four to six times on the counter/worktop. Let the unbaked macarons dry until they look dull but not overly dry. Drying time depends on humidity. In a dry climate, the macarons can dry in 15 to 20 minutes; in a humid climate, it can take 35 to 40 minutes.

While the macarons are drying, heat the oven to 300 F. Bake one sheet at a time on the middle rack. Check in 11 minutes. If the tops slide or move (independently of the ‘feet’ when you gently twist the top), then bake for 2 to 3 more minutes. Check one or two. If they move when gently touched, put them back in the oven for 1 to 2 more minutes until they don’t move when touched. Let the macaroons cool for 10 minutes before removing from the pan. The macarons should release without sticking.

Make the halva buttercream: Place the halvah in the bowl of a food processor and blend until smooth. Drizzle in the melted white chocolate and again blend until smooth and incorporated.

Add the butter to the bowl of a stand mixer fitted with the paddle attachment along with the sugar. Beat on medium until fluffy, about 3-4 minutes. Scrape down the sides of the bowl, then add in the vanilla and salt and mix again until incorporated, about 1 minute. Add in the halvah paste and mix until smooth. Fill a pastry bag fitted with a star tip with the frosting. Use to fill macarons. Allow them to mature overnight in the fridge before consuming or freezing for storage.

ENJOY!

to print the recipe, click here
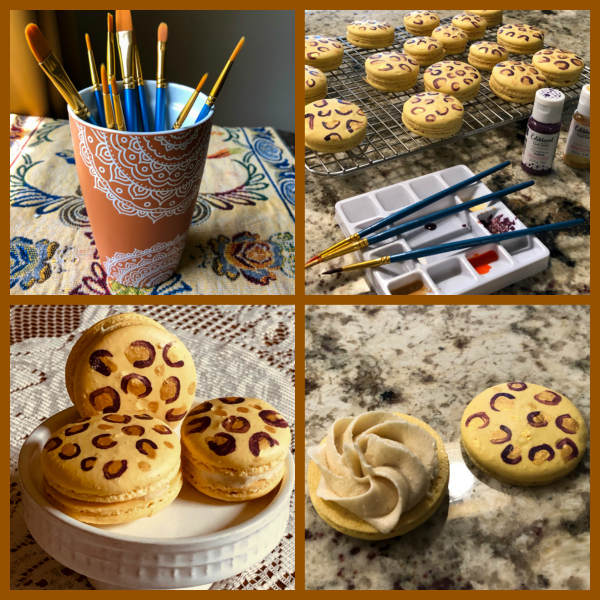
Comments: If you watch videos on how to paint the cheetah motif, some people do the outlining first and then paint the centers. It did not work well for me, the gold paint sipped into the outlining bit, so I prefer to add the centers first, let them dry and then go with the purple around it. Most bakers favor Sweet Sticks brand of edible paint because it is so user-friendly. You shake the bottle well, and it is ready to use. I got mine at Etsy.
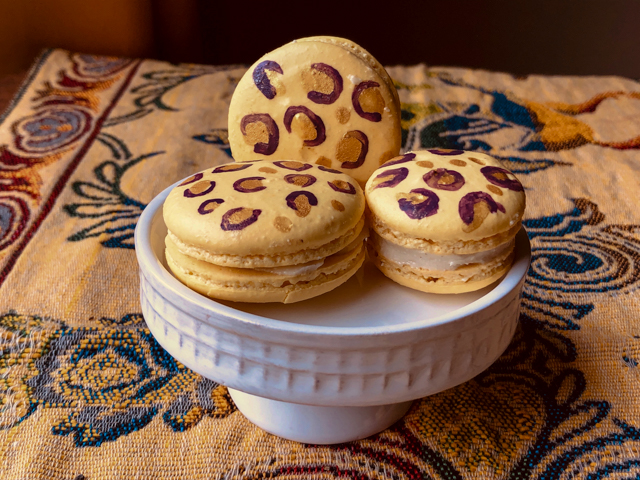
The Halva Buttercream was straight from Joanne’s blog, she used it to fill shortbread cookies. I adjusted slightly the composition to accommodate the amount of halva I had. The recipe makes a lot, so you can conceivably make half and it will be enough to fill a full batch of macarons. Once again, the halva cuts through the excessive sweetness of buttercream, and goes well with the almond shells.

If you are interested in more uses for halva, I found these recipes that seem pretty tasty too.

Halva and Chocolate Babka 

Halva Sesame Ice Cream

Halva Chocolate Bark

Tahini Halva Truffles 
ONE YEAR AGO: Brazilian Pao de Queijo (re-blogged)

TWO YEARS AGO: Apricot Linzer Torte

THREE YEAR AGO: A Trio of Air-Fried Goodies

FOUR YEARS AGO: Focaccia with Grapes, Roquefort and Truffled Honey

FIVE YEARS AGO: Moroccan Carrot Dip Over Cucumber Slices 

SIX YEARS AGO: White Chocolate Macadamia Nut Cookies

SEVEN YEARS AGO: Cilantro-Jalapeno “Hummus”

EIGHT YEARS AGO: A Moving Odyssey

ELEVEN YEARS AGO:
 Shrimp Moqueca

ROASTED GREEN BEANS AND TOMATOES WITH TAHINI SAUCE

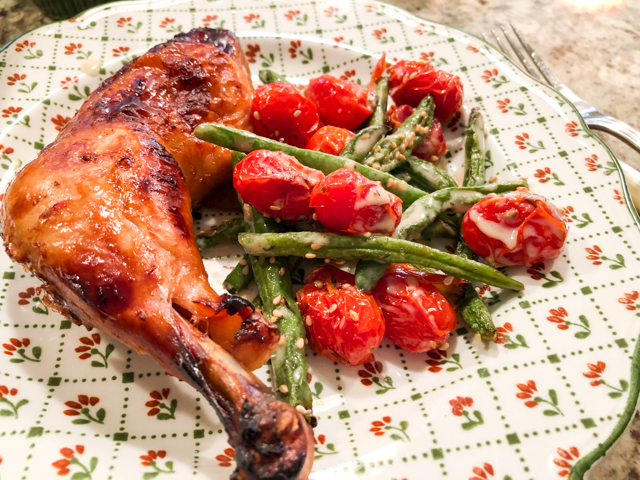
When you need a side dish to impress, consider this one. Two simple veggies (contrasting colors is a must), joined with a delicious tahini-based sauce. Tahini, that component that makes so many recipes shine, does a great job here!

ZA’TAR ROASTED GREEN BEANS AND TOMATOES WITH TAHINI SAUCE
(from the Bewitching Kitchen, inspired by many sources)

Cherry tomatoes (red or a mixture of colors)
Green beans, trimmed
about 2 Tablespoons olive oil
1/2 tsp za’tar (or to taste)
salt and pepper

for the sauce:
¼ cup tahini
juice and zest of 1 lemon
about 1/4 cup water (amount will vary according to your tahini)
drizzle of honey

to serve:
toasted sesame seeds

Heat the oven to 400°F. Coat the tomatoes with one tablespoon of olive oil, season with salt, pepper, and a sprinkle of za’tar. Place the tomatoes in a baking sheet in a single layer, large enough to hold them and the green beans later. Roast for 10 minutes. 

Meanwhile, coat the green beans with the remaining tablespoon of olive oil, the remaining za’atar, salt and pepper to taste. Add to the tomatoes after they have been in the oven for 10 minutes. Roast all veggies together until the green beans are starting to brown (12 minutes or so longer).  As they roast, make the sauce by mixing all the ingredients in a small bowl, adjusting the amount of water to make it a nice drizzling consistency.

Transfer the roasted veggies to a serving platter, add the sauce, sprinkle with sesame seeds and serve right away.

ENJOY!

to print the recipe, click here

Comments: Amounts are quite flexible for everything in this recipe, and I suggest you try the tahini sauce as you make it. Different brands, and also how well you are able to mix the tahini before measuring will have a big impact on the outcome. For my taste, lemon juice should be added with a heavy hand, but then a touch of honey mellows it beautifully. I almost added pomegranate molasses, but left that for a next adventure. When I brought it to the table,  I heard a “oh, wow!” from the husband. And as we enjoyed it with juicy chicken legs, life seemed almost normal. Which is as nice a feeling as one can have these days.

ONE YEAR AGO: Brazilian Pao de Queijo (re-blogged from the past)

TWO YEARS AGO: The Chignon

THREE YEARS AGO: Rack of Lamb Sous-Vide with Couscous Salad

FOUR YEARS AGO: Focaccia with Grapes, Roquefort and Truffled Honey

FIVE YEARS AGO: Moroccan Carrot Dip over Cucumber Slices

SIX YEARS AGO: White Chocolate Macadamia Nut Cookies

SEVEN YEARS AGO: Cilantro-Jalapeno “Hummus”
EIGHT YEARS AGO: A Moving Odyssey

ELEVEN YEARS AGO:
 
Shrimp Moqueca

BISCOITINHOS DE CANELA

Free Portuguese lesson today on the blog: biscoitinhos de canela means little cinnamon cookies. The word “biscoito” means cookie (or biscuit if you are in the UK) and the addition of “inho” to the word immediately implies they are small.  And in this case, I believe also very cute. The recipe comes from Miuda’s bilingual blog (Russian and Portuguese), Verdade de Sabor. She is a professional baker with magical hands and a unique sense of style and elegance. I never miss her posts.
.
(say it like a native,

BISCOITINHOS DE CANELA
(from Verdade de Sabor)

170 g butter, softened
3/4 teaspoon cinnamon (or to taste)
40g eggs
a pinch of salt
80g powdered sugar
170g of all-purpose flour
1/2 teaspoon baking powder
gold dust and lemon extract for decoration (optional)

Beat the butter with the powdered sugar until it is white and fluffy. Add the egg and continue to beat. Sift the flour separately with the baking powder, cinnamon and salt and gradually add to the butter mixture. The dough will be thick, but still soft and flexible.

Transfer the dough to a pastry bag and fill small silicone molds. Hit the form on the table a few times to fill all the empty spaces. Smooth the surface with a spatula. Place in the freezer for 1-2 hours (or longer if desired).

Heat the oven to 350F.  Cover the baking sheet with parchment paper or a silicone mat. Remove the frozen pieces from the molds and distribute on the baking sheet. Immediately place in the oven and bake for 12 to 15 minutes, or until golden brown. Allow the cookies to cool completely on a rack.

Mix golden dust with lemon extract, and using a brush, paint the cookies to accentuate the design.

ENJOY!

to print the recipe, click here


Comments: Do you really need a mold to make those? Well, the cookie batter is soft, so if you want to do a more traditional roll out and cut, you would have to adjust and add more flour, which will change slightly their texture. Just keep that in mind. Miuda finished them with a coating of caramelized gold chocolate, covering just half of each “biscoitinho” but I did not want to risk the chocolate melting when I wrapped them, so I opted for a simple brushing with gold dust.  They are really delicious. As to the molds, I see myself using variations of this recipe, adding some cocoa next time, because I love the look the molds gave. The rectangular shape is nice but in the end I was pretty smitten by the slightly smaller, round one. The ones I used can be found here and they were sold in a set with those two together.

The cookies would be a nice addition to an afternoon tea party, if you are into that sort of thing. And don’t forget, you can have a party for you alone. Pamper yourself. You deserve it!

Miuda, thank you for another great recipe, I always look forward to your beautiful productions!

ONE YEAR AGO: Salmon Tacos

TWO YEARS AGO: The Chignon

THREE YEARS AGO: Rack of Lamb Sous-Vide with Couscous Salad

FOUR YEARS AGO: Focaccia with Grapes, Roquefort and Truffled Honey

FIVE YEARS AGO: Moroccan Carrot Dip over Cucumber Slices

SIX YEARS AGO: White Chocolate Macadamia Nut Cookies

SEVEN YEARS AGO: Cilantro-Jalapeno “Hummus”
EIGHT YEARS AGO: A Moving Odyssey

ELEVEN YEARS AGO:
 
Shrimp Moqueca

11 YEARS, TIME FOR GOODBYE

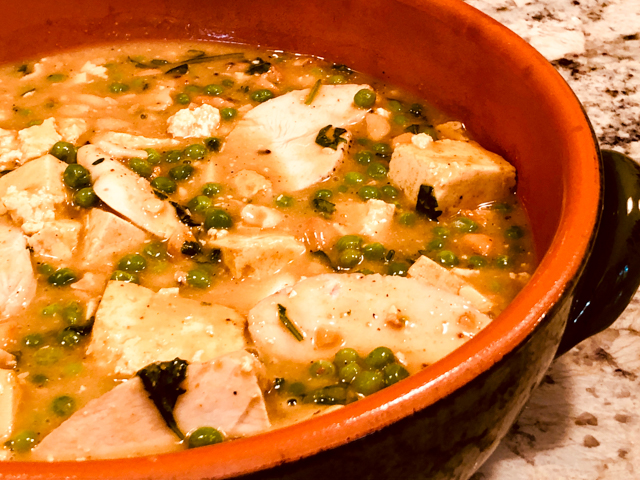
I guess it was bound to happen, sooner or later. Eleven years of blogging and all of a sudden I am forced to witness crowds and crowds of readers abandoning me. It hurts, but I feared that this post could cause it. Tofu. Has she gone nuts? Yes, now that you mentioned, cashews are also partners in this crime. If you are leaving me, I am sorry to see you go, and beg you to re-consider. I swear to you, this was one of the best things I’ve made in the past few months, and even “I” cannot quite believe how much we enjoyed it.  Soooo, will you stay? There shall be macarons soon…

JEN’S CURRIED TOFU WITH PEAS AND CASHEWS
(slightly modified from Jennifer Guerrero’s blog) 

Heat oven to 350 degrees F.

1 pound extra firm tofu
2 Tablespoons peanut butter
2 Tablespoons soy sauce
1 Tablespoon curry powder
1 teaspoon onion powder
½ teaspoon pepper
2 Tablespoons honey
¼ cup water
2 cups vegetable stock or water
2 tablespoons cornstarch
2 cups peas (frozen is fine)
1/2 cup cashews (lightly toasted)

optional:
poached chicken breasts, sliced thin

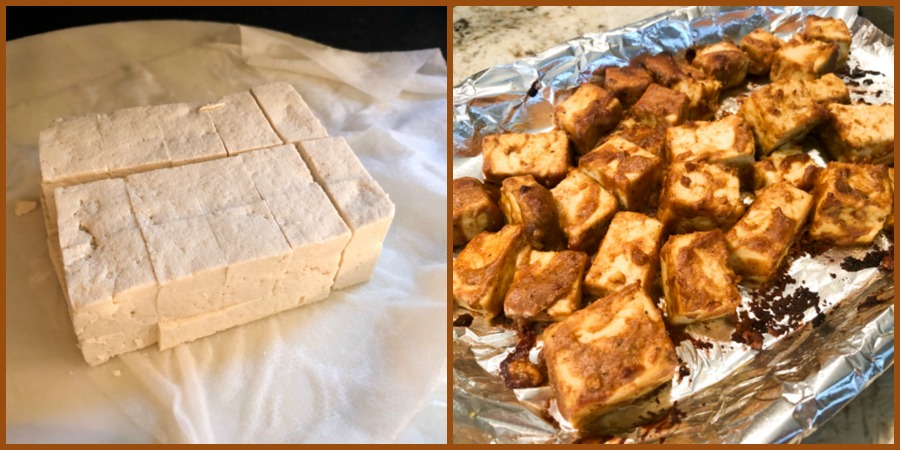
Slice the tofu in a checkerboard pattern and then right across its equator as you see in my composite picture after the recipe. Wrap in plenty of paper towels and put a heavy pan on it to drain while you do the rest of the preparation of the recipe.

In a medium bowl, whisk the peanut butter with the soy sauce, then add the spices, honey and water. Toss with the drained tofu, coating nicely. Spray a baking sheet generously with cooking spray, tip the tofu on in a single layer,  and bake for 30 minutes, flipping them over at halftime.

Whisk together in a saucepan the vegetable broth and the cornstarch. Turn the heat to medium, and when the stock is simmering, add the tofu along with the peas and cashews. If using chicken, add it now.  Stir until it is all lightly thickened, and serve over rice or riced cauliflower.

ENJOY!

to print the recipe, click here

Comments: I hope you stop by Jen’s blog to read her nice write-up about this recipe.  Interestingly, when I read her post about it, I had just bought some extra-firm tofu without any clear ideas of how to put it to use.  Serendipity. Don’t you love when that happens?

Now, I admit that I chickened out and added chicken (very sorry for this phrase, please don’t leave). I was unsure of how we would feel about the texture and taste of tofu, and decided that in case of a complete disaster, at least we could enjoy some animal protein with the peas and cashews. I used chicken breasts that I had previously cooked sous-vide, but you can poach it or saute with a bit of salt and pepper.

This was one amazing meal! It all works together nicely, the tofu gets a nice soaking with the spices and caramelizes a bit with the honey in that marinade. If you are vegetarian, you absolutely must make this. If you are not, you absolutely must make this, and go for the kill: omit the chicken. I guess that means going for the non-kill?  (very sorry for this phrase too, my apologies).

If you are anti-tofu, I hope this post will make you try it, just make sure you get the extra-firm. I know that tofu aficcionados like to use a special press to compact it before cooking, but I felt that the resulting texture was nice enough the way Jen recommended.

Jen, thank you so much for opening my cooking horizons, I love it…

ONE YEAR AGO: Salmon Tacos

TWO YEARS AGO: A Dream that did not come true

THREE YEARS AGO: Kaleidoscopic Macarons

FOUR YEARS AGO: Zucchini Noodles with Sun-dried Tomato Pesto

FIVE YEARS AGO: In My Kitchen, July 2015

SIX YEARS AGO: Sous-vide Pork Chops with Roasted Poblano Butter

SEVEN YEARS AGO: Roasted Strawberry-Buttermilk Sherbet

EIGHT YEARS AGO: Amazing Ribs for the 4th of July!

NINE YEARS AGO: Baby Back Ribs on the 4th of July

TEN YEARS AGO: Blueberry Muffins

ELEVEN YEARS AGO: A Pie for your 4th of July