SWEET AND SPICY ROASTED CAULIFLOWER

Cauliflower is quite likely the most versatile vegetable out there. You can turn it into pizza crust. You can turn it into pasta sauce. It roasts well, it fries well, it mimics rice, it disguises as tabbouleh. I’ve seen recipes using it in brownies, but even with my mind open wide, I cannot quite embrace that aspect. In this recipe, it gets a tempura-like treatment, and into the hot oven it goes. I never expected to have to fight the husband for the last bits of cauliflower in the bowl, but that’s what happened.

SWEET AND SPICY ROASTED CAULIFLOWER
(inspired by Cook Eat Share Vegan)

Yogurt sauce:
150g full-fat yogurt
zest and juice of 1 lemon
1 teaspoon cider vinegar
salt to taste

panko breadcrumbs
1 head of cauliflower, broken into florets

for the batter:
70g g rice flour
pinch of sea salt
¼ teaspoon black pepper
¼ teaspoon baking soda
juice of ½ lemon
150ml milk

for the spicy sauce:
2 tablespoons gochujang (Korean red chilli paste)
2 tablespoons soy sauce
1 tablespoon apple cider vinegar
3 tablespoons agave nectar
50ml water

Heat oven to 420F and line a baking tray with foil or baking paper. Make the yogurt sauce by whisking all ingredients in a small bowl, and reserve in the fridge until serving time.

To make the batter, whisk the ingredients together in a bowl until smooth. Place the panko in a shallow baking dish.  Dip cauliflower florets in the batter and shake off any excess before dredging in the panko crumbs and placing on the prepared baking tray. Bake for 25 minutes or until crispy and golden.

As the cauliflower roasts, place the gochujang dressing ingredients in a saucepan, bring to a boil and cook for 5 minutes, or until smooth thick, adding a splash more water if it seems too thick. Transfer the baked cauliflower to a large bowl, pour over the dressing and toss to coat. Serve right away of keep in a low oven while you prepare the rest of your dinner, with the yogurt sauce on the side.

ENJOY!

to print the recipe, click here

Comments: This was the type of preparation that had me a bit nervous until I finally took the first bite. The Gochujang sauce looked like liquid lava as it reduced, and I thought that it could end up as something that would turn my Dad off for being too spicy (Dad used to eat hot peppers as if they were candy… I refer you to this story of my past if you like to be amused).

But both Phil and I loved it!  It definitely had enough heat but it was not overpowering. No need for Kleenex. At any rate, if you don’t like spicy food, this is definitely not for you. But where there’s a will, there’s a way:  use ketchup instead of kochujang and proceed with the recipe as written. I am sure it will be very delicious.

ONE YEAR AGO: Roasted Cauliflower Salad over Hummus

TWO YEARS AGO: Queen of Sheba

THREE YEAR AGO: Brunch Burger

FOUR YEARS AGO: Mango Salsa with Verjus

FIVE YEARS AGO: Raspberry Bittersweet Chocolate Chunk Brownies

SIX YEARS AGO: Scary Good Pork Burgers

SEVEN YEARS AGO: Review of exercise program Focus25

EIGHT YEARS AGO: Celebrate Wednesday with a Thai Seafood Curry

NINE YEARS AGO:  Post-workout Breakfast

TEN YEARS AGO: Semolina Barbecue Buns

ELEVEN YEARS AGO: Lavash Crackers


CHAI-BUTTERFLY

(for a video tutorial on my default recipe for macarons, click here)

At the risk of inflicting misery on some of my readers, I confess that my current ear worm is “Fly, Robin Fly“, but with the lyrics “Chai Butterfly” instead. I apologize in advance for the inconvenience. Ear worms aside, these were fun to make, but it took me two attempts to get them right. The problem with my first batch (as you can see in the picture below) is that they turned out too big, each macaron could feed a family of four. You don’t want that. They need to mimic the delicate nature of the Monarch butterfly.  Imagine the size of a regular macaron and when you pipe the four circles that will be the final cookie, they must fit that dimension, or be just slightly bigger.

CHAI-BUTTERFLY MACARONS
(from the Bewitching Kitchen)

For the shells:
200g  Icing/powdered sugar
115 g Ground Almonds/Almond Meal
1 bag of Double Spice Chai Tea (Stash)
115 g egg whites at room temperature (approx. 4 eggs)
1/8 tsp of cream of tartar
100 g granulated sugar
¼ tsp vanilla paste or extract
orange, yellow and red food dye (adjusted to get the color of your favorite butterfly)

for the lemon buttercream:
40g unsalted butter, softened
130g powdered sugar
2 teaspoons heavy cream
1 tablespoon lemon juice
zest of 1/2 lemon
pinch of salt

For antennas (optional):
melted Candy melts
black food dye

Make the shells:
Line 3 heavy baking sheets with parchment/baking paper or Silpat mats. Layer the powdered sugar, almond flour and contents of the chai tea bag in a food processor. Pulse until the mixture looks like fine meal, about 12 pulses. Pass through a sieve and transfer to a small bowl or to a sheet of parchment/baking paper. Set aside.

Place the egg whites and cream of tartar in the bowl of a stand mixer fitted with the whisk attachment. Make sure that the bowl and the whisk are impeccably clean. Starting on medium speed, whip the whites with the cream of tartar until they look like light foam. The whites should not appear liquid. The foam will be light and should not have any structure.

Slowly rain in the granulated sugar in five additions, trying to aim the stream between the whisk and the side of the bowl. Turn the speed up to high. Continue to whip the meringue until it is soft and shiny. It should look like marshmallow creme (marshmallow fluff). Add the vanilla and food gel dye. Whip the egg whites until the mixture begins to dull and the lines of the whisk are visible on the surface of the meringue. Check the peak. It should be firm. Transfer the whites to a medium bowl.

Fold in the almond mixture in two increments. Paint the mixture halfway up the side of the bowl, using the flat side of a spatula. Scrape the mixture down to the center of the bowl. Repeat two or three times, then check to see if the mixture slides slowly down the side of the bowl.   Put the mixture in a piping bag fitted with your choice of piping tip.  Pipe shells, making two large circles touching side by side, and two smaller right below them.  Use a needle or a toothpick to smooth the surface and join the circles, to get the right shape.

Slam each sheet hard four to six times on the counter/worktop. Let the unbaked macarons dry until they look dull but not overly dry. Drying time depends on humidity. In a dry climate, the macarons can dry in 15 to 20 minutes; in a humid climate, it can take 35 to 40 minutes.

While the macarons are drying, heat the oven to 300 F. Bake one sheet at a time on the middle rack. Check in 11 minutes. If the tops slide or move (independently of the ‘feet’ when you gently twist the top), then bake for 2 to 3 more minutes. Check one or two. If they move when gently touched, put them back in the oven for 1 to 2 more minutes until they don’t move when touched.   Let the macaroons cool for 10 minutes before removing from the pan.  The macarons should release without sticking.

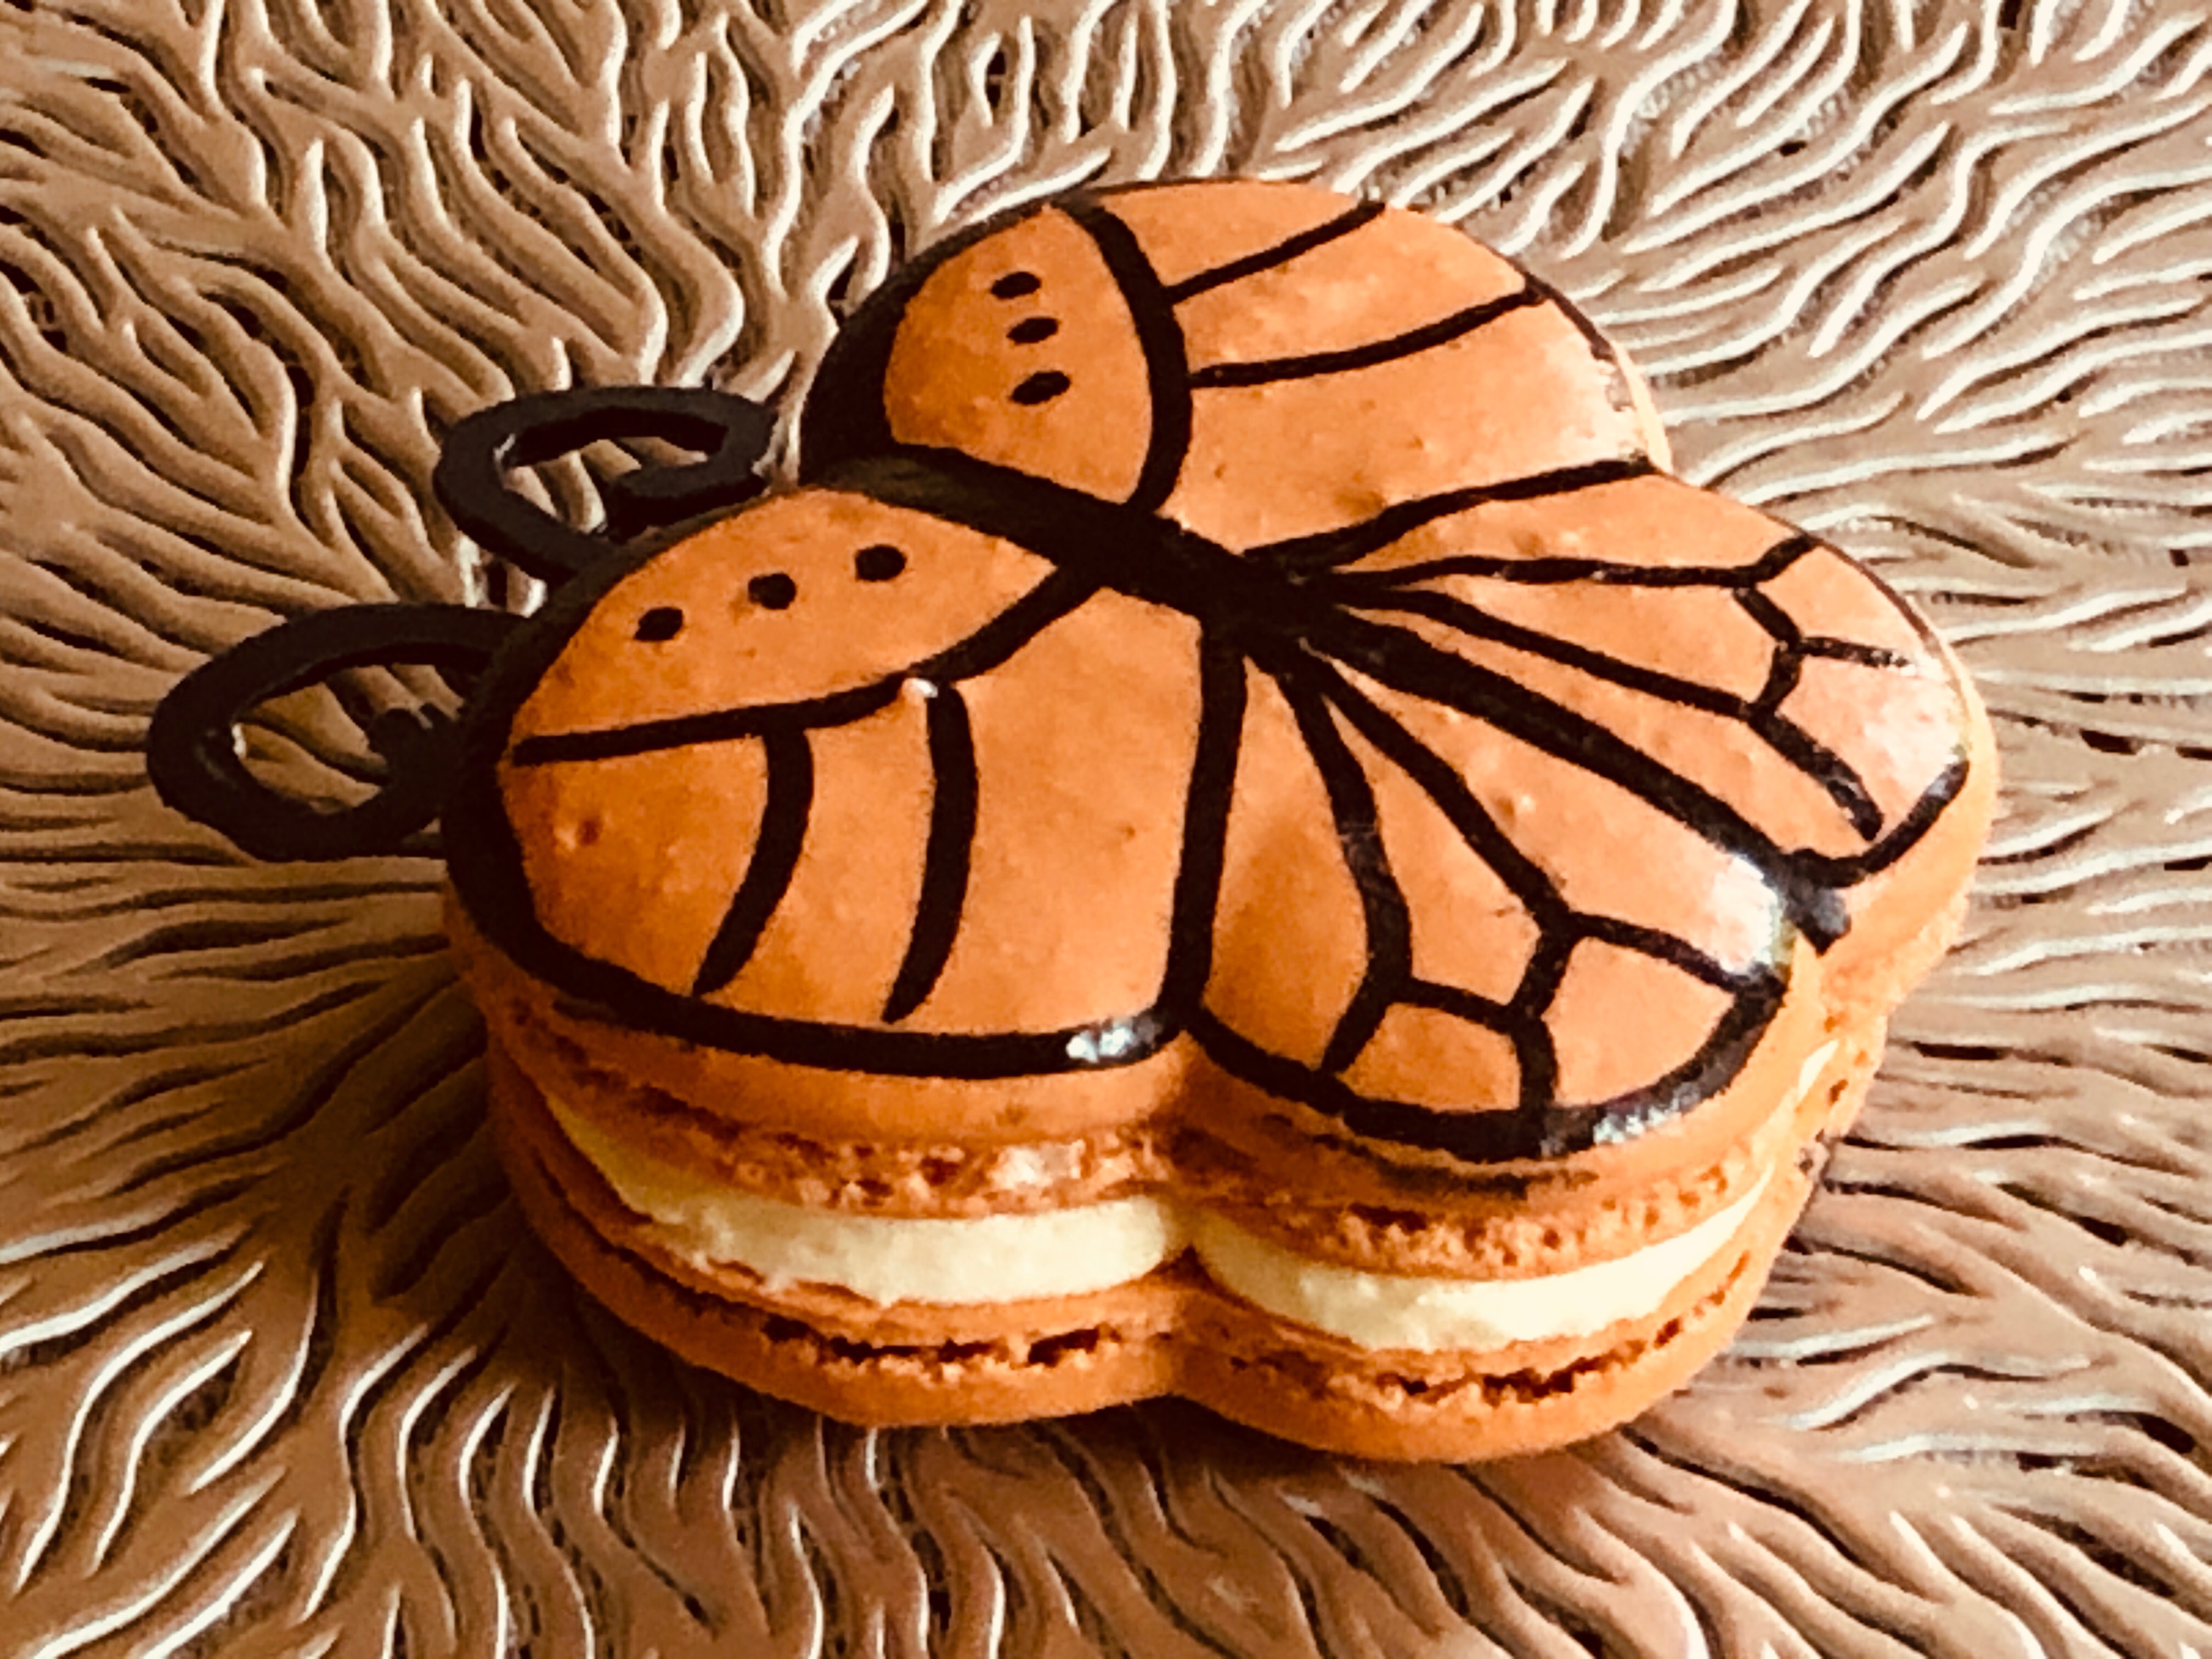
When they are cold, match the shells and decorate one of them using a black food pen.

For the lemon buttercream filling:
In a mixing bowl with whisk attachment, beat the butter until fluffy. Add powdered sugar, heavy cream, lemon juice, lemon zest and salt and beat until well combined. Transfer the buttercream into a pastry bag and fill the macarons.

If you want to make antennas, use Candy Melts dyed black, place in a small piping bag, no need to use a piping tip, just cut a small hole. Pipe antennas (make more than you need, because they break easily). Let them set. Stick them on the head of the butterfly, in between the two shells.

Store the macs in the fridge for 24 hours for perfect texture.

ENJOY!

to print the recipe, click here

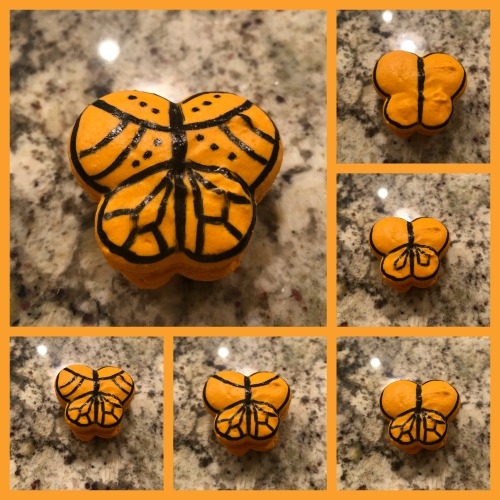
Comments: There are two ways to pipe a butterfly-shaped shell. You can draw a butterfly shape and work with a small piping tip to fill it, or go the much easier route, piping two larger circles next to each other on top, and two smaller ones at the bottom. Smooth the joints using a toothpick or a cookie needle. On my first attempt I used two colors of batter and made a central line for the body in black. I did not like the effect, it was too thick. I think drawing the whole body details with a food-pen (Chefmaster has a soft point, perfect for it) is a much better option.

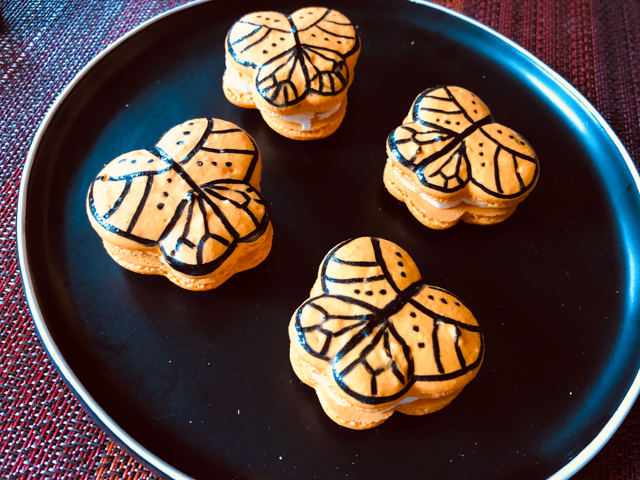
For the antennas, I used Candy Melts dyed black, and piped on parchment. When dry, I stuck into the filling. They are very fragile, and on my second batch I made mutant butterflies. Antenna-less. They are easier to wrap, which is a must for the treats I share at the Common Table.

For the macaron addicts out there, lately I’ve been incorporating one additional step to my recipe: I dry the almond flour the day before in a low oven (200F) for about 20 minutes. I find that the feet are bigger when I do so, and  I like the overall texture of the shell better. The chai flavor is subtle but definitely there.  One bag of the double chai tea is perfect for this amount of batter. I like the contrast of the spice in the shell with the brightness of the lemon buttercream in the filling.

ONE YEAR AGO: Roasted Cauliflower Salad over Hummus

TWO YEARS AGO: Sous-vide Egg Bites

THREE YEARS AGO: Paul Hollywood, The Weekend Baker

FOUR YEARS AGO: Texas Sheet Cake

FIVE YEARS AGO: In My Kitchen, September 2015

SIX YEARS AGO: Sour Cherry Sorbet: A Labor of Love

SEVEN YEARS AGO: In My Kitchen – September 2013

EIGHT YEARS AGO: Raspberry Sorbet at Summer’s End

NINE YEARS AGO: When three is better than two  (four years with Buck!)

TEN YEARS AGO: Grating Tomatoes (and loving it!)

ELEVEN YEARS AGO: A Peachy Salad for a Sunny Day

FROM MY HUSBAND TO YOU: ASPARAGUS STIR-FRY

Some veggies are so delicious that I tend to do as little as possible to prepare them, so they can shine on their own. But the other day the husband pulled an amazing dinner for us and the side dish blew my mind. Asparagus stir-fry that packed a ton of flavor and made us feel as if we were dining in a cool restaurant in Los Angeles. Just like we did during our sabbatical at UCLA years ago (it does feel like a previous life).  I insisted he should write a guest blog post about it, but he is quite busy wrapping up a review article, and food blogging is definitely not a distraction he needs. So, I did the altruistic, sensible thing, and composed the post myself. Because if you also have a soft spot for asparagus, you need this in your life…

ASPARAGUS STIR-FRY
(adapted from The Washington Post)

1 medium jalapeno chile pepper, seeded and thinly sliced
1 tablespoon olive oil
1 pound asparagus, trimmed and thinly sliced on a diagonal
1/4 teaspoon kosher salt
1 tablespoon soy sauce
3 tablespoons lemon juice,  divided
Zest of 1 lemon
1 teaspoon finely grated fresh ginger
1/2 cup fresh cilantro leaves with tender stems
toasted sesame seeds

Heat a large, non-stick skillet over medium-high heat until a drop of water sizzles on the surface. Add the jalapeno and olive oil, saute for a couple of minutes, until fragrant.  Add the asparagus. Sprinkle lightly with salt and cook, tossing occasionally, until the asparagus begins to brown around the edges, a couple of minutes more.

Add the soy sauce and 2 tablespoons of the lemon juice and cook, stirring constantly, until the asparagus is coated in sauce, but still firm, about 1 minute.

Add the lemon zest, the remaining tablespoon of lemon juice and the ginger. Toss to combine and cook, continuing to toss for 1 minute, or until ginger is fragrant. Remove the pan from heat. Transfer the asparagus to a platter and toss with cilantro and sesame seeds. Serve right away, perfect with grilled salmon.

ENJOY!

to print the recipe, click here

Comments: Looking at our served meal, you could conclude we love sesame seeds. And you would be 100% correct. They do go well with salmon and perfect with asparagus. This is a very simple and quick dish to put together, and would complement many main dishes, from beef to poultry.  Serve these asparagus over polenta and you can call it a great, satisfying vegan meal…

I have to say I am pretty lucky to have a partner who cooks dinner for us every other day. I love to cook, but it would get a bit tiring to do it every single evening.  We have different styles, I am always trying new recipes, whereas he tends to stick to his favorites. But every once in a while he finds a recipe and jumps on it. Like this one. It was a fabulous meal…

ONE YEAR AGO: The Best, The Very Best Hummus

TWO YEARS AGO: Chicken Katsu

THREE YEARS AGO: Whole-Lemon Marinade: Long Overdue

FOUR YEARS AGO: Tomato and Cucumber Salad with Almond Vinaigrette

FIVE YEARS AGO: Eggplant Tomato Stacks

SIX YEARS AGO: The Couscous that Wasn’t

SEVEN YEARS AGO: Apple-Cinnamon Bread

EIGHT YEARS AGO: Blueberry Galette

NINE YEARS AGO: In My Kitchen, August 2011

TEN YEARS AGO: Journey to a New Home

ELEVEN YEARS AGO: Friday Night Dinner

HOME BAKERS COLLECTIVE: AUGUST PROJECT

One year ago, filming of Season 5 of The Great American Baking Show was coming to an end. In fact it was probably right this very day a year ago that Dana, Marissa and Brother Andrew faced their last baking challenges in that dreamy tent. Amazing that with this assignment we went full circle, and all the bakers who participate in “the collective”, proposed challenges on a monthly basis. It makes my heart sing. Dana chose a very cool project for the month of August.  Recreate your favorite childhood treat.  I had to give it some thought, but then my friend Denise (who grew up in Rio) reminded me of something called Nhá Benta. No need to panic, I will explain to you exactly how to say it (after the comments).  Nhá Benta is a kind of sweet that is found in many countries under names like Marshmallow Puff, Tunnock’s Tea Cakes, Mallomars. The Brazilian version had a very thin base and a ton (I mean a real huge amount) of marshmallow on top. It was very messy to eat, which was a bit of a turn-off for me. Both my late Dad and I, we shared a little quirk: intense dislike of sugary mess. Even as a child, you would never see me with ice cream melting down my arm or lips. The very idea would leave me paralyzed. But it was so tasty, I could never resist it for very long. My re-make of this Brazilian classic is “user-friendly” and “Dad-approved.”  A bigger, sturdier cookie base, and just the right amount of marshmallow to allow you to bite into it and not lose your dignity. To make it even more Brazilian, a green-and-yellow decoration, because sprinkles make my world go around.

NHÁ BENTA
(from the Bewitching Kitchen)

for the cookie base:
100g flour
25g whole wheat flour
25g hazelnut flour (or hazelnuts, finely ground)
50g brown sugar
½ tsp salt
113g unsalted butter (½ cup) cold, cubed
2 tbsp milk
1 tsp vanilla

for the marshmallow (makes more than you’ll need): 
200 g sugar
¼ cup water
5 sheets gelatin
2 egg whites
¼ fine salt

For the chocolate coating:
250g chocolate couverture, tempered
1 tsp coconut oil, melted
drizzle: white chocolate, melted and dyed with oil-soluble food dye
sprinkles

Heat oven to 350F.

In a food processor, pulse together the flours, sugar and salt. Add the butter and pulse until mixture resembles coarse crumbs. Add the milk and vanilla and pulse until dough holds together when squeezed. Turn the dough out onto the counter and knead gently to bring together. Dust the counter with flour and roll the dough to ¼-inch thickness. Cut into rounds and place on a parchment-lined baking sheet. Freeze for 10 minutes. Bake until firm and beginning to brown on the edges, 12 to 15 minutes. Cool for 2 minutes on baking sheet, then transfer to a wire cooling rack to cool completely.

Make the marshmallows only when the cookies are ready and cool, because it sets reasonably quickly.  Soak the gelatin sheets in cold water. Add the sugar and water in a small saucepan and bring to a boil over medium-high heat. Start whipping the egg whites so that they are at soft peaks within 5 minutes or so. Reduce the heat in the saucepan to medium and boil until mixture reaches 235-240F. Remove from heat and allow bubbling to subside.

With the mixer running on medium-high, gradually stream in the sugar syrup and drained gelatin sheets along the side of the mixing bowl into the egg whites. Continue to beat until glossy, thick and cooled to room temperature, about 6 to 8 minutes. Add the salt and mix for 1 minute.

Spoon the mixture into a piping bag fitted with a medium round piping tip and pipe over the cookies to form a dome. If dome needs smoothing, moisten fingers with water and gently smooth dome. Set aside to cool.

Temper the chocolate and add the coconut oil, mixing gently to incorporate. Immediately dip the cookies, marshmallow side down, into the chocolate. Flip to coat the bottom and place them gently over Silpat or parchment paper (do not place over a grid like a drying rack because that will mess up the coating at the bottom). Melt white chocolate and dye yellow. Place in a small piping bag, cut a very thin opening, and drizzle the surface of the covered cookies. Add sprinkles right away.  Cool and serve, they can be stored in the fridge.

ENJOY!

to print the recipe, click here

Comments: First of all, if you want to make a version closer to the authentic one sold in Brazil by Kopenhagen, roll the cookie very thin, and pile that marshmallow as if you are trying to reach the ceiling. Good luck coating it all with tempered chocolate… but I bet it can be done. This was messy enough for me, I tell you.  The drizzles are optional and are never found in the commercially available Nhá Bentas.


So what about its name? It would be best translated as Ms Benta. Nhá is a contraction of the word sinhá, a term commonly used in rural areas of the country decades ago. Basically, they are both  variations of the formal “Senhora” still used today as a respectful way to refer to an older woman. For instance, my friends addressed my Mom as “Senhora Salete”, and my Dad as “Senhor Danillo.”  The pronunciation of the word can be tricky for foreigners, so here we go, repeat after me…

This was my first time making Nha’ Bentas and I had no idea 2 egg whites would produce such a big volume of marsmallow. If your mixer handles 1 egg white, consider halving the recipe that part of the recipe.  I also had quite a bit leftover tempered chocolate, and saved it for future adventures…

Follow your heart…

Dana, this was such a clever challenge, I am looking forward to the flash-back into childhood of our tent-baking friends. I invite my readers to stop by the Home Bakers Collective to read all about it.

ONE YEAR AGO: The Best, The Very Best Hummus

TWO YEARS AGO: Chicken Katsu

THREE YEARS AGO: Whole-Lemon Marinade: Long Overdue

FOUR YEARS AGO: Tomato and Cucumber Salad with Almond Vinaigrette

FIVE YEARS AGO: Eggplant Tomato Stacks

SIX YEARS AGO: The Couscous that Wasn’t

SEVEN YEARS AGO: Apple-Cinnamon Bread

EIGHT YEARS AGO: Blueberry Galette

NINE YEARS AGO: In My Kitchen, August 2011

TEN YEARS AGO: Journey to a New Home

ELEVEN YEARS AGO: Friday Night Dinner

MARBLED TAHINI COOKIES

These are the perfect cookies for grown-ups. Not too sweet, with a nice tahini flavor. They look stylish in their black and white nature, with the added bling of black sparkling sugar around the edges. I saw this recipe on the New York Times and made it the following day. But, guess what? I was not very happy with the outcome, because the cookies ended up too big. In their recipe, the full block is sliced to form the cookies. I changed things around a bit, and cut the block in half first. They turned out quite a bit more delicate. This version I am happy with, so I share it with you…

MARBLED TAHINI COOKIES
(adapted from The New York Times)

385 grams all-purpose flour
1 teaspoons kosher salt
½ teaspoon baking powder
Cooking spray
225 grams unsalted butter, softened
125 grams confectioners’ sugar
1 large egg, at room temperature, plus 1 egg white
1 teaspoon vanilla extract
¼ cup plain tahini
3 tablespoons black tahini
coarse black sanding sugar (optional)

In a medium bowl, whisk to combine flour, salt and baking powder; set aside. Coat a loaf pan (9 x 5) with cooking spray, then line with plastic wrap, leaving plenty of overhang. Set aside.

In the bowl of a stand mixer fitted with the paddle attachment, cream together butter and confectioners’ sugar on medium-high speed until fluffy, 2 to 3 minutes. Add the egg and the vanilla; beat on medium-high until combined, about 2 minutes. Add flour mixture; beat on low speed until combined; then increase speed to medium and beat until dough starts to clump together.

Remove dough from bowl, knead lightly and form into a fat log. Using a bench scraper or knife, cut into two pieces, one about 1/3 of the dough, and the other 2/3 of the dough. Return the larger piece to the bowl, add the plain tahini, and beat on medium speed until fully combined. Remove from bowl and set aside. Add the smaller piece and the black tahini to the bowl and beat on medium speed until fully combined.

On a floured surface, using a bench scraper or a knife, cut the white dough in half. Pat half the white dough into a 5-inch square. Cut the black dough in half, then pat half the black dough on top of the flattened white dough to match dimensions. Repeat with remaining white dough, then black dough, so you have four alternating layers of white dough and black dough. Cut in half crosswise, and gently knead and roll one piece to marble the two colors together. Repeat with the second piece of dough. Stack both pieces of dough together and briefly knead the pieces together to form one dough. The idea is to marble the colors, so do as much or as little as you like.

Press dough into prepared pan, and fold the plastic wrap over the top to seal. Gently press down to even out the surface as much as possible. Chill until firm,  at least a few hours or overnight.

Heat oven to 325 degrees. Beat the egg white with 1 teaspoon water to thin it out. Spread the sanding sugar out on a small baking sheet. Remove the block of dough from the loaf pan and unwrap it. Trim the slanted sides and the top if you want them really square. Cut it in half lengthwise, so that you’ll have two equal blocks of  cookie dough. Very lightly brush the outside of each block with the egg white mixture. Press  firmly to coat all sides (except the ends) with the sugar, sprinkling and pressing it on to cover any bare spots.

Cut each block into thin slices (less than 1/4 inch) and lay them out 1 inch apart on parchment-lined baking sheets. Freeze until firm, about 10 minutes. Bake until cookies are golden underneath, 14 to 16 minutes. Let cool a few minutes on the baking sheets, then transfer cookies to wire racks to cool completely.

ENJOY!

to print the recipe, click here

Comments: These are quite likely my favorite cookie of this crazy year.  Well, you know I am partial to macarons, but macarons are pretty sweet. Truth is, I like to dream about designs and flavors, bake them, but once I eat one, I’m satisfied. These cookies are quite a bit more dangerous… They have that savory-sweet quality that I find hard to resist. The black sparkling sugar is a nice touch, but you can skip that step with no major harm done. Halloween is approaching. I see no parties, no get-togethers, but I definitely see a batch of these babies, in orange and black. What do you think?

On the picture above you can see the first batch, slicing the full block of cookie dough to make the cookies. Maybe you would prefer them that way, but I definitely like the smaller better.

Each one, so unique!


ONE YEAR AGO: Twice-Baked Goat Cheese Souffle

TWO YEARS AGO: Strawberry-Mango Entremet Cake

THREE YEARS AGO: Hommage to the Sun

FOUR YEARS AGO: Tomato and Cucumber Salad with Almond Vinaigrette

FIVE YEARS AGO: Eggplant Tomato Stacks

SIX YEARS AGO: The Couscous that Wasn’t

SEVEN YEARS AGO: Apple-Cinnamon Bread

EIGHT YEARS AGO: Blueberry Galette

NINE YEARS AGO: In My Kitchen, August 2011

TEN YEARS AGO: Journey to a New Home

ELEVEN YEARS AGO: Friday Night Dinner