INCREDIBLY SIMPLE TIMES THREE

It’s been a few months since I blogged on super simple stuff, so here I am… I will start with a pretty unusual and kind of cute take on the humble broccoli. I am sure you are familiar with smashed potatoes, but in this version, broccoli is the one getting smashed and baked. Delicious, and oh so simple!

SMASHED BROCCOLI

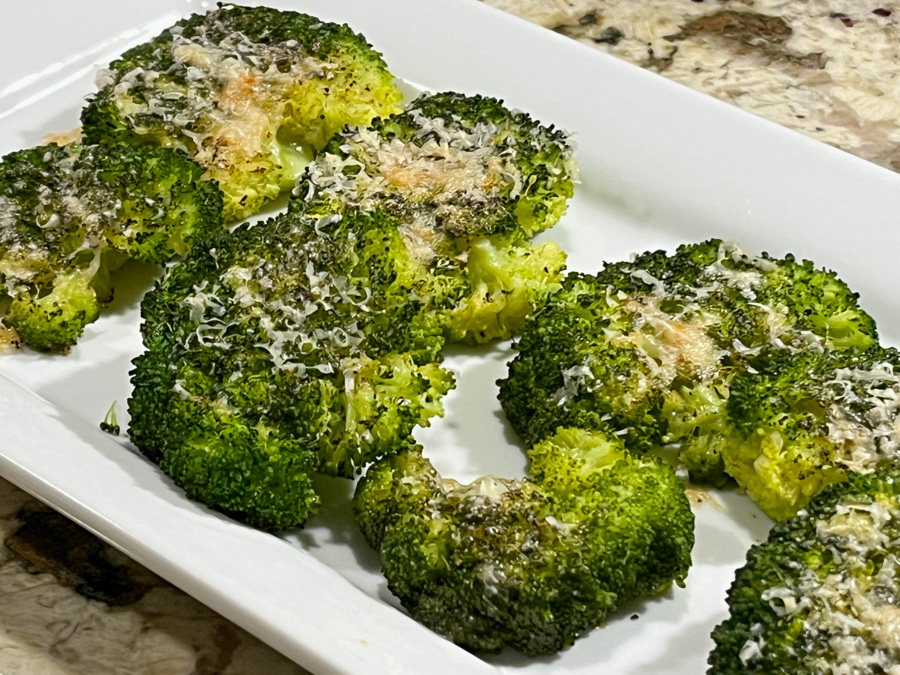
Here’s what you do: cook broccoli florets – as many as will fit in a baking sheet – until just tender, don’t let it get all mushy. Drain, run through very cold water to stop the cooking. Add the pieces to a parchment-lined baking sheet, smash them flat with the bottom of a measuring cup, drizzle a good amount of olive oil, salt and pepper and a bit of cheese on top. You can load it with cheese if you want, or use restraint like we did. You can use mozzarella, Gruyere, Mexican cheese, whatever you feel like. Bake at 425F until the cheese is melted, bubbly, getting dark on the edges. ENJOY!

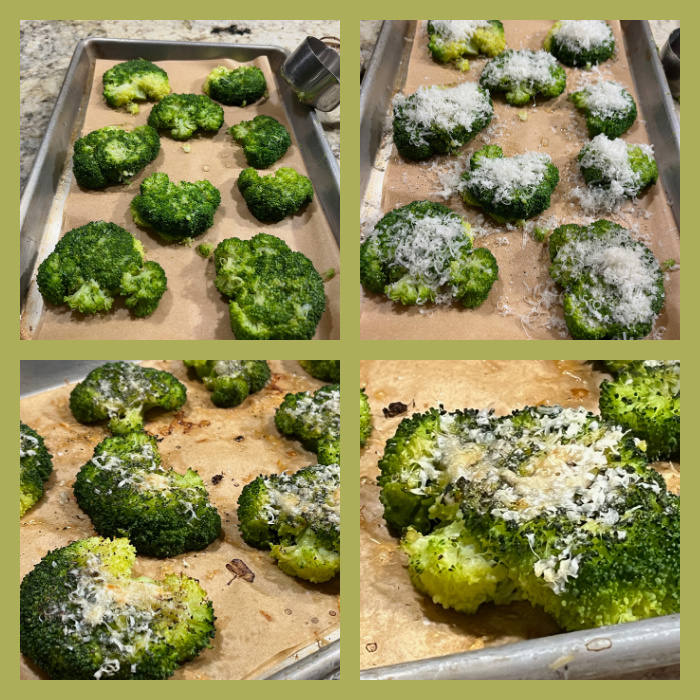
Inspiration for this recipe came from an Instagram post that my friend Elaine shared with me. You can find it here. She goes heavily on the cheese, and next time I might do the same, at least in some pieces. Mouth-watering stuff!

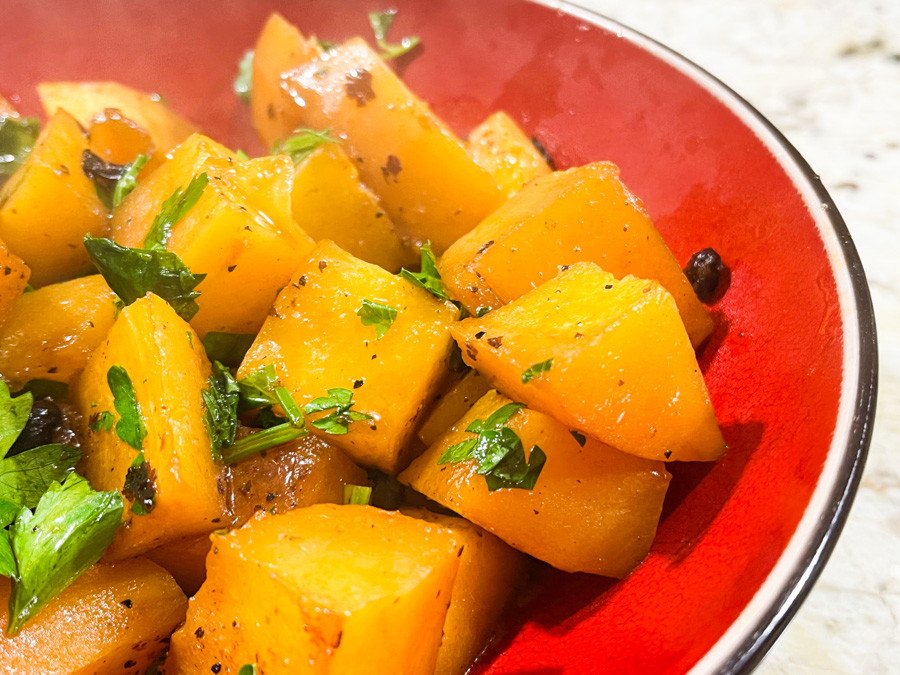
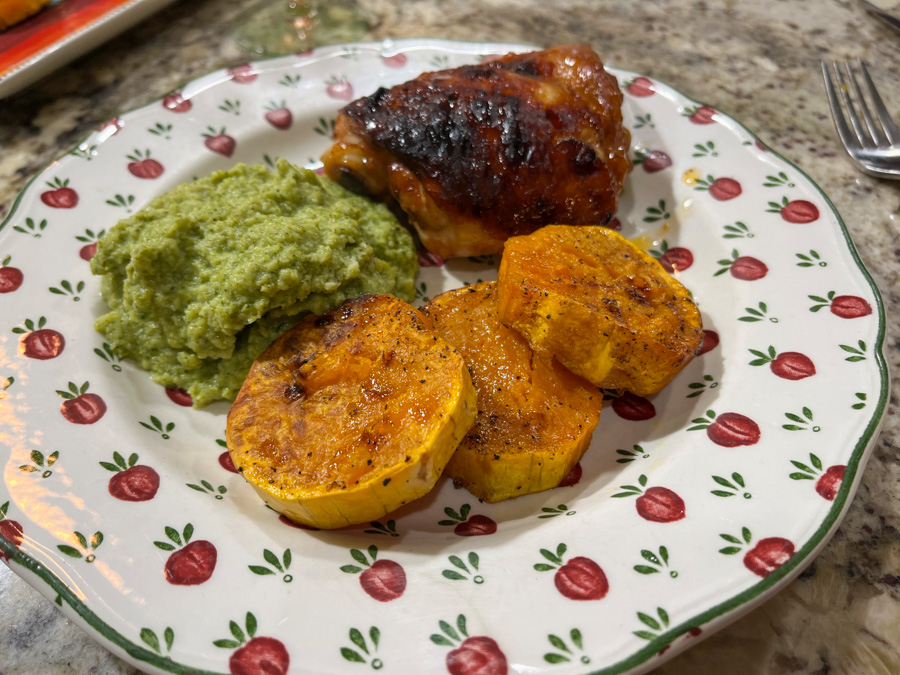
BUTTERNUT SQUASH SLICES

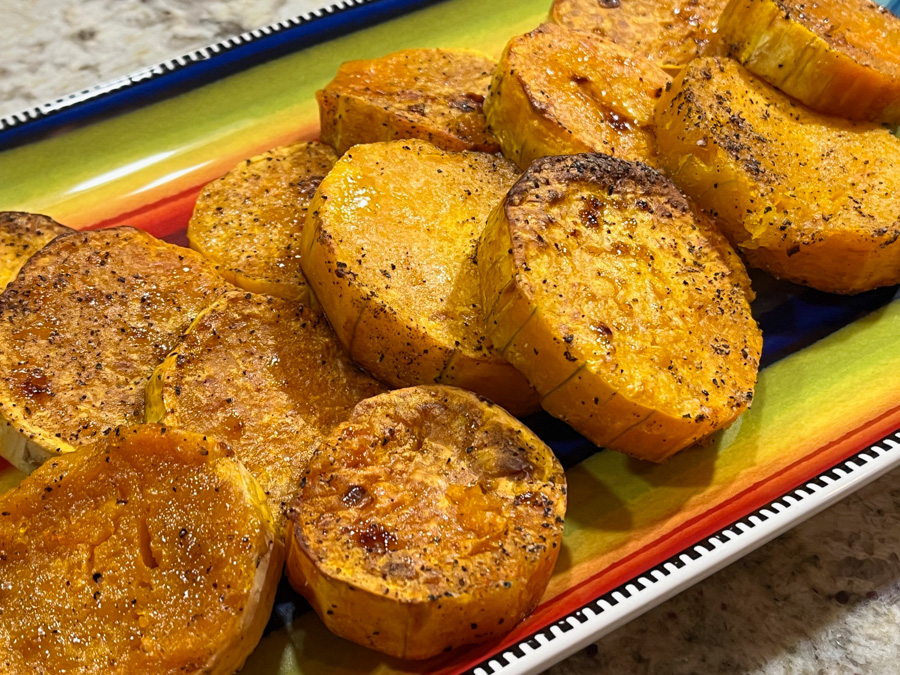
Usually I resort to bags of cut butternut squash because I despise having to prep it myself. However, recently I used this trick that is a game changer: microwave the butternut squash for 4 minutes. No need to poke holes, nothing. Just microwave, allow it to cool a bit until you can handle it, and it will peel like a dream! Then just slice it, coat the slices with olive oil, add salt and pepper, and roast or air-fry it.


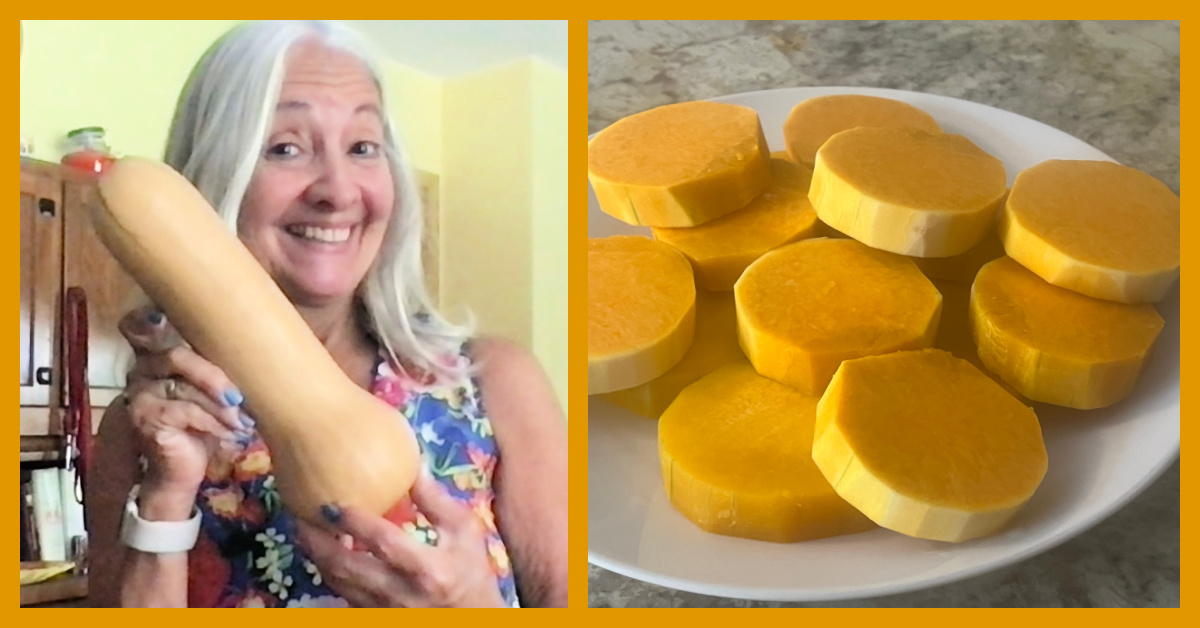
If you find a butternut squash with super long neck, go for it. More slices for you!

BRITISH-STYLE JACKED POTATOES

Phil and I make these ALL THE TIME. I was sure it was on the blog already, then he asked me for the link to send to a friend and I had one of those big “palm-to-forehead” moments. No blog post to be found. Better late than never, here’s what you do: get very large Russet potatoes, wash, scrub them and make two deep cuts in a cross. Season lightly with salt. Place in a 400F oven for TWO HOURS. That is it. Ten minutes before the two hours are up, go with a knife and cut the cross slits a little deeper, squeeze the potatoes (wearing gloves) to open the flesh a bit. Drizzle a touch of olive oil and bake for the additional ten minutes or until they start to get all golden. DONE. You can eat the skin and all, it will be crunchy, the flesh very smooth and flavorful. You can read all the details about it here.

I hope you give these simple recipes a try. Sometimes simple is all you need…

ONE YEAR AGO: Chile Rellenos

TWO YEARS AGO: Vietnamese “Pizza”

THREE YEARS AGO:  Chocolate Bonbons with Mango-Ganache Filling

FOUR YEARS AGO:  Giant Cookie Meets Mousse

FIVE YEARS AGO: The Brazilian Battenberg

SIX YEARS AGO: Salzburg Sourdough

SEVEN YEARS AGO: If I had One Hour

EIGHT YEARS AGO: Apple Cinnamon Oatmeal Cake

NINE YEARS AGO: Sourdough Rye Bread with Flaxseeds and Oats

TEN YEARS AGO: Apricot-Raspberry Sorbet: A farewell to Summer

ELEVEN YEARS AGO: Marcela’s Salpicon

TWELVE YEARS AGO: Pork Kebabs

THIRTEEN YEARS AGO: Fondant au Chocolat

FOURTEEN YEARS AGOGot Spinach? Have a salad!

BUTTERNUT SQUASH WITH FERMENTED BLACK BEANS

No need to run away, I promise you this is a very flavorful way to cook butternut squash. Simple, fast, and perfect to go with roast chicken or grilled salmon. The black beans provide a salty, sharp flavor that complements well the squash. I have made it with the beans as they come from the package, and a second time I minced them. I prefer them minced, the flavor will be more pronounced in the final dish, but if it is your first time trying this ingredient, use them whole and see how you like it.

BUTTERNUT SQUASH WITH FERMENTED BLACK BEANS
(adapted from The Vegan Chinese Kitchen)

1 pound butternut squash, cut in big chunks 
2 tablespoons grapeseed oil 
1 tablespoon Rose Harissa (or any pepper mix you like)
1 tablespoon fermented black beans, coarsely chopped
1 teaspoon sugar
salt to taste
1 cup water
drizzle of sesame seed oil 
cilantro leaves

Heat a wok over high heat and add the oil, swirling to coat the sides. Add the harissa, the fermented beans, and leet them sizzle for a few seconds until fragrant. Add the butternut squash pieces, stir them well to coat with the oil, sprinkle the sugar on top. Pour the water and season with a little salt. Cover, reduce to simmer for about 10 minutes until tender. 

If there is still water, you can drain it a bit or reduce by boiling, as long as the squash is not too tender. Add the cilantro and sesame oil right before serving. 

ENJOY!

to print the recipe, click here

Comments: I normally roast or air-fry butternut squash, but it was really easy and fast to braise it. Leftovers were even better, the flavor intensified a bit, and it never got mushy, even after a brief encounter with microwaves. This will go into our rotation for sure. If you don’t have and won’t be getting fermented black beans to play with, maybe a drizzle with sweet soy sauce and a tiny bit of fish sauce will be a nice move.

ONE YEAR AGO: Karen’s Braided Lemon Bread with Blackberries

TWO YEARS AGO: Bulgur-Pork Tomatillo Platter

THREE YEARS AGO: Baking through the blogosphere

FOUR YEARS AGO: Chickpea Burgers, Vegan and Delicious

FIVE YEARS AGO: Macarons with Ganache Noisette

SIX YEARS AGO: Quiche with Asparagus and Fennel

SEVEN YEARS AGO: Fakebouleh

EIGHT YEARS AGO: Yellow Squash Soup

NINE YEARS AGO: Grilled Chicken with Tamarind and Coconut Glaze

TEN YEARS AGO: Chicken-Apricot Skewers

ELEVEN YEARS AGO:  Asparagus Quiche

TWELVE YEARS AGO: Two-stage Pea and Prosciutto Risotto

THIRTEEN YEARS AGO: Mellow Bakers: Corn Bread

ZUCCHINI CARPACCIO

I adore zucchini and in this preparation it really shines! I strongly advise you to cut it with a mandolin, because paper thin is a must. You won’t have the same beautiful effect of that noodle appearance unless you really slice it super thin. Come to think of it, a veggie peeler might work also!

ZUCCHINI CARPACCIO
(from the Bewitching Kitchen)

2 medium zucchini, cut very thin lengthwise
juice of ½ lemon
3 tablespoons extra-virgin olive oil
roasted peanuts
Herbes de Provence
drizzle of agave nectar

Sprinkle the ribbons of zucchini with salt, place in a colander for 20 to 30 minutes, then drain and dry on paper towels. Add to a large serving bowl and squeeze lemon juice all over the slices. Place in the fridge for 30 minutes, this will soften the veggie a bit. When it is time to serve, drizzle olive oil, season with Herbes de Provence, and spread peanuts on top. Finally, a drizzle of agave nectar for a little contrast of flavor.

ENJOY!

to print the recipe, click here

Comments: It is not very hard for me to praise my favorite squash, but I believe most people will appreciate the texture and freshness of this preparation. Other nuts can work too, the most important step is allowing the lemon juice to do its job. Use a nice olive oil with enough flavor and you are all set!

ONE YEAR AGO: Masala Shrimp

TWO YEARS AGO: Victoria Sponge Mini-Cakes

THREE YEARS AGO: Red Beet Sourdough

FOUR YEARS AGO: A Modern Take on Tarte Tatin

FIVE YEARS AGO: Minnie-Macarons, a Fun Project with a Happy Ending

SIX YEARS AGO: Nigella Lawson in the Bewitching Kitchen

SEVEN YEARS AGO: Walnut-Raisin Bran Muffins

EIGHT YEARS AGO: Gingersnaps with White Chocolate Chips

NINE YEARS AGO: Turkey Chili with Almond Butter

TEN YEARS AGO: Secret Recipe Club: Leek and Cheese Tart

ELEVEN YEARS AGO: Secret Recipe Club; Triple Chocolate Brownies

TWELVE YEARS AGO: Shaved Asparagus Salad

THIRTEEN YEARS AGO: Indonesian Ginger Chicken

CRISPY ASPARAGUS SALAD WITH TOASTED BREAD CRUMBS

Spring: time to enjoy asparagus in all possible ways! I adapted this recipe from Alexandra’s blog. She always has great recipes, both savory and sweet. I have made it exactly as published, but decided to modify it by briefly running the cut asparagus in the microwave. You can skip that and follow Alexandra’s take if you prefer.

CRISPY ASPARAGUS SALAD WITH TOASTED BREAD CRUMBS
(slightly modified from this post)

for the bread crumbs:
1 cup of bread crumbs, preferably from fresh bread
1 tablespoon olive oil
1/4 teaspoon salt

for the salad:
1/2 cup walnuts, slightly toasted
1 lb. asparagus, tough bottoms trimmed
1/2 cup grated Parmigiano Reggiano
1/2 teaspoon crushed red pepper flakes
salt and black pepper to taste
zest from 1 lemon (I used Meyer lemon)
1/4 cup lemon juice
1/4 cup olive oil

Make the toasted crumbs: Heat the oil over medium heat. Add the crumbs and the salt. Cook, stirring occasionally, until crumbs are golden brown. Reserve. You will use 1/3 to 1/2 of the crumbs in the salad. It is easier to make a larger amount so it won’t burn easily. Save the rest to use over pasta or in other tasty concoctions.

Make the dressing by whisking the lemon juice and zest, oil, red pepper flakes. Season with salt and pepper. Reserve.

Prepare the asparagus: Using a sharp knife, slice the asparagus thinly on the bias. Place in a microwave safe dish in a single later, cover with a damp paper towel and microwave for 1 minute. Remove the paper towel and allow it to sit at room temperature.

Assemble the salad: combine the toasted walnuts, asparagus, toasted crumbs, Parmigiano cheese in a large bowl, drizzle the dressing all over, mix gently to combine. Shave more Parmigiano on top right before serving.

ENJOY!

to print the recipe, click here

.

Comments: This is a wonderful mixture of tasty ingredients, I think the key is the toasted bread crumbs, quite unusual and perfect to add a little twist. Warming up the asparagus in the microwave killed the sharpness that it has when totally raw, and I think it made the dressing permeate better. But the salad is delicious with the raw asparagus also. Leftovers were great next day, I just removed from the fridge for 30 minutes before digging in.

.

ONE YEAR AGO: Low-Carb Super Fast Chicken Parmigiana

TWO YEARS AGO: Sundried Tomato Spelt Sourdough

THREE YEARS AGO: A Duet of Chocolate Bonbons

FOUR YEARS AGO: Chocolate Tartlets with Honey-Caramel Filling

FIVE YEAR AGO: Zucchini Soup with Tahini

SIX YEARS AGO: Black Sesame Macarons

SEVEN YEARS AGO: Fine Tuning Thomas Keller

EIGHT YEARS AGO: Cauliflower Tortillas

NINE YEARS AGO: Majestic Sedona, Take Two

TEN YEARS AGO: Secret Ingredient Turkey Meatballs

ELEVEN YEARS AGO: Swedish Meatballs and Egg Noodles

TWELVE YEARS AGO: Italian Easter Pie

THIRTEEN YEARS AGO: Black Olive Bialy

AIR-FRYER CORN RIBS

Note added after publication: I now tried the air-frying with whole corn cobs, and it worked great also! So if you are afraid to cut the cobs (I don’t blame you), go ahead and try it this way. I rubbed the cobs with the seasoned oil, placed at 390F for 16 minutes, turning them around every once in a while. Perfect! Not as cute as the ribs, but definitely safer.


Apparently this recipe went viral on TikTok. I can understand why – it is unusual, cute, and dangerously addictive. However, in my humble opinion, the videos showing how they prep the corn are misleading. It is a dangerous maneuver, and not at all easy to do. I modified the technique by microwaving the corn before cutting it into “ribs”. It did not harm the final product and made a very tricky step a little more user-friendly.

AIR-FRYER CORN RIBS
(adapted from several online sources)

3 ears of corn
1/4 cup olive oil
1 tsp Southwest spices
1/4 tsp smoked paprika
salt to taste
squirt of lemon juice
grated Parmigiano to serve

Wrap the corn cobs in plastic wrap and microwave for 5 minutes. Allow it to cool until you can handle.

Cut the corn cob lengthwise in ribs – you will still need a large knife and maybe use something to bang on the top of it to make it slice through. I have a lower-quality knife with a large blade that can take that abuse.

Whisk the oil, spices and lemon juice in a small bowl, then drizzle all over the ribs of corn in a large bowl. Make sure to rub the mixture well. Place in the air-fryer and set at 400F (or as high as your machine will go) for 10 minutes, moving them around half-way through frying time. Season with more salt if you like, and sprinkle cheese on top.

ENJOY!

to print the recipe, click here

Comments: This is a real keeper of a recipe! The corn gets a perfect texture, and you can vary the spice mix to take it in any direction you like. Many versions will serve it with a sauce, often mayo-based, but we liked it plain. I don’t think you can pull the exact same quality without the air-fryer, but maybe if you roast it at 450F it might get close. Super delicious. Trust me. Prepping the corn is not fun but once you bite into these little morsels you will feel it was all worth it.

I cannot express how much I love them! I ate four, and went back for two more, which was pretty much half the amount prepared. We had no leftovers. I don’t think I ever consumed as much corn in a single sitting. Plus, I smiled and oohed and aaahed all the way through it.

ONE YEAR AGO: Lemony Chicken Thighs with Artichokes and Olives

TWO YEARS AGO: Farari Bateta

THREE YEARS AGO: Covid-19, Keeping yourself safe

FOUR YEARS AGO: Carrot Cake Macarons

FIVE YEARS AGO: Soup Saturday: Say Goodbye to Winter

SIX YEARS AGO: Manchego and Poblano Soup

SEVEN YEARS AGO: A Smashing Pair

EIGHT YEARS AGO: Spinach and Mushroom Stuffed Pork Tenderloin

NINE YEARS AGO: Crispy Chickpea and Caper Spaghetti

TEN YEARS AGO: Spring has Sprung!

ELEVEN YEARS AGO: Chickpea and Fire Roasted Tomato Soup

TWELVE YEARS AGO: Double Asparagus Delight

THIRTEEN YEARS AGO:  Sun-dried Tomato and Feta Cheese Torte