PEAR, BLUE CHEESE & WALNUT SALAD

One of the gifts we’ve received during the holidays was a super special box of Royal Riviera pears from Harry and David.  Inside the box, a little card with a recipe for a salad that would make the pears shine.  They ship the pears slightly unripe, with instructions on the best way to store them as they reach their peak, and also on how to tell when they get there.  We had to wait for a little less than a week, then enjoyed the juiciest pears ever!   The salad? It was so good that we made it again a couple of days later… Come to think of it, that in itself is a huge endorsement, because I tend not to crave salads during the cold months of the year.

Rogue Valley Salad

ROYAL RIVIERA ROGUE VALLEY SALAD
(recipe adapted from Harry & David)

for the dressing:
2 tbsp Champagne vinegar
1 tbsp Dijon mustard
1 tsp agave nectar
1/2 tsp sea salt
1 tsp freshly ground pepper
1/2 cup walnut oil (I used less)

for the salad:
1 head butter lettuce, washed and dried
1 large Royal Riviera Pears, peeled, cored and sliced
1/4  cup Rogue Creamery or other blue cheese, crumbled
1/2 cup  toasted walnuts

Make the dressing: Mix together the first five ingredients. Gradually whisk in the walnut oil. Chill for 20 minutes.

Gently tear the lettuce into bite sized pieces. Arrange on four chilled plates. Top with fans of pear slices. Sprinkle blue cheese evenly over the pears and lettuce and top with nuts. Drizzle the dressing generously over the salad, and serve at once.

ENJOY!

to print the recipe, click here

Pears

The recipe calls for 1/2 cup of walnut oil, I used a lot less than that but kept the other amounts the same. I like my salad to be just barely coated with dressing and prefer it a little less oily. Also, considering the price for walnut oil, I rather use it with a little less abandon.  😉   On my second time preparing this recipe, the dressing was similar, but instead of walnuts I used very thinly sliced celery.  I mixed the celery with the dressing as it chilled for 20 minutes and then incorporated both into the other components.  Two pears were consumed in the name of this delicious salad, the others we enjoyed late at night, usually watching nice movies…  Like the trilogy:  Before Sunrise, Before Sunset, and Before Midnight.  I highly recommend those, Julie Delpy is simply superb!

ONE YEAR AGO: Keema Beef Curry

TWO YEARS AGO: Pork Tenderloin with Soy, Ginger, and Lime

THREE YEARS AGO: No-Fuss Coffee Cake

FOUR YEARS AGO: Swedish Limpa

THE AVOCADO MOUSSE THAT STOLE THE SHOW

MERRY CHRISTMAS!   FELIZ NATAL!  JOYEUX NOËL!

This year we had a pre-Christmas celebration with one of my stepsons, because he had to fly back to California on the 23rd. The evening before his departure we made a special dinner that featured the whole menu of a recent show from the one and only Marcela Valladolid, entitled “My Favorite Holiday Dishes“.  The main dish was Pork with Prunes and Pineapple Glaze (on the blog soon), and I expected it to be the star of our meal, but truth is that the first course,  a simple, unassuming avocado mousse put up a great fight and according to some, took the Christmas Eve spotlight…  😉

Avocado Cilantro Mousse
AVOCADO AND CILANTRO MOUSSE
(slightly adapted from Marcela Valladolid)

1 to 1 + 1/2 bunches fresh cilantro, washed and dried, leaves picked off and reserved (about 2 cups loosely packed)
1  avocado (I used two small ones)
1 (8-ounce) package cream cheese, at room temperature
1 teaspoon salt
1 tablespoon fresh lime juice, from about 1 lime
1 Serrano chile, stemmed, seeded, deveined, and roughly chopped
1 cup cold water, divided
2 (1/4-ounce) envelopes unflavored gelatin
.
Spray 3 (1 cup) or 6 (1/2 cup) ramekins with vegetable oil cooking spray.

Place the cilantro, cream cheese, avocado, salt, lime juice, and chile in a food processor and puree until smooth.
.
Pour 1/4 cup water in a small bowl. Sprinkle the gelatin over the water and let it sit for a few minutes. Place the remaining 3/4 cup water in a small saucepan and bring to a boil. Pour the boiling water over the softened gelatin and whisk until the gelatin has dissolved.
.
Add the gelatin to the mixture in the food processor, pulsing until pureed and thoroughly blended.
.
Pour the mixture into the prepared ramekins. Cover with plastic wrap and refrigerate until firm, about 2 hours. To unmold, fill a large container with very hot water. Dip the ramekins in the water for 1 minute. Run a small, sharp knife tip around the edge of each mousse. Invert onto a platter. Let stand at room temperature for 20 minutes before serving.
.
ENJOY!

to print the recipe, click here

Comments:  I made my own tortilla strips to serve alongside the mousse, and I must say the work involved is minimal, but the pay-off huge.  They were so much better than store-bought versions, both in texture and flavor.  I just cut some yellow corn tortillas into strips, placed them on a baking sheet, sprayed with olive oil, and coated very lightly with salt and more liberally with Southwest Spice mix from Penzey’s.  Baked at 375F until  they start to crisp up and get brown.

The mousse… WOW!  We started enjoying it quite politely, a little bit spread on a cracker, a little more on a tortilla strip, but by the end of the dinner we were slicing it and adding the cold slice on top of the pork tenderloin and moaning about it…  We decided it will go well with pretty much anything, from grilled salmon to lamb burgers, and in case of emergency, licked from the tip of a finger when no one is looking.   It is THAT good.  Please, make it for your next dinner party, and stop by to thank me later… 😉

ONE YEAR AGO: Sourdough Popovers

TWO YEARS AGO: Merry Christmas!

THREE YEARS AGO:  Sourdough Focaccia, with a twist

FOUR YEARS AGO: Merry Christmas!

BRAISED FENNEL WITH SAFFRON AND TOMATO

This side dish is elegant and luscious. Perfect to pair with chicken, pork or a mild fish like cod or sea bass. But, if you prefer to walk the vegetarian path, enjoy it over farro, barley, or as we did, a colorful quinoa.  Add a hearty loaf of bread, and you will be all set…

Fennel with Tomato Saffron1

The recipe is published in  Vegetable Literacy  the latest cookbook from Deborah Madison. Lisa  from “Lisa is Cooking” wrote a great review about the book a few months ago, and shared a recipe from it, check it out by jumping here. Deborah Madison has the amazing ability of bringing the best out of the most humble vegetable. I do not own a copy of this particular book (bravely resisted so far), but her classic Vegetarian Cooking for Everyone is part of our collection.

The recipe is available online, just click here.

composite

Definitely the most important advice is to take the time to brown the fennel well, that will ensure a deeper flavor in the end.  I don’t recommend this dish for those who have issues with fennel, because its flavor is very prominent.  I crumbled goat cheese over the braise, allowing it to melt down in the liquid, and right before serving added the greens from the fennel, minced. As the recipe states, if your fennel bulbs came without the tops, use parsley instead. My main modification from the published recipe was to squeeze a little lemon juice all over, and reduce slightly the amount of tomato paste. I thought three tablespoons seemed excessive, so I added only two.  Capers and saffron are fantastic together, by the way.

Served
Because we have nothing against a little meat with our veggie goodness,  a boneless, grilled chicken breast was part of our dinner too.  As far as looks are concerned, I suppose a fully white quinoa would have been better, but the bag of tricolor quinoa acquired months ago at a Trader Joe’s was winking at me from the pantry.  I spooned a little of the braising sauce over the chicken, so that it all got tied together in a beautiful caper & saffron glory!

platedDinner is served!

ONE YEAR AGO: Revenge of the Two Derelicts

TWO YEARS AGO: Grilling Ribbons

THREE YEARS AGO: Peppery Cashew Crunch

FOUR YEARS AGO: Baked Shrimp and Feta Pasta

MISO SOUP, A JAPANESE CLASSIC

Post dedicated to the memory of my Dad, who today would be 93 years young…

When the weather chills down, we always have a bowl of miso soup to start our sushi dinners. I’ve never had a bad miso soup, but some are definitely better than others. Considering the very few ingredients that go into this soup, it’s clear that technique matters. Last Friday we were so tired that the idea of going out to eat seemed like too much effort, so we resorted to take-out sushi from one of our grocery stores, which is actually pretty nice. Since they don’t offer miso soup, I decided to make my own. Read a bunch of articles, and felt ready for the challenge.  It turned out delicious: soothing, with a mild flavor and smooth consistency. That is actually the most important aspect of a miso soup: it should not be grainy.

miso1

MISO SOUP
(from the Bewitching Kitchen)

4 cups water
1 tsp instant dashi (see comments)
4 Tbsp white miso
firm tofu, cut in cubes
green onions, light and green parts, thinly sliced

Boil the water in a large saucepan, add the instant dashi and mix until dissolved. Turn the heat off, keep the pan with the lid on to retain heat.

Place the miso in a small bowl, add a small amount of the very hot water/dashi, whisk to completely dissolve the miso, so that no lumps stay.

Add the miso to the original saucepan with the rest of the dashi, mix.  Add the diced tofu, let the pan covered for a couple of minutes as you place green onions inside the serving bowls.

Laddle the miso soup with pieces of tofu in each bowl, and serve immediately.
.
ENJOY!
.

to print the recipe, click here

ingredients

Comments: Obviously one cannot make miso soup without miso, but apart from that, lots of variations are out there.  Some recipes use water, some vegetable stock, others call for chicken stock.  However, for the real, authentic Japanese flavor, dashi is the way to go.  I admit to using a shortcut in my version, though.  I used instant dashi instead of making a broth with its two traditional components: seaweed and bonito flakes.  I had both ingredients at home, but when I made this soup they were somewhere in that twilight zone of boxes kept in the garage, as our kitchen is waiting for the green light from the crew working on its hellnovation.  Sanding floors and cabinets generate an amount of fine dust that you simply do not want to have over every little item in your pantry.  So, I took the easy way out and bought a little bottle of instant dashi.   It is actually a very nice ingredient to have laying around, a handy source of the funky-elusive fifth flavor, umami.
.

composite.

Once you have dashi (or make it from scratch),  all you’ll need is some miso and firm tofu. Green onions are a great addition, but not mandatory.  You can use either type of miso, white or red, they differ in the fermentation time, and resulting flavor. White miso will be milder.  Follow the instructions to a T, because the main thing to avoid is boiling the miso once it’s added to the dashi: that leads to an unpleasant grainy texture.  I also like to cut my tofu in small pieces and add to the pan for a couple of minutes before serving the soup.  That allows the tofu to absorb the flavors of the miso more efficiently.   With those two tips in mind, you will be on your way to a great bowl of soup to warm you up on the chilly evenings ahead.
.

daddy1Dad dancing with my niece Fernanda…

(No, he would not touch miso soup even if his life depended on it… ) 😉

ONE YEAR AGO: On my desk

TWO YEARS AGO: A must-make veggie puree

THREE YEARS AGO: Vegetarian Lasagna

FOUR YEARS AGO:  Brazilian Pão de Queijo

SECRET RECIPE CLUB: LINGUINE WITH CAULIFLOWER PESTO

Linguini Cauliflower Pesto

A sensible person evaluates a situation and chooses a path of action that is compatible with it.  For example: a sensible food blogger whose kitchen is undergoing renovation would take a break from The Secret Recipe Club to be back once she actually has a place to cook.  I did consider that option for a while, say… 5 seconds.  😉 So, throwing caution to the wind, here I am to join once more the virtual party in which bloggers are paired in secret to cook recipes from their matched blog.
.
Last month was my 2nd anniversary with SRC, so this post opens my third year with the group. And what could be better for an “old-timer” than to be paired with a new member?  I was assigned Vintage Kitchen Notes, hosted by the beautiful  Paula, who just joined SRC. She cooks and blogs from Argentina, right next door to my home country. Paula blogs in English, but she also keeps another blog in Spanish – talk about blogging stamina!  I actually tried to include recipes in Portuguese for a while, but quickly realized it was too much of a struggle for me.  So, I am in awe that Paula can do it all!  Her photography is beautiful, I had a wonderful time browsing her site. Let me share a few of her concoctions that were particularly tempting to me: 8-Hour Cheesecake with Roasted GrapesLimoncello-Glazed Citrus Poppy Seed Cake, Chocolate-Hazelnut Mini-Bundt Cakes (gorgeous!), Pastel Azteca (gotta make that sometime), Roasted Radicchio and Provolone Risotto (go drool over the photo, will you?), and just to tempt my bread baking addiction, she has more than 40 different bread recipes listed on her index.  I will just mention one: Soft Pretzels with Spicy Beer Cheese Sauce.   I’ve always wanted to make soft pretzels at home, but that will have to wait for calmer days.
.
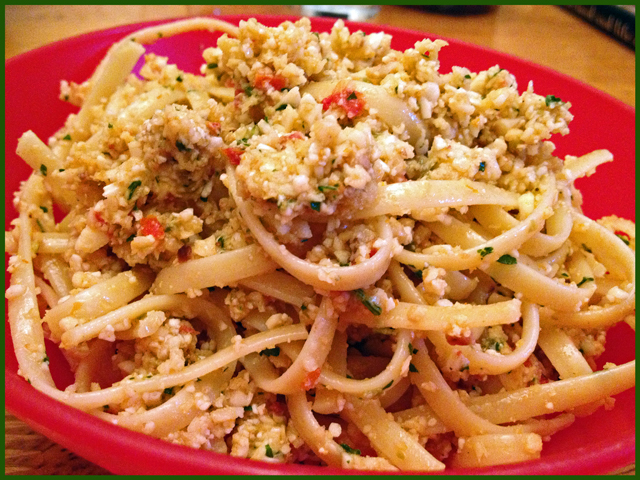
Since our kitchen looks like a war zone.  I ended up choosing a very intriguing recipe that required only the food processor and one pan to cook the pasta.  Seemed doable under the circumstances.  So, I am delighted to share with you my first experience with a cauliflower pesto!

closeup

LINGUINE WITH CAULIFLOWER PESTO 
(from Paula, at Vintage Kitchen Notes, originally adapted from The Smitten Kitchen Cookbook)
.
1 pound (450g) fresh cauliflower
1 medium shallot, quartered
pinch of red pepper flakes
½ cup toasted almonds
2 oz. (60g) Asiago cheese
4 sun-dried tomatoes, dried-packed
1 Tbs drained capers
2 Tbs chopped fresh parsley
salt and pepper to taste
1/3 cup olive oil (I used 1/4 cup)
1 teaspoon sherry vinegar (I added 2 tsp)
1 pound linguine
.
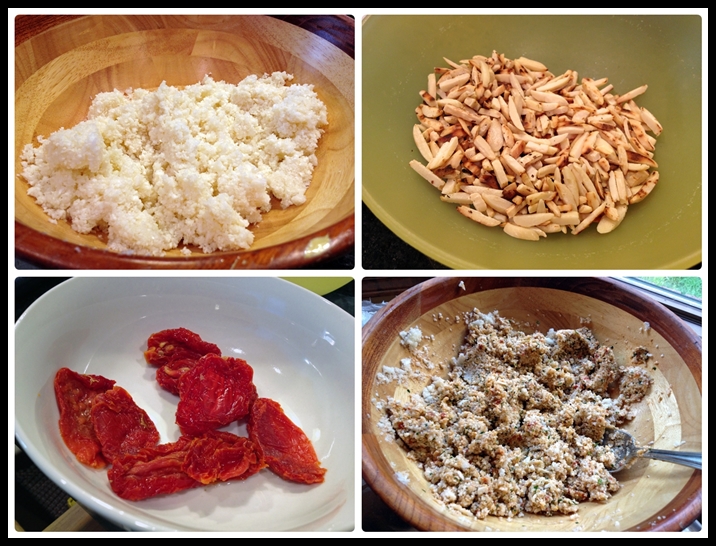
Cover the sun-dried tomatoes with boiling water in a small bowl and let them stand for 5 to 10 minutes to soften. Drain well and chop them coarsely. Rinse the cauliflower, cut off the leaves and hard stalks.  Cut the rest into chunks, and add to a food processor, processing them until they are more or less the texture of couscous. Transfer to a large bowl and reserve while you prepare the other ingredients.
.
Add to the food processor the pieces of shallot,  pepper flakes, almonds, cheese,  sun-dried tomatoes, capers and parsley. Process until they´re as fine as the cauliflower. Season with salt and pepper. Add oil and vinegar and pulse until a paste forms. If you feel it´s too dry for your taste, add another tablespoon of olive oil.
.
Transfer to the bowl with the cauliflower, check the mixture  for salt and pepper and add more if necessary.
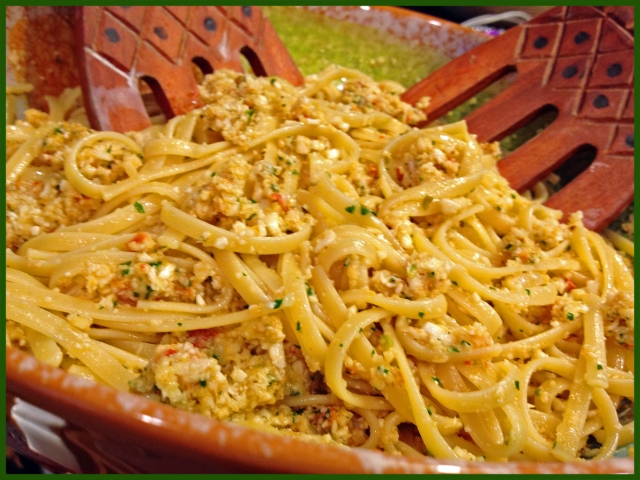
Cook the linguini until al dente in plenty of salted boiling water.  Reserve some of the cooking liquid, and drain the pasta, transferring to a serving bowl.   Add some of the pesto and mix gently.  If necessary, add some of the reserved cooking liquid. Add the remaining pesto, sprinkle with grated cheese, a few parsley leaves and serve immediately.
.
ENJOY!
.
to print the recipe, click here
.

composite11

Comments:  You might remember that Phil is not too wild about cauliflower, so I  was hoping to prepare the pesto while he was doing something outside, maybe playing golf or trimming tree branches.  My plan almost worked but not quite. I had cleaned all the “remains” of the cauliflower from the crime scene,  but he caught a glimpse of the processed cauliflower, and…

What is this? some exotic type of rice?

This? No, not rice.
(quickly moving the bowl away from view)

Hummmmm… couscous?

 No, not really…

What IS it?

I cannot quite tell you.  It’s a surprise. It’s going to be a pesto..  A surprise pesto..    

Pesto? Great, I love pesto!

😉 😉 😉 😉

served

Verdict: Two very enthusiastic thumbs up for this pasta! I can understand why Paula made this dish twice in  the same week. One could imagine the raw cauliflower to be too sharp and omnipresent in the pesto, but it’s not.  It is just a perfectly balanced dish, with the capers, the vinegar, the sun-dried tomatoes, the parsley,  a real winner.  I divulged the “secret ingredient” of the Secret Recipe Club concoction to Phil, and he was amazed.  The heat of the pasta slightly changes the texture of the cauliflower, taming its raw taste.  I highly recommend you try this recipe.  If you use the reduced amount of oil I did, make sure to save some of the pasta cooking liquid to adjust the consistency at the end.  If it still seems too thick, swirl a little olive oil right at the table.

Paula, it was great to get your blog this month, I hope you had fun stalking and cooking from your assigned site!

For a delicious collection of tasty dishes prepared by my friends from Group D of SRC, click on the blue frog at the end of the post…

ONE YEAR AGO: Carriage House Apple-Walnut Pie

TWO YEARS AGO: Chicken Marsala

THREE YEARS AGO:  Home, sweet home

FOUR YEARS AGO: Levain Bread with Caramelized Onions