TANGENTIAL QUICHE WITH ASPARAGUS AND FENNEL

I would like to thank everyone who contacted me about my Mom’s passing.
It is a natural cycle of life to say goodbye to a parent, but it is still very painful.
Your kind words warmed my heart.

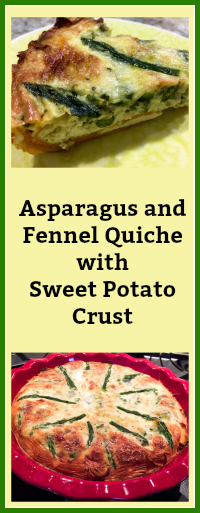
I’ve taken way too many liberties with recipe titles. Hummus without chickpeas? Yes, guilty of that one. Tortillas with no corn? Read my sentence. Rice-free risotto? Just take me. Today I add one more to the list. A quiche. But no crust. In fact, I’ve made a version almost exactly one year ago using sweet potato slices to cover the pie dish. We loved it so much that it’s hard to believe it took me so long to re-visit. This time I paired asparagus and fennel, with a small amount of cheese for good measure. Trickiest part of this recipe is getting the sweet potato slices to roast without shrinking too much and collapsing from the sides of the dish. Still, even if that happens, no major harm will be done. It is all going to be delicious.

SWEET POTATO CRUST QUICHE WITH ASPARAGUS AND FENNEL
(inspired by The Wimpy Vegetarian)

2 tablespoons olive oil
2 sweet potatoes, peeled, sliced thin
olive oil spray for potatoes
kosher salt (about 1 teaspoon total)
freshly ground pepper to taste
1 cup thinly sliced asparagus plus a few stalks left whole for decoration
1 large fennel bulb, diced
4 large eggs
2 egg whites
½ cup half-and-half
½ cup milk
1 teaspoon mustard powder
1/4 cup Gruyere cheese
nutmeg to taste

Heat oven to 400°F.

Coat a pie dish with the sliced potatoes, and spray a good amount of olive oil over the slices. Make sure to do a nice layer all around the edges coming up above the rim of the plate. Season lightly with salt. Place in the oven until the potatoes start to get some color, about 12 minutes. Reserve and lower the oven to 350 F.

Heat 2 tablespoons oil in a skillet over medium-high heat.  Add the asparagus and fennel, season with salt and pepper, and sauté until just tender, about 8 minutes; set aside. Place the whole stalks in a microwave safe dish with a little water, microwave for 30 seconds. Reserve.

Whisk eggs, egg whites, half-and-half, milk, mustard powder,  half teaspoon salt and pepper in another large bowl. Spread the sautéed asparagus and fennel evenly on top of the sweet potato crust. Sprinkle the cheese on top of the vegetables. Pour the egg mixture over it all. Place the stalks of asparagus carefully on top. Grate fresh nutmeg across the top just before sliding into the oven.

Bake until quiche is set and crust is well browned, about 30 minutes, but check after 25 minutes in the oven. It should just jiggle lightly at the center.  Let cool to room temperature before cutting into wedges.

ENJOY!

to print the recipe, click here

Comments: I love fennel but despise licorice. Go figure that one. My problem with fennel is that you buy this huge bulb and by the time you’re done prepping it, you are left with 1/4 cup at most of goodness. Oh, well. Maybe I don’t do a good job prepping it. But all instructions say to remove the tough outer layer. That “outer layer” is often so thick, a huge amount of fennel is gone once I remove it. Oh, well again. But I do love its flavor, both raw in salads, roasted, sautéed, it’s all great.  I am still learning my way around the sweet potato “crust.”  If you go to Susan’s site, you’ll  notice she opted for a hashbrown path to make the crust. That is definitely something to consider. At any rate, a quiche without the regular crust is so much lighter, and a lot quicker to prepare too. Obviously, you could omit the crust altogether, just coat the pie dish with a little butter or oil, add the veggies, pour the egg mixture and bake it. But it’s nice to have a bit of texture underneath.  Whatever you choose to do, this filling with asparagus and fennel, a touch of Gruyere (a favorite cheese of mine) is a winner.


Add to FacebookAdd to DiggAdd to Del.icio.usAdd to StumbleuponAdd to RedditAdd to BlinklistAdd to TwitterAdd to TechnoratiAdd to Yahoo BuzzAdd to Newsvine

ONE YEAR AGO: Fakebouleh

TWO YEARS AGO: Yellow Squash Soup

THREE YEARS AGO: Grilled Chicken with Tamarind and Coconut Glaze

FOUR YEARS AGO: Chicken-Apricot Skewers

FIVE YEARS AGO:  Asparagus Quiche

SIX YEARS AGO: Two-stage Pea and Prosciutto Risotto

SEVEN YEARS AGO: Mellow Bakers: Corn Bread


ZUCCHINI FRITTATA WITH ROASTED TOMATOES AND GOAT CHEESE

Sometimes inspiration for a meal comes from unexpected sources. My friend Denise sent me a message with a photo of her dinner and four simple words: you must make this. She got it in a publication from her grocery store in England, showcasing their seasonal fresh ingredients. It joined zucchini with roast tomatoes and goat cheese, and looked great.  I ask you, what’s not to love? To make things even more interesting,  the zucchini receives the spiralizer treatment, although you could obviously do a coarse shred or a fine slicing. Don’t let the lack of a spiral cutter stop you. I used my Tarte Tatin pan, which sits patiently in the pantry waiting for the opportunity to shine. It is simply perfect for this type of recipe, so if you own one, open your horizons beyond the classic French dessert.

ZUCCHINI, ROASTED TOMATOES AND GOAT CHEESE FRITTATA
(adapted from Lakeland, UK)

12 cherry tomatoes
1 tbsp olive oil
15g butter
1 medium shallot, sliced
1 large zucchini, spiralized (use green or yellow, depending on availability)
5 eggs
2 tbsp heavy cream
1 tsp herbes de Provence
Salt & freshly ground black pepper
125g goat cheese, crumbled
kalamata olives, pitted and halved, to taste

Heat the oven to 400 F (200 C).  Place the cherry tomatoes on a small roasting tray and drizzle over the olive oil. Cook for 10 minutes and set aside.

Meanwhile, melt the butter in a round, non-stick 8-inch pan that can go in the oven,  brushing it over the entire base and up the sides to prevent the frittata from sticking. Cook the sliced shallot over a medium heat until softened. Add the spiralized courgette and cook for 2-3 minutes, until slightly softened.

Whisk the eggs in a Pyrex cup, add the herbs the Provence and season with salt and pepper. Add the eggs to the pan with the crumbled cheese, and top with the roasted tomatoes and black kalamata olives.

Cook over a low heat for 10-15 minutes, until the frittata is beginning to set, but the top is still a little runny. Finish off under a hot oven until the top of the frittata acquires a golden color. Leave in the pan for 1-2 minutes before turning out onto a plate and cutting into wedges.

ENJOY!

to print the recipe, click here

Comments: This goes for our regular rotation, for sure! I think I slightly overcooked the bottom of the frittata this time, but it did not compromise the flavor at all. From the original, I had three modifications. Used herbes de Provence instead of rosemary (a texture thing for me), added a little heavy cream to the egg mixture, and included kalamata olives as topping.  Because, as you might have heard years ago, I am a kalamata-cheerleader. We had a couple of very tiny slices as leftovers, and they were still quite amazing after a brief heating in our small electric oven, just to kill the cold from the fridge.

A very simple and flavorful dish, that you can modify to suit your taste with different veggies, herbs, and maybe adding some coconut milk instead of heavy cream. Yes, that could work quite well…

Add to FacebookAdd to DiggAdd to Del.icio.usAdd to StumbleuponAdd to RedditAdd to BlinklistAdd to TwitterAdd to TechnoratiAdd to Yahoo BuzzAdd to Newsvine

ONE YEAR AGO: Playing with Pectinase

TWO YEARS AGO: Poached White Asparagus with Lemon and Pistachios

THREE YEARS AGO: Dan Lepard’s Saffron Bloomer

FOUR YEARS AGO: Fesenjan & The New Persian Kitchen

FIVE YEARS AGO: Quinoa Salad with Roasted Beets

SIX YEARS AGO: Pasta Puttanesca

SEVEN YEARS AGO: Miche Point-a-Calliere


AIR-FRIED CARROTS, TWO WAYS

No air-fryer? No worries. Both recipes can be prepared without it.

Lolita, the newest member of our gadget family, has been pretty busy these days. I had only one failure: air-frying broccoli, but even that was not a major catastrophic event. It was just a bit tricky to control the cooking of the crowns. Some bits of their external surface got overcooked and ended up with a harsh texture. Maybe a lower temperature would work better. At any rate, that recipe needs tweaking before I share with you. Moving to carrots, I offer two recipes that could not be simpler. First, air-fried carrots with a touch of honey. And then, a batch of shoestring fried carrots that were pretty much inhaled by the two of us. A bit of an argument happened when two lonely strands were left in the bowl. As often happens, the tropical charm spoke louder, and they both went into my belly. Oh, well. By the way, if you don’t have an air-fryer, follow the link to the recipe as shown in The Kitchen, that calls for deep-frying. It will be a bit more caloric, but still less so than the potato version. Plus, I bet kids will love them. One efficient way to deliver veggies to picky eaters.

AIR-FRIED CARROTS WITH HONEY
(from the Bewitching Kitchen)

2 to 3 cups of carrots, cut in 1/2 inch pieces
1 tablespoon olive oil
1 tablespoon honey
tiny drizzle of soy sauce
salt and pepper to taste

Set air-fryer to 390 F.

Place the cut carrots in a bowl, add olive oil, honey and soy, toss gently to coat, trying to cover all surfaces with a bit of oil. Season carrots with salt and ground black pepper. Place in the basket of your air-fryer and cook for about 12 minutes, shaking the pan every once in a while.  Serve right away.

If you don’t have an air-fryer, roast in the oven at 420F until done.

ENJOY!

to print the recipe, click here

Comments: I’ve made these carrots three times. Compared to roasting them in the oven, I would say Lolita is faster, and also gives a different texture, quite pleasing. Leftovers were still very nice with a brief encounter with microwaves. Probably even better warmed up in a regular oven, but when lunch time comes, we opt for the simplest, fastest route to go back to work.

And now for a nice variation on shoestring potato fries. These are much lighter and surprisingly tasty!


SHOESTRING AIR-FRIED CARROTS
(adapted from Food TV The Kitchen)

1 bag (10 ounces) of julienned carrots (sold for cole-slaw)
1 tablespoon olive oil
salt and pepper to taste
apple cider vinegar in a spray bottle
1 teaspoon orange zest

In a medium bowl, mix the carrots with the olive oil, coating them lightly. Try to coat all pieces of carrots. Season with salt and pepper.

Place the carrots in the air-fryer set at 390F. Cook for 13 to 16 minutes, mixing them around every few minutes.

Remove when they start to get nicely brown, watch them closely because pieces might get too dark very quickly. Transfer them to a serving bowl, add orange zest, spray a little apple cider vinegar, adjust seasoning with more salt and pepper if needed. Serve right away.

ENJOY!

to print the recipe, click here

Comments: I will warn you that the air-fryer (at least the model we have) will not hold more than one 10-ounce bag of shredded carrots. And they will shrink A LOT  during frying, as the water content of carrots is pretty high. At first you will see them shrinking, shrinking, getting kind of limp. Until all the water evaporates, they won’t brown.  So you will be left with a small amount of carrots, but perfect for two.  I would say that the main concern with the air-fryer is the amount of food it can handle. For a couple with no kids, it’s a very nice gadget. If you have kids around, you might have to cook food in batches. However, my niece in Brazil has three young kids and she still loves her fryer, so take my comment with a grain of salt.

The idea of using mini-spray bottles for vinegar is pure genius! It allows you to add just a little touch on the food. You can find those for very cheap in grocery stores, sold usually in a bag together with other types of bottles for traveling. I had no use for the spray one, it was hanging around my bathroom, neglected and lonely. Well, it’s now in my pantry, ready to play!

I’ve made these carrots twice already, first time I simply shook the basket every few minutes, and did not notice that the bottom layer was getting very dark and not moving around with my delicate shaking. Second time I used tongs to move the carrot pieces more efficiently. Worked like a charm.  Of course, if you don’t have an air-fryer, you can deep fry them and they will turn out delicious. I just hate dealing with the leftover oil, and find deep-fried food a bit heavy and hard to digest. Bottom line is, Lolita is working quite nicely for us!

Add to FacebookAdd to DiggAdd to Del.icio.usAdd to StumbleuponAdd to RedditAdd to BlinklistAdd to TwitterAdd to TechnoratiAdd to Yahoo BuzzAdd to Newsvine

ONE YEAR AGO: Five Minutes in L.I.T (a tour of our laboratory!)

TWO YEARS AGO: Chicken Thighs with Artichokes and Capers

THREE YEARS AGO: Pea Pancakes with Herbed Yogurt

FOUR YEARS AGO: Mushroom Stroganoff

FIVE YEARS AGO: Tomato Sourdough

SIX YEARS AGO: Gamberetti con rucola e pomodori

SEVEN YEARS AGO: Flirting with Orzo

LOLITA JOINS THE BEWITCHING KITCHEN!

Please allow me to introduce the newest member of the family,
Lolita, our air-fryer!

She arrived last week, after a lot exchanges between me and my niece Raquel in Brazil, who owns the exact same model and had been twisting my arm to get one. Then, my friend Karen joined forces with Raquel, even though they’ve never met. A virtual conspiracy of sorts. Karen brought her air-fryer to play and teased me with drool-inducing chicken wings. Take a look at them here. So, I went back and forth, back and forth, bought a cookbook to help me decide, lost hours of sleep tossing in bed. Turn to the left, I’m going to buy it. Turn to the right, do I really need it?  Of course, Phil was close witness to my personal drama. It is possible that he got a bit tired of some of my evening monologues as I walked around the kitchen, cookbook in hand, reading some of the recipes out loud. Although, seriously, who could get annoyed by that? Right? Anyway, all I know is that one morning he informed me that a Philips air-fryer was on its way. Sorry, ladies, the husband is taken.

First experiment: Russet Potato Fries

This is really a non-recipe.  Get Russet potatoes and cut them in slices, mine were around 1/2 inch, but quite variable. I wanted to see how the fryer behaved and optimize the size for the next time around. To a pot of salted boiling water, add the slices and parboil them for 4 minutes. Drain and dry. Once they are dry, place them in a bag or container and gently toss with a couple of teaspoons of olive oil, a sprinkle of salt (you will add more salt later once they come out of the fryer).  Try to coat each slice with oil, but no need to go crazy with it. Some recipes recommend you shake them in a bag, I was afraid they would start breaking, so I just tossed them with my hands inside a bowl.

Add them to the fryer set at the highest temperature, which in my model is 390F. Set the timer for 25 minutes, place the potato slices in the basket, and fry away. Shake the basket every 5 minutes or so, and keep an eye on them. Depending on the thickness of the slices and the power of your machine, they can take a little more or a little less to get brown and cooked.

Remove the fries to a serving dish, season with more salt and pepper to taste, and ENJOY!

Comments: I was over the moon with these fries, because of course I was worried about my beloved’s investment. They were really good. One thing that becomes evident is how much oil we consume when enjoying “regular”, deep-fried potatoes. These have a nice crust, but the inside feels more like a boiled potato, creamy, no taste of fat. You know how when you grab fries your fingers get all oily, and your lips might end up a bit oily too? None of that happens here. Are they as good as regular fries? That is a tough question. In all honesty, when you have regular fries for some reason it is easy to over-indulge. These are satisfying but don’t make you compulsively inhale them. I made three Russet potatoes into fries, they were not very big, medium size. We had enough for our dinner and offered some to certain four-legged beings that were nearby. Happy tail wagging was observed. Experiment concluded.

Second experiment: Sweet Potato Chips

Or, if you happen to be in Great Britain, Sweep Potato Crisps. I confess I like that name even better…


For this adventure, I enlisted help of another interesting kitchen gadget, the spiralizer. I used the ribbon blade to cut two sweet potatoes. With regular veggies, you’ll end up with long ribbons, perfect to mimic pasta, think of a very large pappardelle. The sweet potato is hard, so the ribbons break and turn into pieces quite suitable for frying.

Of course, you can use your knife skills and cut them uniformly. After slicing, I decided to soak them in cold water. Some recipes skip that step, but it’s clear that doing it results in crisper chips, which was my ultimate goal. I did that on a Sunday afternoon, just placed them in the bowl of water and there they stayed for a few hours. You could do the step of soaking and drying several hours in advance, if pressed for time. Then it’s all a matter of adding the slices to a bowl, coating them with olive oil, seasoning with salt, or any other spices you’d like, smoked paprika, cumin, cayenne, chili. I set the temperature to 360F, which is what I saw recommended in the Phillips manual. They were ready in about 25 minutes, with shaking at several time points, as I could not stop opening the basket and peeking inside.  The photo below gives a glimpse into their frying progression. Loads of fun.


From top to bottom, clockwise… The slices just ready to start air-frying, then after 5 minutes, 10 minutes and 15 minutes (ten minutes left on the timer). They were actually ready before the timer went off, for a total air-frying of 22 minutes. Not bad at all…  If you get your prep work done in advance, sweet potato chips can be enjoyed pretty quickly. And yes, they were very crispy and delicious!  The Philips model heats up very fast, they advise you to wait 2 to 3 minutes before placing the food inside. Experiment concluded. Scientists happy and well-fed.

I have quite a few recipes lined up for future experiments. If you have an air-fryer, I highly recommend this cookbook by Meredith Laurence. it is the one with the best reviews at amazon, and I can understand why. Very creative use of the fryer, with recipes that might surprise you a little. Like Molten Chocolate Almond Cakes… See? I told you!

Add to FacebookAdd to DiggAdd to Del.icio.usAdd to StumbleuponAdd to RedditAdd to BlinklistAdd to TwitterAdd to TechnoratiAdd to Yahoo BuzzAdd to Newsvine

ONE YEAR AGO: Cashew Cream Sauce

TWO YEARS AGO: Blood Orange Margaritas

THREE YEARS AGO: Smoked Salmon Appetizer

FOUR YEARS AGO: Clementine Cake

FIVE YEARS AGO: Springtime Spinach Risotto

SIX YEARS AGO: The end of green bean cruelty

SEVEN YEARS AGO: Torta di Limone e Mandorle

Save

Save

Save

Save

Save

INCREDIBLY SIMPLE TIMES FOUR

Here I am to share with you not one, not two, but four recipes that are so simple you could make them in your sleep. Each delivers a lot more than you’d expect in flavor and you will find yourself making them again and again. Not necessarily in your sleep.

composite

From top to bottom, left to right, here they are:

CHEESE JALAPENO CRACKERS. Credit should go to Angela, from Divalicious Recipes.  Recently she composed a post with 50 ideas for low-carb appetizers very well-timed for a Super Bowl party.  These crackers are pure cheese, with a kick of Jalapeno. I made only eight for the two of us. There was a bit of an argument over the last one, we could not quite agree on who had the right to grab it. I won. Determination is everything.

crackerstutorial

My version, 50:50 Monterey-Cheddar & Parmigiano.
Baked at 350F for about 10 minutes.
Watched them like a hawk.

MARINATED CUCUMBER SALAD. I saw this recipe at FoodTV the other day, a show I don’t normally watch called Valerie’s Home Cooking. I admit to having a bit of a problem with Hollywood folks turned into FoodTV chefs. Maybe I should open my mind a little? Nah, I like my mind the way it is… Anyway, her recipe sounded great but I adapted on my second time around because she used too heavy a hand on the sesame oil. It pretty much overpowered the delicate cucumber.

cucumber

In a small bowl mix and whisk well:

1/2 cup rice vinegar (unseasoned)
1 tablespoon soy sauce
1 teaspoon white sugar
1 teaspoon dark sesame oil.

Slice one cucumber as thin as you can make it, a mandoline could be helpful. I used a Persian cucumber, so I did not remove the seeds, but if you only find regular ones, removing the seeds is a nice touch. Delicately mix the cucumber slices with the dressing, refrigerate for half an hour if you have the time, but it’s good right away too.
So refreshing!

FRIED EGG OVER LABNEH WITH ZA’TAR. This is unbelievably good!  I confess I’m addicted and have it several times each week for my lunch.  I know you will find the combination a bit odd, but trust me, it is to die for. Just smear some labneh or thick Greek yogurt on a plate. Squirt a bit of lemon juice and a little salt (no need for salt if using labneh). Sprinkle za’tar all over, use a heavy hand if you are a za’tar lover.  Fry an egg whichever way you prefer, for this concoction I like a little bit of a crisp edge. Rest the egg on top of the cold labneh or yogurt mixture. Swoon!

zataregg

I use different spices sometimes.  Sumac goes well, Ras El Hanout is superb, but za’tar is hard to beat. There’s something about the mixture of the runny egg yolk with the cold seasoned yogurt, I never tire of it.  I first saw this combination at Maureen’s beautiful blog, she also included in her cookbook Rose Water and Orange Blossoms, which I own.

BLUEBERRY CHIA PUDDING.  I am usually pretty slow to jump on fashionable ingredients, and most of my adventures with chia seeds have been unremarkable. Not this one. It turned out so good I would serve it for company without thinking twice. It is creamy, sweet and tangy at the same time, the coconut flavor so subtle it would not offend those who are not too fond of it.  All you need to do is remember to soak the chia seeds the day before, or at least a couple of hours in advance.  A minute in the blender, and there you have, Nirvana in a bowl.  You can find the recipe here, but I highly recommend you get the book My New Roots, where you’ll find this one and a multitude of other interesting recipes.

blueberry-chia

for the recipe, visit Les Petites Pestes

Sometimes simple is all we need…

four-simple-recipes-from-bewitching-kitchen

Add to FacebookAdd to DiggAdd to Del.icio.usAdd to StumbleuponAdd to RedditAdd to BlinklistAdd to TwitterAdd to TechnoratiAdd to Yahoo BuzzAdd to Newsvine

ONE YEAR AGO: Raspberry Chocolate Truffles

TWO YEARS AGO: Red Velvet Cupcakes

THREE YEARS AGO: Valentine’s Day: The Finale

FOUR YEARS AGO: Almond Butter Chocolate Chip Cookies

FIVE YEARS AGO: Dan Dan Noodles

SIX YEARS AGO: Sophie Grigson’s Parmesan Cake

SEVEN YEARS AGO: Antibiotics and Food