STIR-FRIED CHICKEN AND CABBAGE WITH SPICY ALMOND SAUCE

This is by far my favorite type of lunch. A lot of protein in a flavorful, spicy preparation, with some veggies to make things more interesting. The inspiration came from this post by Lydia, hostess of The Perfect Pantry. I substituted ground chicken for beef, almonds for peanuts, but the basic idea was unchanged. Of course you can take this simple method in countless directions, adding green beans, sautéed corn kernels if you’d like a bit more carbs, sautéed spinach, chickpeas, use cashew butter, sprinkle toasted cashews at the end. I adore this type of recipe!

GroundChickenStirFry


STIR-FRIED CHICKEN AND CABBAGE IN SPICY ALMOND SAUCE
(modified from The Perfect Pantry)

3 Tbsp almond butter
3 Tbsp coconut aminos  (or soy sauce)
1 Tbsp agave nectar
1 tsp rice vinegar
1 tsp Sriracha sauce, or more to taste
1 tablespoon coconut oil
1 lb ground chicken
1 shallot, thinly sliced
12 oz shredded cabbage
1/4 cup slivered almonds, lightly toasted
salt and pepper to taste

In a glass measuring cup or small bowl, beat together the almond butter, coconut aminos, agave, rice vinegar and Sriracha until the mixture is smooth. If too thick, loosen it a bit with water.  In a large skillet or wok, heat the coconut oil (or another fat of your choice), then saute the shallots until translucent, add the ground chicken and cook until  golden. Season lightly with salt and pepper.

Pour in the almond butter mixture, and stir to combine with the meat.  Add the shredded cabbage and slivered almonds, and cook for 30 seconds or until the cabbage wilts slightly, but does not soften completely.

Serve with additional Sriracha sauce.

ENJOY!

to print the recipe, click here

served

Comments: Stir-fries using ground meat are not  eye-candy, I admit it. But this concoction is so flavorful, I hope you’ll overcome its looks and give it a try. The picture above was from my third day in a row enjoying it for lunch with leftover roasted butternut squash. Instead of more Sriracha sauce I drizzled Gochujang all over it. Wonderful things happen when Sriracha meets Gochujang. Clearly, it’s a Batman and Robin thing.

Chicken Stir-fry with Spicy Almond Sauce, from Bewitching Kitchen

ONE YEAR AGO: Fifteen Years!

TWO YEARS AGO: Light Brioche Burger Buns

THREE YEARS AGO: Sourdough Blues

FOUR  YEARS AGO: Headed to Hawaii

FIVE YEARS AGO: A yummy Brazilian cake: Bolo de Fuba’

SIX YEARS AGO:  Hidden Treasure

SEVEN YEARS AGO: Avocado Three Ways


PECAN CRUSTED CHICKEN FROM SOUTHERN AT HEART

Some recipes sound quite tasty but disappoint when you make them.  Not this one. Tasted as good as it sounded…  Funny thing is, I wasn’t sure it would be a winner because chicken breasts can be a bit tricky when baked.  However,  the meat was tender and moist, it looked pretty nice when sliced, and I heard “this is really good” several times during our Sunday dinner. It is a bit involved to make on weeknights, but I guess one could spread the preparation, assembling the “roulades” the evening before and keeping them in the fridge without the pecan coating. Next evening, all that’s left to do is coat the meat with crumbs and bake. The recipe comes from Damaris Phillips show on FoodTV, Southern at Heart.  I find her delightful, upbeat and funny. Even though for the most part her style of cooking is a bit too heavy for my taste, every once in a while I find something that calls my name. Like this chicken. Flavorful and quite elegant to boot.

Pecan Crusted Chicken Breasts

PECAN CRUSTED STUFFED CHICKEN BREASTS
(adapted from Damaris Phillips)

Four boneless, skinless chicken breasts
salt and ground black pepper
4 ounces fresh goat cheese, crumbled
1 tablespoon chopped fresh dill
2 teaspoons grated orange zest
2 eggs
2/3 cup dried breadcrumbs
2/3 cup ground pecans
Coconut oil spray

Heat the oven to 400 degrees F.

Place the chicken breasts between two pieces of plastic wrap and pound to 1/4-inch thick. Pat the chicken dry and sprinkle liberally with salt and pepper on both sides. Sprinkle the goat cheese lengthwise on one half of each breast; then sprinkle with dill, and orange zest.  Fold in the short ends as if folding a Mexican burrito, then, starting on the half with cheese, roll up into a tight cylinder. Close the seams with toothpicks or tie with kitchen twine.

Whisk the eggs in a wide, shallow dish with 1 tablespoon water. In a separate dish, combine the breadcrumbs and ground pecans. Sprinkle the stuffed chicken with salt and pepper. Dip in the egg mixture and then in the breadcrumb mixture; shake off excess breading.

Place the breaded chicken on a wire rack set over a baking sheet and spray with coconut oil. Bake to an internal temperature of 160 degrees F, about 25 minutes. Remove from the oven and let rest for 5 minutes. Remove the toothpicks. Cut in slices and serve.

ENJOY!

to print the recipe, click here

chickencomp

Comments: I know that goat cheese and dill are a match made in heaven, but you know what made this dish a real winner? The orange zest. In fact, the sweet citric flavor was even more intense two days later when we had leftovers for dinner. I served it with butternut squash “noodles” and asparagus, but of course the chicken would go well with many different side dishes. For instance, Damaris paired it with a Southern risotto, very hearty.

This recipe would be great for a dinner party, as you can prepare it all in advance and place the meat in the oven half an hour before you want to sit down for dinner. Keep in mind not to over-process the pecans, so that you get a bit more crunch on the topping.  In typical Sally mode, I totally forgot that I have some pecan flour in the freezer. I bet it would be great to use maybe 50-50 with the bread crumbs, intensifying the pecan flavor.  Something to consider for next time…

ONE YEAR AGO: Lamb Shanks en Papillote with Cauliflower-Celeriac Purée

TWO YEARS AGO: Chestnut Brownies and a Blog Award!

THREE YEARS AGO: Quinoa with Cider-Glazed Carrots

FOUR YEARS AGO: Celebrate Wednesday: Heirloom Tomatoes Steal the Show

FIVE YEARS AGO: Pain de Provence

SIX YEARS AGO: Golspie Loaf, from the Scottish Highlands


FINE TUNING THOMAS KELLER

If you are interested in  sous-vide cooking,  chances are you either own or have heard of the book Under Pressure: Cooking Sous-vide,  by Thomas Keller (a dear friend gave me a copy, am I lucky or what?). When it comes to sous-vide, the outcome is all about the combination of temperature and time in the water bath, and Keller’s book is an amazing source of information to get you going.  I have already shared in the blog a few recipes for chicken thighs sous-vide that relied on the temperature that Thomas Keller recommends,  around 150 F. They turned out delicious, with homogeneously cooked meat, and good flavor. But they lacked a quality I happen to love in this type of meat: the falling off the bone tenderness. I browsed around cooking forums, but found no specific advice to help me out. Then I stumbled more or less by accident into this article and decided to re-visit the issue. Basically, the article states that a temperature of 150 F  will produce very juicy chicken, but with a firm texture. If you increase the temperature to 165 F, your outcome will depend on the time of cooking, going from tender (1 to 4 hours) to “falling off the bone tender” (4 to 8 hours).  I decided to try  the combination of 168 F for 5 hours. Results? Oh Em Gee perfection! Exactly what I’ve been hoping for.  You should have seen me doing the Happy Chicken Thigh Dance. Wait, maybe not.  Some things are better staying in the privacy of a home. So, with apologies to Mr. Keller, I dare say that I prefer my tweaked version, a drastic departure from his. If you don’t own a sous-vide gadget, no need to worry, I give you the specifics to make it in a regular oven too.

Chicken Thighs Sous-vide


ORANGE-SOY CHICKEN THIGHS
(sous-vide or regular oven)
(from the Bewitching Kitchen)

8 chicken thighs
1/2 cup soy sauce (or coconut aminos)
zest and juice of a large orange
1 tablespoon Dijon mustard
1 tablespoon agave nectar
2 tsp lime juice
1 tsp grated ginger
salt and black pepper to taste

Make a marinade whisking well all the ingredients.  Add the pieces of chicken to a large bag, pour the marinade over and let it sit in the fridge for a few hours, or at room temperature for 30 minutes.

If cooking sous-vide:
Remove the chicken from the marinade (save the marinade in the fridge), vacuum-seal four pieces in each of two bags. Place the bags in a water-bath set to 168 F for 5 hours. Close to the end of cooking time, place the reserved marinade in a small pan and cook it over medium-high heat for a few minutes to reduce it slightly. Remove the chicken pieces from the bag, place over a roasting pan, and brush the skin with the reduced marinade. Add a little more salt if you like. Place the pieces under the broiler and roast until dark and crispy.

If cooking in a regular oven:
Place the chicken pieces skin down in a roasting pan with enough marinade all over to keep them moist during roasting.  Season lightly with more salt if you like (we do). Cover with aluminum foil and roast at 325 F for 1 hour.  Remove the foil, turn the pieces over and finish roasting at 425F until the skin is crispy.

ENJOY!

to print the recipe, click here


tender


Comments: What I like the most about sous-vide cooking is how forgiving it is in terms of timing. Take this recipe, for instance, if you set it up at lunch time but do not expect to be home until 6 hours later, no problem. One hour more, two hours more won’t affect the outcome.  Some say that the crock pot behaves the same way, but I don’t think so. Poultry can develop a sort of chalky texture when sitting in a slow-cooker past a certain point.

We enjoyed the chicken thighs with the salad I blogged about not too long ago. I simply do not get tired of it, it is perfect!  If you haven’t yet tried the combination of roasted carrots with avocados, don’t wait for too long…

ONE YEAR AGO: Cauliflower Tortillas

TWO YEARS AGO: Majestic Sedona, Take Two

THREE YEARS AGO: Secret Ingredient Turkey Meatballs

FOUR YEARS AGO: Swedish Meatballs and Egg Noodles

FIVE YEARS AGO: Italian Easter Pie

SIX YEARS AGO: Black Olive Bialy


TURKEY PORTOBELLO BURGER

This will be a bit embarrassing. I’ve made this recipe four times since December, a pretty strong endorsement as I tend to follow the “cook and move on” mode.  Last week I wanted to make it again, so I did a quick search on the blog but came up empty-handed. Puzzled, I went to the index page, and it wasn’t there either.  I concluded I failed to add it to the index page and also did not tag it with the appropriate search words. But then a troubling thought hit me: what if… what if… I simply forgot to blog about it?  Could it be possible?  Only one way to find out. I went to my computer and almost fell off my chair: the pictures were all there, but straight from the camera, never optimized for publication!  Yours truly is officially losing it, but she’s not alone: John from The Bartolini Kitchens  recently had the exact same thing happen to him. We are now virtual siblings, and that makes me happy. So, before I forget everything about ground turkey, mushrooms, and burgers, allow me to share a great recipe that is now part of our regular rotation.

Turkey Portobello Burger

TURKEY PORTOBELLO BURGER
(slightly modified from FoodTV Network)

1 large Portobello mushroom cap
1 tablespoon coarsely chopped shallot
3 tablespoons lightly packed fresh parsley
1 1/4 pounds ground turkey
2 tablespoons extra-virgin olive oil, plus more for brushing
1 teaspoon Worcestershire sauce
zest and juice of 1/2 lime
Kosher salt and freshly ground pepper
cheese slices (optional)

Use a spoon to scrape out the gills from the underside of the mushroom cap. Cut the cap into 1-inch pieces and transfer to a food processor. Add the shallot and parsley and pulse until chopped.

Transfer the mushroom mixture to a large bowl. Add the turkey, olive oil, Worcestershire sauce, lime zest, 1 teaspoon salt, and pepper to taste; gently mix with your hands until just combined. Squeeze lime juice all over and mix very gently. Divide into 4 balls, then lightly press into 1-inch-thick patties. Put on a large plate, cover and refrigerate until firm, about 30 minutes.

Heat a grill to medium. Brush the grates with olive oil. Grill the patties, undisturbed, until marked on the bottom, 4 to 5 minutes. Give the patties a quarter turn and cook until marked again, 4 to 5 more minutes. Flip the patties and grill until cooked through, 6 to 7 more minutes; and if you’d like top each with 2 slices cheese during the last 3 minutes of cooking.

ENJOY!

to print the recipe, click here

patties

Comments: As everybody knows, the problem with turkey burgers is that they can be too bland and dry. Who wants that, right? You can deal with the issue in many ways, in fact I have several recipes in the blog with a juicy outcome. But it’s hard to resist a recipe with the title “Perfect Turkey Burger” although I’m usually skeptical of this type of hype. What I love about this recipe is the depth of flavor given by the Portobello mushroom.  My only modification was to add some zest and lime juice because the citric flavor goes well with the burger. Plus, it gives the meat just a little more moisture.  I have made it without resting the patties in the fridge – they are a tad fragile, but if you are gentle, it works.  I imagine you could make them early in the morning and leave in the fridge the whole day, if that suits your schedule.

Turkey burgers are on our menu at least twice a month, and although I am always looking for different takes on it, it’s been hard to move away from this recipe. I say why change a winning team?

ONE YEAR AGO: Raspberry Ricotta Cake

TWO YEARS AGO: In My Kitchen, April 2014

THREE YEARS AGO: Whole-Wheat Pasta with Lemony Tomatoes and Spinach

FOUR YEARS AGO: Blood Orange Duck: A work in progress

FIVE YEARS AGO: Grilled Mahi-mahi with citrus marinade

SIX YEARS AGO: Memories of Pastéis (and my Dad)


SECRET RECIPE CLUB: CHICKEN KORMA & A BONUS RECIPE

Another month begins, a favorite of mine because April means winter is OVER! I survived another  meteorological ordeal, and must confess it wasn’t that bad. HA!  Am I getting tougher or what?  The first Monday of the month brings Reveal Day of Group A from The Secret Recipe Club, so here I am to divulge which blog was my assignment.  Drum roll, please…. I got the amazing Thyme for Cooking blog, hosted by Katie.  Now, for a shocking statement: I would cook ANY of her recipes, each and every one appealed to me. She is one eclectic cook, having lived in several countries (Ireland, Andorra & France), but not only that, her writing captivates you.  I opened a huge smile when I read her About page, and stumbled on this simple paragraph:

From learning about French paperwork (exhausting) to French chickens (of course they come with feet, Duh!) it’s a constant, often / usually entertaining challenge.

Well, I love France, don’t even think I don’t. But until you face the convoluted French bureaucracy, you’ll know nothing about paperwork hell. Unless of course, you’ve lived in Brazil… Those two beautiful countries could compete to see which bureaucracy would drive a foreigner crazy first. I have a tough time deciding the “winner.”  But, I digress… Her site kept me glued to the computer for many hours on many evenings. I blamed it for preventing me from sitting down with Phil to watch the news. “Are you coming, Sally?”  “I can’t… I can’t…  I have Thyme for Cooking, so No Thyme for News.”  Just to give you an idea of her level of sophistication, she’s got 9 recipes for cornish hens.  Nine. I almost lost my mind trying to decide what to cook, here is a very short list: Ham, Spinach and Avocado Clafoutis…. Shrimp and Spinach Pie...  Chicken with Chickpeas and Preserved Lemon….  Zucchini-Courgette Gratin... Chicken with Tarragon Cream…  Slow-cooker Coq au Vin...  (almost made it for this reveal day, as I also got a slow-cooker recently).  And so many more, I simply had to stop bookmarking them. I had no choice but to make two, one savory, one sweet.  For savory I went with her Chicken Korma, and for dessert (well, not quite, I made it one week later), her Absolute Best Brownies.

Chicken Korma3

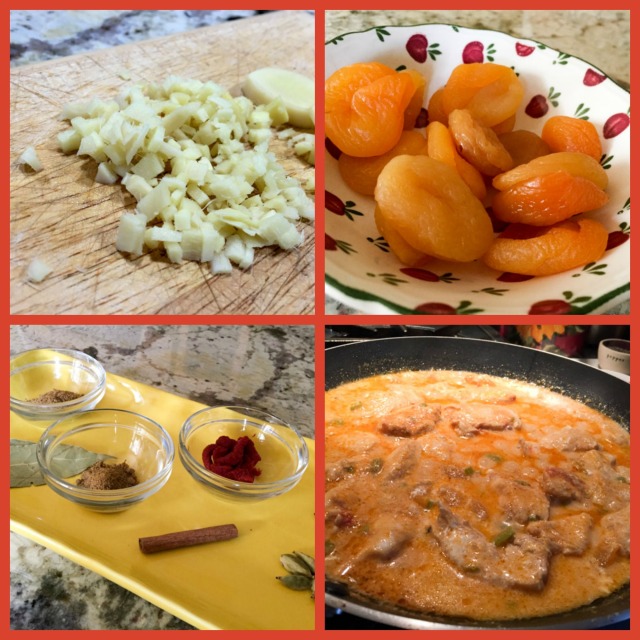
CHICKEN KORMA WITH APRICOTS AND ALMONDS
(slightly adapted from Thyme for Cooking)

3 chicken breasts, boneless, skinless, cut into slices 3 pieces
1/2 cup ground almonds
1 shallot, chopped
1 piece of ginger, about 1/2 inch long, finely minced
1 tbs olive oil
2 bay leaves
5 cardamom pods
4 whole cloves
1 inch of a cinnamon stick
1 tsp ground cumin
1 tsp ground coriander
2 tsp tomato paste
1/2 cup Greek yogurt
3oz (90gr) dried apricots, cut in half
1/2 cup  chicken stock

Heat 1 tablespoon olive oil in a large skillet over medium-high heat. Add bay leaves, cloves, cardamom, cinnamon and stir-fry 10 seconds. Add shallot and fry until tender and starting to brown. Reduce heat to medium, add ginger, cumin, coriander and stir-fry 2 minutes longer. Add tomato paste and stir well to combine.

Add chicken pieces, ground almonds, chicken stock and heat to simmering. Reduce heat to low, cover and simmer for 15 minutes. Add yogurt to chicken and stir well to combine. Add apricots, cover and simmer for 10 minutes longer.

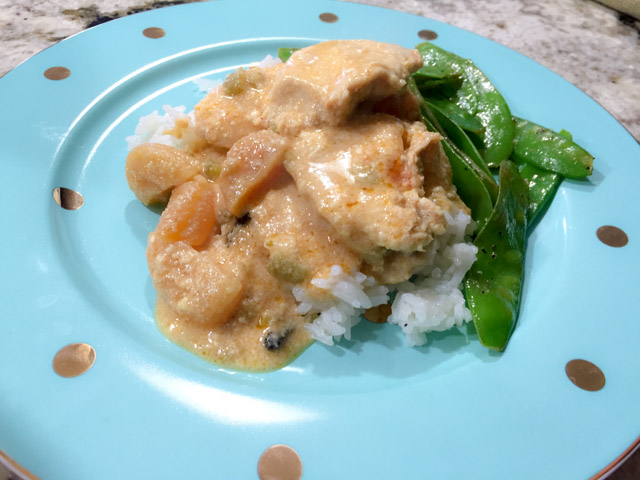
Serve over white rice.

ENJOY!

to print the recipe, click here

kormacomposite

Comments: We loved this recipe! The magical ingredient is definitely cardamon. Every time I open the bottle of cardamon pods I get mesmerized by the smell. The delicate taste they impair to any dish, savory or sweet, is hard to beat. The ground almonds (or almond meal, depending on what is available to you) give the sauce extra body and make it feel substantial and filling. Finally, the apricots bring the bit of sweetness and a pleasant chewy texture. Three chicken breasts were enough for our dinner and lunch a couple of days later. I should add that the sauce was even more flavorful the second time around, although the texture of the meat was better right after cooking.  Overall, this korma is not spicy, just very aromatic.  We enjoyed it over white rice with snap peas alongside. Delicious dinner!

served

Just make sure you don’t bite into the cloves! Find them and put them aside…

And now, for the bonus recipe: 


Brownies Glazed

ABSOLUTE BEST BROWNIES
(from Thyme for Cooking)

for the brownie:
6 tbs butter, plus a bit more for the pan
8oz dark chocolate, in chunks
3/4 cup sugar
1 tsp vanilla
2 eggs, room temperature
1/4 cup flour
1 cup walnuts, chopped

for the glaze:
4oz (120gr) dark chocolate, in chunks
1/2 cup heavy cream

Heat the oven to 350°F (175°C).
Line the inside of an 8-inch square pan with 2 lengths of foil, laying them perpendicular to each other and folding the edges over to form handles. Lightly butter the foil.

In a medium saucepan melt the butter over low heat, add the chocolate. Stir constantly until melted.
Remove pan from heat, add sugar, vanilla and stir well. Add eggs and beat well with a medium-size wooden spoon.
Add the flour and beat vigorously for 1 1/2 – 2 minutes. Better should be shiny and smooth. Stir in the nuts, and pour the batter into the pan.

Bake for 30 minutes. The center should be almost set. Do not over-bake. Cool brownies completely in the pan. As the brownie cools, make the glaze by heating the cream in a small saucepan over low heat. Add the chocolate and stir until just melted.

Lift the brownies out of the pan and loosen the foil on the sides and bottom. Transfer to a plate. Pour the glaze over the top and smooth to the edges. When the glaze is cool, cut into small squares and serve.

ENJOY!

to print the recipe, click here

compositebrownie

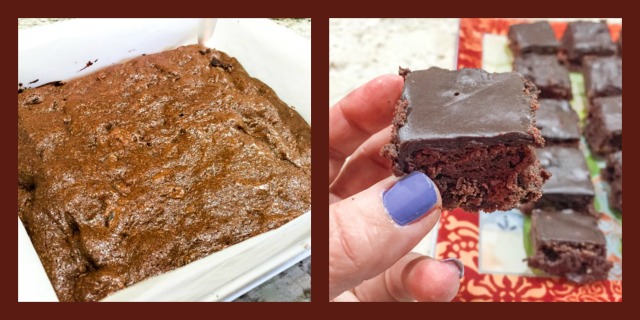
Comments: You will find this to be a very popular recipe (original from David Lebovitz). Many bloggers have made it, not always successfully, in the sense that for some these did not turn out as “absolute best.”  Well, it is all in the technique. For this recipe to work its magic you absolutely MUST beat the batter for at least a full minute, probably two minutes is better.  I considered adding the batter to a KitchenAid but ended up beating by hand. Good workout for the right arm, I can tell you that…  The brownies turned out great, I think the walnuts worked perfectly well with the chocolate, but if you do a google search you’ll find that the basic recipe can be adapted to all sorts of add-ons, one that seems quite popular is mint.  Just crush some mint candy and add to the batter after you beat it into submission. I took the brownies to our department on a foggy and a bit chilly Monday morning. They made many colleagues forget the Monday blues.

Katie, I will be a faithful follower of your blog, and hope you had as much joy with your assignment this month as I had with mine… 

For my readers, make sure to click on the blue extra-terrestrial looking frog at the end of this post, so you can marvel at the productions of my fellow secret recipe friends.

ONE YEAR AGO: Josey Baker’s Olive Bread

TWO YEARS AGO: Almonds, A Cookbook Review

THREE  YEAR AGO: Pomegranate-Molasses Glazed Carrots

FOUR YEARS AGO: Codruta’s Rolled Oat Sourdough Bread

FIVE YEARS AGO: Roasted Corn and Tomato Risotto

SIX YEARS AGO: Light Rye Bread