
I love baking, I love exercising, I love my work, but I also have a secret passion for all things language. It gave me a thrill to be invited by the superb linguist Dr. Denise Santos to contribute with a little article to her blog. If you’d like to see it, jump here.
Yearly Archives: 2020
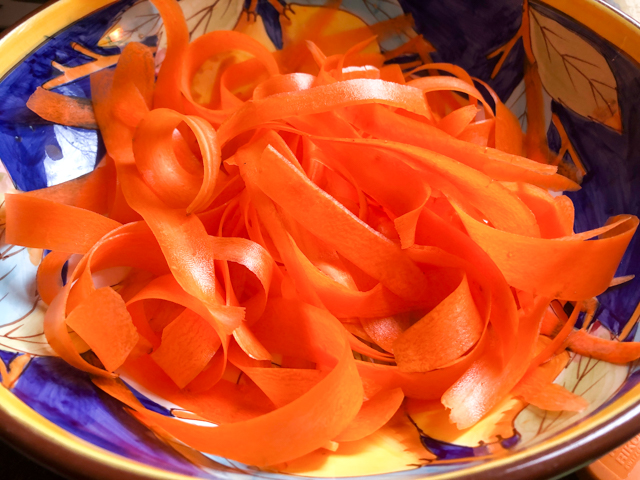
PICKLING RIBBONS
A couple of weeks ago we went out for dinner and I ordered a salad that was surprisingly good. I don’t normally expect to be impressed by a salad, but that was the case. What made it so good was a simple ingredient: ribbons of pickled carrots. I got home, took a virtual ride to Google University, and found out I could double the carrot pleasure by using it also in the dressing. Very pleased with this salad which was hearty enough to almost call it dinner. Almost. Because some boneless chicken breasts were also involved.

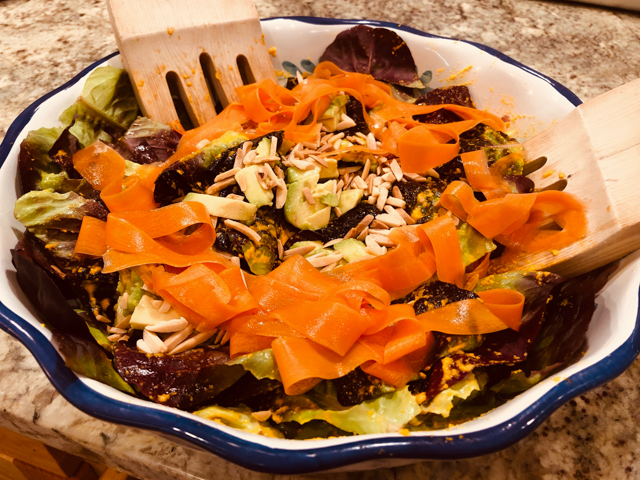
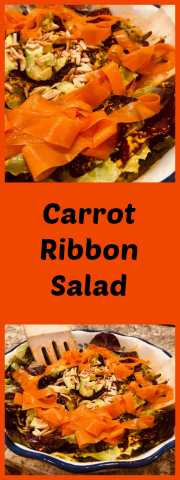
CARROT RIBBON SALAD
(inspired by several sources)
for pickled carrot ribbons:
(slightly modified from Chocolate and Zucchini)
2 large carrots
1 tsp grated ginger
120 ml (1/2 cup) apple cider vinegar
1 cup water
1 + 1/2 teaspoons sea salt
1 + 1/2 teaspoons sugar
Peel the carrots and, using the vegetable peeler, cut them into thin ribbons. Place the ribbons in a heatproof bowl.
Combine the ginger, vinegar, salt, sugar, and water in a small saucepan and bring to a boil. When the mixture boils, stir to make sure the sugar and salt are dissolved.
Pour the ginger brine through a sieve and into the bowl of carrots. Make sure the carrots are completely immersed, cover and let cool to room temperature. Transfer to a clean jar, close tightly with the lid and refrigerate for up to 2 weeks.
for carrot dressing:
1/2 cup chopped raw carrots (include leftover from making ribbons)
¼ cup extra-virgin olive oil
2 tablespoons tahini
2 tablespoons lemon juice
1 teaspoon minced ginger 2 tablespoons (30 mL) fresh orange juice
salt and freshly ground black pepper
In a blender, puree the carrots with the olive oil, tahini, lemon juice, and ginger. Thin with a little cold water if too thick. Season with salt and pepper to taste.
for the salad:
(use as much of each ingredient as you like)
baby romaine leaves
slivered almonds, toasted
a couple of avocados, diced
Add the ingredients to a large bowl, add the carrot dressing and mix well, but gently. Drain the pickled carrot ribbons, and place on top.
Serve with your protein of choice, or a bowl of grains if you prefer to go the vegetarian route.
ENJOY!
to print the recipe, click here
I don’t know about you, but at this time of the year, when I just about had it with the weather, a platter of colorful food lifts my mood. Pickled carrots will be here to stay. I’ve been keeping a small jar in the fridge for my own pleasure. It seems to go well with lots of main dishes, and the texture only gets better with time. Make sure to shave them thin, and probably best to avoid that central harder core. Just turn the carrot around and start from the other side.
I totally forgot to take a picture of the dressing, it ended up with a shockingly bright yellow color, really beautiful. If you like pickled foods, I hope you’ll give this salad a try. Just remember that it is not good manners to steal all the ribbons to your own plate.
ONE YEAR AGO: Green Beans and Carrots with Spicy Almonds
TWO YEAR AGO: Quiche 101
THREE YEARS AGO: Persian Butternut Squash Soup
FOUR YEARS AGO: Walnut Cranberry Sourdough Bread
FIVE YEARS AGO: Ottolenghi in Brazil?
SIX YEARS AGO: Roasted Winter Vegetables with Miso-Lime Dressing
SEVEN YEARS AGO: 2012 Fitness Report: P90X2
EIGHT YEARS AGO: Caramelized Bananas
NINE YEARS AGO: Roasted Lemon Vinaigrette
TEN YEARS AGO: Whole Wheat Bread
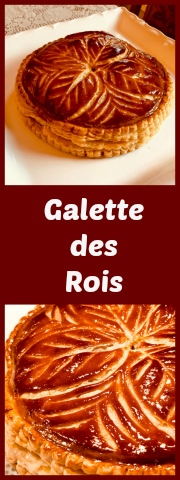
GALETTE DES ROIS

When I first applied to be on the Great American Baking Show, I started working to improve my baking skills. I made a list of general techniques and a list of “classic bakes” to go along with them. Two years passed by. I went to the tent and came back. But this “self-improvement process” goes on. In fact, being in the show gave me extra energy and passion to get better. Tackle the techniques I still feel insecure about. Bake the classics. Such as Galette des Rois. I have always associated it with France, but it originated in Medieval times, enjoyed during Roman festivities known as Saturnalia. Usually a hidden figurine (or a bean, a whole almond) is baked in the tart, and the person who finds it gets to be King (or Queen) for a day. I skipped that part in my dessert, afraid some departmental colleague would break a tooth. Galette des Rois: puff pastry enclosing almond cream. I can think of few things equally mouth-watering.

GALETTE DES ROIS
(adapted from Bake-Street)
For quick puff pastry:
125g all purpose flour
125g pastry flour
250 g unsalted butter, cold
6 g sugar
5 g salt
100-110g very cold water, from the fridge
for almond filling:
125 g almond flour
100 g powdered sugar
100 g unsalted butter at room temperature
2 eggs
1 tsp vanilla extract
3/4 tsp cinnamon
1/2 tsp ground ginger
1/8 tsp ground cloves
to brush before baking:
2 egg yolks
to brush after baking (optional, but nice):
30 g water
30 g sugar
Make the puff pastry dough. Add the flours, sugar, salt and butter to the bowl of a KitchenAid type mixer fitted with the paddle attachment. Mix for about 1 minute in low speed until the butter gets into small pieces. Add 100g of the water and mix another minute, checking to see if you need to add a little more. The mixture should not feel too sticky, but it should come together nicely if you press it with your fingers. Do not mix for too long, to avoid developing gluten. Tranfer the dough to a plastic wrap, form into a rectangle and place in the freezer for 30 minutes.
Roll the dough out as a large rectangle on a lightly floured surface. No need to worry too much about dimensions, I try to make it twice as long as it is wide. Make one envelope-type fold bringing the top down and the bottom part over it. Turn the dough so that one folded part is to your right. Roll out the same way, fold again. Freeze for 30 minutes.
Remove from the freezer and roll again two more times. If the dough seems too warm, and the butter is threatening to melt into it, freeze it again for 30 minutes between the third and fourth folds. Once you finish the fourth fold, keep the dough in the fridge until ready to make the dessert. You can keep it overnight or longer.
Prepare the galette: Lightly sprinkle a work surface with flour. Roll the dough to a large rectangle, around 22 x 14 inches. Cut two circles of approximately the same size, with the diameter you want your galette to be. Mine was 8 + ¾ inch in diameter. Cover both circles with plastic and refrigerate while you make the filling.
Make the almond filling. To the bowl of your KitchenAid type mixer add the powdered sugar and butter, mix at low-speed until it starts to form a thick paste, add one egg and continue mixing. Add the almond flour, always at low-speed, ,then the second egg. Add the vanilla and the spices, mix to incorporate. Place in a piping bag, no need for icing tip.
Place the first round of pastry over parchment paper on a baking sheet. Pipe the almond cream makig a spiral over the circle, leaving a space at the edge without cream. Moisten the edges lightly with cold water. If you want to include a figurine or a whole almond, now is the time to do it.
Place the second disc on top, the water brushed on the edge should help it stick. Gently press the top dough over the filling to avoid bubbles being trapped underneath. Use the side of a knife opposite of the blade to mark the dough all around the edges, so that upon baking, it will form a nice wavy design. Brush the top with a well beaten egg yolk. Refrigerate for 1 hour, uncovered.
Brush with egg yolk again. Make a pattern over the surface, adding a small hole in the center to vent the galette during baking. Refrigerate, uncovered for another hour.
Meanwhile, make the syrup to brush the surface by adding all the ingredients in a saucepan. Place on medium heat and boil until the sugar dissolves. Cool completely before using.
Heat the oven to 375 F. Place the galette in the oven and bake for 10 minutes, then reduce the temperature to 340-350F and bake for 40 to 45 minutes longer. If you want to brush with the syrup, do it as soon as the galette is baked, still hot from the oven. Let it cool completely before slicing.
ENJOY!
to print the recipe, click here

Comments: The traditional scoring on the surface is a spiral design. I decided to go with a different style, inspired by sourdough slashing. After I baked this galette, I saw a very nice version on Instagram decorating the surface with many concentric hearts. Who knows? I might fully ignore that Valentine is over, and go for it in the near future. After all, I already disrespected the correct day to serve this pastry, which happens to be January 6th. So a Galette de Coeur in March or April? Does not bother me at all.
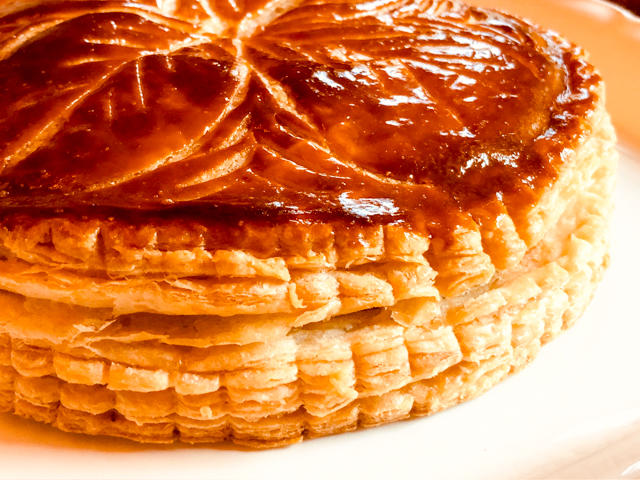
The galette dough can be made with full-laminated pastry or a quick puff. I opted for the latter because it is a type of dough I am not that comfortable with. I made some for what would have been the semi-final of the show (click here), but had to speed up the process quite a bit to fit it all in the available timing. For this galette, you can see that once you take your time and allow the dough to stay very cold all the time, it really puffs up beautifully.

I loved the addition of spices to the almond cream, which was a twist shared in the recipe at Bake-Street. By the way, that is one of my favorite blogs, I never miss her posts, the videos are a pleasure to watch. She is the neat and precise baker I aspire to be. Next life. There’s always next life…
Grab a pin, and let’s Saturnalia together!
ONE YEAR AGO: Sous-Vide Overnight Oatmeal
TWO YEARS AGO: A Valentine’s Day Opera
THREE YEARS AGO: Incredibly Simple Times Four
FOUR YEARS AGO: Walnut-Cranberry Sourdough Bread
FIVE YEARS AGO: Ottolenghi in Brazil?
SIX YEARS AGO: Roasted Winter Vegetables with Miso-Lime Dressing
SEVEN YEARS AGO: 2012 Fitness Report: P90X2
EIGHT YEARS AGO: Caramelized Bananas
NINE YEARS AGO: Roasted Lemon Vinaigrette
TEN YEARS AGO: Whole Wheat Bread
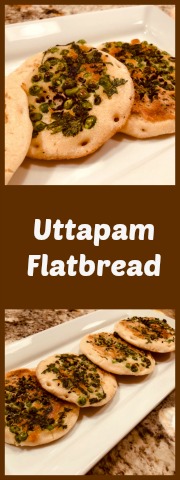
UTTAPAM, WHITE LENTIL AND RICE FLATBREAD

I am back with another recipe using ivory lentils (in case you’ve missed the first one, click here). I had never heard of uttapam, but learned about it in the website of the very company I got the lentils from. They are described as flatbreads, but I suppose little pancakes (or fritters) could work equally well if not better. After all, it is more a batter than a dough, that is poured instead of rolled, and cooked over a griddle, not an oven. In my mind, that gravitates to pancake territory. But flatbread, pancake, fritters… it’s irrelevant. They are delicious. Dangerously so, I should add.

UTTAPAM
(slightly modified from Woodland Foods)
(makes 8 little pancakes)
1 cup Basmati rice
1/2 cup Ivory lentils
3/4 teaspoon sea salt
1 teaspoon sugar
1/2 teaspoon baking soda
1 cup peas (fresh or frozen)
1 Jalapeno pepper, minced
1/2 cup fresh cilantro, chopped
vegetable oil (I used grape seed)
Thoroughly rinse rice and lentils separately. Place each in large bowl of fresh water and soak for 2 hours.
Drain rice and lentils, and place in blender. Add salt, sugar and baking soda and grind mixture into paste. Add about 1/2 cup water, and continue blending to create thick batter. Transfer mixture to bowl, and set aside to ferment at room temperature for at least 4 to 12 hours.
Combine peas, Jalapenos and cilantro in a small bowl. Heat griddle or nonstick skillet over medium heat and brush with oil. Pour in 2 to 3 tablespoons batter and spread out with back of spoon to create circle 4 inches in diameter. Sprinkle some of pea mixture evenly on top. Cook until small bubbles appear on surface, then flip and cook other side until crisp and golden.
ENJOY!
to print the recipe, click here

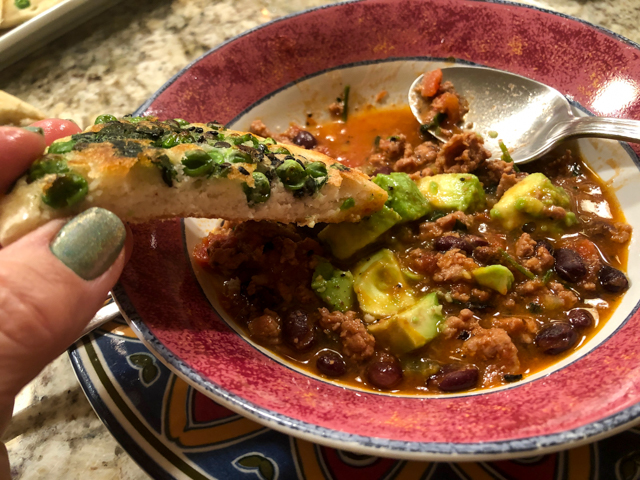
Comments: I always feel a bit insecure making ethnic recipes I have zero experience with, but I must say this one turned out excellent, no problems, every step seemed to happen exactly as expected. Plus we both loved the texture and the taste of the little pancakes, that were served with a turkey chili. Sally again takes a ton of liberties with her dinner preparations. Chili made with turkey. Served with little flatbreads from India. All enjoyed with no remorse whatsoever!
Pin me, pin me!
ONE YEAR AGO: Valentine’s Day Sweetheart Cookies
TWO YEARS AGO: Fesenjan, Fast-Food Style
THREE YEARS AGO: Lavender Macarons with White Chocolate Ganache
FOUR YEARS AGO: Raspberry Chocolate Truffles
FIVE YEARS AGO: Red Velvet Cupcakes
SIX YEARS AGO: Happy Valentine’s Day!
SEVEN YEARS AGO: A Few Blogging Issues
EIGHT YEARS AGO: Dan Dan Noodles
NINE YEARS AGO: Sophie Grigson’s Parmesan Cake
TEN YEARS AGO: Antibiotics and Food
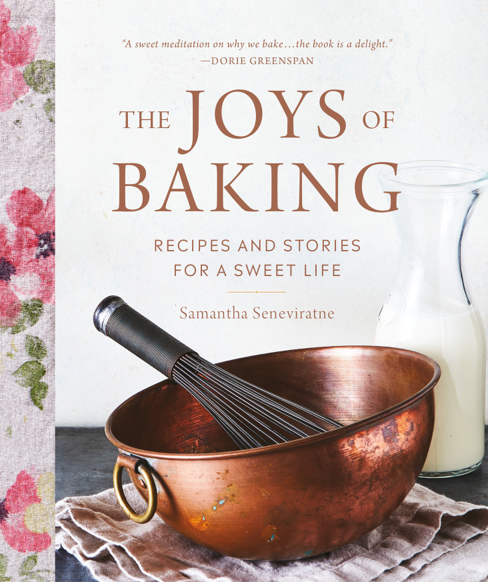
ORANGE STREUSEL CAKE & THE JOYS OF BAKING BOOK REVIEW
I will never write a cookbook. Having said that, IF I ever wrote one, I would like it to be along the lines of The Joys of Baking, by Samantha Seneviratne. As Dorie Greenspan writes in her endorsement: A sweet meditation on why we bake… the book is a delight.
I couldn’t have said it better, Dorie summarized it all. I contacted Samantha and she gave me permission to publish one recipe on the blog. I had quite a hard time choosing which one to share, but decided to go with her Orange Streusel Cake, because its preparation is quite unusual and the cake turned out absolutely perfect for my taste. But I will also show you pictures of another recipe from the book, Samantha’s Mascarpone Gingerbread Bars. Because… ginger…

ORANGE STREUSEL CAKE
(from The Joys of Baking, published with permission from Samantha Seneviratne)
For the streusel:
½ cup (65g) all-purpose flour
½ cup (110g) packed light brown sugar
¼ teaspoon kosher salt
4 tablespoons (57g) unsalted butter, melted (I used half the butter)
1/2 cup (15g) sliced almonds
for the cake:
6 tablespoons (85 g) unsalted butter, at room temperature
1 entire navel orange (about 280 g), seeded, cut into large chunks
¼ cup (60g) sour cream, at room temperature
1 +1/2 cups (195g) all-purpose flour
1 teaspoon baking powder
½ teaspoon kosher salt
¼ teaspoon baking soda
¾ cup (200g) granulated sugar
2 large eggs, at room temperature
for the glaze:
3 to 4 teaspoons freshly squeezed orange juice
¾ cup (90g) powdered sugar
Heat the oven to 350°F.
Prepare the streusel: In a medium bowl, combine the flour, brown sugar, and salt. Drizzle the melted butter over the mixture and stir to incorporate. The mixture should clump together when squeezed. Toss in the almonds. Prepare the cake: Butter an 8-inch square baking pan. Line the pan with parchment paper, leaving a 2-inch overhang on 2 opposite sides. Butter the parchment.
Place the orange in a blender and process until it is the texture of applesauce. It’s okay if you have a few larger pieces. You should have about 1 cup of orange purée. Add the sour cream and stir to combine.
In a medium bowl, whisk together the flour, baking powder, salt, and baking soda. In a large bowl, with an electric mixer on medium speed, beat the butter and granulated sugar until light and fluffy, about 3 minutes. Add the eggs, 1 at a time, scraping down the bowl as necessary. Add half of the flour mixture and beat on low speed until just combined. Beat in the orange mixture, then beat in the remaining half of the flour mixture.
Transfer the batter to the prepared pan and smooth the top. Top with the streusel mixture. Squeeze the streusel to form a range of differently sized clumps. Bake until a toothpick inserted into the center of the cake comes out with moist crumbs attached, 40 to 45 minutes. Transfer the pan to a wire rack to cool for 20 minutes. Then, using the parchment overhang as handles, transfer the cake to a wire rack to cool completely.
Prepare the glaze (if using): In a small bowl, whisk the orange juice into the confectioners’ sugar, adding a little less juice for a thicker glaze that will look lovely on top of the cake, or a little more for a thinner glaze that will soak in. Drizzle the glaze over the cooled cake.
ENJOY!
to print the recipe, click here
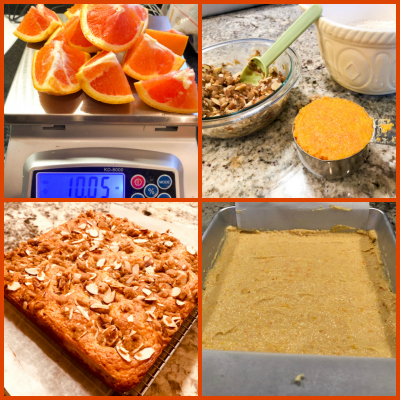
Comments: I am very fond of marinades that use a whole lemon instead of its juice or zest, so the moment I saw that the cake called for a full orange turned into a pulp in the food processor, I knew I had to give it a try. You cannot get much more orange-y than that. And the drizzle of icing sugar/orange juice beautifully seals the deal. The cake is moist, feels rich but light at the same time, if at all possible.

Do you notice the little bits of orange throughout the crumb?
Absolute yumminess.
Now let me share with you a little teaser of a recipe. Originally I was going to focus the blog post on this one, because it was a huge hit when I took it to the Common Table meal (meals for homeless in our town). Mascarpone Gingerbread Bars…

It starts as a very smooth batter, pretty much like a brownie, a one-bowl deal.

Then you swirl a mascarpone cream into it, and marvel at the way it looks.
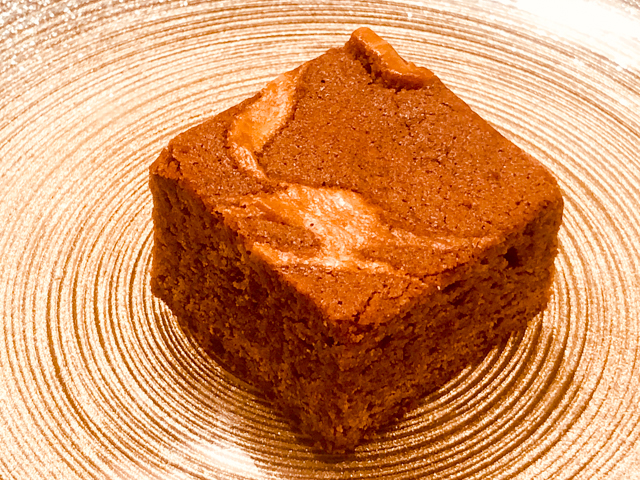
The crumb is tight, full of gingerbread flavor, and you get that delicious sharp contrast of the mascarpone every now and then. This will please anyone.
Now, a virtual tour of Samantha’s book.
From her introductory chapter, I cut and paste her words…
Cooking is a necessity. Everyone needs to eat. Preparing a special meal can be a joy, of course, but often it feels like a chore, just another item on an endless list of things that must get done. Baking is different. Baking is a choice. Baking is never a necessity. No one needs a chocolate cake to survive. Except, sometimes, a chocolate cake is exactly what you need to survive. Sometimes, a chocolate cake is the only thing you need in the world. This is a book about and for those times.
I was touched by this paragraph, it really echoes with the way I view baking. She then moved to talk about the tragic life story of Irma Rombauer, the woman behind the most classic American cookbook of all times, The Joy of Cooking. I was unaware of it, and once again Samantha’s words touched me.
The Joys of Baking is inspired by the book that Irma Rombauer could have written. It’s the story of baking my way through my own heartbreak—of what happened when the parts of my life I thought would be the best turned out to be the worst, and when the things I thought would make me happy almost wrecked me, and why they didn’t.
The book is divided in chapters that have nothing to do with baking categories. They are: Courage, Grace, Bliss, Love, and Wisdom. Each chapter and each recipe starts with a small paragraph that is like a tiny little window into Samantha’s soul. The window might be tiny, but the image it shows is very bright.

From this chapter, many recipes tempted me to get into the kitchen and start baking. Coconut and Passion Fruit Pound Cake, a breathtakingly gorgeous Chocolate Cardamon Babka, Earl Grey Pain au Chocolat, the Mascarpone Gingerbread Bars (photo included in this post), and a Sweet Potato Cinnamon Bun with Browned Butter Cream Cheese Glaze (wow!).
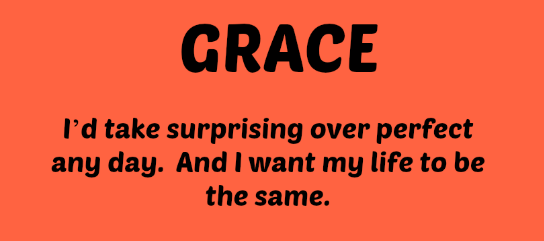
The chapter opens with Salted Chocolate-Covered Chocolate Caramels. Of course, when a person wears braces, she will be fiercely drawn towards caramels, brittles, and nougats, even if before having braces those items were rarely part of her life. Anyway, I will make these babies the moment I get rid of my torture devices. Coffee Creme Bundt Cake, is beautiful and preceded by a heart-warming bit about her Dad. As always, just a little paragraph, just enough to make you smile and wonder if you haven’t been too narrow-minded about your thoughts about food. Next comes a recipe I really wanted to feature in the blog, but did not have a chance to make yet. Ready to dream? Creme Brulle Tart with Pears and Chocolate. Yes, this will be in our kitchen at some point in the near future. Danish Sugar Cookies with Currants and Lemon… Pistachio and Praline Puffs… Sunshine Wreath (a thing of beauty!).

From this chapter the first thing that caught my eye was a shortbread, a recent weakness of mine. Her version is a Chocolate Almond Spelt Shortbread. Looks really tasty. Brownie Cake with Candied Hazelnuts and Whipped Cream... Coconut Buns… Gingered Cashew Nut Brittle (blame it on the braces)… Graham Cupcakes with Milk Chocolate Frosting (just adorable)… Another heavy contender to be featured is We are Nuts About Nuts Cookies. Little sugar cookie rectangles dipped in chocolate and sprinkled with ground pistachio nuts. Just lovely. Orange Streusel Cake, featured today, is also in this chapter.
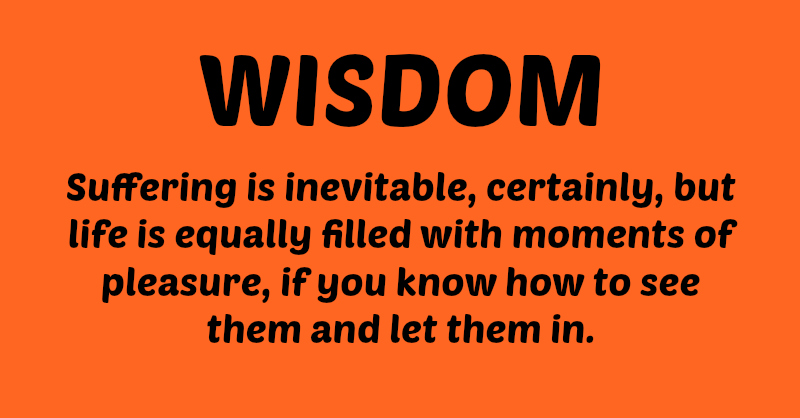
The chapter opens with my favorite little story of her book. Just a few thoughts about JFK Airport in New York City. More specifically about the arrivals gate. “Where shopping and dining isn’t the point. It’s all about the crowd along the barriers.” Just perfect.
From this final chapter, I would gladly try her Apple Snack Cake... Barley Oat Biscuits… Cinnamon Raisin Soft Pretzels (the picture is enough to make your heart missed a few beats)… Lemon Lime Earl Grey Sables... Maple Cream Pie… Orange Pistachio Buns… Saffron and Chocolate Tea Cake… and the very last recipe of the book, Unorthodox Challah with Dates and Cocoa.
I hope you enjoyed my little review and consider inviting this gem of a cookbook into your home. Samantha, thank you for allowing me to share a recipe with my readers. I look forward to baking more goodies from your book, and reading again and again your stories behind each one.

ONE YEAR AGO: Pink Praline Brioche
TWO YEARS AGO: A Spinach Salad to Write Home About
THREE YEARS AGO: Karen’s Four Hour French Country Bread
FOUR YEARS AGO: The Siren’s Song of the Royal Icing
FIVE YEARS AGO: Blog-worthy Roasted Butternut Squash
SIX YEARS AGO: Chocolate Currant Sourdough Loaf & Roasted Beet Hummus
SEVEN YEARS AGO: Sesame and Flax Seed Sourdough
EIGHT YEARS AGO: Spanakopita Meatballs
NINE YEARS AGO: Saturday Morning Scones
TEN YEARS AGO: Pain de Mie au Levain
