A FRUITFUL TRIO

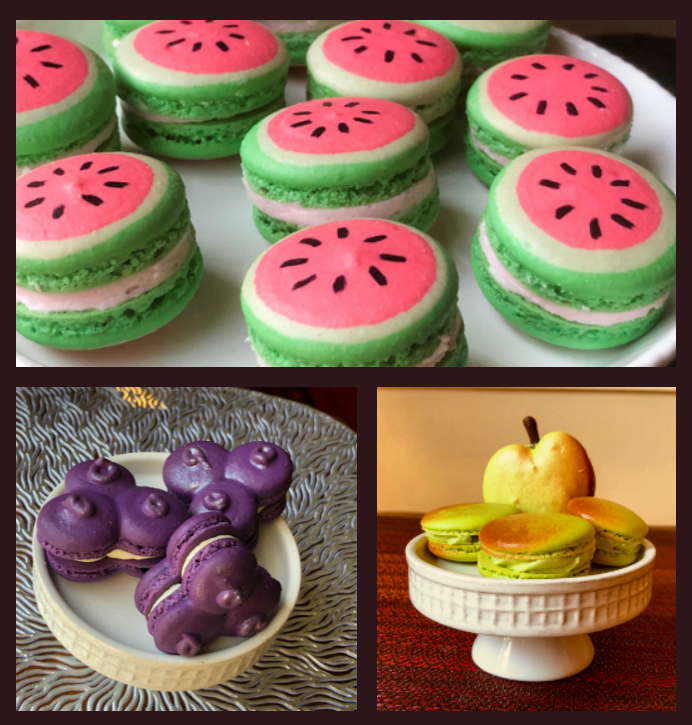
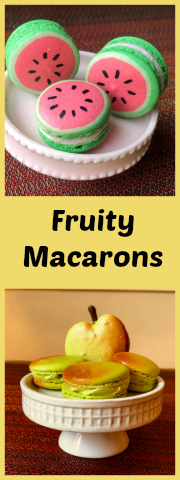
Three fruits, three macarons… Watermelons, Blueberries and Apples, each using a slightly different technique for piping the shells. For the watermelon version, I share two styles for the shells, with the same buttercream filling.

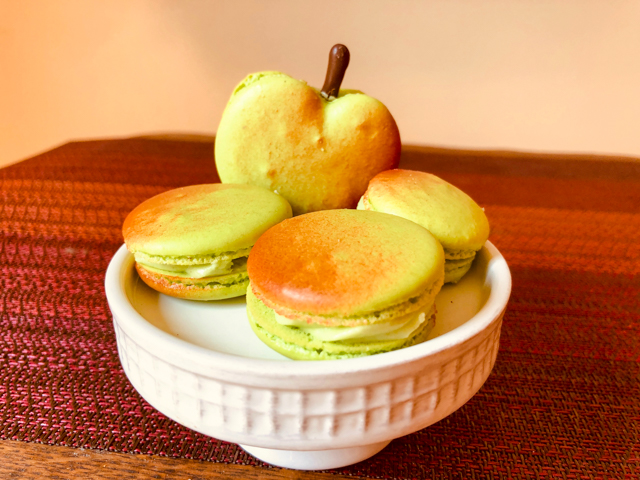
APPLE CIDER MACARONS
(inspired by Broma Bakery)

for shells:
3 egg whites (check the weight, mine were 103g)
same amount of granulated sugar (103g)
same amount of fine almond flour (103g)
same amount of powdered sugar (103g)
1/4 tsp vanilla paste
pinch of cream of tartar
food gel color, yellow and green (8:1)

for filling:
113g unsalted butter (softened)
360g powdered sugar (about 3 cups)
4 tablespoons apple cider
pinch of salt

for decoration:
brown Candy Melts
air-brush color, red and orange

Mix 3 tablespoons of granulated sugar with the egg whites and cream of tartar in the bowl of a KitchenAid type mixer. Place over simmering water and whisk for about 2 minutes until sugar is dissolved (temperature should be around 150F).

Place bowl in the KitchenAid and whisk in medium-speed, slowly adding the rest of the granulated sugar. Whisk for about 4 minutes, until thick peaks form. Add vanilla and food coloring (I added yellow and green).

Mix the almond flour with the powdered sugar, pass in the food processor together for about 10 pulses, then sift the mixture. Add it to the meringue and proceed with the macaronage until you can form a figure 8 with the batter flowing down from a spatula. Place in a large piping bag fitted with a round tip.

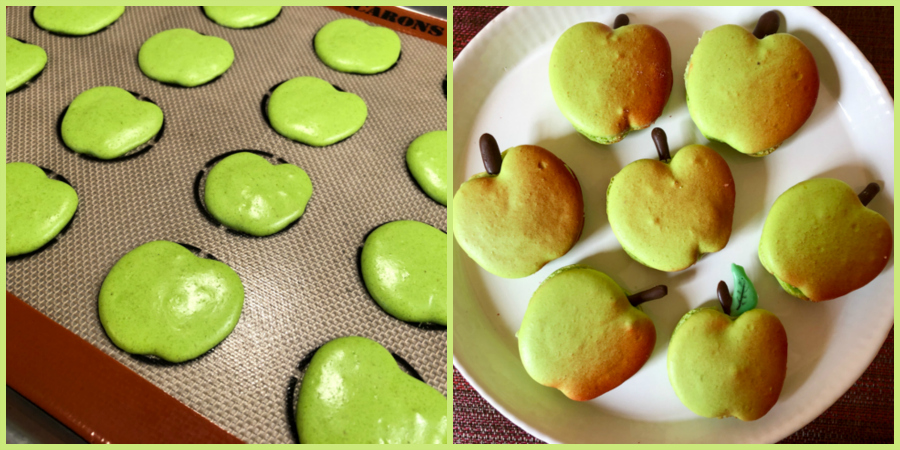
Pipe shells in shape of an apple, let it dry until a skin forms.  Bake at 300F for about 12 minutes, until the top does not move when you gently try to twist it around. Color half of the shell with airbrush, I used a mixture of red and orange colors, eye-balling to get the tone I wanted.

Make the stems by piping Candy Melts on parchment paper. Make more stems than you’ll need, as they might break.

Make the filling by creaming the butter for a couple of minutes, then adding the powdered sugar, cider and salt. Adjust consistency with milk if needed, or more powdered sugar.

Fill shells, match them, and add the stems. Let the macarons mature overnight in the fridge before serving.

ENJOY!

to print the recipe, click here

Comments: The macaron recipe is the one I’ve been playing with recently, from Broma Bakery. I just adapted it to make it in proportion to the weight of a given number of egg whites, because it simplifies everything quite a bit. I love how these turned out, air-brushing really adds a lot to the shells, but if you don’t have it, they will be fine without it. You can also make the macarons round and add just the stem, or maybe the stem and a little leaf, also piped with Candy Melts, dyed green.

Next time you want to make macarons, think about the size of the batch you need.
A small batch? Grab two egg whites, weigh them and add the other ingredients, all with the exact same amount by weight.
A regular batch (enough for about 24-30 macs?) Grab three egg whites.
A big batch? Four egg whites. That would probably be my limit, macaronage on a bigger batch might be tricky. 

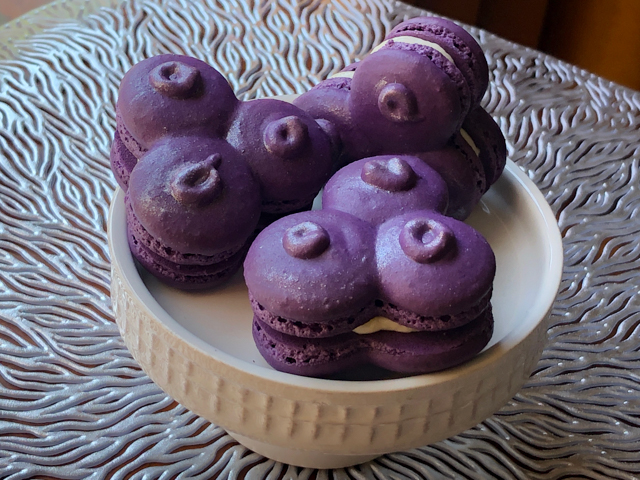
BLUEBERRY CLUSTER MACARONS
(inspired by Veronika Gowan)

Macarons made with this recipe, using gel food dye purple, from Artisan Accents)

Macaronage kept a bit thicker than normal, so that shells can be piped without losing their individual circles. Most of the batter was placed in a bag with a regular icing tip for macarons (80-100mm), and a very small amount was placed in a bag without any tip, with a small opening cut with scissors. That was used to pipe the little round stem spots.

When you pipe the cluster, make sure each “blueberry” is kept small, so that the final macaron is not huge.

for the filling:
1/4 cup blueberry jam (store-bought or homemade)
113g butter, softened
240g powdered sugar
lest of 1 lemon
lemon juice to taste
pinch of salt

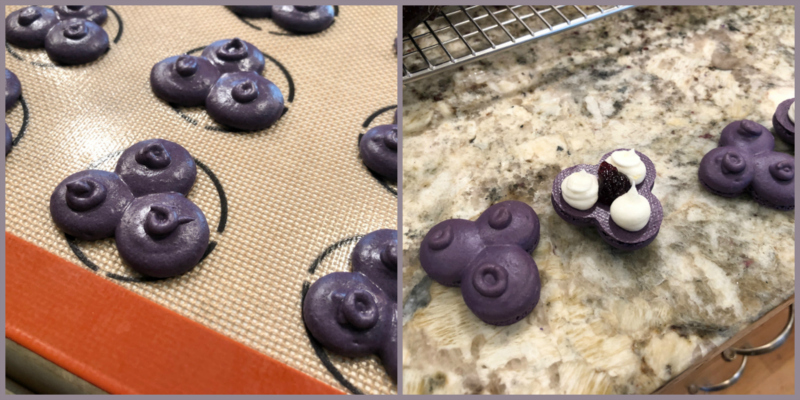
Pipe the cluster of three small berries. Tap the tray to release air bubbles, but be gentle, you don’t want the circles to join too much. Let the batter sit for 5 minutes, then pipe the round stem centers. Let the shells dry until a skin forms, then bake as normally (300F for about 12 minutes).

Make the lemon buttercream by whisking the softened butter for a couple of minutes in a KitchenAid type mixer. Add the lemon zest and whisk another 30 seconds, then the powdered sugar in a few batches in very low speed. Slowly increase the speed once the sugar is starting to get incorporated, add the lemon juice, salt, and whisk at high speed for a couple of minutes. Adjust consistency with more lemon juice or powdered sugar, as needed.

Fill the shells with a dollop of jam in the center and lemon buttercream around, as shown in the picture below.  Let the macarons mature in the fridge overnight before enjoying.

Comments: Veronika Gowan makes incredible macarons, perfect examples of fruits and even vegetables (she recently made unique and exquisite chanterelle macarons). I need to practice my piping skills for very delicate features, but in the case of blueberry clusters, next time I will add the stem decoration by painting. I think they will be more delicate and maybe more realistic that way. You can click on her instagram feed to see many of her amazing productions.

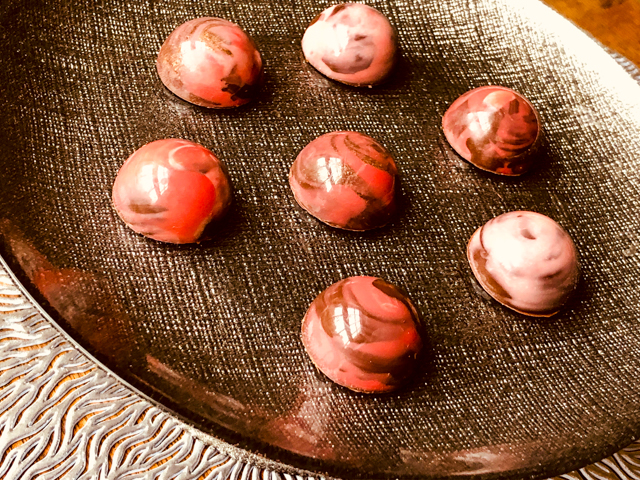
WATERMELON MACARONS, TWO WAYS
(piping inspired by Pies and Tacos)

for shells:
same recipe as Apple Cider macarons above, separated in three batches: green, light green (or left un-dyed), and watermelon (pink and red 2:1)

for filling:
200g powdered sugar
60g unsalted butter softened
1/2 tsp Amoretti watermelon emulsion (adjust to taste)
milk or heavy cream to adjust consistency of buttercream
pinch of salt

to decorate:
edible food marker, black

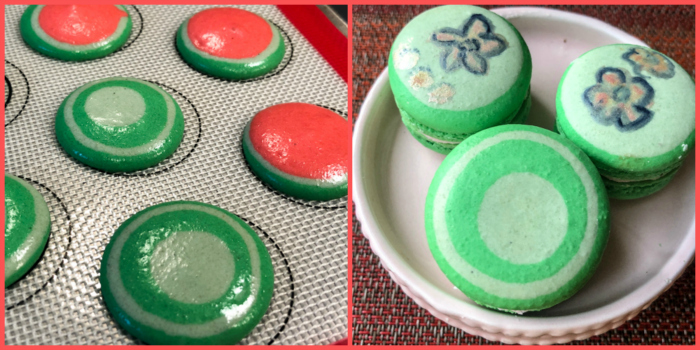
You will pipe the shells in three concentric colors, starting with the dark green, then light (or un-dyed), then watermelon After that you tap the tray to release bubbles as normally, just don’t be too harsh.

Once baked, you can fill them and do the final decoration with a black marker. You might have leftover batter of one or two colors (I had both green colors leftover). In this case, use them as the back of your macaron, or come up with a totally different design. Go with the flow, dance to the Macaron Music… 

To make the watermelon buttercream, follow the general method of the lemon buttercream above, but use watermelon flavor added to the butter after it is creamed. Then proceed with the powdered sugar addition and milk or cream, if needed.

Alternative design for watermelon macarons

You can simplify things and pipe shells of two different colors, matching one green and one watermelon-color. I air-brushed some pink luster on the shell, but that is just a bit of icing on the cake…  😉

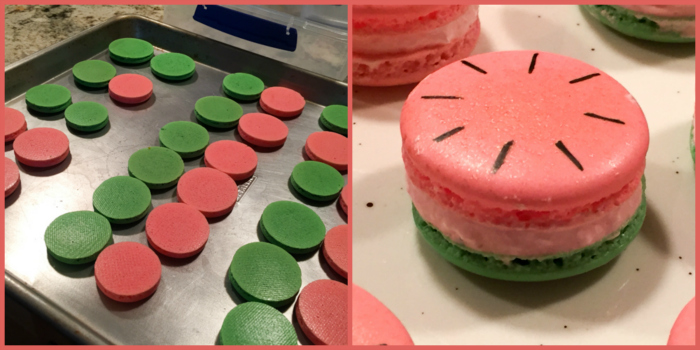
After filling the macarons with watermelon buttercream,  make little seed markings with black food marker, and as always, let the macarons sit in the fridge overnight for proper maturation of the shells.

I hope you enjoyed these variations on my favorite cookie. I have been practicing with different shapes, and results are not always that great, but I still have fun trying…

ONE YEAR AGO: Halloween Entremet Cake

TWO YEAR AGO: Pork with Prunes, Olives and Capers

THREE YEARS AGO: Kansas Corn Chowder

FOUR YEARS AGO: Impossibly Cute Bacon and Egg Cups

FIVE YEARS AGO: Pulling Under Pressure

SIX YEARS AGO: Cooking Sous-vide: Two takes on Chicken Thighs

SEVEN YEARS AGO: Miso Soup: A Japanese Classic

EIGHT YEARS AGO: On my desk

NINE YEARS AGO: A must-make veggie puree

TEN YEARS AGO: Vegetarian Lasagna

ELEVEN YEARS AGO:  Brazilian Pão de Queijo

INCREDIBLY SIMPLE TIMES FOUR: OCTOBER 2020

It’s been a while since I shared with you recipes that are super simple but tasty enough to justify being featured on a blog post.

INCREDIBLY SIMPLE #1
EGGS WITH ZA’ATAR AND LEMON

This very simple “recipe” is from a wonderful cookbook called “Falastin.”  Gently boil as many eggs as you want, but just for 6 minutes. The idea is to get the yolk still pretty creamy. Now in a small bowl, whisk olive oil, lemon juice, and za’tar. Peel the eggs, and chop them coarsely, drizzle your little sauce and sprinkle salt on top. Amounts are totally flexible, I usually go with 2 eggs, 1 tablespoon olive oil and then improvise.  I don’t know how many times I’ve called this lunch, with Ak-Mak crackers or a slice of sourdough bread. So good!


INCREDIBLY SIMPLE #2
SMOKY CHICKPEAS

Inspiration for this recipe came from Steeped: Recipes Infused with Tea (I adore it). You will need some smoked tea (Lapsang Souchong), but it is totally worth it to get some and keep in your pantry, even if you don’t enjoy it as a regular tea. I use it in chocolate ganache and quite often in cooking. It gives the food a very nice, subtle smoky flavor.

Slice open one bag of smoked tea, mix its contents with some cumin, smoked paprika, and salt. Open a can of chickpeas, drain and rinse well. Add into a bowl, drizzle some grape seed oil all over it, add the dry spice mixture and mix.  Spread on a baking sheet lined with aluminum foil, and roast in a 400F oven for 25 minutes until golden brown.  Once again, amounts can be totally eye-balled, no need for precision here. Relax and have fun with it.


INCREDIBLY SIMPLE #3
AROMATIC BASMATI RICE

I found this gem of a recipe at Spice House website and made it four times in a row. That tells you how much we enjoyed it. It just turns a regular batch of rice into something special.  I made some adjustments to their recipe as I felt that the rice was turning out a bit too underdone for our taste.

AROMATIC BASMATI RICE
(adapted from Spice House)

1 cup Basmati rice, rinsed
1 Tablespoon grape seed oil (or another mild-flavored oil)
5 whole cardamom pods
2-3 whole cloves
1 cinnamon stick
salt to taste
2 cups cold water  

Add oil to a non-stick saucepan and place the pan over medium heat. When the oil is hot, add the cardamon (you can lightly crush them if you want more flavor), cloves and cinnamon stick to saute briefly. When fragrant, add rice and salt. Saute a minute or so to coat the grains of rice with the flavored oil. Add water, but don’t put the lid on yet.

Once the water boils, turn the heat down and simmer uncovered for 7 minutes. Cover the pan, and let it cook on very gently heat for 7 more minutes. Turn the heat off and let the rice sit in the pan for 10 minutes before removing the spices and fluffing the rice for serving.

ENJOY!

to print the recipe, click here

Make sure to count how many little spice pieces you add to the pan so you can be sure to remove them all, although they are pretty visible on the cooked rice later.  There is so much flavor in this recipe, I guarantee you will be hooked on it.

.

INCREDIBLY SIMPLE #4
BAKED SALMON WITH SOY-GINGER GLAZE

BAKED SALMON WITH SOY-GINGER GLAZE
(inspired by At Home with Natalie)

3 salmon filets
1/4 cup soy sauce
1/4 cup mirin (sweet rice wine)
1 Tablespoon brown sugar
1 Tablespoon freshly grated ginger
1 tsp sesame oil (do not add more, it is powerful stuff)
salt to taste
sesame seeds to sprinkle on top

Place the salmon filets (skin side down) over a baking sheet covered with aluminum foil leave at room temperature while you heat the oven to 350F and reduce the sauce for glazing.

Mix the soy sauce and mirin in a small non-stick saucepan, add the ginger, brown sugar and sesame oil. Simmer gently for a few minutes, until it starts to get a little thicker.   Brush the top of the filets with some of the glaze, season very lightly with salt, and place in the oven for 20 minutes. Reserve the rest of the glaze.

Remove the pan from the oven, brush with more glaze and sprinkle sesame seeds. Return to the oven, and cook until done to your liking. Serve immediately.

ENJOY!

to print the recipe, click here

We eat salmon every week, but usually the husband is the seafood cook in our house. I rarely venture into his department, but was tempted to try this very simple preparation. I know I’ll be making it regularly, the only key thing is to get the fish cooked to the exact point you want (which is easier to do with sous-vide, but sometimes it’s nice to simplify things further).  Probe the filet with a paring knife, and remove from the oven when it reaches your personal Nirvana level.

ONE YEAR AGO: Halloween Entremet Cake

TWO YEAR AGO: Pork with Prunes, Olives and Capers

THREE YEARS AGO: Kansas Corn Chowder

FOUR YEARS AGO: Impossibly Cute Bacon and Egg Cups

FIVE YEARS AGO: Pulling Under Pressure

SIX YEARS AGO: Cooking Sous-vide: Two takes on Chicken Thighs

SEVEN YEARS AGO: Miso Soup: A Japanese Classic

EIGHT YEARS AGO: On my desk

NINE YEARS AGO: A must-make veggie puree

TEN YEARS AGO: Vegetarian Lasagna

ELEVEN YEARS AGO:  Brazilian Pão de Queijo


SUNBURST PUMPKIN SOURDOUGH

OCTOBER 16th: WORLD BREAD DAY!

It is that time of the year, when leaves turn orange and red, pumpkins pop up in every recipe (including many where they don’t belong, but let’s not get into a sour mood).  I share with you today a sourdough bread to celebrate Fall. It does have a little canned pumpkin in the formula, but I promise you the taste is very mild, it just contributes moisture and it slightly changes the final texture of the crumb. We loved this bread and hope you’ll also like it if you make it.

SUNBURST PUMPKIN SOURDOUGH
(from the Bewitching Kitchen)

475 g white bread flour
25 g whole wheat flour
120g starter at 100%
100 g canned pumpkin
340g water
10g salt

Add all ingredients to the bowl of a KitchenAid type mixer and using the dough hook, work the dough for 4 minutes at low speed. Adjust flour if necessary, it should still stick to the bottom of the bowl not cleaning it completely as the dough moves.

Remove from the bowl, knead briefly by hand and let it ferment for 3 and a half hours folding every 45 minutes. Shape as a round loaf, refrigerate overnight, seam side up.

Heat the oven to 450F, invert the dough on parchment paper, so that the smooth side is now up. Dust the surface with regular flour, lightly but uniformly. Score with a brand new razor blade, in concentric arcs from the center. Bake for 45 minutes in a Dutch oven, covered for 30 minutes, removing the lid for the final 15 min.  Let it cool completely before slicing.

ENJOY!

to print the recipe, click here

Comments: I’ve been really in love with this method of starting the kneading in the KitchenAid and finishing with foldings. It gets a nice jump start on gluten formation, and it has the advantage of being very “clean”.  When you do the whole incorporation by hand, the two initial foldings can be pretty messy, the dough gets on the fingers, sticks to the sides of the bowl… it’s not too big a deal, but allowing the KitchenAid to do that initial work makes clean up so much easier. I know bread baking purists will turn their noses but… it works for me.

This bread was a loud, loud singer as it cooled down. And the crumb had the kind of structure we like. Not too open, not too tight.

As I mentioned, you cannot taste pumpkin, it is just a very mellow sourdough, with a creamy texture given by the pumpkin puree. If you like a more orange hint to the crumb, adding turmeric is a good option, but not too much, I’d say 1/2 tsp for this size loaf.

ONE YEAR AGO: Sourdough Four-Play

TWO YEARS AGO: World Bread Day 2018

THREE YEARS AGO: Slow-Roasted Tomatoes

FOUR YEARS AGO: Spicy Cotija and Black Olive Sourdough

FIVE YEARS AGO: Apple Cinnamon Oatmeal Cake

SIX YEARS AGO: Sourdough Rye Bread with Flaxseeds and Oats

SEVEN YEARS AGO: PCR and a Dance in the Mind Field

EIGHT YEARS AGO: October 16: World Bread Day

NINE YEARS AGO: The US Listeria Outbreak 2011

TEN YEARS AGO: 36 Hour Sourdough Baguettes

ELEVEN YEARS AGO: October 16 is World Bread Day


CHOCOLATE BONBONS WITH MANGO-GANACHE FILLING

It’s been a long time since I tried my luck with bonbons. Six months, to be precise. Every weekend I kept adding it to my list of little culinary adventures, but somehow postponing it to that uncertain time called “near future.”  But it finally happened. I tricked myself by making the filling first, so that I had to put it to use. Psychology 101. It worked. If you are not interested in making bonbons, consider the filling for macarons or sandwich cookies. I had some leftover and made a small batch of macarons to take care of it. They turned out into “Funky Rose Macarons” and I share photos in the end of this post.

CHOCOLATE BONBONS WITH MANGO-GANACHE FILLING
(from the Bewitching Kitchen, adapted from several sources)

for the shells:
300g dark tempered dark chocolate for shells
100g cocoa butter
1/2 tsp titanium oxide
two colors of fat-soluble dye of your choice
gold pearl dust (optional)
150g tempered dark chocolate for closing bonbons

for the filling:
160g dark chocolate, chopped (I used Lindt 70%)
56g heavy cream
35 g mango purée
7 g light corn syrup
7 g butter,  soft   ⅛ ounce
1/8 tsp ground coriander

Start by making the filling. Place the chopped chocolate in a medium-size bowl. Pour the cream into a small, heavy-bottomed saucepan and add the mango purée and corn syrup.   Cook over medium-high heat until the cream mixture reaches a rolling boil. Pour onto the chopped chocolate. Let sit for 2 minutes undisturbed, then stir slowly to incorporate.  Once the ganache cools to about 95F add the butter and the coriander.  Place the ganache in a piping bag, and it can be piped into tempered shells once it is at 88F. You can make the ganache in advance and warm gently to use.

Make the shells. Clean your mold with alcohol and rub every cavity very well with a cotton ball or a make-up pad. Heat the cocoa butter very gently, preferably don’t let it go over 115F. Add titanium oxide and blend it vigorously with an immersion blender. In the composite photo below, you’ll see that melted cocoa butter is translucent, yellow. Once you add titanium oxide it will turn white and opaque, that’s what you need as a starting point to add any color you want.  Divide the cocoa butter in two portions, add the color you want (make sure it is fat-soluble or your cocoa butter will seize). Add each color to a piping bag (do not cut the tip).  Now, gently roll the bag on a surface, back and forth, back and forth, so that the cocoa butter cools and tempers.


Check the temperature every few minutes, it will cool reasonably fast. If you have an infra-red thermometer, that’s the easiest way to do it. Once the temperature drops to 92F it will be ready to add to the molds. Simply use a gloved finger and paint each color inside the cavities. If you want to add some gold tones to it, once the cocoa butter sets, you can brush lightly with pearl dust.

Temper 300g of dark chocolate and fill the cavities. Tap the mold to release any air bubbles, then invert the mold to let the excess chocolate drip (do that on top of plastic wrap so you can collect the chocolate to use again later, or to do some decorations while it’s still tempered. I made some spider webs, because…. that’s the spirit!

Let the mold sit inverted and suspended over your countertop (the easiest way to do it is to use those silicone dough strips so that the mold does not touch any surface. After one hour at room temperature, you can flip the mold and fill the cavities with your prepared ganache (make sure it is not over 88F so that your shells won’t be melted and lose temper). Make sure to leave a little space for the chocolate that will seal the bonbons.

Now temper 150g chocolate and use it to cover the shells. Right before you pour the chocolate, heat the surface of the mold with a hairdryer very very briefly. You do that to melt just a bit the edge of the shells. Pour the chocolate and place a sheet of acetate covering the whole mold. Hold the top with one hand, and use the other hand to scrape the acetate very hard, so that all excess chocolate will drip out and the acetate will be stuck to the mold.


Ideally, wait for 12 to 24 hours to un-mold, but you can also leave it for 1 hour at room temperature and then place it in the freezer for exactly 15 minutes. The shells will contract and be ready to un-mold then.  Be brave and bang the mold hard on a countertop, the shells should pop out. Full crystallization of the chocolate will happen over time, just leave it at room temperature.  Marvel at the random pattern of colors you got.

ENJOY!

to print the recipe, click here

Comments: I had some issues with the painting of the mold, my colored cocoa butter kept forming a puddle at the bottom instead of painting nicely on the sides, although the temperature seemed “spot on” (to quote Paul Hollywood). So I kept cleaning it all with cotton balls (it was nightmarish) and trying again, and again. Finally, in complete despair, I stuck the clean mold in the freezer for 5 minutes and that worked like a charm, because the cocoa butter then set exactly where I wanted it to be.  Of course, when making bonbons you are “in the dark” about the whole process until the very end – the thrilling moment of un-molding the beauties.

If you read my first adventure with bonbons, at that time I had some problems closing the shells. This time I used a different method, much more efficient. Pour the tempered chocolate on the filled molds, and press a sheet of acetate (cut to size) right on top of it, then scrape it firmly using one of these tools of a cake smoother. The chocolate will crystallize beautifully on the acetate, giving a nice shine to the bottom of the bonbon.

I wanted to dye the shells orange and red, but realized I did not have fat-soluble orange dye, so I went with pink and red, which would be more appropriate for a raspberry filling. But I am so happy with the results, the shells turned out super shiny and not a single bonbon cracked during un-molding. The gold dust did not show too well, I was afraid of over-doing it, next time I will add more.

The bonbons had a very thin and delicate shell, very uniform all the way around. All in all, it was a successful project. The kitchen looked like the aftermath of a paintball fight, and I was that player who was killed 9 times, but it was all worth it!

As I mentioned, I had leftover ganache. I kept it at room temperature, and next day whipped it with a handheld blender so that it was easier to pipe. Macarons were made using the Broma Bakery recipe (Swiss-meringue based), and orange food dye.  Half the batter I did the macaronage to the normal level and piped round shells. Half the batter I kept a lot thicker and piped with a Wilton 1M tip in rosette shape as I did in the past. I painted the edges of the petals with black, gold, and copper pearl dust dissolved in vodka. In some shells I used an air-sprayer with black dye, but I thought those turned out a bit too dark.


The tempered spider web decorations were also put to use on cupcakes.  I will be making a blog post in the near future (yes, that time frame I am so fond of!).

I hope you enjoyed my third adventure int the world of chocolate bonbons.
I have the feeling it won’t take me six more months to try again…

ONE YEAR AGO:  Giant Cookie Meets Mousse

TWO YEAR AGO: The Brazilian Battenberg

THREE YEARS AGO: Salzburg Sourdough

FOUR YEARS AGO: If I had One Hour

FIVE YEARS AGO: Apple Cinnamon Oatmeal Cake

SIX YEARS AGO: Sourdough Rye Bread with Flaxseeds and Oats

SEVEN YEARS AGO: Apricot-Raspberry Sorbet: A farewell to Summer

EIGHT YEARS AGO: Marcela’s Salpicon

NINE YEARS AGO: Pork Kebabs

TEN YEARS AGO: Fondant au Chocolat

ELEVEN YEARS AGOGot Spinach? Have a salad!

CURRIED SWEET POTATO FRITTERS

This is a wonderful take on sweet potatoes, that you could conceivably serve as a little appetizer, if you make them slightly smaller and use a lighter hand on the yogurt topping. Using cookie cutters to shape the patties makes the presentation very uniform and appealing, but of course if you don’t want to go through that step, simply add portions to the hot oil. They will be rustic but there’s really nothing wrong with that.

CURRIED SWEET POTATO FRITTERS
(adapted from Tea Time Magazine, November-December 2020)

for yogurt sauce:
1/3 cup yogurt
1 tsp agave nectar
1/8 tsp ground cardamon
1 Tbs lemon juice
pinch of salt

for fritters:
2 cups sweet potato, peeled and grated
1 egg
1/4 cup all-purpose flour
1/2 tsp curry powder
1/2 tsp salt
olive oil for shallow frying

Make the yogurt by mixing all ingredients in a small bowl, and keeping in the fridge until serving time.

Stir together all ingredients for the fritters (except olive oil)  in a large bowl.  Place a 2-inch cookie cutter over a baking sheet lined with parchment paper. Place a little over 1 tablespoon of the sweet potato mixture inside the cutter, patting it flat. Carefully remove the ring and make a second one. Use all the potato mixture, you should have between 8 and 10 fritters. Refrigerate to firm the mixture up for about 20 minutes.

Heat the olive oil in a large non-stick frying pan and sautee the little cakes on both sides until golden brown. Drain on paper towels, and serve with a dollop of the yogurt sauce on top. You can keep the fritters in a low-oven for a while if needed.

ENJOY!

to print the recipe, click here

Comments: You can make the little patties way in advance and keep them in the fridge. In fact, I recommend you do that because they will keep their shape better as you cook them. I did not want to make them too thin, because they would get too soaked in oil, so after sauteeing both sides, I placed them in a 350F oven for about 10 minutes.

When I make them again, I will go Pollock on the sauce, I think it will look pretty cool that way. And yes, this will undoubtedly be one of those recipes to show up regularly in our kitchen. We both loved it!

ONE YEAR AGO: Miso and Sesame Roast Chicken with Revelation Quinoa

TWO YEAR AGO: Incredibly Simple Times Four

THREE YEARS AGO: Parsnip, Coconut and Lemongrass Soup

FOUR YEARS AGO: In My Kitchen, October 2016

FIVE YEARS AGO: Paleo Moussaka

SIX YEARS AGO: In My Kitchen, October 2014

SEVEN YEARS AGO: In My Kitchen, October 2013

EIGHT YEARS AGO: Bourbon and Molasses Glazed Pork Tenderloin

NINE YEARS AGO: Crimson and Cream Turkey Chili

TEN YEARS AGO: Taking a break from the nano-kitchen

ELEVEN YEARS AGO: Chocolate Chip Cookies