WHITE CHOCOLATE RASPBERRY DOME & AFTERNOON TEA REVIEW

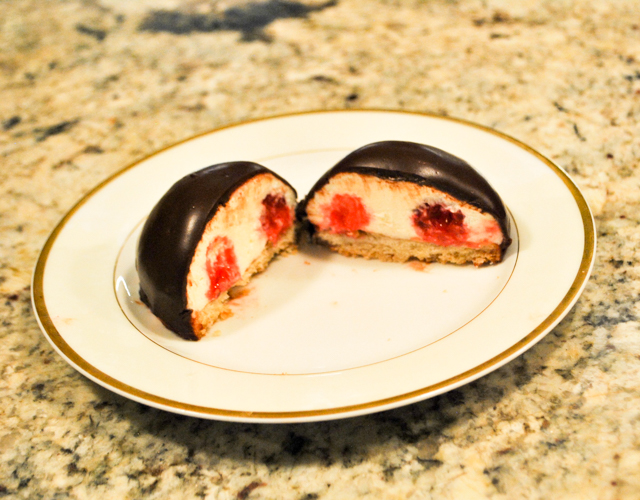
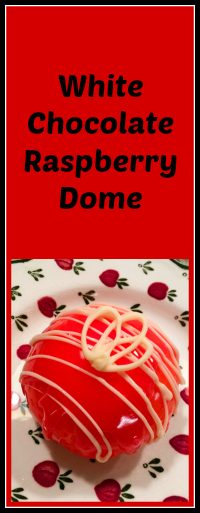
If you want to make a dessert to impress, search no further. This one looks impossibly cute, it mixes different textures, and it comes in single portion size, which always makes a dessert more special. Made just for you! The recipe comes from a cookbook that you absolutely must have: Eric Lanlard’s Afternoon Tea. I fell in love with it without having any idea who Mr. Lanlard was, and it turns out he is quite the celebrity chef, having done several cooking shows on TV and written a fair number of cookbooks. Born in Bretagne, he’s been living in the UK since age 22, now the owner of a wonderful place in London called Cake Boy. Maybe one day I will be able to visit and enjoy one of his beautiful concoctions. With a perfect cup of tea, of course… But without further ado, here is my version of his adorable dome-shaped dessert.


WHITE CHOCOLATE AND RASPBERRY DOME
(reprinted with permission from Eric Lanlard)

100g (3½oz) white chocolate, roughly chopped
10g (¼oz) golden caster sugar (or regular sugar)
1 egg yolk
10g (¼oz) cornstarch
50ml (2fl oz) milk
1 gelatine leaf (about 2.5 g)
250ml (9fl oz) whipping cream
30 raspberries
6 thin Palets Breton (recipe follows)
8 tbsp apricot jam
pink food coloring
tempered white chocolate for decoration

Melt the white chocolate in a heatproof bowl set over a saucepan of barely simmering water, making sure the surface of the water does not touch the bowl. Leave to cool slightly. In a separate heatproof bowl, whisk the sugar and egg yolk until pale and fluffy, then fold in the cornstarch.

Heat the milk in a saucepan, then pour over the egg mixture and whisk until smooth. Pour the mixture back into the pan and cook over a medium heat for 2–3 minutes, stirring continuously, until it has thickened. Meanwhile, soak the gelatine in cold water until softened. Stir the custard into the melted white chocolate. Squeeze out the excess water from the gelatine and add to the warm chocolate mixture, then stir together until the gelatin has melted. Leave to cool.

Whip the cream to soft peaks, then fold into the cooled custard. Divide the mousse among 6 individual dome silicone molds, filling them half full. Arrange 5 raspberries over the mousse in each mold, then spoon over the remaining mousse. Place the molds in the freezer for at least 4 hours until set solid.

Melt the apricot jam in a small saucepan, then pass through a sieve until smooth. Return the glaze to the pan and stir in the food dye. Turn each mould out on to a cooling rack. Pour the glaze over the frozen domes to cover – the glaze should set within 30 seconds. Using a palette knife carefully lift each on to a Palet Breton biscuit. Chill in the refrigerator until ready to serve.

PALETS BRETON
(slightly modified from Eric Lanlard’s recipe)

2 egg yolks
85g (3oz) golden caster sugar (or regular sugar)
85g (3oz) unsalted butter, softened
140g (5oz) plain flour, plus extra for dusting
1 tsp baking powder
2 generous pinches of Guérande salt

In a bowl, whisk together the egg yolks and sugar until pale and fluffy, then add the butter. Sift the flour, baking powder and salt together, then add to the mixture and combine together to form a smooth dough. Turn out on to a lightly floured surface and shape as a flat disk. Cover with plastic film and chill in the refrigerator for one hour.

Roll the dough about 3/8 inch thick and bake in a 350F oven for about 20 minutes. While still warm from the oven, cut disks the same size as your dome mold for the mousse.  Leave to cool completely before assembling the dessert.

ENJOY!

to print the recipe, click here

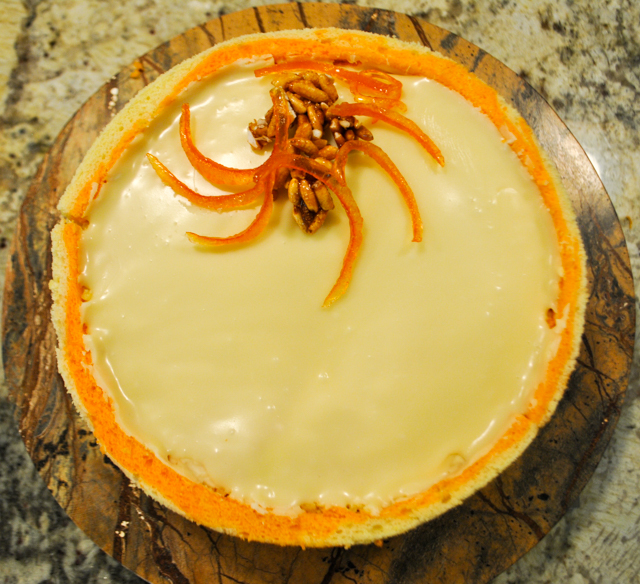
Comments: I am really over the moon with this dessert. It is deceptively simple to prepare, but  having made it twice, I can tell you that small details matter. If you look at the bottom right picture in the composite above, you’ll see that the raspberries are visible underneath the glaze. That happened because the berries were a little too big (hey, Kansas is not that far from Texas) and when I placed them inside the mold and filled it with mousse, some were pushed all the way to the edge. It is evident on the upper right photo. Ideally, the fruit should be totally surrounded by the white chocolate mousse. It is a small detail, but in such a lovely dessert, it is one to pay attention to next time. See? There I am again using the “next time” line. That is also the reason why I added the drizzle of white chocolate, to make the boo-boo less evident. Plus, it gave me a good excuse to try my hands at tempering white chocolate. It was quite a thrill, but one with a happy ending.

I used the seeding method, in which I melted very slowly 3/4 of diced white chocolate (to 105 F), then brought the temperature down to 80 F adding the remaining 1/4 diced bits with constant agitation (talking not only chocolate but my inner self). After that, I increased the temperature super gently with a hairdryer just to be able to drizzle and pipe the design over silpat, not allowing it to go over 85 F.

The cookie base can be whatever cookie you like. The most important thing is that the dimension match that of the domed mousse. Since some cookies shrink or change shape during baking,  I decided to roll the dough out, bake it and then cut the cookies exactly the size I needed. Worked pretty well. Sablès are sturdy but have that melt in your mouth feel of a shortbread. I had some cookies leftover, and they received a drizzle of tempered white chocolate. They turned out very good, simple and delicious. The small amount of salt in the Palets Breton’s dough is a must. Normally these cookies are pretty thick (google and you’ll see what I’m talking about), but of course to serve as a base for the dessert, it is best to bake thinner versions, they will be more delicate.

One more thing: avoid using apricot jam like Bonne Maman. Oddly enough, that delicious version does not have as much pectin as more mundane brands do, and it’s hard to get good coverage of the mousse. On my first attempt, I ended up resorting to a chocolate glaze. It was also very good, but I think I prefer the taste and color impact of the pink-red glaze.

For those interested, this is the dome mold I used. 

And now, allow me to offer you a small overview of my favorite cookbook of the moment…
Eric Lanlard’s Afternoon Tea

The book starts with a nice introduction about paring tea with food, something most people don’t bother thinking about. But, truth is, tea covers many complex flavors and will complement, enhance, or sometimes fight with the food you serve it with. One of the interesting combinations he suggests is a Lapsang Souchong tea with anything chocolate. Lapsang Souchong is a smoked tea with quite unique flavor (and smell). I’ve seen pastry chefs making chocolate mousses infused with it, but have not tried it yet. That too, shall happen in the Bewitching Kitchen. But, back to the book. The chapters are divided into sections that cover particular types of goodies. I will list the recipes that made my heart miss a beat or three from each chapter. And by the way, let me tell you the photos are spectacular (you can tell by the cover of the book).

Macarons and Choux. How could I not fall in love with a book that opens with Macarons??? I want to make pretty much every one of the 10 recipes in the chapter, but just to share the favorites: Lemon and Pepper Macarons with Smoked Salmon, Hazelnut Macarons with Pumpkin Puree, Blue Cheese Gougères, and Mini-Salmon Mousse and Nigella Seed Paris-Brest.

Savory Tarts. Pear, Roquefort and Walnut Tartlets, Tartes Flambées, Camembert and Apple Tarts with Walnut Drizzle, Spinach and Pine Nut Wholemeal Tartlets.

Sandwiches and Scones. Very creative chapter, let me tell you… Combinations of flavors that seem quite unusual but not over the top. Vanilla-Cured Salmon on Beetroot Caraway Bread, Paprika Chicken Ciabatta, Pistachio and Rose Scones (swoon!), Raw Cacao and Raspberry Scones.

Cakes and Sweet Tarts. Pistachio and Rose Financiers (gosh, I must make these), Strawberry Ombré Cake (from the cover of the book, gorgeous cake), Chocolate and Ginger Tart (a thing of beauty), Linzer Torte.

Patisserie. My favorite chapter, that includes the some recipes I made from the book. Red Velvet Cheesecake, White Chocolate and Raspberry Domes, Lemon Posset, Saffron Crême Pâtissière, Mango, and Mint Cups, Raspberry Choux Craquelin Buns.

Biscuits. I cannot pick favorites. I want to make them all, so here they are: Viennese Butter Biscuits, Palets Breton, Cardamom BiscuitsSoft Ginger Biscuits, Honey and Lemon Biscuits, Lavender Shortbread Hearts, Cranberry and Pistachio Biscotti, Peanut Butter and Banana Cookies, Coconut Macarons Rocher, Gluten-free Tahini Cookies, and Cinnamon Palmiers.  Are you in love yet?

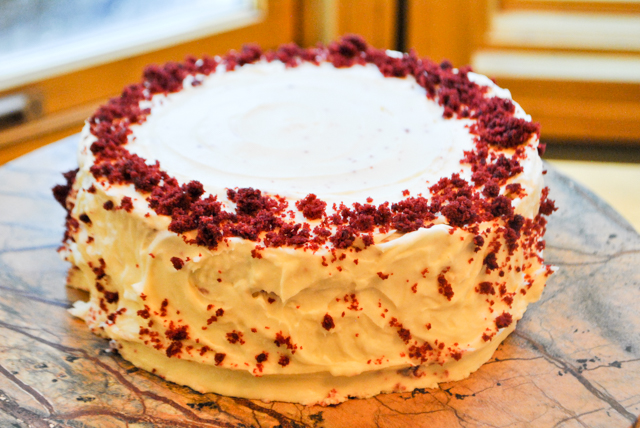
Finally, a teaser for you… this is his Red Velvet Cheesecake Cake. I took it to our department and people went crazy for it. It is decadently delicious.

Get the book, bake from it. Have a cup of tea. Find your hygge

Mr. Lanlard, thank you for allowing me to publish your recipe, and thanks for the advice on the raspberry dome. I look forward to baking a lot more from your gorgeous cookbook.

ONE YEAR AGO: Blueberry Crumble Coffee Cake

TWO YEARS AGO: Pickled Red Onions

THREE YEARS AGO: Strawberry Chocolate Chip Cake

FOUR YEARS AGO: Mini-Chocolate Cheesecake Bites

FIVE YEARS AGO: Whole-Wheat Spaghetti with Grated Tomato Sauce

SIX YEARS AGO: A Taste of Yellow to Honor Barbara

SEVEN YEARS AGO: Gratin of Beefsteak Tomatoes

EIGHT YEARS AGO: Tour de France Final Stage: PARIS

NINE YEARS AGO: Snickerdoodles with a Twist


SaveSave

SaveSave

SaveSave

SaveSave

SaveSave

SaveSave

SaveSave

SaveSave

SaveSave

SaveSave

SaveSave

SaveSave

SaveSave

SaveSave

SaveSave

SaveSave

SaveSave

SaveSave

SaveSave

SaveSave

SaveSaveSaveSave

SaveSave

SaveSave

SaveSave

SaveSave

SaveSave

RASPBERRY PUFFS

This recipe can be super simple if you buy puff pastry at the store, or quite a bit more involved if you make it yourself. I don’t want to sound snobbish – although probably it will be the case – but homemade will be a lot better. It is hard to get as many flaky layers from a store-bought puff pastry, and the version made at home definitely feels lighter. But particularly during the summer, I see nothing wrong with opening that package and going at it with your rolling-pin. Working with all that butter, performing the foldings, is quite tricky when the weather is warm and humid. Once the pastry is done, the preparation of these raspberry squares is very simple and the end result… oh so very cute! I made my own puff pastry and a link to the recipe is included below. But for simplicity (it’s a very long recipe), I am sharing a simplified version using store-bought.

RASPBERRY PUFFS
(from the Bewitching Kitchen)

1 package of puff pastry, defrosted
to make your own, follow this link
fresh raspberries and blackberries (5 per pastry square)
8-ounce block cream cheese
¼ cup granulated sugar
½ teaspoon vanilla extract

Heat the oven to 400F.

In a medium bowl, mix cream cheese, sugar, and vanilla until smooth.

Roll the puff pastry and cut into 3 to 3.5 inch squares. Using the packaged pastry, one sheet will be enough to make 4 squares. Leaving a thin border, make cuts along the edges of the square. Use either a small rolling pastry cutter or a very sharp knife, so that you don’t squish the layers of the puff pastry. Place a tablespoon of the cream cheese filling in the middle of the square, then top with 4 raspberries. Take one of the edge flaps and fold it towards the center, looping over the raspberry. Repeat with the other flaps. Place a raspberry in the center, on top of where all the flaps overlap. Repeat with the remaining pastry squares.

Bake for 20 minutes or until pastry is golden brown and puffed. Serve with a sprinkle of powdered sugar, if so desired.

ENJOY!

to print the recipe, click here

Comments:  If you like, you can brush the top of the loops with a little egg wash for extra shine, but I did not do that this time. Blueberries could be fun to use too, although they tend to bleed a lot more during baking. Don’t  be afraid to bake them until the pastry is very dark, because the filling tends to make the pastry a big soggy. In retrospect, I think I should have baked mine longer. But, as I like to say often, there’s always next time… live and learn…

They do have similarity with a Danish pastry, and go perfectly with a nice steamy cappuccino. One of these babies will be more than enough to satisfy any cravings for sweetness. They are fun to make and delicious to savor…  I hope you give them a try, with homemade puff or not.

ONE YEAR AGO: Vietnamese-ish Chicken

TWO YEARS AGO: Rutabagas Anna

THREE YEARS AGO: The Ultimate Raspberry Sorbet

FOUR YEARS AGO: Crispy Cornmeal Sweet Potato Fries

FIVE YEARS AGO: Pan-grilled Tilapia with Smoked Paprika & Avocado Cream

SIX YEARS AGO: Golden Saffron and Fennel Loaf

SEVEN YEARS AGO: In My Kitchen, July 2011

EIGHT YEARS AGO: Heavenly Homemade Fromage Blanc

NINE YEARS AGOA Perfect Sunday Dinner

SaveSave

SaveSave

SaveSave

SaveSave

SaveSave

SaveSave

SaveSave

BLOOD ORANGE ENTREMET CAKE


Entremets seem to be the rage at the moment. Originally, entremets were small portions of sweet concoctions served in between savory items in a multi-course banquet type meal. We are talking royalty stuff, from the Middle Ages to the overindulgence that was happening in France before 1789 (wink, wink). Nowadays, the term is applied to cakes that involve multiple layers with different textures and flavors. Basically it is a layer cake with severe superiority complex. My version was closely based on a Craftsy class taught by Kathryn Gordon, Contemporary Layer Cakes.  I don’t have permission to publish the recipe but will share an overview.

BLOOD ORANGE ENTREMET CAKE
Recipe Overview
(from Craftsy)

For the cake component, a Jaconde sponge is prepared using the following ingredients:
6 egg yolks beaten with 90g sugar
110g  almond flour sifted with 60g cake flour
a touch of vanilla and salt
60g melted butter
meringue made with 6 egg whites and 90g sugar

The cake batter will be enough to bake one round 8 inch cake and you will have leftover batter to spread as a thin rectangle for the sides (for lack of a better term) of the cake. The round cake will be halved crosswise so that you’ll have two layers for the entremet. To line the pan, make sure you will have 2 pieces that will cover its whole circumference. You can use the mathematical formula C = π x D or cut a piece of string that goes around the pan, and measure it. In any case, you will arrive at the need for two pieces of cake 13 inches long. The height depends on how tall your cake will be in the end. Make it around 6 inches so you have some flexibility. The top can be trimmed once assembled. I placed a Silpat on top of the paper and spread the cake batter on it, using the drawing underneath to guide me.

For the marble effect you have two options: paint some food color on the Silpat and pour the batter on top, or divide the batter in two portions, add orange food color to half, and pour the two batters together, spreading them gently so that the color is not fully distributed.  I prefer the second method because it gives a much more subtle effect.  But, if you are in a Pollock frame of mind, go wild with a brush.

In the center you see the full rectangle of very thin cake, that was split in half lengthwise and placed inside the ring. Those are technically called “sponge strips” and I thank Gary, patissier extraordinaire for enlightening me. Please keep in mind that the photos are not on the same scale. The cake is assembled inside an 8-inch ring. First the sides are set in place, with the swirl facing the outside. Then the bottom layer.

Filling components:
Blood Orange Cremeux:  cream made with 8 egg yolks tempered and cooked with 360mL heavy cream previously infused with the zest of two blood oranges and 3/4 cup of blood orange juice.  Once the mixture coats the back of a spoon, it is poured over 200g white chocolate and 6g sheet gelatin, softened in cold water.
Caramelized rice cereal: 1/4 cup sugar is heated in a heavy pan until amber. To that 1/2 cup popped rice cereal is added, quickly mixed and poured on a Silpat or parchment paper.
Caramelized blood orange segments: Make a syrup with 100g sugar and 4 tablespoons water. Heat until fully dissolved, then pour over the segments of one blood orange. Let the fruit sit in the syrup until cold, drain before using in the cake.

To the bottom cake layer, a little cremeux is added and spread. Then pieces of caramelized puffed rice. A bit more cremeux, caramelized orange segments, and more cremeux on top. The second piece of cake goes over it, pushing down to make sure it’s all well compacted.

The top of the cake is brushed with a bit of melted white chocolate and oil, to seal the layer. The whole thing is frozen for several hours, then the cake is covered with a very thin layer of white chocolate mirror glaze, made with sugar (50g dissolved in 2 T water), heavy cream (2 T), corn syrup (1 T) and white chocolate (150 g). Kathryn explains exactly how to do it in a way that the top will be very smooth.

The cake is then removed from the ring, the top edge is trimmed, if so desired, and the top is decorated with bits of caramelized rice cereal and blood orange zest.

Comments: First of all, my apologies for not posting the full recipe, but without permission to do so, I cannot do it. You can find the basic method of preparing a Jaconde sponge, as well as all other components online. In fact, many different cake formulas and fillings will work to produce a similar entremet cake. All you need to keep in mind is a contrast of textures and flavors.

The blood orange cremeux turned out very refreshing, so even considering this is a rich, indulgent dessert, it had a light and bright quality to it. Rice puffed cereal is a good alternative to the famous Gavottes cookies that were part of my recent Gateau Royal. You can definitely caramelize it and  use it to add crunch to any layer cake. Those things are sold in huge bags, and we don’t eat puffed rice as a cereal, so I see a few aventures with this caramelized version in my future.

This Craftsy class by Kathryn is really wonderful, because not only she explains every single step of the recipe in real-time, but she encourages you to plan and make your own version of this elaborate cake. Although it might seem a bit too involved, each component can be made in advance. I actually baked the cakes and made the cremeux on a Saturday, the other components Sunday morning, assembled the cake, froze it, and added the mirror glaze in the end of the day. Piece of cake! (Literally).

Just like macarons are my favorite cookies, I suspect entremets are quickly becoming my favorite type of cake. The possibilities of cake, fillings, textures, and icing are endless.

ONE YEAR AGO: Flourless Chocolate Pecan Cake

TWO YEARS AGO: A Tale of Two Macarons

THREE YEARS AGO: Chocolate Chip Shortbread Cookies

FOUR YEARS AGO: Chicken in Green Pipian Sauce, Sous-vide Style

FIVE YEARS AGO: Classic Shrimp Gobernador Tacos

SIX YEARS AGO: A Walk Towards the Sunset

SEVEN YEARS AGO: In My Kitchen

EIGHT YEARS AGO:  Heavenly Home-made Fromage Blanc

NINE YEARS AGO:  A Perfect Sunday Dinner

SaveSave

SaveSave

SaveSave

SaveSave

SaveSave

SaveSave

SaveSave

SaveSave

SaveSave

SaveSave

SaveSave

SaveSave

SaveSave

SaveSave

SaveSave

SaveSave

SaveSave

AIR-FRIED MEXICAN MEATLOAF

Don’t run away, you can make this tasty recipe in any oven, but let me tell you that the air-fryer shines on this preparation.  My friend Dorothy blogged about it not too long ago and urged me to give it a try. I made it three times in consecutive weeks. Yes, that’s how much we loved it. Simple to put together, and ready in 20 minutes thanks to the air-fryer environment, a blast of very intense heat concentrated in that small chamber. Pure awesomeness. It gets a nice crust, the meat inside is moist, with just the right amount of spicy heat. We inhaled them. Leftovers are wonderful too, by the way.

MEXICAN TURKEY MEATLOAF
(adapted from Shockingly Delicious)

1 egg
1 pound ground turkey
1 onion, chopped (I omitted)
1/3 cup almond flour
1 cup (about 4 ounces) grated Mexican blend cheese
1/4 cup green salsa (I used La Victoria)
1 cup finely sliced spinach leaves
2-4 tablespoons chopped fresh cilantro
1 teaspoon chili powder
1/2 teaspoon ground cumin
1/2 teaspoon ground oregano
1/2 teaspoon fine sea salt
A few grinds of black pepper

Spray the basket of the air fryer with nonstick spray. If you have a perforated parchment sheet protector, lay it on the screen.

In a large mixing bowl, crack the egg and use a fork to beat it lightly. Add the turkey, onion (if using), almond flour, cheese, salsa, spinach, cilantro, and all spices. Gently mix with your hands.

Shape the turkey mixture into 4 loaves.  Place them in the air fryer, turn the heat to 390F degrees, and set the timer for 20 minutes.

Remove basket from oven, and place each meat loaf on a dinner plate. Top with additional salsa — either green or red salsa,  if you so desire.

You may also shape this into a single loaf and bake it in the oven for about 45 minutes.

ENJOY!

to print the recipe, click here

Comments: The first time I made this recipe, I completely forgot to spray the basket of the air-fryer with some oil. I had the most epic mess to deal with later, as bits and pieces of crusty cheese bonded happily with the screen. I tell you, it was not fun. Having learned a painful lesson, I made it again and not only greased the basket, but I also protected it with a special perforated parchment liner that works like a charm both for bamboo steamers and air-fryers.  I highly recommend those, although you could improvise with parchment paper and scissors. I am not very gifted with this type of DIY stuff, so I rather amazon-it.

My main modification of Dorothy’s version was to use almond flour instead of bread crumbs, which reduces the carbo-load a bit, and gives a slight nutty flavor which I love. You can definitely go for the traditional bread crumb option, in this case you should add about 1/2 cup.

Dorothy, thanks for the inspiration! Glad you are having fun with your air-fryer, I hope we’ll go on inspiring each other!

Note added after publication: it was brought to my attention a nice review on different brands of air-fryers. If any of my readers is considering such purchase, take a look here before you decide which one to get.

ONE YEAR AGO: Mimi’s Sticky Chicken, a Call from my Past

TWO YEARS AGO: Perfect Soy-Grilled Steak

THREE YEARS AGO: The Devil’s Bread

FOUR YEARS AGO: Heart of Palm Salad Skewers

FIVE YEARS AGO: Potluck Frittata and Lavoisier

SIX YEARS AGO: Home-made Corn Tortillas

SEVEN YEARS AGO: Whole-Wheat Spaghetti with Peanut Sauce

EIGHT YEARS AGO: Brigadeiros: A Brazilian Party!

NINE YEARS AGO: Lemony Asparagus

SaveSave

SaveSave

SaveSave

SaveSave

SaveSave

SaveSave

SaveSave

SaveSave

SaveSave

SaveSave

SaveSave

SaveSave

SaveSave

SaveSave

SaveSave

SaveSave

APRICOT LINZER TORTE

Do you know Anna Olson? I don’t remember how I got hooked into her shows, but I think it was one of those suggestions that pop in the amazon page. At any rate, she is big on Canadian Food TV. As far as I can tell, the Canadian food TV is far superior to our own. I watched every single episode I could find online. Basically a full season of “Sugar“, and a full season of “Baking with Anna Olson.”  They are organized by ingredient (chocolate, blueberries, pecans),  or basic component (say, pastry cream, or pie dough), and she usually shares three recipes with increasing level of difficulty.  I like her a lot. She is the type of baker who is clearly talented, but also down to Earth. Some professional bakers make you think that unless you can find the vanilla bean harvested on the Sava region of Madagascar under a moon 100% full, please don’t bother making the recipe. Not the case with Anna. You’ll feel less constrained and even encouraged to try something a little different. Sometimes she might even have a little powdered sugar flying moment in her KitchenAid, which in my mind just makes her even more special.  Of course, that type of moment is not a rare event in the Bewitching Kitchen, quite the opposite (sigh). When I watched her show on apricots, I knew I had to try her Linzer version. I am glad I did…

APRICOT LINZER TORTE
(from Anna Olson)

for filling:
2 cups fresh apricot, washed and pitted
⅔ cup apricot jam
¼ cup sugar
zest of one orange

for dough:
3 hard-boiled egg yolks
1 ¼ cup unsalted butter, room temperature
½ cup icing sugar
dash of vanilla extract
½ cup ground hazelnuts, lightly toasted
¾ tsp salt
¼ tsp baking powder
2 ¼ cups all-purpose flour
1 egg, mixed with 2 tbsp cold water

Cook all ingredients for the filling in a big saucepan until apricots are tender. Remove from heat, puree and cool completely before using.

Push cooked egg yolks through a sieve and set aside. Cream together butter and icing sugar until smooth. Stir in vanilla extract. Add hazelnuts and cooked egg yolks and blend in. Sift together salt, baking powder and flour and add to butter mixture. Blend until dough comes together (it will be quite soft). Divide dough into 2 discs, wrap and chill for at least one hour, until firm.

Heat oven to 350 F.

On a lightly floured surface, roll one disc of dough to 3/4- inch thick. Using the bottom of a 10-inch removable-bottom tart pan as your template, cut out a disc of pastry. Repeat this with the second disc of pastry.

Using the tart pan bottom as a lifter, transfer the first disc of pastry to a parchment-lined baking sheet. Spread the apricot filling over the entire surface of the dough. If the dough is very soft, I like to flash it in the freezer for 5 minutes, to make spreading the filling easier.

Using a 3/4 -inch round cutter cut decorative circles around the dough. Use a slightly smaller cutter to make a second series of smaller openings. While still on the cutting board, brush the top of the disc generously with egg wash. Place gently on top of apricot filling. Place ring of a springform pan around torte to help it hold shape while cooking.

Bake for 35-40 minutes, until a rich golden brown in colour. Allow to cool before cutting. If desired, sprinkle with a dusting of powdered sugar before serving.

ENJOY!

to print the recipe, click here

Comments: It was a lot of fun to make this recipe, it is a real soft though, and I decided to roll it out in between two sheets of parchment paper. Works much better for me that way. The filling is delicious, I had to hold myself back not to use it in macarons next day, it would be great added to some chocolate ganache, I think. Apricot and chocolate are a match made in heaven.

The dough is on the crumbly side as expected for a Linzer concoction. Her use of hazelnuts instead of almonds makes it quite unique and special. Everyone in the department loved this little treat, which brightened up one very summery Monday.


Make Sally happy, grab a pin!


ONE YEAR AGO: A Trio of Air-Fried Goodies

TWO YEARS AGO: Focaccia with Grapes, Roquefort and Truffled Honey

THREE YEARS AGO: Moroccan Carrot Dip Over Cucumber Slices 

FOUR YEARS AGO: White Chocolate Macadamia Nut Cookies

FIVE YEARS AGO: Cilantro-Jalapeno “Hummus”

SIX YEARS AGO: A Moving Odyssey

NINE YEARS AGO:
 Shrimp Moqueca

SaveSave

SaveSave

SaveSave

SaveSave

SaveSave

SaveSave