CARAMEL CHOCOLATE TARTLETS


With this post I become a life-time member of The Craftsy Cheerleading Club.  Quite likely the oldest member of the organization, but my enthusiasm matches that of a sophomore. This class in particular Pies and Tarts for Every Season, is taught by  Gesine Bullock-Prado. I’m a bit distant from TV (except for binge watching stuff like Broadchurch, Outlander, Black Mirror) so I had no clue she is such a hot commodity in the media. Deservedly so. Teaching is a bit of a performing act. You need to capture the attention of your students and at the same time convey your message in a clear and efficient way. Lightening up a lecture using jokes and funny analogies is a nice way to make sure your audience stays with you. However, balance is everything. There is a delicate line to negotiate between lightness and solid info, and she really shines at it. I learned a lot about pie crusts, how to manipulate each kind, how to choose which crust to bake depending on the type of filling. All in a fun, relaxed way.  I am always amazed at the quality of online classes offered by Craftsy, and the reviews by users are for the most part spot on. Before buying any class, you can browse through to see exactly what you’ll be getting, and the feedback from other users. A win-win situation. Now, for the bit of bad news. I could not get permission to publish the recipe, so if you are interested in the exact formula Gesine used for crust and filling, you’ll have to get it from the site.

OVERVIEW OF THE RECIPE

It all starts with the crust. You have several options. You can make a single larger tart, or shape about 50g of dough per tartlet, using muffin rings or a tartlet pan like I did. Compared to a muffin ring, my tarts were a tad bit bigger, so I used 60g of dough for each one. Her recipe has some cute twists, like using condensed milk in the dough. It gives not only a more intense sweetness, but it browns nicely in the oven.  Following her detailed instructions, I was happy to get all tarts to bake evenly, no soggy bottoms (who wants to have that? not me!), and basically zero shrinkage (scary thought).

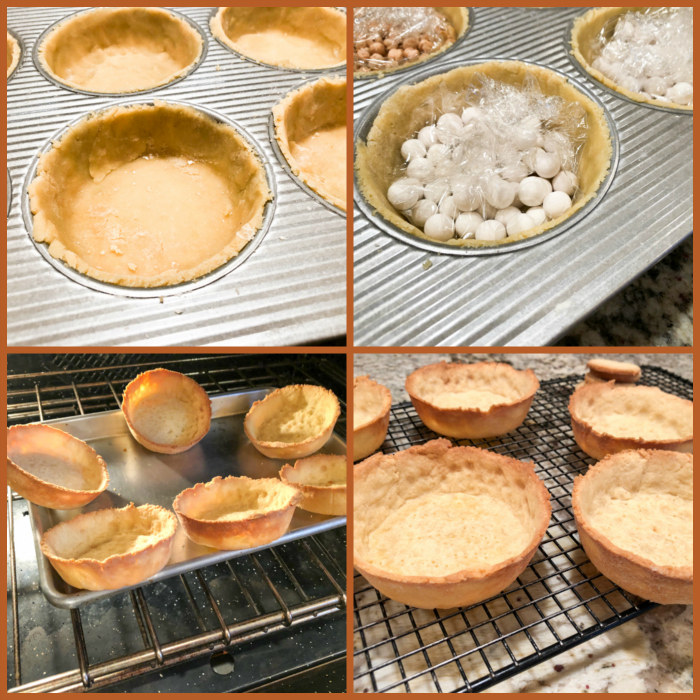
I added my own little twist to the preparation by placing the pie weights (and dried beans) into the shells using food grade plastic wrap instead of parchment paper. It does not melt in the oven, as long as you crumble it on top preventing it from touching the metal of the pan, you’ll be fine.  I love the way it allows the beans and ceramic balls to reach the edge of the tart. As long as you don’t bake the shells in a higher than 400F oven, no problem.  After the initial baking with weights, I removed them, got the shells back in a baking sheet and baked with the bottoms up in the air as shown in the photo. I just wanted to prevent any soggy bottom phenomenon (watching Great British Bake Off made me traumatized about those).

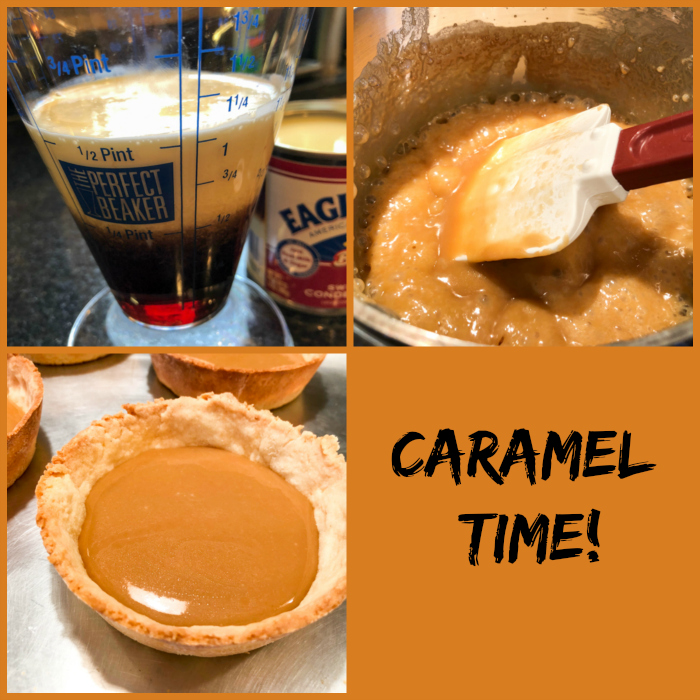
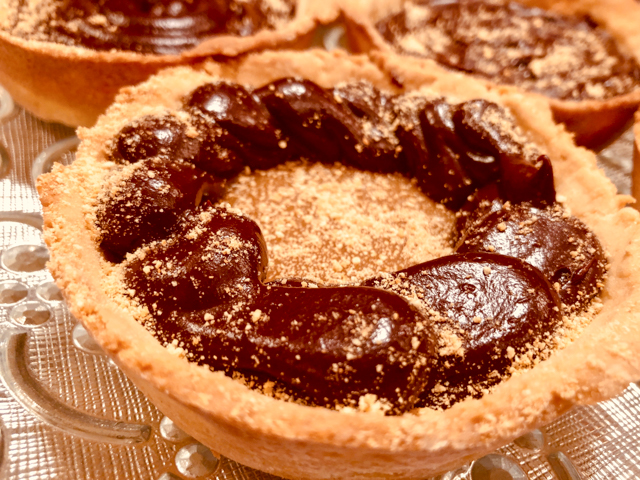
For her caramel recipe, she uses a bit of maple syrup in addition to usual suspects. Any caramel recipe you enjoy will do, make sure to cook it to the correct temperature, 240 F, that will provide the perfect texture. No caramel running out when you slice the tartlet, no biting into a rock either.  It hardens very quickly, but I still allowed the filled tartlets to rest at room temperature for a good 45 minutes before adding the chocolate ganache.  Again, any recipe will do, but you need to have it almost cool to room temperature, so that it pipes nicely using a 1/4 inch piping tip.

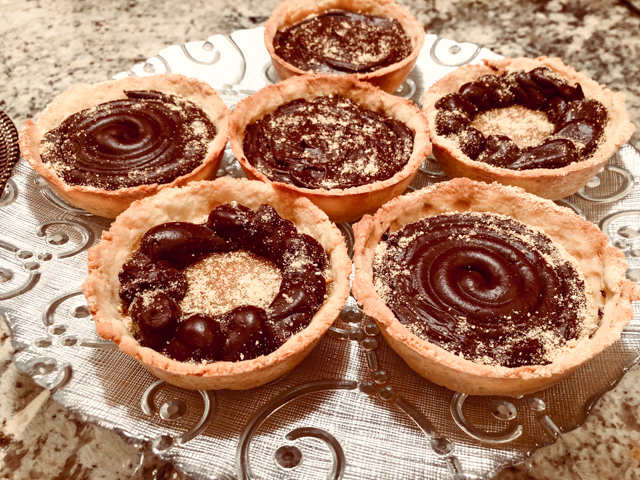
You can be creative, do swirls, waves, fill it solid and play with the surface using an off-set spatula. Once it’s set, sprinkle Graham cracker crumbs on top, or anything else you might like. A drizzle of white chocolate? Oreo crumbs? Gold leaf in pieces? Or as Gesine does in the video,  top with toasted mini-marshmallows and call them Caramel Smore’s Tarts.   Brilliant!  You can probably see a picture on Craftsy. Adorable stuff.

I had a blast making these… and the taste? Spectacular, even if I say so myself

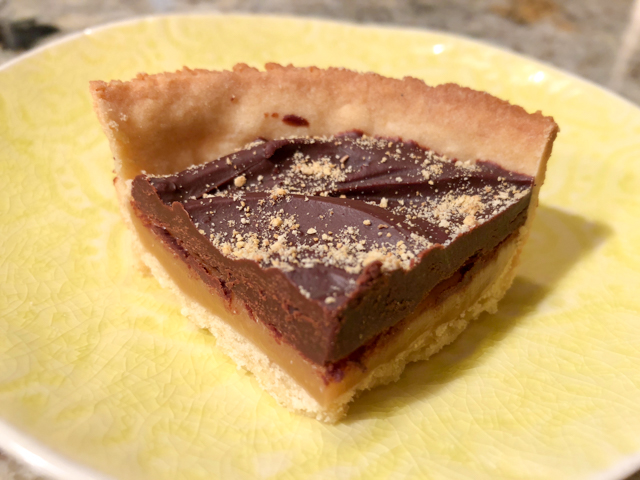
That’s what you want… A nice layer of caramel in between the crunchy crust and the luscious chocolate ganache. Next time I will use muffin rings, so that the top of the crust will be leveled with the chocolate. If you have muffin rings, give them a try as tartlet containers.

Did I mention these would be amazing on Valentine’s Day?

Gesine, thank you for your helpful comments,
I have quite a few of your projects on my list of stuff to try soon….  

ONE YEAR AGO: Chicken Korma-ish

TWO YEARS AGO: Sunday Gravy with Braciola

THREE YEAR AGO: In My Kitchen, February 2015

FOUR YEARS AGO: Avocado and Orange Salad with Charred Jalapeno Dressing

FIVE YEARS AGO: Green Olive, Walnuts and Pomegranate Salad

SIX YEARS AGO: Romanian Flatbreads

SEVEN YEARS AGO: Ziti with Artichokes and Meyer Lemon Sauce

EIGHT YEARS AGO: Blasted Broccoli, Stove-top version

SaveSave

SaveSave

SaveSave

SaveSave

SaveSave

SaveSave

SaveSave

INCREDIBLY SIMPLE TIMES FOUR – JANUARY 2018

It’s done. I  just added a new category of recipes to the blog, entitled Incredibly Simple.  You can find it on the right side, scrolling past Blogroll. Under this new category I list recipes that are almost effortless to put together. In the near future I will also make a separate category in the index page, so they are not only easy to make, but also easy to find in the site. For this round-up I share four side dishes, one uses the air-fryer. I am aware that not many people own one, but I was so amazed by the outcome that I had to include it. You can of course make it in a regular oven… it will just take a bit longer to reach the dinner table, and the texture won’t be quite the same.

INCREDIBLY SIMPLE #1

MICRO-STEAMED ASPARAGUS  

Inspiration for this recipe came from seriouseats

The simple part of this method is the steaming.  I’ve been using it all the time now. Place asparagus in an even layer on a large microwave-safe plate and season with salt and pepper. Lay a double layer of damp paper towels on top of the stalks, completely covering them. Microwave on high for about 3 minutes. Check with a fork, if necessary add another 30 seconds to 1 minute. That is it. You can dress them super simply with a mixture of olive oil and lemon juice, or if you have a bit more time, go for this simplified walnut vinaigrette. 

Toast half a cup or so of walnuts in a skillet or oven. Coarsely chop them and place in a small bowl. Add 2 tablespoons of a mild vinegar, 1 tablespoon of water, a very light drizzle of honey or maple syrup. Whisk 1/4 cup olive oil, until it all emulsifies. The walnuts will help the process. Season with salt, and add on top of the asparagus fresh from the microwave step.  That is all. You want to know a little secret? The exact same method works well for broccolini too, you might have to slightly increase the steaming time.

INCREDIBLY SIMPLE #2
 .
AVOCADO AND ORANGE SALAD  

Inspiration for this recipe came from Geoffrey Zakarian on a recent episode of The Kitchen.

Don’t let the simplicity of this non-recipe fool you. The result goes well beyond expectations. As GZ put it on the show, the combination of orange and avocado is a complete winner, and we agree. The only work involved is segmenting the orange. Distribute the slices of avocado on a plate, add orange segments on top. Squeeze all the juice left from the orange in a small bowl, season with salt and pepper, whisk a small amount of olive oil to emulsify it. If you like your dressing on the sweet side, a touch of honey will do.  Drizzle on top of the salad, and sprinkle pomegranate seeds on top. You can also substitute toasted slivered almonds or walnuts in case you don’t have pomegranate around.  I’ve made it twice in the same week, and intend to keep bringing this to our table. Blood oranges would make it even more special, so keep that in mind.

INCREDIBLY SIMPLE #3

ROASTED BROCCOLINI WITH LEMON AND PARMIGIANO CHEESE

Inspiration for this recipe came from Dining In: Highly Cookable Recipes, by Alison Roman.

Put a baking dish in the oven and heat it to 425 F. You will need broccolini, one lemon, and freshly grated Parmigiano cheese.

Add one or two bunches of broccolini to a large bowl, add to it very thin slices of one lemon. Drizzle olive oil all over, just enough to coat the veggies and lemon slices. Season with salt and pepper.

Place the broccolini on the hot baking sheet in one layer, add a small coating of grated Parmigiano cheese and roast for 10 to 15 minutes, until it all starts to get golden, and the broccolini is cooked through.

The cheese will more or less disappear, but you will notice its sharp bite as you bite into the broccolini.  Super simple indeed, and absolutely delicious.


INCREDIBLY SIMPLE #4

This is really a non-recipe if I’ve ever seen one.  Fork the skin of the sweet potato a few times. Rub it with olive oil, season with salt.  Place in the air-fryer set at 390 F or the highest temperature your machine will go.  Cook for 35 minutes, turning it once or twice during frying.  Remove from the fryer, cut the skin open, add some butter, salt and pepper. That’s all.

What amazed me about this recipe is that you won’t have to wait for the oven to heat to high temperature to start roasting. The air-fryer needs no advance notice. You turn it on, in a minute or so you are right where you need to be. For whole potatoes or sweet potatoes, it’s hard to beat the convenience of using the air-fryer. And the texture turned out perfect, I think better than a regular oven. We would need a blind test to be sure, but I tell you, this was really really good. Apparently regular potatoes can be prepared exactly the same way and won’t take more than 40-45 minutes to be done. They are on my list for the near future.

So that’s all for now… Four recipes that are so easy to put together, no matter what happened at work, you can face their preparation with a smile. Making life simple is always a good move.

ONE YEAR AGO: Two Salads and a Blog Award!

TWO YEARS AGO: When Three is Better than Two

THREE YEARS AGO: Somebody Stop Me!

FOUR YEARS AGO: Zucchini Pasta with Cilantro-Cashew Pesto

FIVE YEARS AGO: Bran Muffins, Take Two

SIX YEARS AGO: Brown Butter Chocolate Chip Cookies

SEVEN YEARS AGO: Mogo Mojo

EIGHT YEARS AGO: Slow-Roasted Chicken Thighs: an Ice-Breaker


SaveSave

SaveSave

SaveSave

SaveSave

SaveSave

SaveSave

SaveSave

SaveSave

SaveSave

SaveSaveSaveSave

SaveSave

SaveSave

SaveSave

SaveSave

SaveSave

SaveSave

MAPLE GRILLED PORK TENDERLOIN OVER LEMONY ZUCCHINI

After the caloric content of my previous post, it’s time to get back to our regular routine. Pork tenderloin is a favorite of ours, we like the texture, the subtle flavor, and the fact that it’s quite lean, which obviously poses problems for the cook.  This recipe is super simple, if you have time to marinade the meat hours in advance do it, but if not, offer it a 30 minute marinade-party, and move on. Or rather, grill on. You could go all fancy and put the meat on skewers, but this time I just laid every little morsel of goodness on the grill grates. I like the way those grill marks work on the flat surface of the meat. And, contrary to what most chefs recommend, we like our pork cooked past medium-rare.  Adjust your cooking time according to your personal preference.

MAPLE GRILLED PORK TENDERLOIN OVER LEMONY ZUCCHINI
(from the Bewitching Kitchen)

for the pork:
1 pound pork tenderloin, cut in 1/2 inch slices and lightly pounded
3 tbsp maple syrup
3 tbsp extra virgin olive oil
1 tbsp balsamic vinegar
1 tsp paprika
1 tsp sal
1/2 tsp black pepper

for the zucchini:
4 small zucchini, shredded on a food processor
1 tablespoon ghee (or olive oil)
1/4 cup slivered almonds
salt and pepper
juice and zest of one lemon

Make the marinade by combining all the ingredients in a small bowl. Add the pieces of pork to a plastic bag or small dish, and pour the marinade all over. Leave it in the fridge for 30 minutes to overnight.

Heat the grill.  Remove the pork from the bag, letting the marinade drip off. Lightly pat the pieces with a piece of paper to avoid excessive moisture to stay on the meat.  Grill the pieces to your preference, we like about 5 to 6 minutes per side on a very hot grill.

Prepare the zucchini.  Heat the ghee or olive oil on a large skillet. When very hot, add the shredded zucchini, season with salt and pepper. Leave undisturbed for a couple of minutes so that the layer in contact with the skillet will get brown. Move it around gently, keeping the heat high at all times. When the zucchini is almost done, make a small opening in the center of the skillet, add the almonds, let them saute for a couple of minutes, then mix them with the zucchini.  Squirt some lemon juice, add the zest, incorporate and serve immediately, with more lemon slices on the side.

ENJOY!

to print the recipe, click here

Comments: If you are looking for a low-carb meal that satisfies, this is a good option.  Zucchini – either shredded, simply sautéed, or the more elaborate spiralized version – is a perfect match for pork tenderloin. Especially if you add a lemony touch to it, and a few nuts for a bit of texture. I was patting myself on the back after this dinner. Simple, quick to prepare, and mighty tasty. I hope you give it a try.


ONE YEAR AGO: Danish Rye Bread

TWO YEARS AGO: The Best Sourdough Recipe

THREE YEARS AGO: Mini-Quiches with Duxelles and Baby Broccoli

FOUR YEARS AGO: Quinoa and Sweet Potato Cakes

FIVE YEARS AGO: Pumpkin Bolo de Fuba’ Cremoso

SIX YEARS AGO: Citrus-crusted Tilapia Filets

SEVEN YEARS AGO: Bran Muffins, not just for Hippies

EIGHT YEARS AGO: Flourless Chocolate Cake


SaveSave

SaveSave

SaveSave

SaveSave

SaveSaveSaveSave

SaveSave

SaveSave

THE OUTCOME OF THE IRON (CHEF) CHALLENGE

(continuation from last post...)

For those curious about which cake our IT expert chose for my challenge,
here we go:

A GERMAN CHOCOLATE CAKE

All things considered, it could have been worse, but it still represented a big challenge to yours truly. A layered cake?  That is intimidating to say the least. I needed heavy artillery for it, so a trip  to my America’s Test Kitchen source was needed.  As you may know, they are notoriously difficult in allowing bloggers to publish their sacred recipes, but I found a very close adaptation to share with you. It comes from Leite’s Culinaria, a site that I’ve been following for a long time. Definitely worth subscribing to.

GERMAN CHOCOLATE CAKE
(from Leite’s Culinaria)

For the pecan filling
4 large egg yolks
One 12-ounce can evaporated milk
1 cup granulated sugar
1/4 cup packed light brown sugar
6 tablespoons unsalted butter, cut into 6 pieces
1/8 teaspoon salt
2 teaspoons vanilla extract
2 1/3 cups sweetened shredded coconut
1 1/2 cups finely chopped pecans, toasted

For the chocolate cake
4 ounces semisweet chocolate, chopped fine
1/4 cup Dutch-processed cocoa, sifted
1/2 cup boiling water
2 cups unbleached all-purpose flour, plus more for dusting the pans
3/4 teaspoon baking soda
12 tablespoons unsalted butter, softened but still cool
1 cup granulated sugar
2/3 cup packed light brown sugar
3/4 teaspoon table salt
4 large eggs, room temperature
1 teaspoon vanilla extract
3/4 cup sour cream, at room temperature

Make the pecan filling: Whisk the yolks in a medium saucepan off the stove. Gradually whisk in the evaporated milk. Add the sugars, butter, and salt and cook over medium-high heat, whisking constantly, until the mixture is boiling, frothy, and slightly thickened, about 6 minutes. Pour the mixture into a bowl, whisk in the vanilla, then stir in the coconut. Let cool until room temperature.

Heat the oven to 350°F (175°C). Toast the pecans on a rimmed baking sheet until fragrant and browned, about 8 minutes. Transfer to a plate to cool.

Make the chocolate cake:  Keep your oven at 350°F (175°C) and adjust an oven rack to the lower-middle position. Combine the chocolate and cocoa in a small bowl and then add the boiling water over. Let stand to melt the chocolate, about 2 minutes. Whisk until smooth and let stand until room temperature.

Spray two 9-inch-round by 2-inch-high straight-sided cake pans with nonstick cooking spray and then line the bottoms with parchment or waxed paper rounds cut to fit. Spray the paper rounds, dust the pans with flour, and tap out any excess flour. Sift the flour and baking soda into a medium bowl or onto a sheet of parchment or waxed paper.

In the bowl of a standing mixer, beat the butter, sugars, and salt at medium-low speed until the sugar is moistened, about 30 seconds. Increase the speed to medium-high and beat until the mixture is light and fluffy, about 4 minutes, scraping down the bowl with a rubber spatula halfway through. With the mixer running at medium speed, add the eggs one at a time, beating well after each addition and scraping down the bowl halfway through. Beat in the vanilla, then increase the speed to medium-high and beat until light and fluffy, about 45 seconds.

With the mixer running at low-speed, add the chocolate mixture, then increase the speed to medium and beat until combined, about 30 seconds, scraping down the bowl once.  With the mixer running at low-speed, add the dry ingredients in 3 additions, alternating with the sour cream in 2 additions, beginning and ending with the dry ingredients. Beat in each addition until barely combined. After adding the final flour addition, beat on low until just combined, then stir the batter by hand with a rubber spatula, scraping the bottom and sides of the bowl. The batter will be thick. Divide the batter evenly between the prepared cake pans, spreading the batter to the edges of the pans with the rubber spatula and smoothing the surface.

Bake the cakes until a toothpick inserted into the center of the cakes comes out clean, about 30 minutes. Cool in the pans 10 minutes, then invert the cakes onto a greased wire rack; peel off and discard the paper rounds. Cool the cakes to room temperature before filling, about 1 hour.

Assemble the German chocolate cake: Stir the toasted pecans into the chilled filling. Set one cake layer on a serving platter. Place the second cake on a work surface or leave it on the wire rack. Hold a serrated knife held so the blade is parallel with the work surface and use a sawing motion to cut each cake into 2 equal layers. Carefully lift the top layer off each cake.

Using an icing spatula, distribute about 1 cup filling evenly on the cake layer on the serving platter or cardboard round, spreading the filling to the very edge of the cake and evening the surface. Carefully place the upper cake layer on top of the filling. Repeat using the remaining filling and cake layers. Dust any crumbs from the platter and serve.

(I used only three layers, found that the cake was large enough,
more would be a bit excessive, in my opinion)

ENJOY!

to print the recipe, click here

Comments: First things first, let’s clarify for those who do not know, that German Chocolate Cake has nothing to do with Germany. The name refers to Mr. Samuel German, an English-American chocolatier who developed the special formulation of baking chocolate used in the recipe.  Having said that, it is a classic indeed: chocolate, coconut and pecans. There, I gained two pounds just typing the ingredients, but in the name of having My Precioussss repaired, I don’t mind it at all.

As I mentioned, I turned it into a three-layer cake instead of four, and trust me, you won’t miss the fourth one, it is already pretty rich and decadent. The cake is very moist, and the filling is perfect, if you like coconut, that is. Sweet, creamy, with a nice added texture given by the nuts and coconut. A winner, perfect celebration cake.

So there you have it. A challenge proposed, accepted, and conquered. Not sure I want to set myself up for another one, so I hope our gamma-counter will be ok until my retirement…   And yes, our IT man, the Performer of Miracles on All Things Electronic, was very pleased with the cake.

Mission accomplished!

ONE YEAR AGO: Thank you!

TWO YEARS AGO: Salmon Rillettes, a Classy Appetizer

THREE YEARS AGO: Linzer Cookies

FOUR YEARS AGO: Baked Ricotta, Take Two

FIVE YEARS AGO: Pumpkin Uncanned

SIX YEARS AGO: Pork Ragu

SEVEN YEARS AGO: Friendly Kuri Squash

EIGHT YEARS AGO: Celery and Apple Salad


SaveSave

SaveSave

SaveSave

SaveSave

SaveSave

SaveSave

SaveSave

SaveSaveSaveSave

SaveSave

SaveSave

SaveSave

SaveSave

SaveSave

SaveSave

SaveSave

SaveSave

THE IRON (UPTAKE) CHEF CHALLENGE

I wish I could take credit for coming up with Iron Uptake Chef, but one of my readers – you know who you are – coined the term for me. Coolest title ever!  Iron uptake experiments are my “thing” in the lab. You know how a person might love to make pasta from scratch, or bake breads, or bake cookies, and that is their comfort zone in the kitchen? In a lab, we all have our favorite experiments. For me, by far, it is anything related to iron uptake. These experiments require careful timing and I was born with a chronometer inside my head. Anything that requires careful timing, please let me take care of it. I love it, and all modesty aside, do a pretty good job with it. For these experiments we must measure the radioactivity in hundreds of test tubes, one by one, using a machine called gamma-counter, aka My Preciousssss.

If something happens with My Preciousssss, I am in deep, deep trouble. Unfortunately that is exactly what I faced last year. My beloved gamma-counter died. I suspected a mechanical problem, the chains that move the tubes around were stuck. Our counter is old (built in 1990), no one services it anymore, parts are next to impossible to find.  So the Iron Uptake Chef was left with 180 samples inside the machine. Paralyzed. We considered buying a new machine, but the price tag is painful: about 25K.

In despair, we asked our IT guy to take a look at it. He’s been working in our department for 30 years (!!!), and performs all sorts of miracles in anything involving computers and beyond. Gamma-counters go beyond the definition of beyond, but… he said he would take a look at it. Yes, it was a mechanical problem, and he thought that replacing one component that rotates a big handle inside the machine could be the key to solve it. He took the part out, searched for it on ebay, and found something that seemed to be a good replacement. A few more days went by, the radioactivity in my samples decaying at the same rate my hyperventilation was increasing.  When we finally got the part, the dimension of one metal component was too big, it would not fit in the little space available for it. Undeterred, our guru got a special saw and “trimmed” the part to fit. He worked a whole weekend on it, and by Monday morning my Preciousss was in top shape, and my experiment saved!

So how do you even begin to say thank you for someone who went not just the extra mile, but what it amounts to a full marathon for you?  I asked him what was his favorite cake, and promised I would bake him one. As he considered all the possibilities, I started to shake inside, fearing the worst. What have I just done? Have I set myself to calamitous trouble? Could he possibly pick a Gateau Saint-Honore’? A Sacher Torte, perhaps? Well, it was challenge enough for this Iron Woman. Stay tuned for the outcome…

(to be continued….)


SaveSave

SaveSaveSaveSave

SaveSave

SaveSave

SaveSave