PANETTONE TIME!

Panettone is a classic bread from Italy, very popular during Christmas festivities. I dare to say that it is almost equally popular in Brazil. Brazilians for the most part need to have the end-of-the-year panettone fix, as if mandatory.  Growing up, I would not touch it, picky eater that I was. Crystallized, dried fruit? Me? No, not happening. At some point I opened my horizons a little and would go for a nibble on a small piece. But I was never a big fan, to me it seemed too dry, with a bit of an unpleasant texture. Toasted, with a decent spread of butter, wast the only way to enjoy it. Phil had never tried any until we found ourselves in São Paulo many Decembers ago. He fell deeply in love with it. Over the years he’s also tried other kinds, like those studded with chocolate chips, called “Chocottone” in Brazil. His favorite? The classic version, from Bauducco. Raisins and dried fruits. Not sure what happened this year, but I got an intense desire to bake the version of his dreams. I went the extra mile and got all the necessary toys and gadgets for it. It paid off, big time!


PANETTONE
(adapted from The Fresh Loaf)

Pre-ferment
6 oz (1 cup) all-purpose flour
8 oz (1 cup) milk
1/4 t instant yeast (regular yeast is fine)

Fruit Soaker:
1 cups diced dried fruit (cherries, cranberries, apricots, dates)
1/2 cup candied orange peel
2 cups golden raisins
1/2 cup rum + 1/2 cup water

Final Dough:
1 pound (3 cups) all-purpose flour (plus 1 tablespoon to 1/2 cup more as necessary)
soaking liquid for fruits
2 eggs
2 oz (1/3 cup) sugar
1/2 t Fiori di Sicilia extract
1 t salt
1 T instant yeast (I used this one which is osmo-tolerant)
1 stick butter (1/2 cup), softened, cut in several pieces
soaked, drained fruits, orange peel
grated zest of one orange

The night before, mix up the preferment with instant yeast. Cover and leave at room temperature overnight.

The next morning, mix the dried fruits with the rum and water and let soak for 30 minutes.

Make the final dough: drain the fruit, reserving the soaking liquid. Add to the bowl of a Kitchen Aid type mixer fitted with the dough hook the pre-ferment, the flour, liquid from the soaked fruits, sugar, eggs, salt and osmo-tolerant yeast.  Mix the dough for 5 minutes, then add the pieces of butter, one by one. Once all the butter is added, continue kneading in the machine for 5 more minutes.

Add the soaked fruits, the candied orange peel and the fresh orange zest and mix gently, adding additional flour as necessary to get it to a proper consistency, so that it is slightly sticky but can be handled by hand.

Cover the bowl and let the dough rise for two to three hours. If using osmo-tolerant yeast, it might be fully risen by 2 hours.

Split the dough into the necessary number of pieces you need for the loaves you want to make. I used 3/4 of the dough to make a big panettone in the traditional pan (6 in diameter, 6 in high). The rest of the dough I baked in a small springform pan. Shape the dough, place them into the molds, cover lightly and let them rise for two to three hours again. If using osmo-tolerant yeast, they could be ready to bake in 90 minutes. Meanwhile, heat the oven to 350 F.

Bake until nicely browned and the internal temperature registers 185F. My big panettone took 55 minutes to bake, the smaller one, using about 1/4 of the dough, was ready in 25 minutes. A thermometer to check the temperature really helps. Remove from the oven and let cool completely before slicing.

ENJOY!

to print the recipe, click here

Comments: In case you are wondering, there are countless recipes for panettone out there. Using regular yeast, wild yeast, osmo-tolerant  yeast, pre-ferment, overnight fermentation in the fridge, you think about one particular condition, and someone has already tried – and formed a strong opinion about it. They all involve a rich dough, containing sugar, milk, butter, and eggs – think in the direction of brioche and you’ll be close. They must include raisins, and orange peel. Sometimes other dried fruits, sometimes almonds. They must all be baked in a tall pan, to form a nice domed structure. And if you want the real authentic flavor, skip the vanilla and go for Fiori di Sicilia. That gives it the real characteristic flavor we all associate with panettone. If you don’t have osmo-tolerant yeast, you can use regular instant. You should then expect longer proofing times, like those specified in the recipe. I suspect I could have used less osmo-tolerant yeast, as the dough rose really fast. Live and learn.

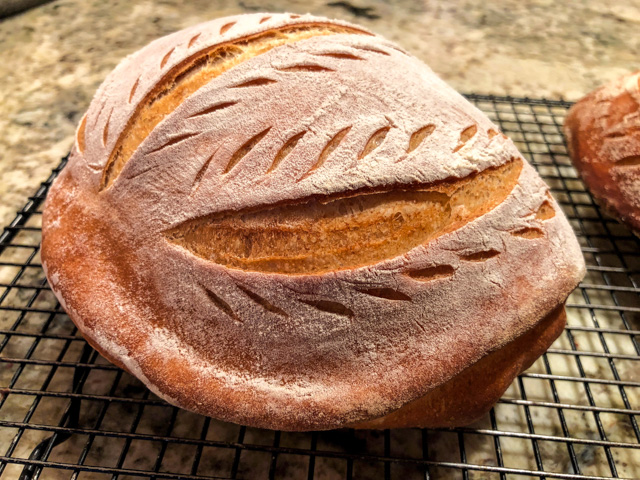
My second, small loaf, made with 1/4 of the dough.

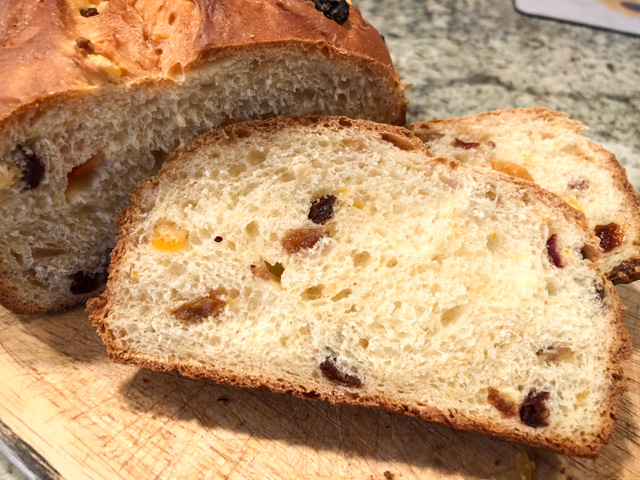
I read a ton of recipes before settling on my version, that joins The Fresh Loaf with some technical advice from America’s Test Kitchen.  I enjoyed baking this bread so much and it was so well-received by our colleagues, that I intend to make it again before 2018 says goodbye. Moist, flavorful, sweet but with a sour tang, the smell that lingered in the kitchen after baking was something! Can you tell how happy I am about this bake? I was on top of the world…

I took the panettone all sliced up to the department two days after baking. It was a bit past its prime, but still very tasty. Compliments galore, and by 10am everything was gone. Not even a crumb left. What more could I ask?

Notes to self: if repeating this exact recipe, I will cut the amounts by half. It will make the right amount for the panettone pan I have, which is 6 inches in diameter, 6 inches high.

Two tempting options to try: this version from Paul Hollywood, and this version from my virtual sister Susan. Decisions, decisions…

ONE YEAR AGO: Pistachio Creme Brulee

TWO YEARS AGO: Fast and Furious Bison Chili

THREE YEARS AGO: In My Kitchen, December 2014

FOUR YEARS AGO: Braised Fennel with Saffron and Tomato

FIVE YEARS AGO: Revenge of the Two Derelicts

SIX YEARS AGO: Grilling Ribbons

SEVEN YEARS AGO: Peppery Cashew Crunch

EIGHT YEARS AGO: Baked Shrimp and Feta Pasta

PASTEIS DE NATA


March, 2003. While living in Paris we took a few days break in Lisbon where we met a couple of great friends from the US who were vacationing in Europe (Sally waves hello to M & V). It was also a trip to celebrate our 3rd wedding anniversary. Portugal, the home country of my maternal grandparents, was a place I had always wanted to visit. The country is charming, people absolutely adorable, and the food? The food does not get the respect and admiration it deserves, in my opinion. As it is mandatory for anyone visiting Lisbon, we stopped by the birth place of Pastéis de Belém, also known as Pastéis de Nata. You can read all about it here.

But first, would you like to say it as a native?  let’s try it…

When  you bite into your first one, the skies open, angels start singing, and you wonder how would you ever leave Portugal and that indescribable pleasure behind. Yes, they are that wonderful. For almost 15 years I’ve been dreaming of making them at home, even though I am fully aware they would not compare to the original ones. Then I watched an episode of the latest season of The Great British Bake Off, and pastéis de nata were requested as one technical challenge. Sally said to herself… if they can do it, perhaps I could too?

PASTÉIS DE NATA
(slightly modified from  Leite’s Culinaria)

for the dough:
2 cups minus 2 tablespoons all-purpose flour (227 grams)***  (see my notes)
1/4 teaspoon sea salt (1 gram)
3/4 cup plus 2 tablespoons cold water (208 ml)
8 ounces unsalted butter (2 sticks), room temperature, stirred until smooth

for the custard:
3 tablespoons all-purpose flour (23 grams)
1 1/4 cups milk (297 ml), divided
1 1/3 cups granulated sugar (264 grams)
1 cinnamon stick
2/3 cup water (158 ml)
1/2 teaspoon vanilla extract (3 ml)
6 large egg yolks, whisked

for the garnish:
confectioners’ sugar
cinnamon

Make the dough: In a stand mixer fitted with a dough hook, mix the flour, salt, and water until a soft, pillowy dough forms that pulls away from the side of the bowl, about 30 seconds. I needed to add quite a bit more flour than the recipe called for, at least 1/4 cup more, perhaps more. 

Generously flour a work surface and pat the dough into a 6-inch square using a pastry scraper. Flour the dough, cover with plastic wrap, and let it rest at room temperature for 15 minutes. Roll the dough into an 18-inch square. As you work, use the scraper to lift the dough to make sure the underside isn’t sticking to your work surface.

Brush the excess flour off the top of the dough, trim any uneven edges, and, using a small offset spatula, dot and then spread the left 2/3 portion of the dough with a little less than 1/3 of the butter being careful to leave a 1 inch plain border around the edge of the dough. Neatly fold the unbuttered right 1/3 of the dough (using the pastry scraper to loosen it if it sticks) over the rest of the dough. Brush off any excess flour, then fold over the left 1/3 of the dough.

Starting from the top, pat down the dough with your hand to release any air bubbles, and then pinch the edges of the dough to seal. Brush off any excess flour. Turn the dough 90° to the left so the fold is facing you. Lift the dough and flour the work surface. Once again roll it out to an 18-inch square, then dot the left 2/3 of the dough with 1/3 of the butter and smear it over the dough. Fold the dough as directed in the previous steps.

For the last rolling, turn the dough 90° to the left and roll out the dough to an 18-by-21-inch rectangle, with the shorter side facing you. Spread the remaining butter over the entire surface of the dough. Using the spatula as an aid, lift the edge of dough closest to you and roll the dough away from you into a tight log, brushing the excess flour from the underside as you go. Trim the ends and cut the log in half. Wrap each piece in plastic wrap and chill for 2 hours or preferably overnight.

Make the custard: In a medium bowl, whisk the flour and 1/4 cup milk until smooth. Bring the sugar, cinnamon, and water to a boil in a small saucepan and cook until an instant-read thermometer registers 220°F (100°C). Do not stir.

Meanwhile, in another small saucepan, scald the remaining 1 cup milk. Whisk the hot milk into the flour mixture. Remove the cinnamon stick and then pour the sugar syrup in a thin stream into the hot milk-and-flour mixture, whisking briskly. Add the vanilla and stir for a minute until very warm but not hot. Whisk in the yolks, strain the mixture into a bowl, cover with plastic wrap, and set aside. The custard will be thin.

Assemble and bake the pastries:  Place an oven rack in the top third position and heat the oven to 500°F.  Remove a pastry log from the refrigerator and roll it back and forth on a lightly floured surface until it’s about an inch in diameter and 16 inches long. Cut it into scant 3/4-inch pieces. Place 1 piece pastry dough, cut side down, in each well of a nonstick 12-cup mini-muffin pan (2-by-5/8-inch size). Allow the dough pieces to soften several minutes until pliable.

Have a small cup of water nearby. Dip your thumbs in the water, then straight down into the middle of the dough spiral. Flatten it against the bottom of the cup to a thickness of about 1/16 inch, then smooth the dough up the sides and create a raised lip about 1/8 inch above the pan. The pastry sides should be thinner than the bottom. Fill each cup 3/4 full with the slightly warm custard. Bake the pasteis until the edges of the dough are frilled and brown, about 8 to 9 minutes.

Remove from the oven and allow the pasteis to cool a few minutes in the pan, then transfer to a rack and cool until just warm. Sprinkle the pasteis generously with confectioners’ sugar, then cinnamon and serve. Repeat with the remaining pastry and custard.

ENJOY!

to print the recipe, click here

Comments: I will not lie to you, this is a labor of love. It is time-consuming, and the first time you make it, you’ll feel quite insecure about each step. Did I roll out the pastry thin enough? Is the butter melting too much into the dough? And the insecurities get more intense when it comes time to shape each little shell, because it’s a bit of an unusual process. After rolling the pastry as a long sausage, small bits are cut cross-wise and placed in each mini-muffin tin, like this:

Then, very gently you will push down with the finger right in the center of the cylinder, making the pastry stretch to the sides. Instructions tell you to make the base thicker than the sides. That is easy to understand but not that easy to achieve. Plus, the idea is to work as quickly as possible so the butter won’t melt with the heat of your fingers. If you do it perfectly right, after baking the base of the pastry should show a nice rolling pattern.

Not quite there yet… but I guess not too bad…

The amazing thing is that I did two batches of these Portuguese delicacies, two days in a row. Why? Because I am married to Phil. Puzzled?  Let me explain. A dialogue, that happened as we arrived home from work, went more or less like this:

“What are you going to do with all this leftover custard in the fridge?

I have no clue, maybe pour over some fruit? You can have it, by the way…

(A bit of a pause)

Why don’t you make a second batch of pastéis de nata?

(pause due to sheer shock)

Are you totally out of your mind? Do you realize what it takes to make these?

C’mon, it cannot be that bad…

(my reply was not fit to print)

Ok, ok, OK, I get it.. BUT what if I help you? We make it together, how about that?

And that’s how a second batch of Pastéis de Nata was made after work on a weeknight. He did help me, first sitting by the countertop making small conversation as I prepared the dough, and then shaping a batch of shells.  He even made a little video while I was working hard with dough and butter. I guess he got bored! 😉 Anyway, here is the mercifully short video.

Even though they turned out very delicious, there is room for improvement. I guess baking them closer to the heat source would be better, ideally you want them all to have the very dark spots I showed you in the first photo.  Interestingly enough, those had been baked in my small electric oven, where the tray was placed a lot closer to the top heating element. That’s something to keep in mind if you try them yourself.  I also made a small batch with commercial puff pastry, and must admit home-made from scratch turns out a lot better. Something about the way the custard and the shell join in a more homogeneous way. The store-bought puff pastry had a harsher texture. Still, if that’s the only option for you to bake a batch of Pastéis de Nata, go for it. It will still be amazing, I promise. I must stress again the fact that as written, the recipe from Leite’s Culinaria posed me problems. I find that the amount of flour called for has got to be wrong. Maybe it has to do with the brand he’s used, but keep that in mind. You need a dough that you can work comfortably with.

Hard to believe that my first encounter with Pastéis de Nata was almost 15 years ago!

Getting ready to leave for our anniversary dinner, in a restaurant with great seafood and live “fado”, a music that speaks straight to the human soul. 

I hope you enjoyed my adventure with this delicacy of my past. I am so glad I finally decided to go for it. Now I need to face another dream of mine, éclairs. Stay tuned!

ONE YEAR AGO: New Mexico Pork Chile, Crockpot Version

TWO YEARS AGO: Chocolate on Chocolate

THREE YEARS AGO: Double Chocolate and Mint Cookies

FOUR YEARS AGO: The Story of my first Creme Brulle’

FIVE YEARS AGO: Sourdough Mini-rolls

SIX YEARS AGO: Focaccia with Sun-dried Tomatoes and Gorgonzola

SEVEN YEARS AGO: Mediterranean Skewers

EIGHT YEARS AGO Fettuccine with Shrimp, Swiss Chard, and Tomatoes

SaveSave

SaveSave

SaveSave

SaveSave

SaveSave

SaveSave

SaveSave

SaveSave

SaveSave

SaveSave

SaveSave

SaveSave

SaveSave

SaveSave

SaveSave

SaveSave

SaveSave

SaveSave

SaveSave

SaveSave

FIRST MONDAY FAVORITE: NOVEMBER 2017

First Monday of the last month of the year… How on Earth did we get here so fast?

I suppose it is a good sign when I have a hard time picking my favorite post from last month. After a lot of deliberations with myself, I will go with this one:

To read the full post about it, click here….

The link below takes you to the favorite post of my virtual friends who participate of this event. If you are a blogger and would like to join us, contact Sybil at http://www.sidsseapalmcooking.com

(comments are shutdown for this post)

https://static.inlinkz.com/cs2.js

SaveSave

SaveSave

SaveSave

SaveSave