AIR-FRIED CARROTS, TWO WAYS

No air-fryer? No worries. Both recipes can be prepared without it.

Lolita, the newest member of our gadget family, has been pretty busy these days. I had only one failure: air-frying broccoli, but even that was not a major catastrophic event. It was just a bit tricky to control the cooking of the crowns. Some bits of their external surface got overcooked and ended up with a harsh texture. Maybe a lower temperature would work better. At any rate, that recipe needs tweaking before I share with you. Moving to carrots, I offer two recipes that could not be simpler. First, air-fried carrots with a touch of honey. And then, a batch of shoestring fried carrots that were pretty much inhaled by the two of us. A bit of an argument happened when two lonely strands were left in the bowl. As often happens, the tropical charm spoke louder, and they both went into my belly. Oh, well. By the way, if you don’t have an air-fryer, follow the link to the recipe as shown in The Kitchen, that calls for deep-frying. It will be a bit more caloric, but still less so than the potato version. Plus, I bet kids will love them. One efficient way to deliver veggies to picky eaters.

AIR-FRIED CARROTS WITH HONEY
(from the Bewitching Kitchen)

2 to 3 cups of carrots, cut in 1/2 inch pieces
1 tablespoon olive oil
1 tablespoon honey
tiny drizzle of soy sauce
salt and pepper to taste

Set air-fryer to 390 F.

Place the cut carrots in a bowl, add olive oil, honey and soy, toss gently to coat, trying to cover all surfaces with a bit of oil. Season carrots with salt and ground black pepper. Place in the basket of your air-fryer and cook for about 12 minutes, shaking the pan every once in a while.  Serve right away.

If you don’t have an air-fryer, roast in the oven at 420F until done.

ENJOY!

to print the recipe, click here

Comments: I’ve made these carrots three times. Compared to roasting them in the oven, I would say Lolita is faster, and also gives a different texture, quite pleasing. Leftovers were still very nice with a brief encounter with microwaves. Probably even better warmed up in a regular oven, but when lunch time comes, we opt for the simplest, fastest route to go back to work.

And now for a nice variation on shoestring potato fries. These are much lighter and surprisingly tasty!


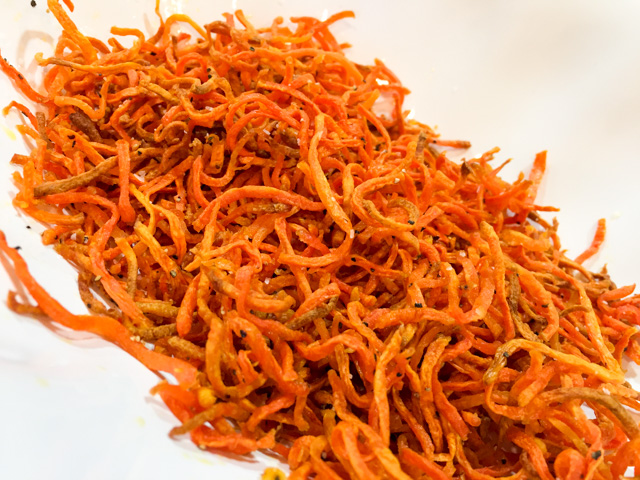
SHOESTRING AIR-FRIED CARROTS
(adapted from Food TV The Kitchen)

1 bag (10 ounces) of julienned carrots (sold for cole-slaw)
1 tablespoon olive oil
salt and pepper to taste
apple cider vinegar in a spray bottle
1 teaspoon orange zest

In a medium bowl, mix the carrots with the olive oil, coating them lightly. Try to coat all pieces of carrots. Season with salt and pepper.

Place the carrots in the air-fryer set at 390F. Cook for 13 to 16 minutes, mixing them around every few minutes.

Remove when they start to get nicely brown, watch them closely because pieces might get too dark very quickly. Transfer them to a serving bowl, add orange zest, spray a little apple cider vinegar, adjust seasoning with more salt and pepper if needed. Serve right away.

ENJOY!

to print the recipe, click here

Comments: I will warn you that the air-fryer (at least the model we have) will not hold more than one 10-ounce bag of shredded carrots. And they will shrink A LOT  during frying, as the water content of carrots is pretty high. At first you will see them shrinking, shrinking, getting kind of limp. Until all the water evaporates, they won’t brown.  So you will be left with a small amount of carrots, but perfect for two.  I would say that the main concern with the air-fryer is the amount of food it can handle. For a couple with no kids, it’s a very nice gadget. If you have kids around, you might have to cook food in batches. However, my niece in Brazil has three young kids and she still loves her fryer, so take my comment with a grain of salt.

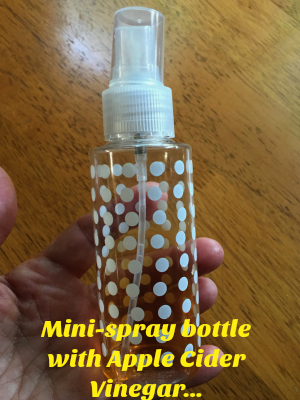
The idea of using mini-spray bottles for vinegar is pure genius! It allows you to add just a little touch on the food. You can find those for very cheap in grocery stores, sold usually in a bag together with other types of bottles for traveling. I had no use for the spray one, it was hanging around my bathroom, neglected and lonely. Well, it’s now in my pantry, ready to play!

I’ve made these carrots twice already, first time I simply shook the basket every few minutes, and did not notice that the bottom layer was getting very dark and not moving around with my delicate shaking. Second time I used tongs to move the carrot pieces more efficiently. Worked like a charm.  Of course, if you don’t have an air-fryer, you can deep fry them and they will turn out delicious. I just hate dealing with the leftover oil, and find deep-fried food a bit heavy and hard to digest. Bottom line is, Lolita is working quite nicely for us!

Add to FacebookAdd to DiggAdd to Del.icio.usAdd to StumbleuponAdd to RedditAdd to BlinklistAdd to TwitterAdd to TechnoratiAdd to Yahoo BuzzAdd to Newsvine

ONE YEAR AGO: Five Minutes in L.I.T (a tour of our laboratory!)

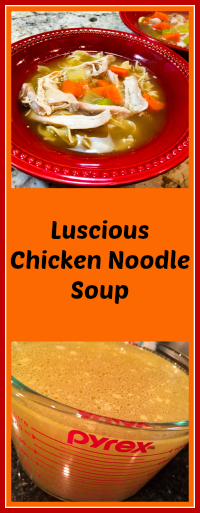
TWO YEARS AGO: Chicken Thighs with Artichokes and Capers

THREE YEARS AGO: Pea Pancakes with Herbed Yogurt

FOUR YEARS AGO: Mushroom Stroganoff

FIVE YEARS AGO: Tomato Sourdough

SIX YEARS AGO: Gamberetti con rucola e pomodori

SEVEN YEARS AGO: Flirting with Orzo

SESAME AND POPPY SEED SOURDOUGH

It’s been a while since I baked a loaf of sourdough bread, Dan, my poor starter was definitely feeling neglected. This time, I decided to make something heavily loaded with seeds, but not big ones like pumpkin or sunflower. More delicate, seeds that would disperse nicely in the crumb. My starting point was a recipe from Josey Baker’s book Bread, but I added a few twists and modified the method slightly. Very pleased with the way it turned out.

SESAME AND POPPY SEED SOURDOUGH
(adapted from Josey Baker’s Bread)

for seed mixture:
1/2 cup toasted sesame seeds (80 g)
1/4 cup poppy seeds (40 g)
1/2 cup hot water (120 g)

for dough:
240 g sourdough starter at 100% hydration
240 g water
300 g bread flour
75 g spelt flour
12 g salt (2 tsp)
all seed soaker

The day before, feed your starter and make sure it is all bubbly and ready to go. Prepare more than you need, so you can save some for future bread baking.

Prepare the seed soaker by mixing sesame and poppy seeds in a small bowl, adding the hot water on top. Mix and let it sit for one hour.

Prepare the dough by mixing all ingredients in a large bowl.  Mix until it’s a shaggy mass, leave it covered with plastic wrap for 30 minutes.

Knead or fold the dough (ten times or so).  Cover and let it ferment for 30 minutes.

Knead or fold the dough again. Cover and let it sit for 30 minutes. Perform two more cycles of kneading 30 minutes apart.  Knead again and let it sit for 1 hour.

Shape the dough. Place it inside a banneton or other appropriate container, seam side up. Let it ferment for 2 hours. Place it in the fridge overnight, or around 12 hours.

Remove from the fridge one hour before baking, as your oven heats to 450 F.  Invert the dough on parchment paper, slash the top and bake for 45 minutes with initial steam (use your favorite method for that). I bake inside a Dutch oven, covered, and uncover after 30 minutes to brown the crust.

Allow it to completely cool on a rack before slicing.

ENJOY!

to print the recipe, click here

Comments:  I’ve been trying to work on more “artistic” slashing, inspired by greater bakers such as Elaine from foodbod. Evidently, I need to bake more often and practice. The thing is, slashing is so…. final!  Once you do it, that is it, there’s no going back to fix it a little, and the finality of it makes me nervous and a bit paralyzed. Maybe that’s the same problem I have with golf. Once you take that golf club back, it’s over, my friend. Either you get it or it is a disaster of dire consequences. Usually option two happens for me, particularly with the 5-iron. But I digress…  Independent of my slashing skills, the bread tasted exactly how I hoped. Sesame is such a nice flavor, and the seeds gave a pleasant extra chew to the bread.

Most important step in the recipe: make sure the dough is proofed enough. It needs the seal of approval of experienced eyes.

Yes, Mom. It looks perfect. And smells great too… Now, if only you would leave the premises for a few minutes….

I close the post with the mandatory crumb shot. This bread was particularly awesome with Brie cheese.


Add to FacebookAdd to DiggAdd to Del.icio.usAdd to StumbleuponAdd to RedditAdd to BlinklistAdd to TwitterAdd to TechnoratiAdd to Yahoo BuzzAdd to Newsvine

ONE YEAR AGO: Pecan-Crusted Chicken from Southern at Heart

TWO YEARS AGO: Lamb Shanks en Papillote with Cauliflower-Celeriac Purée

THREE YEARS AGO: Chestnut Brownies and a Blog Award!

FOUR YEARS AGO: Quinoa with Cider-Glazed Carrots

FIVE YEARS AGO: Celebrate Wednesday: Heirloom Tomatoes Steal the Show

SIX YEARS AGO: Pain de Provence

SEVEN YEARS AGO: Golspie Loaf, from the Scottish Highlands

LUSCIOUS CHICKEN NOODLE SOUP

Perhaps you would think that the time for blogging about soup is pretty much over. But two facts conspired to bring it to our table. First, Phil got a little cold, and second, the weather turned pretty nasty. Forecast for Saturday and Sunday: chilly and full-time rain. Great combination for a rotten weekend. I will disclose to you that we do resort to Campbell’s canned soup sometimes. Yes, it’s not that great, but whenever we feel like we might be getting a bit sick, we buy a couple of cans and call them dinner. I squirt a little lemon juice over my bowl, freshly ground black pepper, and it does a reasonably ok job. But, this time I decided to take this classic soup medicine into my own hands. I would start by making my own chicken broth and use that to cook chicken thighs until  fork-tender. I won’t be humble. This was one spectacular chicken noodle soup. Even if for my bowl I used zoodles instead.

CHICKEN NOODLE SOUP
(from the Bewitching Kitchen)

A pressure cooker is preferred, but not mandatory

for the chicken stock:
2 pounds of chicken wings
2 carrots, cut in chunks
1 celery rib, cub in chunks
1/2 large onion
10 whole peppercorns
1 piece of ginger, about 1/2 inch
1 piece of kombu, about 3 inches long
1 bay leaf
7 cups of water

for the soup:
6 chicken thighs, skinless, with bone-in
4 medium carrots, diced
2 ribs celery, diced
chicken broth, as much as needed
salt and pepper to taste
fresh lemon juice to taste
cooked noodles or zoodles

Start by making the chicken broth. Mix all ingredients in a large stockpot or pressure cooker. If using a pressure cooker, cook for 40 minutes under pressure, release steam, open the pan, strain the stock. If using a regular pan, simmer for at least one hour, preferable an hour and a half.

Return about 2 cups of broth and 1 cup of water to the pressure cooker, add the chicken pieces seasoned with salt and pepper. Cook under pressure for 20 minutes. Alternatively, simmer in a regular pan until the meat is very tender. Remove the pieces of chicken to a bowl, allow it to cool until you can handle it.

As the chicken cools, return the pressure cooker to the stove, add the carrots, celery, cook under pressure for 5 minutes, or in a regular pan until the veggies are tender. The base of the soup is now ready.  Shred the chicken with a fork or your fingers. Reserve.

When it’s time to enjoy the soup, cook some noodles (or zoodles) in boiling salted water.  Re-warm the soup by mixing the soup base, the reserved chicken meat, and any reserved stock until the consistency is the way you like. Squirt fresh lemon juice, adjust seasoning if needed with salt and pepper. Place some cooked noodles in your serving bowl, ladle the soup over, and…

ENJOY!

to print the recipe, click here

Comments: I got the inspiration for this soup from a couple of sources. For instance, the use of kombu in the chicken stock came from the book The Longevity Kitchen. It is an interesting ingredient, one that I advise you to use just like you would fish sauce. Don’t sniff it. Big turn off. But it does a great job, not only nutritionally speaking, but in terms of flavor. The stock made with chicken wings has been my method of choice for years now, after a basic recipe found in one of my favorite cookbooks  Simple to Spectacular. I pumped it up by using the pressure cooker, and it does a great job extracting all flavors and goodies from the wings. In the composite photo you can see the color of the stock (upper left), no photoshopping was involved.

You will notice that I used the pressure cooker three times in a row, but you can do it all in a regular pan. Make sure to allow the wings to simmer for one full hour at least, and the chicken thighs until very tender. I’ve seen recipes recommending a 10 minute simmer, and I have no idea what those people are talking about. You would have to pretty much wrestle the meat off the bone with such a quick cooking.

All in all, this was so good that I had to blog right away. Contrary to what normally happens, you are reading on Wednesday a recipe we enjoyed only three days earlier. Also contrary to my principles, with this post I line two articles in a row involving chicken. Oh, well. That shows you how much I enjoyed this recipe, I simply could not wait to share.  I hope you’ll give it a try if you are headed to winter where you live, or if someone is feeling lousy with a cold. Heck, try it if you simply love chicken noodle soup. No other reason needed!

Add to FacebookAdd to DiggAdd to Del.icio.usAdd to StumbleuponAdd to RedditAdd to BlinklistAdd to TwitterAdd to TechnoratiAdd to Yahoo BuzzAdd to Newsvine

ONE YEAR AGO: Orange Mini-Cakes and a Bonus Recipe

TWO YEARS AGO: In My Kitchen, May 2015

THREE YEARS AGO: Chestnut Brownies and a Blog Award!

FOUR YEARS AGO: Quinoa with Cider-Glazed Carrots

FIVE YEARS AGO: Celebrate Wednesday: Heirloom Tomatoes Steal the Show

SIX YEARS AGO: Pain de Provence

SEVEN YEARS AGO: Golspie Loaf, from the Scottish Highlands


FIRST MONDAY FAVORITE: MAY 2017

Could someone tell 2017 that it is NOT a race to get to December?
Thanks.

Anyway, today is the First Monday of the month, so it’s time to showcase my favorite post of April. Easy job for me, very very easy, I do have a favorite, and it should not come as a surprise.

BLACK SESAME MACARONS!

Loved to design them, loved to make them, loved to share them with our departmental colleagues.  If you’d like to see the full recipe, click here

Thank you Sid, for organizing the First Monday Favorite!  
If you are a food blogger and would like to participate, drop Sid a line.

To see the contributions from my virtual friends, click on the link below

(comments are shutdown for this post)

https://static.inlinkz.com/cs2.js