SECRET RECIPE CLUB: TAILGATING PARTY!

If you are a regular reader of my blog, you will probably be a bit surprised to see another Secret Recipe Club feature just one week after the last one.  Here’s the reason: some months have five Mondays, but there are only four groups of blogs (A through D) in the club. So in some months a Monday would be empty of virtual fun, and that is sad.  The moderators then had this brilliant idea of coming up with a special theme for these extra Mondays in which all groups participate. Since football season is starting, the theme for today’s Reveal Day is “Tailgating“. Now, I must say I’m not too wild about tailgating, probably because I did not grow up in the US. But, nothing makes me miss a party, and I loved coming up with a recipe appropriate for the occasion. I was assigned the blog Dancing Veggies, hosted by Amanda, a member of Group A. One of the things I got a kick out of stalking her blog is the way she chooses pretty creative, unexpected names for her posts.  For instance, what do you think a post called “Heart Racing” would be about? A bowl of chili? a hot Indian curry?  Nah. It’s about Cranberry Oatmeal Cookies!  🙂 How about a post called “Meet me at Midnight?” Caviar on toast and a shot of vodka?  A platter of oysters on the half shell?  No, not really. That one is about German Chocolate Brownies…  For this tailgating event, my contribution is a plate of cookies, and since Fall is knocking at the door (stiff upper lip ON), my cookies include the P word. Talk about someone who dances with the music… that’s me, baby, all the way! And speaking of dancing to the music, Amanda just explained to me the meaning behind her posts titles: they are all song titles, the “dancing” part of her blog, Dancing Veggies.  Too awesome for words!

Pumpkin Choc Chip Cookies2

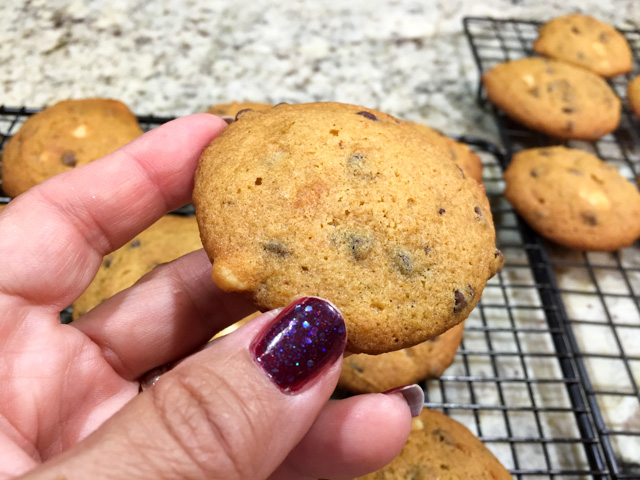
PUMPKIN CHOCOLATE CHIP COOKIES
(slightly modified from Dancing Veggies)

makes about 30 cookies

1/2 cup unsalted butter, softened
1/2 cup brown sugar
1/2 cup white sugar
1 egg
1/4 tsp salt
1/2 tsp vanilla extract
1/2 cup mashed pumpkin
1 + 1/2 cups flour
1 tsp baking soda
1/8 tsp nutmeg
1/2 tsp cinnamon
1/4 to 1/2 cup mini dark choc chips
1/4 to 1/2 cup white choc chips

Heat the oven to 350 F.

Cream the butter and sugar for 5 minutes, until slightly fluffy. Add in the egg, salt, and vanilla extract and beat for a few more minutes before adding in the mashed pumpkin.

In a small bowl stir together the flour, baking soda, and spices. Slowly add to the wet ingredients and beat until just mixed. Spoon the dough onto cookie sheets in walnut sized portions. Bake for 12 to 15 minutes, or until a golden orange shade. Cool on a rack.

ENJOY!

to print the recipe, click here

composite

Comments:  My main modification of the recipe was to use a mixture of white and dark chocolate chips. I am very fond of white chocolate and had just a little bit left in a bag, so I decided to put them to good use.  I left the amounts pretty flexible in the recipe, because Phil loves a cookie that is loaded with chips, so see how much your dough can take and go for maximal pleasure.  I think dried cranberries would work great too, by the way. The texture of the cookies is on the chewy side due to the pumpkin puree, which by the way, I used canned.  As usual, no one will be able to taste the pumpkin, it just gives them a mysterious flavor.  The nutmeg and cinnamon of course complement it all beautifully.  A perfect Fall cookie (stiff upper lip threatening to fail).

have a cookie

You cannot have summer back, but you can always have a cookie!

Amanda, I had a lot of fun browsing your collection of recipes, in fact your zucchini fritters were insistently calling my name, but I thought that maybe those would be hard to enjoy at tailgating with the dipping sauce and all. So I stuck with cookies, easy to grab and run away to the stadium not to miss the kick-off. As usual, everyone can check the collection of tailgating recipes by poking the cute blue frog at the end of the post.

ONE YEAR AGO:  One Million Page Views!

TWO YEARS AGO: Tlayuda, a Mexican Pizza

THREE YEARS AGO: Paradise Revisited

FOUR YEARS AGO: Feijoada, the Ultimate Brazilian Feast

FIVE YEARS AGO: Vegetable Milhojas

SIX YEARS AGO: Italian Bread

EGGPLANT TOMATO STACKS

This is pretty much a non-recipe, but a few details made this preparation so delicious, I must share. First of all, you’ll need to use the best juicy large tomatoes you can find. We got heirloom tomatoes that turned out perfect. Slice them thick, no skinny slices. Same goes for the eggplant slices, and once you grill them, 2 minutes per side and you are done. This will preserve some of the eggplant texture, it won’t go all mushy on you.  I often make the mistake of over-grilling eggplant. It gets bitter and limp. No bueno city.

Eggplant Stacks

EGGPLANT TOMATO STACKS
(from the Bewitching Kitchen)

1/4 cup olive oil
juice of half a lemon
Herbes de Provence to taste
salt and pepper to taste
2 big Heirloom tomatoes
1 medium eggplant
4 slices of mozzarella cheese

Make the dressing by mixing the olive oil, lemon juice, herbs, salt and pepper. Whisk well to emulsify.

Cut the eggplant in thick slices and brush each side with some of the dressing.  Reserve.  Slice the tomatoes, place over a platter and brush each slice very slightly with the dressing.  Reserve.

Grill the eggplant two minutes per side on a very hot grill. While hot from the grill, assemble the stacks, starting with a thick tomato slice, then a slice of hot eggplant on top. Add a slice of mozzarella, continue stacking the veggies. Top with a thin mozzarella slice, and drizzle any dressing leftover on top.  Add a tad more salt and serve.

ENJOY!

to print the non-recipe, click here

Comments: Sometimes simplicity is all you need in life. I didn’t anticipate making a post about this dish, but considering how much we both loved it, I had to share.  Resist the idea of melting the mozzarella on top by running the dish under a broiler or something.  It’s all a play with contrasting temperature and texture. The tomato will be just barely warm from cozying up with the grilled eggplant, and that will intensify its taste in a delightful way. I said it once, but will say it again, do not grill the eggplant to death. Assemble the stacks, bring them to the table, and pair them with any main dish you feel like it. I suppose two of these stacks could work well as a light meal. If you have some bread with it, even better. Some leaves of fresh basil in between the layers would be a nice touch, which unfortunately I thought about only a couple of hours later.  Such is life…

I hope you’ll give this a try before summer is over…  (typing this last phrase just about sent me into a crying fit. I am such a sensitive creature…)

ONE YEAR AGO: The Couscous that Wasn’t

TWO YEARS AGO: Apple-Cinnamon Bread

THREE YEARS AGO: Blueberry Galette

FOUR YEARS AGO: In My Kitchen, August 2011

FIVE YEARS AGO: Journey to a New Home

SIX YEARS AGO: Friday Night Dinner

SECRET RECIPE CLUB: TURKEY-CHORIZO BURGER WITH GREEN CHILE DRESSING

August is bit too close to the end of the summer, so the dark clouds start to contaminate my mood, as I notice the forecast showing less and less days over 90 F and more and more below 80 F, which is the divisive line between life worth living and misery.  Meteorological troubles aside, the fourth Monday of the month brings with it Reveal Day for  The Secret Recipe Club! This month I was paired with Lynsey Lou’s, a blog I’ve already been following  for a while, so of course the assignment made me super excited… it was like getting a dear colleague from work on the Secret Santa drawing…  Lynsey has been married to Spencer since 2008, and is convinced that the way to a man’s heart involves food. They both have fond memories of a particular  batch of brownies taken to his frat house when they started dating. Too cute! If I remember correctly, Ina Garten has a similar experience with her husband of many many years, Jeffrey. Great relationships might very well start around the table. Or around a lab bench, I suppose.  😉   One of the lines I loved the most in Lynsey’s About page was this one:

Cooking, like many other things, is a learning experience that comes with a lot of trial and error.

I feel exactly the same way, and like her, love to expand my horizons trying recipes from different cuisines whenever possible. So many recipes appealed to me this month, it was tough to settle on one.  Some of my final contenders are here: White Chocolate Coconut Cookies, Red Velvet Brownies with White Chocolate Ganache (sigh), White Chocolate Toffee Crunch Cookies, and her Overnight Cinnamon Rolls (you gotta stop and check the recipe, perfect to start the day with freshly baked rolls without having to wake up at 4am).  Since so often I lean towards sweets in the Secret Recipe Club, I forced myself to do something different this time.  So, without further ado, I present you with Turkey Chorizo Burgers with Green Chile Mayo.  A mouthful of a name for a fantastic recipe that Phil and I absolutely loved!

Turkey Chorizo Burger

TURKEY-CHORIZO BURGER WITH GREEN CHILE DRESSING
(slightly modified from Lynsey Lou’s blog)

for the burgers:
8 Oz fresh chorizo, casings removed
1-1 1/2 Pounds ground turkey
2 Tsp Worcestershire sauce
3/4 Tsp salt
1/4 Tsp cayenne pepper
4 slices Jack cheese
hamburger buns (optional)

for the dressing:
1 Poblano chile
3/4 cup yogurt
1 Tbsp olive oil
1 Tbsp freshly squeezed lime juice
Salt and pepper, to taste

Make the chile dressing: Heat oven to 400.  Line a baking sheet with aluminum foil. Place the cleaned chile on the prepared baking sheet and place in oven.  Roast for approximately 15 minutes, until skin is charred and blistered.  Rotating during the roasting process.  Place the roasted pepper in a bowl and cover tightly with plastic wrap and allow to stand for 10 minutes.

Remove the pepper from the bowl and remove the skin, stem and seeds.  Finely chop the pepper.  In a food processor, combine the chile, yogurt, olive oil, and lime juice and process until the mixture is smooth.  Season, to taste with salt and pepper. Reserve.

Heat grill to medium. In a large bowl combine turkey, chorizo, Worcestershire sauce, salt and cayenne pepper.  Gently mix the ingredients together, being careful to not overwork the meat.  Divide the meat evenly into 4 pieces, approximately 8 ounces each.  Gently form each section of meat into 1-inch thick patties.

Place the prepared patties on the grill and cook to a minimum internal temperature of 160 degrees, 5 to 7 minutes per side. Once burgers are cooked to desired doneness, transfer to a plate and top with cheese.

Spread a generous helping of green chile mayonnaise on the top and bottom of hamburger buns, if using.  Place the burger patties on bottom portion of each bun.  Top with lettuce, spinach or arugula and top with the top portion of the bun.  Serve immediately. If not using buns, assemble the burgers using appropriate substitutions (we went with grilled eggplant slices). Spoon the dressing on top, and serve with your favorite toppings.

ENJOY!

to print the recipe, click here

composite

Comments:  The main modification I made from Lynsey’s original was to skip the mayo and use yogurt and olive oil instead for the dressing. We are both very fond of turkey burgers, but this poblano-infused dressing totally stole the show! Poblano peppers are delicious in their natural form, but roasting improves their flavor and texture quite a bit. Once you process the roasted pepper with the yogurt, you are in for a very special treat…  I found myself sampling a teaspoon here, another there while the burgers were outside on the grill.  Really superb.

These days we almost never have bread with our burgers, so don’t be shocked by the absence of bread from our spread of goodies….  We like our burgers served over hearty lettuce leaves, but this time I grilled thick slices of eggplant and that worked even better.

dinnerserved1

Adding chorizo to ground turkey works great to give a little extra fat and a boost of flavor.  Grilled corn on the cob, avocado, and tomato slices were perfect as side dishes for our meal.

Turkey BUrger Sally

And, of course, I was a super happy camper next day, look at my lunch!

MyLunch

Who said leftovers have to be boring?
😉

Well, folks, that’s all for this Reveal Day… Lynsey, I hope you also had a ton of fun stalking your assigned blog. As usual, I invite my readers to browse the collection of goodies, the result of the hard work of my virtual friends from Group D of The Secret Recipe Club. Just poke the alien-looking frog at the end of the post and have fun!

ONE YEAR AGO: Taco Salad

TWO YEARS AGO: Semolina Sourdough Boule 

THREE YEARS AGO: Forgive me, for I have sinned

FOUR YEARS AGOCracked Wheat Sandwich Bread

FIVE YEARS AGO:  Au Revoir, my Bewitching Kitchen

SIX YEARS AGO:  French Bread

APRICOTS, THREE WAYS

Apricots Bowl
This year has been the year of the apricot for us. We bought them at each opportunity. Now, I realize that it is the type of fruit that goes down in flavor very quickly once it is picked, so maybe the apricots we have access to are not as fantastic as those found right in California or Washington.  Still, some were spectacularly juicy and tender.  In this post I am sharing not one, not two, but three recipes using not only the fruit but – are you ready for this? – their pits! Yes, and that recipe in particular will blow your mind, I promise. Maybe you won’t be able to make it this year, as the season is over, but next year start buying apricots as early as you can, and freeze the pits. Once you get 20  or so of them, you’ll be ready to make THE most amazing ice cream of your existence.  I promise.

TAKE #1: APRICOT COMPOTE

I found this recipe over at Mike’s blog, and made it almost immediately. Vanilla, ginger, and apricots? No need to say anything else. I am not too fond of compotes and jams, but I am so glad I tried this recipe. You should too…

Apricot Compote

GINGER AND VANILLA APRICOT COMPOTE
(from The Iron You)

1 lb firm ripe apricots, halved and pitted
2 tablespoons fresh lime juice
2 to 3 tablespoons coconut palm sugar
1-inch piece of ginger, peeled
½ teaspoon vanilla extract

In a large skillet combine apricots, lime juice, sugar, ginger, and vanilla extract.

Cook over medium heat, turning occasionally, until apricots are glazed and syrupy, about 7 to 8 minutes. Transfer to a small bowl and chill.

Serve apricot compote with yogurt or ice cream.

ENJOY!

to print the apricot compote recipe, click here

Cooking

This was absolutely delicious, not too sweet, very simple to prepare, the flavor of lime, ginger, and vanilla playing nicely with the fruit. Great recipe!  By the way, if you don’t have coconut palm sugar, use brown sugar or honey. I don’t normally have breakfast, but must say that a small bowl of this compote served with yogurt and a sprinkle of cereal was a nice way to start a particular Saturday morning…. Big thank you to Mike for sharing his recipe!

Apricot Compote Served

TAKE #2: APRICOT-PASSION FRUIT SORBET

We make sorbets quite often during the summer. All credit must got to Phil, as he is the one who comes up with fruit combinations and plays with the right proportions to get the best flavor.  This batch combined apricots and passion fruit. Refreshing, light, a perfect ending to a summer evening…

Apricot PF sorbet

APRICOT-PASSION FRUIT SORBET
(from the Bewitching Kitchen)

1.5 lb. fresh apricots
1/2 lb. passion fruit pulp
1 cup water
3/4 cups sugar
1 ripe banana, cut in pieces
1 Tablespoon vodka (optional, but improves consistency)

Split the apricots in half, remove the pits, and cut each half into chunks. Combine the apricot and water in a saucepan and cook, covered, over medium heat, stirring occasionally. Heat until cooked through, about 10 minutes. Remove from the heat and stir in the sugar. Let the mixture cool to room temperature.

Place the cooked apricots to the bowl of a food processor, add the banana, then puree the mixture until completely smooth. Add the passion fruit and vodka, process briefly to combine. Taste and adjust the amount of sugar if necessary.  Cover and chill thoroughly in the refrigerator.

Freeze the mixture in your ice cream maker.

ENJOY!

to print the sorbet recipe, click here

The sorbet will stand on its own, but a superb way to indulge in it is by pairing it with….

TAKE #3: NOYAU ICE CREAM

Noyau (also spelled in its plural form, noyaux), the amazing, one and only ice cream made with apricot pits! Sometimes also called nougat ice cream, although it’s not the most appropriate name for it. The recipe comes from one of my favorite food blogs, Pastry Studio.  Speaking of which, if you haven’t yet read my little review about Gayle’s book, please take a look here, and order your copy. She is a natural teacher when it comes to all things baking.  But, anyway, her description of this ice cream, the way each summer she makes sure to prepare a batch using apricot pits carefully collected, made me crave for it.  Wondering about the taste, apparently so unique.  Well, this ice cream turned Phil into a compulsive collector of apricot pits. The moment he tasted the first spoonful, he told me we better never EVER run out of it.  Yeap, folks. That great.  So, without further ado, here it is…

Nougat Ice Cream

NOYAU ICE CREAM
(from Pastry Studio)

20 apricot pits (see my comments)
3/4 C sugar
3/4 C milk
2 1/4 C heavy cream
4 egg yolks

Break open apricot pits with a hammer to remove the small almond-like kernels inside. You may want to use a cloth to keep the bits from flying. Crush the kernels with a mortar and pestle or chop into small pieces.

Place the sugar, milk, cream and kernels in a saucepan and heat right up to a good simmer but just before it boils. Cover and let the mixture steep for 30 minutes to an hour, tasting periodically to check for strength. It should taste of almond, but not bitter.

When you have the desired flavor, heat the milk mixture a bit and pour some of it into the yolks, whisking constantly to temper the mixture. Pour the yolks and cream back into the pan and cook slowly over medium heat, stirring constantly, until it coats the back of a spoon. Strain into a clean container and cool, stirring occasionally. Chill thoroughly.

Pour into your ice cream maker and freeze. Pour into a clean container, cover the surface of the ice cream with a piece of plastic wrap, be sure the container lid is tight and place in your freezer to firm up.

ENJOY!

to print the noyau recipe, click here

Comments:  In case I did not make it clear enough, let me state I am absolutely in love with this ice cream! Head over hills, spoons over bowls. Make it. Save those kernels, and make it. To break the pits, we found that once frozen they broke very easily with a nutcracker, so we did not have to use a hammer.  Full disclosure: Phil broke them, I watched. But the pits freshly taken from the fruit resisted the nutcracker, so they were sent for time-out into the freezer for proper attitude adjustment.  Here is what they will look like once removed from the fruit. You can save those at room temperature for a few days, no problem.

Pits
The smell is reminiscent of almonds, with a “je ne sais quoi” in the background. That “je ne sais quoi” will be prominent in the flavor of the ice cream… I am dreaming as I type this paragraph… magic flavor indeed!

You must dice the kernels to optimize the infusion of the cream… and after simmering to develop the flavor (I did it for 45 minutes), simply strain the pits out, and freeze the base of the ice cream…   That’s all there is to it!

basestrained

Gayle, thank you so much for bringing this recipe to our kitchen!  It is amazing to think that at my age I would be tasting for the first time something so delicious… a wonderful gastronomic experience indeed!

+++++++++++++++++++++++++++++++++++++++++++++++++++++++

Well, I hope you enjoyed this triple post on apricots. The season is of course over, but we have about 30 pits saved in the freezer to make one more batch of this ice cream soon.  We will savor one spoonful at a time, to try and stretch this delicacy as long as possible in time…

Before I leave you, let me share a link about the “danger” of noyau, linked to the presence of trace amounts of cyanide in the stone fruit pit. As you can see, no need to avoid this delicacy….

😉

ONE YEAR AGO: Up Close and Personal with Kale

TWO YEARS AGOBlack Berry Cherry Sorbet

THREE YEARS AGO: Asparagus Pesto

FOUR YEARS AGO: Chocolate and Chestnut Terrine

FIVE YEARS AGO: Under the spell of lemongrass

SIX YEARS AGO: Greens + Grapefruit + Shrimp = Great Salad!

ROASTED RED PEPPER-WALNUT DIP WITH POMEGRANATE

Are you familiar with Muhammara, a flavorful Middle Eastern red pepper dip? This concoction is similar but not quite the same. The addition of dates gives it a sweeter note, and the use of pomegranate juice is also a departure from the classic.  I made it for a dinner party we hosted not too long ago, and served it with Ka’kat bread. Perfect partner for the dip.  The recipe comes from Martha Stewart, and contrary to my expectations, there were problems. In fact, it was almost a disaster, but my beloved husband saved the show and thanks to his advice, the dip did not metamorphose into soup. And guess what? This is Paleo-friendly, so if you are into it, feel free to dig in!

Red Pepper Walnut Dip

ROASTED RED PEPPER-WALNUT DIP WITH POMEGRANATE
(from Martha Stewart)

4 pitted dates
3 chopped roasted red peppers
1/2 cup pomegranate juice (use less: see my comments)
1/2 cup toasted walnuts
1/2 teaspoon red-pepper flakes
2 tablespoons extra-virgin olive oil
Coarse salt and freshly ground pepper
Pomegranate seeds (optional)

Soak dates in hot water until softened, about 10 minutes; drain. Pulse dates, red peppers, pomegranate juice, walnuts, and red-pepper flakes in food processor until smooth. With machine running, slowly add olive oil until thoroughly combined. Season with salt and pepper.

Dip can be stored in refrigerator in an airtight container up to 3 days.

Garnish with pomegranate seeds, if so desired.

ENJOY!

to print the recipe, click here

composite2

Comments: Don’t let my almost disaster stop you from making this dip, it was delicious!  However, I even left feedback on Martha Stewart’s website stating that there are problems with the recipe as published. No way 1/2 cup of pomegranate juice will work. I actually roasted more bell peppers than the recipe called for, and it was still pretty much a soup once I was done processing it.

In complete despair, I told Phil that we would have to settle for store-bought hummus for our dinner party because the dip was ruined, but he did not even blink: put it in a sieve to drain, it will be alright.  He is simply the most optimistic human being ever, nothing brings him down.  Take golf, for instance. He faces each shot, no matter how tough, with full composure. Moi? I start shaking uncontrollably when my golf ball goes into a bunker (the golf balls I play with have a mind of their own, did you know that?).  In part because I know how many strokes it will take me to get said ball out of there. But, let’s get back to cooking, a nicer subject.

Following the advice of the resident scratch golfer, I placed the dip inside a small colander lined with a coffee filter, and within 30 minutes it had reached a perfect dip consistency.  Tragedy averted! I struck gold in March 07th, 2000.

😉

ONE YEAR AGO: Lemon-Pistachio Loaf

TWO YEARS AGO: Roast Beef French Dip Sandwich with Green Pea Pesto

THREE YEARS AGO: Asparagus Pesto

FOUR YEARS AGO: Chocolate and Chestnut Terrine

FIVE YEARS AGO: Under the spell of lemongrass

SIX YEARS AGO: Greens + Grapefruit + Shrimp = Great Salad!