ONE GIFT, ONE DOUGH, TWO RECIPES

Last month my dear friend Louise sent me a wonderful gift: a box with many (and by many I mean more than 50!) little tartlet tins in several different shapes and sizes. I was speechless, and so touched by her generosity! It is now time to share my first adventure with this special gift. A single dual-purpose dough was used to make little tarts and a modernized version of Linzer cookies. The recipe for the dough comes from Haniela’s blog. She is one of the cookie artists I follow and try to learn from. I suspect it will become my default dough for sweet tarts. The texture is perfect, and I loved the way it is intensely flavored with vanilla.

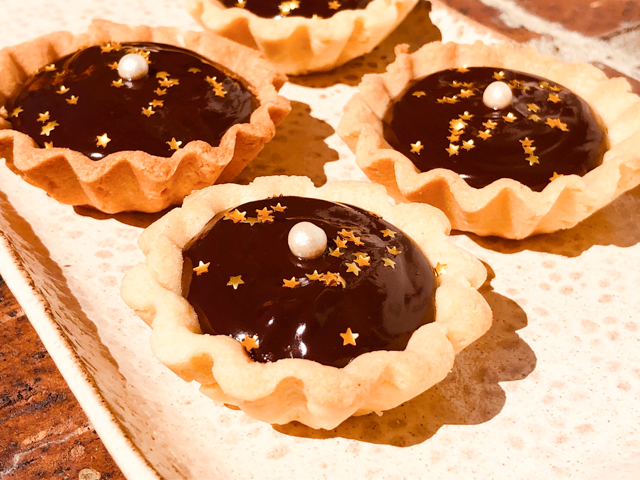
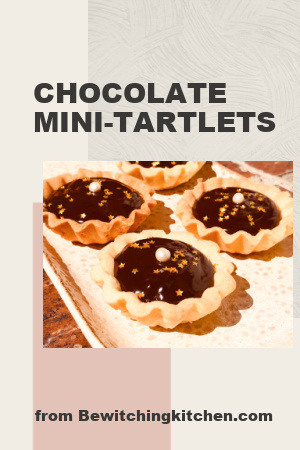
CHOCOLATE GANACHE MINI-TARTLETS
(dough recipe from Haniela’s)

for the dough:
430g all-purpose-flour
1/8 tsp salt
160g powdered sugar
3 egg yolks
2 tsp vanilla bean paste or vanilla extract
226 g unsalted butter, at room temperature

for the filling:
6oz dark chocolate, cut in small pieces
1/2 cup heavy cream
1/8 tsp orange oil
sprinkles to decorate (optional)

Sift flour and salt. Set aside. In a mixer fitted with a paddle beater, mix butter and powdered sugar until smooth. In a small dish whisk together egg yolks and vanilla. Gradually beat egg yolk mixture into the creamed butter. Scrape the bowl a few times as needed.

On low-speed, gradually add flour mixture to butter mixture. Mix until it starts to come together. If the dough is too crumbly, add 1tsp milk. Do not overwork the dough. Invert the dough onto a clean work surface or into a large bowl and gather dough together with your hands into a ball. Then form the dough into a disk, wrap it in the foil and chill for 1 to 2 hours.

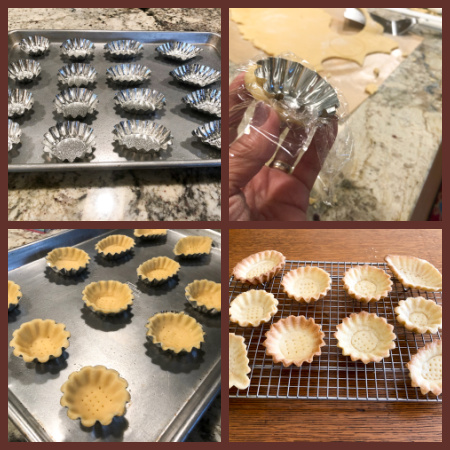
Heat oven to 350F. Place mini tart shell molds onto a baking sheet. Spray with a non-stick spray, set aside. Take out the chilled dough, cut it in half. Let if soften for 5 minutes. Roll it to 1/8 inch rolling. Cut out as many rounds as you can. Gather scraps and re-roll. Shape the tarts and use a fork to prick the bottom of the shells. Bake at 350F for 12-14 minutes until golden around the edges.

Let cool for 10-15 minutes before removing tarts from the molds. Turn the mold upside down and tap it firmly onto your work surface to release the shell. Let the tarts cool before adding a filling.

Make the filling: place the chocolate in a bowl, heat the heavy cream to almost boiling, and pour over the chocolate. Wait a few minutes, add the orange oil, and gently stir until fully smooth. Let the ganache cool for about 5 minutes, then place in a piping bag and fill the tartlets, smoothing the top. Decorate with sprinkles, if desired. Place in the fridge to set the ganache for about 30 minutes. Serve at room temperature.

ENJOY!

to print the recipe, click here

Comments: Check Hani’s site for detailed step-by-step instructions. As she shows, the best way to shape the dough is using an empty tin of the same format to press it in, with a Saran wrap type plastic over the dough to protect it. Works like a charm (check top right picture in composite above). You can make many tartlets and store them in the freezer for a mini-tartlet emergency…

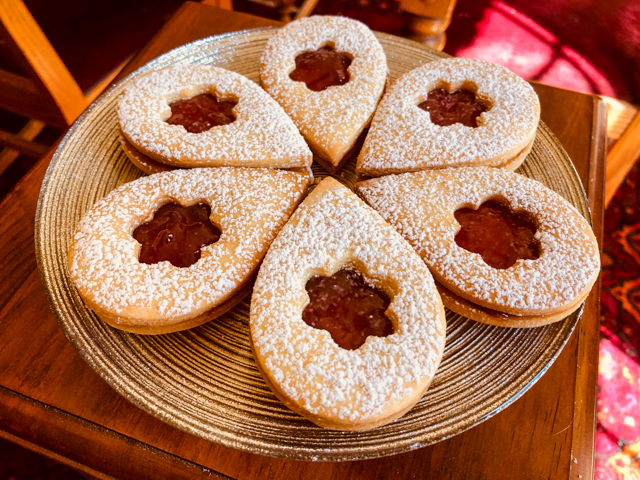
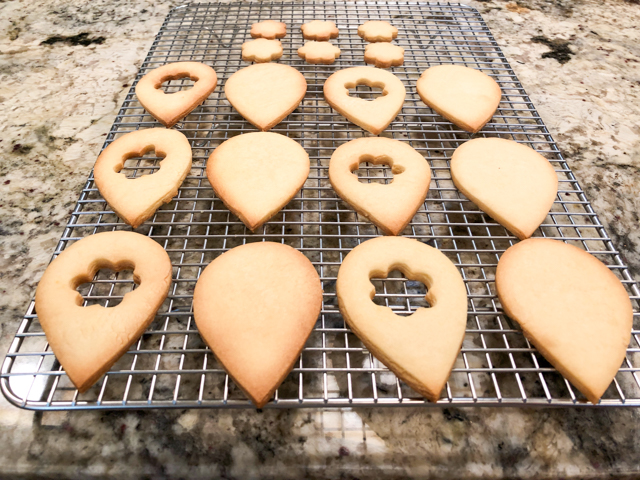
The same exact dough can be rolled and cut into any shape you like to make a Linzer version. I went with a teardrop and cut-out small flower shapes for the top layer.

Simply bake the cookies, let them cool, and spread a thin layer of the jam of your choice. I used seedless raspberry jam for this batch.

A little shower with powdered sugar is optional, but in my opinion, a nice finishing touch.

The dough is wonderful to work with, and as a cutout cookie, it held the shape well. The tartlets puffed up a bit, but midway through baking I pressed them down gently. Perfect texture.

A big thank you to Louise and Haniela!

ONE YEAR AGO: Rocking the Zucchini Boat

TWO YEARS AGO: Polenta Bites with Spicy Tomato Sauce

THREE YEAR AGO: Vague Mousse Cake

FOUR YEARS AGO: Cottage Loaf, my very own technical challenge

FIVE YEARS AGO: Pork Ribs: Sticky, Spicy and Awesome

SIX YEARS AGO: Sobering Peach Sorbet

SEVEN YEARS AGO: Buttermilk-Blueberry Breakfast Cake

EIGHT YEARS AGO: Silky Cauliflower Puree with Almond Milk

NINE YEARS AGO: Beef and Broccoli Stir-fr

TEN YEARS AGO:Wheat Germ and Sage Sourdough Bread

ELEVEN YEARS AGO:Popeye-Pleasing Salad

TWELVE YEARS AGO:Summer’s Finale

KALEIDOSCOPIC MACARONS

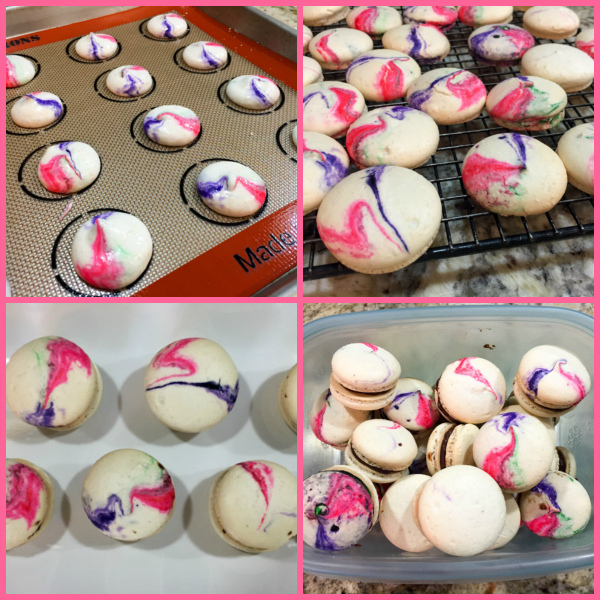
One more take on my ongoing obsession… But first, a relevant question: how far can we stretch the boundaries of these adorable cookies and still be comfortable calling them macarons? Apparently the boundaries are very blurry. From colors, types of fillings, decorations on top of the shells, we see endless variations. I cannot call myself a purist, as I am often taking liberties with classics, but I think my standards would be: macarons must be prepared with almond flour as the main component.  If other ground nuts are added, let them be a very minor player. Must contain a meringue incorporated with the flour by the macaronage method. Must have discernible feet. Other than those three requirements, I’ll accept anything. Savory fillings, neon-like colors, cute alternative shapes. For this batch, I experimented with a color effect. Some newbie errors took place, but I still performed better than I do at the golf course. Much, much better.

KALEIDOSCOPIC MACARONS
(from the Bewitching Kitchen, slightly adapted from Craftsy.com

Yield: About 72 shells; 36 assembled macarons

for the shells:
198 g powdered sugar
113 g almond meal
1/8 teaspoon dried lavender
113 g egg whites (I aged mine for three days)
1 g or a pinch of cream of tartar
100 g granulated sugar
Purple Gel color from AmeriColor
2 drops vanilla extract
for the filling:
chocolate ganache with finely chopped hazelnuts
recipe in this post

Line 2 or 3 heavy baking sheets with parchment paper or Silpat mats. Layer the powdered sugar, almond meal and lavender in a food processor or mini processor. Pulse until the mixture looks like fine meal, about 15 seconds. Pass through a sieve and transfer to a small bowl. Set aside.

Place the egg whites and pinch of cream of tartar in the bowl of a stand mixer fitted with the whisk attachment. Make sure that the bowl and the whisk are impeccably clean. Starting on medium speed, whip the whites with the cream of tartar until they look like light foam. The whites should not appear liquid. The foam will be light and should not have any structure.

Slowly rain in the granulated sugar, trying to aim the stream between the whisk and the side of the bowl. Turn the speed up to medium-high. Continue to whip the meringue until it is soft and shiny. It should look like marshmallow creme. Add the gel color and the vanilla. Staying at medium-high speed, whip the egg whites until the mixture begins to dull and the lines of the whisk are visible on the surface of the meringue. Bet until firm peaks form. Transfer the whites to a medium bowl.

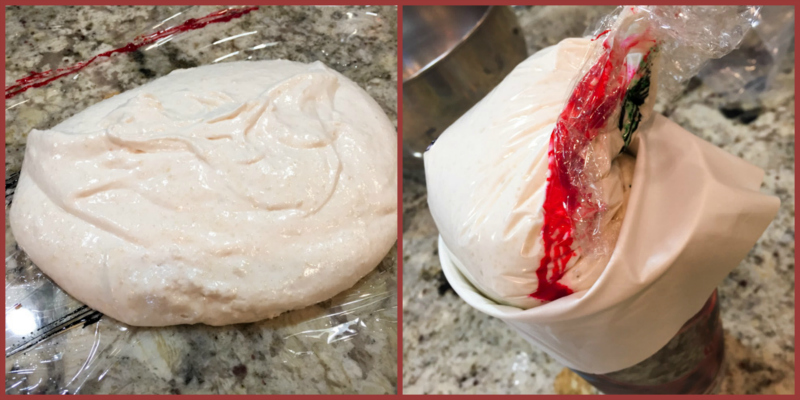
Fold in the almond meal mixture in three increments. Paint the mixture halfway up the side of the bowl, using the flat side of a spatula. Scrape the mixture down to the center of the bowl. Repeat two or three times, then check to see if the mixture slides slowly down the side of the bowl. Open a plastic wrap on the counter, paint three lines of gel color of your choice separated by one inch. Pour the dough on top, wrap the plastic around, and insert the whole thing in a piping bag, making sure to have an opening in the wrap connected to the piping tip. Pipe shells on the prepared baking sheets.

Slam each sheet hard four to six times on the counter. Then fist bump each end of the sheet’s underside twice. Let the unbaked macarons dry until they look dull but not overly dry. Drying time depends on humidity. Ina dry climate, the macarons can dry in 15 to 20 minutes; in a humid climate, it can take 35 to 40 minutes.

While the macarons are drying, heat the oven to 330 F (170 C/gas mark 3). Bake one sheet at a time on the middle rack. Check in 11 minutes. If the tops slide, then bake for 2 to 3 more minutes. The macarons should release without sticking. Check one or two. If they stick, put them back in the oven for 1 to 2 more minutes. Let the macaroons cool for 10 minutes before removing from the pan.

Assemble the macarons: find two macarons similar in size and add a good amount of ganache to the bottom of one of them. Place the other on top and squeeze gently to take the filling all the way to the edge.  Ideally, store in the fridge for 24 hours for best texture.

ENJOY!

to print the recipe, click here

Comments: I know it’s hard to believe but I used three different colors for the shells, the green is barely noticeable, only in a few of them. Many of the shells got zero color. Puzzling? Read on, and the mystery will be solved. There are essentially two types of strategies to get more than one color in the macaron shell. You can make the dough, divide it in two (or three) portions, color each one separately, add them to the piping bag and allow them to mix during piping. I decided not to do it, because I was a bit insecure as to when to divide the dough, and maybe deflate it too much when mixing with the colors. I normally add the color very early in the process.  That brings me to method number two, which gives a very interesting marbled effect, when done correctly. You start by opening a plastic wrap over your counter. Then, you paint two or three solid lines of gel color over the plastic. Pour your dough with the optimal lava consistency over the plastic, wrap it around, and insert the whole thing inside a piping bag. See the photo below.

I realize it’s hard to see the lines of gel color on the first picture, but trust me, they are there. To my disappointment, the first 20 or so shells I piped were totally white! The reason is, when painting the lines they must go all the way to the icing tip, otherwise obviously you’ll get no color until the dough moves through and gets in touch with the gel.  Alternatively, you can use a long brush and paint the inside of the piping bag itself, making sure to reach down all the way to the tip. I must re-visit this technique and get the effect I was hoping for. It was quite frustrating to keep piping shell after shell, with no color, and then a little bit here and there. But hopefully practice makes perfect, and I will succeed next time.

As I mentioned before, the parallels between making macarons and golf are truly amazing! Once you take that golf club back, it’s over. For macarons, a little misjudgment and you don’t get what you want. The Macaron Gods are not very forgiving. And I’ve probably been extra naughty lately. You’d think?

Almond flour: $9.99

12 eggs: $3.50

Powdered sugar: $2.50

Matching outfit to macarons: Priceless!

Add to FacebookAdd to DiggAdd to Del.icio.usAdd to StumbleuponAdd to RedditAdd to BlinklistAdd to TwitterAdd to TechnoratiAdd to Yahoo BuzzAdd to Newsvine

ONE YEAR AGO: Zucchini Noodles with Sun-dried Tomato Pesto

TWO YEARS AGO: In My Kitchen, July 2015

THREE YEARS AGO: Sous-vide Pork Chops with Roasted Poblano Butter

FOUR YEARS AGO: Roasted Strawberry-Buttermilk Sherbet

FIVE YEARS AGO: Amazing Ribs for the 4th of July!

SIX YEARS AGO: Baby Back Ribs on the 4th of July

SEVEN YEARS AGO: Blueberry Muffins

EIGHT YEARS AGO: A Pie for your 4th of July


SaveSave

SaveSave

SaveSave

SaveSave

SaveSave

SaveSave

SaveSave

SaveSave

SaveSave

SaveSave

SaveSaveSaveSave

SaveSave

SaveSave

SaveSave

BEWITCHING BIRTHDAY!

One year of blogging! It passed with astonishing speed, proving that time flies when you’re having fun!   It’s surely been fun, sharing what happens in our kitchen with friends, family and lots of other folks, and getting acquainted (at least virtually) with new people and bloggers through comments and emails.

A cake is a mandatory birthday celebration!  Unfortunately,  cake and Sally don’t make a good match.   But in the name of this special occasion I faced my demons and baked a cake. Choosing the recipe wasn’t easy, but I decided by elimination: genoise was out of the question, I’d rather be tortured.   Any recipes involving the instructions “cream the butter with the sugar” were also excluded.  Then, browsing the latest issue of Bon Appetit, I spotted a layered chocolate raspberry cake and I was smitten: that was it! Luscious, beautiful, perfect… would you believe  that the recipe didn’t need an electric mixer?  Instead, two bowls and a whisk…. my kind of recipe!  Even the layering didn’t bother me (although it should have, … but  ignorance is bliss).

So, here it is, my first layered cake, in honor of my baby blog…

CHOCOLATE-RASPBERRY LAYERED CAKE
(from Bon Appetit, June 2010)

2 cups unbleached all purpose flour
1 + 3/4 cups sugar
3/4 cup unsweetened cocoa powder
2 teaspoons baking soda
1/4 teaspoon salt
1 cup water
3/4 cup buttermilk
3/4 cup vegetable oil
3 large eggs

18 ounces bittersweet chocolate (maximum 61% cocoa), chopped
2 + 1/4 cups whipping cream
6 tablespoons seedless raspberry jam, divided
resh raspberries
powdered sugar

Heat the oven to 350°F. Coat two 9-inch-diameter cake pans with nonstick spray. Line their bottoms with parchment paper rounds and spray the rounds. Sift the flour, sugar, cocoa powder, baking soda, and salt into a large bowl; whisk to blend and form a well in the center. Whisk 1 cup of water, buttermilk, oil, and eggs in a medium bowl to blend. Pour the wet ingredients into well in dry ingredients; whisk just to blend. Divide the cake batter between the prepared pans.

Bake the cakes for 30 minutes or until a toothpick inserted into center comes out clean.  Cool completely in pans on cooling racks.

for the ganache and raspberry topping;
Place the chopped chocolate in a medium bowl. Bring the cream to a boil in a heavy medium saucepan. Pour it over the chocolate.  Let stand for 1 minute, then stir until the ganache is melted and smooth. Transfer 1 + 1/4 cups of the ganache to a small bowl. Cover and refrigerate until the ganache is thick enough to spread, stirring occasionally, about 1 hour. Let the remaining ganache stand at room temperature to cool until  lukewarm.

Invert one cake onto a cardboard round or the bottom of 9-inch-diameter tart pan. Peel off the parchment paper and spread 3 tablespoons of raspberry jam over the top, then spoon dollops of chilled ganache over the surface, spreading it around.   Invert the second cake onto another cardboard round or tart pan bottom.  Peel off  its parchment paper. Carefully slide the cake off its round and onto the frosted cake layer.  Spread the remaining 3 tablespoons of raspberry jam over top of the second cake layer, and pour half of the lukewarm ganache over the cake, spreading it over the sides to cover.  Place the cake in the freezer until the ganache sets, about 30 minutes. Pour the remaining ganache over the cake, allowing it to drip down sides and spreading over the sides if needed for even coverage and smooth edges. Freeze again to set the ganache, about 30 minutes.

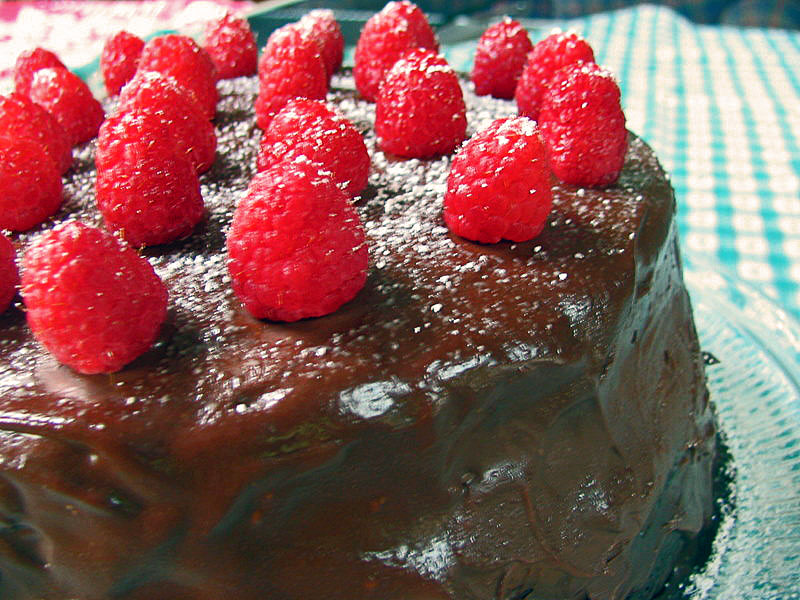
Arrange the raspberries in concentric circles atop the cake, then sift powdered sugar lightly over raspberries and serve.

ENJOY!

to print the recipe, click here

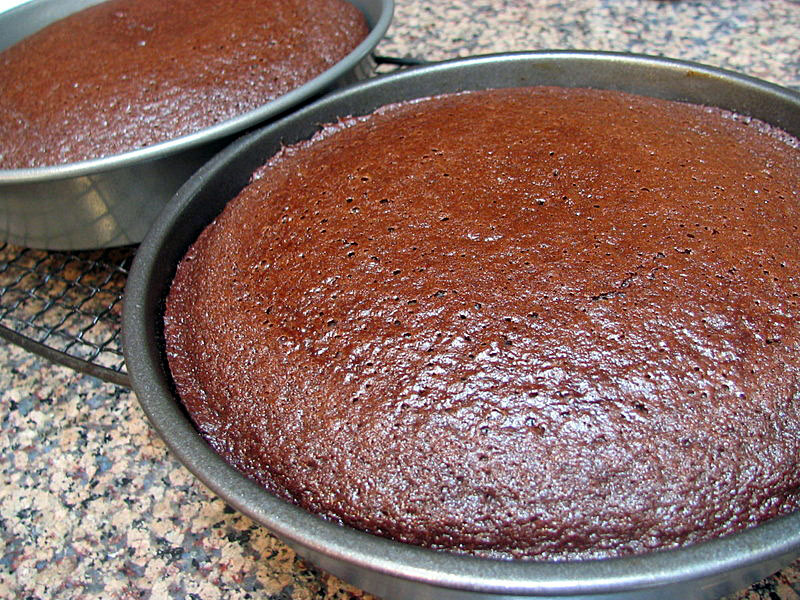
Comments: I wish that my cake-phobia was cured, but now I have a few more reasons to stick with breads and pizzas.   At first  my confidence grew as the batter behaved exactly as anticipated, filling two 9-inch cake pans and baking into beautiful brown cakes with only a slight dome in the center.  But the Cake Gods  weren’t quite finished with their conspiracy against me.   Spreading the ganache was nightmarish, to put it mildly. Thinking back, I realize that it wasn’t quite  hard enough to spread, so instead of forming a nice thick layer, it ran down the sides, but my cake-naivete made me go on, thinking  that eventually everything would be OK.

When I placed the second cake on top of the first, once all the slippage-fiesta stopped, the ganache layer had a big gap all around the edges, that stubbornly resisted my attempts to fill it.  In despair, I checked my cake pans, and was shocked and appalled to realize that they were not identical in size – a small difference from one brand of pan to another, which made my layers unequal. My last hope was that the “lukewarm icing” would solve all the problems and make a beautiful, smooth covering of all the boo-boos. But, this was not the case.  Not a chance.  To make a  long story short, my cake ended a bit like the Leaning Tower of Pisa in Italy.  Its sides had nothing to do with the “picture perfect” look in the magazine.    I had hoped to post a picture of my cake on a gorgeous stand with a nice candle in the center, but I settled instead for the only photo that showed more cake than boo-boos.

Cake, my friends, is not for sissies…But, even if its looks were not picture-perfect, it disappeared in an afternoon, devoured with gusto by hungry grad students!  The flavor was amazing: deep chocolaty, with a tangy background of raspberries, not overly sweet, but decadent.  I guess there might be hope for next year… 😉

Add to FacebookAdd to DiggAdd to Del.icio.usAdd to StumbleuponAdd to RedditAdd to BlinklistAdd to TwitterAdd to TechnoratiAdd to Yahoo BuzzAdd to Newsvine

One year ago…. Welcome to my blog!