FOR THE LOVE OF GAUDI

We just came back from a 2-week trip to France and my first time ever in Spain. We drove from Avignon to Arles and then to Barcelona and stayed there for a few days enjoying the company of great friends… Although I was familiar with Gaudi’s work, visiting Basilica de la Sagrada Familia and Casa Batlló were two experiences I will never ever forget. Today I celebrate Gaudi with a little sourdough bread.

GAUDI-LOVE SOURDOUGH BREAD
(from The Bewitching Kitchen)

Basic formula:
475g bread flour
25g rye flour
10g salt
1/2 tsp Baharat spice mix
75g sourdough starter at 100% hydration
350g water

Make the levain mixture about 6 hours before you plan to mix the dough. It should be very bubbly and active.

When you are ready to make the final dough, place the water in the bowl of a KitchenAid type mixer and dissolve the starter in it, mixing with a spatula briefly, then add the two types of flour, salt and spices. Turn the mixer on with the hook attachment and knead the dough for 4 minutes at low-speed all the time. You will notice the dough will gain quite a bit of structure even with just 4 minutes in the mixer. Remove from the machine, and transfer to a container lightly coated with oil, cover lightly with plastic wrap and allow it to ferment for 4 hours, folding every 45 minutes or so. Because the dough is already a bit developed from the initial time in the mixer, you should get very good structure after 3 and a half hours, or even sooner than that.

After four hours bulk fermentation, shape the dough as a ball, and place, seam side up, in a lightly floured banetton. Leave at room temperature one hour, and then place in the fridge overnight, from 8 to 12 hours.

Next morning, heat the oven to 450F.

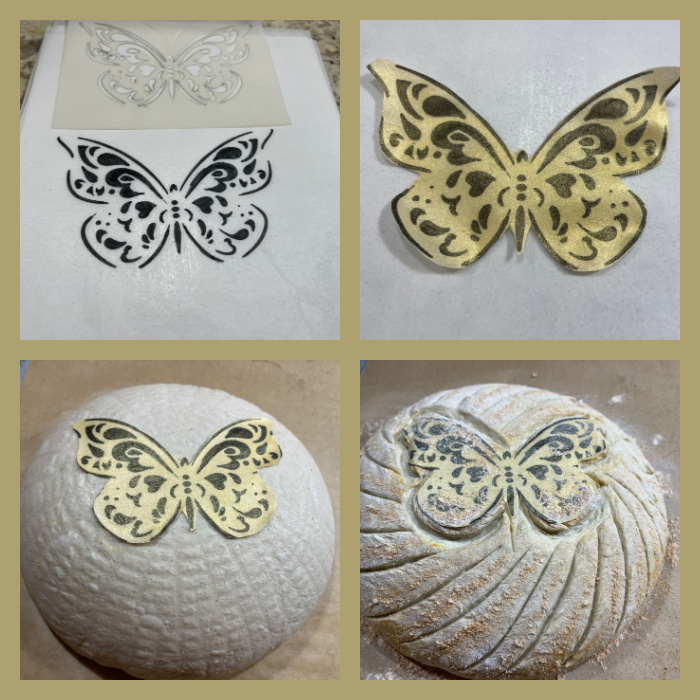
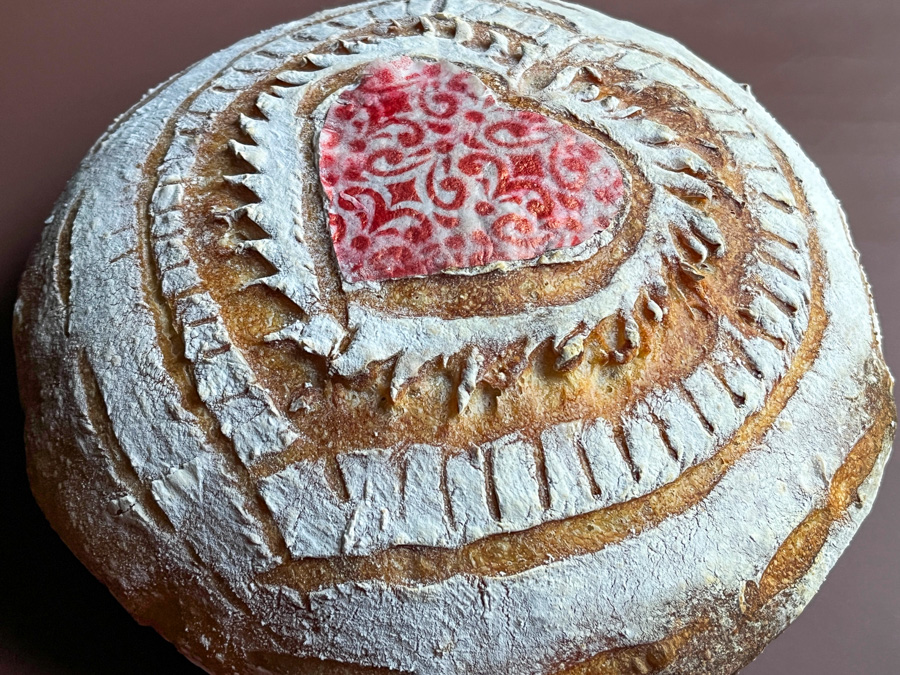
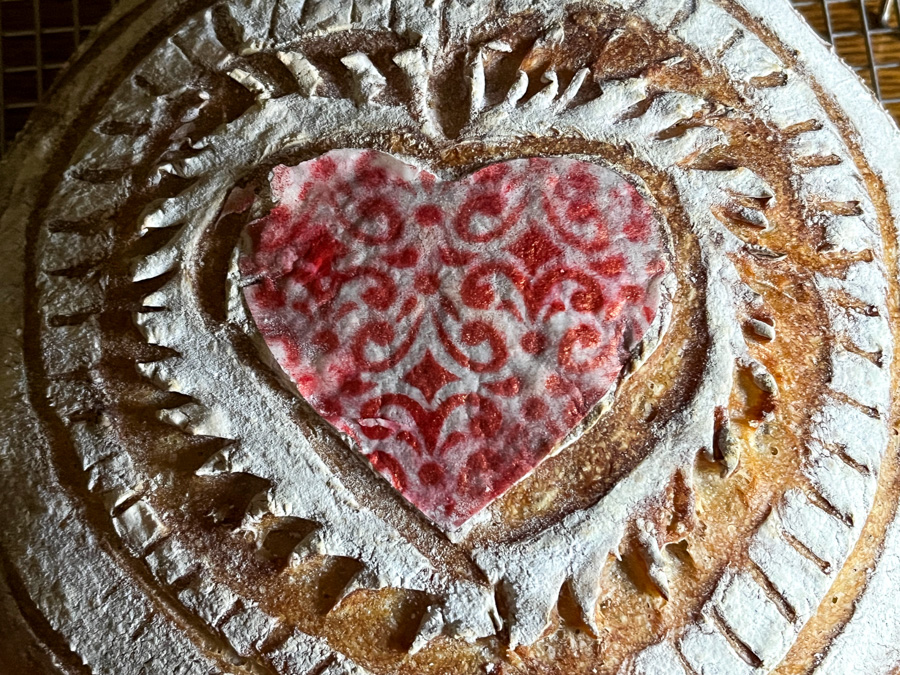
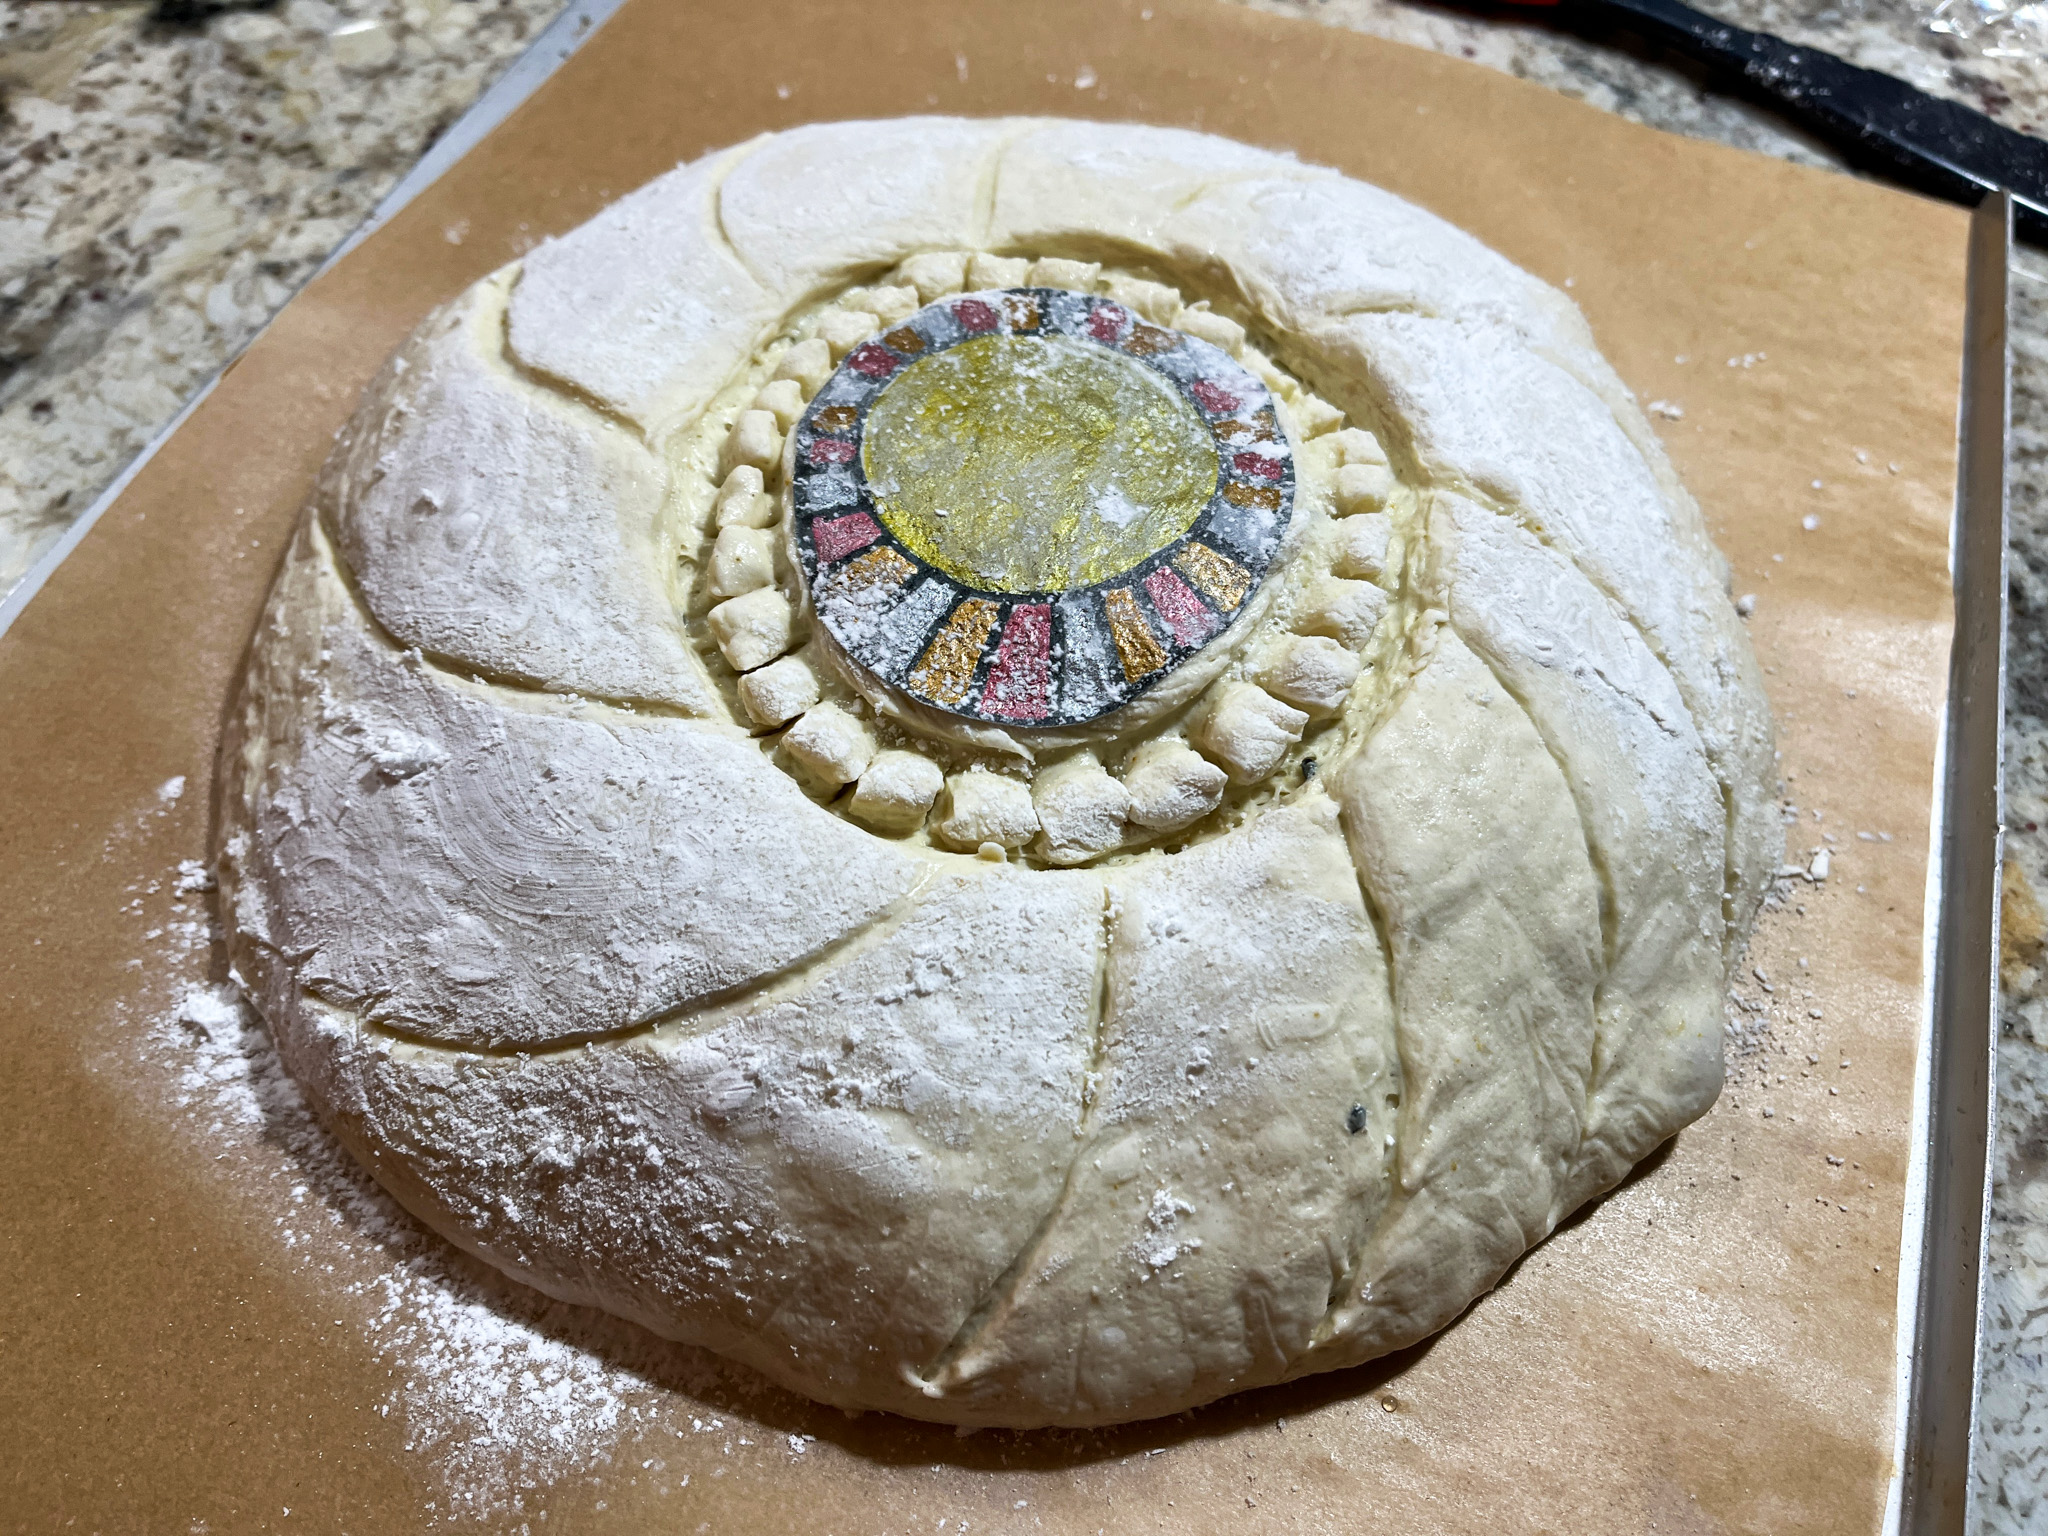
Place a parchment paper on top of the dough, a flat baking sheet, and invert the dough, flipping it out of the banneton. Slightly wet the top of the dough and place your wafer paper decoration on top. Flour the surface and score a little pattern with a razor blade.

Bake at 450F for 45 minutes, preferably covered for the first 30 minutes to retain steam. Cool completely over a rack before slicing.

ENJOY!

to print the recipe, click here

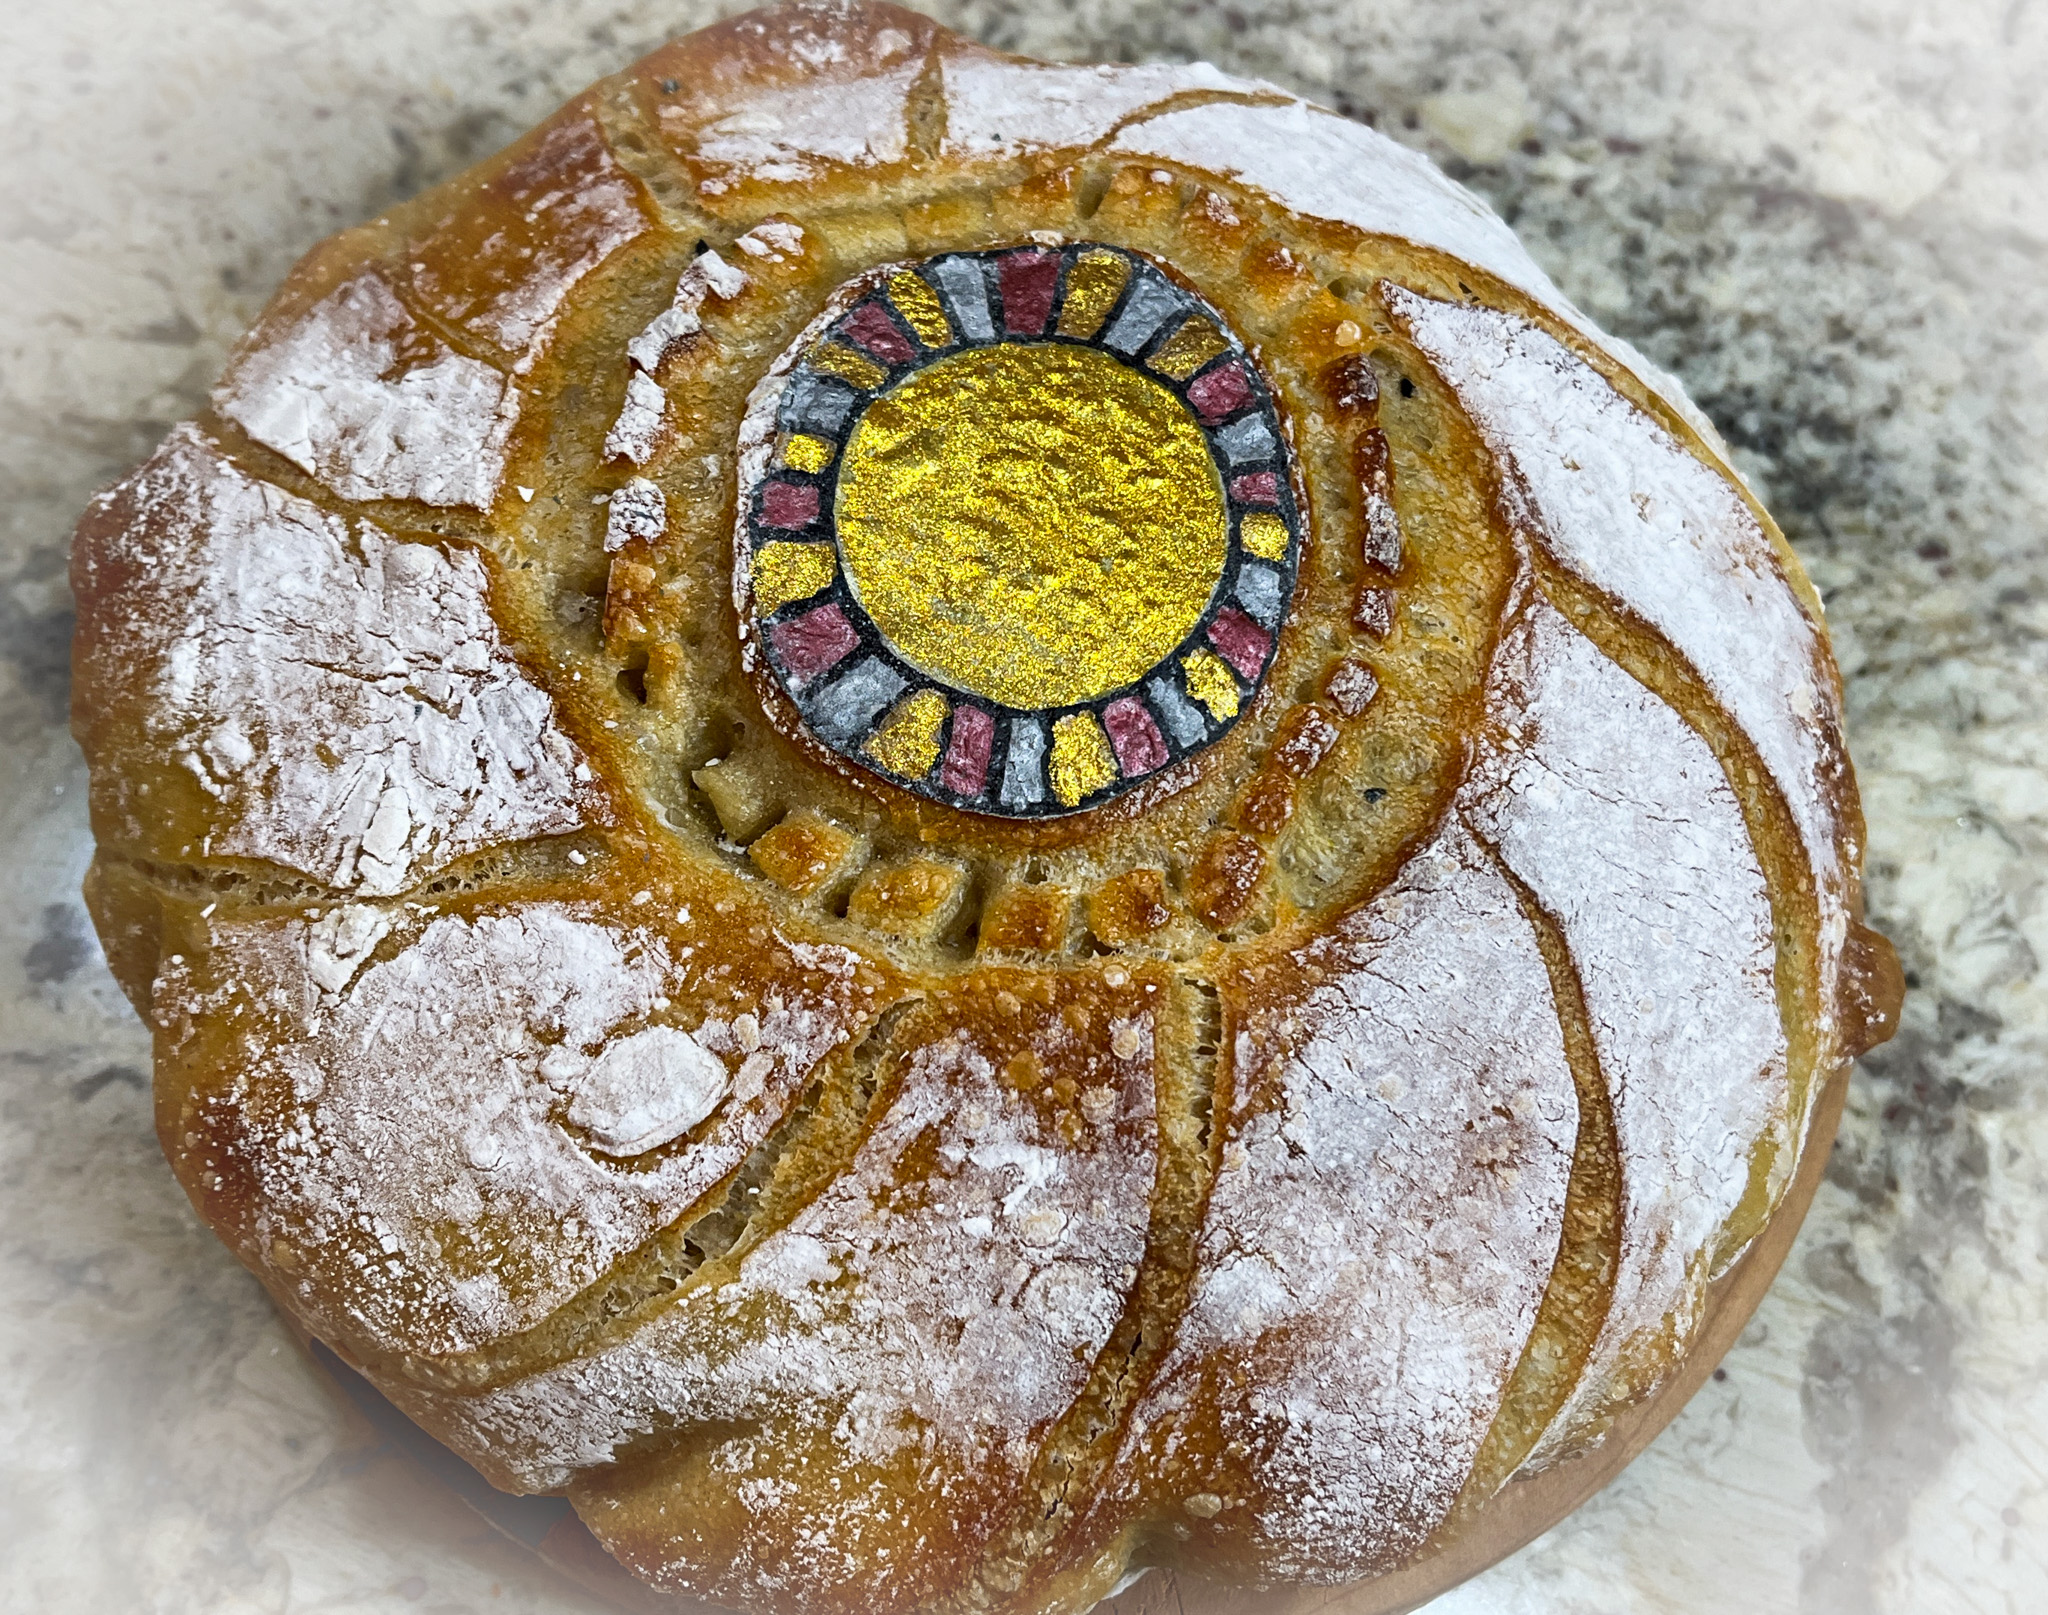
Comments: The picture above shows the inspiration for the design, artwork he included as a decorative panel above a door in Casa Batlló. I used wafer paper and food safe pens in metallic tones to make a similar design. I hope Gaudi would not get too mad at me…

After baking, I thought the colors of the design faded slightly, so I painted them again once the bread cooled completely.

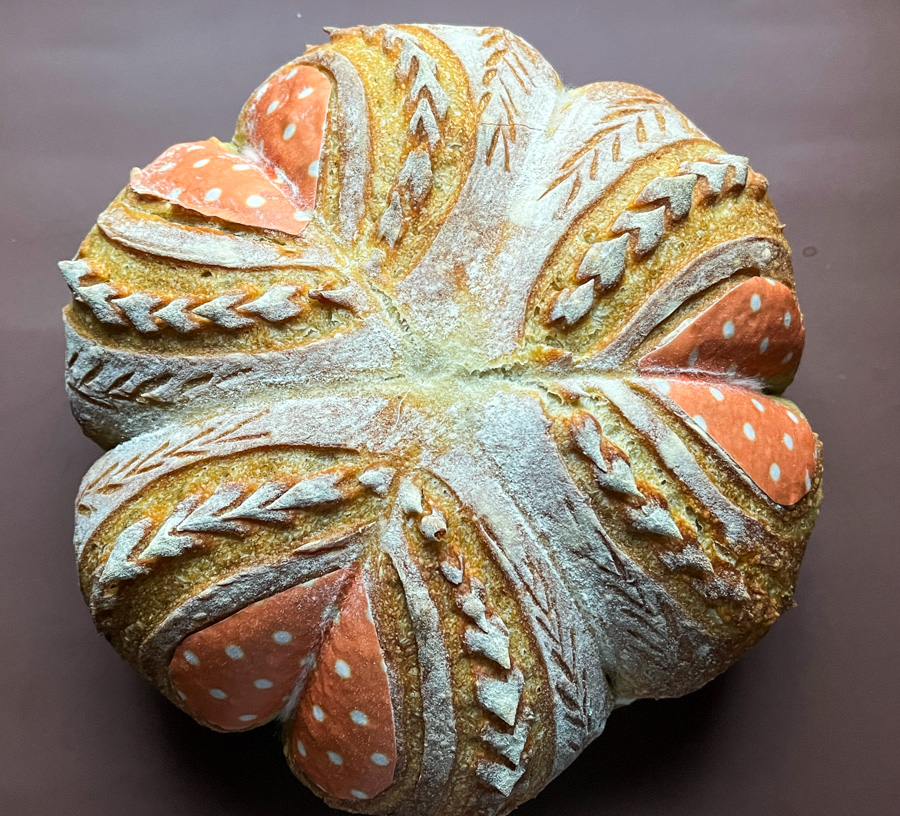
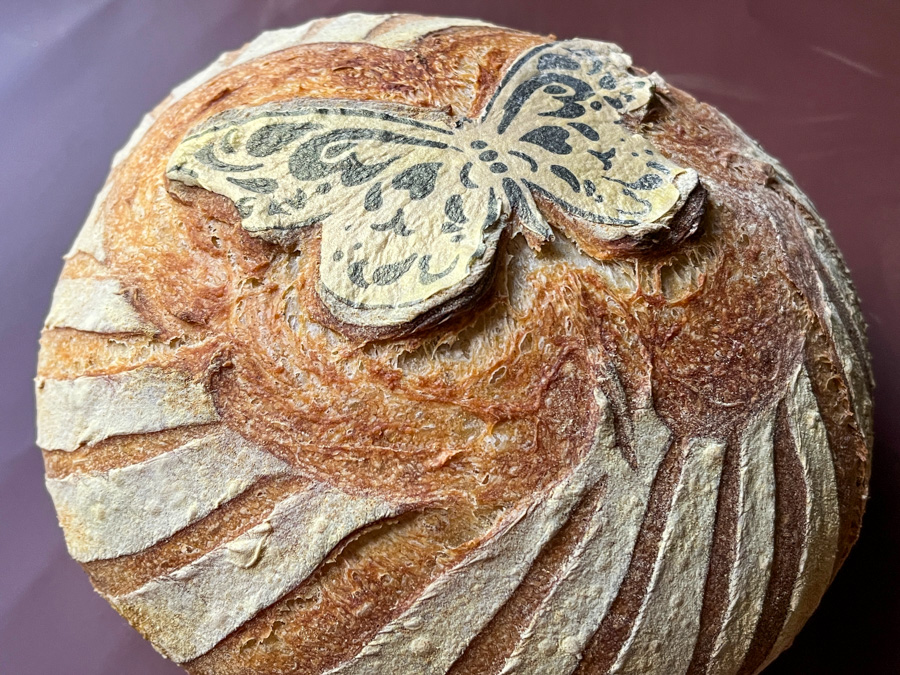
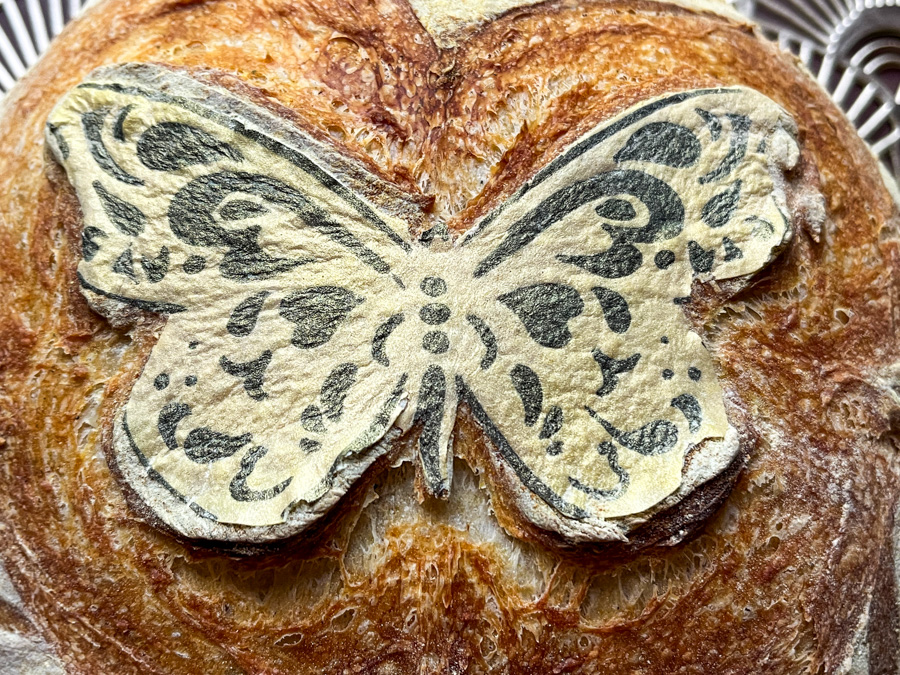
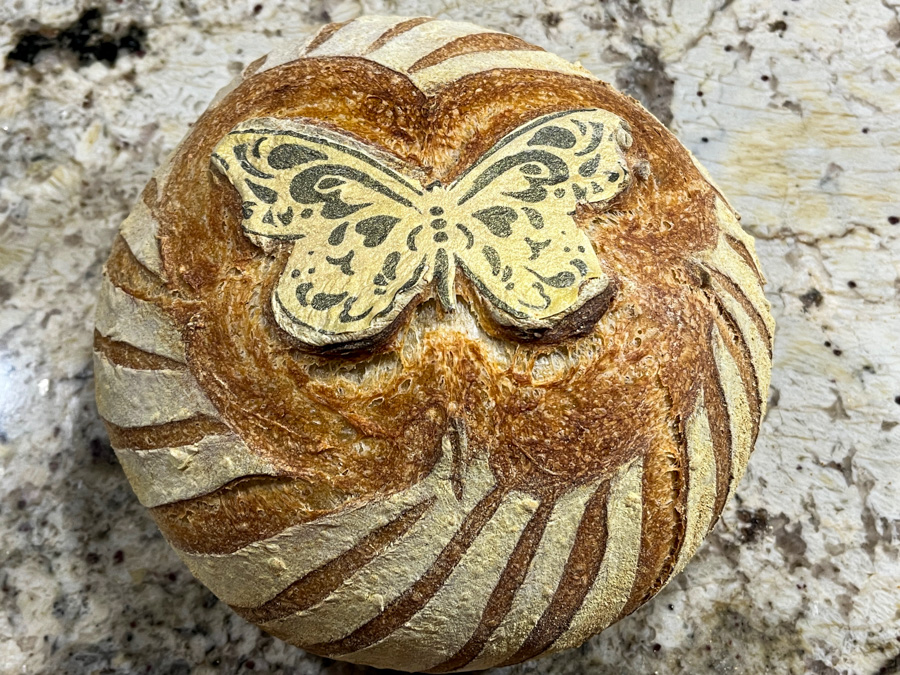
Wafer paper is fast becoming my favorite way to decorate bread… To see a couple of examples from my past, click here (butterfly) and here (polka dot).

ONE YEAR AGO: Hello There, Cupcake!

TWO YEARS AGO: Two Deliciously Refreshing Cucumber Salads

THREE YEARS AGO: Grilled Shrimp with Parsley Oil over Black Rice Noodles 

FOUR YEARS AGO: Chicken Shawarma, the Easiest Way

FIVE YEARS AGO: Marshmallow Macarons

SIX YEARS AGO: Mango-Lime Macarons

SEVEN YEARS AGO: Honey-Glazed Sriracha Meatballs

EIGHT YEARS AGO: Slow-cooker Braised Lamb Shanks

NINE YEARS AGO: How about some coffee with your steak?

TEN YEARS AGO: Celebrate Wednesday with a Spiral Kick

ELEVEN YEARS AGO: Carrot Flan with Greens and Lemon Vinaigrette

TWELVE YEARS AGO: Granola Bars

THIRTEEN YEARS AGO:  Awesome Broccolini

FOURTEEN YEARS AGO:  A Twist on Pesto

FIFTEEN YEARS AGO: Ciabatta: Judging a bread by its holes

POLKA DOT LOVE SOURDOUGH

Once again I played with wafer paper to decorate sourdough bread, but this time I coupled it with a few strings to generate a cute shape, often used to turn the bread into pumpkin shape, but I opted for a more romantic outcome… Nothing personal against pumpkins, I do love them and honored them in the past (click here).

Start by cutting wafer paper in small heart shapes…. You will need three, and three long strings that you should rub very lightly with oil to facilitate removing later.

Place the strings equally spaced over the proofed dough, flip the dough over parchment paper, and tie the strings on the top, trying to hit the center as closely as possible. Gently insert the paper, coat the surface with flour and score the bread in any design you like. I used the Sonic blade and small scissors, as I often do.

Bake as you normally do, I keep the lid for 30 minutes and remove it for a final 15 minutes, all at 450F. Remove the strings, and allow the bread to cool completely before slicing.

You can use different patterns for the small hearts, or cut plain wafer paper and paint it yourself.

It is really amazing how well the colors in the wafer paper stay pretty much unchanged with baking, much better than air-brushed or gel colors. I hope you give this technique a try and have as much fun with it as I am having…

ONE YEAR AGO: Plum Sorbet

TWO YEARS AGO: Grilled Chicken with Sesame Roasted Carrots

THREE YEARS AGO: Let’s Get Spooky!

FOUR YEARS AGO: Miso and Sesame Roast Chicken with Revelation Quinoa

FIVE YEARS AGO: Incredibly Simple Times Four

SIX YEARS AGO: Parsnip, Coconut and Lemongrass Soup

SEVEN YEARS AGO: In My Kitchen, October 2016

EIGHT YEARS AGO: Paleo Moussaka

NINE YEARS AGO: In My Kitchen, October 2014

TEN YEARS AGO: In My Kitchen, October 2013

ELEVEN YEARS AGO: Bourbon and Molasses Glazed Pork Tenderloin

TWELVE YEARS AGO: Crimson and Cream Turkey Chili

THIRTEEN YEARS AGO: Taking a break from the nano-kitchen

FOURTEEN YEARS AGO: Chocolate Chip Cookies

WAFER PAPER AND SOURDOUGH BAKING

This post is dedicated to Eha, a lover of butterflies

I am so excited to share this new technique with you today! I first saw it on Instagram (check this page) and decided to give it a try. The possibilities are simply endless, of course. Basically, you make a design using wafer paper painted by hand or with a stencil, add that to the shaped, fully proofed dough right before baking, score around it with a razor blade. Isn’t that the coolest thing since….. sliced bread?


You can use any sourdough formula you want, in this particular loaf I re-visited the Ras-El-Hanout of my past, because I love that combination of flavors. Below you see the preparation of the wafer paper and the way I scored it (using my Sonic blade).

I used a stencil and painted the black portion with a food safe pen. Then I sprayed the whole surface with air-brush gold. That has to dry completely, so I advise you to make the wafer paper decoration the day before you intend to bake the bread. Or even several days in advance, it stays perfect, no issues.

My dough had enough moisture for the paper to stick to the surface without problem, if your dough is too dry, spray it lightly with water. VERY lightly. After the paper is on the surface, dust the surface of the loaf lightly with tapioca or all-purpose flour. In my case, I mixed tapioca flour with a little turmeric to re-inforce the golden color and the taste of the bread. Slash around the paper and all over the bread with the pattern of your choice.

Another important point – do not forget this – after the bread has been in the oven for 5 to 7 minutes, go back and slash AGAIN only around the design. That will make it lift and look much better. Try not to forget this step.

My first attempt making this type of decoration did not work as well for two reasons: I was too focused on the paper and did not plan carefully the scoring, so it did not turn out very good. Second, I forgot to go back and slash the design again after 5 minutes into the bake. That made the paper stay glued to the bread and the design did not have the right impact. Anyway, it is the type of thing that you learn the more you do it.

I know I will be playing with this quite often in the future, and I hope you consider this fun technique also. The paper does not darken in the oven, which surprised me a bit, and the air-brush colors also seem to hold up well. If you are the artistic type, you can paint flowers, landscapes, whatever your imagination desires!

.

ONE YEAR AGO: Banana Bread from the Experts

TWO YEARS AGO: Shrimp Stir-Fry with Snow Peas and Cashews

THREE YEARS AGO: Pickled-Roasted Chickpeas with Cashew Cream

FOUR YEARS AGO: Twice-Baked Goat Cheese Souffle

FIVE YEARS AGO: A Star from England in the Bewitching Kitchen

SIX YEARS AGO: Hommage to the Sun

SEVEN YEARS AGO:The Fabulous Three
.
EIGHT YEARS AGO: Turkey-Chorizo Burger with Green Chile Dressing
.
NINE YEARS AGO:Taco Salad
.
TEN YEARS AGO: Semolina Sourdough Boule
.
ELEVEN YEARS AGO:Forgive me, for I have sinned
.

TWELVE YEARS AGOCracked Wheat Sandwich Bread
.
THIRTEEN YEARS AGO:  Au Revoir, my Bewitching Kitchen
.
FOURTEEN YEARS AGO:French Bread

COOKIE THERAPY, ANYONE?

Four top-notch cookie decorators. Two from the US, one from Canada, one from Spain. Marlyn and Amy get together virtually on Tuesdays for Cookie Therapy (I am undergoing treatment). On Fridays, Marlyn, Haniela and Amber join efforts in their Cookie Lunch Break (videos available here). Both virtual events showcase cookie decorating techniques live, as they chat, share tips, and answer eventual questions from those watching. It starts at noon where I live, so it is now a nice routine for me, I have my lunch and cookie therapy at the same time. Today I share two examples of goodies that were recently showcased by Marlyn and Amy in their Tuesday series. They have in common the use of wafer paper flowers. Needless to say, I fell in love with the technique…

HONEY SUGAR COOKIES WITH WAFER PAPER FLOWERS
(from the Bewitching Kitchen, decoration following Amy’s tutorial)

1 cup butter (226g), cut in pieces, cold
200g sugar 
zest of 1/2 lemon
2 eggs
1 tsp honey extract (Olive Nation)
1/2 tsp vanilla extract
420 g all-purpose flour
60 g cornstarch
1/2 tsp salt
1/4 tsp baking powder

Mix the flour, cornstarch, salt and baking powder and reserve. 

Cream sugar, butter and lemon zest in the bowl of a Kitchen Aid for a couple of minutes until the sugar is incorporated well and does not feel gritty. Add the eggs, honey emulsion and vanilla extratc slowly and mix until incorporated, but don’t over-mix. 

Add the flour mixture slowly, mixing in low-speed. If needed, add a little more flour, up to 1/4 cup. Once the dough comes together, stop, and form three discs. You should have three discs with about 330g each. Dough can be rolled out immediately or placed in the fridge to roll out later. It also freezes extremely well. 

Cut in shapes, freeze the cut-outs for 10 minutes, then bake in a 350F oven for about 13 minutes. Ice and decorate as desired. 

For my favorite Royal Icing recipe, visit Tanya’s blog with a click here.

ENJOY!

to print the recipe, click here

Comments: The hexagonal cookie tutorial with detailed explanation on making the flowers, starts at 41 min this video. Wafer paper sheets are available from the seller of all things, amazon.com. To make the flowers and leaves, you’ll need mini puncher cutters, (several other kinds available like this) or a considerable amount of patience to cut the shapes by hand. The wafer paper is white, so you have two options to color it: before or after cutting the shapes. I strongly advise that you spray paint or brush color on the sheet, let it dry and then cut the shapes, because they are very delicate and harder to paint after cutting. When you cut them, they will be flat. To give a tri-dimensional look, you can gently wrap them around the tip of a small plastic bottle (eye-drop bottles will work great), or what Amy suggests, using the tip of an air-brush dye bottle like these. Both methods work like a charm, just be gentle. Even if the center rips a little bit, when you add the centers it will hide the boo-boo. As to the centers, they can be dry Royal icing transfers, or you can just pipe a little blob of icing when you glue the flowers on the cookie’s surface. The great thing about these decorations, is that they last a long time, so you can make a little treasure chest with flowers, leaves, and save them for a cookie (or cupcake) emergency.

CHOCOLATE TWIG COOKIES

I find these cookies absolutely adorable! I cannot share the exact recipe I used, as it is available exclusively for Marlyn’s supporters through her Patreon site. You can certainly use your favorite chocolate cookie recipe, as long as it does not have leavening agent. It is also a good idea to pick a recipe that calls for some brown sugar, so that the dough will be more flexible and smooth.

Detailed method for shaping and decorating can be found here starting at 32 min and 30 seconds. Her flowers are logs above mine, with added details that I felt were beyond my skill level. She performs magic with the air-brush! They end up looking exactly like cherry blossoms, but I am still pretty thrilled with my little babies.

The secret to get the bark look, is brushing the cookies with Americolor Ash right before baking. This step is optional but I believe it adds a lot of charm.

As you might notice, I re-use parchment paper. The twigs were baked right after the hexagonal cookies from Amy’s tutorial, as well as some stick cookies, you can still see their ghost images in there…

After baking, you’ll need green Royal icing in stiff consistency to pipe leaves and glue the flowers over the surface.

Another way to use the wafer paper is sticking them on the surface of a freshly baked cookie, the residual heat will make the decoration stick and lay flat on it.

Now, I should also mention that the decorations look very nice, but not everyone will enjoy the mouthfeel of the wafer paper. So tell your guests or whoever will be enjoying the cookies that they can just peel off the decorations if they prefer. You can also minimize the amount of wafer paper by coupling the flower with Royal icing leaves.

I hope you’ll consider joining Cookie Therapy on Tuesdays, or Friday Cookie Lunch Break, at 1PM EST. They are always coming up with interesting things that will open your horizons to cookie making and decorating. I promise you will love it!

Watch it at 13:00hs EST (or anytime later) via youtube here..

ONE YEAR AGO: The Quasi-Vegan Quiche

TWO YEARS AGO: Not Quite Moqueca

THREE YEARS AGO: Roasted Butternut Squash with Cashew Nuts

FOUR YEARS AGO: Mississippi Roast and the Open Mind

FIVE YEARS AGO: Walnut-Raisin Bran Muffins

SIX YEARS AGO: A Star is Born!

SEVEN YEARS AGO: Chestnut Flour Sourdough Bread

EIGHT YEARS AGO: Kinpira Gobo and Japanese Home Cooking

NINE YEARS AGO: Walnut Sourdough

TEN YEARS AGO: Thai Chicken Curry

ELEVEN YEARS AGO: Zen and the art of risotto