KEN FORKISH’S WARM SPOT SOURDOUGH

First bread post of 2015!  Not the first bake of the year, because this was made for Phil’s birthday on the last week of December. He chose the whole menu, which consisted of oysters on the half-shell as a first course, and clam chowder as the main dish. Also according to his request, no dessert to keep things moderate.  Perfect for me.  The bread was all that bowl of chowdah needed to shine in its creamy glory!

Warm Spot Sourdough1

WARM SPOT SOURDOUGH

I am not going to share the full recipe (from Ken Forkish’s book Flour Water Salt Yeast), but you can find it online with a visit to Karen’s site. And don’t just limit yourself to that recipe,  look around and be amazed by her talent. Just a recent example: she tackled Pretzel Rolls, the traditional Laugenbrötchen. That is on my mile-long list of things to try this year. Now, back to my sourdough…

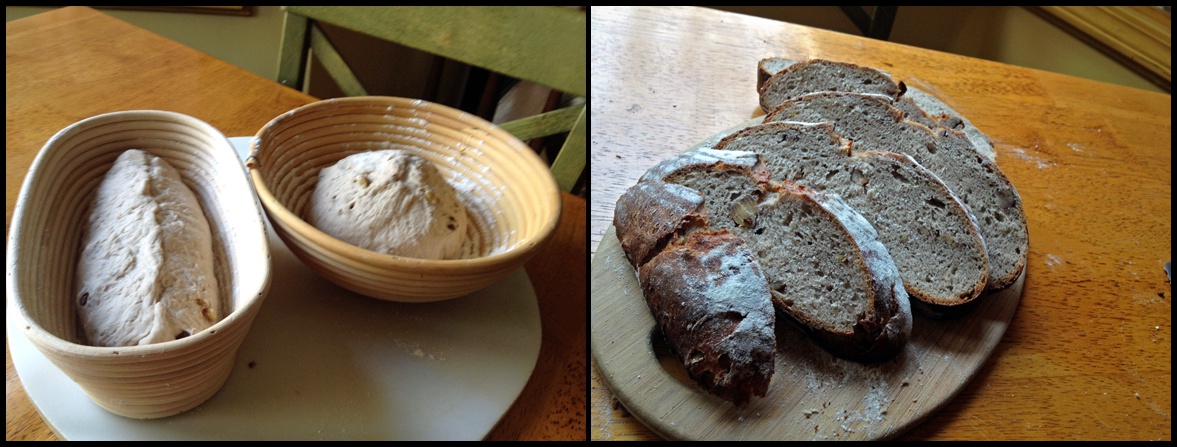
A little walk through the method… The bread takes three days to prepare, but don’t let that intimidate you. It is worth your time. The interesting twist in the recipe is keeping your sourdough starter at a higher temperature of fermentation, around 85 F. During the winter that can be a challenge, but I am the lucky owner of a bread proofing box. Problem solved. Because the starter ferments at a higher temperature you will need to refresh it more often than usual, but as I mentioned in my previous sourdough post, Ken is particularly helpful in laying out a nice schedule for each of his recipes.

After the bulk fermentation, in which I gave four folding cycles to the dough, the bread is shaped, and retarded in the fridge overnight. From the fridge it goes straight into the hot oven, no need to bring it to room temperature.

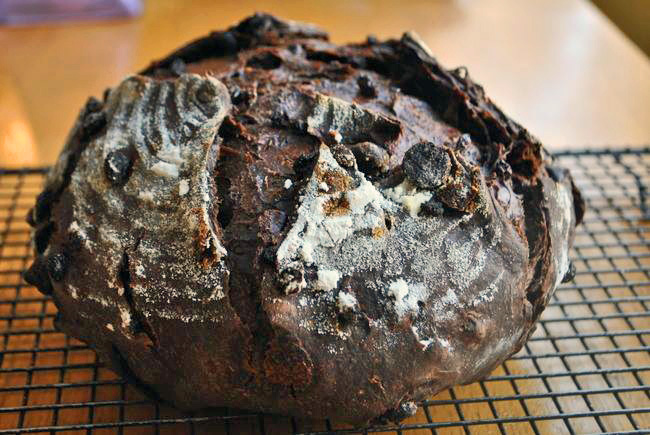
One of the things I did differently in this bake was to flour my banetton, cover it with plastic wrap (Saran Wrap type), flour the plastic and place the shaped dough for its final proof, seam side UP (going against Ken’s usual method).  Next morning, I inverted the bread on parchment paper, slashed the surface and baked it with my normal method of steam (Dutch oven covered with a wet lid).  Ken likes to allow his breads to open naturally, so he proofs the shaped loaf with the seam side down, then simply inverts it on the baking sheet without slashing. I did this on my first time making this recipe a couple of months ago, and even though the bread tasted as good as this one, it failed to open in a more dramatic way.  Take a look:

FirstLoaf

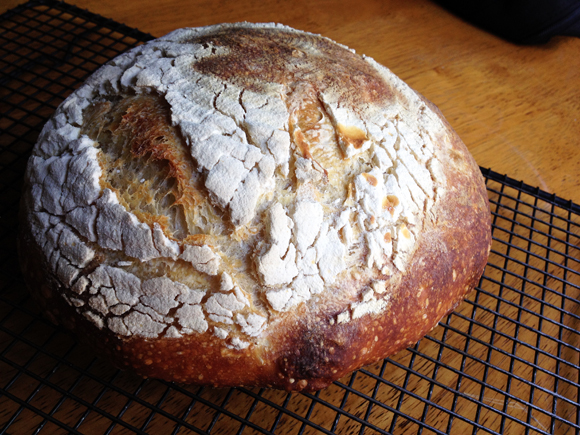
Maybe it is just a matter of personal preference, but I rather help the bread open in a more defined way.  One more remark before I go: I liked the use of the plastic wrap because it gave me extra confidence removing the bread from the banetton. I’ve had too many situations of dough sticking and compromising the shape of the loaf in the end.  I suspect my skills to shape the loaf and generate enough surface tension need improvement. Until then, I will be using this trick, and if you had problems with dough sticking give it a try…

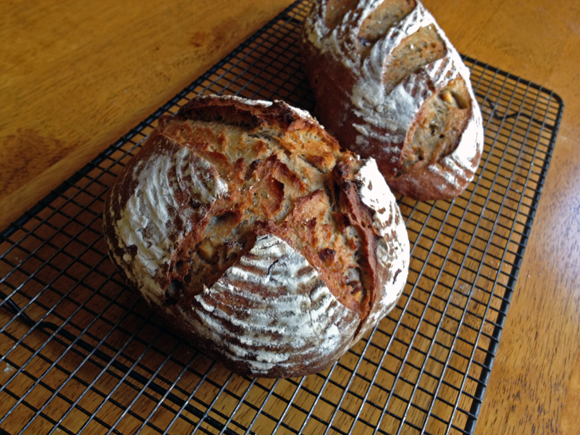
The bread had good oven spring, the crust was just the way we love it!
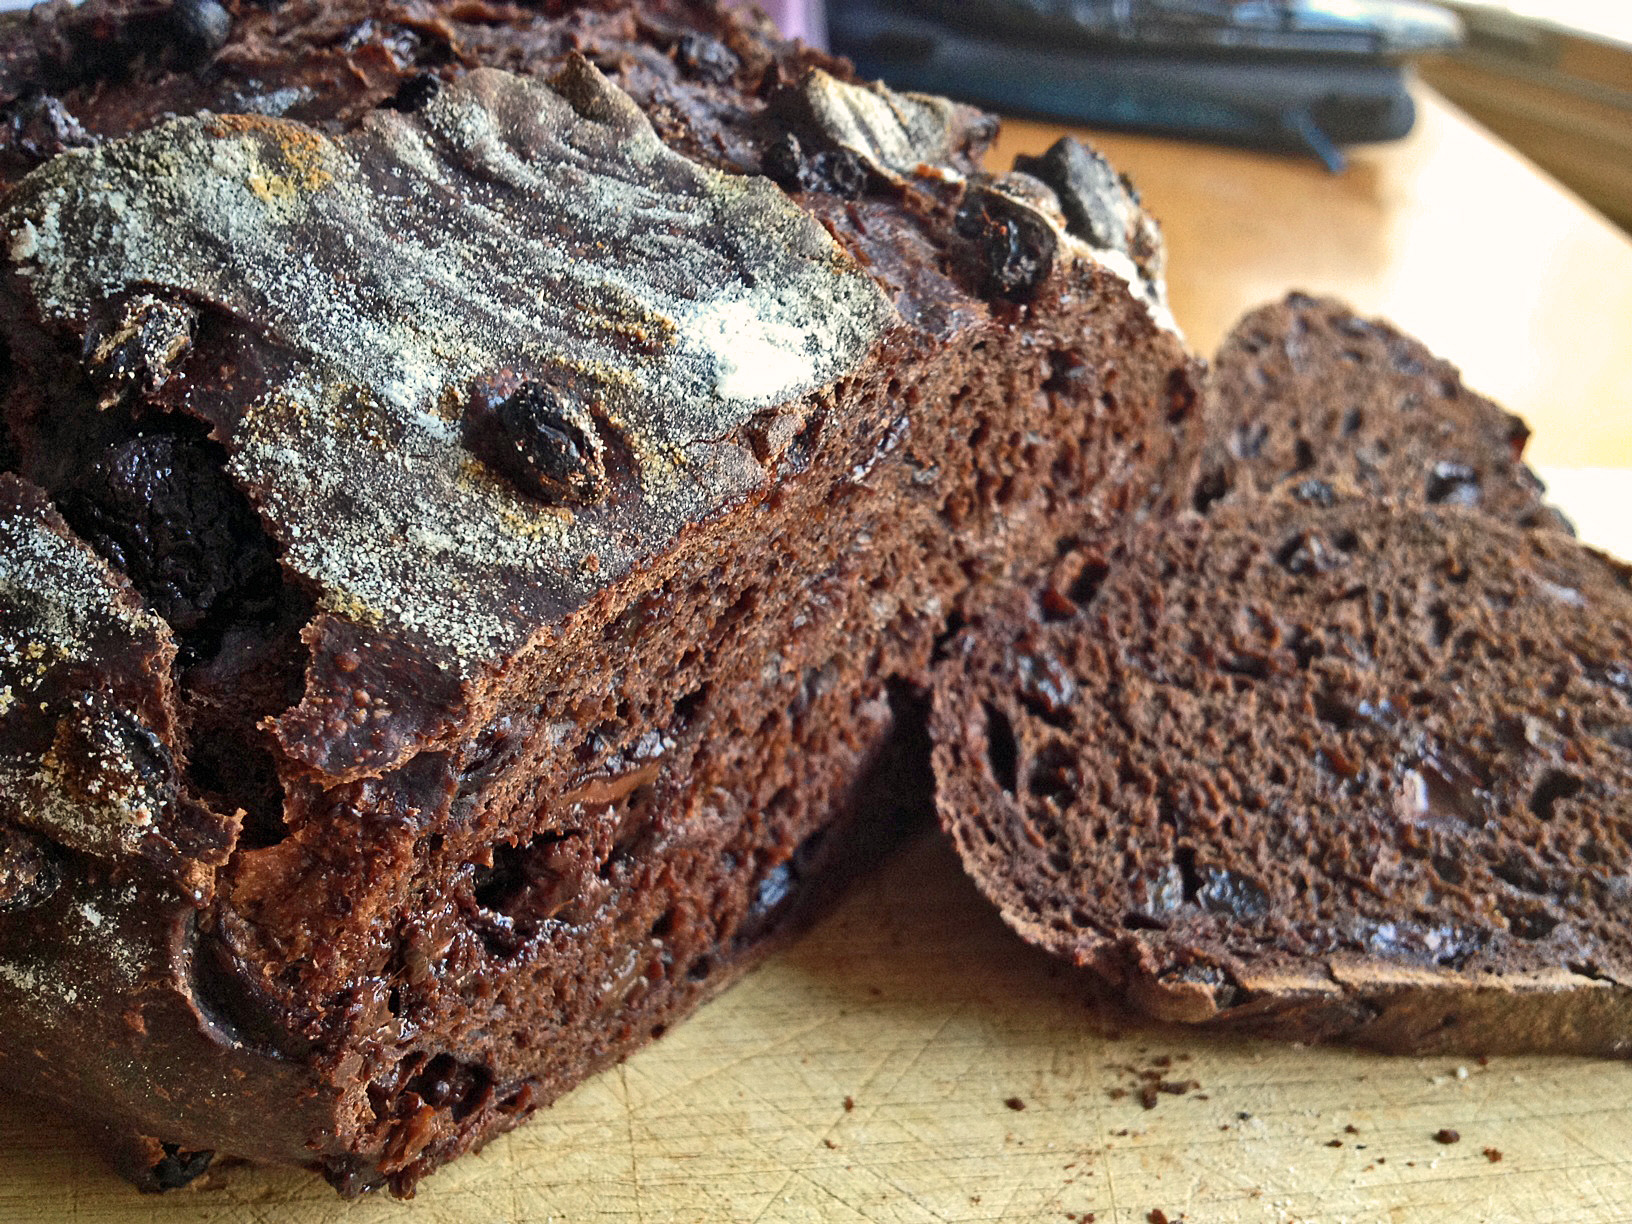
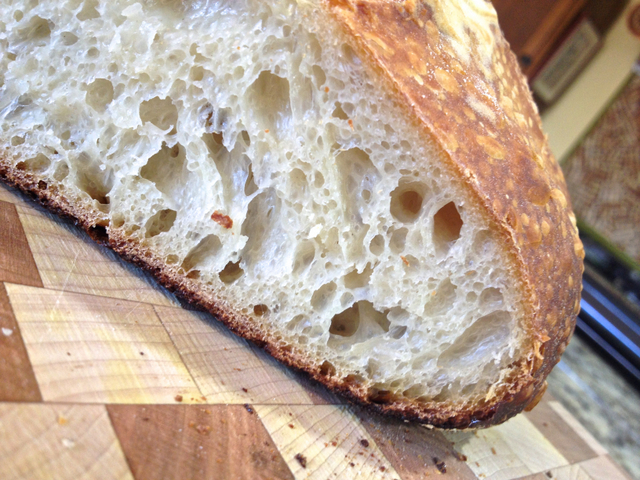
CrumbCRUMB SHOT

So there we have it, another birthday celebration, with good music, juicy oysters, delicious bread, and a warming bowl of soup, all in the comfort of our home!  Life is good…

I am submitting this post to Susan’s Yeastspotting event…

ONE YEAR AGO: Bran Muffins, Rainbows, and a wonderful surprise!

TWO YEARS AGO: Cider-Marinated Pork Kebabs

THREE YEARS AGO: Golden Age Granola

FOUR  YEARS AGO: Mushroom Souffle for Two

FIVE YEARS AGO: Stollen

SOURDOUGH RYE BREAD WITH FLAXSEEDS AND OATS

This is that type of bread that begs for mindful eating. No sitting down in front of the TV grabbing one piece here, another there, or sharing it with friends in the middle of a loud party.  No, this is a bread that deserves attention. It is dense without being overly heavy, and its flavor is quite complex due to the use of assertive flours and flax seeds. The recipe was created by Rosa, from Rosa’s Yummy Yums, a food blog that not too long ago celebrated its 9th anniversary!  Nine years.  No small feat, folks, considering that each of Rosa’s post is a masterpiece: carefully composed text (with recipes in two languages, English and French), matched with her incredibly beautiful photography. Hers is the type of blog that just like this bread, deserves full attention.

Rosa Yum Yum BreadMade July 26th; Blogged October 13th

WHOLE-WHEAT AND RYE SOURDOUGH WITH FLAX SEEDS AND OATS
(from Rosa Mayland’s blog)

(for one round loaf; check her site for full version that makes 2 loaves)

1 heaping tablespoon of flax seeds 1/2 Tbs Flax seeds
150g whole-wheat flour
100g white flour
35g rye flour
35g buckwheat flour
100g active sourdough starter

188-200 g/ml lukewarm water
A pinch of dry yeast
1 heaping tablespoon of olive oil

20g Rolled oats
7g fine sea salt

Put the flax seeds in a small bowl and add 63g/ml of boiling water (this will make them slimy). Stir and leave to cool.

In the bowl of your stand mixer put the flours, sourdough, water, yeast, olive oil, flax seeds (+soaking water).  Mix until all the ingredients are just combined. Let the dough rest (autolyse) for 2 hours.

Add the salt as well as the oats and continue mixing for about 5-8 minutes (add a little flour if the dough is too wet), until the dough reaches medium gluten development.  Transfer the dough to a slightly oiled container and cover with plastic wrap. Let the dough ferment/rise, at room temperature, for about 2h30 (or until doubled in size), folding at 50 and 100 minutes.

Shape it as desired (sandwich loaves, boule, bâtard, banneton, etc…). Sprinkle your loaves with flour and cover them with plastic wrap let proof for about 90 minutes or until doubled in size.

Bake at 230° C (450° F) using your favorite method to generate steam during the initial 20 minutes of baking. Total baking time will be approximately 40 minutes.  Leave the bread in the oven for 5 minutes with the door ajar once you turn the oven off.  Cool it completely on a rack before slicing it.

ENJOY!

to print the recipe, click here

crumb
Now, if that crumb doesn’t make you sigh, there is something wrong with you… This was a very nice baking project, perfect for a weekend in which we had nothing planned, no social commitments, no need to go to the lab, just taking each hour as the hour shaped up.   If you stop by Rosa’s original post, you’ll see that she coupled this recipe with a text about the importance of slowing down, a praise for idleness. Food for thought, as usual for her posts. It is nice to be able to take a step back and do nothing. Or, if doing nothing seems like too much of a shock for  you 😉  grab your flours and make this bread. Then, slowly slice it, and close your eyes when you taste it.   Yes, it is that wonderful!

Rosa, thank you for a great recipe, and above all, for the effort you put into your blog, a pleasure to visit every single time!  See you around the blogosphere 😉

I am submitting this post to Susan’s Yeastspotting event…

ONE YEAR AGO: Apricot-Raspberry Sorbet: A farewell to Summer

TWO YEARS AGO: Marcela’s Salpicon

THREE YEARS AGO: Pork Kebabs

FOUR YEARS AGO: Fondant au Chocolat

FIVE YEARS AGOGot Spinach? Have a salad!

CHESTNUT FLOUR SOURDOUGH BREAD

On the last In My Kitchen post, I promised to come back to talk about a bread made with chestnut flour brought all the way from France. The Bread Baking Queen Farine was the one who got me into this bread adventure, and advised me to search for this exotic flour in Paris. When I sent her a photo of the bag I bought she was super excited because it turns out chestnut flour from Corsica is considered the best in the world!  Amazing that it was exactly the type available near our hotel. Pure luck. With the stars so beautifully aligned, I was sure this would turn out as a wonderful baking project!  Was I right?  Well, let’s say that troubles were brewing faster than the wild yeast in my sourdough starter.

chestnutbread12

CHESTNUT SOURDOUGH BREAD
(from Farine’s blog)

(makes 4 small loaves)

For the pre-fermented dough
175 g mature white starter
494 g unbleached all-purpose flour
258 g water
26 g raw wheat germ (I used toasted)
12 g salt

For the final dough
750 g unbleached all-purpose flour
400 g chestnut flour
700 g water
450 g fermented white dough
5 g instant dry yeast
25 g salt
200 g whole, peeled cooked chestnuts, crumbled into chunks

For the fermented dough
Mix flour, water and white starter until the flour is well hydrated, cover with a cloth and let rest 20 minutes. Add salt and mix until you get a gluten window (when you stretch some of the dough really thin, you see strands of gluten and almost-see through spots). Put in an oiled bowl and cover tightly.

Let rise at room temperature for about two hours, then put in the fridge for up to 48 hours

Remove from the fridge at least two hours before using

For the final dough
Combine the flours in the bowl of the mixer, add the water and mix well. Cover with a cloth and let rest for 30 minutes

Add the fermented dough and yeast and mix until the dough is smooth and elastic. Sprinkle the salt over it and mix some more.

Very lightly flour your work surface. Place your dough on it, rough-side up, and flatten it out with your fingers. Spread the chestnut pieces over the top and press them well into the dough. Fold a few times so that all the chestnuts are incorporated into the dough. Form the dough into a ball, put it into an oiled bowl, cover with a cloth and let it rest for 40 minutes.

Lightly flour your work surface again, and turn the dough out on it. Fold the dough (on all four sides), then put back into your bowl, cover with baking cloth and let it rest for another 20 minutes. Lightly flour your work surface again, turn out the dough and divide it into 4 equal pieces.  Shape as desired.

Place on a semolina dusted parchment paper over a sheet pan. Let rise, covered with baking cloths, for 1 ½ hour or until just doubled in volume.

Meanwhile turn on the oven to 500ºF/250ºC with a baking stone in it and an empty cast iron (or metal) pan on the bottom shelf. When ready to bake, score the breads the way you like, pour 1 cup of water in the cast iron (or metal) pan and slide the breads (still on their parchment paper) onto the baking stone, spray some water into the oven and close the door quickly.

After 5 minutes, turn the oven down to 440ºF/220ºC and bake for another 20 minutes. Check to see if the loaves need to be turned around or if they need to switch places, then bake for another 10 minutes as needed

Let cool on a rack.

ENJOY!

to print the recipe, click here

ChestnutsDough1

Comments: When you buy 500g of chestnut flour several thousand miles away from home, you become very protective of it  A recipe that calls for 400g (in other words, 80% of my treasure) prompted me to launch a quick email to Farine, asking her thoughts on halving the recipe.  She is far more experienced in sourdough baking than me, so when she speaks, I listen. Once she gave me the ok to go for it, I felt empowered, on top of the world. Yes, I will be able to bake this bread and have a lot of chestnut flour leftover to play with. How cool is that?  So, being the super smart person I like to think I am, I made a nice table in which all amounts were cut in half, and went to work.

The catastrophic event was completely neglecting to look back at the table when mixing starter with the other components of the dough. I would have noticed that only HALF of the fermented dough should be added. So, that beautiful photo you see above, with a stretched out dough and the chestnuts waiting to be incorporated, was taken right before the piercing cry, the calling myself names, and the scared dogs running after Phil as he dashed out of the kitchen.  It is shocking and appalling to realize how little sympathy I get from those who live with me.

It is not easy to think rationally under duress, but I figured that the only way out of my self-inflicted misery was to discard half of that dough (ouch, it hurt!)  and add more of all other components to the other half, except (obviously) the starter.  Two problems with this strategy: I would not have time to let the flours go through autolyse before mixing, and I would have to use more of my precious chestnut flour.  With a heavy heart, that’s what I did.

compositechestnut

I was absolutely sure the abused bread would turn out to be a complete failure, but the Gods of Bread are a lot kinder than the Gods of Golf, so all had a miraculous happy ending.  Maybe the crumb turned out a little too tight, but I can tell you this bread tastes amazing!  If you can find chestnut flour where you live, or if you can order it online, try this bread. And, I echo Farine with one piece of advice she gave me: it is ok to scale down the recipe, but do not substitute walnuts or other nuts. Chestnuts are essential…

MC, thanks for the constant inspiration, and sorry I messed up the recipe. There’s always next time, as long as I find a good source for chestnut flour here in the US. Amazon.com to the rescue?  😉

Breads11

I am submitting this post to Susan’s Yeastspotting

ONE YEAR AGO: Kinpira Gobo and Japanese Home Cooking

TWO YEARS AGO: Walnut Sourdough

THREE YEARS AGO: Thai Chicken Curry

FOUR YEARS AGO: Zen and the art of risotto


VALENTINE’S DINNER FOR TWO: OPENING ACT

I am absolutely thrilled about this post!  I usually don’t publish blogs linked to special celebrations such as Thanksgiving, Christmas, or 4th of July.  However, this Valentine’s Day will receive special attention from the Bewitching Kitchen. I was invited by Jamie (who hosts the great blog “Cooking in Red Socks“)  to write a collaborative series of posts to celebrate it.  So here is the deal: we will both be blogging three days in a row to cover the appetizer course, dinner, and dessert. My posts will center on a romantic meal for two.  Jamie will blog on the same courses, but her posts will be about Valentine’s Dinner for Friends. Her posts are made super special as one of her best friends, Allie, celebrates her Birthday on V-day.   How cool is that?  😉 Make sure to stop by her blog and marvel at her choice for the appetizer course: Sun-Dried Tomato Palmiers… WOW!

To start the day on a great note, I offer a perfect Valentine’s Day breakfast bread: Chocolate Currant Sourdough.  A slice, slightly toasted, and a cup of hot cappuccino: heavenly!

Chocolate Currant Sourdough

ChocolateSourdoughCHOCOLATE CURRANT SOURDOUGH BREAD
(from Farine’s blog, original recipe from How to Make Bread)

Recipe overview:  This bread takes a regular sourdough starter, at 100% hydration.  The starter is incorporated into a final dough containing white flour, cocoa powder, chocolate chips, and currants. After a series of foldings, the dough is shaped, either as two small loaves (as shown in Farine’s blog), or as a large round boule (as I did).  My shaped loaf fermented for 4 hours in our bread proofing box, temperature set to 78 F.   I baked it inside a covered clay pot for 30 minutes at 435 F, then removed the lid, and baked for 15 more minutes.

For the detailed recipe, visit Farine’s site or get  your copy of Emmanuel Hadjiandreou’s book.  Both links are included underneath the recipe’s title. 

Comments: Even though this bread contains a good amount of chocolate and currants, it is not overly sweet. The cocoa powder and the sourdough starter  act together to counteract excessive sweetness.  We loved it, in fact I did not expect to like it as much as I did.  If you have a starter going on in your kitchen, add this bread to your “to bake soon” list.  And don’t keep it there for too long…

♥♥♥♥♥♥♥♥

Now, let’s move on to the appetizer course of our romantic meal for two… I wanted something light, and red. Hummus is a favorite in our home, so I went with a twist on this classic, turning it into a shockingly red dip. Food coloring? No way!  This is a Roasted Beet Hummus, and it was absolutely wonderful…

Roasted Beet Hummus

ROASTED BEET HUMMUS
(from the Bewitching Kitchen)

1 medium beet
olive oil
salt and pepper to taste
1 can (15 ounces) of chickpeas, drained, rinsed, peeled
1 lemon, zest and juice
1/4 tsp ground cumin
1/4 cup tahini
2 Tbs olive oil
salt and pepper to taste
cold water to desired consistency
sesame seeds and lemon zest for decoration

Peel the beet, cut it in quarters, coat with a little olive oil, season with salt and pepper.  Place in a roasting dish covered with foil, and roast at 400 F for 30 minutes or until fully cooked through.

Place the roasted pieces in the bowl of a food processor, and process it for a few seconds.  Add all other ingredients, up to olive oil.  Process until completely smooth.  Season with salt and pepper, and adjust consistency with water if necessary. Taste and adjust seasoning if necessary.   Depending on the acidity of your lemon and your personal taste, a little more lemon juice right before serving might be a good idea.  Sprinkle sesame seeds and lemon zest on top, and…

ENJOY!

to print the recipe, click here

RoastedBeets

Comments:  Phil is not too fond of beets, so I took a risk by choosing it for a Valentine’s Day menu.  But the flavor of this spread is very complex, and the beets stay mildly sitting in the background, their presence big in color but mellow in flavor.  Perfect for those who don’t jump up and down with joy when such bright red beings are found in the middle of the groceries. Serve this spread with crackers, or for a lighter appetizer course, celery or carrot sticks.

Make sure to visit Jamie’s site for her appetizer course on a Valentine’s Day Party for Friends! Stay tuned for the dinner course tomorrow…

♥♥♥♥♥♥♥♥

ONE YEAR AGO: Sesame and Flax Seed Sourdough

TWO YEARS AGO: Spanakopita Meatballs

THREE YEARS AGO: Saturday Morning Scones

FOUR YEARS AGO: Pain de Mie au Levain

LIGHT RYE SOURDOUGH WITH CUMIN AND ORANGE

Where are the virtual fireworks when I need them? After months of neglect, my sourdough starter was brought back to the kitchen! I actually tried baking bread once a few weeks ago, but when I attempted to revive the sourdough “chips” I had prepared, the resulting starter refused to cooperate: it was sluggish, slow, not at all vibrant. This time I went back to my frozen little balls of starter and they jumped right back into action. For my first bread made in the Supernova, I chose a recipe from TxFarmer, who runs two blogs, one in Chinese and another at The Fresh Loaf Forum. She is very creative and always pushes the boundaries of sourdough baking. Without further ado, this is the first bread born in the confines of our new oven…

Orange Cumin Sourdough

LIGHT RYE SOURDOUGH WITH CUMIN AND ORANGE
(slightly adapted from TxFarmer’s recipe)

*Makes 1 X 700g loaf

Levain
68 g  dark rye flour
54 g water
4 g rye starter at 100% hydration

Mix and rise at room temp for 12 to 16 hours.

Final Dough
386 g bread flour
9 g salt
grated orange peel from 1 large orange
fresh orange juice from 1 orange plus water to 245 g
1/2 Tbsp cumin powder
122 g levain mixture

Mix everything except for salt, autolyse for 40 min.  Add salt and knead in a KitchenAid type mixer at medium speed for 4 minutes.

Bulk rise at room temp (~78F) for about 2.5hrs, with stretch and fold  at 30, 60, and 90 minutes.

Pre-shape into a ball, let the dough rest for 10  minutes, then shape and place in a floured banneton for the final rise.

Proof until the dough springs back slowly when pressed. It took me 2 hours and 20 minutes.

Bake at 450F for 40 to 45 minutes, the first 25 minutes with steam. Let it cool completely on a rack before slicing.

ENJOY!

to print the recipe, click here

Comments: This is a bread that screams for a bowl of chili, and that is exactly what I made on a Sunday afternoon.  I used our favorite recipe that simmers on the stove top for hours, but we did not touch it until next day.  That chili is good on the day it is made, but it turns into spectacular the day after.  Plus, what can be better than arriving home from work on a chilly Monday, and have dinner basically ready and waiting for you?

withChili

TxFarmer description of this baby was spot on, by the way.  The orange gives it a slight hint of sweetness, but the sourdough character of this bread is there.  The cumin is the touch of genius that makes this loaf superb with a bowl of chili or any type of spicy stew.  I could not have chosen a better loaf to inaugurate our Supernova!

I am submitting this post to Susan’s Yeastspotting

loaf1

ONE YEAR AGO: Homemade Calziones

TWO YEARS AGO: Plum-Glazed Duck Breasts

THREE YEARS AGO: Holiday Double-Decker

FOUR YEARS AGO: New York Deli Rye