MINI-CAKES, TWO WAYS

This is a wonderful, simple recipe that works well even in very small silicone molds, as you can see further down in my article. For the mini cakes below, I used the pan featured in this post from my past.


MINI-RASPBERRY CAKES WITH RUBY RED GANACHE FILLING
(from The Bewitching Kitchen)

250g butter, soft, at room temperature
200 grams of sugar
1 tsp vanilla paste
pinch of salt
5 large eggs, at room temperature
250g all-purpose flour
2 tsp baking powder
3 tablespoons milk at room temperature
25g freeze-dried raspberries – finely crushed

for ruby red ganache:
100 g ruby red chocolate (from Godiva)
110 g whipping cream

Make the ganache. Heat the whipping cream in the microwave until very hot, and pour over the pellets of ruby chocolate. Allow to sit 5 minutes at room temperature, then stir gently until fully dissolved. Reserve at room temperature.

Heat the oven to 350F.

Mix the flour, baking powder and salt in a bowl and set aside. Cream the butter and sugar until the sugar is fully dissolved and the butter turns lighter and fluffy, about five minutes in a Kitchen Aid type mixer with the paddle attachment. Add the eggs one by one, mixing for about 30 seconds before you add each egg. Gently fold the flour mixture and then the milk. Once that is incorporated, add the freeze-dried raspberry powder.

Fill the mold of choice to 3/4 of their capacity. Bake for 15 to 20 minutes, depending on the size of your mold. Let the cakes cool completely before removing them, at least 45 minutes. Fill the center with ruby red ganache. Wait until it sets before serving.

ENJOY!

to print the recipe, click here

MINI-HEARTS RASPBERRY CAKES

Use the same recipe for the cake, distribute the batter into the cavities of this mold. Use store-bought or home-made raspberry jam to fill the center of the cakes. 

These are soft, moist and delicious little cakes. The hear-shaped ones are tiny, as you can see in this close-up picture.

Two bites, and you are done! They were a huge success with colleagues from our department. The cakes filled with ganache are richer (and considerably bigger, although still small). I do love ganache so maybe my heart moves more in the direction of those, but if you prefer the sharp taste of raspberry jam to pair with the sweet cake, consider making a batch of the tiny hearts. 

ONE YEAR AGO: Earl Grey Shortbread Cookies

TWO YEARS AGO: Summertime Macaron Duet

THREE YEARS AGO: Pain de Mie Dressed up for Party

FOUR YEARS AGO: Five-Stranded Bread

FIVE YEARS AGO: Green Olive Salad

SIX YEARS AGO: Coffee Macarons Dressed up to Party

SEVEN YEARS AGO: Blogging Hiatus

EIGHT YEARS AGO: Tomato Tatin

NINE YEARS AGO: Headed to Colorado!  

TEN YEARS AGO: Farofa Brasileira

ELEVEN  YEARS AGO: Thai-Inspired Pork Tenderloin

TWELVE YEARS AGO: A yummy Brazilian cake: Bolo de Fuba’

THIRTEEN YEARS AGO:  Summer’s Tomatoes

FOURTEEN YEARS AGO: Leaving on a jet plane… 

INCREDIBLY SIMPLE TIMES FOUR: MAY 2021

Last time I shared Incredibly Simple recipes was 7 months ago, so it’s been a while… The first three are embarrassing simple. The fourth will surprise you. Read on, my friends!

INCREDIBLY SIMPLE #1

AIR-FRIED CAULIFLOWER FLORETS

I admit that the picture is not that great. The problem is I had no intention of blogging about it, until I realized I made it three weeks in a row, and now it’s pretty hard for me to prepare cauliflower any other way. The air-fryer is the perfect environment to get crispy, tender inside florets, in 20 minutes. Yes, 20 minutes start to finish. No mess, no fuss. Perfect results every single time.

Toss the florets in a large bowl with a little grapeseed oil (you can use olive oil if you prefer), season with salt, pepper, and when you want to rock your world a bit, go for smoked paprika, maybe a touch of curry. Set your fryer to the highest temperature (mine is 390F), and let it roast for 20 minutes, shaking the basket once or twice.

INCREDIBLY SIMPLE #2

HARD-BOILED EGGS, THE AIR-FRYER WAY

If you own an air-fryer and want to expand your horizons to use it more often, hard-boiled eggs are a great option. Place as many eggs as you want in the basket. Set it to 270F (or around that temperature, depending on your model) and set the timer to 15 minutes. You might need a little adjustment in the time. For my fryer and my taste in hard-boiled eggs, that combination hits the spot. If you want to have soft-boiled eggs, reduce the time to 8 to 10 minutes, but again you’ll have to tweak the conditions. The eggs peel like a dream, by the way.

INCREDIBLY SIMPLE #3

SWEET AND SPICY WALNUTS (or PECANS)

Phil came up with this idea and now we do it all the time for our salads. Grab a handful of walnuts or pecans. Coat a non-stick small skillet with a tiny tiny tiny amount of olive oil. Heat, and add the nuts. Season with salt and pepper, or if you like to change things a bit, go for a touch of paprika. When the nuts start to get fragrant, drizzle a very small amount (maybe 1 tsp) of maple syrup. Everything will bubble furiously. Shake the pan to move the walnuts and coat them with the syrupy mixture. Immediately remove from the heat and transfer them to a small bowl to cool down a bit. Add to your salad. Any salad. Try to refrain from picking those babies from the bowl when no one is looking

INCREDIBLY SIMPLE #4

FRIANDS

You may ask yourself… “Has she lost her mind?” BAKING in Incredibly Simple? Nope, I did not lose my mind (at least not for this particular reason). This is a recipe that a 5 year old can make with minor supervision as the young child will need to operate a food processor.

Melt 1 stick (113g) of butter and place in the bowl of a food processor together with
90g all-purpose flour
110g almond flour (or finely ground almonds)
3/4 tsp baking powder
5 egg whites
190g powdered sugar
1 tsp vanilla

Process for 1 minute. It will be very foamy. Spoon the mixture in non-stick muffin tins (or friand molds), filling each cavity no more than 3/4 full. Place two raspberries in each portion, top with some slivered almonds. Bake at 325F for 18 to 20 minutes, until the edges start to get golden. Let them cool for 10 minutes, remove from the molds and when fully cold, dust with powdered sugar.

ENJOY!

to print the recipe, click here

Comments: I hope that if you consider yourself a non-baker, or worse yet, a bake-o-phobe (like I used to be), you will still grab the ingredients and try this recipe. You can vary the nut flour by adding some hazelnuts or even ground pistachios in some proportion together with almond flour. Or you can bake this simple version. They are delicate, moist, fragrant, absolutely perfect with a cup of tea. And so incredibly simple to prepare! Make sure to surprise whoever is around and when you bring those to the table, say very non-challantly… “I’ve made some friands for you”… Work on your best French accent, it is a must in this case.

ONE YEAR AGO: Phyllo Parcels with Moroccan Turkey

TWO YEARS AGO: Roasted Corn and Zucchini Salad

THREE YEAR AGO: Fraisier Cake, A Celebration of Spring

FOUR YEARS AGO: Zucchini Frittata with Roasted Tomatoes and Goat Cheese

FIVE YEARS AGO: Playing with Pectinase

SIX YEARS AGO: Poached White Asparagus with Lemon and Pistachios

SEVEN YEARS AGO: Dan Lepard’s Saffron Bloomer

EIGHT YEARS AGO: Fesenjan & The New Persian Kitchen

NINE YEARS AGO: Quinoa Salad with Roasted Beets

TEN YEARS AGO: Pasta Puttanesca

ELEVEN YEARS AGO: Miche Point-a-Calliere

ISPAHAN MACARONS

Little annoucement: I edited my Index page, so that Macarons are now in a category by themselves, separated from other cookies.  I hope you find that helpful…


Pierre Hermé is the genius behind the combination of flavors known as Ispahan: lychees, roses, and raspberries. Nowadays you can find this sexy trio as a base for cakes, tarts, bonbons, but they were originally conceived many years ago as macaron filling. I read somewhere that Hermé designed them while working at Ladurée, but for one reason or another they were not a big hit then. Only when he opened his own shop and included Ispahan Macs in his regular production customers fell in love, head over heels. The rest is history.  You can find his original recipe here. I had a few issues with his macaron recipes in the past (operator error, I am sure), so to play it safe I used the method that almost never fails me.

ISPAHAN MACARONS
(inspired by Pierre Herme’s recipe)

for the shells:
198 g powdered sugar
113 g almond meal
113 g egg whites at room temperature
a pinch of cream of tartar
100 g granulated sugar
Teal food gel from Chefmaster
1/8 tsp vanilla extract

for the filling:
210g white chocolate, diced finely
200g lychees (preserved in syrup)
40g whipping cream
1/8 tsp rose extract
seedless raspberry jam

to decorate:
white candy melts dyed pink
brown food safe marking pen

Line 2 or 3 heavy baking sheets with parchment paper or Silpat mats. Layer the powdered sugar and almond meal   in a food processor. Pulse until the mixture looks like fine meal, about 15 seconds. Pass through a sieve and transfer to a small bowl. Set aside.

Place the egg whites and pinch of cream of tartar in the bowl of a stand mixer fitted with the whisk attachment. Make sure that the bowl and the whisk are impeccably clean. Starting on medium speed, whip the whites with the cream of tartar until they look like light foam. The whites should not appear liquid. The foam will be light and should not have any structure.

Slowly rain in the granulated sugar, trying to aim the stream between the whisk and the side of the bowl. Turn the speed up to medium-high. Continue to whip the meringue until it is soft and shiny. It should look like marshmallow creme. Add the gel color and the vanilla. Staying at medium-high speed, whip the egg whites until the mixture begins to dull and the lines of the whisk are visible on the surface of the meringue. Check the peak. It should be firm.

Switch to paddle attachment. Add half the almond meal mixture, turn the mixer on low and mix for about 3 seconds. Stop and add the rest of the almond mixture, turn the mixer on low, and process for about 5 more seconds. It should still be reasonably thick, but the grains of almond should be more or less disappearing in the batter.  Remove the bowl from the mixer, and finish the macaronage by hand.  Put the mixture in a piping bag fitted with one of the tips listed above. Pipe on the prepared baking sheets.

Slam each sheet hard four to six times on the counter. Then fist bump each end of the sheet’s underside twice. Let the unbaked macarons dry until they look dull but not overly dry. Drying time depends on humidity. Ina dry climate, the macarons can dry in 15 to 20 minutes; in a humid climate, it can take 35 to 40 minutes.

While the macarons are drying, heat the oven to 300 F. Bake one sheet at a time on the middle rack. Check in 11 minutes. If the tops slide, then bake for 2 to 3 more minutes. The macarons should release without sticking. Check one or two. If they stick, put them back in the oven for 1 to 2 more minutes. Let the macaroons cool for 10 minutes before removing from the pan.

Make the filling: Place the chopped white chocolate in a bowl. Process the lychees in a food processor to form a puree. Drain excessive liquid. Warm up the heavy cream almost to boiling, add the lychee puree, continue simmering until almost boiling again. Pour over the chocolate. Wait for a couple of minutes and gently mix the chocolate to dissolve it fully. Add the rose extract. Allow it to cool to room temperature and then whip it with a handheld mixer until fluffy.  Place in a piping bag fitted with a star tip such as Wilton 1M.

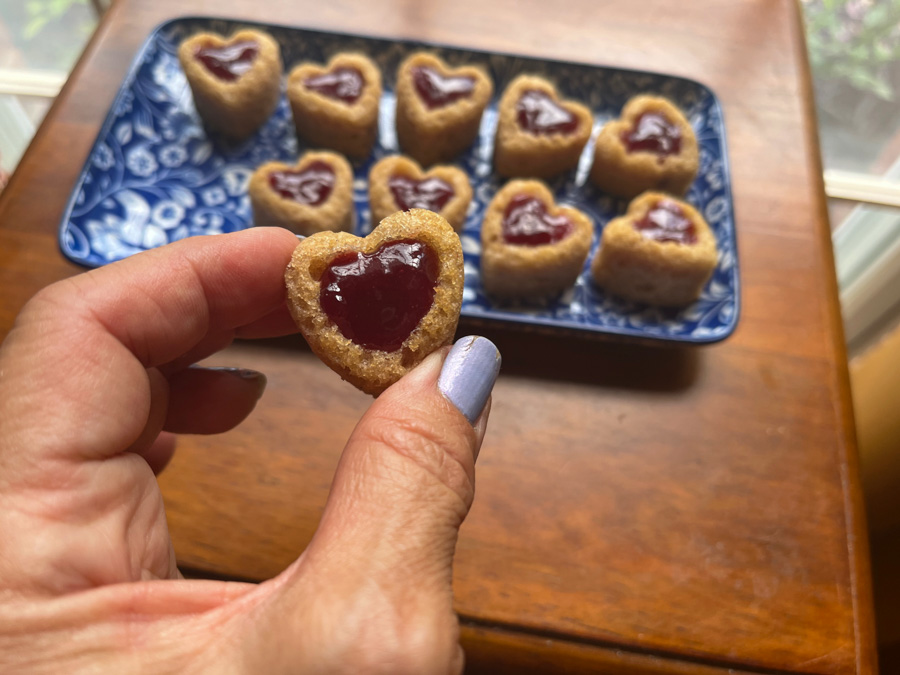
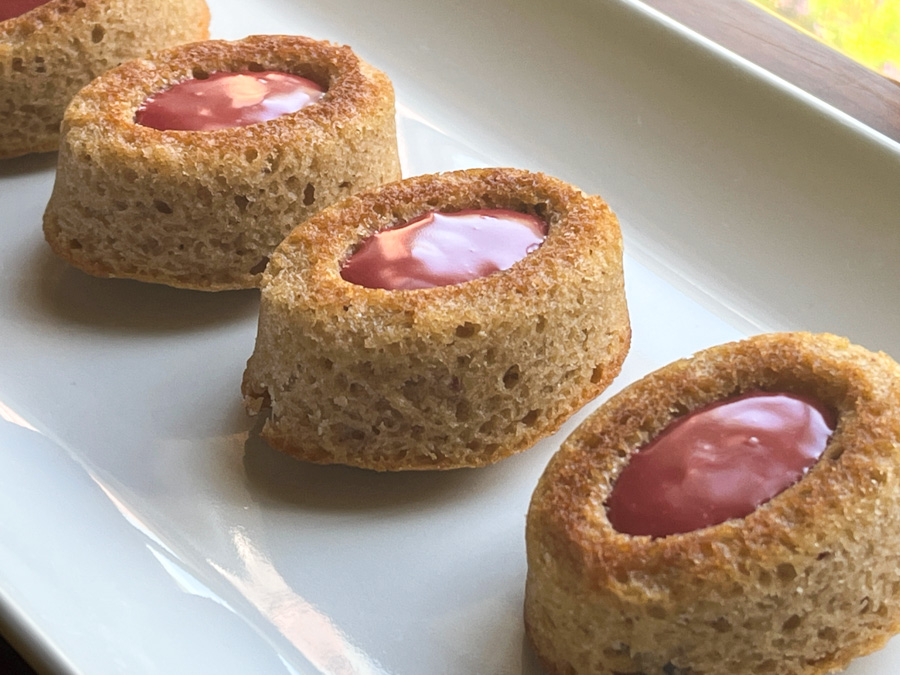
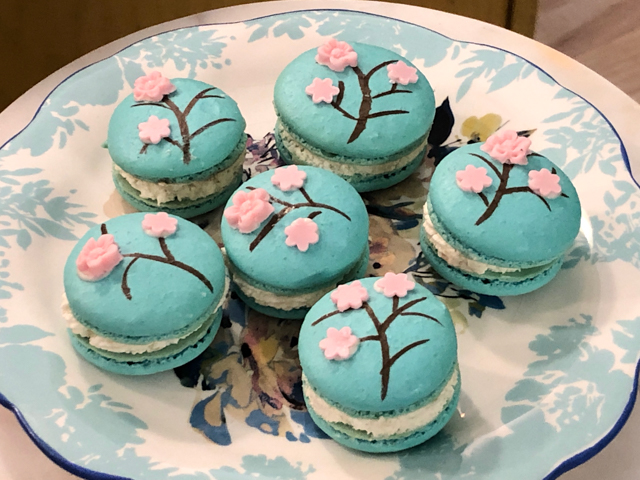
Assemble the macarons: find two macarons similar in size and add a good amount of lychee ganache to the bottom of one of them. Place a bit of raspberry jam in the center, and close with another macaron shell. Squeeze gently to take the filling all the way to the edge.

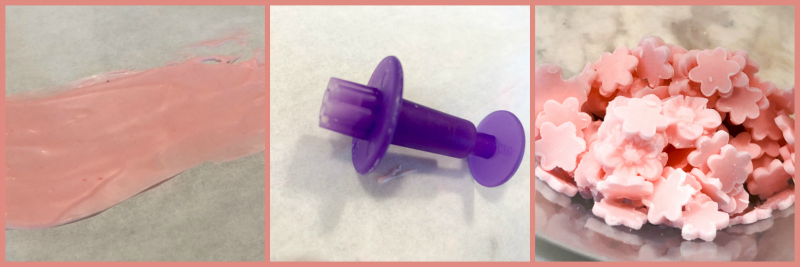
To make the decorations, dye a small amount of melted candy pink. Spread on a piece of parchment as a thin layer. Let it set at room temperature, cut flower shapes. You can also just fill tiny little silicone flower molds with the melted candy, and freeze. Make enough to have several flowers for each macaron shell. They can be made well in advance and frozen.

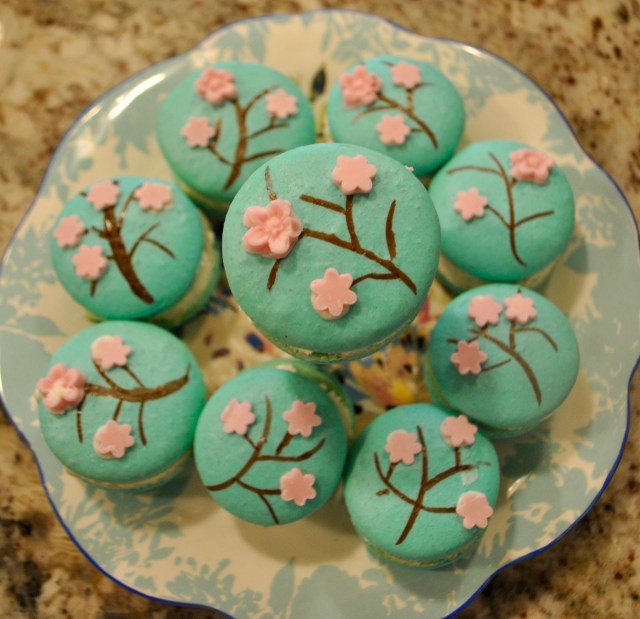
Decorate the top of each macaron with branches using a brown food-safe marker. Add flowers using melted candy to glue them on the cookie shell. Store in the fridge for 24 hours for perfect texture.

ENJOY!

to print the recipe, click here

Comments:  I don’t know for how long I’ve been flirting with this recipe, trying to imagine how the flavors would work together. Pierre Hermé makes a raspberry jelly from scratch, cuts in pieces and places that on top of the lychee ganache. I actually did that, but was a bit unsure of how well the gelatin did its job. My little discs of raspberry jelly seemed a bit too watery once removed from the freezer. I did not want to risk ruining my macs, so I used seedless raspberry jam instead. I guess it made them slightly sweeter than they should be, but I really liked the way they turned out. 


For the decoration, I used candy melts, but it’s of course totally optional, they would look pretty nice with a delicate brush of pink luster dust, for instance, making the whole decoration step a lot simpler and faster.  More or less along the lines of these from last year. Keep in mind that these little flowers keep very well in the freezer. In fact, I had made them three weeks earlier. I cannot take credit for the idea, though. I saw macarons similarly decorated on Pinterest a couple of years ago, and saved the idea. I think it was from a German food blog. Wish I could give credit, but a google search did not take me back there.

The lychee flavor is so unique, if you’ve never tried it please do so. It is exotic and mysterious, a great match for the rose extract. Hermé hit this one perfectly. I need to bake a Ispahan Entremet Cake sometime soon. Expect a mirror glaze. Because… Ispahan begs for it…

ONE YEAR AGO: Smokin’ Hot Meatloaf and Homemade Ketchup

TWO YEARS AGO: Banana Bread with Espresso Glaze

THREE YEARS AGO: Slow-Cooker Carnitas & Paleo Planet Cookbook Review

FOUR YEARS AGO: The Making of a Nobel Reception

FIVE YEARS AGO: Fennel Soup with Almonds and Mint 

SIX YEARS AGO: Green Curry Pork Tenderloin

SEVEN YEARS AGO: Farfalle with Zucchini and Ricotta

EIGHT YEARS AGO: Slow-baked Salmon with Lemon and Thyme

NINE YEARS AGO: Hoisin Explosion Chicken


RASPBERRY PUFFS

This recipe can be super simple if you buy puff pastry at the store, or quite a bit more involved if you make it yourself. I don’t want to sound snobbish – although probably it will be the case – but homemade will be a lot better. It is hard to get as many flaky layers from a store-bought puff pastry, and the version made at home definitely feels lighter. But particularly during the summer, I see nothing wrong with opening that package and going at it with your rolling-pin. Working with all that butter, performing the foldings, is quite tricky when the weather is warm and humid. Once the pastry is done, the preparation of these raspberry squares is very simple and the end result… oh so very cute! I made my own puff pastry and a link to the recipe is included below. But for simplicity (it’s a very long recipe), I am sharing a simplified version using store-bought.

RASPBERRY PUFFS
(from the Bewitching Kitchen)

1 package of puff pastry, defrosted
to make your own, follow this link
fresh raspberries and blackberries (5 per pastry square)
8-ounce block cream cheese
¼ cup granulated sugar
½ teaspoon vanilla extract

Heat the oven to 400F.

In a medium bowl, mix cream cheese, sugar, and vanilla until smooth.

Roll the puff pastry and cut into 3 to 3.5 inch squares. Using the packaged pastry, one sheet will be enough to make 4 squares. Leaving a thin border, make cuts along the edges of the square. Use either a small rolling pastry cutter or a very sharp knife, so that you don’t squish the layers of the puff pastry. Place a tablespoon of the cream cheese filling in the middle of the square, then top with 4 raspberries. Take one of the edge flaps and fold it towards the center, looping over the raspberry. Repeat with the other flaps. Place a raspberry in the center, on top of where all the flaps overlap. Repeat with the remaining pastry squares.

Bake for 20 minutes or until pastry is golden brown and puffed. Serve with a sprinkle of powdered sugar, if so desired.

ENJOY!

to print the recipe, click here

Comments:  If you like, you can brush the top of the loops with a little egg wash for extra shine, but I did not do that this time. Blueberries could be fun to use too, although they tend to bleed a lot more during baking. Don’t  be afraid to bake them until the pastry is very dark, because the filling tends to make the pastry a big soggy. In retrospect, I think I should have baked mine longer. But, as I like to say often, there’s always next time… live and learn…

They do have similarity with a Danish pastry, and go perfectly with a nice steamy cappuccino. One of these babies will be more than enough to satisfy any cravings for sweetness. They are fun to make and delicious to savor…  I hope you give them a try, with homemade puff or not.

ONE YEAR AGO: Vietnamese-ish Chicken

TWO YEARS AGO: Rutabagas Anna

THREE YEARS AGO: The Ultimate Raspberry Sorbet

FOUR YEARS AGO: Crispy Cornmeal Sweet Potato Fries

FIVE YEARS AGO: Pan-grilled Tilapia with Smoked Paprika & Avocado Cream

SIX YEARS AGO: Golden Saffron and Fennel Loaf

SEVEN YEARS AGO: In My Kitchen, July 2011

EIGHT YEARS AGO: Heavenly Homemade Fromage Blanc

NINE YEARS AGOA Perfect Sunday Dinner

SaveSave

SaveSave

SaveSave

SaveSave

SaveSave

SaveSave

SaveSave

RASPBERRY ALMOND BRUNCH CAKE FOR A SWEET MONDAY

Almost exactly three years ago I reviewed The Global Pastry Cookbook, a cookbook that is very dear to my heart, as I’d been following Gayle’s blog for a very long time. Today I share with you one more recipe from the book, which Gayle gave me permission to publish in full. It is a delicious cake, easy to prepare, with a soft crumb, intense raspberry flavor, and the perfect textural topping given by sliced almonds. Perfect. Just perfect. As it’s often the case, this cake was a Sunday baking project to be shared with our departmental colleagues next day. My goal? To turn the least appreciated day of the week into… something sweet…

RASPBERRY ALMOND BRUNCH CAKE
(from Gayle Gonzales’ Global Pastry Table)

6 oz fresh raspberries
2 tablespoons (26 grams) sugar
1 teaspoon lemon juice
1 cup (5 oz) flour
1/ 2 teaspoon baking powder
1/ 4 teaspoon baking soda
1/ 4 teaspoon salt
1 egg at room temperature
1/ 2 cup + 2 tablespoons (4 1/ 2 oz) sugar
1/ 2 cup (4 oz) buttermilk at room temperature
3 oz (6 tablespoons) butter, melted
1 teaspoon vanilla
1/ 4 cup (3/ 4 oz) sliced almonds

Heat oven to 350ºF. Lightly grease an 8” x 2 1/ 2” cake pan and line the bottom with parchment.

Combine raspberries, sugar and lemon juice and set aside to macerate. In a separate bowl, whisk together the flour, baking powder, baking soda and salt. In another bowl, whisk the egg, sugar, buttermilk, melted butter and vanilla. Use a fork to stir in the flour mixture and mix until moistened and there are no streaks of flour.

Spoon a little over half of the batter into the prepared pan, making sure to cover the entire bottom surface. Top with the raspberry mixture. Dollop the remaining batter over the raspberries and spread out in an even layer. There will be some raspberries exposed and that’s fine. Sprinkle with sliced almonds.

Bake until a tester comes out clean, about 30 minutes. Cool on a wire rack for 10 minutes. Run a thin knife around the edges and gently turn out the cake. Invert again and cool.

ENJOY!

to print the recipe, click here

It’s hard to find a more beautiful color than that of fresh raspberries…  I always catch myself smiling at the bowl, feeling it’s almost rude to cook them or hide them in a cake batter. But it’s for a great cause. They melt down into a single layer, topped by the moist cake and crowned with the almonds and their delicate crunch. Almonds and raspberries, at the risk of repeating myself, it is one of those perfect matches. This is a cake you can make with kids, very easy and it will be a hit with anyone who tries a slice. Or three…

Before I leave you, let me invite you to re-visit my old post and get a tour of Gayle’s book. Hard to believe it’s been three years. When I wrote her to ask permission to publish this recipe, I though the review was maybe a year old, 18 months tops. Almost fell off my chair when I realized it was written in November 2014.  This type of time-shock happens to me quite often these days. I wonder why… (sigh)

ONE YEAR AGO: Paalak Paneer, a Farewell Post

TWO YEARS AGO: In My Kitchen, November 2015

THREE YEARS AGO: Helen Fletcher’s Oatmeal Cookies

FOUR YEARS AGO: Thai-Style Pesto with Brown Rice Pasta

FIVE YEARS AGO: Shrimp with Spicy Orange Sauce

SIX YEARS AGO:  A Simple Appetizer (Baked Ricotta)

SEVEN YEARS AGO: Sour Cream Sandwich Bread

EIGHT YEARS AGO: Pasta with Zucchini Strands and Shrimp

SaveSave

SaveSave

SaveSave

SaveSave

SaveSave

SaveSave

SaveSave

SaveSave

SaveSave

SaveSave

SaveSave