PUFF PASTRY TWISTS WITH CINNAMON AND CARDAMON

You can conceivably use store-bought puff pastry (try to find a brand that uses real butter, not shortening), but a lot of the fun is making your own. For this type of pastry, no need to do too many folds. Great project for a weekend, but avoid days of excessive heat.


PUFF PASTRY TWISTS WITH CINNAMON AND CARDAMON
(from The Bewitching Kitchen, adapted from several sources)

3 cups (390g) all-purpose flour
1½ tablespoons sugar
1½ teaspoons salt
2 teaspoons white vinegar
1 cup ice water (you may not need the full cup)
for butter square:
3 sticks unsalted butter, chilled

Process flour, sugar, and salt in food processor until combined. With processor running, add vinegar, followed by ¾ cup super cold water. Add remaining ¼ cup water as needed, a little at a time with the machine always running. Stop adding water when the dough comes together, and immediately remove from the processor, gathering the dough gently with your hands. Form into a square, wrap in plastic and refrigerate for 1 full hour.

Start working on the butter block: Lay the three butter sticks side by side over a sheet of parchment paper and cover with a plastic wrap. Gently pound butter with rolling pin until butter is softened, then roll out as an 8-inch square, trying to keep the thickness equal all over the extension of the butter. Wrap the square in plastic and refrigerate until chilled, about 1 hour.

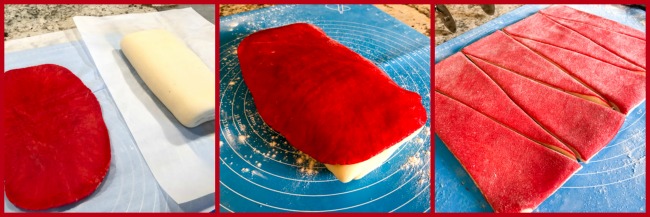
Roll chilled dough into 14 inch square on lightly floured counter. Place chilled butter square diagonally in center of dough. Fold corners of dough up over butter square so that corners meet in middle and pinch dough seams to seal (see first photo of the composite below). Gently roll dough into 14-inch square, dusting with extra flour as needed to prevent sticking. Fold dough into thirds like a business letter, then fold rectangle in thirds to form a square, try to make it as neat as possible. Wrap dough in plastic, freeze for 30 minutes and remove to the refrigerator, keeping it there for 60 minutes more.

Repeat the folding and rolling twice, if you can do it fast no need to refrigerate, but if at any time you feel the butter warming, place it in the fridge for 45 minutes before the next rolling out. Once you complete the foldings, let the dough rest for 2 full hours before finally using it.

MAKING THE TWISTS
1/2 of the puff pastry made as above
½ cup sugar
3 tablespoon unsalted butter melted
pinch of salt
2 teaspoons ground cinnamon
¼ teaspoon ground cardamom

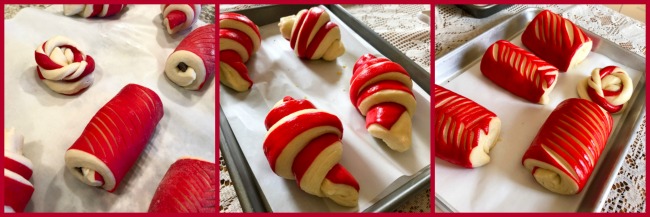
Mix sugar, salt and spices in a small bowl. Reserve. Heat the oven to 400F and line a baking sheet with parchment paper (it works better than silicone for this type of bake, disregard what you see in the composite picture below, I switch to parchment on the second batch).

Roll the puff pastry into a large square (about 12 x 12 in), the thinner the better without allowing it to crack. Brush melted butter all over the pastry, then sprinkle the sugar-spice mixture, pressing gently with the fingers. Fold the pastry sheet in half, enclosing the sugar mixture. Cut narrow strips with a pizza roller. Twist each piece and place on the parchment-lined sheet.

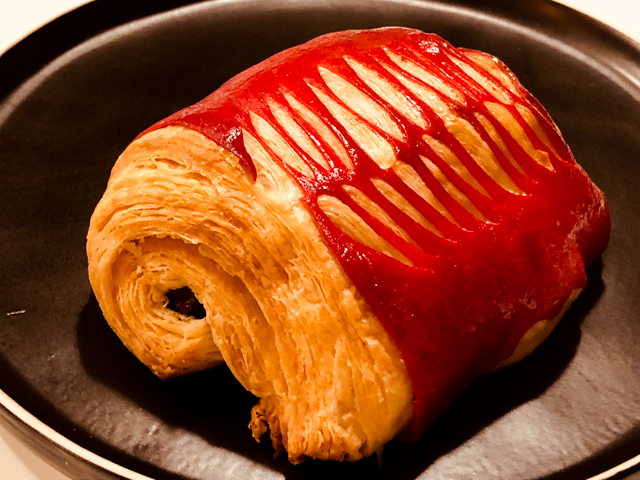
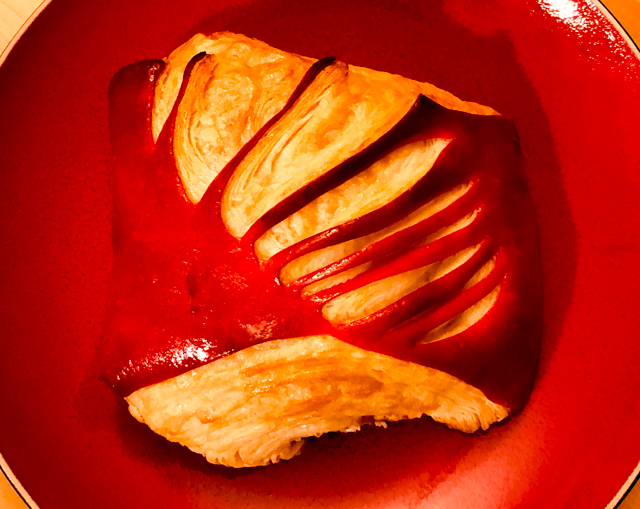
Bake for 14-15 minutes until golden brown.

ENJOY!

to print the recipe, click here

Comments: These turned out absolutely delicious, although they un-twisted quite a bit during baking. I should have pressed the ends harder on the parchment paper, but still it didn’t compromise the experience. I cut the long strips in half because I did not want to have very long twists, so do what you think is best for you.

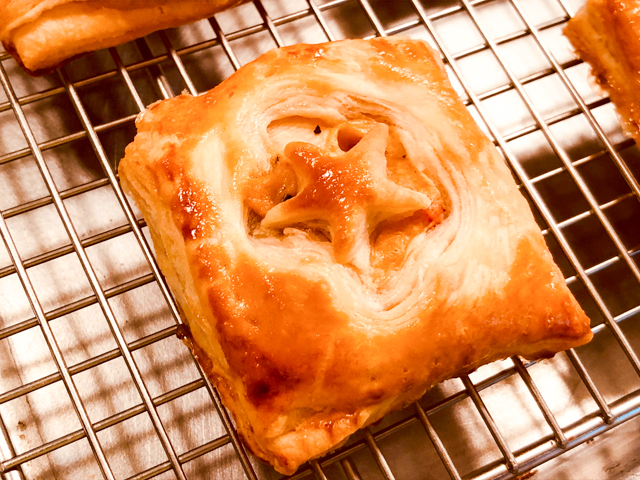
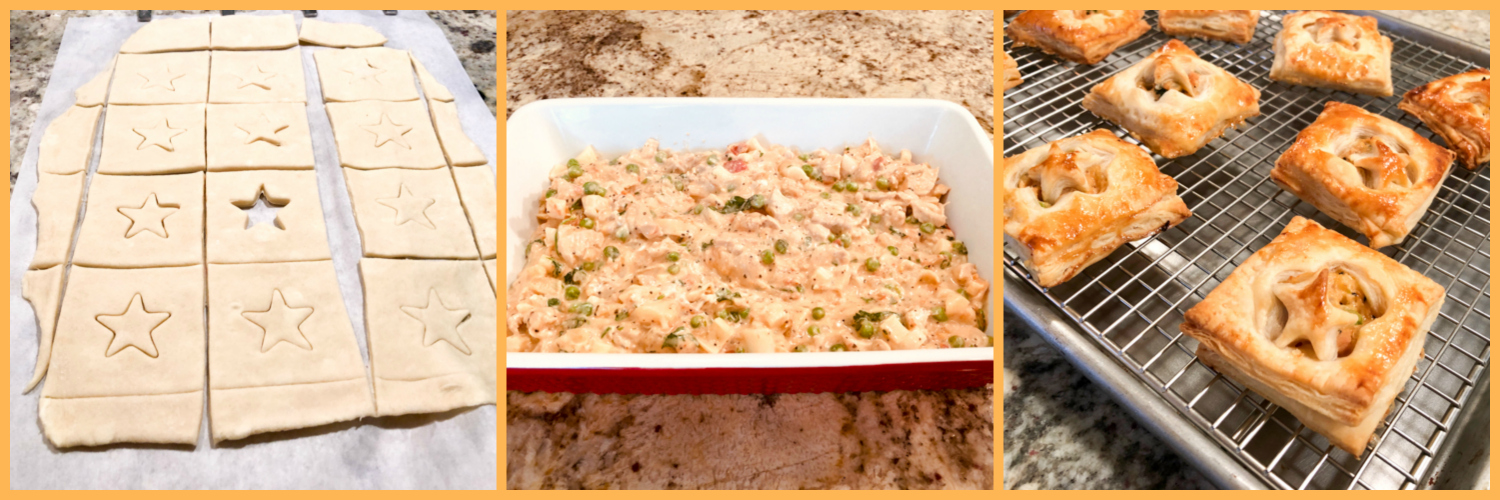
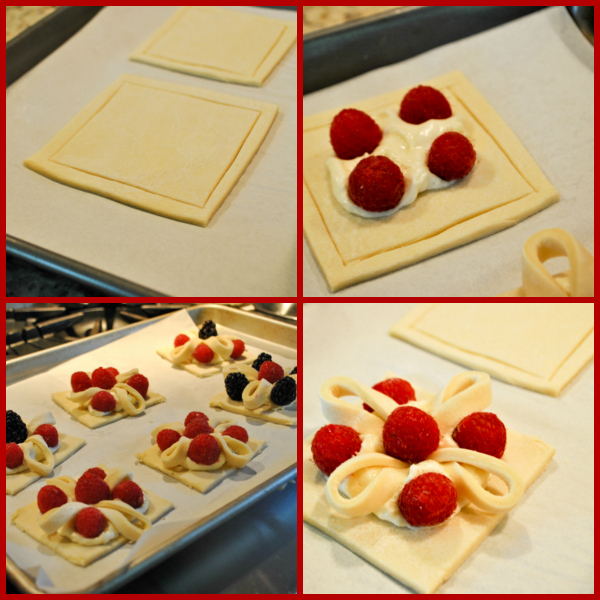
Yes, making puff pastry from scratch takes a bit of work, but quite a bit of it is waiting for the dough to chill. I will make turnovers pretty soon, so stay tuned!

ONE YEAR AGO: Three Delicious Bakes

TWO YEARS AGO: Banana Bread from the Experts

THREE YEARS AGO: Shrimp Stir-Fry with Snow Peas and Cashews

FOUR YEARS AGO: Pickled-Roasted Chickpeas with Cashew Cream

FIVE YEARS AGO: Twice-Baked Goat Cheese Souffle

SIX YEARS AGO: A Star from England in the Bewitching Kitchen

SEVEN YEARS AGO: Hommage to the Sun

EIGHT YEARS AGO:The Fabulous Three
.
NINE YEARS AGO: Turkey-Chorizo Burger with Green Chile Dressing
.
TEN YEARS AGO:Taco Salad
.
ELEVEN YEARS AGO: Semolina Sourdough Boule
.
TWELVE YEARS AGO:Forgive me, for I have sinned
.

THIRTEEN YEARS AGOCracked Wheat Sandwich Bread
.
FOURTEEN YEARS AGO:  Au Revoir, my Bewitching Kitchen
.
FIFTEEN YEARS AGO:French Bread

BICOLOR CROISSANT AND PAIN AU CHOCOLAT


For the past few months, I could not get bicolor croissants and their close cousins – pain au chocolat – out of my mind. As you may already know, I tend to get obsessed about things. That means that two bad batches in a row did not prevent me from trying again. They were heavy and doughy, with almost no lamination.  You probably won’t find a detailed recipe in cookbooks, but youtube videos (some not in English) promise to show you how to succeed in a home setting. Keep in mind that for the most part, these are made in patisseries by bakers who have those incredibly efficient rolling machines (sheeters) at their disposal.  Fear not, I am ready to share a recipe and a method that worked well for me. My main advice: do not rush it. This is not the type of recipe to try and adapt for a tent-baking situation. Take your time. Keep the dough and yourself cool at all times.

BICOLOR CROISSANTS & PAIN AU CHOCOLAT
(adapted from many sources)

for main dough:
490g all-purpose flour
36g sugar
10g osmo-tolerant yeast (or regular instant  yeast, same amount)
16g salt
300g full-fat milk
70g butter, melted and cooled
for butter block:
340g butter cut in pieces, cold
(unsalted Land O’Lakes *see comments)
35g flour

Batons of chocolate
1 egg for egg wash
simple syrup (water and sugar, equal amounts by weight, dissolved by boiling and cooled)

Make the dough the day before.  Add all ingredients except butter to the bowl of a KitchenAid type mixer with a dough hook. Process for about 3 minutes, then add the butter, and mix for about 4 minutes longer, at low-speed. The dough should feel smooth and elastic.

Remove from the machine, knead by hand a few times, place in a bowl coated with a little butter, cover and leave at room temperature for 1 hour. Remove 110g of dough and add a few drops of red gel dye. Wearing gloves, knead the color into the dough, adding more if necessary. It will take a little while, the color will resist mixing at first. Make sure it is totally incorporated throughout the little ball of dough.  Reserve both doughs in separate bowls, covered, and place in the fridge overnight.

Make the butter block. Add cold butter and flour to the bowl of a KitchenAid type mixer fitted with the mixing blade. Process for about 2 minutes. Make an envelope for the butter using parchment paper. Fold 24-inch length of parchment in half to create a 12-inch rectangle. Fold over 3 open sides of rectangle to form 8-inch square, creasing the folds very firmly.  Unfold parchment envelope, add the butter/flour and refold the envelope. Roll gently until the butter is uniform in thickness and forms a perfect 8-inch square.  Refrigerate 30 minutes.

Roll the main dough (with no color) over a lightly floured surface to a rectangle about 9 x 16 inches, so that you can set the butter square in the center and fold the top and bottom parts over it, with a seam in the exact middle of the butter square. Gently glue the open sides of the dough so that the butter is all cozy inside. Turn the dough so that the seam is vertical now, perpendicular to you.  Roll again to the same general dimension (9 x 16 inches).  Make the first fold: divide the dough in three pieces (eye-balling is fine). Bring the top third down, and the bottom third up, in what is known as the envelope fold. Place the folded dough in the fridge covered with plastic for 45 minutes, transfer to the freezer for 20 minutes.

Roll the dough again to the same dimension (9 x 16 inches). Make the second fold, exactly like you did the first. Place the folded dough in the fridge, covered with plastic for 45 minutes, transfer to the freezer for 20 minutes.

Roll the dough again to the same dimension (9 x 16 inches). Make the third and final fold. Bring the top part down and the bottom part up to almost meet at the center, leaving a small space between the edges, so that you can fold the dough right there in the center.  That is known as the “book-fold.”  Refrigerate for 1 hour and freeze for 20 minutes.

While the dough cools, it’s time to roll out the red dough. You need to make it thin and a little bigger than the dimension of the folded white dough, so that it sits on top of it. When the dough is out of the freezer, moisten it very lightly with water, place the rolled out red dough on top, and gently roll them both together (you can flip the dough to place the red one at the bottom after rolling a few times).

Roll both doughs together to a final dimension of 9 by 20 inches. Ideally, roll slightly bigger than that, then cut neatly to that final dimension. If for some reason some parts near the edges do not have the red dough on it, do not worry. Just proceed with cutting the pieces, it will not hurt the final look.

I used half the dough to make croissants and half to make pain au chocolat.  To make the croissants, I cut a 9-inch square from the dough and eye-balled triangles from it. With the rest of the dough I cut rectangles that were about 3 1/2 by 4 1/2 inches.  Shape croissants and enclose two chocolate batons per pain au chocolat, placing the red dough at the bottom in both cases.

Right after shaping the pain au chocolat, make parallel cuts with a razor blade on the red dough to expose the plain dough underneath. Some scraps from the dough I used to shape as a little flower. Allow the shaped pastries to proof for 2 and a half to 3 hours.

Heat the oven to 350F (higher temperatures will affect the red color).  Brush the pastries very lightly with egg wash, and place them in the freezer for 15 minutes to allow the butter to solidify a bit. Bake for 30 to 35 minutes. Cool on a rack. If desired, brush the surface with a simple syrup while they are still hot for a little shine.

ENJOY!

to print the recipe, click here

Comments: I used all-purpose flour and American butter, not the fancy 82% or higher fat butter than many recipes recommend. American butter has slightly more water, it resists better the rolling and pounding without incorporating into the dough, and it laminates well too. Particularly with the two-color dough, I felt it gave a lighter and better laminated final product. European butter made the croissants doughy and a lot of butter leaked during baking. It is possible that I need to improve my technique before using a higher fat butter with the two-color dough. If it works well for you, go for it. Freezing the dough before baking is a nice additional step that I learned in Artful Baker and decided to incorporate in the recipe. 

In theory, there are two ways to incorporate the red dough on the plain one. You can do what I did, or you can roll both doughs to the final dimension (9 by 20 inches) and place the red on top at that time. I tried both ways, and prefer the method I shared here. It is quite tricky to roll the red dough by itself as a large sheet and it is not as efficiently “glued” to the main dough since you simply place it on top and proceed to cutting the pieces. I should also mention that Philip, Baker Extraordinaire, makes a colored dough that does not contain yeast and it works very well. Check his method here. I am going to try that next time.

On shaping. As you roll the croissants or the little pain au chocolat, it is important to make it tight, by stretching a bit, generating tension as you roll. I was a bit worried about the layer of red dough and got too gentle with the shaping, so the pain au chocolat was not as tight as it should have been. Most were already unrolling during proofing. So that is definitely a detail to keep in mind.

Overall I am pretty happy with these babies. My previous attempts were  heavy and dense, with no open structure at all inside.  These had a nice crumbly crust, good butter flavor (even using American butter), and felt pretty light when handled. All I need to do next is optimize the shaping. And perhaps explore a different color scheme… Orange? Black?

ONE YEAR AGO: Lemon-Blueberry Entremet Cake

TWO YEARS AGO: Walk Strong3: A review of Jessica Smith’s latest workout program

THREE YEARS AGO: Pork Medallions with Black Berry Compote

FOUR YEARS AGO: Indian-Spiced Chicken with Chickpeas and Spinach

FIVE YEARS AGO: Curry Cardamon Cookies

SIX YEARS AGO: In My Kitchen, March 2014

SEVEN YEARS AGOBoeuf Bourguignon for a Snowy Evening

EIGHT YEARS AGO: Chickpea Salad

NINE YEARS AGO: Soft Spot for Chevre

TEN YEARS AGO: Roasted Onion and Asiago Cheese Miche

GALETTE DES ROIS

When I first applied to be on the Great American Baking Show, I started working to improve my baking skills.  I made a list of general techniques and a list of “classic bakes” to go along with them. Two years passed by. I went to the tent and came back. But this “self-improvement process” goes on. In fact, being in the show gave me extra energy and passion to get better. Tackle the techniques I still feel insecure about. Bake the classics. Such as Galette des Rois. I have always associated it with France, but it originated in Medieval times, enjoyed during Roman festivities known as Saturnalia. Usually a hidden figurine (or a bean, a whole almond) is baked in the tart, and the person who finds it gets to be King (or Queen) for a day.  I skipped that part in my dessert, afraid some departmental colleague would break a tooth. Galette des Rois: puff pastry enclosing almond cream. I can think of few things equally mouth-watering.

GALETTE DES ROIS
(adapted from Bake-Street)

For quick puff pastry:
125g all purpose flour
125g pastry flour
250 g unsalted butter, cold
6 g sugar
5 g salt
100-110g very cold water, from the fridge

for almond filling:
125 g almond flour
100 g powdered sugar
100 g unsalted butter at room temperature
2 eggs
1 tsp vanilla extract
3/4 tsp cinnamon
1/2 tsp ground ginger
1/8 tsp ground cloves

to brush before baking:
2 egg yolks

to brush after baking (optional, but nice):
30 g water
30 g sugar

Make the puff pastry dough. Add the flours, sugar, salt and butter to the bowl of a KitchenAid type mixer fitted with the paddle attachment. Mix for about 1 minute in low speed until the butter gets into small pieces.  Add 100g of the water and mix another minute, checking to see if you need to add a little more.  The mixture should not feel too sticky, but it should come together nicely if you press it with your fingers.  Do not mix for too long, to avoid developing gluten. Tranfer the dough to a plastic wrap, form into a rectangle and place in the freezer for 30 minutes.

Roll the dough out as a large rectangle on a lightly floured surface. No need to worry too much about dimensions, I try to make it twice as long as it is wide. Make one envelope-type fold bringing the top down and the bottom part over it.  Turn the dough  so that one folded part is to your right. Roll out the same way, fold again.  Freeze for 30 minutes.

Remove from the freezer and roll again two more times. If the dough seems too warm, and the butter is threatening to melt into it, freeze it again for 30 minutes between the third and fourth folds. Once you finish the fourth fold, keep the dough in the fridge until ready to make the dessert. You can keep it overnight or longer.

Prepare the galette: Lightly sprinkle a work surface with flour. Roll the dough to a large rectangle,  around 22 x 14 inches. Cut two circles of approximately the same size, with the diameter you want your galette to be. Mine was 8 + ¾ inch in diameter.  Cover both circles with plastic and refrigerate while you make the filling.

Make the almond filling. To the bowl of your KitchenAid type mixer add the powdered sugar and butter, mix at low-speed until it starts to form a thick paste, add one egg and continue mixing.  Add the almond flour, always at low-speed, ,then the second egg. Add the vanilla and the spices, mix to incorporate.   Place in a piping bag, no need for icing tip.

Place the first round of pastry over parchment paper on a baking sheet. Pipe the almond cream makig a spiral over the circle, leaving  a space at the edge without cream.  Moisten the edges lightly with cold water. If you want to include a figurine or a whole almond, now is the time to do it.

Place the second disc on top, the water brushed on the edge should help it stick. Gently press the top dough over the filling to avoid bubbles being trapped underneath.  Use the side of a knife opposite of the blade to mark the dough all around the edges, so that upon baking, it will form a nice wavy design.  Brush the top with a well beaten egg yolk. Refrigerate for 1 hour, uncovered.

Brush with egg yolk again. Make a pattern over the surface, adding a small hole in the center to vent the galette during baking. Refrigerate, uncovered for another hour.

Meanwhile, make the syrup to brush the surface by adding all  the ingredients in a saucepan. Place on medium heat and boil until the sugar dissolves.  Cool completely before using.

Heat the oven to 375 F. Place the galette in the oven and bake for 10 minutes, then reduce the temperature to 340-350F and bake for 40 to 45 minutes longer.  If you want to brush with the syrup, do it as soon as the galette is baked, still hot from the oven.  Let it cool completely before slicing.

ENJOY!

to print the recipe, click here

Comments: The traditional scoring on the surface is a spiral design. I decided to go with a different style, inspired by sourdough slashing. After I baked this galette, I saw a very nice version on Instagram decorating the surface with many concentric hearts. Who knows? I might fully ignore that Valentine is over, and go for it in the near future. After all, I already disrespected the correct day to serve this pastry, which happens to be January 6th. So a Galette de Coeur in March or April? Does not bother me at all.

The galette dough can be made with full-laminated pastry or a quick puff. I opted for the latter because it is a type of dough I am not that comfortable with. I made some for what would have been the semi-final of the show (click here), but had to speed up the process quite a bit to fit it all in the available timing.  For this galette, you can see that once you take your time and allow the dough to stay very cold all the time, it really puffs up beautifully.

I loved the addition of spices to the almond cream, which was a twist shared in the recipe at Bake-Street. By the way, that is one of my favorite blogs, I never miss her posts, the videos are a pleasure to watch. She is the neat and precise baker I aspire to be. Next life. There’s always next life…

Grab a pin, and let’s Saturnalia together!

ONE YEAR AGO: Sous-Vide Overnight Oatmeal

TWO YEARS AGO: A Valentine’s Day Opera

THREE YEARS AGO: Incredibly Simple Times Four

FOUR YEARS AGO: Walnut-Cranberry Sourdough Bread

FIVE YEARS AGO: Ottolenghi in Brazil?

SIX YEARS AGO: Roasted Winter Vegetables with Miso-Lime Dressing

SEVEN YEARS AGO: 2012 Fitness Report: P90X2

EIGHT YEARS AGO: Caramelized Bananas

NINE YEARS AGO: Roasted Lemon Vinaigrette

TEN YEARS AGO: Whole Wheat Bread


CHICKEN AND HEART OF PALM SQUARES

Puff pastry turns any delicacy into something special. It is hard to beat the taste and texture of a nicely laminated dough. You can go sweet or savory, you can skip any additions, just form them as sticks, twist them around and enjoy plain or with a humble sprinkle of spices. Today I share a recipe for puff pastry squares using a classic Brazilian filling: chicken and hearts of palm.

CHICKEN AND HEART OF PALM SQUARES
(from the Bewitching Kitchen)

for rough puff pastry:
(makes a little more than you’ll need)
345 g unsalted butter, frozen
1 tablespoon sugar
1½ teaspoons salt
300g all-purpose flour + 2 Tbsp (to toss with grated butter)
80 g whole milk, cold
80 g water, cold (may not use it all)
1 egg for egg wash

for the filling:
2 boneless, skinless chicken breasts
2 tablespoons soy sauce
1 lemon (to poach chicken)
salt and ground black pepper to poach chicken breasts
2 Tablespoons olive oil
1 medium onion, finely diced
2 cloves garlic
salt and ground black pepper
2 large tomatoes
2 tablespoons tomato paste
100 g hearts of palm, cut in ¼ inch rounds
100 g frozen peas (no need to defrost)
80 g cream cheese (full-fat)
Sriracha sauce
fresh cilantro to taste
1 lemon
2 tablespoons flour
½ cup whole milk

Mix in a large bowl the 300g flour, sugar, and salt. Set aside.

Grate the butter using a food processor with a grating disk attachment. Toss it with 2 Tbsp flour and reserve.

Take 155 g of the grated butter and mix with the flour in the large bowl, tossing with your hands to form reasonably small crumbles. Keep the rest of the butter in the freezer. Add to the flour/butter mixture all the cold milk and half of the water. Make a smooth dough, trying to handle it as little as possible. Adjust with water and or more flour.

Roll it out as a rectangle, about 12 inches long and 4 inches wide. Add roughly 50 g of frozen grated butter to the center of the dough. Fold bottom half up, add 50 g more butter to the folded portion. Fold the top portion down, covering the butter. Turn the dough so that one open side is facing you. Roll it out as before, add the leftover grated butter exactly the same way. Fold and place in fridge for 30 minutes.

Roll the dough as before, fold two more times without adding any more butter. Roll out as a rectangle and keep in fridge until filling is ready and cold.

Roll out about 1/3 of the dough (roughly 300 g) as a square a little bigger than 12 inches. Do the same for another third of the dough.  Cut 12 squares from each piece of dough, punching a star using a cookie cutter in the center of half the squares (they will be the top of the pastry).

Place the squares that will be the bottom over parchment paper. Add enough cool chicken filling, brush the sides with egg wash, place the top pastry and push the edges to close it down. Brush the top with egg wash and bake at 400F for about 25 minutes, until golden brown.

FOR THE FILLING (can be made a couple of days in advance)
Poach the chicken breasts very gently in water seasoned with salt, pepper, soy sauce and lemon juice. I like to bring the water to almost a boil, turn the heat off, and leave the chicken in the pan for 15 minutes. Keep in mind it will cook longer in the pie.  When chicken is poached and cool enough to handle, shred the meat with your fingers or a couple of forks. Reserve.

Sautee the onion and garlic in olive oil with a touch of salt and pepper in a large skillet until fragrant. Add the shredded chicken breast, tomatoes, tomato paste, hearts of palm pieces and cook for a couple of minutes, stirring. Dissolve the flour in the milk, whisking well to avoid lumps. Pour into the meat mixture and heat until it starts to thicken.  Add the cream cheese, then the frozen peas and mix everything gently. Add the Sriracha sauce, adjust seasoning with salt and pepper if needed. Add the minced cilantro, lemon juice and allow the mixture to cool completely before assembling the pastries.

ENJOY!

to print the recipe, click here

Comments: The filling for these puff pastry squares is very similar to this one of my recent blogging past. It is a classic component of Brazilian recipes like pasteis, empadinhas and pies. The recipe will provide you with leftovers that you can enjoy over rice, pasta, mashed potatoes, or if you are truly daring, try it as a topping for pizza or flatbreads. Add a bit more cheese on top for good measure.

You will have a little bit of puff pastry leftover. You can cut in small squares, fill mini-muffin pans and play with other fillings like….

Mushroom duxelles!  Or save in the freezer for future important experiments in the kitchen. It does freeze beautifully…

ONE YEAR AGO: Seedy Crackers for a Fun Party

TWO YEARS AGO: Brutti ma Buoni Low-Carb Soup

THREE YEARS AGO: Turkey Stir-Fry with Almond Butter

FOUR YEARS AGO: Secret Recipe Club: Tailgating Party!

FIVE YEARS AGO: One Million Page Views!

SIX YEARS AGO: Tlayuda, a Mexican Pizza

SEVEN YEARS AGO: Paradise Revisited 

EIGHT YEARS AGO: Feijoada, the Ultimate Brazilian Feast

NINE YEARS AGO: Vegetable Milhojas

TEN YEARS AGO:  Italian Bread

RASPBERRY PUFFS

This recipe can be super simple if you buy puff pastry at the store, or quite a bit more involved if you make it yourself. I don’t want to sound snobbish – although probably it will be the case – but homemade will be a lot better. It is hard to get as many flaky layers from a store-bought puff pastry, and the version made at home definitely feels lighter. But particularly during the summer, I see nothing wrong with opening that package and going at it with your rolling-pin. Working with all that butter, performing the foldings, is quite tricky when the weather is warm and humid. Once the pastry is done, the preparation of these raspberry squares is very simple and the end result… oh so very cute! I made my own puff pastry and a link to the recipe is included below. But for simplicity (it’s a very long recipe), I am sharing a simplified version using store-bought.

RASPBERRY PUFFS
(from the Bewitching Kitchen)

1 package of puff pastry, defrosted
to make your own, follow this link
fresh raspberries and blackberries (5 per pastry square)
8-ounce block cream cheese
¼ cup granulated sugar
½ teaspoon vanilla extract

Heat the oven to 400F.

In a medium bowl, mix cream cheese, sugar, and vanilla until smooth.

Roll the puff pastry and cut into 3 to 3.5 inch squares. Using the packaged pastry, one sheet will be enough to make 4 squares. Leaving a thin border, make cuts along the edges of the square. Use either a small rolling pastry cutter or a very sharp knife, so that you don’t squish the layers of the puff pastry. Place a tablespoon of the cream cheese filling in the middle of the square, then top with 4 raspberries. Take one of the edge flaps and fold it towards the center, looping over the raspberry. Repeat with the other flaps. Place a raspberry in the center, on top of where all the flaps overlap. Repeat with the remaining pastry squares.

Bake for 20 minutes or until pastry is golden brown and puffed. Serve with a sprinkle of powdered sugar, if so desired.

ENJOY!

to print the recipe, click here

Comments:  If you like, you can brush the top of the loops with a little egg wash for extra shine, but I did not do that this time. Blueberries could be fun to use too, although they tend to bleed a lot more during baking. Don’t  be afraid to bake them until the pastry is very dark, because the filling tends to make the pastry a big soggy. In retrospect, I think I should have baked mine longer. But, as I like to say often, there’s always next time… live and learn…

They do have similarity with a Danish pastry, and go perfectly with a nice steamy cappuccino. One of these babies will be more than enough to satisfy any cravings for sweetness. They are fun to make and delicious to savor…  I hope you give them a try, with homemade puff or not.

ONE YEAR AGO: Vietnamese-ish Chicken

TWO YEARS AGO: Rutabagas Anna

THREE YEARS AGO: The Ultimate Raspberry Sorbet

FOUR YEARS AGO: Crispy Cornmeal Sweet Potato Fries

FIVE YEARS AGO: Pan-grilled Tilapia with Smoked Paprika & Avocado Cream

SIX YEARS AGO: Golden Saffron and Fennel Loaf

SEVEN YEARS AGO: In My Kitchen, July 2011

EIGHT YEARS AGO: Heavenly Homemade Fromage Blanc

NINE YEARS AGOA Perfect Sunday Dinner

SaveSave

SaveSave

SaveSave

SaveSave

SaveSave

SaveSave

SaveSave