BICOLOR CROISSANT AND PAIN AU CHOCOLAT


For the past few months, I could not get bicolor croissants and their close cousins – pain au chocolat – out of my mind. As you may already know, I tend to get obsessed about things. That means that two bad batches in a row did not prevent me from trying again. They were heavy and doughy, with almost no lamination.  You probably won’t find a detailed recipe in cookbooks, but youtube videos (some not in English) promise to show you how to succeed in a home setting. Keep in mind that for the most part, these are made in patisseries by bakers who have those incredibly efficient rolling machines (sheeters) at their disposal.  Fear not, I am ready to share a recipe and a method that worked well for me. My main advice: do not rush it. This is not the type of recipe to try and adapt for a tent-baking situation. Take your time. Keep the dough and yourself cool at all times.

BICOLOR CROISSANTS & PAIN AU CHOCOLAT
(adapted from many sources)

for main dough:
490g all-purpose flour
36g sugar
10g osmo-tolerant yeast (or regular instant  yeast, same amount)
16g salt
300g full-fat milk
70g butter, melted and cooled
for butter block:
340g butter cut in pieces, cold
(unsalted Land O’Lakes *see comments)
35g flour

Batons of chocolate
1 egg for egg wash
simple syrup (water and sugar, equal amounts by weight, dissolved by boiling and cooled)

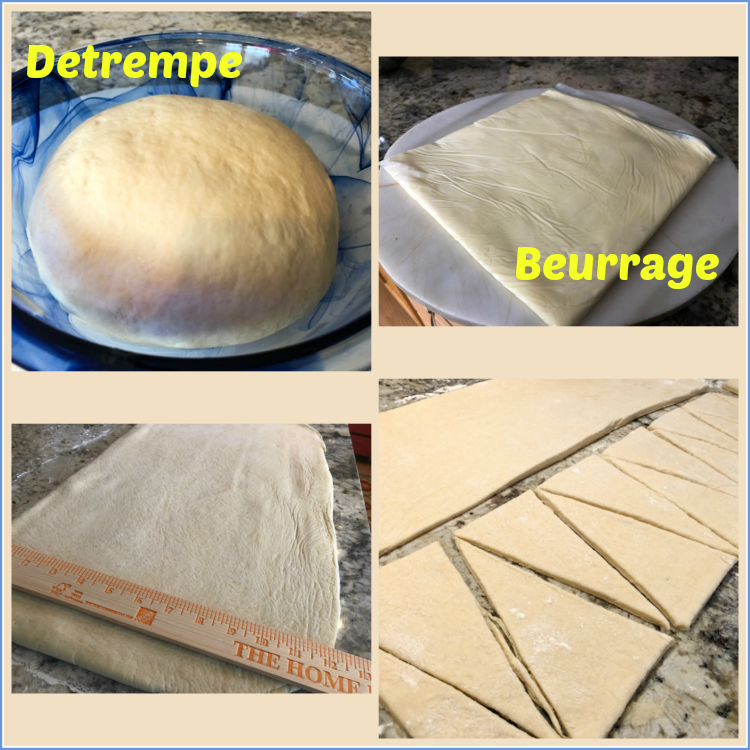
Make the dough the day before.  Add all ingredients except butter to the bowl of a KitchenAid type mixer with a dough hook. Process for about 3 minutes, then add the butter, and mix for about 4 minutes longer, at low-speed. The dough should feel smooth and elastic.

Remove from the machine, knead by hand a few times, place in a bowl coated with a little butter, cover and leave at room temperature for 1 hour. Remove 110g of dough and add a few drops of red gel dye. Wearing gloves, knead the color into the dough, adding more if necessary. It will take a little while, the color will resist mixing at first. Make sure it is totally incorporated throughout the little ball of dough.  Reserve both doughs in separate bowls, covered, and place in the fridge overnight.

Make the butter block. Add cold butter and flour to the bowl of a KitchenAid type mixer fitted with the mixing blade. Process for about 2 minutes. Make an envelope for the butter using parchment paper. Fold 24-inch length of parchment in half to create a 12-inch rectangle. Fold over 3 open sides of rectangle to form 8-inch square, creasing the folds very firmly.  Unfold parchment envelope, add the butter/flour and refold the envelope. Roll gently until the butter is uniform in thickness and forms a perfect 8-inch square.  Refrigerate 30 minutes.

Roll the main dough (with no color) over a lightly floured surface to a rectangle about 9 x 16 inches, so that you can set the butter square in the center and fold the top and bottom parts over it, with a seam in the exact middle of the butter square. Gently glue the open sides of the dough so that the butter is all cozy inside. Turn the dough so that the seam is vertical now, perpendicular to you.  Roll again to the same general dimension (9 x 16 inches).  Make the first fold: divide the dough in three pieces (eye-balling is fine). Bring the top third down, and the bottom third up, in what is known as the envelope fold. Place the folded dough in the fridge covered with plastic for 45 minutes, transfer to the freezer for 20 minutes.

Roll the dough again to the same dimension (9 x 16 inches). Make the second fold, exactly like you did the first. Place the folded dough in the fridge, covered with plastic for 45 minutes, transfer to the freezer for 20 minutes.

Roll the dough again to the same dimension (9 x 16 inches). Make the third and final fold. Bring the top part down and the bottom part up to almost meet at the center, leaving a small space between the edges, so that you can fold the dough right there in the center.  That is known as the “book-fold.”  Refrigerate for 1 hour and freeze for 20 minutes.

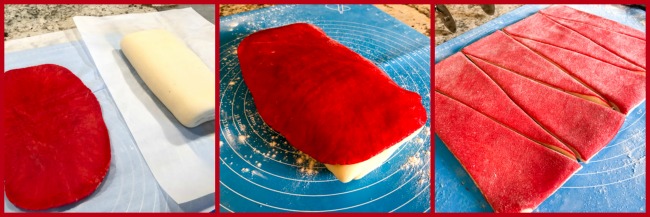
While the dough cools, it’s time to roll out the red dough. You need to make it thin and a little bigger than the dimension of the folded white dough, so that it sits on top of it. When the dough is out of the freezer, moisten it very lightly with water, place the rolled out red dough on top, and gently roll them both together (you can flip the dough to place the red one at the bottom after rolling a few times).

Roll both doughs together to a final dimension of 9 by 20 inches. Ideally, roll slightly bigger than that, then cut neatly to that final dimension. If for some reason some parts near the edges do not have the red dough on it, do not worry. Just proceed with cutting the pieces, it will not hurt the final look.

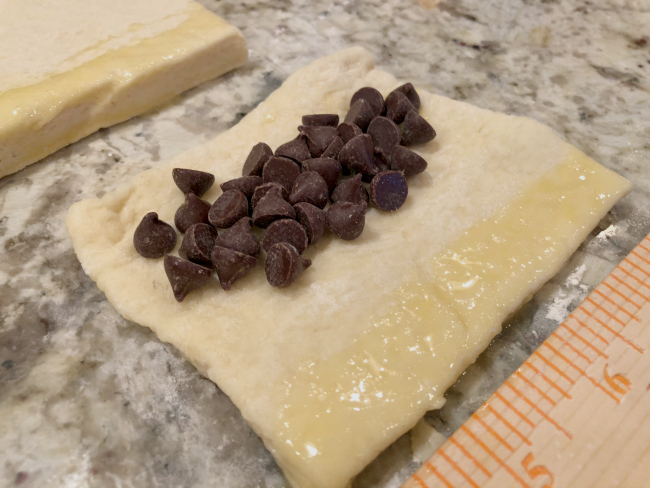
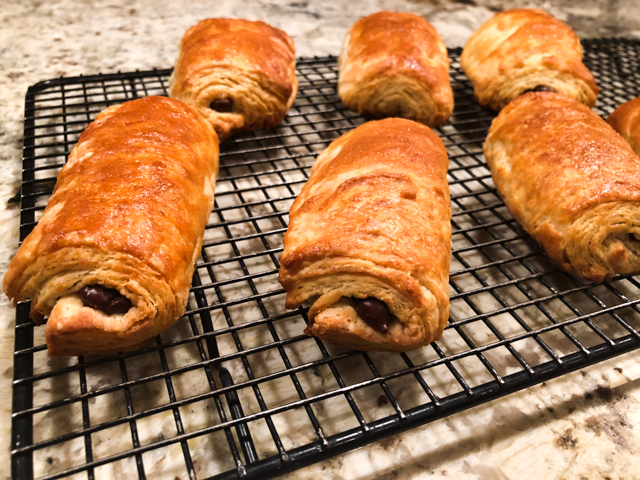
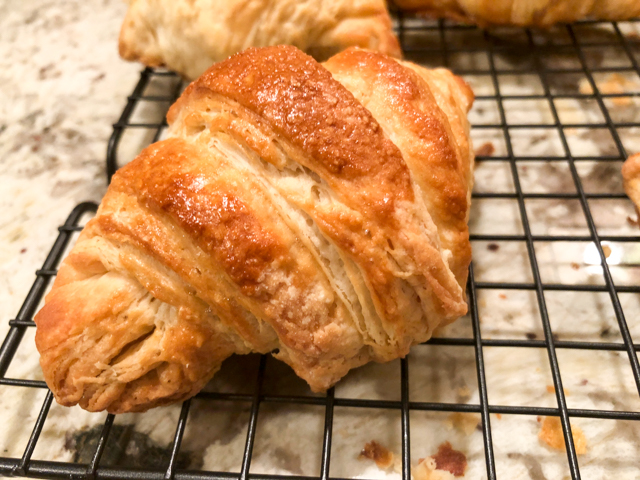
I used half the dough to make croissants and half to make pain au chocolat.  To make the croissants, I cut a 9-inch square from the dough and eye-balled triangles from it. With the rest of the dough I cut rectangles that were about 3 1/2 by 4 1/2 inches.  Shape croissants and enclose two chocolate batons per pain au chocolat, placing the red dough at the bottom in both cases.

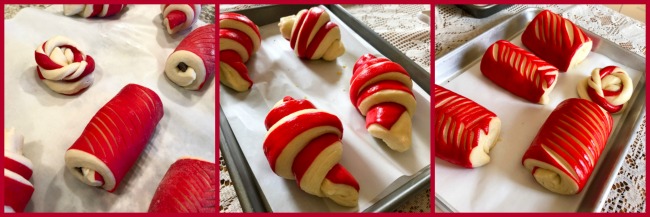
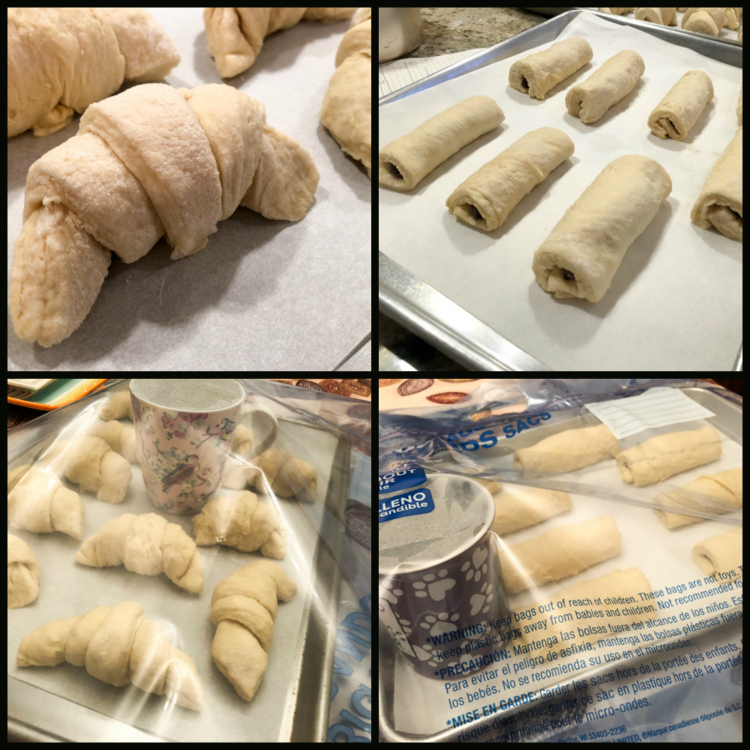
Right after shaping the pain au chocolat, make parallel cuts with a razor blade on the red dough to expose the plain dough underneath. Some scraps from the dough I used to shape as a little flower. Allow the shaped pastries to proof for 2 and a half to 3 hours.

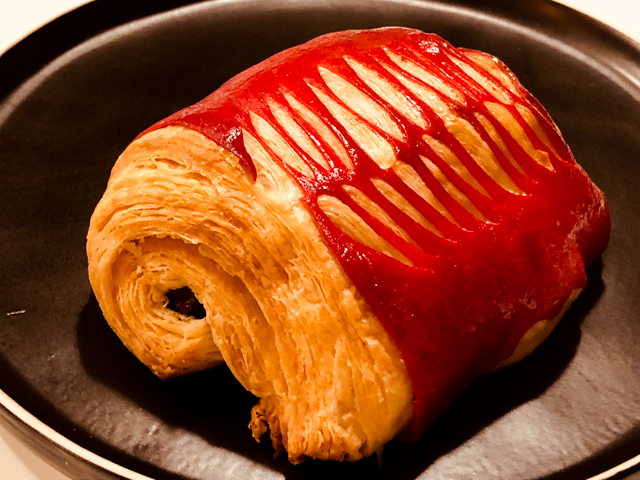
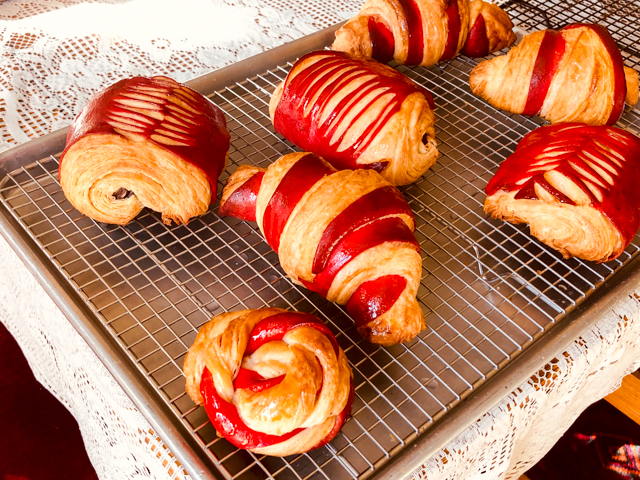
Heat the oven to 350F (higher temperatures will affect the red color).  Brush the pastries very lightly with egg wash, and place them in the freezer for 15 minutes to allow the butter to solidify a bit. Bake for 30 to 35 minutes. Cool on a rack. If desired, brush the surface with a simple syrup while they are still hot for a little shine.

ENJOY!

to print the recipe, click here

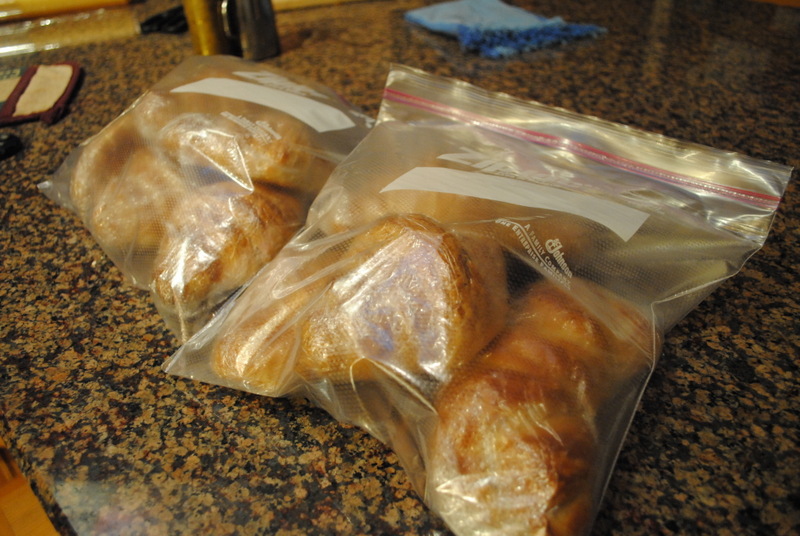
Comments: I used all-purpose flour and American butter, not the fancy 82% or higher fat butter than many recipes recommend. American butter has slightly more water, it resists better the rolling and pounding without incorporating into the dough, and it laminates well too. Particularly with the two-color dough, I felt it gave a lighter and better laminated final product. European butter made the croissants doughy and a lot of butter leaked during baking. It is possible that I need to improve my technique before using a higher fat butter with the two-color dough. If it works well for you, go for it. Freezing the dough before baking is a nice additional step that I learned in Artful Baker and decided to incorporate in the recipe. 

In theory, there are two ways to incorporate the red dough on the plain one. You can do what I did, or you can roll both doughs to the final dimension (9 by 20 inches) and place the red on top at that time. I tried both ways, and prefer the method I shared here. It is quite tricky to roll the red dough by itself as a large sheet and it is not as efficiently “glued” to the main dough since you simply place it on top and proceed to cutting the pieces. I should also mention that Philip, Baker Extraordinaire, makes a colored dough that does not contain yeast and it works very well. Check his method here. I am going to try that next time.

On shaping. As you roll the croissants or the little pain au chocolat, it is important to make it tight, by stretching a bit, generating tension as you roll. I was a bit worried about the layer of red dough and got too gentle with the shaping, so the pain au chocolat was not as tight as it should have been. Most were already unrolling during proofing. So that is definitely a detail to keep in mind.

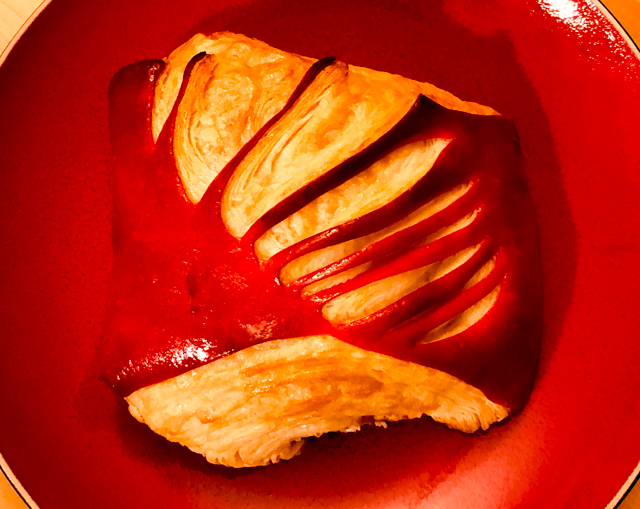
Overall I am pretty happy with these babies. My previous attempts were  heavy and dense, with no open structure at all inside.  These had a nice crumbly crust, good butter flavor (even using American butter), and felt pretty light when handled. All I need to do next is optimize the shaping. And perhaps explore a different color scheme… Orange? Black?

ONE YEAR AGO: Lemon-Blueberry Entremet Cake

TWO YEARS AGO: Walk Strong3: A review of Jessica Smith’s latest workout program

THREE YEARS AGO: Pork Medallions with Black Berry Compote

FOUR YEARS AGO: Indian-Spiced Chicken with Chickpeas and Spinach

FIVE YEARS AGO: Curry Cardamon Cookies

SIX YEARS AGO: In My Kitchen, March 2014

SEVEN YEARS AGOBoeuf Bourguignon for a Snowy Evening

EIGHT YEARS AGO: Chickpea Salad

NINE YEARS AGO: Soft Spot for Chevre

TEN YEARS AGO: Roasted Onion and Asiago Cheese Miche

PAIN AU CHOCOLAT

If you expect a diet-nutrition-low-cal-related post because it’s January, I am here to disappoint  you…

😉

While most people were busy “only” with the holiday season, we had an additional reason to celebrate in that final week of December. My beloved’s Birthday. To start the day on the right note, I decided to bake a batch of one of his all time favorite treats: Pain au Chocolat! Whenever we go to Paris and sit down for our first coffee next morning, it never fails,  he always asks for it.  The plain croissant can wait…  but, since they take the exact same dough, I said to myself why not make both? And that’s how a little bit of Paris was brought into a chilly Kansas morning.

PAIN AU CHOCOLAT (& CROISSANTS)
(reprinted with permission from Colette Christian, at Craftsy.com)

for the butter block (beurrage)
1+ ¼ pound unsalted butter (I used Plugra)

for the dough (dètrempe)
2 large eggs, beaten
16 ounces water at about 90 F
12 g instant or osmotolerant yeast
28 g nonfat dry milk powder
957 g unbleached all-purpose flour
3 tablespoons (39 g) sugar
2 tablespoons (28 g) unsalted butter,  softened
2 teaspoons (16 g) salt

Make the butter block: In the mixer bowl fitted with the paddle attachment, cream the butter on speed 2 until it has softened and no longer clings to the paddle. Mix for about 1 minute. The butter should be smooth. Roll it to a 10 inch square, as perfect as you can make it (I rolled it inside a quart size ziplock bag). Put it in the refrigerator as you work on the dough.

Make the dough: Put the eggs, yeast, water and dry milk powder in the mixer bowl. Fit the mixer with the dough hook attachment. Mix on speed 1 for 30 seconds to combine and dissolve the yeast.

Add the flour, sugar, butter and salt. Mix on speed one for 4 minutes, until the dough reaches “clean-up” stage.  Mix for 1 more minute on speed 1. Remove the dough from the mixer and knead by hand for a couple of minutes. Do not add any additional flour to the dough or to the work surface.  Place the dough in a buttered bowl and let sit at room temperature for 30 minutes.

After 10 minutes, remove the butter from the refrigerator. Leave it resting for about 20 minutes, as the dough rests. Check to make sure it is the correct temperature. The butter is the perfect temperature is when the butter packet can be rolled on the edge of the counter without cracking.

Lightly flour your work surface and roll the dough out to a 10 inch by 20 inch rectangle. Place the butter block on the left side of the dough. There should be one inch border of clear dough on all three opened sides. Fold the unbuttered side over the buttered side of the dough. Press down on the unbuttered edges to seal them. Dust flour under the dough so that it does not stick. Lightly dust the top. Roll out the dough until it measures 12 by 24 inches.

Place the dough on a parchment lined baking sheet and turn the dough so that the long fold is furthest away from you and the long open side is nearest you. The two open short sides are at your right and left. Each time you make a turn the dough should be positioned in the same way. Mark the turns on the paper, crossing off each turn as you complete them.

Fold the dough in thirds (like a business letter) – always starting with the right side. Then fold the left side over the right. This is your first turn. Cover the dough with plastic wrap and refrigerate for 30 minutes. After 30 minutes, remove the dough from the refrigerator and complete another turn. Return the dough to the refrigerator for another 30 minutes and then do one more turn. You have now completed all three turns and the dough can be wrapped and refrigerated overnight, or you can proceed with the final rolling out.

Roll the dough into a 26 by 17 inches rectangle. Cut in half lengthwise and straighten all the edges by trimming about 1/4 inch of the edges.  Cut the dough into triangles (base should be 4 inches, height should be 8 inches), or rectangles for pain au chocolat, as shown in my photo below. If making pain au chocolat, add a chocolate baton or sprinkle semi-sweet chocolate chips in the lower half of the dough. Brush with egg wash the farthest edge of the rectangle, then roll the dough around, making sure the egg wash part in tucked under.

Proof the croissants and pain au chocolat inside a large baking sheet covered with a plastic bag – include a large mug with very hot water to generate steam and make a nice temperature for proofing.  Check after 45 minutes, they should look a bit more plump. At that point, you can brush the surface of each little croissant and roll with egg wash. 

Bake at 400 F for 15 minutes, then reduce the temperature to 350 F and bake for 15 minutes more. If they are not fully golden, bake for 7 to 8 minutes longer.

 ENJOY!

to print the recipe, click here

Comments:  Have I praised enough the online classes at Craftsy? My first experience was macarons, also taught by Colette. Love her. Then, I decided to get the Classic Croissants at Home class and I must say I learned so much, it’s not even funny. Worth every penny, particularly because I got the class on a special end of the year sale. Cannot beat that. Croissants and pain au chocolat are all about precision. See that yard stick? She advises getting one and using it at every stage of rolling and folding. It makes life so much easier!  The recipe is detailed, but nothing compares to watching her make the dough and show you exactly what you are looking for. I highly recommend it. And she is very responsive, if you have doubts and asks her a question at the platform on the site, she usually will answer in a few minutes, or at most a couple of hours. Even during the holidays!

It is important to use either the batons sold specifically for pain au chocolat, or chocolate chips, because their formula prevents them from melting during baking. If you use regular chocolate, as you bite into it, you’ll be covered by a liquid lava. Yes, tasty, but not exactly the goal here.


SaveSave

SaveSave

SaveSave

SaveSave

SaveSave

SaveSave

SaveSave

SaveSave

The proofing using a very large ziplock bag is pure genius. They sell those for storage of very large items and they work wonders to enclose a large baking sheet. The mug with hot water turns it into a home-made proofing device, moist and just warm enough for the dough to rise. I save two large bags for my baking, if any flour or egg wash glues to the inside, you can wash with warm water and dry them over the back of a chair.

There they are!  Cooling and waiting…

This was a very nice cooking project, perfect for a cold day. Of course it is a lot trickier to try and make laminated dough in the summer, so keep that in mind. One of the very few advantages of chilly weather. I would like to thank Colette for yet another superb class. Your attention to detail, and neatness during baking are really inspiring!

The best thing of making a big batch of these goodies is that they freeze very well. So, when the mood strikes, we remove a couple from the bag and place them, still frozen, in a 350F oven. In less than 10 minutes you can have croissants that taste as good as freshly baked…  What’s not to like?

ONE YEAR AGO: Two Unusual Takes on Roasted Veggies

TWO YEARS AGO: Kadoo Boranee: Butternut Squash Perfection

THREE YEARS AGO: Creamy Broccoli Soup with Toasted Almonds

FOUR YEARS AGO:
 Fennel and Cheddar Cheese Crackers

FIVE YEARS AGO: A Festive Pomegranate Dessert

SIX YEARS AGO: My First Award!

SEVEN YEARS AGO: A Message from WordPress

EIGHT YEARS AGO: Turkish Chicken Kebabs

SaveSave

SaveSave

SaveSave

SaveSave

SaveSave

SaveSave

SaveSave

SaveSave

SaveSave

THRILLING MOMENTS

June 2006: crossing the finish line in my first (and only) marathon…

March, 2009:  cutting a slice of my first (but not only) successful sourdough loaf,  and marveling at the open, airy crumb…

April 2012: making croissants that finally brought an important bit of Paris to our home!

I am not sure how many times I’ve tried to make croissants, perhaps five or six, but each and every occasion left me disappointed and  frustrated.  I didn’t  throw in the towel, though, and you may remember that I included croissants as one of my cooking projects for this year.   Since January,  I assembled all the recipes, tips (thanks once more, Gary!), and blog posts on the subject, finally settling on the recipe from Peter Reinhart‘s Artisan Breads Every Day. I couldn’t be happier, aren’t they cute?

Without further ado, here’s the full recipe, with photos that walk you through  the process.

CROISSANTS
(published with permission from Peter Reinhart,
recipe from  his book Artisan Bread Every Day)

for the “detrempe
4 + 2/3 cup all purpose flour (21 oz / 595 g)
1  + 3/4 tsp. salt (0.4 oz / 11 g)
1/4 cup sugar (2 oz / 56.5 g)
1 Tbs  instant yeast (0.33 oz / 9 g)
3/4 cup + 2 Tbs milk (7 oz / 198 g)
1 cup cool water (8 oz / 227 g)
2 Tbs melted butter (1 oz / 28.5 g)

for the butter block:
1 + 1/2 cups cold butter (12 oz / 340 g)
2 Tbs flour (0.57 oz / 16 g)

Make the dough (detempre) by whisking the flour, salt, sugar and yeast in a mixing bowl. Pour in the milk and water, then add the butter. Mix with the paddle attachment on the lowest speed for about 1 minute, stop, and check that the dough is shaggy.  It should not be too firm as you’d expect from a bread dough.  Adjust with a little water or a little flour if too wet.  Mix again for a couple of minutes, transfer to a board, form into a ball  and refrigerate overnight (or up to 2 days) inside an oiled bowl.

Make the butter block on baking day.  Cut the cold butter in 16 pieces, and place them in the bowl of an electric mixer together with the flour. Use the paddle attachment for 1 minute to incorporate the flour into the butter, without allowing it to melt.  Transfer the butter/flour to a piece of parchment paper (spray the surface of the paper with a little oil), and form into a 6 x 6 in square, about 1/2 inch thick.  Be as precise as you can with the measurement, and try to form it into a neat, straight-edged little package.  Cover the square with a plastic wrap and refrigerate for 10 minutes (or longer, if convenient).

Transfer the dough from the fridge to a floured work surface, sprinkle more flour on top, and roll the dough to a rectangle 12.5 inches wide and 6.5 inches long.  Square off the edges, try to keep it all straight.   The dough should be about 1/2 inch thick.  Place the butter block on the left side of the rolled out dough, check that only a border of 1/4 inch is left between the butter and the edge of the dough.  If necessary, roll the dough out a little more.  Lift the right side of the dough and cover the butter, stretch the dough to cover it all well, and pinch the edges to fully enclose the butter.

Lift each side of the package of dough/butter gently, toss more flour underneath, flour the top again, and gently tap the surface of the package with a rolling pin, to distribute the butter evenly into the four corners.  Roll the dough to a rectangle 16 inches wide and 9 inches long.  Again you should aim for a 1/2 inch thick dough.   Square off the edges as nicely as possible, and fold the dough as a letter in an envelope: fold the right one-third to the left, and the left one-third of the dough to the right.  Transfer the dough to a floured baking sheet, and place in the fridge for 20 minutes.

Place the dough again on a floured surface, with the open seam facing away from you and the closed side facing you.  Gently roll the dough again to the same dimensions (16 x 9 inches).  Fold again in thirds.  Let it rest in the fridge for another 20 minutes, and repeat this exact rolling and folding procedure one more time.  Let the dough rest 20 minutes more, and get ready for the final rolling and cutting of croissants.

If working the full dough at once, you will need to roll it as a rectangle 24 to 28 inches wide, and 9 inches long. If you prefer, cut the dough in half, and roll it to 12 to 14 inches wide, 9 inches long.  Once the dough is fully rolled (about 1/4 inch thick), make marks starting at the left side of the bottom part of the dough, placing a small notch at 4-inch intervals. Repeat the same on the top part of the dough, but start at the 2 inch mark from the left.  Use a pizza cutter to cut a line from the left bottom corner of the dough to first notch on the top part of the dough (at the 2 inch point).  Go on connecting the marks to cut triangles.  When all pieces are separated, cut a 1 inch notch into the bottom center of the triangle base of each piece (that helps the croissant get its curved shape).  Spread the bottom as wide as the notch will allow to create wing-like flaps. Start with the flaps and begin rolling up the dough as you would roll a rug.  Stretch the pointed end of the triangle as you roll, trying to elongate the dough.  Make sure the end of the croissant stretches all the way under it, so that it remains rolled as it rises and bakes.

Place the croissants on a baking sheet lined with parchment paper, and let them rise at room temperature for 2 and a half to 3 hours. Brush the surface with egg wash if desired.  Heat the oven to 450 F F (232 C), place the croissants inside, and reduce the temperature immediately to 375 F (190 C). Bake for 15 minutes, rotate the pans, and bake for an additional 15 to 20 minutes, until golden brown on all sides.

Allow the croissants to cool on a rack for 45 minutes to 1 hour.

ENJOY!

to print the recipe, click here

Now, allow me to show you a few photos of the process, which seems intimidating at first, but if you pay attention to a few details, it will be quite doable.
Use good quality butter, I recommend getting Plugra if you can find it, and measure the amount with a scale, no eye-balling here.  We are talking croissants, let’s make them pretty!   😉

After its rest in the fridge overnight, the dough will have risen quite a bit, and will be all puffy and nice to work with.  Working with it straight from the fridge will make it much easier to handle.

Be as precise as possible with the measurement,  each step matters, a little liberty here, a little liberty there, and your croissants will suffer.  Let’s make them pretty!   😉

The dough is rolled out  and the butter square is placed on one side, then all you have to do is fold the dough over it and pinch the edges, enclosing the butter completely inside the dough.

And the fun begins, rolling the dough to the right dimension (16 x 9 inch rectangle), then folding it in three, like a letter to be mailed to a dear  long-distance friend…  The package goes to rest in the fridge for 20 to 30 minutes, and the whole thing is repeated two more times (two additional series of rolling and folding in three).  Please notice my rolling pin, a gift Phil gave me for my Birthday. It is an antique piece that handles any dough extremely well.  Plus, I find it  very beautiful!

If you have a loooooong surface to roll the final dough out, go ahead and do the whole thing in one step.  I found it easier to cut the dough in half,  roll it, mark the spots to cut the triangles, and form the croissants from that half.  Place them on a baking sheet for the final rise, and move to the second portion of the dough.  Easy as pie!  One telling sign of the quality of your dough is how much can you stretch it without tearing it.  In my previous attempts, I could barely stretch it at all, but this recipe made the most elastic and forgiving dough ever!

Once they rise for a couple of hours, they will be noticeably bigger and plumper.

Brush them with egg wash (I think it makes for  beautiful croissants, with a nice shinny surface), and place in the oven, resisting the temptation to peek too often.  A little peek every once in a while is ok, particularly if you are a food blogger overly excited by your first good looking batch of croissants and anxious to get just one more photo…

And then, once they are all baked, allow them to cool for 45 minutes minimum. One full hour is even better, so that the butter sets in and gives you the best texture as you bite through the croissant.

In the end, all your hard work will be rewarded, I promise!

With all that in mind, is it feasible to have freshly baked croissants for breakfast?  Honestly, I find that a bit tricky.  Even if you retard the final proofing in the fridge, you will still have to let them come to room temperature to bake, and that will take about 1 hour, half an hour more to bake, and the gruesome wait of 45 minutes to attack them.  Maybe it would be possible to bake a batch for an 11am brunch,  but other than that, I think it’s much better to bake them, let them cool, and wrap each one individually to freeze.  You can see  here the results of my labor, ready to be enjoyed in the near future. Once you wake up with that unstoppable urge to have a warm-from-the-oven croissant,  simply unwrap them, leave at room temperature 10 minutes, and place in a 300 F oven for 5 minutes.  Voila’, mes amis:  great croissants whenever you feel like it!

I am grateful to Peter Reinhart for writing a great tutorial for croissants in his book, and of course for allowing me to publish his recipe on my blog. Thank you!

I am submitting this post to Susan’s Yeastpotting event…

ONE YEAR AGO: Maple-Oatmeal Sourdough Bread

TWO YEARS AGO: Pork Trinity: Coffee, Mushrooms, and Curry

Add to FacebookAdd to DiggAdd to Del.icio.usAdd to StumbleuponAdd to RedditAdd to BlinklistAdd to TwitterAdd to TechnoratiAdd to Yahoo BuzzAdd to Newsvine

TOUR DE FRANCE FINAL STAGE: PARIS


Last year I participated in an event with the goal of increasing awareness about cancer,  “The Taste of Yellow“, that was hosted by Barbara from Winos and Foodies.  Now I have the privilege of joining one of her other events:  food blogging along  the “Tour de France,” the premier bike race in the world!  This year   sixteen teams cruised, bounced and blasted through a 2,263 miles circuit that started in Rotterdam on July 3rd.  Each year the race takes a different route, but it always end in Paris, with the final stretch taking the athletes back and forth along the spectacular Avenue des Champs Elysees, between the sublime Place de la Concorde and the gorgeous Arch du Triomphe.  What a visual energy boost it is!  In Barbara’s “Tour de France 2010,”  bloggers posted their descriptions of the food traditions from each locale surrounding the individual stages.  You can enjoy this virtual tour  here.

I was thrilled when Barbara asked me to cover the final stage of the tour, because I love Paris so much! But was also quite nervous about it, because  she was originally going to write about it herself.  Talk about pressure!

So, I’ll start by sharing some thoughts on the City of Lights, and finish by offering the recipes of  three Parisian treats, hopefully as authentic as  La Tour Eiffel itself!

The Paris that everyone knows…
Even people who never set foot in Paris know about its cafes, restaurants, cheeses, baguettes and museums,  that create the aura of romance and charm permeating every corner of the city.  It’s a  favorite activity in Paris to sit outside at a cafe and indulge in people-watching on a pleasant day.  We always gravitate back to  Les Deux Magots and Cafe’ de Flore, that are situated almost next to each other in the shadow of the oldest church in Paris, St. Germain de Pres.

Not bad to enjoy a  cappucino, croissant or pain au chocolat, while staring in awe at the austere tower of the cathedral, provoking dreams of the middle ages, or the days when Sartre and Simone de Beauvoir sat at those very tables, maybe looking across the Boulevard St. Germain to the ultra-traditional Brasserie Lipp, where Hemingway or Modigliani sat and ate Alsatian food fit for the gods (that they were).

Flickr Creative Commons photo

The street markets… are pretty much a French institution.  Our favorite may be  on Rue Cler, in the 7eme arrondisement.  It only takes one stroll through the market to get anything and everything needed to prepare dinner, from the freshest seafood to the most perfect veggies, fruits, cheeses and chocolates.  And don’t forget to stop for a fine Sauternes or Bordeaux!  During the “R” months, fresh oysters from Bretagne will be  waiting for you, either live in the shells or shucked in seconds by the vendor’s expert hands.   If you just want to “window-shop,”  then grab a crepe made at the small stand halfway along the length of the market:  you’ll be amazed at how delicious it is.

Croissants…. are not French by birth, but they will always be associated with Paris.  A great croissant makes a soft crunch as you bite into it, and it covers your lips with tiny buttery flakes.  It’s messy, but you don’t want it any other way.   My favorite  (OK, one one of my favorites)  is from the Lenotre boulangerie in the 15th arrondisement, but good croissants are everywhere in Paris.   Ask for a “croissant pur beurre,” which excludes any lower-fat variations from your lips.  No point in having a croissant unless it comes loaded with buttery flavor and goodness.  You know, “moderation in moderation.”  😉

Macarons… Apparently, I’m the only human being who does not care for macarons (or macaroons,  the English spelling).  I apologize for this handicap, and hope you will still visit the Bewitching Kitchen after learning about it.   Nevertheless, they are a Parisian fever,  so I did my homework and learned that macaron lovers are crazy for those from  Pierre Herme‘s patisserie in the 15th arrondisement.  And if you want to make them at home, click here for a great tutorial!

Bread, cheese, and metro stations… have something in common:  wherever you are in Paris, they’ll all be within walking distance.  Baguettes are freshly baked around the clock, and nothing beats munching on one that’s still warm from the oven you stroll through the streets.   I always go for the “baguette tradition,” made according to precise specifications of the bread bakers syndicate: it has no illegal additives and its exclusively leavened with Saccaromyces cerevisiae (the famous “baker’s yeast”).   No corners are cut with these baguettes, and their taste and texture proves it.   But one cannot mention Parisien bread without also talking about Pain Poilane, and its famous bakery, where you can buy the huge four pound “boule” and enjoy it for days!


With a great bread, one needs some great cheese.  When I first lived alone in Paris, I developed a nice relationship with the cheesemonger near my apartment in the 15th.  Every week I would ask for my “usual suspects” (Brie de Meaux, Roquefort, and a camembert au lait cru), and she would pick a new one for me to try.   That was a happy year!  No, I wasn’t able to finish tasting all of these, but I had fun trying.

The Paris that not everybody knows about….
The bees in Paris are almost as busy as its lively streets, making some of the best honey around!  The largest beehives are in Jardin du Luxembourg and Parc George Brassens (site of a weekly book market that is also worth a visit).   But  smaller hives are on top of the Opera Garnier building, and also on the Hotel Eiffel Park.   Bees travel a maximum of 2 miles around the hive, and collect pollen from a large variety of flowers.  Parisian honey has a complex flavor, and even more “complex” price!  😉   Because production is small, the pots of Parisian honey sell like liquid gold.   When you are in town take a guided tour of the  beehive in Luxembourg, it’s a  must see.

Menu “Faim de nuit” (late night “munchies menu”) at La Coupole

photo from Wikipedia

One of the most famous restaurants in Paris offers an affordable dinner every evening starting at 10:30pm.  Why have dinner so late?  Well, when in France, do as the French do!  No sense going to sleep before 2am anyway!  La Coupole is always packed, a very popular choice not only for tourists, and not only for dining: in the basement you can dance the night away, following a tradition that spans many decades.

Wine, sure… but made in Paris? Mais oui! In the 17th century the vineyards of Paris were the most important in the country, covering a huge area of more than 100 thousand acres.  Later other regions started to produce wine, Paris turned into a metropolis, and the vines almost completely disappeared.  Almost, but not quite.  Small production still takes place in vines located in Montmartre (Clos Montmartre) and a few other spots around town.  With very few exceptions, the wine produced in Paris cannot be commercialized.  This site is an interesting read (in French).

photo from Wikimedia Commons

Now, the most important question:  what to cook at home to celebrate Paris?  Follow me to the next page to find out.

Continue reading