After the caloric content of my previous post, it’s time to get back to our regular routine. Pork tenderloin is a favorite of ours, we like the texture, the subtle flavor, and the fact that it’s quite lean, which obviously poses problems for the cook. This recipe is super simple, if you have time to marinade the meat hours in advance do it, but if not, offer it a 30 minute marinade-party, and move on. Or rather, grill on. You could go all fancy and put the meat on skewers, but this time I just laid every little morsel of goodness on the grill grates. I like the way those grill marks work on the flat surface of the meat. And, contrary to what most chefs recommend, we like our pork cooked past medium-rare. Adjust your cooking time according to your personal preference.
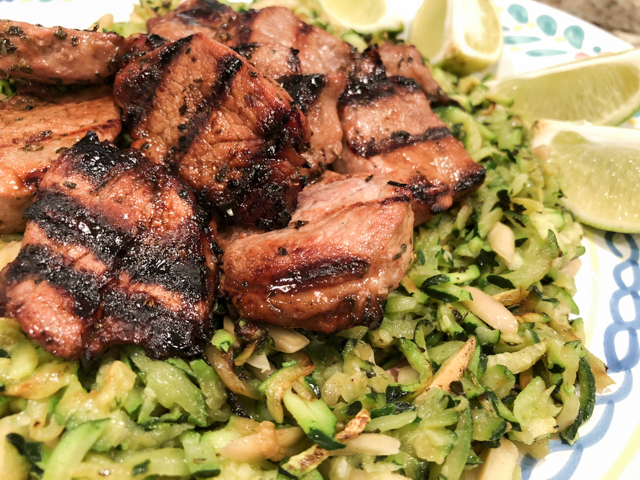
MAPLE GRILLED PORK TENDERLOIN OVER LEMONY ZUCCHINI
(from the Bewitching Kitchen)
for the pork:
1 pound pork tenderloin, cut in 1/2 inch slices and lightly pounded
3 tbsp maple syrup
3 tbsp extra virgin olive oil
1 tbsp balsamic vinegar
1 tsp paprika
1 tsp sal
1/2 tsp black pepper
for the zucchini:
4 small zucchini, shredded on a food processor
1 tablespoon ghee (or olive oil)
1/4 cup slivered almonds
salt and pepper
juice and zest of one lemon
Make the marinade by combining all the ingredients in a small bowl. Add the pieces of pork to a plastic bag or small dish, and pour the marinade all over. Leave it in the fridge for 30 minutes to overnight.
Heat the grill. Remove the pork from the bag, letting the marinade drip off. Lightly pat the pieces with a piece of paper to avoid excessive moisture to stay on the meat. Grill the pieces to your preference, we like about 5 to 6 minutes per side on a very hot grill.
Prepare the zucchini. Heat the ghee or olive oil on a large skillet. When very hot, add the shredded zucchini, season with salt and pepper. Leave undisturbed for a couple of minutes so that the layer in contact with the skillet will get brown. Move it around gently, keeping the heat high at all times. When the zucchini is almost done, make a small opening in the center of the skillet, add the almonds, let them saute for a couple of minutes, then mix them with the zucchini. Squirt some lemon juice, add the zest, incorporate and serve immediately, with more lemon slices on the side.
ENJOY!
to print the recipe, click here
Comments: If you are looking for a low-carb meal that satisfies, this is a good option. Zucchini – either shredded, simply sautéed, or the more elaborate spiralized version – is a perfect match for pork tenderloin. Especially if you add a lemony touch to it, and a few nuts for a bit of texture. I was patting myself on the back after this dinner. Simple, quick to prepare, and mighty tasty. I hope you give it a try.


ONE YEAR AGO: Danish Rye Bread
TWO YEARS AGO: The Best Sourdough Recipe
THREE YEARS AGO: Mini-Quiches with Duxelles and Baby Broccoli
FOUR YEARS AGO: Quinoa and Sweet Potato Cakes
FIVE YEARS AGO: Pumpkin Bolo de Fuba’ Cremoso
SIX YEARS AGO: Citrus-crusted Tilapia Filets
SEVEN YEARS AGO: Bran Muffins, not just for Hippies
EIGHT YEARS AGO: Flourless Chocolate Cake